Hello dear readers, today I would like to share with you my experience on WINDOWS setup 7. This idea came to me after I was asked several times to speed up windows work 7, for example, to work on the Internet or to improve performance in games.
The issue of reducing resource consumption by the WINDOWS 7 operating system is quite relevant, as everyone remembers, even after the release Windows Vista many users have experienced problems due to excessive resource consumption by the system. But in today's article I would like to tell you HOW TO SPEED UP WINDOWS 7.
PROLOGUE
Let's try to understand why we need to optimize the work operating system WINDOWS 7? Someone will say that it is already well made and works well, without failures and quickly, but those who do not know how much will say so unnecessary services sometimes it is included in his system and the one who does not know how much faster it can work. This article is more written for users who value every percentage of performance. random access memory and processor. I am sure that such people have already tried many ways to speed up their Windows 7 operating system, but still I will tell you my methods, which are quite effective and I have personally tried.
Most often, the acceleration Windows optimization 7 is needed either by GAMERS who want to run more “heavy” games on their computers without glitches and freezes, or by people who use resource-intensive software. Both of them will find a lot of useful information in my article.
VISUAL OPTIMIZATION
We need visual optimization in order to reduce the consumption of processor and video card resources by disabling unnecessary effects and animations in the system.
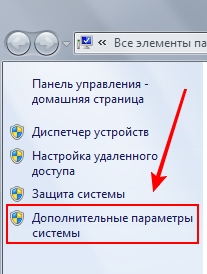
We need to open the “System Properties” window, this can be done in several ways, for example, by pressing the Win + Pause (Break) key combination: +  or you can launch the “System” window by right-clicking on the “My Computer” icon on the desktop.
After launching the window, left-click on the item “ Extra options systems” in the upper left corner of the screen. As shown in the figure below:
Disable loading effects
After that, we will open a window with settings, in which we need to disable all unnecessary effects so that the effects do not steal valuable computer resources and to speed up the Windows 7 system itself.
In the “PERFORMANCE” section, click on the “OPTIONS” button and DISCONNECTING checkboxes as shown in the image below:

Press the “OPTIONS” button in the “BOOT AND RECOVERY” section and disable everything as shown in the figure:
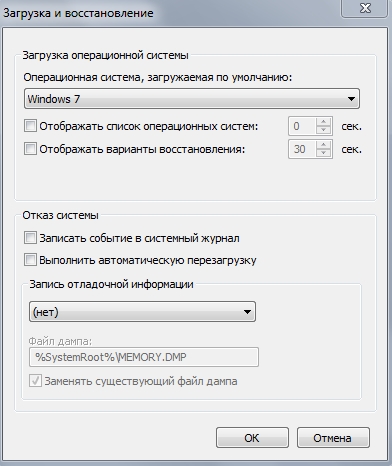
The “DO NOT DISPLAY LIST OF OPERATING SYSTEMS” checkbox should be unchecked only if you do not have other operating systems installed on your computer, otherwise you will not be able to boot into them.
These settings will not negatively affect the operation of the system, and now we will not waste resources on debug logging and unnecessary visual effects.
CLEANING THE SYSTEM
Very important step this is a system cleanup, because I’m sure that everyone’s system is littered with unnecessary unused files and “dead” shortcuts, and very often unused entries remain in the system registry after removing some programs.
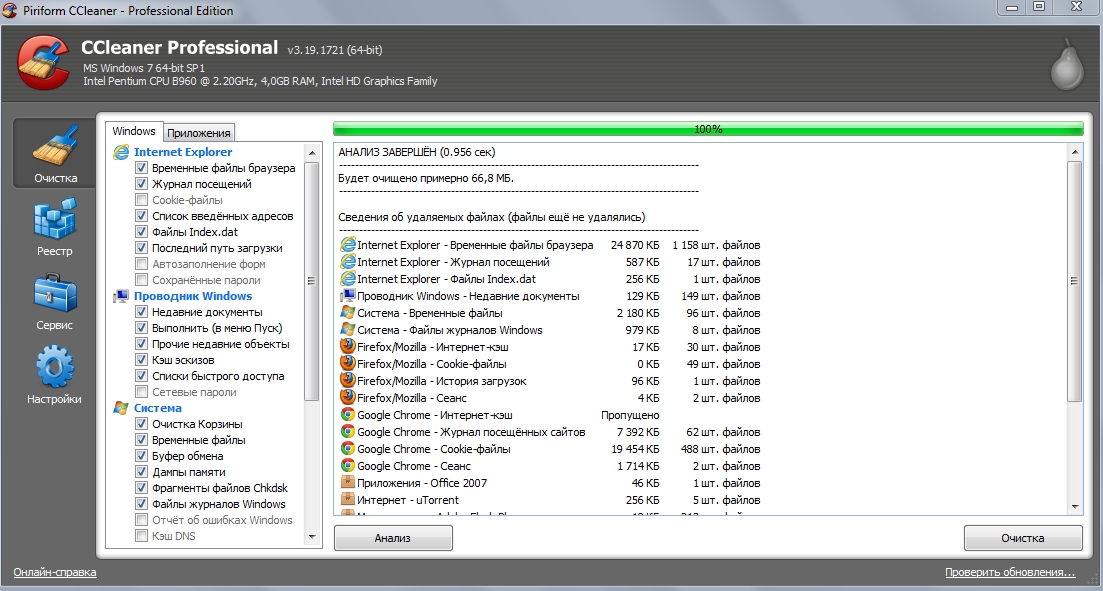
To clean up the WINDOWS 7 OS, we use free program CCleaner.
First you need to download the program, you can do it from the link below:
Who does not have access to torrents can use the instructions to bypass site blocking
After downloading the program, install it in any way convenient for us from those available in the archive folder and perform cleaning as shown in the images below:

Also, in the CCleaner program, in the “Tools - Startup” section, I advise you to exclude unnecessary programs from autoload.
DISK SPACE OPTIMIZATION
In this section, we will look at how to correctly optimize the available disk space, what functionality to disable, and what work to do with the file system.
We will start by disabling unnecessary functionality, and such for Windows 7 is “File indexing” “File archiving”
Disable file indexing
For DISABLED“File Indexing” we need to enter “My Computer” and right-click on one of the sections of your disk and uncheck it as shown in the figure below:
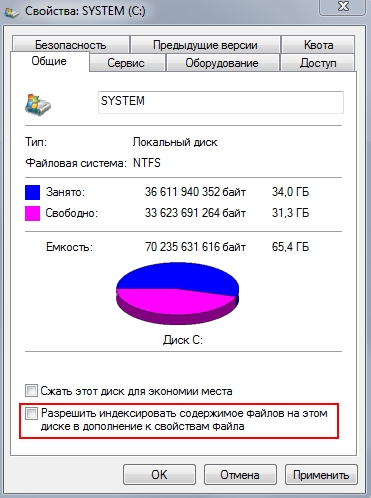
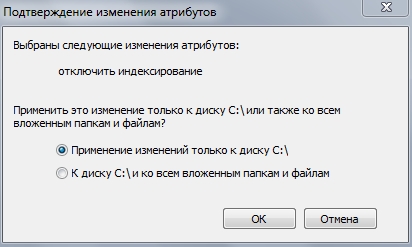
Select as shown in the image and click OK.
Disabling data archiving
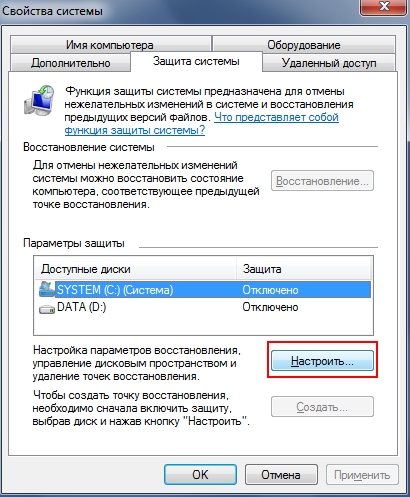
We go to the "System Properties" window as described in the "" section and in the "SYSTEM PROTECTION" tab, select the desired section and click the "Configure" button and in the window that opens, check the "Disable system protection" checkbox, as shown in the screenshots below. We do this for all sections.
![]()
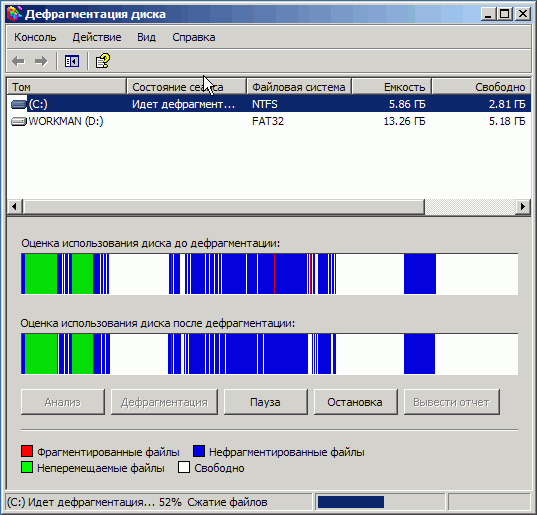
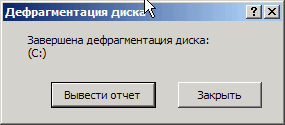
File defragmentation
The next item is defragmentation. file system, is an important point, but only if the defragmentation is performed correctly.
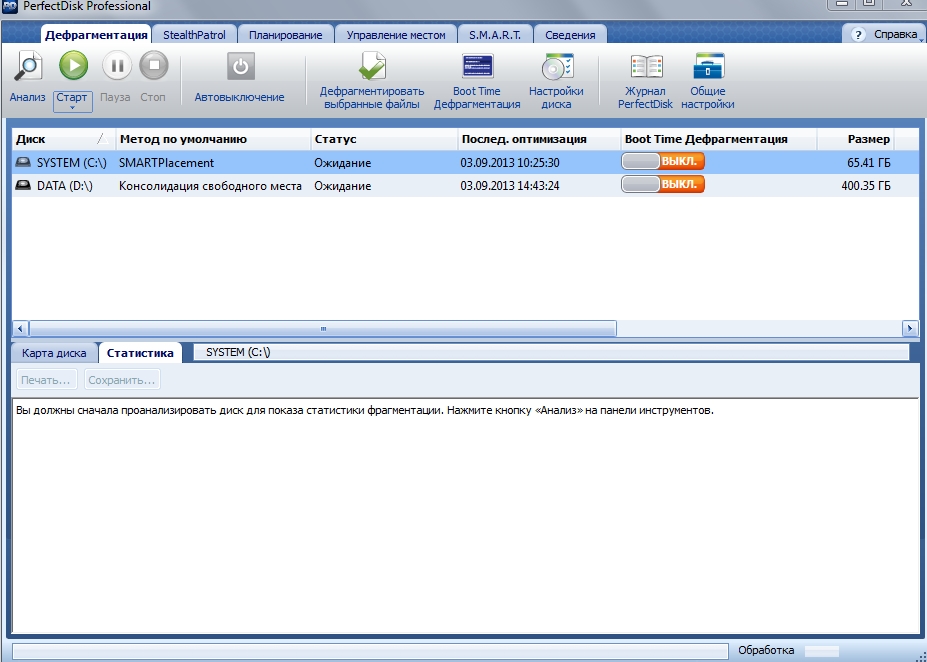
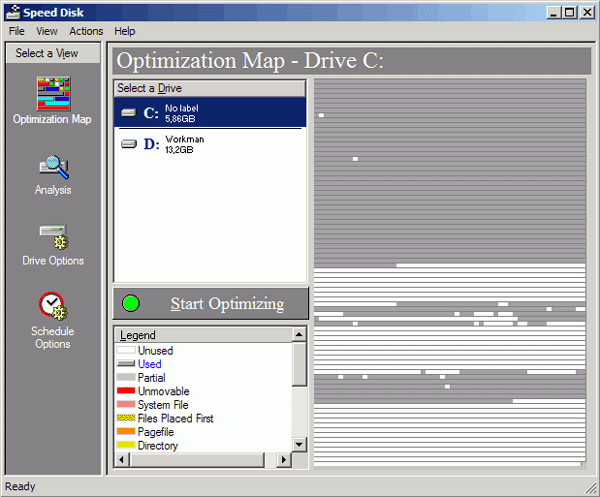
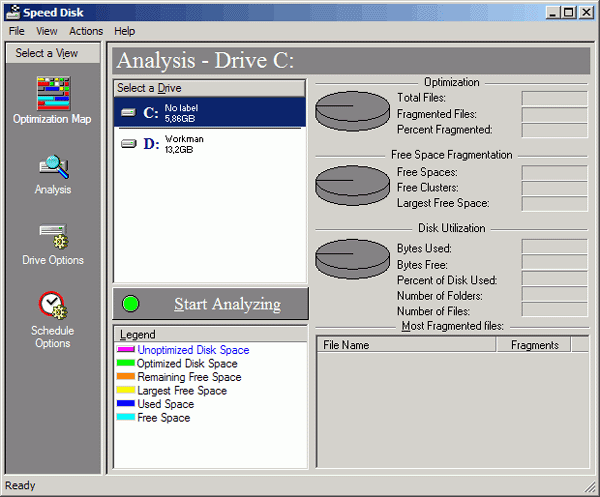
We will carry out defragmentation using the program “ perfect disk“, which, in my opinion, and not only in my opinion, is the best program for disk defragmentation!
After downloading, we defragment your partitions, for the Windows 7 partition, select “SmartPlacement defragmentation”, for the rest of the partitions, “Consolidate free space”.
On this optimization disk space finished.
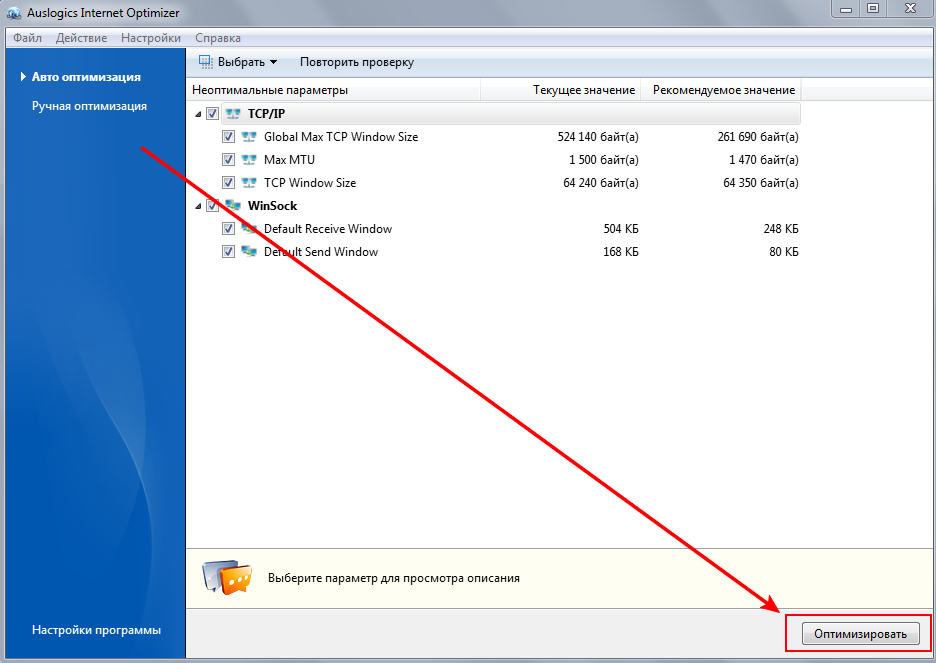
SERVICE OPTIMIZATIONFix flagged issue

After the analysis, we leave all the parameters selected and click the “OPTIMIZE” button
This completes the optimization of your computer or laptop on the windows 7 operating system for games or loads of programs.
CONCLUSIONS
So, in the article we learned how to optimize your equipment when using the WINDOWS 7 operating system. I tried to explain everything to you as simply and clearly as possible using images, if some steps in the pictures are not clear to you or somewhere I missed the thread of explanation and you if you don’t understand what to do, you can write in the comments below without any problems and I will explain to you what and how to do to improve the speed of your OS.
Disk system optimization
This article is an attempt to answer questions about how to create an optimal system from the available software and hardware components. We will talk about the performance of the disk complex - about the method connecting hard discs and CD/DVD drives, IDE controller drivers, where is the best place to place a file virtual memory and what size to allocate for it, and about many other performance issues.
The material of this article is quite universal, since most of the problems discussed relate either to hardware or to the general principles of building modern operating systems. However, where I can do this, I will try to give specific advice on changing the settings of specific systems.
IDE Interface
Hardware connection of devices
The vast majority of modern computers have a disk system based on the IDE (ATAPI) interface. A traditional motherboard has two IDE controller channels - primary (primary) and secondary (secondary), each of which is, in fact, a separate controller. Each channel has its own connector on the motherboard and a separate cable to which one or two IDE devices can be connected. One of them will work in master mode, and the other in slave mode, and these modes are set by jumpers on the drive or drive. I will not reveal any new facts - everything I say in this section has already been said in various documents and FAQs. Despite this, the question of what and where to connect is quite common, and since the operation of the disk system directly depends on this, I will try to put together everything that can be said on this topic.
I will add right away that it is not possible to describe the performance of SCSI-based systems in this article - mainly due to the immensity of this topic and the presence of a huge number of particulars.
How do two devices placed on the same channel (loop) work?
Unfortunately, the current protocol for working with IDE devices does not allow two drives operating on the same channel to work completely separately from each other. It's not even that they use a common loop (cable) to connect to the controller. The problem is somewhat more acute - the data transfer protocol itself (the controller device) and the driver mode used in the vast majority of IDE systems do not allow using one of the devices until the other device has executed the command given to it. In practice, this results in a very unpleasant thing: for example, the hard drive received a command to read a sector. Often he cannot do this right away - for example, because the heads hard drive are in a different area, and to read the sector, you will have to perform mechanical operations. While searching for the necessary data - about a dozen milliseconds - the device is simply silent, executing the controller's command. Unfortunately, during this period, the second IDE device located on the same controller (channel) is simply not available. Problem of two hard drives located on the same IDE controller is not so scary, because HDD in any case, it is able to execute the commands given to it quickly enough. In the case, for example, with a CD-ROM drive, the problem can be much more serious. When the CD-ROM searches for a track (about a hundred milliseconds, in rare cases - and more), performs some of its own, for example, calibration, manipulations, or even simply has difficulty reading a sector (up to ten (!) seconds), the second device running on the same channel is simply not available.
The conclusion, unfortunately, has to be drawn as follows: if possible, place devices with which simultaneous work will be carried out on different controllers. If you have only two devices, you simply put them on different controllers, and each of them will work separately from the other, and, therefore, in an optimal way. What if there are more devices?
- Two hard drives and a CD/DVD-ROM? Most likely, it makes sense to leave one - the main, system, hard drive alone, so that nothing could interfere with access to system files and virtual memory. And if you want to put some programs or a virtual memory file on another hard drive? In this case, it would still be better for you to spread these hard drives to different controllers in order to ensure their simultaneous operation. On the other hand, if you often use CD/DVD - for example, often listen to music (MP3), then it may make sense to put the disc-reading drive on a separate controller - in this case, the difficulties of reading data from the CD will not interfere with your background work and do not freeze the main hard disks and hence the entire computer.
- Writer (CD-R/-RW/DVD-ROM)? Consider what media you will be writing to this drive from. If, for example, you often copy discs on the fly (from a conventional CD-ROM to CD-R), then it is highly desirable for you to separate the CD-ROM and the CD-R drive to different controllers. If your drive has a large enough buffer then this is not very important, but in case your recording drive's buffer is small, it would be extremely good to put it on a separate controller alone. Or not alone (if this is not possible), but at least paired with a device that will not be used in the process of burning discs - for example, you can pair it with a hard drive that stores data that is not related to the recording process.
We will return to the question of how to place several hard drives to create an optimal system in terms of speed, and what benefits can be obtained from several hard drives.
Slave or master?
Two devices placed on the same loop cooperate in one way or another to ensure their work. Each IDE device has a slave or master switch, and two devices running on the same loop must work in different modes. Does it make any practical difference which device is the slave and which is the master? At the present time, we can say quite confidently: it does not matter. The operation of the IDE protocol in the form to which it has come so far is practically independent of which device is the slave and which is the master. Set the jumpers in the way that makes more sense from the point of view of the operating system (by default, in most systems, letters are assigned to disks in the order in which they are physically present in the system - that is, master will go first, then slave). The only thing that can still be said about the hardware aspect is that if you have a very old hard drive or CD-ROM (say, more than five years old), try not to set it as master to a more modern device. This is unlikely to bring performance loss, but it can give fundamental compatibility problems due to which the second device (slave), or even both drives, will not work correctly or will not work at all. One more note - if there are two drives capable of reading CDs on the same controller, then you will not be able to boot from the second (slave) drive. Last problem already solved in the latest motherboards (in BIOS AWARD 6.0, for example, you can choose which device will be considered a CD drive when choosing a boot sequence), but so far there are far from the majority of such motherboards. If you have two CDs on one controller (for example, CD and CD-RW), and you want to be able to boot from the CD drive, it is advisable to set it as master - this will work regardless of the board and BIOS version.
Which device should be connected to the middle connector of the cable, and which one - to the outer one?
It also doesn't matter. Yes, some electromagnetic moments make this or that combination preferable, but in practice another aspect is much more important: just connect the devices so that the cable runs as freely as possible, does not bend or stretch. Excessive mechanical deformation and stress of the cable can lead to the fact that in some place (for example, in the connector) there will be a weak contact or (partial) damage to the wires of the cable itself, and this can lead to data loss or unreliable operation of drives. Another unpleasant thing - if the cable partially comes out of the connector during system operation - can also bring a bunch of unpleasant consequences, up to physical breakdown(this, however, is unlikely). Therefore, the advice will be simple - connect the devices so as not to strain the cable. It is still unlikely to take into account other factors.
Bus Mastering Drivers
The second important aspect of the disk system based on the IDE controller is the controller driver. How the driver, and hence the operating system, will work with devices and the controller, in what mode the data will be exchanged, greatly affects the overall performance of the system.
Currently, there are two strategies for the operation of disks, the controller and the driver: the “standard” mode for older devices, in which all IDE drives are required to work - PIO (Programmed Input / Output) mode, in which the central processor is used to transfer data between the drive and the system . This mode works on all IDE controllers, and is, in fact, the original mode of operation, regulated in the very first standard. However, in the last few years, the vast majority of controllers and devices have an alternative mode of operation - the so-called Bus Mastering (DMA / UDMA) mode, in which data transfer is controlled by the controller itself, without the participation of the processor. This mode not only frees up the processor, which is very important in multitasking systems, but also removes the limitation on the data transfer rate imposed by the processor and software. On Windows NT4.0 and Windows 2000, for example, the PIO mode driver on my machine (Celeron 333A, BX chipset) can't transfer more than 5 MB/s from any of the three modern drives (Quantum 10 GB, Seagate 6 GB and Seagate Barracuda 30 GB). In Bus Mastering mode, on the contrary, Seagate Barracuda, for example, delivers 10 - 15 MB / s, which is almost three times (!) Faster, and the rest of the drives reach their theoretical limit of 7 - 10 MB / s. Add to this the fact that for work in normal mode the processor load (for me personally) is 100%, and in Bus Mastering mode it is about 20%, and you will understand why your system simply has to work in this mode.
Fortunately, all systems (motherboards) released since the days of Pentium, and even more so now, support Bus Mastering (hereinafter referred to as BM) without any problems. The only problem that remains is to use this particular mode of operation of the equipment. Unfortunately, there are still some pitfalls here.
Windows 98/Windows ME
Modern computers based on these systems, in the vast majority of cases, they already have drivers capable of working in BM mode - this especially applies to Windows ME. You can verify this as follows - go to the control panel, the "system" item, and read the name of the hard drive controller in the device manager. If you have a motherboard based on an Intel chipset, and the name contains the words “Bus Master” or, sometimes, an analogue in Russian (“bus control” or something like that), then required drivers already installed. Users of modern (Pentium and above) systems based on VIA chipsets can be calm - if you have a driver with VIA mention, and not a standard IDE driver, then you are guaranteed BM. If you still have only the standard IDE controller driver installed, then you most likely need to install newer drivers. Windows users 95, unfortunately, you will have to look for drivers - standard drivers There is no BM in this system.
All that is left to do now is to make sure that all your devices are working in this mode. To do this, in the same device manager, you need to go through all hard drives and CD / DVD drives, and set them to "DMA" mode in the "Settings" tab. Miscellaneous systems have different default settings, and it's possible that several of your devices will continue to work in PIO mode. It is worth paying attention, however, to the fact that some devices (especially older CD or CD-R[W] drives) may not work in DMA mode, or may not work quite correctly. Sometimes it happens, for example, that a CD drive in DMA mode stops playing VideoCD or copying audio data. I have also seen cases where the CD-RW drive stopped working altogether in DMA mode. Take note of this - if something stops working the way it used to, you will unfortunately have to stop using DMA on that device.
Windows 2000
This system in the vast majority of cases already has Bus Mastering drivers, and even uses them. All you can do is try to make sure that all devices use this access mode: the fact is that removable storage drives (CD, for example) are often set to PIO mode by default during system installation, just in case, which is not always justified. You must go to the device manager (it can be found in the tree, which is launched, for example, by right-clicking on "my computer", item manage), find the IDE ATA / ATAPI controllers there, and check the settings for both controller channels ( Primary/Secondary IDE channel). In the Advanced Settings tab, you can both control the current operating mode of the device and set the mode you need - DMA if available (DMA, if possible), if it is suddenly not installed.
Windows NT4.0
Users of this OS will, in the vast majority of cases, have to take more active steps in order to get a job in BM mode. The standard drivers of NT systems with SP3 and higher already have BM support for Intel PIIX3 and higher controllers (used in the i430/i440 line chipsets), but, unfortunately, in the vast majority of systems they cannot use it on their own due to an unsuccessful automatic definition of this mode. To determine if BM is working in your system or not, you can use, for example, the ConfigNT program, which will show the current operating modes of the devices. If you see that BM does not work on your controller, you have two options - either turn on this mode by force (right in the same program - only for Intel chipsets i430/i440, which are very common, by the way), or install drivers with BM support.
Users of other chipsets (for example, from the same VIA, or the new Intel i8xx line) will have to install special drivers with Bus Mastering support.
- Attention 1: Both options can theoretically lead to the fact that your system will not boot for some reason, and it will be very difficult to recover. For experienced users who know what to do in this case, I can advise you to create an emergency recovery disk (rdisk / s command) just in case, but in general I can console you with the fact that I have never encountered a situation where, after enabling BM mode, otherwise the system did not boot. If the driver detects that there is still no BM on your system, it will just continue to work as usual.
- Attention 2: Keep in mind that old BM drivers under NT4.0 - for example, from Triones, or old ones Intel drivers, do not know how to work with drives larger than 8 GB. Installing such drivers can turn into a disaster - for example, NTFS volumes that have areas beyond 8 GB from the beginning of the disk have a chance of being irreversibly damaged, as the system will put down "bad" clusters even when trying to read from inaccessible areas, which will lead to loss your data. I strongly recommend using drivers released at least in 1999 for Intel chipsets - version 4 and higher (the first digit of the version number).
Other OS
Fortunately, other modern operating systems (Linux, FreeBSD, BeOS, etc.) have better support for Bus Mastering. All these systems, or rather, their standard drivers ( latest versions systems), have Bus Mastering support for almost all Intel controllers (and some for VIA), and themselves use all devices in the most optimal mode. Users of Unix systems, for example, will be able to verify this by following the messages that the driver issues at boot (assuming, of course, their system issues this information - Unix can be configured as you like). BeOS enables this mode by default, so sometimes you even have to solve the opposite task: turn it off manually (if you have problems booting the system). With IDE controllers ( motherboards) from other manufacturers other than Intel and VIA, the situation is somewhat worse, and sometimes, unfortunately, not at all - but you can get answers to these questions only by studying your situation yourself.
Sufficiently recent Bus Mastering drivers for all common chipsets for Windows systems can be found at www.bmdrivers.com or on this site in the "Media" or "Motherboards" section - IDE Bus Mastering drivers.
Virtual memory settings
All modern operating systems use virtual memory, a special paging file that compensates for the insufficient amount of physical system memory. The main parameter related to the virtual memory system is the size of the paging file (or several files).
- Windows 95/98/ME has a dynamic virtual memory file by default that resizes itself according to the current needs of the system. Does it make sense to interfere with this mode of operation by setting the minimum and maximum size manually? Yes, there is some sense in this. If you set the minimum paging file size in the region of 200 - 300 MB (the maximum is up to you, but at least 500 MB is better), you will save the system from unnecessary manipulations to dynamically resize the file. If, after this procedure, you also defragment your disk with a modern defragmenter that can work with a virtual memory file, you will get a little more performance. What is the minimum virtual memory file size to choose? As much as you feel sorry for, but more than 300 MB, perhaps, is not worth it.
- Windows NT4.0 and Windows 2000 systems have a slightly different virtual memory strategy - dynamic change virtual memory file size, although provided, is not regular mode work. What is the overall minimum swap file size to choose? The only thing that can be said for sure is that the default value is too small to work effectively. For conventional systems, I recommend at least somewhere in the region of 200 - 300 MB, and for complex computers such as publishing or, for example, graphic workstations, 500 MB will not be superfluous. I also recommend not to skimp on the maximum size - figures of the order of a gigabyte will be just right. This will practically not affect the normal operation of the system in any way, but it will help to avoid surprises and failures at the most crucial moments, for example, while working with huge documents.
- For users of other operating systems, basically the same advice can be given: try to make sure that the virtual memory file does not change its size dynamically, as this reduces system performance and increases fragmentation.
Does it make sense to set the maximum possible size of the paging file? Unfortunately no. If the file contains all the necessary data (that is, it does not increase during operation), then the system performance is maximum, and it will not be possible to increase it by increasing the file size. Yes, with an increase in the virtual memory file, some effects will come into play that affect the performance of the swap system, but they will be both for and against, and they will not affect practical performance in any noticeable way.
Where and how to place the swap file?
- In case you have several logical drives, try to place the virtual memory file on the partition closest to the physical beginning of the disk. The performance of read / write operations there is traditionally slightly higher, or, in extreme cases, no worse than in other places on the disk. Unfortunately, placing virtual memory on another logical drive, trying to isolate it from operating system files, is pointless - as long as the virtual memory file is on the same physical drive, you will not gain anything by changing its logical location.
- Virtual memory on a system with multiple hard drives is a more flexible issue. Try to place virtual memory where there are no program files - that is, outside the system partition. This will greatly improve performance. Many modern systems(for example, Windows NT4.0 and Windows 2000) can use virtual memory on multiple disks - but keep in mind that you should not place even part of the virtual memory on the same physical disk as the system itself. If you have three physical drives, don't pay attention to their comparative performance, but place the paging files on both non-system drives - this will also greatly increase performance, and the system will balance the loading of the drives according to their speed. Just keep in mind that it is strictly forbidden to place a virtual memory file on disks operating in PIO mode.
- On what file system to allocate virtual memory? This is of no practical importance. It would be better if the cluster size on the disk where the virtual memory file is located was larger - but this is not really very important either.
- Try not to create virtual memory from scratch on partitions that are more than two-thirds full - this will almost always result in a fragmented swap file. If you have no other choice, at least try to defragment the disk before increasing the size of the virtual memory files.
Structure of logical disks
What is better in terms of performance - one logical disk per 10 GB, or 3 GB allocated for the system, and 7 GB for any data? In terms of performance, it will almost always be much better to allocate a separate partition of a small size (2 - 4 GB) for the system. This step will result in system files, which are accessed more or less simultaneously, will be located on areas of the physical disk that are close to each other - that is, the physical "mutual fragmentation" of system files will be much lower. This point is especially worth considering for those who have system disks several tens of gigabytes in size. If you allocate 10% - 20% of the capacity of a large disk (i.e., about 2 GB) for the system logical disk, then the track search time when the disk head moves between system files will be several times less than the time that needs to be spent for moving the head around physical disk. If the system is installed on a disk of a dozen or two GB, the system files will necessarily be randomly dispersed throughout this space, which will create unnecessary difficulties with simultaneous access to these files.
Is it worth shredding disks in any other way? No, it's not worth it. Each logical disk in the process of being used by the system (mounting) makes it necessary to store quite a lot (hundreds of Kbytes) of service information in memory, and this reduces the amount available system memory. Although this is not a very big loss, but in terms of performance, the advantages in creating many logical disks are still less. This rule, however, has one exception: if you use the FAT32 system (and Windows98 / ME users do not have another standard file system), then you should not create logical disks larger than 10 - 15 GB. If you have a hard drive, say, about 40 GB, then it would be wiser to make all the same several volumes, in addition to the system one, and it is very desirable so that large volumes are not used simultaneously. Other modern file systems have no such restrictions.
Conclusion
The disk system of specific operating systems can be optimized further - for example, by managing caching, changing the operating modes of file system drivers, etc. But, unfortunately, these settings are too specific for each specific operating system. This article talks about general considerations that are common to all operating systems, and we may return to the issue of optimizing specific systems.
This documentation has been archived and is no longer maintained.
Storage Spaces performance testing with synthetic workloads in Windows Server
Applies to:Windows Server 2012 R2
How do I know what level of performance to expect from Tiered Storage Spaces in Windows Server and how do I determine if the storage tiers are delivering the performance I need after deploying workloads?This article describes how to run a series of performance tests on artificial workloads using DiskSpd.exe to get a baseline of performance on newly created disk space. It also shows you how to monitor and tune performance during a staged migration of workloads so that the storage tiers provide the performance needed for those workloads.Procedures include setting up monitoring and testing, as well as performance testing for both random small I/Os and sequential large I/Os.
When testing the performance of the created tiered storage space, you need to determine the baseline performance of the storage tiers by testing only the SSD tier.For optimal performance, the SSD tier should be large enough to accommodate the entire working set (all active data) of the workloads using that space.Thus, faster solid-state drives (SSDs) will handle all or most of the I/O, and the remaining minimum of I/O will be performed on slower but less expensive hard drives(HDD), designed to store "cold", i.e. inactive data.
Storage Tier Optimization, which runs daily at 1:00 AM by default, maintains this balance whenever possible by moving active (hot) data to the SSD tier and inactive (cold) data from the SSD tier to cheaper hard drives, depending on I/O activity since the last tier optimization.If you are not familiar with this process, see the article.You can also pin important files to the SSD tier so that all processing is done on the SSDs only.
In reality, it is unlikely that the entire working set will be supported at the SSD level, but this can be as close as possible.By figuring out how much disk space will speed up with all the I/O at the SSD level, you can get a baseline against which to measure performance when moving workloads to disk space.During a staged migration, you can get diagnostic data from the Optimize Storage Tiers report to determine the SSD tier size and optimization frequency that will meet performance requirements for your workloads.
| Note |
|---|
To provide a point of comparison when testing SSD-level performance, if possible, run several of the same DiskSpd tests on one of the SSDs to test its capabilities.This will help determine the maximum performance of physical disks under the same artificial load, avoiding the overhead associated with each additional layer of storage stack.You can perform this procedure before creating a storage pool. You can also remove the drive under test from the pool or test an additional SSD of the same model. |
Our tests are run on a clustered file server configured as a Scale-Out File Server (SOFS) with the configuration described in the following table.References to these configurations can be found in the following procedures.
Table 1. Sample disk space test configuration
configuration | Deployment Example |
|---|---|
Cluster File Server | Cluster file server: FSCluster Cluster nodes: FS01, FS02 Owner node for disk space: FS02 |
Media pool | Storage Pool: Pool1 |
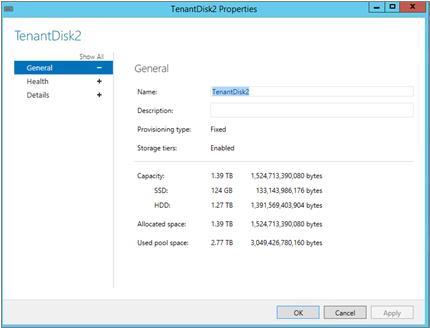
Disk space | Disk space: TenantDisk1 Stability: double-sided mirror Storage levels: SSD Tier: TenantDisk1_HDDTier (8 SSDs) HDD Tier: TenantDisk1_HDDTier (16 HDDs) |
csv | SOFS volume: C:\ClusterStorage\Volume3 Cluster Shared Volume (CSV) for virtual disk: \\SOFS.contoso.com\TenantDisk1\ |
Test VM | Virtual machine: STORE-TEST1 Virtual machine location: UNC path: \\SOFS.contoso.com\TenantDisk1\STORE-TEST1\Virtual Hard Disks\STORE-TEST1.vhdx Local path (on node FS02): C:\ClusterStorage\Volume3\Shares\TenantDisk1\STORE-TEST1\Virtual Hard Disks\STORE-TEST1.vhdx |
Before running performance tests with DiskSpd or any other tool, you should check the health of your storage space and storage pool, and make sure that using resources from other sources on your file server, storage spaces, or test machine will not skew the performance data.In addition, schedule tests and alert users who may be affected by them.
Pre-Action Checklist:
| Note |
|---|
This series of DiskSpd tests provides a baseline of the potential performance of disk space in a new storage pool before deploying workloads to pool spaces.When testing under other conditions, additional checks should be performed.For example, you need to shut down all other virtual machines deployed in the storage space.If the pool contains other Storage Spaces, DiskSpd tests should be run at low usage levels for the workloads deployed in those Storage Spaces.It is also recommended that you run a storage tier optimization before testing to ensure that active (hot) data is moved to the SSD tier. |
This section describes some of the checklist procedures in more detail.
To run the DiskSpd tests at the SSD level, there must be enough available space to store all the copies created from the 64 GB test file.For example, if resilience is based on a two-way mirror, two copies are kept.
SSD tier scoping
If you do not have enough SSD level space to test, you can.
Checking the Health of Storage Pools and Storage Spaces in Server Manager
Select a storage pool with a mouse click.
In chapter Virtual disks open the properties of the disk space (virtual disk) you want to test (for example, TenantDisk1).
On the tab performance check the health and working condition of the disk space.
On the file server, open Server Manager and choose File and storage services.
To check the health of the storage pool, select Tom > Media Pools and check the status of the pool that contains the disk space (Pool1 in the test environment).
To check disk space health:
Checking the health of storage pools and Storage Spaces in Windows PowerShell
You can determine the status and next time that tasks run in Windows PowerShell or by using the Task Scheduler in Server Manager.
Two planned tasks are especially important: storage tier optimization, which runs daily at 1:00 am by default, and data integrity check, which runs monthly by default and is triggered when the system is rebooted.
Checking the status of optimizing storage tiers and other tasks in Task Scheduler
Determining the Status and Run Time of Scheduled Tasks in Windows PowerShell
Open Windows PowerShell as an administrator.
Optionally, start a Windows PowerShell session on the file server by running the following command.Change the names of all clustered file server nodes to FS02.
To determine the status of all scheduled tasks running or queued, run the following script:
Sample output:
PS C:\WINDOWS\system32> Get-ScheduledTask | Where-Object ($_.State -EQ "Running" -OR $_.State -eq "Queued")TaskPath TaskName State -------- -------- ----- \ Microsoft\Windows\SpacePort\ SpaceAgentTask Running\Microsoft\Windows\TextServicesFramework\ MsCtfMonitor Running \Microsoft\Windows\Wininet\ CacheTask Running
To find out the next run time of all scheduled tasks that have not been disabled, run the following script:
On a clustered file server, this command returns a long list of tasks.Check the next task start time storage tier optimizations And data integrity checks, as well as other long-running tasks that may affect performance tests.
To use all layers of the storage stack during testing, tests should be run on virtual machine deployed in disk space.To test the performance of just the SSD tier, you need to pin the VHD for the VM on it, and then perform storage tier optimization to move the entire file to the SSDs.The DiskSpd tool is then installed on the virtual machine.
On a stand-alone file server, you can zip a file, move it, and verify that the move was successful by simply doing three windows commands PowerShell:
Set- FileStorageTier - FilePath
On a scale-out file server, you can use the SMBStorageTier1.ps1 script to determine the owner node for the storage space and the local path to the file you want to pin.You must specify the UNC path for the VHDX file and the media type for the required storage tier (in this case - solid state drive (SSD)). The script will zip the file and then perform storage tier optimization that will move the file to the SSDs.You can also use the script to determine the placement status of pinned files.
To pin a VHDX file to the SSD layer of a scale-out file server:
to the file server.This script can be run from any scale-out file server node.But since we will need to perform other tasks from the owner node regarding disk space (FS02 in our case), we downloaded the script to the root directory of this node.
On the file server, run Windows PowerShell as an administrator.
To pin a file to the SSD tier using the SMBStorageTier.ps1 script, run the following command, replacing the VHD UNC path for the test VM with the path shown below:
Depending on the UNC path used, the script determines the local path and disk space (virtual disk).Then, using the media type, the script returns the friendly name of the storage tier.After pinning (assigning) the file to the SSD tier, the script runs the storage tier optimization to move the file to that tier's SSDs.
Sample output:
PS C:\> .\SMBStorageTier.ps1 –PinFile "\\SOFS1.contoso.com\TenantDisk1\STORE-TEST1\Virtual Hard Disks\STORE-TEST1.vhdx" –MediaType ssdInput parametersFile to pin: \\SOFS1.CONTOSO. COM\TENANTDISK1\STORE-TEST1\VIRTUAL HARD DISKS\STORE-TEST1.VHDXMedia type: SSDCalculated parametersLocal file path: C:\ClusterStorage\Volume3\SHARES\TENANTDISK1\STORE-TEST1\VIRTUAL HARD DISKS\STORE-TEST1.VHDXNode owning the volume: FS02Tier Name: TenantDisk1_SSDTierExecuting command:Set-FileStorageTier -CimSession FS01 -FilePath C:\ClusterStorage\Volume3\SHARES\TENANTDISK1\STORE-TEST1\VIRTUAL HARD DISKS\STORE-TEST1.VHDX –DesiredStorageTierFriendlyName TenantDisk1_SSDTier
To ensure that the file is fully moved to the SSDs, use the SMBStorageTier script again, replacing the path to shared folder for virtual disk:
If for the parameter Placement Status value specified Completely on tier(Fully level) means all data has been moved to SSDs.
Sample output:
PS C:\> .\SMBStorageTier.ps1 -ReportShare "\\SOFS1.contoso.com\TenantDisk1\"Input parameterShare Name: \\SOFS1.CONTOSO.COM\TENANTDISK1\Calculated parametersVolume behind the share: \\?\Volume( 4abeee8b-b42a-465e-9e41-d3a38b691642)\Node owning the volume: FS02Executing command:Get-FileStorageTier –CimSession FS01 –VolumePath \\?\Volume(4abeee8b-b42a-465e-9e41-d3a38b691642)\ | Select *PlacementStatus: Completely on tierState: OKDesiredStorageTierName: TenantDisk1_SSDTierFilePath: C:\ClusterStorage\Volume3\Shares\TenantDisk1\STORE-TEST1\Virtual Hard Disks\STORE-TEST1.vhdxFileSize: 12117344256FileSizeOnDesiredStorageTier: 12117344256PSComputerName: FS01CimClass: ROOT/Microsoft/Windows/Storage :MSFT_FileStorageTierCimInstanceProperties: (DesiredStorageTierName, FilePath, FileSize, FileSizeOnDesiredStorageTier...)CimSystemProperties: Microsoft.Management.Infrastructure.CimSystemProperties
Next, on a test virtual machine, you need (available for download at http://aka.ms/diskspd).The downloaded ZIP file contains separate folders for three versions of DiskSpd: amd64fre (for 64-bit systems), x86fre (for 32-bit systems), and armfre (for ARM systems).To run a test on a server under Windows control Server 2012 R2, you only need to download the amd64fre folder.For our tests, we downloaded all three versions of DiskSpd to the C:\DiskSpd\ folder on STORE-TEST1.
For detailed information on using DiskSpd, see the documentation available for download in DOCX and PDF formats within the DiskSpd tool itself.
Add performance counters to the performance monitor display to control when running DiskSpd tests.See the article (Configuring the Performance Monitor Display).
Add a data collector set to collect additional data from other layers of the storage stack during testing.See the article (Create Data Collector Sets in Performance Monitor).
Install the November 2014 Cumulative Update for Windows Server 2012 R2. To obtain performance counters for storage tiers (Tiers object) and writeback cache (WriteCache object) for Storage Spaces, install the November 2014 Rollup for Windows Server 2012 R2 (KB 3000850) .
Update the Optimize Storage Tiers task to save the report. This report allows you to monitor the performance of the SSD and HDD tiers and provides information that you can use to tune your configuration once workloads have started moving to storage space.By default, when you run this task daily, the report is not saved.For instructions on updating the task to save the report, see the article (Save the report when you run storage tier optimization).
Preparing Performance Monitor for Monitoring and Data Collection (Optional). DiskSpd returns a summary of the main performance counters needed to determine the optimal queue length for disk space.But in order to evaluate the performance of storage with a larger queue length, along with DiskSpd, we recommend using the performance monitor during testing.
Before starting tests, in case of random I/O operations of a small amount of data, we recommend that you do a little preliminary testing in order to familiarize yourself with the DiskSpd tool and adjust its parameters for disk space.
Before running scripted tests, it is recommended that you run a single DiskSpd command to familiarize yourself with the available options and DiskSpd output.The DiskSpd options for this test allow you to emulate a typical OLTP workload. This assumes an optimal queue length, which will be tested later (during performance tests in the case of random I/Os of a small amount of data).This procedure includes step by step instructions, including some additional steps (such as adding a performance monitor to a process) and certain requirements (such as using administrator rights on a test computer) that you will need to learn about when you run future tests.
Running the DiskSpd Test
If the underlying disk space storage is high throughput, multi-file testing can increase parallel processing speed and improve performance.To test this, run the same DiskSpd test you ran earlier on one 64 GB test file, but now on two 32 GB files and four 16 GB files.You need to test the same amount of data in each test and set the number of threads per file to keep the queue length the same.
To test this, run the same DiskSpd test you ran earlier on one 64 GB test file, but this time on two 32 GB files and four 16 GB files.It is necessary to test the same amount of data and set the number of threads for the file to maintain the same queue length.Then set up the rest of the DiskSpd tests to use the number of files that provides the maximum throughput.
Testing Two Files. IN command line An elevated Windows PowerShell run the following command to create two 32 GB test files (test1.dat and test2.dat) that are half the size of the original test file, with half the number of threads per file (-t4 ) to maintaining the same queue length in disk space:
c:\diskspd\amd64fre\diskspd.exe -r -w30 -d600 -W300 -b8K -t4 -o12 -h -L -Z1M -c32G C:\test1.dat C:\test2.dat
Testing four files. Run the following command to create four 16 GB test files with two threads per file (-t2 ) to maintain the same queue length on disk space:
c:\diskspd\amd64fre\diskspd.exe -r -w30 -d600 -W300 -b8K -t2 -o12 -h -L -Z1M -c16G C:\test1.dat C:\test2.dat C:\test3.dat C:\test4.dat
This series of DiskSpd tests is needed to determine the optimal performance that can be achieved in tiered storage for online transaction processing (OLTP) workloads.Since the best performance is achieved when processing the entire working set at the SSD tier, only that tier's performance is tested.
To emulate the mode of OLTP workloads, the DiskSpd tests use the following parameters for random I/O of a small amount of data.For design options other than random I/O of small amounts of data, see the section above.
The 8 KB block size is the page size used for SQL Server data files.
30/70 write to read ratio, typical for OLTP workload mode.
When reporting performance test results for small random I/Os, we perform calculations on the raw performance data to arrive at the optimal queue length for disk space.
For workloads with random I/Os of a small amount of data, it is necessary to determine the optimal queue length (total number of waiting threads) for disk space and find a balance of threads per file and pending I/Os per thread that provides maximum throughput at compliance with the allowable delay for workloads in space.
Optimizing throughput (measured in IOPS) on any system requires at least a minimum queue of IOs pending.This can be compared to checking tickets when boarding a train.If there is no queue, no one has to wait (everything happens without delays), and the passengers are happy. But at the same time, the landing speed (that is, throughput) is lower than with a constant flow of impatient passengers.A long queue may speed up boarding, but passengers may still be unhappy.
The key to designing optimal disk space performance is to determine the threshold at which maximum throughput is achieved while maintaining acceptable latency for the workloads in the space.As it turns out, the most important indicator in tiered storage space is the average queue length for each solid state drive at the SSD level.
In tiered storage, performance tests for small random I/Os indicate that the optimal total queue length is 16 pending operations for a single SSD.This is approximately the threshold at which throughput reaches a steady level, and the delay begins to skyrocket.
To determine the optimal queue length for disk space during testing, we don't need to evaluate the raw performance data. Instead, we will carry out calculations using the number threads per file(values -t ) and number pending I/O operations per thread(values -o ).
Basic calculations:
= * gain / number of solid state drives
number of pending I/Os for disk space = number of test files * number of threads per file * number of pending I/Os for a thread
gain = (% read operations * 1) + (% Writes * number of copies per disk space)
Gain- The average number of I / O operations performed per read or write transaction.Read operations are performed in one transfer.In each read operation, the number of I/O operations depends on the number of copies of data stored in storage spaces. This number, in turn, is determined by the stability parameters for the space.For example, if resiliency is based on a two-way mirror, two copies of each file are kept.
DiskSpd's random I/O tests for a small amount of data take 6 hours or more.
Each DiskSpd startup takes about 15 minutes: 5 minutes to warm up and 10 minutes to collect data.
Script-based tests include running DiskSpd multiple times, throttling the number of I/Os per thread, and the number of threads per file. This will determine the optimal queue length and the optimal balance of threads and pending I/Os for disk space.A total of 24 DiskSpd commands were used in our tests (12 per test).If the original array did not allow reaching maximum performance for disk space, you may need to test additional values.
The purpose of the first small random I/O test is to get the performance data needed to calculate the optimal queue length for a single SSD in the storage system.To perform this calculation, you need to determine the optimal queue length for disk space.To get this value, you need to vary the number of pending IOs per thread while still maintaining 8 threads per file, as in the DiskSpd pre-test.
| Note |
|---|
Changing the Number of Small Random I/Os Pending for a Thread with DiskSpd
The optimal number of pending I/Os per thread is subjective based on the performance capabilities of the storage space and the requirements of the applications running in the space.
The maximum favorable number of pending I/O operations per thread for disk space ultimately depends on the latency allowed for applications using that space.The more you understand the application behaviors and performance characteristics, the more finely you can fine-tune DiskSpd's settings to artificially create workloads.
The optimal number of pending I/Os per thread is reached when the incremental latency value equals and exceeds the incremental throughput value (or earlier). In our test, this happens with a queue length of 17 pending operations per thread (as shown below).The resulting small performance gain before this threshold is usually too expensive (in terms of increased latency).The optimal value we determined for our tests is 16 pending I/Os per thread.
Let's return to the previous calculations (see the section on ). For the current benchmarks, which use 16 waiting threads for storage space, a gain of 1.3, and eight SSD-level drives, the total queue length for one such drive would be 15.6, which corresponds to the target queue length (16).
The calculations will look like this:
Number of pending I/Os per file. Testing a single data file when it has 8 threads (-t8 ) and a thread has 12 pending IOs (-o12 ), we get 96 pending IOs for disk space (1 * 8 * 12) .
Gain: Testing with a 70/30 read/write ratio (-w30 ) - a fairly typical pattern for an OLTP workload - on storage space with resiliency based on a two-way mirror (keeping two copies of the data), we get a gain of 1.3: ( 0.7 * 1) + (0.3 * 2) = 1.3.
Total queue length. Multiplying the number of pending I/Os per space by the gain factor gives a total queue length of 124.8 for disk space (or 15.6 for SSD when using eight SSDs per SSD level):
queue length for space = 96 * 1,3 = 124,8
queue length for solid state drive = 96 * 1,3 / 8 = 15,6
For the last random I/O test of a small amount of data, we rounded the result a bit and used a target queue length of 120 pending disk space operations.
In the previous test, we determined that with a target queue length of 120 pending operations per space (-t x -o ), optimal performance was achieved with a random-type artificial workload for small I/Os.The final step in our task is to determine the combination of threads per file (-t ) and the number of pending I/O operations per thread (-o ) that achieve optimal performance.To do this, you can change both variables while maintaining the optimal total queue length for disk space (defined as 120 pending operations per space).
Determine combinations of -t and -o values to test
Change combinations of -t and -o values for optimal queue length for small random I/O
Use the procedure below to get a summary of the results for a single DiskSpd command. additional information For information on working with data exported by DiskSpd, see the documentation available for download in DOCX and PDF formats from DiskSpd itself.
Getting a summary of results for individual DiskSpd commands
With the command set-content and the DiskSpd command, transfer the results of the DiskSpd test to a .txt file.For example, the following command saves the results of -t2 to a file named results-t2.txt located in the current folder (in our case, C:\Windows\System32\):
c:\diskspd\amd64fre\diskspd.exe -b8K -r -t2 -o60 -w30 -d600 -W300 -L -h -Z1M -c4g c:\testfile.dat | Set-Content result-t2.txt
You can then use the following script to get a summary of the results:
Function Parse($FileName) ( $result = Get-Content $FileName foreach ($line in $result) (if ($line -like "total:*") ( $total=$line; break ) ) foreach ($line in $result) (if ($line -like "avg.*") ( $avg=$line; break ) ) $mbps = $total.Split("|").Trim() $iops = $total.Split ("|").Trim() $latency = $total.Split("|").Trim() $cpu = $avg.Split("|").Trim() "Param $param, $iops iops, $mbps MB/sec, $latency ms, $ cpu cpu" }
For completeness, you should also test disk space performance with large sequential I/O workloads, such as reporting and online analytical processing (OLAP).In the following, we will describe the DiskSpd tests that need to be run, provide example scenarios, results, and data analysis, but it is up to you to design the test procedures.
To emulate the mode of reporting and OLAP workloads, the DiskSpd tests use the following test options for testing sequential I/Os of large amounts of data.See the section above for design options not related to serial I/O of large amounts of data.
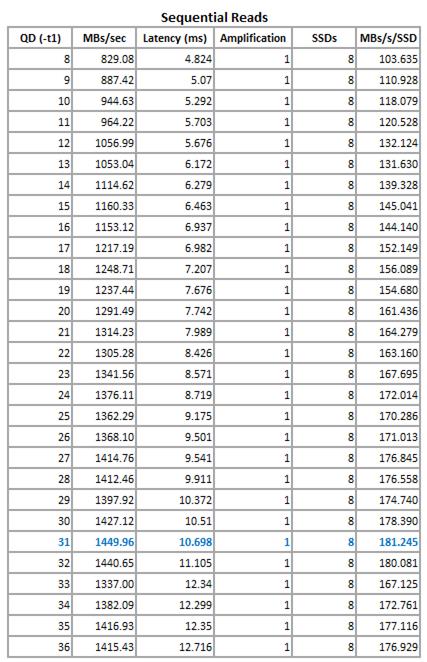
To determine the queue length at which throughput (MB/s) starts to reach a steady level on sequential reads, we used the following scenario in tests with values from -o8 to -o32 with a single thread.
8..36 | ForEach-Object ( $param = "-o$_" $result = c:\diskspd\amd64fre\diskspd.exe -w0 -d600 -W300 -b512K -t1 $param -h -L -Z1M -c64G C:\test1 .dat foreach ($line in $result) (if ($line -like "total:*") ( $total=$line; break ) ) foreach ($line in $result) (if ($line -like "avg .*") ( $avg=$line; break ) ) $mbps = $total.Split("|").Trim() $iops = $total.Split("|").Trim() $latency = $ total.Split("|").Trim() $cpu = $avg.Split("|").Trim() "Param $param, $iops iops, $mbps MB/sec, $latency ms, $cpu CPU ")
PS C:\Windows\system32> C:\Users\administrator\DiskSpd_SEQ_Reads.ps1Param –o8, 1658.15 iops, 829.08 MB/sec, 4.824 ms, 1.48% CPUParam –o9, 1774.83 iops, 887.42 MB/sec, 5.070 ms, 1.28 % CPUParam –o10, 1889.27 iops, 944.63 MB/sec, 5.292 ms, 1.35% CPUParam –o11, 1928.44 iops, 964.22 MB/sec, 5.703 ms, 1.41% CPUParam –o12, 2113.98 iops, 1056.95 MB 1.44% CPUParam –o13, 2106.08 iops, 1053.04 MB/sec, 6.172 ms , 1.57% CPUParam –o16, 2306.24 iops, 1153.12 MB/sec, 6.937 ms ms, 1.64% CPUParam –o19, 2474.89 iops, 1237.44 MB/s 7.989 ms, 1.69% CPU Param –o22, 2610.55 iops, 1305.28 MB/sec, 8.426 ms, 1.81% CPU Param –o23, 2683.13 iops, 1341.56 MB/sec, 8.571 ms, 1.78% CPUParam –o24, 2752.21 /sec, 8.719 ms, 1.83% CPU Param –o25, 2724.59 iops, 1362.29 MB/sec, 9.175 ms, 1.82% CPU Param –o26, 2736.20 iops, 1368.10 MB/sec, 9.501 ms, 1.83% CPUParam –o27, 2829 , 1414.76 MB/sec, 9.541 ms, 1.93% CPUParam –o28, 2824.93 iops, 1412.46 MB/sec, 9.911 ms, 1.92% CPUParam –o29, 2795.85 iops, 1397.92 MB/sec, 10.372 ms, 2.995% CPU iops, 1427.12 MB/sec, 10.510 ms, 1.95% CPUParam –o31, 2899.93 iops, 1449.96 MB/sec, 10.689 ms, 2.05% CPUParam –o32, 2881.30 iops, 1440.65 MB/sec, 11.105% CPU -o3 ms , 2674.00 iops, 1337.00 MB/sec, 12.340 ms, 1.91% CPUParam -o34, 2764.18 iops, 1382.09 MB/sec, 12.299 ms, 1.99% CPUParam -o35, 2833.87 iops, 1416.93 MB/sec2.sec, -1062 MB/sec2.sec0 o36, 2830.87 iops, 1415.43 MB/sec, 12.716 ms, 2.12% CPU
We have performed calculations in Microsoft Excel to determine the throughput (MB/s) for the SSD in the case of each queue length.It has been found that for our disk space, throughput starts to reach a steady level at a queue length of 31 (-t1 -o31 ).
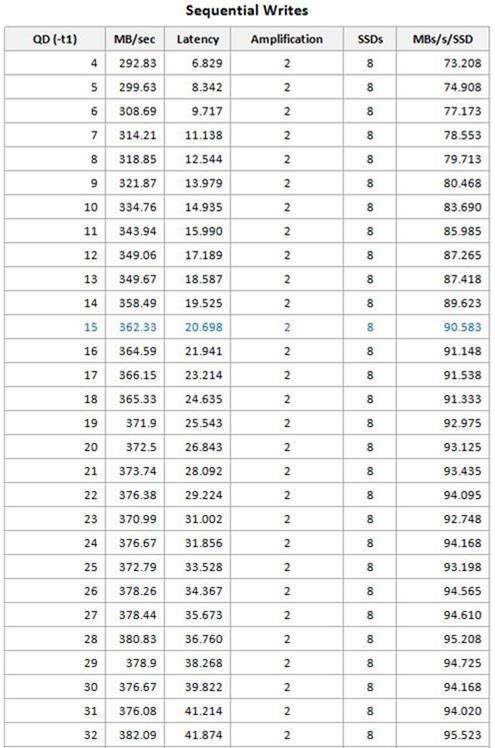
For sequential write operations with a large amount of data transfer, we ran tests with values from -o4 to -o48 and got the following results.
4..32 | ForEach-Object ( $param = "-o$_" $result = c:\diskspd\amd64fre\diskspd.exe -w100 -d600 -W300 -b512K -t1 $param -h -L -Z1M -c64G C:\test1 .dat foreach ($line in $result) (if ($line -like "total:*") ( $total=$line; break ) ) foreach ($line in $result) (if ($line -like "avg .*") ( $avg=$line; break ) ) $mbps = $total.Split("|").Trim() $iops = $total.Split("|").Trim() $latency = $ total.Split("|").Trim() $cpu = $avg.Split("|").Trim() "Param $param, $iops iops, $mbps MB/sec, $latency ms, $cpu CPU ")
PS C:\Windows\system32> C:\Users\administrator\DiskSpd_SEQ_Writes.ps1Param -o4, 585.67 iops, 292.83 MB/sec, 6.829 ms, 0.62% CPUParam -o5, 599.26 iops, 299.63 MB/sec, 8.342 ms, 0.62 % CPUParam -o6, 617.39 iops, 308.69 MB/sec, 9.717 ms, 0.64% CPUParam -o7, 628.42 iops, 314.21 MB/sec, 11.138 ms, 0.66% CPUParam -o8, 637.70 iops, 318.85 MB/sec, 12. 0.67% CPUParam -o9, 643.75 iops, 321.87 MB/sec, 13.979 ms , 0.69% CPUParam -o12, 698.11 iops, 349.06 MB/sec, 17.189 ms ms, 0.69% CPUParam -o15, 724.66 iops, 362.33 MB/sec, 20.698 ms, 0.69% CPUParam -o16, 729.19 iops, 364.59 MB/sec, 21.941 ms, 0.68% CPUParam -o17, 732.30 iops, 366.15 sec 23.214 ms, 0.69% CPUParam -o18, 730.66 iops, 365.33 MB/sec , 26.843 ms, 0.73% CPUParam -o21, 747.48 iops, 373.74 MB/s sec, 31.002 ms, 0.75% CPUParam -o24, 753.35 iops, 376.67 MB/sec, 31.856 ms, 0.71% CPUParam -o25, 745.58 iops, 372.79 MB/sec, 33.528 ms, 0.71% CPUParam -o26, 85ps2.5 /sec, 34.367 ms, 0.72% CPUParam -o27, 756.88 iops, 378.44 MB/sec, 35.673 ms, 0.72% CPUParam -o28, 761.66 iops, 380.83 MB/sec, 36.760 ms, 0.72% CPUParam -o29, 8.io37.7 MB/sec, 38.268 ms, 0.70% CPUParam -o30, 753.34 iops, 376.67 MB/sec, 39.822 ms, 0.70% CPUParam -o31, 752.15 iops, 376.08 MB/sec, 41.214 ms, 0.69% CPUParam -o3.8, 764 382.09 MB/sec, 41.874 ms, 0.70% CPU
Based on the same calculations in Microsoft Excel, we found that with sequential writes, throughput (MB/s) starts to reach a steady level at a queue length of 15.
For reads and writes, we chose the optimal queue length at about the point where additional pending I/Os don't significantly increase throughput, i.e. the optimal queue length for our disk space was 3.75.We were less interested in latency growth with sequential workloads.As you test, you must determine the acceptable latency for your applications.Because sequential operations reads and writes were tested separately, with a read gain of 1 and a write gain of 2.
Table 5. Performance Results Summary: Sequential Large Data I/Os
Operation | Optimal queue length | MB/s | Latency (ms) | Gain | Number of SSDs | MB/s for a separate SSD | Optimal queue length for an SSD |
|---|---|---|---|---|---|---|---|
read | 30 | 1449,96 | 10,698 | 1 | 8 | 181,245 | 3,875 |
Write | 15 | 362,33 | 20,698 | 2 | 8 | 90,583 | 3,750 |
Have you tested the performance possible for the level SSD disk space, with an artificial workload of both arbitrary type for small I/O operations, and sequential type for large I/O operations. After that, you can start migrating workloads to disk space, monitoring their performance as they become stable and predictable.
Perform a staged migration.Migrate multiple workloads.Then use the storage tier optimization report and system monitor to determine the disk space performance of your workload during the first few days.You may need to pin core files to the SSD tier and run storage tier optimizations more frequently for some workloads, and periodically rebalance workloads across storage spaces, or expand the SSD tier to accommodate a larger or volatile working set.
For more information about configuring storage tiers, see the article.
Increase in speed
Defragmenting Hard Drives
An effective remedy hard drive performance is about organizing the program and data files stored on these devices. Indeed, during the operation of a computer, files are often written, erased and changed in length. Repeated execution of these actions leads to the fact that a significant number of files turn into broken chains, parts of which, or otherwise fragments, are randomly scattered across the working space of the hard disk. The process of such file fragmentation is due to the fact that files are written to the hard disk, taking into account the free space that appeared on it in the process of deleting other files. In addition, the continuity of files is often broken when they increase in size in the process of modification. When searching for and reading such disparate chains of files distributed over the disk - fragmented files, the hard disk head is repeatedly mechanically shuffled and positioned. This, of course, takes much more time than the search and reading of a continuous file, when the spatial change in the position of the head is minimized.
You can increase the speed of reading fragmented files after preliminary disk defragmentation. This operation should be carried out periodically using special software tools. For example, using defrag.exe from MS-DOS 6.xx or speedisk.exe from Norton Utilities. In Windows 9x systems, there are special programs for performing this operation - Disk Defragmenter (Defrag). It should be noted that before defragmenting, it is advisable to perform a disk check with the Check Disk program (ScanDisk).
The launch of the Disk Defragmenter (Defrag) program in Windows 95/98 illustrates a sequence of figures (Fig. 2.7-2.10), representing fragments of images on the computer monitor screen.
It should be noted that the problem of performance degradation due to fragmentation of files located on hard drives is typical not only for Windows 9x operating systems, but also for more advanced Windows NT 4.0, Windows 2000 and Windows XP. There is a widespread belief that the NTFS file system, which is supported by these operating systems, is designed in such a way that files are practically not fragmented. Contrary to this opinion, file fragmentation also exists for NTFS, although this problem is not as acute as compared to the FAT16 and FAT32 file systems.
Rice. 3.7. Disk defragmentation program startup sequence (Defrag)
Rice. 2.8. Choice of defragmentable logical drive
Rice. 2.9. The process of defragmenting the selected disk
Rice. 2.10. Dialog box after disk defragmentation is complete
Unfortunately, the Windows NT 4.0 operating system does not have a built-in defragmentation program, as, for example, in Windows 95 Windows 98. Therefore, in Windows case NT 4.0 to defragment files located on hard drives, external programs are usually used, specially designed for this operating system. Hat, the Norton Speed Disk programs became more widespread. This ms can be, for example, Norton Speed Disk version 5.1. This program is good for file NTFS systems. An example of the operation of this program is shown in Fig. 3.11.
Rice. 2.11. Calling the installed Norton Speed Disk 5.1 file defragmenter
The advantages of this program include the following features:
- MFT (Master File Table) optimization;
- the ability to place any file either at the beginning of a section, or at the end of a section, or at the end of all files (after data);
- defragmentation of folders and swap file (only for NTFS partitions);
- work according to the schedule (scheduling);
- the ability to defragment several partitions at the same time;
- disk diagnostics and error correction using the built-in check program;
- conclusion detailed information about disk fragmentation and results of work; P analysis of the degree of fragmentation of files (Fig. 2.12).
Rice. 2.12. File fragmentation analysis with Norton Speed Disk 5.1
It should be noted that this Norton Speed Disk program is not the only program that defragments files on computer hard drives on the market. software there are other software tools that can defragment files on Windows NT and Windows 2000 operating systems. Examples of such tools include programs such as Diskeeper, O&O Defrag, Contig, PerfectDisk, etc.
As for the Windows 2000 operating system, unlike Windows NT, it has a built-in defragmenter based on famous program Diskeeper. This program has a simple interface and has similar characteristics to the well-known Norton Speed Disk tools. However, Diskeeper works through a so-called API, which is not always optimal, especially for the NTFS file system. It is generally accepted that Norton Speed Disk, which works differently from Diskeeper, is more efficient and reliable in operation.
The call to the file defragmentation program built into the Windows 2000 operating system is shown in fig. 2.13.
Examples of working with the file defragmentation program in the Windows 2000 system are shown in Fig. 2.14-2.16.
The call to the file defragmentation program built into the Windows XP operating system is shown in Fig. 2.17.
Examples of working with the file defragmentation program in Windows XP are shown in Fig. 2.18.
![]()

In addition to defragmenting files, increase the speed work hard disks can be, if you take into account some features of their work. For example, when distributing files, it is advisable to take into account different read / write speeds depending on their location on the drive disks. Files that need to be accessed for reading and writing in a minimum time should be placed at the beginning of the hard disk - in areas corresponding to the minimum numbers of cylinders. The farther programs and data are located from the beginning of the hard disk, the longer the access time to them (3-5 times). This can be done, for example, with an operation such as executing certain sequence initial writing of files to the hard drive. The files that are written to the hard disk first are placed by the firmware at the beginning of the data storage area, which provides the fastest access to them.
Sometimes you can improve computer performance by increasing the speed work hard disk for some files by rearranging them. Changing the location of files on an already full hard drive is done using a series of special programs funds. For example, you can move files for MS-DOS and Windows 3.1* systems using the file defragmenter program (speedisk.exe) from the Norton Utilities package. To do this, after starting this program, you need to select the commands in the Configure menu - Directory Order, File Sort, Files to Place First and set the necessary parameters. Similar Settings are also available in the reviewed program Speed Disk for Windows 9x/NT/2000. An appropriate choice of program parameters will provide not only defragmentation of files, but also a change in the order of their placement on the disk, and, consequently, the time of access to files for reading and writing information.
It should be noted again that the organization of program and data files stored on hard drives, as well as accounting different speed access to information, depending on its physical location in the working space of these devices, can significantly increase the speed of the disk memory subsystem. And this, ultimately, increases the performance of the entire computer.
Modern hard drives use different ways hardware and software control, providing high speed reading and writing data. This is supported by the appropriate computer hardware and software: the use of algorithms and hardware caching, the use of writing, reading and block exchange, etc. As a rule, such capabilities are provided in BIOS Setup. There are also corresponding software tools. The tools that provide these capabilities are often managed by modern operating systems. All this, of course, evens out the data flow and increases the speed of the drives.
Firms - manufacturers of hard drives are constantly improving their designs and improving parameters. At the same time, not only new samples are produced, but the maintenance of previously released devices is carried out for quite a long time. On the Internet, on the websites of large hard drive manufacturers, you can often find new drivers for both newly released models and quite old ones. Often, new drivers can significantly improve the performance of hard drives.
You can increase the speed of hard drives using various software tools, such as accelerator programs. An example is the Drive Rocket Date Accelerator v.1.14 program from Ontrack Computer Systems Inc. This program is often used in conjunction with Disk program Manager of the same company to manage hard disks, for example, the company western digital. Another option for accelerator software is XStore Pro (busmaster drivers for Windows 9x recommended by Chaintech) from HighPoint Technologies. Depending on the memory and system configuration, hard disk performance can be up to 60% faster than using standard drivers from Intel or Microsoft, and overall computer performance up to 10%. XStore Pro programs are based on the technology of caching with read-ahead after the search. For best results, it is recommended to use on computers with 64 MB of RAM.
It is difficult to imagine the work of modern operating systems without such a resource as virtual memory. Virtual memory allows you to run more programs at the same time than physical memory computer (RAM). However, virtual memory occupies a significant amount of disk space, and when paging data, the speed of program execution is significantly reduced. Virtual memory is designed for computers with MP 80386 and higher and is the hard disk space that modern systems work with, starting with Windows 3.1x. This space is used as if it were real memory - RAM. This is achieved through a special file - the paging file, into which information from the RAM is periodically placed (pumped up). It should be borne in mind that writing and reading data using the fastest hard drive is more than 10,000 times slower than working with the slowest RAM. Therefore, increasing the RAM is the most effective method reduce the load on hard drives and improve computer performance. This is due to the fact that reducing the frequency of virtual memory accesses reduces the waiting time for hard disks to process requests from application and system programs.
It is possible to increase the speed of hard disks (and also, if necessary, CD-ROMs and floppy disks) by introducing such a procedure as software caching of data reading and writing processes. As
tools that provide this can be used, for example, programs from the MS-DOS suite, the Norton Utilities package, and the Windows 9x tools.
Most recently, we published an article on our website on the Windows Registry, which explains what it is and how important it is to keep it in order. Indeed, the speed and uninterrupted operation of the operating system, as well as the effectiveness of the interaction between the software and hardware components of your computer, directly depends on the state of the registry.
Unfortunately, over time, almost any OS begins to show a decrease in the speed of its work, which is expressed in an increase in system load, application launch time, inexplicable freezes and thoughtfulness when running several programs at the same time. In addition, users may experience the constant appearance of dialog boxes, reporting about not found files in the specified folders and other incomprehensible errors.
One way to return the system to its former agility, or at least significantly increase the overall speed of work, is to turn to special programs that clean up all kinds of system garbage, which is often the cause of all the troubles described above.
MAIN PURPOSE OF PROGRAMS
The work of almost any user on a computer is always accompanied by the procedure for installing or removing various kinds of software, be it device drivers, programs general purpose, games, antivirus solutions and others. During all these actions, the system constantly makes entries in the registry about all the parameters of installed programs, their locations and other important things.
Unfortunately, the process of uninstalling applications does not provide complete cleaning systems from their former presence. As a rule, after removing programs, a lot of “traces” of them remain in the system registry in the form of incorrect links and paths or unnecessary entries. Over time, there are more and more of them, which ultimately leads to a general decrease in performance, errors and other troubles.
The main purpose of programs designed to improve your system is to clean the registry of accumulated debris and remove temporary and unused files from your computer's hard drive. It is these two functions that underlie this class of utilities. True, in the struggle for the sympathy of users, many developers are trying to make their products, especially paid ones, more attractive by adding additional system optimization tools and setting its parameters to them.
TESTED APPS
For testing, we have selected 8 of the most popular freeware and shareware programs in this area. Their degree of popularity was determined based on the most downloaded and rated applications of this kind on well-known software file sharing services. And also based on the frequency of mentioning these applications on various thematic portals and blogs.
So, our top eight are:
- Reg Organizer
- Vit Registry Fix
- jv16 PowerTools
- TweakNow RegCleaner
- Auslogics Registry Cleaner
- Wise Registry Cleaner
- Free Registry Cleaner
One of the most popular free utilities in this area, with a nice and concise user interface. The program is able to clear hard disk space from junk files, such as temporary files of various browsers, browsing logs, cookies, recent documents, Index.dat files, and many more. Also, if necessary, the user can clean the clipboard, thumbnail cache, recycle bin and Windows log files.
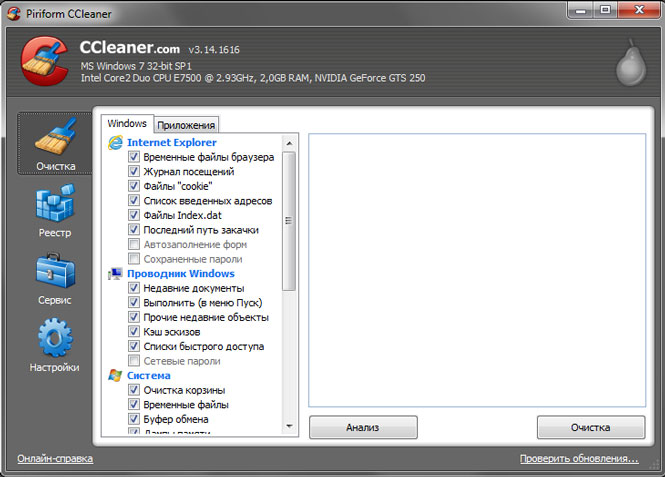
Second important function program is a status check system registry and bug fixes found in it.
Additional features include the ability to uninstall programs, change startup, manage system restore points, and securely erase free disk space.
Reg Organizer 5.3
Multifunctional program for maintaining the system registry and configuration files. Before version 2.5 this product was distributed free of charge for users from the former USSR. Now its cost for residents of the CIS is 500 rubles per copy.
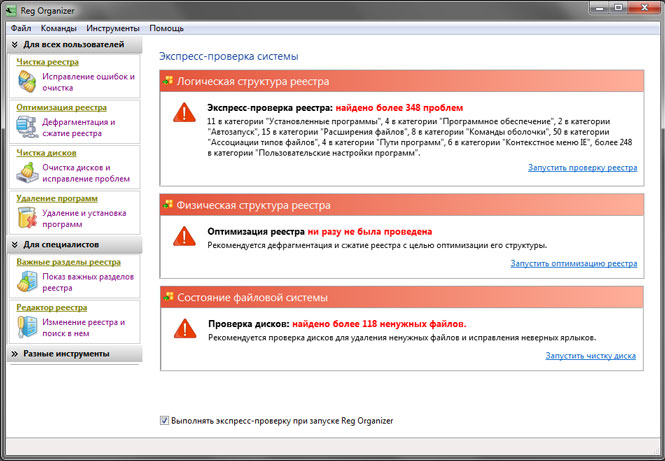
Reg Organizer is equipped with sufficiently rich functionality that can satisfy the needs of both novice users and professionals:
- Fixing registry errors and cleaning it
- Defragment and Compress the Registry
- Show important registry keys
- Enhanced Registry Editor
- Registry snapshots
- Disk Cleanup and Troubleshooting
- Uninstalling programs
- Fine settings systems
Vit Registry Fix
A powerful tool for ridding the registry of obsolete data and more than 50 options for all kinds of errors. The program has both paid version(170 rubles) under the name Professional, and free with the prefix Free.
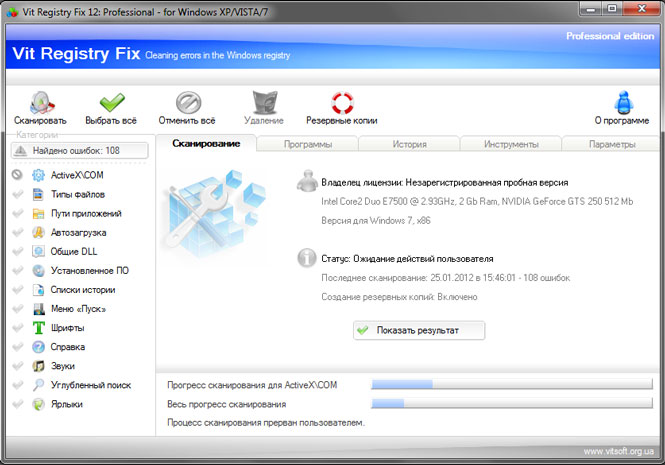
In its composition Vit Registry Fix has 6 additional utilities, with the help of which it is possible to: optimize the system registry files (Registry Optimizer), create full or partial copies of the registry (Registry Backup), as well as search and delete data in it (Registry Search). The developers did not bypass the side and such useful features, like, cleaning temporary and unnecessary files (Disc Cleaner), managing applications in Windows startup (StartUP Manager) and deleting installed programs(Uninstall Manager).
The free version lacks two utilities: Vit Registry Backup and Vit Registry Search, and also has basic functionality and error search capabilities, compared to the professional edition.
jv16 PowerTools
This full set a variety of utilities that combines 24 components designed to monitor the status of your computer and, if necessary, fix the problems found. The program has a trial period of 60 days for free evaluation. For further use, you will have to pay $29.95.
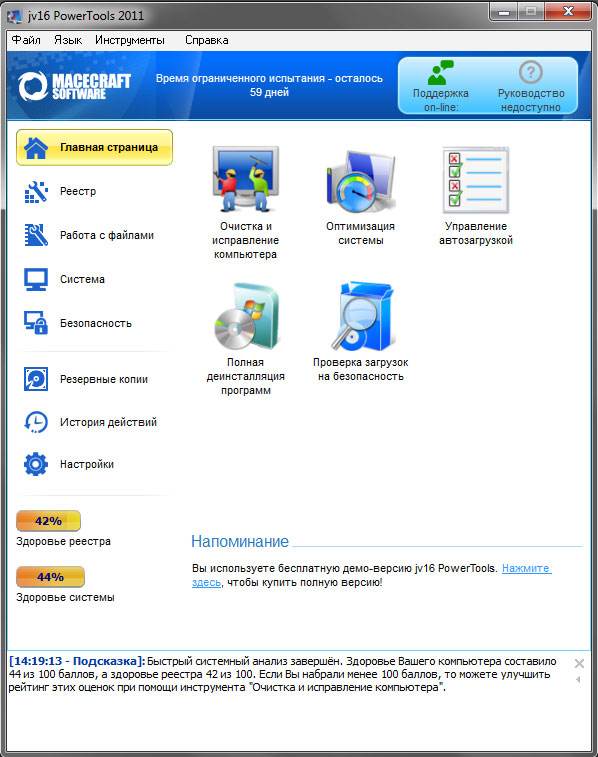
Immediately after installation, a pleasant interface catches your eye, which can be simple for beginners and advanced for advanced users.
The functionality of the program is really rich. For convenience, all components included in this package are divided into several thematic groups:
- Registry. Using the utilities of this group, you can clean the registry from unnecessary garbage, compress it, search for and replace the necessary components, as well as get detailed information about it. There is also a registry monitoring tool, and a backup tool has been placed in a separate group.
- The file management section contains various tools with which you can rid your hard drive of unnecessary files, restore files, and search for files, folders and their duplicates. This also includes a file organizer.
- The system section contains a program uninstaller, startup manager, service manager, start menu cleanup manager, and system optimizer.
- With the help of security utilities, you can clear the history lists of favorite applications and wipe the contents of certain folders, the entire hard drive, or just free space.
TweakNowRegCleaner
Another comprehensive program that cleans the registry and hard drive. The developers ask for $24.95 for their brainchild, although before buying you can use the utility for 30 days for free.
The program interface is devoid of the Russian language, although it is quite understandable and concise. Quick optimization window, offers users, without going into details, in automatic mode optimize system settings and Internet connections, clean the registry, remove temporary files and traces from web browsers.
If the result of quick optimization is not satisfactory, you can go to the system cleaning window, where a standard set of components is at your service: disk space cleaning and analysis, registry defragmenter, registry cleaner, startup manager and program uninstaller.
In addition, with the help of TweakNow RegCleaner, you can find out details about system parameters, as well as monitor the latest versions of video card drivers.
Auslogics Registry Cleaner
This utility is highly specialized and is aimed at optimizing only the system registry. It will help remove unused keys from it and get rid of errors. Moreover, the program is completely free.
The application interface is very concise and understandable, which can be explained by low functionality.
Wise Registry Cleaner
Another free specialized utility to clean the system registry and defragment it. At startup, it offers to create a registry backup in case the system crashes after the optimization procedure.
The application interface seems somewhat old-fashioned and does not have the Russian language, however, if desired, it is possible to download the crack. The program does not clean up the hard drive, although at the end of the installation it offers to download another free application - WiseDiskCleaner, which is designed specifically for this.
As an additional feature, users are offered the ability to perform system optimization on 19 parameters.
AMLFree Registry Cleaner
A free program for optimizing your computer, which has a classic set of functions for such utilities.
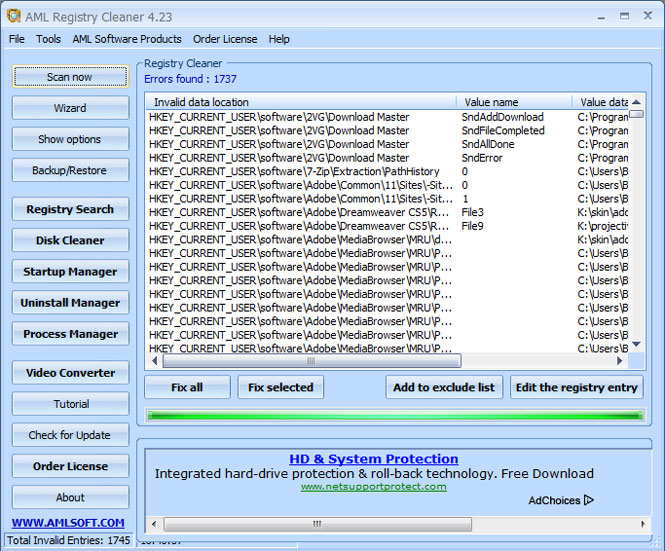
The interface of this application does not know the Russian language and does not shine with originality. But, in addition to the standard cleaning of the registry, users will be able to delete temporary files from the disk, edit the automatic download list and uninstall unnecessary applications.
TESTING METHODOLOGY
To test our subjects, we specifically chose a computer with a fairly heavily littered Windows system 7, which was installed about a year ago. Before testing, a backup copy of the system partition, OS registry was made and the system boot time was measured. To exclude all kinds of errors, the Windows start time was measured three times and averaged. The size of the saved registry was also fixed.
Then, the test utility was installed. With the help of it, the system registry and the computer's hard drive were cleaned of unnecessary garbage in automatic mode. Further, the system boot time was again measured, the size of the optimized registry and the volume of deleted unnecessary files were recorded. After that, the operating system was restored from the backup to its current state and the same actions were performed with the next program.
The system boot time, for the purity of the experiment, was measured in two ways. In the first case, the counter built into Windows 7 was used, located in the event log, which can be found in the following path: “Control Panel -> System -> Performance Counters and Tools -> Additional tools-> View performance details in the event log”. In the second case, the time was fixed by a special BootRacer utility.
At the end of testing, all indicators were summarized in several charts, on which we can see the results of our contestants and determine the winner.
TEST RESULTS
Operating system boot time
First of all, let's look at how the boot time of the operating system has changed after the optimization of the system registry by the tested programs.
![]()
The first chart shows the boot time of the OS, which was measured by our own Windows tools, which can be viewed in the system event log. Red is the time shown before system optimization, green is the fastest boot.
At the same time, time Windows startup measured using a special utility BootRacer.
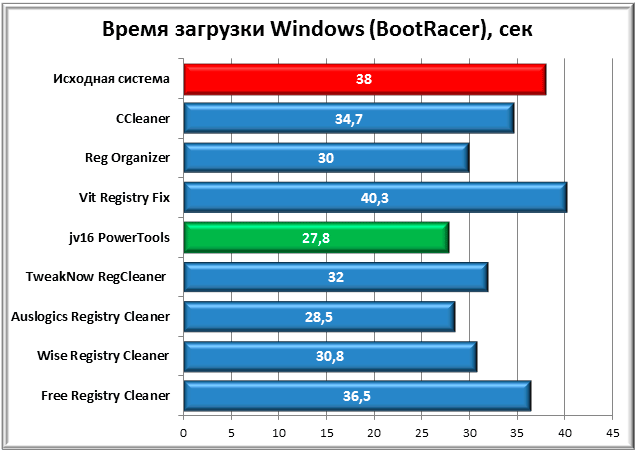
In the first case, the best result was demonstrated by the system that was optimized CCleaner. At the same time, time Windows boot decreased by 11 seconds, which can be called a very good result. Quite a bit behind TweakNow RegCleaner and Reg Organaizer.
As you can see from the second diagram, the time recorded by BootRacer is somewhat different from the previous results. Here, the jv16 PowerTools application takes the lead, improving load rates by 11 seconds as well. The second place went to Auslogic Registry Cleaner, and the third place was again taken by Reg Organizer.
In order to get a more unambiguous result, it was decided to average the download times obtained.
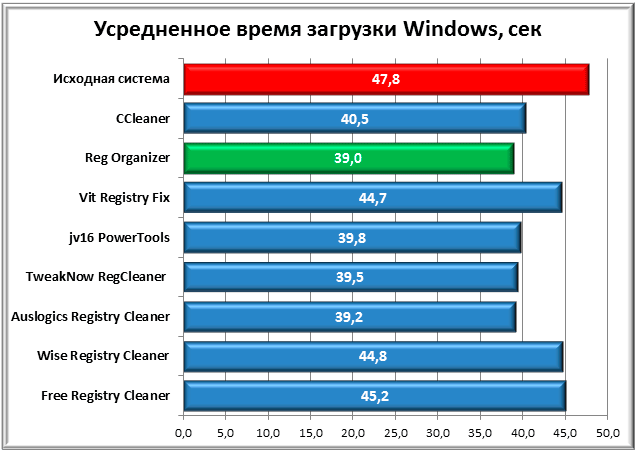
As a result, Reg Organizer becomes the winner, which is not surprising, since it was this application that showed the most stable result in both cases of measuring time. It was followed by Auslogic Registry Cleaner and TweakNow RegCleaner by a fraction of a second. The worst average is Free Registry Cleaner.
Registry Size
Before testing, we had assumptions that after cleaning, the size of the registry may change significantly. But in practice, everything turned out differently. The size of the unoptimized registry in our case was 64.2 MB, and the optimized 61.52 MB. Thus, maximum value deleted data from the registry amounted to 2.68 MB, which is only 4% of its total volume.
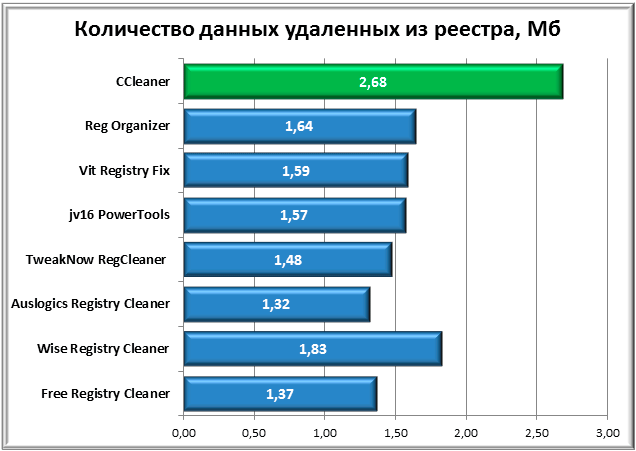
The leader in this dispute was CCleaner, the second place went to Wise Registry Cleaner, and the third to Reg Organizer.
Freed up disk space
Not all programs that took part in our testing have the function cleaning hard disk from temporary or unnecessary files. However, in cases where it was possible, we recorded the amount of freed space after garbage collection.
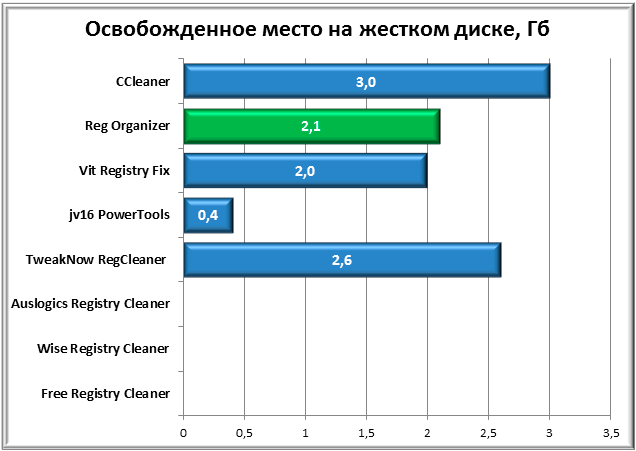
As can be seen from the chart, three members of this review were unable to participate in this trial. Of those who did participate, CCleaner had the best result, followed by TweakNow RegCleaner by 400 MB. The third place, already traditionally, belongs to Reg Organizer.
EVALUATION OF USEFULNESS OF USING TESTED PROGRAMS
Now, after the end of the tests, let's first try to answer the question: "Are there many benefits from programs of this class and should they be used on your computer at all?"
The average system load has improved by almost 9 seconds compared to the original result, which is really good. But here's the bad luck, having spent an elementary defragmentation of the hard disk using regular Windows tools, we managed to achieve almost the same result as in the case of its optimization using special programs. Why did this happen?
In the test results, we saw that the size of the registry after optimization did not change much, which means that the system boot time in our case did not particularly depend on its size. Perhaps it was the large fragmentation of the registry files that caused the increased PC boot time. For those who do not understand, let me explain. The file that contains Windows registry, is stored on the hard disk in pieces, and not as a whole. And these pieces on the surface of the hard drive can be located quite far from each other, which slows down the reading time of the file as a whole. When defragmenting, parts of one file are brought together, and due to the fact that the read heads of the hard disk have to move less in space, the file reading time is reduced and the system boots faster.
Clearing the hard drive from all sorts of "unnecessary" or temporary files, oddly enough, is not always beneficial. For example, after this procedure, you can lose passwords remembered by browsers, the history of visited web pages, data caching files, which in some cases speed up the process of launching programs or searching necessary information on the computer.
Still, the usefulness of this type of program should not be underestimated. Despite the fact that many of the actions that they offer, you can do without their help with regular system tools, friendly user interface, memorization Windows states before optimization and various tips to avoid critical errors. Plus, all these utilities work quite quickly and allow you to assess the health of the system and suggest treatment options in a matter of minutes.
In our opinion, it is most effective to use system cleaners only as aids keeping your Windows in optimal condition. In order not to be unfounded, let's give an example.
One of the most common reasons slow work your system and its startup are applications that are registered in Windows startup. Before cleaning the registry, check how many programs are automatically loaded with it.
To do this, in the command line, which is called by the keyboard shortcut Win + R, type "msconfig" and press Enter. In the window that opens, click on the "Startup" tab. Most likely, a fairly impressive list of programs will be found there. For the experiment, disable them all (the "Disable all" button) and restart your computer. We think that already at this stage, the result will please you.
Remove all unnecessary programs from the system, or at least remove them from startup, leaving there only the most necessary software that you use very often (for example, antivirus). Then optimize the registry with special utilities. Lastly, you can clear system disk from unnecessary files and defragment it.
After all these procedures, most likely your system will start to work much faster and more responsive.
CONCLUSION
Well, now, let's return to the tested programs and summarize our review.
It is rather difficult to name a clear winner here, and yet I would like to mention several contestants who left positive impressions of their work.
Let's start with a domestic development - Reg Organizer, which showed the most stable results throughout all the tests. Friendly user interface and rich functionality, for quite a long time, allow this utility to be among the leaders among programs of this class. The only shortcomings include the lack of editing the startup menu of the system. Yes, and its paid (500 rubles) can scare away many users.
CCleaner has been one of the most popular popular programs aimed at optimizing the system registry. At the same time, being free, the application has a clear and concise modern user interface, good functionality and a high-quality troubleshooting algorithm.
And finally, TweakNow RegCleaner. Good optimization results, additional features system settings and a modern user interface are conducive to using this product as a cleaner of unnecessary garbage from the OS. But the cost of almost $ 25 and the lack of a Russian language make you think about the advisability of buying this application against the background of other equally worthy solutions in this area.
Pretty good, a small Auslogic Registry Cleaner utility has proven itself, but poor functionality allows us to recommend it only when you only need to clean the registry from unnecessary entries.
Wise Registry Cleaner and Free Registry Cleaner were unattractive GUI, and the latter, and completely weak results.
The remaining Vit Registry Fix and jv16 PowerTools, despite the fact that they have a beautiful design and rich declared features in their arsenal, in fact, did not show anything outstanding. At the same time, the results of Vit Registry Fix can be called one of the weakest among the contestants.
In conclusion, I would like to say that, no matter which assistant you choose to maintain a healthy state of the system, first of all, you should not forget about elementary safety net. After all, programmers, like other people, make mistakes. And this means that after using such programs, there is always a chance to get a system crash due to an incorrect remote registry setting. To avoid such unpleasantness, before making any changes, try to do backups registry, with the help of which, if necessary, it will be possible to correct possible unfortunate consequences.