In order to measure computer performance using tests, it is not necessary to download any third-party applications and utilities.
It is enough to take advantage of resources already built into the operating system.
Although for more detailed information the user will have to find a suitable program.
Based on the test results, we can conclude which of the parts of a PC or laptop needs to be replaced before the others - and sometimes it’s easy to understand the need to buy a new computer.
The need for verification
Performing a computer speed test is available to any user. For verification, neither specialized knowledge nor experience with certain versions of the Windows OS is required. And the process itself is unlikely to need to spend more than an hour.
For reasons to use the built-in a utility or a third-party application include:
- causeless slowdown of the computer. Moreover, not necessarily the old one - a check is needed to identify problems with new PCs. So, for example, the minimum results and indicators of a good video card indicate incorrectly installed drivers;
- device check when choosing several similar configurations in a computer store. Usually they do this before buying laptops - running a test on 2-3 devices that are almost identical in parameters helps to find out which one is best for the buyer;
- the need to compare the capabilities of the various components of a gradually upgraded computer. So, if the HDD has the least performance value, then it should be replaced first (for example, with SSD).
According to the results of testing, which revealed the speed at which a computer performs various tasks, you can detect driver problems and incompatibility of installed devices. And sometimes even poorly functioning and failed parts - for this, however, you will need more functional utilities than those that are built into Windows by default. Standard tests show a minimum of information.
System Tools Check
You can check the performance of individual computer components using the built-in features of the Windows operating system. The principle of operation and information content are approximately the same for all versions of the platform from Microsoft. And the differences are only in the way the information is launched and read.
Windows Vista 7 and 8
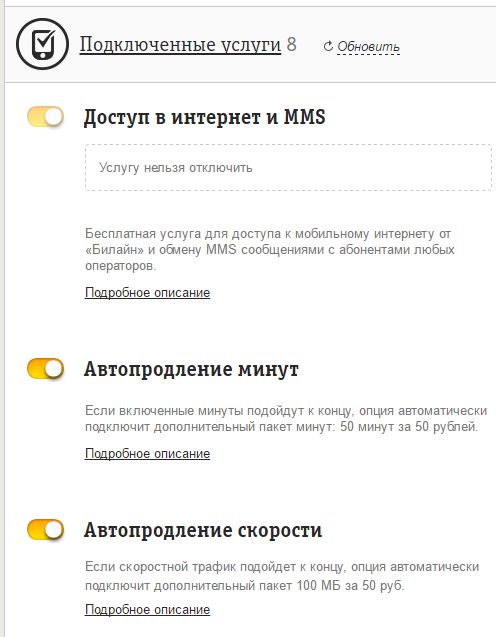
In the 7th and 8th versions of the platform, as well as Windows Vista, the counter of the performance of computer elements can be found in the list of basic information about the operating system. To display them on the screen, just right-click on the “My Computer” icon and select the properties.
If testing has already been conducted, information on its results will be available immediately. If the test is performed for the first time, you will have to run it by going to the performance test menu.
The maximum score that Windows 7 and 8 allow is 7.9. It is worth thinking about the need to replace parts if at least one of the indicators is below 4. Gamers are better suited to values \u200b\u200babove 6. Windows Vista has the best score of 5.9, and the “critical” score of about 3.
Important: To speed up performance calculations, you should turn off almost all programs during the test. When testing a laptop, it is desirable to include it in the network - the process consumes battery power noticeably.
Windows 8.1 and 10
For more modern operating systems, finding information about computer performance and starting its calculation is not so simple. To run a utility that evaluates system parameters, follow these steps:
1Go to the operating system command line (cmd through the menu "Run"caused by simultaneous keystrokes Win + R);
2Include assessment processleading a team winsat formal –restart clean;
3Wait for completion;
4 Go to folder Performance \\ WinSAT \\ DataStore located in the Windows system directory on the system drive of the computer;
5Find and open the file in a text editor "Formal.Assessment (Recent) .WinSAT.xml".
Among the multitude of text, the user must find WinSPR block, where the same data that is displayed on the screen and Windows 7 and 8 systems is located - only in a different form.
So called SystemScore hiding the general index calculated by the minimum value, and MemoryScore, CpuScore and GraphicsScore denote indicators of memory, processor and graphics card, respectively. GamingScore and DiskScore - performance for games and for reading / writing a hard disk.
The maximum value for Windows 10 and version 8.1 is 9.9. This means that the owner of the office computer can still afford to have a system with numbers less than 6, but for the full operation of the PC and laptop, it should reach at least 7. And for a gaming device - at least 8.
Universal way
There is a way that is the same for any operating system. It consists in launching the task manager after pressing Ctrl + Alt + Delete. A similar effect can be achieved by right-clicking on the taskbar - there you can find the item that launches the same utility.
On the screen you can see several graphs - for the processor (for each thread separately) and RAM. For more detailed information, go to the "Resource Monitor" menu.
From this information, you can determine how heavily loaded the individual components of the PC. First of all, this can be done by the percentage of load, and secondly, by the color of the line ( green means the normal operation of the component, yellow - moderate red - the need to replace a component).
Third party programs
Using third-party applications, checking computer performance is even easier.
Some of them are paid or shareware (that is, requiring payment after the end of the trial period or to increase functionality).
However, testing these applications is more detailed - and often give out a lot of other useful information for the user.
1. AIDA64
As part of AIDA64, you can find tests for memory, cache, HDDs, SSDs and flash drives. And when testing the processor, 32 threads can be checked immediately. Among all these advantages, there is also a small drawback - you can use the program for free only during the “trial period” of 30 days. And then you have to either switch to another application, or pay 2265 rubles. per license.
2. SiSoftware Sandra Lite
3. 3DMark
4. PCMark 10
The application allows not only testing the operation of computer elements, but also saving test results for future use. The only drawback of the application is the relatively high cost. You will have to pay $ 30 for it.
5. CINEBENCH
Test images consist of 300 thousand polygonal images that add up to more than 2000 objects. And the results are issued in the form pTS - the more it is, the more powerful the computer. The program is free, which makes it easy to find and download it on the network.
6. ExperienceIndexOK
Information is displayed on the screen in points. The maximum number is 9.9, as for the latest versions of Windows. ExperienceIndexOK is designed specifically for them. It is much easier to use such a program than to enter commands and look for files with results in the system directory.
7. CrystalDiskMark
To test a disk, select the disk and set the scan parameters. That is, the number of runs and file sizes that will be used for diagnostics. After a few minutes, information on the average read and write speeds for the HDD will appear on the screen.
8. PC Benchmark
Having received the test results, the program offers to optimize the system. And after improving the browser, a page opens where you can compare the performance of your PC with other systems. On the same page you can check whether the computer can run some modern games.
9. Metro Experience Index
10. PassMark PerformanceTest
findings
Using various methods of checking the performance of your computer allows you to check how your system works. And, if necessary, compare the speed of individual elements with the performance of other models. For a preliminary assessment, such a test can also be done using the built-in utilities. Although it is much more convenient to download special applications for this - especially since among them you can find several fairly functional and free ones.
Video:
In this video, let's figure out how to check the speed of the local network. As a rule, the need to check the data transfer speed in the network appears when there is a malfunction, or rather, at a low speed. So, as part of this lesson, we will consider the work of the LAN Speed \u200b\u200bTest program for checking the local network speed, and also consider an example from practice to understand how to accurately identify the cause of a low network speed or malfunction.
Suppose I need to measure the speed of data transfer in a local area network between a server and a workstation. The simplest option is to copy some file and see the approximate speed of the local network in the copy information window. But, for this, the computer must have open write access, the file for copying must be large in order to have time to analyze the information, and it is also not very convenient to perform a LAN speed test between several computers.
Therefore, I will use the LAN Speed \u200b\u200bTest program, which will greatly simplify the process of measuring the speed of the local network. A more recent version of the program has become paid, so I use an outdated, but still free, especially its functions are quite enough for me.
The essence of the program is as follows. We indicate the path to the folder on the local network, indicate the size of the copied file and measure the speed of its writing and reading.
Since I have a virtual network, here the measurements are not true, since, in fact, the information was not transmitted over the physical environment. However, in a real network, everything will be adequate.
By the way, if you do not have a public folder on the computer with which you need to check the speed of the local network, then hidden network resources that are intended for administrators and are created by default on any computer will help you.
This resource looks \\\\ windows-7 \\ C $. By specifying this path, you can also check the speed of the local network, but for this you need to have administrator rights to this computer, since only the administrator is allowed to connect to the hidden resource. And if you are testing from under the domain administrator account, then there will not be any problems at all, since the doors are open for you everywhere.
You can download the LAN Speed \u200b\u200bTest program from the link below!
Now consider the situation in which this program helped me identify the cause of a network failure. In general, there is a remote employee who connects via RDP to one of the workstations in the organization. So he says that the remote desktop is very slow and periodically throws.
The structure is as follows, there are two switches in different buildings. In one there is a server with client computers, and in the other there are only workstations. The employee works at the client computer No. 3, so the data is transmitted along the following path Server - Switch 1 - Switch 2 - Client 3. And there can be many problems on this path, and in this example there are 11 of them, except for program errors.
So these can be problems with network cards, network cable, ports on the switches and the malfunction of the switches themselves. And we need to find out exactly what the reason is, therefore, we will check each node consistently.
In my situation, 2 ports on the second switch turned out to be faulty at once. Moreover, other ports either gave out normal speed, then low. As a result, I connected the devices to stably working ports, but in any case, I need to buy a new switch, as it clearly ends its life path.
Also, the problem may be in a computer that is actively distributing or downloading through a torrent.
Real Estate World Mantra - Location, Location, Location. For the world of system administration, this sacred text should read: Visibility, Visibility and again Visibility. If every second throughout the day you do not know exactly what your network and servers are doing, you look like a pilot who flies blindly. Disaster will inevitably await you. Fortunately for you, the market now has many good programs, both commercial and open source, that can set up your network monitoring.
Since the good and free is always more attractive than the good and expensive, we offer you a list of open source programs that every day prove their worth in networks of any size. From discovering devices, monitoring network equipment and servers to identifying trends in network performance, graphically presenting monitoring results, and even creating backup copies of switch and router configurations, these seven free utilities will most likely surprise you.
Cacti
First was MRTG (Multi Router Traffic Grapher) - a program for organizing a network monitoring service and measuring data over time. Back in the 1990s, its author, Tobias Oetiker, decided to write a simple charting tool using a ring database, originally used to display the bandwidth of a router on a local network. So MRTG spawned RRDTool, a set of utilities for working with RRD (Round-robin Database, a ring database) that allows you to store, process and graphically display dynamic information such as network traffic, processor load, temperature, and so on. Now RRDTool is used in a huge number of open source tools. Cacti is a modern flagship among open source graphical network software, and it takes MRTG principles to a whole new level.

From disk usage to fan speed in a power source, if the metric can be tracked,Cacti will be able to display it and make this data easily accessible.
Cacti is a free program included in the LAMP-set of server software that provides a standardized software platform for plotting based on almost any statistics. If any device or service returns numeric data, then it is likely to be integrated into Cacti. There are templates for monitoring a wide range of equipment - from Linux and Windows servers to Cisco routers and switches - basically everything that communicates with SNMP (Simple Network Management Protocol, Simple Network Management Protocol). There are also collections of templates from third-party developers that further expand the already huge list of Cacti compatible hardware and software.
Although SNMP is the standard Cacti data collection method, Perl or PHP scripts can also be used for this. The software system framework skillfully divides data collection and its graphic display into discrete instances, which makes it easy to re-process and reorganize existing data for various visual representations. In addition, you can select certain time frames and individual parts of the charts simply by clicking on them and dragging.
So, for example, you can quickly look at data from several past years to understand whether the current behavior of network equipment or a server is abnormal, or whether similar indicators appear regularly. And using Network Weathermap, a PHP plugin for Cacti, you can create real-time maps of your network without undue effort, showing the load of communication channels between network devices, implemented using graphs that appear when you hover over the image of a network channel. Many organizations using Cacti display these cards around the clock on 42-inch wall mounted LCD monitors, allowing IT professionals to instantly monitor network congestion and channel status information.
Thus, Cacti is a toolkit with extensive capabilities for graphically displaying and analyzing trends in network performance, which can be used to monitor almost any monitored metric presented in a graph. This solution also supports virtually unlimited customization options, which can make it too complex for certain applications.
Nagios
Nagios is an established network monitoring software system that has been under active development for many years. Written in C, it allows you to do almost everything that system and network administrators may need from a software application package for monitoring. The web interface of this program is fast and intuitive, while its server part is extremely reliable.

Nagios can be a problem for beginners, but a rather complicated configuration is also an advantage of this tool, as it can be adapted to almost any monitoring task.
Like Cacti, a very active community supports Nagios, so various plugins exist for a huge amount of hardware and software. From simple ping checks to integration with complex software solutions, such as, for example, Perl-written free software toolkit WebInject for testing web applications and web services. Nagios allows you to continuously monitor the status of servers, services, network channels and everything else that understands the IP network layer protocol. For example, you can control the use of disk space on the server, the load of RAM and CPU, the use of the FLEXlm license, the air temperature at the server’s outlet, delays in the WAN and the Internet channel, and much more.
Obviously, any server and network monitoring system will not be complete without notifications. Nagios is fine with this: the software platform offers a customizable email notification mechanism, via SMS and instant messages of most popular Internet messengers, as well as an escalation scheme that can be used to make smart decisions about who, how and when under what circumstances should be notified that with the right settings will help you provide many hours of restful sleep. And the web interface can be used to temporarily stop receiving notifications or confirm a problem, as well as making notes by administrators.
In addition, the display function demonstrates all the monitored devices in a logical representation of their placement on the network, with color coding, which allows you to show problems as they arise.
The drawback of Nagios is the configuration, since it is best done through the command line, which greatly complicates the training of beginners. Although people familiar with the standard Linux / Unix configuration files should not have much trouble.
The possibilities of Nagios are enormous, but the effort to use some of them may not always be worth the effort. But do not let the difficulties intimidate you: the advantages of the early warning system provided by this tool for so many aspects of the network cannot be overestimated.
Icinga
Icinga started as a branch of the Nagios monitoring system, but has recently been rewritten into a standalone solution known as Icinga 2. At the moment, both versions of the program are under active development and are available for use, while Icinga 1.x is compatible with a large number of plugins and configuration Nagios. Icinga 2 was designed less cumbersome, with a focus on performance, and more convenient to use. It offers modular architecture and multi-threaded design, which are neither in Nagios, nor in Icinga 1.

Icinga offers a complete monitoring and alerting software platform that is designed as open and extensible asNagios, but with some differences in the web interface.
Like Nagios, Icinga can be used to monitor everything that speaks IP, as deep as you can use SNMP, as well as custom plugins and add-ons.
There are several web interface variations for Icinga, but the main difference between this monitoring software solution from Nagios is the configuration, which can be done through the web interface and not through the configuration files. For those who prefer to manage their configuration outside the command line, this functionality will be a real gift.
Icinga integrates with many monitoring and graphing software packages such as PNP4Nagios, inGraph, and Graphite, providing reliable visualization of your network. In addition, Icinga has advanced reporting capabilities.
Nedi
If you ever had to search for devices on your network through Telnet protocol to the switches and search by MAC address, or you just want to be able to determine the physical location of certain equipment (or, perhaps, even more it is important where it was located earlier), then it will be interesting for you to take a look at NeDi.

NeDi constantly scans the network infrastructure and catalogs devices, tracking everything it finds.
NeDi is a free LAMP-related software that regularly looks at the MAC addresses and ARP tables in the switches of your network, cataloging each device found in the local database. This project is not as well-known as some others, but it can become a very convenient tool when working with corporate networks, where devices are constantly changing and moving.
You can search through the NeDi web interface to determine the switch, switch port, access point or any other device by MAC address, IP address or DNS name. NeDi collects all the information it can from every network device it encounters, pulling out serial numbers, firmware and software versions, current time parameters, module configurations, etc. You can even use NeDi to mark the MAC- device addresses that have been lost or stolen. If they reappear online, NeDi will let you know.
Discovery is triggered by the cron process at specified intervals. The configuration is simple, with a single configuration file that can significantly increase the number of settings, including the ability to skip devices based on regular expressions or given network boundaries. NeDi typically uses the Cisco Discovery Protocol or Link Layer Discovery Protocol to discover new switches and routers, and then connects to them to collect their information. Once the initial configuration has been established, device discovery will occur quite quickly.
Up to a certain level, NeDi can integrate with Cacti, so it’s possible to associate device discovery with relevant Cacti schedules.
Ntop
The Ntop project - now for the “new generation" better known as Ntopng - has come a long way over the past decade. But call it whatever you want - Ntop or Ntopng - as a result you get a first-class tool for monitoring network traffic paired with a fast and simple web interface. It is written in C and is completely self-contained. You start one process configured on a specific network interface, and that’s all it needs.

Ntop is a lightweight web-based packet analysis tool that shows real-time data on network traffic. Information about the flow of data through the host and the connection to the host are also available in real time.
Ntop provides easily digestible graphs and tables showing current and past network traffic, including protocol, source, destination and specific transaction history, as well as hosts from both ends. In addition, you will find an impressive array of real-time graphs, charts and maps of network usage, as well as a modular architecture for a huge number of add-ons, such as adding NetFlow and sFlow monitors. Here you can even find Nbox - a hardware monitor that integrates into Ntop.
In addition, Ntop includes an API for the Lua scripting programming language, which can be used to support extensions. Ntop can also store host data in RRD files for continuous data collection.
One of the most useful uses of Ntopng is to control traffic at a specific location. For example, when part of the network channels on your network map are highlighted in red, but you don’t know why, you can use Ntopng to get a per-minute report on a problem network segment and immediately find out which hosts are responsible for the problem.
The benefits of this network visibility are hard to overestimate, and getting it is very easy. Essentially, you can run Ntopng on any interface that has been configured at the switch level to monitor another port or VLAN. That's all.
Zabbix
Zabbix is \u200b\u200ba full-blown network and system monitoring tool that combines several functions in one web console. It can be configured to monitor and collect data from a wide variety of servers and network devices, providing maintenance and performance monitoring for each facility.

Zabbix allows you to monitor servers and networks with a wide range of tools, including monitoring virtualization hypervisors and web application stacks.
Basically, Zabbix works with software agents running on controlled systems. But this solution can also work without agents, using the SNMP protocol or other monitoring capabilities. Zabbix supports VMware and other virtualization hypervisors by providing detailed information about the performance of the hypervisor and its activity. Particular attention is also paid to monitoring Java application servers, web services and databases.
Hosts can be added manually or through the automatic discovery process. A wide range of default templates applies to the most common use cases, such as Linux, FreeBSD, and Windows servers; widely used services such as SMTP and HTTP, as well as ICMP and IPMI for detailed monitoring of the network hardware. In addition, user checks written in Perl, Python, or almost any other language can be integrated into Zabbix.
Zabbix allows you to customize your dashboards and web interface to focus on the most important network components. Notifications and escalations of problems can be based on custom actions that apply to hosts or host groups. Actions can even be configured to run remote commands, so some of your script can run on a controlled host if certain event criteria are observed.
The program displays graphs of performance data, such as network bandwidth and processor load, and also collects them for custom display systems. In addition, Zabbix supports customizable maps, screens, and even slide shows showing the current status of monitored devices.
Zabbix can be tricky to get started, but the smart use of auto-discovery and various patterns can partially ease integration difficulties. In addition to the installable package, Zabbix is \u200b\u200bavailable as a virtual device for several popular hypervisors.
Observium
Observium is a program for monitoring network equipment and servers, which has a huge list of supported devices using the SNMP protocol. As software related to LAMP, Observium is relatively easy to install and configure, requiring normal installations of Apache, PHP and MySQL, creating a database, configuring Apache, and the like. It is installed as its own server with a dedicated URL.

Observium combines system and network monitoring with performance trend analysis. It can be configured to track virtually any metric.
You can enter the graphical interface and start adding hosts and networks, as well as set ranges for automatic detection and SNMP data, so that the Observium can examine the networks surrounding it and collect data for each detected system. Observium can also detect network devices via CDP, LLDP, or FDP, and remote host agents can be deployed on Linux systems to aid in data collection.
All this collected information is available through an easy-to-use user interface that provides advanced features for statistical display of data, as well as in the form of charts and graphs. You can get anything from ping and SNMP response times to bandwidth, fragmentation, number of IP packets, etc. Depending on the device, this data may be available for every port detected.
As for the servers, for them Observium can display information about the state of the central processor, RAM, data storage, swap, temperature, etc. from the event log. You can also enable data collection and performance graphing for various services, including Apache, MySQL, BIND, Memcached, Postfix, and others.
Observium works great as a virtual machine, so it can quickly become the main tool for obtaining information about the status of servers and networks. This is a great way to add automatic discovery and graphical representation to a network of any size.
Too often, IT administrators find that they are limited in their capabilities. Regardless of whether we are dealing with a custom software application or an “unsupported” piece of hardware, many of us believe that if the monitoring system cannot immediately deal with it, then it is impossible to obtain the necessary data in this situation. This, of course, is not so. With a little effort, you can make almost everything more visible, accounted for, and controlled.

An example is a user application with a database on the server side, for example, an online store. Your management wants to see beautiful graphs and charts, designed either in one form or in another. If you are already using, say, Cacti, you have several options to display the collected data in the required format. You can, for example, write a simple script in Perl or PHP to run queries in a database and transfer these calculations to Cacti, or use an SNMP call to the database server using a private MIB (Management Information Base). One way or another, but the task can be completed, and completed easily, if you have the necessary tools for this.
Accessing most of the free utilities in this article to monitor network equipment should not be difficult. They have batch versions available for download for the most popular Linux distributions, unless they are originally included in it. In some cases, they can be preconfigured as a virtual server. Depending on the size of your infrastructure, configuring and configuring these tools can take a lot of time, but as soon as they work, they will become a reliable support for you. In extreme cases, it’s worth at least testing them.
Regardless of which of the above systems you use to monitor your infrastructure and equipment, it will provide you with at least the functionality of another system administrator. Although it can’t fix anything, it will literally monitor everything on your network around the clock and seven days a week. Pre-spent time for installation and configuration will pay off with interest. In addition, be sure to run a small set of stand-alone monitoring tools on another server to monitor the main monitoring tool. This is the case when it is always better to follow the observer.

Always in touch, Igor Panov.
See also:
This is a very convenient program that allows you to perform network testing, troubleshooting. The program tests and displays a report on the operation of the route in the form of a graph; the program also allows continuous monitoring of the network and notifies the user in case of a malfunction.
After a malfunction is detected, the program can determine the cause of the malfunction without contacting the provider's technical support.
Briefly about the features of the program:
- continuous monitoring of the Internet line;
- quick fault detection;
- determination of the possible causes of the malfunction.


1. Run the notepad as administrator and add the following lines to the hosts file C: \\ Windows \\ system32 \\ drivers \\ etc \\ hosts:
127.0.0.1 pingplotter.com
127.0.0.1 www.pingplotter.com
2. Install the program, run, press "Enter Key"
3. Launch keygen.
4. In keygen, select the type of license "Complimentary"
5. Copy the username in the program activation window and paste the keygen in the "Registration name" field.
6. Click "Generate", click "Register"
7. Copy Serial from keygen and paste into the "LicenseKey" field of the program activation window.
8. Click "Activate Software"
Interface: English
Activation: see above
System requirements:Windows XP, 7, 8, 10
File size: 13.69 Mb
Periodically I come across the need to determine the data transfer rate over the local network. Measurements can be carried out manually. For this purpose, we send a file of a fixed size via FTP. Then, laborious calculations of the ratio of the file size and the duration of its transmission, often including significant errors, are necessary. This takes time and energy, so you should not reinvent the wheel; user-friendly programs can do this for us. I usually use several.
Programs for local speed test
Does everything the same, only herself and quickly. The advantage is the combination of the compactness of the program with the ability to create large test files. It is equipped with a package of additional features, such as viewing lists of equipment connected to the server, and command line support. A user-friendly interface allows you to track the entire process, and as a bonus - no installation is necessary.
Download LAN Speed \u200b\u200bTest - http://www.totusoft.com/downloads.html
Very useful utility. We take a pair of computers connected to the network, equip both with this utility, monitor ping and, if necessary, open access to the port undergoing testing. You should also make settings on the computers to be scanned in accordance with the server and client parts. The abundance of options for the server and client allows you to control the testing process to the smallest detail. There are many possibilities - testing the line in both directions, setting a limit for traffic, launching several flows simultaneously and so on. Therefore, the program is so popular and used quite widely. Pitfalls may be the need to select a person at the other end of the channel, but this is the case when taking measurements in places remote from one another.
Download Iperf - https://iperf.fr/iperf-download.php
Last of my favorites. The network checkpoint installer is designed for specific network nodes. It runs on TCP / IP and access Windows software to network servers. The program consumes a minimum of system resources and also does not require installation. To start the test, you just need to run the executable program. After that, two sections will open - Server and Client. After making sure that the server is turned on, you can proceed to the testing process itself. To do this, click the "Test" button located in the client section. The check takes ten seconds and in the end we see the number of packets sent and received. In the settings you can select the scan duration, packet size and much more. Works with Windows XP, Windows Vista, Windows 2003/2008 and Windows 7.
Download LAN Bench -http://www.zachsaw.com/?pg\u003dlanbench_tcp_network_benchmark

The programs are easy to operate and effective. This is my minimum set of essential software for diagnostics and timely detection of problems with the local network.