As of 2015, devices with Android installed accounted for slightly less than 80% of the total number of smartphones sold in the world. Simply put, four out of five owners of “smart phones” have Android, although the percentage ratio varies depending on the country.
Given that Android is a free system, it is installed on a variety of devices: from Samsung flagships to unknown Chinese or Indian smartphones for a few dollars. As a result, optimization suffers: some official assemblies openly lag, forcing users to look for information on how to flash an Android phone through a computer.
How to flash a phone on Android through a computer
Firmware Rules
Before you start flashing the device, read the rules and recommendations:
- Be sure to check if there is a separate guide for flashing your model. This is especially true for Chinese smartphones such as ZTE. The general procedure for firmware is described below.
- Download files from trusted sources (for example, w3bsit3-dns.com).
- Ensure that the device’s battery is 100% charged. Emergency shutdown of the phone will lead to errors.
- Use only the original USB cable that came with your smartphone.
All actions you perform at your own peril and risk. Incorrect flashing can cause the device to become corrupted, that is, it will stop turning on. If the phone is still under warranty, then it is better to contact a service center to fix software errors. Attempting to flash the device yourself will void the warranty.
Search for a suitable version and software
The most difficult thing is to find a suitable version of the system that will not conflict with the hardware. To select the correct version of the system, you need to find out the current firmware:
- Open your phone’s settings.
- Find the item “About the device” and look at the firmware version (not Android, but the firmware, can be written as “Build number”).
Try to download files in a ZIP archive, it’s easier to install the system. Be sure to read the installation guide and the comments of other users.
If you have a Samsung smartphone, then use the Odin program for flashing. Chinese devices have their own utilities. Some models are flashed via FastBoot. I have on my hands the ZTE Blade AF3 model, for the flashing of which the ResearchDownload utility was used for Spreadtrum processors. But we will see the general order for all Android devices.
Phone preparation
So that there are no problems with flashing, you need to get Root rights on the device. We do this through the KingoRoot program.
Launch KingoRoot. Turn on USB debugging on the phone and connect to the computer using the USB cable. After synchronization is complete, press “ROOT”. 
After rebooting the device, you will receive superuser rights on it that allow you to make any changes. It is also recommended to make a backup in case of unsuccessful flashing. To backup, use the Titanium Backup application: backup all user software and system data.
The next step is to install CWM Recovery. You can do without this add-on using the standard Recovery menu, but on some models it is greatly reduced. Download the CWM Recovery file and drop it into the root directory of the memory card.
Installing CWM Recovery is done through RomManager. For correct installation, the CWM Recovery file must be in the root of the memory card and have the name recovery.img. The downloaded file with the system as a ZIP archive also needs to be placed in the root of the memory card.
Firmware process
After completing all the preparatory steps, you can proceed to flashing the device. The file with the system is already at the root of the memory card. Turn off the device, and then turn on the recovery menu by simultaneously holding down the Power key and volume down button. 
Before installing the new system, you need to remove the old version and clean some sections of the memory. Navigation in the Recovery menu is carried out with the volume keys and the power button.
Android is the most accessible and most demanded operating system in the market of modern gadgets. About 80% of all tablets and smartphones work precisely under her leadership. Since Android is absolutely free software, it is installed not only on HTC or Sumsung flagships, but also on cheap Chinese DooGee. Due to the massive use of this program, OS optimization starts to “lame”: gadgets even with the official build begin to lag, which forces their owners to look for ways to reflash their device.
How to flash an Android phone through a computer - features
Before deciding on an independent firmware for an android device, you need to take into account general recommendations and take into account all the risks:
- As a rule, all smartphones are flashed according to the standard scheme. But, if you are the owner of a Chinese gadget, for example, ZTE, then in this case you will need a separate guide for changing the OS.
- Download software better from trusted online sources or official sites.
- For successful gadget firmware, it is better to download program files in a zip archive.
- You should also make a backup copy of the gadget's system files in case of a failed firmware.
- First you need to charge the battery of the device.
- It is preferable to use only a "native" USB adapter.
- If your device is still in warranty service, then independent firmware will lead to its loss.
How to flash an Android phone through a computer - search for quality software
Half of the device’s successful firmware is choosing the right OS. In order for the future system to find a common language with the hardware, you need to determine what firmware is currently installed on your device: open "Settings" - "About Phone". Here you will find the Android build number.
You can find the right program on w3bsit3-dns.com. On the site forum, you also need to find the CWM-recovery file for your device. The firmware and recovery file must be placed on the device’s SD card.


How to flash an Android phone through a computer - preparing a gadget
For high-quality firmware, you need to get root-rights:
- Download KingoRoot Utility.
- Install and run KingoRoot.
- Connect the device to the computer using the USB cable.
- After synchronization is complete, press the ROOT button.
- When the device reboots, you will get full access to the system.


Stages of firmware Android device
After the file with the OS is located in the root folder, you can proceed with the firmware of the device. You need to turn off the device, and then start the recovery menu, while holding down the Power key and the sound reduction button.
Before installing a new system, you must uninstall the previous version:
- Select Wipe.
- Format - Wipe all data / factory reset.
- Clear the cache - “Wipe / cache” item and “Wipe dalvik cache” item.
- Return to the main menu and select the “Mounts” item, sub-item “format / system”.


Now you can install new software:
- Return to the initial menu to the item “Install zip from sdcard”.
- Open the memory card directory by clicking “Choose zip from internal sdcard”.

- Select the folder with the firmware and confirm the action.


The firmware will take about 5-7 minutes. Starting the device for the first time will take some time, but this is completely normal, so do not worry that something is wrong with it. Then you will have to reinstall the language, date, time and other functions. After that, you can actively use your updated gadget.
Hello! Today we will consider the simplest and most convenient methods for flashing your smartphone (or tablet).
The article is divided into the following sections:
Why do I need a flashing?
Everything is clear here: either you have problems with the device, or you want something new, but the developers have stopped submitting new versions of the OS.
What are the firmware methods?
There are two of them, but each in turn is divided into several more.
- Firmware via phone.
- Firmware using a computer.
Now we will consider several methods of firmware using a PC.
Necessary preparation before the flashing process
All this needs to be done so that there are no disruptions to the installation of the new OS.
- Fully charge the device and your computer;
- Make a backup of the old OS;
- Check if the USB cable is working.
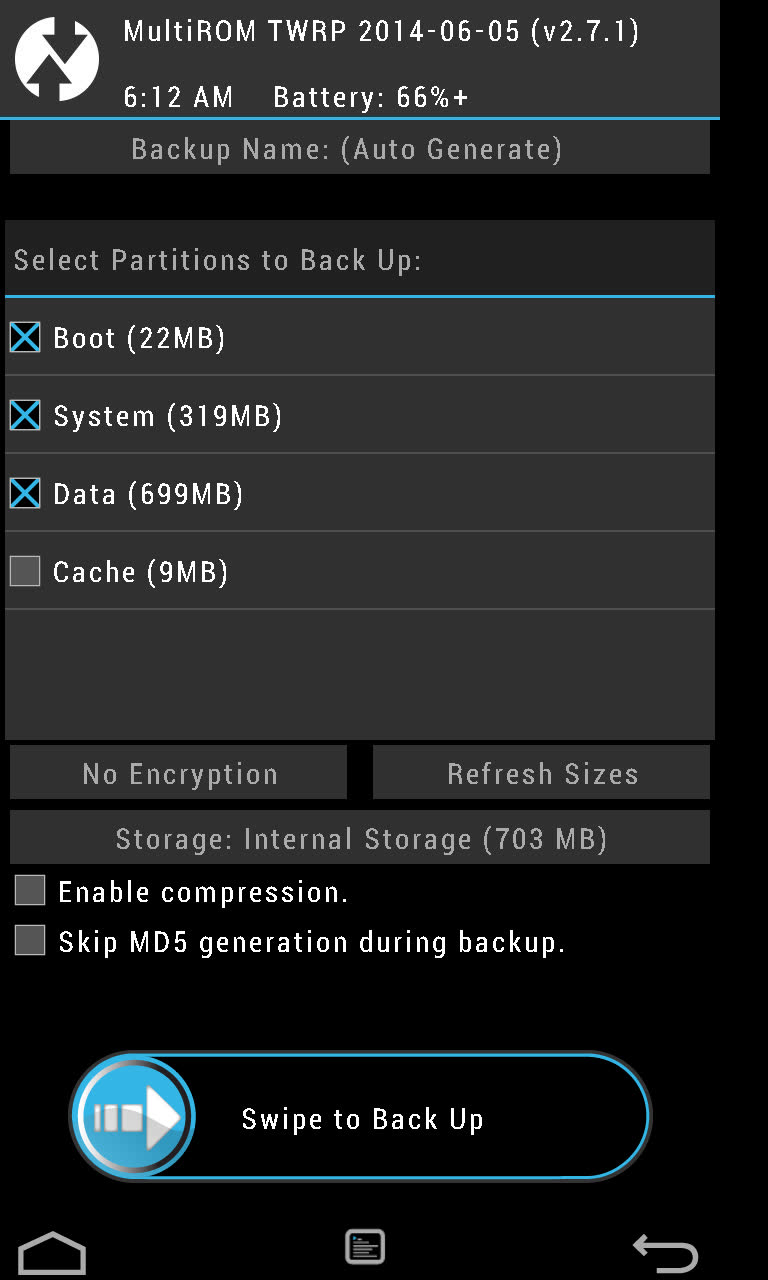
Make backup
The example shows the Android 5.0 OS, but all the actions described below are almost the same in any version. Therefore, just carefully review these instructions.
- Go to the settings of your device.
 2. Select the "System Details" item and the "Memory" section.
  3. Now click the “Backup” button.
 4. Now everything is simple: make a backup by selecting the items you need to save, as shown in the pictures.


5. That's it, the backup is ready. You can copy it to another device or use it. 

Firmware with FASTBOOT
Now that all possible security measures have been taken, you can proceed with the firmware.
To get started, download Fastboot to your computer. Make the program boot folder in the root directory of drive C. For example, C: \\ fastboot. In this case, it will be easier for you to register the location of the firmware in the future.

The installation file can be downloaded from the link (Android debugging utility).
First unlock bootloader
Bootloader is a program outside the android system that provides access to the device’s core. It can be compared to the BIOS on a computer.
Unlocking it, we get root-rights - open access to the system. On devices of various manufacturers, this is done using different software. But there is one algorithm of work, and it is like this:
- You download and install the program for unlocking accordingly with the device manufacturer.
- Then connect the smartphone via the USB cable in debug mode.
- Open the downloaded program, select your device and click “Unlock”.
Unlock example
Here is an example of unlocking a device manufactured by HTC.
1. Download and install HTC Bootloader Unlock.
2. Then connect the device to the computer in debug mode. Everything is quite simple here: go to the "For Developers" settings section and select "USB Debugging".

3. Now open the downloaded program and confirm debugging (on the android device).

4. It remains to simply unlock by pressing the "Unlock" button. In fact, the process can be performed through the Windows command line. This program only automates the unlock process.

5. To exit HTC Bootloader Unlock, click “Finish” after the botloader unlock process has finished.

Note: There are unlock programs for a smartphone or tablet of any manufacturer. For example:
Nexus - Nexus Root Toolkit;
Samsung - Kies;
Sony - Sony Bootloader Unlock.
If your device is from a different manufacturer, just search the Internet for the appropriate utility.
Firmware process
- The first thing to do is connect to the computer in USB debugging mode. How exactly to do this is described a little earlier.
- First move the new firmware to the C: \\ fastboot directory
 3. Now transfer the device to fastboot mode. At the command prompt, enter the commands as shown in the screenshot.

4. In order for the flashing to succeed, you need to format all the directories of your device. Enter these commands on the command line in turn (after each - “Enter”):
- fastboot erase boot
- fastboot erase userdata
- fastboot erase system
- fastboot erase recovery
- fastboot erase cache
5. But now it’s already possible to start the firmware. From the folder with the firmware (the “fastboot” folder) run the flash-all bat-file. This is how it looks on the command line:

6. After a successful firmware process, you will see a message about this.  That's all, the device is flashed. And after rebooting it, you can see this.
Reflash using the program ODIN MULTI DOWNLOADER
1. First, you need to connect the phone to the computer using a USB cable, in the delay mode. After that, be sure to run the Odin Multi Downloader program as an administrator.

2. Then indicate the location of the firmware that you want to install. Here's what you need to do: press the BOOT button and select the firmware file.


Note: if your firmware consists of several files (basically there are three of them), then the path must be specified accordingly:
PDA file - in the “PDA” field;
Phone file - in the “Phone” field;
CSC file - in the “CSC” field;
3. Now you need to restart the phone. This can be done using the key combinations (volume up + screen lock button + center button). As a result, the computer should recognize the phone, thereby on the screen, a yellow box with the name of the COM port will appear.

4. After you click the “Start” button, the system update will begin. At this time, do not disconnect the phone from the computer. During the installation process, the smartphone will reboot several times, but you should not pay attention to this. After successful firmware (which takes about 10 minutes) on the computer screen, the word “PASS” will appear.

Having taken all the steps according to this instruction, you can use any version of the Android operating system. In addition, it is worth noting that this program is suitable for flashing android devices of any manufacturer.
Firmware for LG Android device using KDZ UPDATER
If you have a phone or tablet from the manufacturer LG, then it will be easier, and more correct, to flash using the KDZ Updater program. How to do this?
1. First download the KDZ Updater program. Actually, this is an archive that you need to unzip to a folder located in the root of the system drive C of your computer.


2. Add the firmware you need to the same root folder. Here the executable file of the program is the only way the firmware will be visible to the program.

3. Be sure to install the action policy file called msxml.msi
4. Now enable debugging via USB. How exactly to do this is described above.
5. Put the device into S / W Upgrade mode. Namely:
- turn it off;
- remove the battery;
- hold down the volume down key and insert the USB cable.
- the corresponding inscription will appear - “S / W Upgrade”.
Notes:
if you failed to enter the S / W Upgrade mode, then try to do all the above steps without removing the battery;
also try to clamp both “sound rockers” instead of the volume down key;
In order for the firmware to become possible, you need to disable the LGE Mobile USB Modem program in the Device Manager.

6. Now it's time to start the flashing. Run as administrator the executable file of the program KDZ_FW_UPD.exe from the root folder on drive C.
Note: point to the program icon and right-click. Select "Run as administrator".

7. Set all parameters as shown in the screenshot and click “Launch software update”.

8. After some time (approximately 10 minutes) the firmware will complete. Just reboot the device and use the new interface.
Firmware for smartphones and tablets from Lenovo
Why did I also bring this topic apart? Because Lenovo devices have their own nuances that create certain difficulties. However, there is a program that compensates them. What exactly? Ease of use and its intuitive interface.
So, let's begin.
1. You need a program for firmware SP Flash Tools. Download it.
2. To continue the firmware, you need to install the driver on the device. As a rule, when connected, they are not automatically installed. Therefore, you need to do this manually.
download drivers, respectively the model of your device;
enter in the device manager on the computer (the above shows how to do this);
turn off the device;
connect the device via USB-cable to the computer;
right-click on the device that appears (unrecognized) and select "Install driver from a specified location";
select driver.

3. Now run the SP Flash Tool. And specify the path to the executable firmware file (scatter file). Click on “Scatter Loading”.


5. And just now connect the device to the computer.
6. After the flashing is completed, you will be notified of this by the appearance of a bright green ring on the computer screen.

When you turn on the device, the first boot of the system will last quite a long time (5-10 minutes). So it should be, do not worry.
Brief Summary
As you can see, there are special software for android devices of some manufacturers that facilitates the firmware process. Therefore, use it first.
However, there are many methods for flashing an Android device using a computer. How many utilities are there that make this process easier. But the above methods, in my humble opinion, are some of the most convenient and easy. Therefore, read, understand and go!
In which case does the Android firmware be required? This is necessary if the user wants to expand the functionality, get acquainted with the gadget in a new “wrapper”, set up the phone when it is not possible to roll back and so on.
Installing firmware on Android using a computer
First you need to download it. It is advisable to download from the official website of the mobile device developer. It should be noted that the software should be chosen for a specific model of the device. Otherwise, installation problems may occur. When the required software is not available on the official website or it does not suit the user for any reason, you can find custom software on the Internet.
What do you need to know?
Before proceeding with the firmware of a mobile device, you should remember and adhere to several rules:
The battery charge must be at least 80%;
you need to install drivers on a computer for your own device
it is undesirable if the Android firmware breaks due to a power outage (it is recommended to use a laptop);
To protect your own device from a poor-quality operating system, you must create a backup of your existing software and data;
It is not recommended to use the USB 3.0 port during the flashing process;
it is necessary to familiarize yourself with the firmware before downloading, avoiding suspicious sites;
It is advisable to use the original USB cable that comes with the device.
After flashing, you should hold the power button of the device for about 15-20 seconds.
Fastboot
Using Fastboot, you can get the firmware for your Android tablet through your computer. To do this, you need to download the Fastboot utility program and unzip it to the root of the system drive. The result is a folder with the path to it C: \\ Android. In addition, there are two more objects: Tools and Drivers. The first contains the required programs, the second contains drivers. You must open the Drivers folder and install the drivers. After that, you need to transfer the downloaded firmware to the Tools folder in the zip archive.
Next, the device is connected to the computer when using USB. Then the command line (or cmd) is opened and “cd C: \\ Android \\ Tools” is entered without quotes. Having made the transition to the directory of this folder, you should enter fastboot devices. After that, the device code appears. If it is not there, then you need to unlock Bootloader, which provides OS data about the status of the memory card, RAM, kernel. In addition, he is responsible for the process of loading the operating system. In this way.
If the bootloader is not unlocked, the device will not be able to flash. It should be noted that if it is unlocked, the device loses its warranty. True, you can perform a lock again if such a need arises. You should pay attention to the fact that unlocking erases all the contents of the device and the memory card. That is why it is recommended that you back up the data of the internal memory and SD card before doing this.
Unlock bootloader
To unlock the bootloader, you must do the following:
1. Disconnect the mobile device.
2. Connect it to the computer and hold down the power button, as well as both volume keys.
3. On the computer, the command line (or cmd) opens, into which you need to enter “cd C: \\ Android \\ Tools” without quotes.
4. The fastboot oem unlock command is entered.
5. It is checked again by the fastboot devices command.
When waiting for device is displayed instead of the device code, check the drivers and replace the USB cable. If the device is recognized, you must enter the command: fastboot update the name of the file .zip. When the firmware is completed, the device reboots.
Flashtool
Before installing the firmware on Android using a computer using the Flashtool program, you will need to download the operating system in ftf format. Then install the utility. The downloaded file, intended for flashing, must be placed in the Firmwares folder located in the program directory. After that, you should run the utility. Then you need to click on the button with the lightning bolt icon, which is located in the upper left corner, leave a dot on Flashmode.
Next, you need an operating system file from the list for the device. Marks on Wipe User Data and Wipe Cache should be set on the right. After a short wait, a window appears containing instructions for connecting the phone. By connecting it to the computer, you must simultaneously hold down the power button and the volume down. When the program gets access, the process of automatically flashing the phone using the computer begins. "Android" is installed quickly enough, literally a few minutes. After the process is complete, you must turn on the gadget and go through the initial setup. This software installation option is considered one of the best.
Using specialized programs
Most developers of mobile devices have created special service applications. One such update is the Fly smartphone software. It allows you to update the current operating system and firmware "Android" Fly-smartphone using a computer. First you need to download and install it. Then the program will offer to connect the device to the computer.
It should be noted that USB debugging must be active. Otherwise, you should use the help of a utility that will allow you to do this. Then you need to click "Install Driver", connect a smartphone, run the program. After that, you will need to click on “Check for Update” and select a model from the list provided. A window with information about the software will appear on the screen, where you need to click "Start Download" and follow simple recommendations. There are other utilities that allow you to install firmware on Android through a computer.
Recovery Mode
In this case, you can also reflash your own device. For this, the Recovery mode is used. First you need to download the operating system and transport it to the SD card. This firmware is carried out without a computer. To install a new operating system on the phone, you will need to go to the engineering menu or Recovery mode. But first you need to turn it off, then hold down the power key and volume down at the same time.
Given the version of "recovery", the actions are as follows:
- in the standard version, you must click apply update from external storage;
- in the TWRP version, click install ZIP;
- in CWM version - apply update from sdcard.
When the firmware is successful, you will need to reboot the smartphone and go through the initial setup. If all possible options have been tried, and the device could not enter the “recovery” mode, this means that this function is turned off in the device or it does not exist at all.
Finally, it’s worth recalling some more important points that allow you to save your nerves in case of installing the Android firmware. Before performing this operation from a computer, it is imperative to back up the data. To do this, you can use special programs from an official or unofficial developer. Thus, system recovery will be possible if the flashing failed. After carrying out all the actions, you must hold the power button for about 15-20 seconds. If the device does not turn on, you can remove the battery, and then reinsert it. Then you need to turn on the device again. Typically, a flash card needs formatting. Therefore, it is advisable to transfer its contents to a computer before performing the firmware procedure.
Android is an open source system, so developers can freely modify it, add new features and create their own images of the operating system for phones and tablets. Some of these firmwares are gaining immense popularity and even become the basis for successful commercial projects. We introduced you to some of these in this as well. And now we want to discuss with you those reasons that can convince you to take the risk and install third-party firmware on your Android.
Getting the latest version of Android
It's no secret that many manufacturers of even expensive devices do not bother too much with the support of their products. Once they sell you their product, they immediately forget about the need to release new versions of firmware for them. As a result, it turns out that you do not have the opportunity to upgrade to the new version of Android, even if the hardware of the smartphone is free.
In this case, the best and at times the only solution will be to use the well-known CyanogenMod, which although it has many of its own "chips", but in many ways resembles stock Android. Thanks to this development, owners of even fairly old devices can use the latest versions of the system.
Refusal of "branded" shells
Many popular manufacturers (we will not point the finger) are very fond of equipping the phones with their proprietary shells, which, however, is not liked by all users. Not only are many of them frankly ugly and uncomfortable - as you know, it's a matter of taste, but they also manage to noticeably slow down the system. Naked Android against this background shows speed records and impresses with its responsiveness.

Yes, of course, you can put your launcher and tidy up all these widgets, but there is no way to refuse all the dubious settings that the manufacturer made in the operating system. So in order to get a truly “clean” Android, you will need to install a custom ROM.
Removing preinstalled software
Having received your brand-new phone and having played enough with the programs installed on it, gradually comes the understanding that it would be better if they were not at all. Most often, manufacturers complete the software kit of the device, focusing not on expediency and quality, but purely from commercial motives. In addition, these programs are considered systemic and so simply removing them will not work. As a result, we get a device full of frank trash that prevents us from living.
A radical solution to this problem is precisely flashing the device to a custom assembly that does not contain pre-installed software.
Obtaining additional functions and system settings
Many firmwares have a look and set of functions so different from the original Android that you can safely talk about independent operating systems. First of all, we are talking about such popular Chinese projects as MIUI, Lewa, Oppo, which are developing at a gigantic pace. It is likely that once you try this oriental cocktail, you will look at the fresh Android dish with undisguised regret.
Other firmware, for example AOKP, although they are based on stock Android, but give such scope in the settings, such customization possibilities that owners of ordinary smartphones did not even dream of.
Security
This may sound strange, but free community-generated firmware can sometimes be safer than a Google product. In them, if you wish, you can completely get rid of the all-seeing eye of this company, completely replacing all of their services and applications with third-party developments. It turns out, thus, “Android without Google”, no matter how strange it sounds.

In addition, many user ROMs contain a built-in antivirus and so detailed permission settings for each application that you can thoroughly indicate who, for what purpose can move on your device.
Reasons not to use third-party firmware
But, as you know, everything is far from being so rosy and there are pretty good problems that you may encounter in your experiments with firmware.
- Bricks. The flashing process, although thoroughly designed and quite easy, nevertheless, with some degree of bad luck and curvature of the hands, it can turn your device into a dead block of plastic and microcircuits.
- Battery problems. A custom ROM may not be optimized enough for a particular device and drain the battery faster than official firmware.
- Hardware issues. Your new firmware may not fully support all the hardware in the phone, so you may encounter errors, some idle modules and other issues. For example, the device’s camera may not shoot as well as before, or your GPS will suddenly slowly search for satellites.
- Mistakes. The manufacturers of your device test the software well before releasing it for sale, which, of course, cannot be said about independent firmware developers. Therefore, you may encounter annoying mistakes, which in the future, although they will be fixed, but you can spoil a lot of blood.
- Warranty. If you use third-party firmware, you lose the warranty. If this is important to you, then think about it.
And now I would like to know your opinion about the need to reflash Android. We ask you to participate in the survey and express your point of view in the comments.