How to protect Windows from problems caused by hard drive damage? For this there is a backup mechanism, in particular, one with automatic creation of incremental or differential backups to maintain the current state of the OS. But there is also an alternative solution - mirroring Windows system partitions, performed by its own standard means.
This is software creation RAID in configuration RAID 1 in order to preserve information and gain access to the OS environment in case of problems caused by problems with the hard disk that ensures its existence. What are the features of this mechanism, and how to implement it in the Windows environment - we will talk about all this in detail below.
1. Windows mirroring: what is it
Mirroring is, as mentioned, software RAID 1 , a commonly used disk array configuration, in which data is duplicated onto a second hard drive called a mirror. In case of problems with the first, primary hard drive, we can use the mirror to access our valuable information. Moreover, if mirroring is applied to Windows system partitions, if the main disk fails, we will not only gain access to the information stored in the system, we will even get inside it. Not inside its original, but inside its exact clone on the disk-mirror.
Implementation of software RAID 1 possible with dynamic disk technology. This technology exists in the Windows environment, starting from the version 2000 ... The technology itself is applicable to both MBR - and to GPT -disks, but here's the creation of software RAID 1 complicated by the need to perform additional operations with the command line. So everything that will be proposed below applies only to MBR -discs. Creation of software RAID possible only in OS editions, starting with Pro.
When reinstalling the system on dynamic disks, you do not need to inject specific drivers into the distribution RAID-controller, as required by the hardware RAID... As well as there is no need to reinstall anything when using any of the configurations of the software RAID... However, when working with dynamic disks, we cannot use more than one Windows. The OS installed on other partitions will simply not boot. Technology works by rule "Entry - one ruble, exit - two": the initial basic disks with the structure and data are converted into a dynamic type easily and simply by means of Windows, but the opposite direction works only for disks with an unallocated area. If the structure and data are there, you will have to resort to third-party software.
Another important nuance: to work with this technology, it is important that the computer name contains only Latin characters. Otherwise we will get an error "Invalid package name".
2. Preparatory stage
For Windows application RAID 1 a second hard disk with a capacity of at least the total volume of both system partitions must be connected to the computer. In our case, those occupy, respectively, 549 Mb and 60 GB, and the mirror disk has a volume with a small margin - 70 GB... The mirror must be prepared for its further fate - to delete all sections on it. A clean unallocated area should remain.
Information about booting installed on other Windows partitions, if any, is better to remove and leave the ability to start only the current system. When mirroring, the boot menu will be overwritten, and there will be a record of loading only one OS with the addition of the ability to launch its clone on a mirrored disk. So it is important that there is a record of loading the necessary Windows. Otherwise we get BSOD .

We will implement mirrored Windows using the system utility diskmgmt.msc , she's a console.
3. Convert disk to dynamic
On either of the two disks, call the context menu, select the conversion to dynamic type.

Check both of them. Click "OK".

We press and confirm the action.

4. Creating mirrors of system partitions
So, both disks - both the main and the mirror - are now dynamic. Call the context menu on a small technical section of the system (bootloader section) ... We choose.

Click on the mirror disk. We press.

Then we will see how a clone partition was formed on the mirror and the data synchronization process started.

Now we press the context menu on the main Windows partition, on the disk WITH ... And we do the same operation as above.

Now we have configured data synchronization with the mirror. We can dispose of the unallocated area remaining on the mirror disk in any way: leave it as it is, create a separate partition from it, attach the space to some other partition (and on any of the disks, because we are now working with their dynamic type) .

5. Mirror Windows
As soon as the data is synchronized with the mirror, and we find out about the completion of this process by the degree of load on the disk in the task manager, we can reboot and test the performance of the mirror Windows. Access to it, as mentioned, will appear in the bootloader menu, it will appear with the inscription "Windows such and such version is a secondary plex" ... The bootloader menu, by the way, in the last two OS versions can be configured right at the stage of computer startup.

You can set a shorter time for Windows autoselection.

The system will boot first on the main disk, so you can choose the minimum 5 seconds to display boot options.

In older versions of Windows, the timeout for the bootloader menu is configured in the system utility "System configuration".
Mirror Windows is a complete clone of the main system. Here we can do everything the same as in the original environment. If anything happens to the main HDD or SSD , turn it off by hardware, start the computer and press F9 on the boot error screen OS.

6. Removing Windows mirrors
If you no longer need to mirror Windows, you can delete its mirror. This is done in the same place where this mirror was added - in the utility diskmgmt.msc ... In turn, click each of the system sections, in the context menu, click.

Select the mirror disk, press the delete button and confirm.

The space of the mirrored disk will turn into unallocated area, and its type is converted from dynamic to original base.
7. Reinstall Windows under mirroring conditions
Reinstallation of Windows in the conditions of existence of mirrors of its partitions is carried out in the same way as usual - we can delete two of its partitions and specify an unallocated area with the OS installation location, or we can simply format its two existing partitions.

In any of these cases, when you reinstall Windows, its mirror will not go anywhere, it will continue to function in the new system. Program RAID 1 transferred to a new, reinstalled system environment. And everything would be fine if we mirrored regular user sections with our data. But the software RAID 1 for system partitions, remember, it also provides for the ability to enter Windows on a disk-mirror. And here we come across another Microsoft jamb: the record about loading the mirror system will be lost - the very same bootloader menu item with an additional note "Secondary plex" ... After all, we formatted or deleted a small bootloader partition when installing the system. Leaving it as it is, not formatting it is even more dangerous. Let's remember that only one Windows can boot on dynamic disks. If the bootloader partition is not formatted, the new system will appear second in the boot menu and will not be able to start. Likewise, neither the first system nor its mirror will start, because the first one no longer exists, and its mirror is a clone of a non-existent Windows.

So the Windows boot partition when reinstalling it must be either formatted or deleted. How, then, do you ensure that you log into mirrored Windows? The solution here is very simple: you need to recreate the mirrors of the system partitions - delete them, as discussed in the previous paragraph, and reassign. The mirror disk is re-synchronized with the system partitions, and in the Windows bootloader menu, the item of the mirror system with an additional note appears again "Secondary plex".
Hello friends! If you look at the comments of readers on our website in the section on repairing hard drives, then you will be amazed how many people were not ready for the fact that their information storage device suddenly went out of order and all important files: projects, plans, diplomas, drawings, calculations, over which a person worked for several months in a row, they simply disappeared into nowhere. difficult even for a professional repairman, let alone a common user. Therefore, eif you care about personal information, be sure to read today's article. In it we will show you how to createRAID-1 array of two HDDin the newest Windows 10 Fall Creators Update. It is very easy to do this, because the technology« disk mirroring» built into the operating system.
This article differs from the fact that "Mirror» we will create directly for the system drive (C :) and right in running Windows 10!
At the beginning of the article, I will remind you that a RAID array or "Disk Mirroring" is the parallel writing of data to two hard drives. When one breaksHDD all information remains safe and sound on another hard drive. That's the whole secret!For a better assimilation of the information, we will consider everything on a specific practical example, so you will understand everything much better than I would now begin to tell you the theory.
Create a RAID Array or Disk Mirroring in the Latest Windows 10 Fall Creators Update
Let's take a regular computer in the organization where I work.
Right-click on the Start menu and select "Disk Management".
In this window, you can see two hard drives connected to the PC.

The first disk (Disk 0) contains two partitions: (C :) and (D :). On disk (C :) windows 10 installed... The OS desktop contains important working folders. If the folders disappear for any reason, then the work of the entire organization will stop for several days and I'm even afraid to imagine all the consequences. On disk(D :) no serious information, only movies and photos. Therefore, I will create a mirror for one system partition.(C :).
The second hard disk (Disk 1) is completely blank and contains no partitions, its entire area is unallocated. It is on it that we will create a disk mirror (C :). All information written to the system disk will also be duplicated on the disk - mirror.

It is important that the HDD from which we want to create a mirror is without partitions and is at least as large as the original disk on which the operating system is installed. In our case, both hard drives are exactly the same.
Right-click on the drive (C :) and select "Add mirror ..."

Windows 10 will prompt you to select the drive that we want to use as a mirror. Select the blank Disk 1 with the left mouse button and press« Add mirrored volume».

There is a warning about the fact that now the disks will be converted to dynamic and if several operating systems are installed on your PC, then after the conversion you will be able to load only the current operating system.Will explain.
Tune RAID-1 array or Disk Mirroring is only better if you have one operating system installed on your computer with one bootloader. If several operating systems are installed on your PC, for example, Windows 8.1 and Windows 10, then you can mirror disks in the Windows that was installed last. That is, you have installedWindows 8.1, then Windows 10, in this case customizableRAID-1 array in Windows 10 and after that only Windows 10 will be loaded on the computer. If you configure RAID-1 array in Windows 8.1, then no Windows will be loaded on a PC at all. This problem is connected with the peculiarity of the work of dynamic disks, about which it would be nice to write a separate article, but all hands do not reach.
There is only one OS installed on my computer. I press "Yes".

The process of resynchronization of disks begins when the mirror is created. In simple terms, Windows 10 creates an exact copy of the drive (C :) on the second hard drive (Disk 1).From the unallocated space, you can create a partition and use it without any problems.

The resynchronization process is complete and the OS is ready to go.
How to create a software RAID 1 array (mirror) using Windows 10, 8.1, 8, 7, Vista.
What is RAID 1?
RAID 1 is an array of two disk media, information on which is duplicated on both disks. That is, you have two disks that are full copies of each other. Why is this done? First of all, to enhance the reliability of information storage. Since the probability of failure of both disks at the same time is small, in the event of failure of one disk, you will always have a copy of all information on the second.
You can store any information on a RAID 1 array just like on a regular hard disk, which allows you not to worry about an important project that you have been working on for a very long time.
Today we will look at how a RAID array is created using Windows itself when using two empty disks (I confidently declare that this instruction works on Windows 7, 8 and 8.1).
Instructions:
1) First, install the hard drives in the system unit and start the computer.
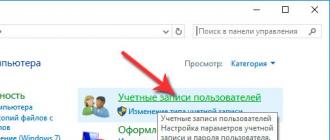
2) Open “Control Panel → System and Security → Administrative Tools → Computer Management → Storage → Disk Management”. When you turn it on for the first time, the utility will inform you about the installation of new disk devices and offer to select a partition for them. If you have a disk of 2.2TB or more, choose GPT, if less, then MBR.
3) At the bottom of the window, find one of our new hard drives and right-click on it. We select "Create mirrored volume":
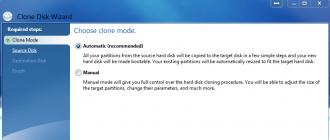
4) The Image Wizard will open. Click further.

5) On this page you need to add a disk that will duplicate the previously selected disk. Therefore, select the disk on the left and click the "Add" button: Click next.


6) Select the letter that will designate the new volume. I chose M for Mirror. Click on next.

7) Set the file system, cluster size and volume name. I also recommend checking the box next to "Quick Format", let it do everything at once. And again further.

8) We check what we have done, if everything is correct, we press "Finish".

9) The system will warn you that it will convert the disks to dynamic, and we will not be able to create a boot volume on them. There is nowhere to retreat, we press "Yes". :)
18.06.2018.
How to protect Windows from problems caused by hard drive damage? For this there is a backup mechanism, in particular, one with automatic creation of incremental or differential backups to maintain the current state of the OS. But there is also an alternative solution - mirroring Windows system partitions, performed by its own standard means.
This is software creation RAID in configuration RAID 1 in order to preserve information and gain access to the OS environment in case of problems caused by problems with the hard disk that ensures its existence. What are the features of this mechanism, and how to implement it in the Windows environment - we will talk about all this in detail below.
1. Windows mirroring: what is it
Mirroring Is, as mentioned, software RAID 1 , a commonly used disk array configuration in which data is duplicated onto a second hard drive called a mirror. In case of problems with the first, primary hard drive, we can use the mirror to access our valuable information. Moreover, if mirroring is applied to the Windows system partitions, if the main disk fails, we will not only gain access to the information stored in the system, we will even get inside it. Not inside its original, but inside its exact clone on the disk-mirror.
Implementation of software RAID 1 possible with dynamic disk technology. This technology exists in the Windows environment, starting from the version 2000 ... The technology itself is applicable to both MBR - and to GPT -disks, but here's the creation of software RAID 1 complicated by the need to perform additional operations with the command line. So everything that will be proposed below applies only to MBR -discs. Creation of software RAID possible only in OS editions, starting with Pro.
When reinstalling the system on dynamic disks, you do not need to inject specific drivers into the distribution RAID-controller, as required by the hardware RAID... As well as there is no need to reinstall anything when using any of the configurations of the software RAID... However, when working with dynamic disks, we cannot use more than one Windows. The OS installed on other partitions will simply not boot. Technology works by rule "Entry - one ruble, exit - two": the initial basic disks with the structure and data are converted into a dynamic type easily and simply by means of Windows, but the opposite direction works only for disks with an unallocated area. If the structure and data are there, you will have to resort to third-party software.
Another important nuance: to work with this technology, it is important that the computer name contains only Latin characters. Otherwise we will get an error "Invalid package name".
2. Preparatory stage
For Windows application RAID 1 a second hard disk with a capacity of at least the total volume of both system partitions must be connected to the computer.In our case, those occupy, respectively, 549 Mb and 60 GB, and the mirror disk has a volume with a small margin - 70 GB... The mirror must be prepared for its further fate - to delete all sections on it. A clean unallocated area should remain.
Information about booting installed on other Windows partitions, if any, is better to remove and leave the ability to start only the current system. When mirroring, the boot menu will be overwritten, and there will be a record of loading only one OS with the addition of the ability to launch its clone on a mirrored disk. So it is important that there is a record of loading the necessary Windows. Otherwise we get BSOD .
We will implement mirrored Windows using the system utility diskmgmt.msc , she's a console "Disk Management".
3. Convert disk to dynamic
On either of the two disks, call the context menu, select the conversion to dynamic type.
Check both of them. Click "OK".
We press "Convert" and confirm the action.
4. Creating mirrors of system partitions
So, both disks - both the main and the mirror - are now dynamic. Call the context menu on a small technical section of the system (bootloader section) ... We choose "Add mirror".
Click on the mirror disk. We press Add Mirrored Volume.
Then we will see how a clone partition was formed on the mirror and the data synchronization process started.
Now we press the context menu on the main Windows partition, on the disk WITH ... And we do the same operation as above. Add a mirror.
Now we have configured data synchronization with the mirror. We can dispose of the unallocated area remaining on the mirror disk in any way: leave it as it is, create a separate partition from it, attach the space to some other partition (and on any of the disks, because we are now working with their dynamic type) .
5. Mirror Windows
As soon as the data is synchronized with the mirror, and we find out about the completion of this process by the degree of load on the disk in the task manager, we can reboot and test the performance of the mirror Windows. Access to it, as mentioned, will appear in the bootloader menu, it will appear with the inscription "Windows such and such version is a secondary plex" ... The bootloader menu, by the way, in the last two OS versions can be configured right at the stage of computer startup.
You can set a shorter time for Windows autoselection.
The system will boot first on the main disk, so you can choose the minimum 5 seconds to display boot options.
In older versions of Windows, the timeout for the bootloader menu is configured in the system utility "System configuration".
6. Removing Windows mirrors
If you no longer need to mirror Windows, you can delete its mirror. This is done in the same place where this mirror was added - in the utility diskmgmt.msc ... In turn, click each of the system sections, in the context menu, click Remove mirror.
Select the mirror disk, press the delete button and confirm.
The space of the mirrored disk will turn into unallocated area, and its type is converted from dynamic to original base.
7. Reinstall Windows under mirroring conditions
Reinstallation of Windows in the conditions of existence of mirrors of its partitions is carried out in the same way as usual - we can delete two of its partitions and specify an unallocated area with the OS installation location, or we can simply format its two existing partitions.
In any of these cases, when you reinstall Windows, its mirror will not go anywhere, it will continue to function in the new system. Program RAID 1 transferred to a new, reinstalled system environment. And everything would be fine if we mirrored regular user sections with our data. But the software RAID 1 for system partitions, remember, it also provides for the ability to enter Windows on a disk-mirror. And here we come across another Microsoft jamb: the record about loading the mirror system will be lost - the very same bootloader menu item with an additional note "Secondary plex" ... After all, we formatted or deleted a small bootloader partition when installing the system. Leaving it as it is, not formatting it is even more dangerous. Let's remember that only one Windows can boot on dynamic disks. If the bootloader partition is not formatted, the new system will appear second in the boot menu and will not be able to start. Likewise, neither the first system nor its mirror will start, because the first one no longer exists, and its mirror is a clone of a non-existent Windows.
So the Windows boot partition when reinstalling it must be either formatted or deleted. How, then, do you ensure that you log into mirrored Windows? The solution here is very simple: you need to recreate the mirrors of the system partitions - delete them, as discussed in the previous paragraph, and reassign. The mirror disk is re-synchronized with the system partitions, and in the Windows bootloader menu, the item of the mirror system with an additional note appears again "Secondary plex".
If you like articles, notes and other interesting material presented on the White Windows website and you have an irresistible desire to support this modest project, then choose one of the two types of support strategies on a special page - Page with donation
See also:
- Repairing the Windows 10 bootloader.
- "Quick Help" is an application included in Windows 10 Anniversary for remote computer control.
- Where does Update Assistant store Windows 10 installation files?
- Replacing the Windows 10 calculator with the "good old" one from previous versions. http://fetisovvs.blogspot.nl/2015/10/windows-10-windows-10_18.html
- How to determine which app is draining your battery the most in Windows 10.
- How to prevent built-in Windows 10 apps from resetting associations to default values.
- Updates not installing on Windows 10: how to fix the problem?
- Disk Spaces Management in Windows 8, 8.1 and 10.
- How to restrict access to Windows settings.
- How to transfer Windows 10 system from HDD to SSD.
- How to find out the key for Windows XP, Vista, Windows 7, 8, 8.1, 10 in case the system does not boot.
- Checking the integrity of Windows 10 system files.
- How to restore the integrity of system files if Windows 10 does not boot.
- Create a restore point and restore Windows 10.
- What can you do if the message "This device may work faster ..." appears when you connect a 3.0 flash drive to a USB 3.0 port.
- System process and high memory consumption in Windows 10.
- User Account Control (UAC) Guide.
- Windows 10 Home users can now turn off automatic app updates.
- How to change task priority in Windows 10.
- How to change the boot priority of tasks in Windows 10.
- How to remove items from startup.
- How to remove an item from the context menu.
- What services "can" be disabled in Windows 10.
- Customizing the Explorer window in Windows 10.
- How to enter the Windows 10 registry.
- Does the Prefetch folder play a role in optimizing Windows and applications.
- How to enter Windows 10 Safe Mode.
- How to restore Windows 10 using restore points if the system won't boot.
- How to add options to uninstall programs to the Windows 10 Explorer context menu.
- How to replace Windows 10 Recovery Environment with Acronis True Image 2017 bootable image.
- How to use virtual desktop in Windows 10.
- How to uninstall programs and applications in Windows 10..html
- How to enable God Mode in Windows 10.
- How to download the official Windows 10, update earlier versions to it and install from scratch without a product key.
- How to disable automatic program error reporting in Windows 10.
- Generating a new key when upgrading to Windows 10.
- How to rollback from Windows 10 to a previous version of the system.
- How to cleanly reinstall Windows 10 after upgrading from Windows 7, 8.1.
- How to hide a disk partition in Windows - 4 ways. .html http: //site/2015/07/esd-esd-iso-windows-10.html How to clean the Windows 10 registry: how to clean the Windows 10 registry.
I have 2 disks of the same size, one has a win7 system, now it's done as in the screenshot, but I'm confused by the moment that the 100MB area is not mirrored.
How to mirror the system partition so that if you physically pull out 1 disk (when it fails) win7 can boot just as easily?
Something terrible happened, after I finished the work normally (but apparently the disks did not finish resynchronizing), the computer did not want to boot and hangs on "Verifying DMI pool data".
I tried to turn off 1 disk alternately, in one case it writes too.
I tried to select the boot disk explicitly through F12.
I tried to restore Windows from a flash drive (with a cat. I installed win7). 


And nothing helped despite the fact that it was written that the partition table was restored.
Here is what it shows from the boot disk when viewed through the command line using diskpart 
And from other separate physical test disks ubuntu and win7 boots fine.