As it is known even to blacks in Zimbabwe, a home network consists of several computers connected to each other via Ethernet or Wi-Fi channels. At the same time, all computers are connected to switches, routers or access points, which, in turn, are connected to other switches to which other computers on the local network are connected. Thanks to this scheme, it is possible to create home networks that include tens of thousands of computers. This article describes how to configure your computer with installed Windows Vista to work in a home LAN.
The information provided is useful for working not only with official home networks that offer paid access to the Internet, but also with those small home networks that are created in families with several computers.
Setting up network equipment in Windows vista It became as simple as possible. The main work is done in the window , to open which select the command Start\u003e Control Panel Network and Internetand then on the link . As a result, the window shown below will open.
This center is the main tool for working with a local network and connecting to the Internet. At the very top of the window is a network map that reflects how your computer is connected to a local network and the Internet. The main tasks for configuring network parameters are performed by selecting the appropriate command on the left pane of the window. As you can see, there are quite a few commands in this panel, and then we will look at some of them.
Click on the link to view a list of all the computers in the same workgroup. If one of the computers is configured to share video or audio files, an icon appears in this window. Clicking on each computer icon will allow you to view a list of shared resources, including files and folders, located on these computers. To access these resources, you must have the appropriate rights.
Now go back to the window then click on the link Connect to network. As a result, a window opens in which a list of all the networks detected by the computer, including Wi-Fi wireless networks, will be presented. It is enough to double-click on the icon of any connection to connect to the selected network (if, of course, the network is not protected or you have the necessary access rights). To refresh the list of detected networks, click the Refresh button in the upper right part of the window. This window is very useful to all owners of laptops who love to walk with them around the city. How to find out if in the near or far radius from the laptop any wi-Fi networkto connect to? Open the window Connect to network and you will receive a list of all wireless networks detected by your laptop's wireless adapter.
Go back to the main window again. then click on the link . As a result, a window that is already familiar to us will open, in which you can configure access to the Internet via both a dial-up connection and a broadband network.
Let us consider in more detail which options for connecting to the Internet are presented in the window shown above.
- Internet connection. If the computer could not connect to the Internet automatically, you will need this link. With it, you can configure a broadband connection, a connection through wireless network Wi-Fi or via a regular dial-up modem. How to do this has already been discussed earlier in this chapter.
- Setting up wireless routers and access points. AT home network Routers and access points are often used, thanks to which all computers on a local network gain access to the Internet. This link will help you set up a newly acquired router, however, please note that you will most likely achieve the best results using the configuration program bundled with your router or access point.
- Customization telephone connection . This link will help set up a dial-up Internet connection via telephone line and modem.
- Connection to the workplace. This link will help you configure VPN access to a remote network. This is how Internet access in large commercial home networks is often configured.
Returning to the main window click on the link Network Connectivity Management. In this window, icons of absolutely all connections of your computer will be displayed, for example, an icon for connecting Ethernet and Wi-Fi. Double-clicking on the icon will open the properties of this connection, in which you can not only view various properties of the connection, but also configure the network connection parameters.
By clicking on the button shown above Intelligence, you can view detailed connection information, such as its IP address, IP address lease time, subnet mask, default gateway IP address, etc. These options will help in setting up network adapter or router. In turn, click on the button Properties allows you to configure the TCP / IP protocol suite, in particular, manually specify the IP address and subnet mask for your computer. After clicking on the button Turn off the network connection will be closed and you will be left without access to the Internet (unless you have a backup connection). And finally, if there are any problems with the Internet connection, click on the button. Diagnostics. At the same time, Windows Vista will try to find the source of the problem and offer solutions to it.
By the way, for diagnostics, you can also click on the link Diagnostics and recoverylocated on the left pane of the window . Network Connectivity Diagnostic Software - Great windows tool Vista, which will automatically perform for you some actions hitherto known only to system administrators. For example, it will renew the lease of the DHCP address, restore the network connection, disable or enable the network adapter if necessary, etc.
At the same time, a window with the diagnostics results may appear on the screen, in which various recommendations will be offered to solve the problem. Often, the diagnostic tool solves problems with your network connection yourself.
Now pay attention to the link View full maplocated in the upper right corner of the screen, immediately below the caption . Click this link to have Windows Vista independently create a map of your home network, including the display of all connections to other computers on the network. Unfortunately, the best result will be achieved if Windows Vista is installed on all computers on the local network. Otherwise, the network map will be incomplete, although all network devices will be listed in it.
Now back to the window and look at the parameters located immediately below the mini-map of your network connection in the right part of the window. If you click on the link Customizationlocated to the right of the icon NetworkYou will be able to choose the type of network location for your computer. The choice of type depends on where and in what quality your computer is used.
There are only two types of accommodation. For each type of placement, you can select a special icon or use the default icon offered by Windows Vista.
- Public. When you connect to a public network, such as a public Wi-Fi network in a cafe or airport, Windows Vista will try to protect the computer as much as possible (in particular, the laptop) from possible intrusion from outside.
- Private. The private type of placement is ideal for a home or office network, because it makes the computer more accessible to other computers on the network with which it can communicate without obstacles.
Now pay attention to the field Sharing and Network Discovery. As you can see, it lists a lot of network functions, each of which has certain features. Consider them in more detail.
- Network discovery. Enable this feature to make your computer visible to other computers on the network.
- File Sharing. This feature allows you to set up file sharing.
- Shared access to shared folders. Set up sharing of shared folders, such as a folder Are common in folder Users on drive C.
- Using shared printers. Configure access to a printer connected to your computer for other computers on the local network.
- Password protected sharing. Enable this feature so that you need to provide a username and password to access shares and devices on your computer. If this feature is turned off, free access to resources will be open to everyone.
- Sharing media files. Activate this feature and then specify in Windows Media Player 11 which media files (audio and video) you want to share.
To view which folders and files are shared on your computer, click on the link Show all files and folders on this computer that are sharedlocated at the very bottom of the window .
Sergey Pakhomov
When you start working with the new operating system Windows Vista, the problem of setting up network connections arises. The difficulty lies in the fact that, having become accustomed to the interface of the Windows XP operating system, it is not possible to quickly change to the new interface offered by Windows Vista. In general, the first impression from the Network Management Center and shared (this is the name of the network connection settings dialog box in Windows Vista) is by no means unambiguous. It seems that, wanting to simplify everything as much as possible, the developers have left the entire configuration process at the mercy of the corresponding Network Connection Setup Wizard. But it seems that they have overdone it, and as a result, everything has only become more complicated. The transparency and simplicity that were inherent in Windows XP disappeared, and instead of them we got a lot of dialog boxes that are easily confused. But in Windows Vista, there are tools that increase the security and reliability of network connections, which, of course, is its undoubted advantage.
In this article we will take a closer look at all the nuances of creating network connections using the example of Russian windows version Vista Ultimate (32 bits) (build 6.0.6000).
AT operating system Microsoft Windows Vista all network connection settings are made in the window. To access it, click on the desktop icon Network right-click and in the opened context menu select item Properties (Fig. 1).
Fig. 1. Accessing the Network and Sharing Center
As a result, a window will open. Network and Sharing Center(Fig. 2), in the right part of which the status and properties of the computer connection to the Internet and the local network are displayed, and in the left part the taskbar with links to other dialog boxesrelated to the settings, management, viewing and diagnostics of network connections.
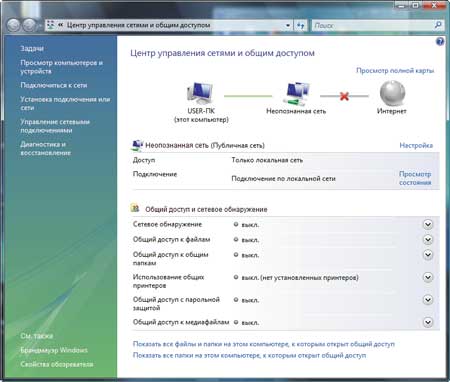
Fig. 2. Network and Sharing Center
First consider the connection of a computer with Windows Vista operating system to a local network using a wired interface, that is, an Ethernet connection.
Until the necessary settings for connecting to the local network are made on the computer’s network controller, Network Sharing Centercomputer connection status will be displayed as No connection or as connection to Unidentified network.
To enable a computer on a local network, first of all you need to find out if it uses a DHCP server or if each computer on the network is assigned a static IP address. However, the second option is quite rare - as a rule, it is used at home, when two or three computers are combined in a network. But even if the home network is built on the basis of a router with Internet access, the router itself is often used as a DHCP server, which necessarily has a built-in DHCP server. In the case of corporate networks with tens or more computers, the standard solution is to use a DHCP server.
A DHCP server allows all computers on a local network to obtain IP addresses automatically from a predefined range of IP addresses. Actually, in this case, no specific settings are required on the network controller. With the default settings, the network controller will try to get all network addresses (its IP address, the default gateway IP address, DNS server IP address) automatically.
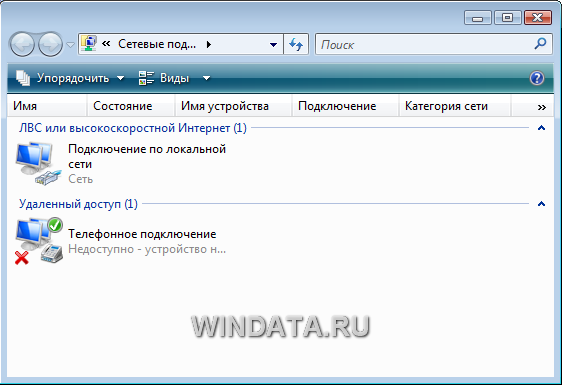
In order to configure the network controller of the computer to automatically obtain IP-addresses or manually set IP-addresses, it is necessary in the window Network and Sharing Centeron the taskbar click on the link Network Connectivity Management. In the window that opens Network connections (Fig. 3) select the network interface we need (if there are several of them) and, by clicking on it with the right mouse button, select the item in the context menu Properties.
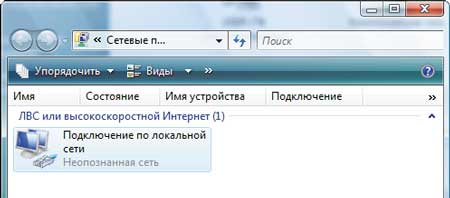
Fig. 3. Network Connections window
This will open the properties dialog box. network connection (LAN connection- properties) (Fig. 4), which practically does not differ from a similar window in the operating room windows system Xp.
Fig. 4. Network Connection Properties Dialog Box
Going to the item, click on the button Properties, after which the familiar (for those who have experience in setting up network connections in Windows XP) the TCP / IPv4 protocol properties window should open. It sets the IP addresses of the network controller, default gateway and DNS server.
If the local network uses a DHCP server, then in the TCP / IPv4 protocol properties window it is necessary to check Get an IP address automatically and item Get the DNS server address automatically. (Fig. 5). These network controller settings are used by default.
Fig. 5. Configure TCP / IPv4
If you need to connect to a local network that does not use a DHCP server, you must manually assign an IP address to the computer and set the subnet mask. Naturally, the assigned IP address must be from the same subnet as all other addresses of the computers on this local network. In addition, if your local network has a router with Internet access, you must also specify the IP address of the main gateway (the IP address of the router with Internet access) in order to gain access to the Network.
After the computer’s network interface has been configured, it will be connected to the local network and in the window Network and Sharing Centerthe connection status is displayed with the name of the network to which the PC is connected. For example, if a computer is connected to a network domain, then the network domain name will be displayed as the network name (Fig. 6).

Fig. 6. Network Control Center window
and sharing with status display
network domain connection
After connecting the computer to the local network in the window Network and Sharing Centerit will be possible to make additional settings for the network connection.
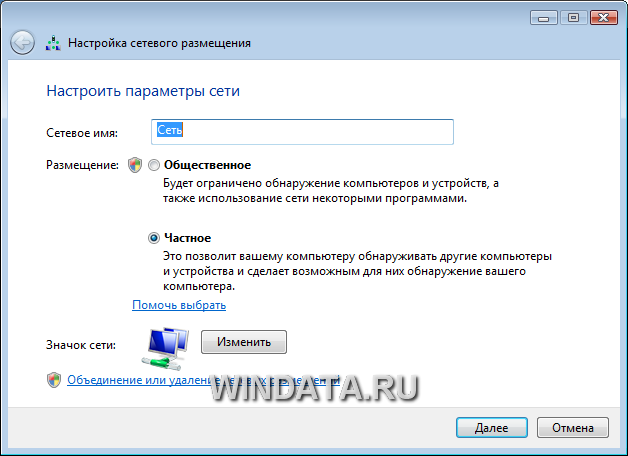
To do this, select the link on the taskbar. Customization opposite the name of the local network. In the window that opens Network Location Setup (Fig. 7) you can specify the name of the created network connection (for example, HOME LAN), select the icon for this connection and the type of network location ( Publicor Private). As for the home network, it is better to set the type of placement Privatebecause it will allow your computer to detect other computers and devices on the local network and make it possible for them to detect your computer. For a public network (for example, if we are talking about a wireless hot spot) it is better to use the type of placement Public. In this case, the detection of computers on the network, as well as the use of the network by some programs, will be limited.
Fig. 7. Setting network parameters
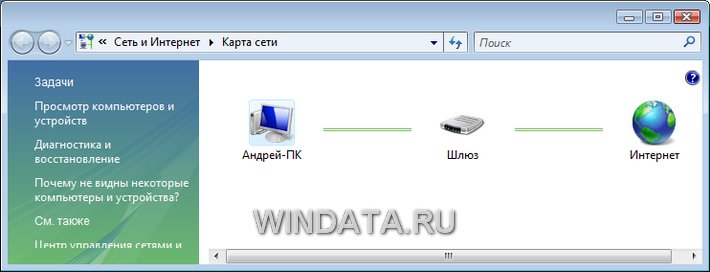
Once the network settings are configured, in the Network and Sharing Centeryou can view the complete network map by clicking on the link. View full map. It should be noted that the correct network structure is displayed only in the simplest cases, and if the local network more or less complicated, it is not necessary to expect its correct display. For example, in our case, we used a home LAN consisting of three computers and two wireless routers operating in the distributed wireless network (WDS) mode and respectively connected to each other via a wireless interface. A laptop and a wired computer were connected to one router wirelessly, and another computer was connected via a wired interface to another router. A diagram of such a network is shown in Fig. eight.
Fig. 8. View the full map of the local network
As you can see, the Network and Sharing Center incorrectly displays the network diagram. First, the wireless router is displayed as a wireless access point and an associated switch, and not as a single device. The second wireless router is generally displayed as a switch, and wireless communication between two routers is defined as a wired connection between two switches. Therefore, you should not trust the displayed network diagram. At the same time, we note that the created network map allows you to quickly view the IP and MAC addresses of all computers and network devices included in the local network. To do this, it is enough to move the mouse pointer to the icon with the image of a computer or a network device, and the IP and MAC addresses of the network adapter (network device) are displayed in a pop-up prompt.
In addition to the ability to specify the type of location of the local network ( Privateor Public), in the Network and Sharing Center you can more precisely configure all parameters of computer access to the network, as well as access parameters to the computer from the local network. Thus, management (switching on and off) of the following access parameters is provided:
- network discovery;
- file sharing;
- sharing shared folders;
- the use of shared printers;
- shared access with password protection;
- sharing media files.
Access parameter Network discovery determines whether this computer will see other network computers and devices and whether, in turn, this computer is visible to other network computers.
Parameter File Sharing establishes whether files and printers that are shared on a computer will be available to other users of the network.
Parameter Sharing shared folders Determines whether network users will be able to access files located in a shared folder. At the same time, you can enable shared access to shared folders so that network users can open, edit and create files in shared folders on this computer or just open them for reading.
Parameter Using shared printers determines whether printers connected to this PC can be used by other network users.
When enabled Password protected sharing access to shared files and printers will be available only to users for whom this PC is created accounts and passwords.
When enabled Sharing media files Network users will have access to music files, images and video files stored on this PC, and the computer will search for common files of this type on the network.
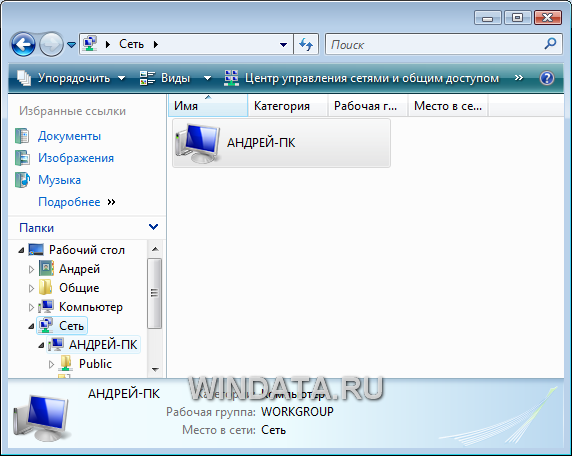
After the computer is included in the local network, the Network and Sharing Center allows you to quickly access the local network browser. To do this, just enough on the taskbar in the window Network and Sharing Centerselect link View computers and devices. This will open a window Network (Fig. 9), in which all computers of the local network and network devices will be displayed. By clicking on any of these computers (devices), you can access it, if provided for by the security policy.
Fig. 9. View computers included in the local network
Note that access to the network browser can also be obtained by left-clicking on the icon Network on the desktop.
The next function provided by the Network and Sharing Center is the ability to select the local network to which you want to connect. It is important in the case when there are several wireless LANs.
For setting up wireless connections, the Network and Sharing Center provides a special wireless connection setup wizard. To configure wireless connections on the taskbar in Network and Sharing Centeryou must select a link. After that, a window of the same name will open (Fig. 10), in which you can create a new profile (or edit an existing one) of the connection to the wireless network.
Fig. 10. Window Wireless Management
To create a new profile for connecting to a wireless network, you first need to either configure the wireless adapter to automatically obtain IP addresses, or manually register all IP addresses.
For settings wireless adapter select in the box Wireless Management on the taskbar item Adapter properties. This will open the window of wireless network adapter settings that are already familiar to us. Going to the point Internet Protocol Version 4 (TCP / IPv4) and pressing the button Properties, we get to the standard window where you can set the IP address of the wireless network adapter, the subnet mask, the IP address of the main gateway, as well as the IP addresses of the primary and secondary DNS servers.
If we are talking about a public wireless network such as a hot spot, you need to configure the wireless network adapter to automatically receive all IP addresses (these are the default settings). For a home network based on a wireless access point or wireless router, you may need to manually assign IP addresses.
After setting up the wireless network adapter, you can start creating a new wireless profile. To do this in the window Wireless Management on the taskbar, select To add. After this, a dialog box opens (Fig. 11), offering three options for creating a wireless profile:
- add a network that is in range of this computer;
- create a network profile manually;
- create a network "computer - computer"
Fig. 11. Options for creating a wireless profile
If your wireless access point or wireless router is active and your computer is in range of an unsecured wireless network, it is advisable to use Add a network that is in range of this computer. Selecting this option will open a window with a list of all detected wireless networks (Fig. 12). By selecting from this list an unsecured wireless network, that is, a network that does not use data authentication and encryption protocols, and click on the button Connect, you can connect to this wireless network. After successful connection to the selected wireless network, you will be asked to save the settings of this network, that is, to create a profile wireless connection to a specific network. If you plan to repeatedly connect to the selected wireless network, it is advisable to save the connection profile, however, if you connect to the network once, you do not need to create a profile. If the option to save the connection parameters is selected, in the Wireless Management a new wireless network connection profile will be added.
Fig. 12. Window with a list of wireless networks
in the area where the computer is located
If you plan to create a connection profile to a secured wireless network, then in the dialog box Manually connect to a wireless network you must select a connection option Create a network profile manually. Selecting this option will open a dialog box in which you must specify the network name, security type, and encryption key. In addition, in the same window, you can specify options such as the ability to automatically connect to this network (Fig. 13).
Fig. 13. Profile setting
wireless connection when connected to a secured network
It should be noted that in the current implementation of Windows Vista, the wireless setup wizard when connected to a secure wireless network does not work correctly (what to do - there are a lot of "glitches" in Vista!). Therefore, do not be surprised that after creating a wireless network profile using the above described method, you will not be able to connect to it - you must first edit the profile. For example, if you connect to a secure network that uses WEP encryption, then when you specify the WEP security type and enter the security key in the created profile, WEP encryption will be used, but without user authentication (security type - No authentication(open)). In addition, the specified network name will also serve as the SSID. Naturally, these settings may not allow you to connect to a secure network, and therefore the first step is to start fixing "glitches".
In the window Wireless Management select the added profile and right click on it. To change the name of the network (but not the SSID network), in the context menu, select Rename (Fig. 14). This will allow you to enter a new network name, different from the SSID network.
Fig. 14. Rename Wireless Network
Then again click on the added profile with the right mouse button and select the item in the context menu Properties. This will open a window Network security properties. Tab Connection You can specify the method of connecting to the network, and on the tab Security - security type (authentication method), encryption type and enter the encryption key (Fig. 15). It is on this tab that you can fix Microsoft errors. Specify the required security type (authentication method), encryption type and re-enter the encryption key. Only after that the created profile will allow you to connect to a secure wireless network.

Fig. 15. Configure authentication method
and type of encryption in a wireless network
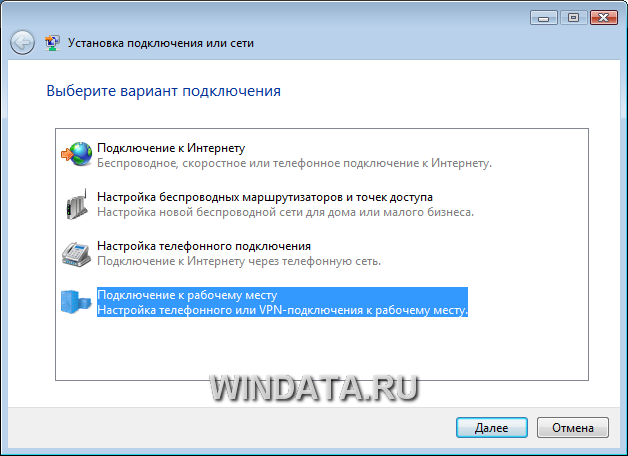
Another useful feature provided by the Network and Sharing Center is the ability to run the New Connection Wizard. To run this wizard on the taskbar in the window Network and Sharing Centerselect link Establishing a connection or network. A window of the same name will open (fig. 16), in which several options will be offered for creating connections or network settings:
- internet connection;
- setting up wireless routers and access points;
- manually connect to a wireless network;
- setting up a computer-to-computer wireless network;
- telephone connection setup;
- connection to the workplace.

Fig. 16. Set up a network or network window
Option Internet connection allows you to configure a wireless, high-speed (using PPPoE protocol) or telephone (using an analog modem or ISDN) Internet connection (Fig. 17).
Fig. 17. Dialog box Connect to the Internet
Choice of option Setting up wireless routers and access points launches the router setup wizard (access point). Naturally, to run this wizard, it is necessary that the computer be connected to a router (access point). The setup wizard offers two ways to configure it: it allows you to either open the web-interface of the router (access point) and then manually configure the device, or create all the settings of the protected wireless network (network profile) and save them to flash media with the possibility of later transfer to the router and other computers. True, for this the router (access point) must support configuration from flash media.
Choice of option Manually connect to a wireless network starts the familiar wireless network setup wizard.
Option Wireless network setup "computer- computer" Allows you to configure your wireless network in Ad-Hoc mode, that is, in the mode of two computers interacting with each other directly, without using an access point.
Option Telephone setup is designed to configure an Internet connection using an analog modem. This option duplicates the wizard, which runs in option Internet connection when choosing a telephone connection method.
Option Connection to the workplace allows you to configure a VPN connection to the Internet.
Sergey Pakhomov
When you start working with the new operating system Windows Vista, the problem of setting up network connections arises. The difficulty lies in the fact that, having become accustomed to the interface of the Windows XP operating system, it is not possible to quickly change to the new interface offered by Windows Vista. In general, the first impression of the Network and Sharing Center (the so-called network connection settings dialog box in Windows Vista) is by no means unambiguous. It seems that, wanting to simplify everything as much as possible, the developers have left the entire configuration process at the mercy of the corresponding Network Connection Setup Wizard. But, it seems, they overdid it, and as a result, everything only became more complicated. The transparency and simplicity that were inherent in Windows XP disappeared, and instead of them we got a lot of dialog boxes that are easily confused. But in Windows Vista, there are tools that increase the security and reliability of network connections, which, of course, is its undoubted advantage.
In this article we will take a closer look at all the nuances of creating network connections using the example of the Russian version of Windows Vista Ultimate (32 bits) (build 6.0.6000).
In the Microsoft Windows Vista operating system, all network connection settings are made in the window. To access it, click on the desktop icon Network right-click and in the context menu that opens, select Properties (Fig. 1).
Fig. 1. Accessing the Network and Sharing Center
As a result, a window will open. Network and Sharing Center(Fig. 2), in the right part of which the status and properties of the computer’s connection to the Internet and the local network are displayed, and on the left, the taskbar with links to other dialog boxes related to settings, management, viewing and diagnostics of network connections.
Fig. 2. Network and Sharing Center
First consider the connection of a computer with Windows Vista operating system to a local network using a wired interface, that is, an Ethernet connection.
Until the necessary settings for connecting to the local network are made on the computer’s network controller, Network Sharing Centercomputer connection status will be displayed as No connection or as connection to Unidentified network.
To enable a computer on a local network, first of all you need to find out if it uses a DHCP server or if each computer on the network is assigned a static IP address. However, the second option is quite rare - as a rule, it is used at home, when two or three computers are combined in a network. But even if the home network is built on the basis of a router with Internet access, the router itself is often used as a DHCP server, which necessarily has a built-in DHCP server. In the case of corporate networks with tens or more computers, the standard solution is to use a DHCP server.
A DHCP server allows all computers on a local network to obtain IP addresses automatically from a predefined range of IP addresses. Actually, in this case, no specific settings are required on the network controller. With the default settings, the network controller will try to get all network addresses (its IP address, the default gateway IP address, DNS server IP address) automatically.
In order to configure the network controller of the computer to automatically obtain IP-addresses or manually set IP-addresses, it is necessary in the window Network and Sharing Centeron the taskbar click on the link Network Connectivity Management. In the window that opens Network connections (Fig. 3) select the network interface we need (if there are several of them) and, by clicking on it with the right mouse button, select the item in the context menu Properties.
Fig. 3. Network Connections window
This will open the network connection properties dialog box ( LAN connection- properties) (Fig. 4), which practically does not differ from a similar window in the Windows XP operating system.
Fig. 4. Network Connection Properties Dialog Box
Going to the item, click on the button Properties, after which the familiar (for those who have experience in setting up network connections in Windows XP) the TCP / IPv4 protocol properties window should open. It sets the IP addresses of the network controller, default gateway and DNS server.
If the local network uses a DHCP server, then in the TCP / IPv4 protocol properties window it is necessary to check Get an IP address automatically and item Get the DNS server address automatically. (Fig. 5). These network controller settings are used by default.
Fig. 5. Configure TCP / IPv4
If you need to connect to a local network that does not use a DHCP server, you must manually assign an IP address to the computer and set the subnet mask. Naturally, the assigned IP address must be from the same subnet as all other addresses of the computers on this local network. In addition, if your local network has a router with Internet access, you must also specify the IP address of the main gateway (the IP address of the router with Internet access) in order to gain access to the Network.
After the computer’s network interface has been configured, it will be connected to the local network and in the window Network and Sharing Centerthe connection status is displayed with the name of the network to which the PC is connected. For example, if a computer is connected to a network domain, then the network domain name will be displayed as the network name (Fig. 6).
Fig. 6. Network Control Center window
and sharing with status display
network domain connection
After connecting the computer to the local network in the window Network and Sharing Centerit will be possible to make additional settings for the network connection.
To do this, select the link on the taskbar. Customization opposite the name of the local network. In the window that opens Network Location Setup (Fig. 7) you can specify the name of the created network connection (for example, HOME LAN), select the icon for this connection and the type of network location ( Publicor Private). As for the home network, it is better to set the type of placement Privatebecause it will allow your computer to detect other computers and devices on the local network and make it possible for them to detect your computer. For a public network (for example, if we are talking about a wireless hot spot) it is better to use the type of placement Public. In this case, the detection of computers on the network, as well as the use of the network by some programs, will be limited.
Fig. 7. Setting network parameters
Once the network settings are configured, in the Network and Sharing Centeryou can view the complete network map by clicking on the link. View full map. It should be noted that the correct network structure is displayed only in the simplest cases, and if the local network is more or less complex, then it is not necessary to expect its correct display. For example, in our case, we used a home LAN consisting of three computers and two wireless routers operating in the distributed wireless network (WDS) mode and respectively connected to each other via a wireless interface. A laptop and a wired computer were connected to one router wirelessly, and another computer was connected via a wired interface to another router. A diagram of such a network is shown in Fig. eight.
Fig. 8. View the full map of the local network
As you can see, the Network and Sharing Center incorrectly displays the network diagram. First, the wireless router is displayed as a wireless access point and an associated switch, and not as a single device. The second wireless router is generally displayed as a switch, and wireless communication between two routers is defined as a wired connection between two switches. Therefore, you should not trust the displayed network diagram. At the same time, we note that the created network map allows you to quickly view the IP and MAC addresses of all computers and network devices included in the local network. To do this, it is enough to move the mouse pointer to the icon with the image of a computer or a network device, and the IP and MAC addresses of the network adapter (network device) are displayed in a pop-up prompt.
In addition to the ability to specify the type of location of the local network ( Privateor Public), in the Network and Sharing Center you can more precisely configure all parameters of computer access to the network, as well as access parameters to the computer from the local network. Thus, management (switching on and off) of the following access parameters is provided:
- network discovery;
- file sharing;
- sharing shared folders;
- the use of shared printers;
- shared access with password protection;
- sharing media files.
Access parameter Network discovery determines whether this computer will see other network computers and devices and whether, in turn, this computer will be visible to other network computers.
Parameter File Sharing establishes whether files and printers that are shared on a computer will be available to other users of the network.
Parameter Sharing shared folders Determines whether network users will be able to access files located in a shared folder. At the same time, you can enable public access to shared folders so that network users can open, modify and create files in shared folders on this computer, or just open them for reading.
Parameter Using shared printers determines whether printers connected to this PC can be used by other network users.
When enabled Password protected sharing access to shared files and printers will be available only to users for whom accounts and passwords have been created on this PC.
When enabled Sharing media files Network users will have access to music files, images and video files stored on this PC, and the computer will search for common files of this type on the network.
After the computer is included in the local network, the Network and Sharing Center allows you to quickly access the local network browser. To do this, just enough on the taskbar in the window Network and Sharing Centerselect link View computers and devices. This will open a window Network (Fig. 9), in which all computers of the local network and network devices will be displayed. By clicking on any of these computers (devices), you can access it, if provided for by the security policy.
Fig. 9. View computers included in the local network
Note that access to the network browser can also be obtained by left-clicking on the icon Network on the desktop.
The next function provided by the Network and Sharing Center is the ability to select the local network to which you want to connect. It is important in the case when there are several wireless LANs.
For setting up wireless connections, the Network and Sharing Center provides a special wireless connection setup wizard. To configure wireless connections on the taskbar in Network and Sharing Centeryou must select a link. After that, a window of the same name will open (Fig. 10), in which you can create a new profile (or edit an existing one) of the connection to the wireless network.
Fig. 10. Window Wireless Management
To create a new profile for connecting to a wireless network, you first need to either configure the wireless adapter to automatically obtain IP addresses, or manually register all IP addresses.
To configure your wireless adapter, select in the Wireless Management on the taskbar item Adapter properties. This will open the window of wireless network adapter settings that are already familiar to us. Going to the point Internet Protocol Version 4 (TCP / IPv4) and pressing the button Properties, we get to the standard window where you can set the IP address of the wireless network adapter, the subnet mask, the IP address of the main gateway, as well as the IP addresses of the primary and secondary DNS servers.
If we are talking about a public wireless network such as a hot spot, you need to configure the wireless network adapter to automatically receive all IP addresses (these are the default settings). For a home network based on a wireless access point or wireless router, you may need to manually assign IP addresses.
After setting up the wireless network adapter, you can start creating a new wireless profile. To do this in the window Wireless Management on the taskbar, select To add. After this, a dialog box opens (Fig. 11), offering three options for creating a wireless profile:
- add a network that is in range of this computer;
- create a network profile manually;
- create a network "computer - computer"
Fig. 11. Options for creating a wireless profile
If your wireless access point or wireless router is active and your computer is in range of an unsecured wireless network, it is advisable to use Add a network that is in range of this computer. Selecting this option will open a window with a list of all detected wireless networks (Fig. 12). By selecting from this list an unsecured wireless network, that is, a network that does not use data authentication and encryption protocols, and click on the button Connect, you can connect to this wireless network. After successfully connecting to the selected wireless network, you will be asked to save the settings of this network, that is, to create a wireless profile for connecting to a specific network. If you plan to repeatedly connect to the selected wireless network, it is advisable to save the connection profile, however, if you connect to the network once, you do not need to create a profile. If the option to save the connection parameters is selected, in the Wireless Management a new wireless network connection profile will be added.
Fig. 12. Window with a list of wireless networks
in the area where the computer is located
If you plan to create a connection profile to a secured wireless network, then in the dialog box Manually connect to a wireless network you must select a connection option Create a network profile manually. Selecting this option will open a dialog box in which you must specify the network name, security type, and encryption key. In addition, in the same window, you can specify options such as the ability to automatically connect to this network (Fig. 13).
Fig. 13. Profile setting
wireless connection when connected to a secured network
It should be noted that in the current implementation of Windows Vista, the wireless setup wizard when connected to a secure wireless network does not work correctly (what to do - there are a lot of "glitches" in Vista!). Therefore, do not be surprised that after creating a wireless network profile using the above described method, you will not be able to connect to it - you must first edit the profile. For example, if you connect to a secure network that uses WEP encryption, then when you specify the WEP security type and enter the security key in the created profile, WEP encryption will be used, but without user authentication (security type - No authentication(open)). In addition, the specified network name will also serve as the SSID. Naturally, these settings may not allow you to connect to a secure network, and therefore the first step is to start fixing "glitches".
In the window Wireless Management select the added profile and right click on it. To change the name of the network (but not the SSID network), in the context menu, select Rename (Fig. 14). This will allow you to enter a new network name, different from the SSID network.
Fig. 14. Rename Wireless Network
Then again click on the added profile with the right mouse button and select the item in the context menu Properties. This will open a window Network security properties. Tab Connection You can specify the method of connecting to the network, and on the tab Security - security type (authentication method), encryption type and enter the encryption key (Fig. 15). It is on this tab that you can fix Microsoft errors. Specify the required security type (authentication method), encryption type and re-enter the encryption key. Only after that the created profile will allow you to connect to a secure wireless network.
Fig. 15. Configure authentication method
and type of encryption in a wireless network
Another useful feature provided by the Network and Sharing Center is the ability to run the New Connection Wizard. To run this wizard on the taskbar in the window Network and Sharing Centerselect link Establishing a connection or network. A window of the same name will open (fig. 16), in which several options will be offered for creating connections or network settings:
- internet connection;
- setting up wireless routers and access points;
- manually connect to a wireless network;
- setting up a computer-to-computer wireless network;
- telephone connection setup;
- connection to the workplace.
Fig. 16. Set up a network or network window
Option Internet connection allows you to configure a wireless, high-speed (using PPPoE protocol) or telephone (using an analog modem or ISDN) Internet connection (Fig. 17).
Fig. 17. Dialog box Connect to the Internet
Choice of option Setting up wireless routers and access points launches the router setup wizard (access point). Naturally, to run this wizard, it is necessary that the computer be connected to a router (access point). The setup wizard offers two ways to configure it: it allows you to either open the web-interface of the router (access point) and then manually configure the device, or create all the settings of the protected wireless network (network profile) and save them to flash media with the possibility of later transfer to the router and other computers. True, for this the router (access point) must support configuration from flash media.
Choice of option Manually connect to a wireless network starts the familiar wireless network setup wizard.
Option Wireless network setup "computer- computer" Allows you to configure your wireless network in Ad-Hoc mode, that is, in the mode of two computers interacting with each other directly, without using an access point.
Option Telephone setup is designed to configure an Internet connection using an analog modem. This option duplicates the wizard, which runs in option Internet connection when choosing a telephone connection method.
Option Connection to the workplace allows you to configure a VPN connection to the Internet.