We looked at the subsection of the file identifier and its parameters that affect the display of the file in Explorer. Today we will look at the ShellNew subsection of the file extension branch ( HKEY_CLASSES_ROOT \\ .extension \\ ShellNew), the presence of which indicates the presence of a file type in the "Create" menu.
Subsection Shellnew present in some files immediately after installing the system. A typical example is a shortcut file (* .lnk), you can create a shortcut in almost any area of the file system.
The very fact of the existence of a subsection Shellnew - the condition is necessary but not sufficient for the correct functioning of the menu item "Create". For this item to work, the subsection must contain at least one of these parameters of the string type:
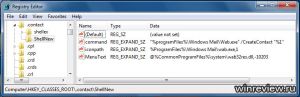
In addition, in Shellnew The following parameters may also be found, also of string type:
- IconPath - sets the path to the icon displayed for the menu item "Create".
- MenuText - sets the text name of the menu item "Create". It can be directly text or a link to a string DLL resource.
There are a number of additional options for setting up a mechanism for creating a new file through the "Create" menu. These capabilities are governed by string type parameters with an empty value, located in the subsection HKEY_CLASSES_ROOT \\ .extension \\ ShellNew \\ Config:
- NoExtension - remove the extension from the created file being created. Every time you create a new folder with Explorer, you see this parameter in action.
- DontRename - do not select the name of the newly created file for renaming.
- IsFolder is a sign that the file being created is a means of organizing links to files. The usual folder is a vivid example.
- NoEmptyFile - creating an empty file is not allowed (hmm, antipode ShellNew \\ NullFile?)
We use this information in practice.
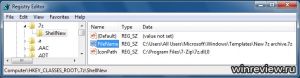
Example number 1. Creating item "New archive 7z"
For the 7-zip archiver, we will create the "Create" menu item (here I assume that it is already installed on the target computer), which we will use to create the new 7z archive.
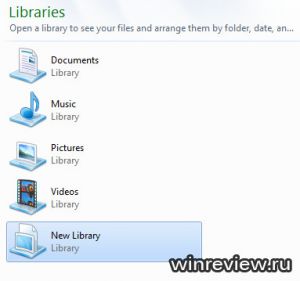
Example number 2. Create libraries anywhere in the file system
In early builds Windows 7 there was an opportunity to create libraries where the soul wishes. Closer to the final subsection expansion HKEY_CLASSES_ROOT \\ .library-ms \\ ShellNew modified in such a way that libraries can now be created only in the appropriate folder. As a demo in the article we will turn this feature back.
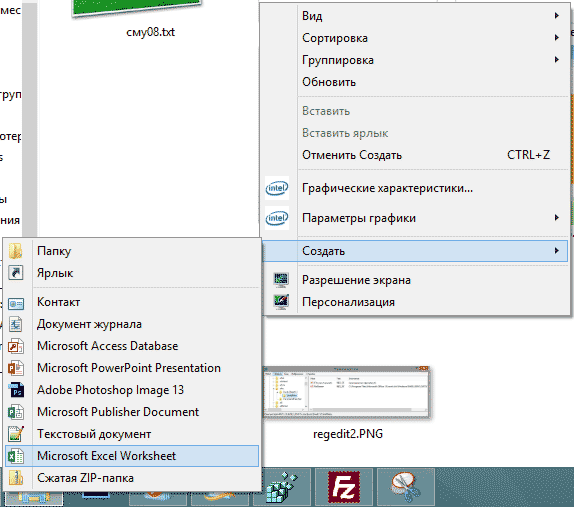
After installation latest version Microsoft Office 2014 there was a problem: in any folder when you click on the right mouse button in paragraph The “Create” option was missing to create a new Microsoft Excel sheet.
The Internet is full of solutions, how to add your file type to this section, but all solutions are incomplete. My instructions are suitable for the 2014 office, but with some obvious adjustments, this solution can also be used for previous versions.
- So, open the Start - Run - regedit - OK.
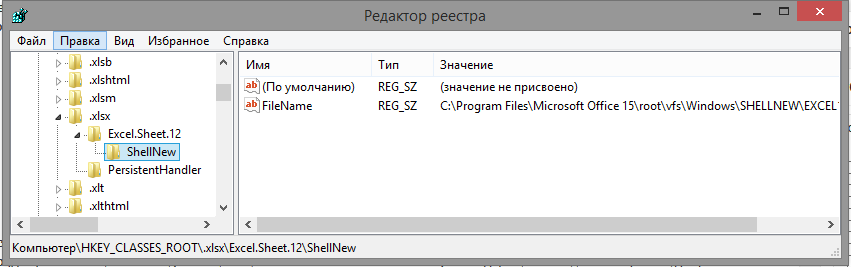
- Open HKEY_CLASSES_ROOT \\ .xlsx: this branch should have the default value “Excel.Sheet.12”, and the Content Type should be “application / vnd.openxmlformats-officedocument.spreadsheetml.sheet”.
- Inside the .xlsx branch, you need to create a section called "Excel.Sheet.12".
- In this section, we create another “ShellNew” section, and in it we add the FileName string parameter with the value “C: \\ Program Files \\ Microsoft Office 15 \\ root \\ vfs \\ Windows \\ SHELLNEW \\ EXCEL12.XLSX”. It is necessary to create not an empty file, but a file by a template. This template is in the folder with the office, the path to this file may be different, check with yourself. By default it is located at the address given above.
- Done! You can complete the explorer.exe process and restart it, or just restart your computer.
Bonus! For those who are too lazy to poke around in the registry on their own, I suggest a ready file, which is enough to import into the registry (double-click on it). If you have installed Microsoft Office 2014 in a standard folder, then this file will work without problems.
The result should be:
Customize and adjust to your needs context menu "Explorer", in particular, a submenu for creating new files and folders.
In the context menu of the "Explorer" Windows there is a submenu for creating new files and folders. However, there is little benefit from it, since the necessary programs usually don’t write their templates there, and unnecessary ones, on the contrary, only in vain occupy lines. In this article we will describe how this menu can be adjusted to fit your needs.
First, consider how to clean it from unnecessary lines.
There are two options. Option one is to use the Microsoft PowerToys Tweak UI tool.
Installing and downloading this application, follow the Templates section. It's simple. Pressing the Delete button deletes the selected line, and removing the check mark in front of one line or another, we achieve a temporary deactivation of the menu item for which it is responsible.
If someone doesn't like this simple solution (or operating system Windows of the old version, with which PowerToys does not work), then there is a second option. Its essence is as follows. Experimentally, we find out what extension we have of the file being created, the possibility of creating which we want to get rid of. Suppose it is .doc. Go to the registry, find the HKEY_CLASSES_ROOT branch and open the .doc file extension there.
Remove from the branch all subdirectories named ShellNew. Please note that they can be either directly in the extension folder or in its deeper subdirectories. Pre-recommended to keep a copy of this registry key.
Well, with the removal figured out. All changes take effect immediately (more precisely, after a few seconds), no reboot is required.
Now let's figure out how to create your own line in this menu.
Let's start solving the problem again with the help of the Microsoft PowerToys Tweak UI mentioned above. First in the desired program create a file and save it (it will be the initial template). Then open the Tweak UI and click the Create button in the Templates section. The utility will ask you to specify a template file, indicate only the file created. Is done. Now, when selecting the line of our new file in the context menu, our template file will be copied to this place.
Meanwhile, the possibilities of this mechanism are much wider than Tweak UI offers. For example, you can automatically launch any program immediately, or create a template file of just zero size.
So if simple creation The file is small, go to the registry in the HKEY_CLASSES_ROOT section, find the extension of the desired file type. There, we grope or create a subfolder with the name ShellNew (in order to open a new file in the context menu of the explorer, it is enough to create a subfolder with the name ShellNew in the registry of the extension of the desired file type).
The next option is to provide the ability to create a file for the program. Specify the string parameter Command. As it is easy to guess from the title, this command linewhich will be launched. In Command, we simply write in quotes the full path to the program file, a space and (also in quotes) the macro% 1 (it will be replaced with the name of the newly created file), for example, "c: \\ windows \\ notepad.exe" "% 1" .
Now the created file will immediately open in the specified program.
Parameters FileName, Data, NullFile, Command cannot be used together, only one of them can be used.
1. Described in the knowledge base
Adding a new item to the menu "Create"
Chebotarev Igor
I sat here recently, sculpted several pages for the site. It was necessary to create all the files from scratch, so the simple method of copying and editing did not work. I usually work in FARe, but this time I had to use a computer where it was not there, and create all the files in notepad. It is painfully inconvenient for this business - to create a bunch of initially files of the same type all over again, and I remembered the possibility of creating files using Windows. Did you pay attention to the Create menu item that appears when you click on the Desktop or free space open folder? Well, of course, paid, because this is how you create new directories and shortcuts to the programs. But did you create anything else (after all, there is a very impressive list)? I doubt it. And if they created, it is very rare. And, nevertheless, it is very convenient function. The only pity is that there are not those files that can be useful to us. So what's the problem? Add the menu items for the files that we need.
So, it all started with html-files, and a considerable part of the audience of this site is people somehow related to web design, so I’ll show you the creation of a new menu item using these files as an example.
But we will not start with the registry (although it won't do without it), but with the Windows directory (well, or where you installed it) ... You need to find the ShellNew directory there. Note that it is hidden. It is stored in it blanks for files that are created using the context menu. If you have Microsoft Office installed, then you will see in this directory files for Word and Excel, and some other files. But now they do not interest us. Create a file in it, for example index.html. It is best to use FAR for these purposes (I really love this file manager, so I try in every way to promote it among the masses). Inside it write the preparation of your page. Personally, I wrote the following:
though, you can add something else to your taste (for example, meta tags, some kind of body design).
Save the file. Now it is the turn of the registry (as without him :)). If you remember, in the article Register File Extensions Using windows registry The method of this registration was described. The material cited there will be useful for understanding the essence of the manipulations performed, although you can do without it. So, we are looking for the HKEY_CLASSES_ROOT \\ .htm and HKEY_CLASSES_ROOT \\ .html section and create ShellNew sections in them. In the ShellNew section, we create a string parameter FileName for the value of which we need to specify the name of the template we created. That's all. It remains only to restart the computer and enjoy the new menu item.
By the way, the file will be created initially with the name specified in the Default parameter of the HKEY_CLASSES_ROOT \\ htmlfile section (which section for other extensions this can be seen in the Default parameter of the HKEY_CLASSES_ROOT \\ .XXX section, where XXX is the file extension) .
Actually, "everything" I said a bit early. After all, it is not necessary to create a template file. It may be empty, but then instead of the FileName parameter, you need to create an empty NullFile string parameter.
And what if the section with the extension you need is not in HKEY_CLASSES_ROOT? This is where you can use the link to the article above. First you register this extension in Windows, and then you do all the simple manipulations described in this article.
Well, how to remove the menu item from the "Create", I think, it is not worth explaining. It's pretty simple and easy to figure out.
Now everything is exactly. Finally, I will say that by spending fifteen minutes, you can save much more time in the future, because you can create not only html-files, but any other. Who prevents to create several templates of frequently used documents of your organization, and then only choose the ones you need from the menu. So everything depends on your imagination, and I am sure that you have it rich :).