"System Recovery Disk" what is it and how to use its capabilities? - such questions often torment inexperienced users, who, like me, I think, do not really want to immediately after the first “collapse”. Creating a system recovery disk is necessary for a total rollback of all changes that have damaged the operating system performance. In addition, the computer will restore the system files needed, at least, in order for Windows to boot. A disk with spare files is of great importance if you have neither the time nor the strength to make a total reinstall of Windows, given that the computer has valuable documents that should not be harmed.
Creating a system recovery disk is done in two steps; this is a fairly easy process. I strongly recommend having such a disc in order to quickly return the presentable look to your computer and continue to enjoy life. Today I will tell you how to create this CD, as well as describe the course of the “rehabilitation” launched with its help.
Create a disc
So, let's start creating a CD. I do not know which OS you are using, dear visitors, but I will present this procedure using the example of "Sevens". This principle holds true for all versions of Windows, so this can be easily understood.
First of all, open the "Start" menu, then put the cursor in the search bar and enter "Create".
As you can see, the function that we need is displayed first in the list of results. Choose this option. If nothing is opened or the system issues a message like “Administrator rights are required and the One-Power Ring ...”, proceed as follows. Right-click on the same title, then select "Run as administrator". It is possible that you will be asked to enter an administrator password, provided that you set it, then this window will open.
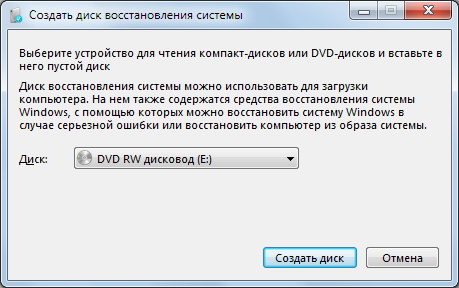
Before you make a system recovery disc, you should select a recording drive. Well, this is in case you have multiple drives. Then insert a clean "blank" in the selected drive. Then click "Create a disc".

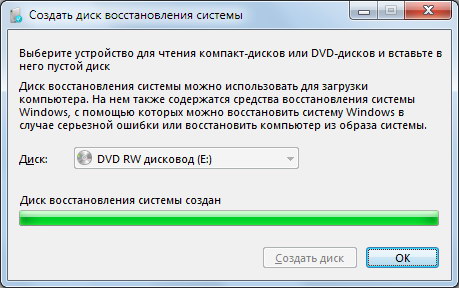
As you can see, the process starts automatically, and to start it, we did not need to perform supernatural operations. As soon as the drive stops buzzing, a window will pop up on the display.
Loading
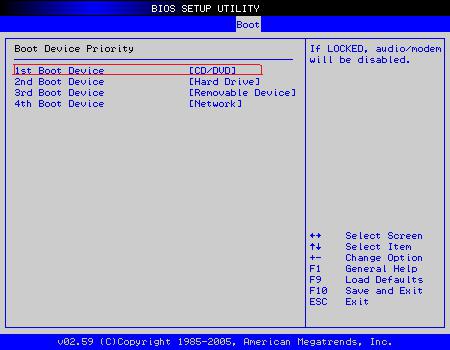
Now that the user has prepared an escape path in case of a critical error in Windows, you can begin to "training recovery." First of all, we need to turn off the computer, then boot from that disk. By the way, make sure he is in the drive! You can load the machine in this way using BIOS. To do this, we click on the ESC, DEL, F2 key (in one of them) immediately after pressing the power button (on most computers this is done this way). So we get into the BIOS. We find the section associated with the priority of the equipment when it is turned on; usually, the phrase BOOT Device is present in this name. In the first place should be the drive, as in the following screenshot. Read more about how to set the boot priority in the BIOS.

The next time you turn on the computer, do not forget to return this configuration to its previous position. That is, in the first place should be a screw, instead of a drive. Yes and when you exit the BIOS, be sure to save all the changes (usually it is F10 key. After you clicked it, you need to press ENTER again).
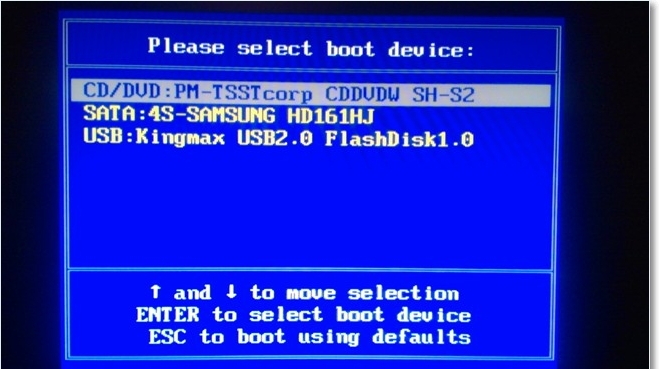
Also on the machines is available a similar function to select the device to run. It is called BOOT Menu. Similar to the previous case, we click on the F9 key (maybe another key, you will have to act at random), after which a menu will appear with a choice of device from which you can boot the car. Choose a drive and voila!
Getting started!
As soon as the system recovery disk loads the so-called “emergency mode”, the main stage of the work begins. Actually, the recovery utility will be presented as follows.

I think, in my example, everything is crystal clear what is the purpose of each mode, kindly suggested by the program. But on all kinds of firemen, i will describe the work of each of them in a little more detail.
The first item in this menu is needed to troubleshoot basic problems when starting the computer. The main ones are basic files of the system, without which your Windows has no value at all. With the help of the tool "fix errors launch" you can fix all the problems arising from the damage or lack of vital files to boot the system. But remember that this utility does not help to correct errors associated with the operation of the hard disk or RAM! The same can be said about protection from.
System Restore, which is in the second position in the screenshot above, is able to restore system files to the previous state. To which particular? This is already decided by the user. This procedure can be described as a journey through time, albeit on a virtual scale. After such a “rollback”, all your personal data will remain intact (photos, music, video, application files). Actually, this is the main advantage of the method. Otherwise, the system recovery procedure is very simple. If you feel insecure in this matter, I recommend in an already running OS.
"Restore system image" - the next opportunity, which opens before us an emergency disk recovery system. Before working with this function, you need to create the very image of the system. From here we can work with a personal archive on disk. This archive contains a bunch of user and system files needed to restore the stable operation of Windows.
Diagnostics of Windows memory is an important element in the section "Restoring a computer from a backup disk." It contains a special program that allows you to make a test of RAM. Testing is started immediately or after a reboot, the decision is up to the user. The verification process can take a long time. It depends on the capacity of the RAM. After that, the computer will automatically restart. If the computer does not work correctly with memory, the system will give you the corresponding error.
The last is the Windows command line. Here we can perform all the above procedures by entering commands. As soon as you select this item, a command line window will open, where we start working. Read more about recovery using cmd (command line).
Conclusion
Creating a system recovery disk was successful, as was the recovery process itself. As you can see, the guys from Microsoft made sure that users could instantly return a presentable look to their computer and continue working without fear for the loss of valuable data. Successes!
As you know, unfortunately, "OSes" of the Windows family are not particularly distinguished by high stability in operation. It is they who are most susceptible to viruses or malware, as well as unforeseen disruptions in work, which often leads to extremely sad consequences when system loading becomes impossible. And Windows 7 is no exception. This will help create a recovery disk Windows 7. How to do it in several ways, we now consider.
Boot issues of Windows 7
As for the reasons that can affect the performance of Windows 7, they can be very much. Despite the fact that of all the operating systems of this family, the “seven” is one of the most stable and protected, however, it is not immune from such cases.
Speaking of boot problems, they can be divided into two main categories: software malfunctions of the OS itself and hard disk malfunctions, including system errors. Quite often, such situations are associated with, say, virus attacks, the influence of malicious codes, incorrect shutdowns, HDD overheating, unexpected power cuts, which can even cause physical damage to the hard drive during a short circuit, etc., etc.
But now it will be a question of how to create a Windows 7 recovery disk. In most cases, fixing software failures and helps fix a lot of problems, even when the automatic checkpoint is impossible (in Windows 7, this happens very often and is due to hard drive or in the partition where the OS is installed).
Using the recovery disc Windows 7
Now a moment of patience. Before proceeding to the direct solution of the issues of creating a Windows 7 recovery disk, a few words about its use. The fact is that when booting from such a disk (or flash drives), all saved parameters, drivers, programs, etc., are not loaded from the hard drive, since the system present on it does not have boot priority.
To properly use the Windows 7 recovery disk, you need to specify in the BIOS settings that the first boot device will be a CD / DVD-drive or USB flash drive. This parameter is selected in the Boot Sequence section (Boot Device Priority) in the First Boot Device row.
Note: if a flash drive is specified as a priority device, it must already be inserted into the appropriate USB port before turning on the computer.
Where to begin?
So let's get started. Immediately it should be said that many users do not particularly bother with creating a Windows 7 recovery disk, preferring to use the original installation or repair kit.
On the one hand, this is a fairly simple solution, but it is suitable either for installing the system from scratch, or for accessing (if there is one on the disk). The problem is that not all users know how to use it. This is where the manually created disk comes in handy, especially since with its use it is possible to recover not only the system, but also the data from the hard drive.
restore windows 7
You can create a boot disk in several ways. To begin, consider the standard tools of the Windows operating system itself.
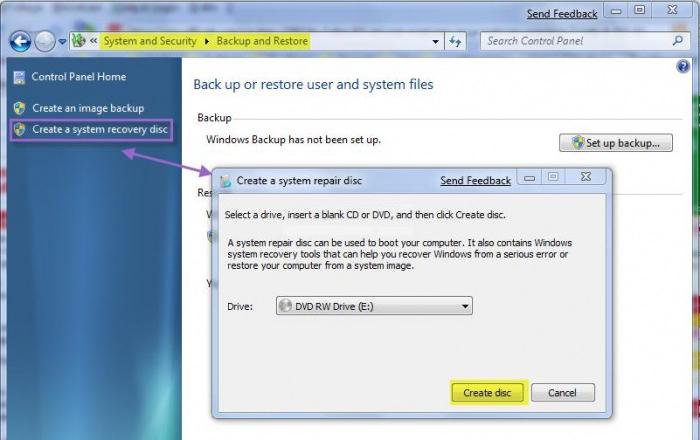
The first and simplest method is to use the “Control Panel”, in which the “Backup and Restore” section is selected. In this section, you must select the line “Create a system recovery disk”, after which you will be asked to choose a device as a boot tool. All you have to do is insert an empty “disc” into the drive and start the recording process.
Immediately, we note that in most cases a regular CD will suffice for a 32-bit system. The amount of recorded information will be about 150 MB. If you are using a Windows 7 64-bit recovery disk, it is better to take a DVD.
This is not the only method of access to commands. You can also use the main “Start” menu, where in the “Maintenance” section you can select access to archiving and recovery or direct the command to create a system boot disk. You can use the recdisc command in the Run menu (Win + R). The essence of this does not change.
Creating a system image
No less effective may be creating an image of the system. This method allows you to get copies of all disks and partitions necessary for the correct operation of the "OS".
In the section above, instead of creating a recovery disk, the option “Create a system image” is simply selected, after which you will need to select the backup storage location (hard disk or partitions, or network location). In principle, the procedure is almost the same as what was described above.
What you need to restore the hard disk
Naturally, Windows 7 can produce just the way discussed, but it is better (and this is proven in practice) to use special utilities. One of the most powerful is Acronis True Image. In it, you can create and restore Windows 7, and a backup of the entire hard drive and its partitions.
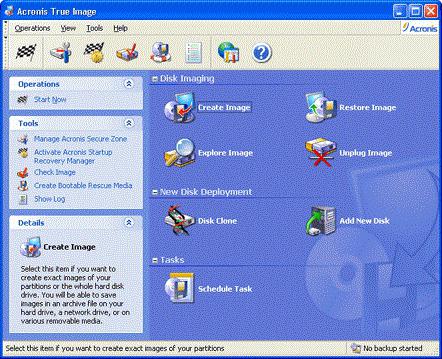
In this case, in the program menu, select the item “Create archive”, after which you can choose what exactly needs to be copied. There are two fields here: “The entire hard disk or separate sections on it” and “Files and folders”. It is clear that you can make a complete copy of all data from the hard drive, but here it is worth considering one important aspect, namely, the amount of information placed in the backup.
This is where the problems with lack of disk space begin. For a solid image, it is better to use removable HDD-hard drives connected via USB ports, and to save individual files and folders in most cases, a regular flash drive is suitable. It all depends on the volume of the “screw” (files and folders) and the amount of removable media.
Third Party Applications
A fairly simple solution to the question of how to create an image of a Windows 7 recovery disk can be the use of popular tools like UltraISO, Daemon Tools, and many others. As a rule, all software products of this type have at their disposal the appropriate tools for working with images.

In this case, the image itself (system or hard drive) is first created, and then recorded on the appropriate removable media.
If nothing helps with recovery
And now a few words about the problems with the boot, if the bootable disk recovery system Windows 7 does not help.
A system crash could be triggered by viruses, so even booting from a disk will not fix the problem. A copy will still “catch” the virus from the hard drive, because the recovery does not affect the user files and folders (and the viruses are disguised just for them).
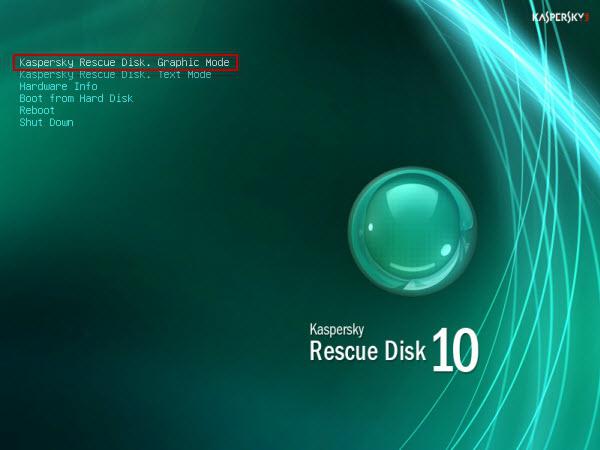
In this case, before restoring, it is recommended to use utilities such as Kaspersky Rescue Disc, which are able to boot even before the OS starts. As practice shows, they remove viruses much more effectively than stationary antiviruses, whose work directly depends on the state of the "OS".
In some cases, the problem, if the system has not recovered, can be solved by using utilities to check the HDD. Among them, too, there are those that start before the start of Windows. However, the use of antivirus, and then the system recovery disk in most cases helps very well. Checking the hard drive may be necessary only if there are problems related to physical defects or system failures in the form of broken sectors that are not correctable by standard methods.
The Windows RE recovery environment allows you to restore system startup and operation, restore from a previously created image, gain access to the command line, and perform diagnostics of RAM.
Recovery Environment Overview
During the installation of Windows 7, a service partition is automatically created on the hard disk, containing the Windows RE recovery environment.
Using the Windows RE service partition, you can:
- boot into recovery environment from hard disk
- create a cd containing the recovery environment
This will allow you to bring the system back to life, even if it does not boot. It does not require the installation disk of the operating system, as was the case with Windows Vista. This is a very important improvement of Windows 7, which should especially please the owners of pre-installed systems that do not have an installation disk. If earlier OEMs implemented their own recovery solutions, now they can simply add their own user interface to the process of restoring images from Windows RE.
Opportunities
As in Windows Vista, the recovery environment in Windows 7 provides you with the following features:
- Startup recovery Automatically fixes problems that prevent Windows 7 from booting. You can use this tool if the boot files are damaged or overwritten by another operating system bootloader.
- System Restore allows you to return to the point created before the problem occurred. Sometimes this tool also allows you to restore system startup. Of course, system protection must be enabled, otherwise there will be no recovery points.
- System Image Recovery is a wizard that guides you through the steps of restoring a system from an image previously created by means of Windows archiving.
- Windows memory diagnostics checks RAM for errors. As a rule, the visible manifestation of errors in RAM is a blue screen (BSOD). When a blue screen appears, a memory check can be used as the first diagnostic tool.
- Command line allows you to perform a wide range of actions from file operations to running the registry editor, which can also be used to restore normal system operation.
Boot into recovery environment from hard disk
To enter the menu Additional download optionsclick F8 after turning on the computer (but before loading the operating system).

The first menu item is Computer troubleshooting - select it and press Enter. Windows Recovery Environment will start, where you will first be asked to select a keyboard layout.

Select the language in which you have set the password for the administrative account, as you will need to enter it in the next step.

After entering the password, you will see a window with recovery options.
Creating a system recovery disk and booting from it
If you have a Windows 7 installation disk, it is not necessary to create a recovery disk. From the installation disc, you can boot into the Windows RE recovery environment. If you do not have the installation disk, you need to create a recovery disk - it will come in handy sooner or later.
Creating a system recovery disk
Insert a blank CD into the drive. In the control panel, open the item Backup and Restorethen click the link in the left panel Create system recovery disc. Actually a disk is created with one click.

Boot from system recovery disk
Insert the recovery disk into the drive and reboot (in BIOS, you need to set the boot priority from the drive). It will boot into Windows RE.
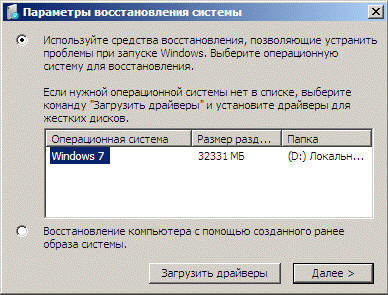
And press the button Further
Booting into the recovery environment from the installation disk
Insert the installation disk into the drive and reboot (in BIOS, you must set the boot priority from the drive). Windows Setup starts. On the first screen, set the language settings, then you will see the initial screen for installing Windows 7.

Select the system you want to restore, select the switch Use recovery tools ... and click Further. You will see a window with recovery options.