Visual and informative video tutorial - 50% success in learning to work with something, especially if it concerns software products or various digital devices. It is sometimes very tiring and unclear to follow the algorithms from the sheet, while on the video the student learns the entire sequence of actions on the fly and easily repeats them on his computer. But in order to create a high-quality video test, you need to record what is happening on the screen, and in fact not everyone knows how to do it.
In such cases, users come to the aid of a special software. We recommend using the universal program "On-Screen Camera", which will allow you to easily record any part of the desktop of your computer, and then process the clip qualitatively.
In this article we will talk about how to shoot video from the monitor screen in just a few minutes.
Step 1. Downloading and installing the program.
First, you need a program for taking video from the screen "Screen Camera", the distribution of which is 55 Mb. Run downloaded Exe file and install the application. To always have quick access to the program, place a shortcut on the desktop - this will make it much more comfortable to work in the future.
Step 2. How to shoot video from the screen
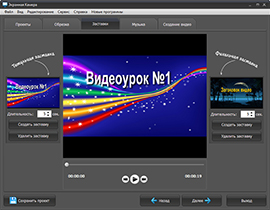
Before shooting a video from the screen, you should click "Create Video" and select the recording mode - full screen, a fragment of the screen or the selected window. The desired video capture area can be moved with the mouse cursor using the convenient arrow icon. Once the desired area is fixed, click "Screen Recording". You can set the video size manually and turn on audio recording. Next, click "Record", and at the right time, stop shooting with the "hot key".
Step 3. Process in the editor.
Using the utility, you can not only shoot video from the screen, but also edit it. Before you start working with the created screencast, save it on your PC as a project. After that, you can make changes to the project in the tab "Editing". You can cut off extra video fragments, add initial and final screensavers, and also impose original music from the collection or upload your own melodies.
Step 4. Create a video tutorial.
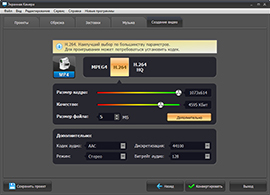
Offers 3 ways to save a video tutorial. To select one of them, go to the tab "Creating a Video". To view the video on your computer, use the Create Screen Video feature. To burn screencast to DVD, select “Burn Video to DVD”, and to upload to popular video hosting - “Publish to Internet”.
Video content taxis. And we are not talking only about media rollers. In technical manuals, now you can not carry out the user through long descriptions and a pile of screenshots - it is enough to record the process itself from the screen. It is easy for the participants of the draw in the social network to provide a proof of the choice of the winner by recording it at the agreed time. Programs for recording video are used by gamers broadcasting their exploits in games, by teachers of online courses.
And since the question of how to record video from a computer screen is so in demand, we have prepared an overview of the most popular and proven online services and full-fledged programs.
Let's start the review with online services. Working with them takes less time, because they do not need to download, it is suitable for those who rarely face the need to record video. The disadvantage of such resources is that their functionality is usually inferior to full-fledged programs that require installation.
Online services for recording video from the screen
Screencast-o-matic
This service allows you to record video online without additional downloads, provided that your computer is running on a modern version of Windows and, accordingly, supports Java. If there is no Java client, the service will offer to download it. The service is in English.
There are free and paid basics that differ in the functionality and duration of video recording (15 minutes in the free version).
Service features:
- Shooting video from the monitor screen and a webcam. There is the possibility of simultaneous shooting.
- Direct posting on YouTube.
- You can add additional information: video title, description, category and tags.
- Privacy settings.
- Variable display of the cursor on the record.
After the popular online video recording service Screenr.com "resigned", the above-described website remains the only online service for recording video from the screen.
Now consider independent freeware. There are a lot of them, and some of them are hardly inferior in their functionality to paid utilities.
Free programs
iSpring Free Cam
This program appeared in access relatively recently, it is completely free and does not have ad inserts on the finished video. Clips are saved in a single WMV format.
The program can:
- record sounds: music from speakers, sound from a microphone, system sounds;
- record the movement of the cursor and its pressing;
- select a screen area to record;
- cut unnecessary parts in the already finished video;
- upload videos directly to Youtube.
The program is Russified and works on all modern versions of Windows.
Cam studio
English-language program for recording video from the monitor, one of the most popular among users. It differs from similar free utilities with the ability to record video of different extensions: MP4, AVI and SWF.
The main features of the program:
- supports microphone and system sound recording;
- allows you to select a recordable area of the screen;
- records video up to 2 GB.
O cam screen recorder
Another program worthy of attention, the main feature of which is not technical, but aesthetic: a set of frames for decorating the video is included.
Key features:
- full soundtrack: microphone, system sounds, music;
- selection of the quality of the video;
- watermark overlay on video;
- supports Russian language.
Important. It takes up very little screen space in the computer’s RAM.
Let us turn to the review of paid programs for recording video from the screen, which, as a rule, are used by professional clip makers or bloggers.
Paid programs
Camtasia Studio
The program can be purchased on the official website of the developer for $ 200, and, as users write on the forums, the price is fully justified.
The program can:
- edit already recorded video: resize images and add various special effects;
- simultaneously capture both the entire screen and its individual part;
- work on any modern Windows system;
- compress files without losing quality.
The program is supported by mobile devices and has a Russian-language interface.
This utility is most often used for professional purposes, however, the support of the Russian language and a simple interface allow Camtasia Studio to be used with any level of training.
Bandicam
It is considered the most popular software for recording video from the screen. On the official website they offer to download a trial version for free, the full version will cost $ 39.
The main advantage of the program is stable operation even on the weakest computer, since the requirements of the operative memory are only 512 MB.
Key features:
- allows you to capture a specific area on the screen;
- compresses video without losing quality;
- supports formats: MJPEG, XviD, AVI, MPEG-1;
- it works not only on modern Windows, but also on versions 2000, 2003 and XP;
- there is a version that supports the Russian language.
Important. The program can continue to work non-stop during the day, controlling the recording process, and turn off the computer after the completion of its work, if you set this in the settings.
VM Recorder
In this program, you can download a trial version with limited functionality. A paid package will cost from $ 45 to $ 79, depending on the version. The main feature is the recording of multiple streams simultaneously.
With this program you can:
- simultaneously record system sounds and microphone sounds;
- schedule tasks within the program;
- intercept streaming data from multiple sources;
- set a secure password on the finished video.
All video formats are supported here. The interface of the program is English.
Important. If a problem occurs, the program itself optimizes the quality of the recording in relation to the speed of the Internet.
Of all the programs described above, VM Recoder has the most powerful functionality and does not have significant shortcomings.
When choosing a program for recording video from a computer screen, build on your needs. If you want to record a simple short video, an online service will do. If you have to record video from the screen often, download a free utility with suitable functionality. When deciding whether to purchase a program to record video from a monitor, make sure that you really need the features you pay for.
Do you need to record actions on the monitor at work? What tools do you use?
AzSonsult.ru
Add a comment Cancel reply
How to shoot a video on your computer?

Recently it has become very popular to shoot videos using a computer. You may need to display what is happening on the monitor for different purposes - you may wish to make your own video tutorial, record some excerpt of a computer game for yourself, etc. Therefore, in this article we will explain how to shoot video on a computer.
Screen camera
There is an interesting program that is called - Screen Camera. It is designed to create videos from the monitor screen. After downloading, follow the instructions:
- Run the downloaded file in order to install the application. You can make a program shortcut to your desktop to provide quick access to it.
- Before recording, you will need to select the mode you need in the “Create Video” menu. This may be a specific window, the entire screen, or a specific part of it, which you install yourself. This is done simply: you fix the necessary screen fragment by moving the cursor with the arrow icon. So you can stretch and narrow the size.
- After fixing the desired size, click on “Screen Record”.
- Manually you have the ability to set the recording sound and video size. After that, select the “Write” button. You can stop shooting at the required moment using the hot key.
By the way, the program makes it possible not only to shoot a video, but also to edit it later. In the “Editing” tab, after saving the video to a computer, you can trim unwanted parts, add screensavers and music. The utility is also widely used to create video tutorials.
FastStone Capture
Another handy program for recording video on a PC is FastStone Capture. You need to install and run it. When the program is running, proceed to the action:
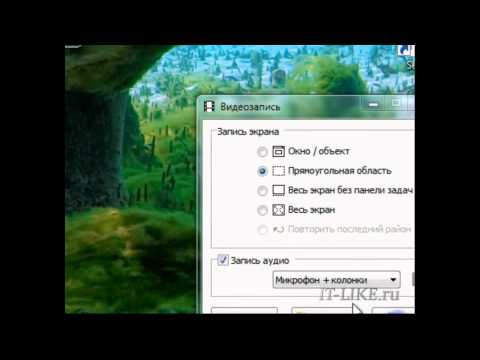
- In the menu, select "Record Video".
- On the right below you will see a window with various parameters, where you also need to choose the size of your video - the window, the entire screen, the entire screen without the taskbar or area (the latter option assumes your choice of a specific screen fragment, as is the case with the previous program).
- In the same window there is an item “Record audio”. If you need a sound, leave a tick in front of it and choose where the sound will come from. It can be a microphone, speakers, or both.
- To start recording, click on “Record”. A window will appear with the parameters you selected for the video.
- If everything is in order, click “Start”. At the right time, use the “Stop” button on the bottom panel.
- After that you can save your video on your computer.
Read about other methods and programs in our articles.
Such applications are enough. We will not consider everything, but only talk about some of them.
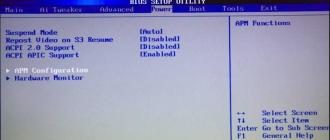
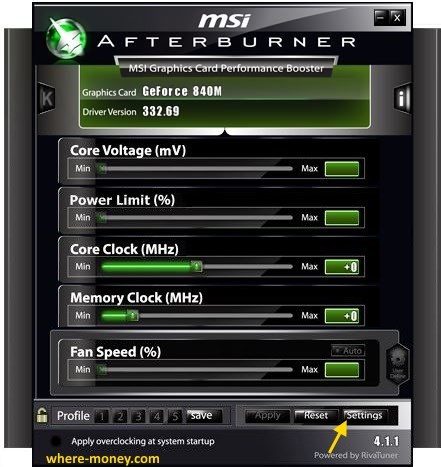
Do not be afraid of the abundance of settings and graphs in this program, in fact, everything is simple. Now we are interested in the Settings button.
In the window that opens, go to the "Capture Video" tab. At the very top, set a hot key to start and stop recording. As an example, install F3, you can specify your command.
In the same window there are other settings: compression format, quality, frame rate per second (Frames Per Second - FPS), save path, audio source, etc.
Look at the available parameters and make your own adjustments.

Save the changes - “OK”.
To avoid interference, in the main window of the program, click on the "i" button - information.
![]()
Make sure that the caption "Active 3D process" says "missing".
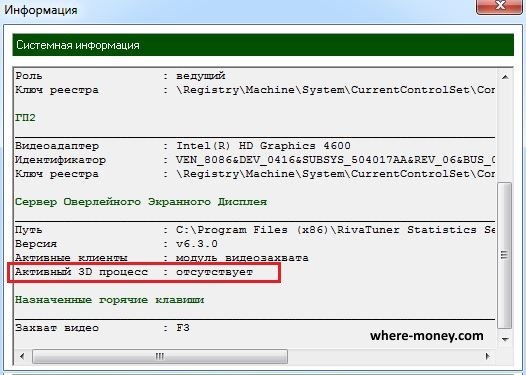
Otherwise, launch Windows Task Manager (Shift + Ctrl + Esc). Click on the Processes tab. Check the box next to "Display processes for all users."
Find the Active 3D process reported by MSI Afterburner and stop it.

Is it done? Now press the hot key. Earlier we talked about it. Use it again to stop recording.
Look for the footage in the folder, the path to which is specified in the settings.
How to make video from computer screen online
Consider a free internet service. Of course, it will not replace your full-fledged software. However, for shooting videos up to 5 minutes is enough.
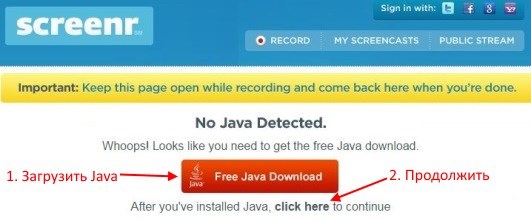
Go to www.screenr.com and log in. Then click “Record” or “Launch screen recorder now”.

Screenr will start Java detection on your computer. If the software is not found, a link to its free download will appear. When finished click the link that says “click here” to continue.
To start shooting, press the red button, stop - DONE (displayed during shooting).

When the video is captured, it will appear on the Screenr website. Add a description to it (required) and click Publish.
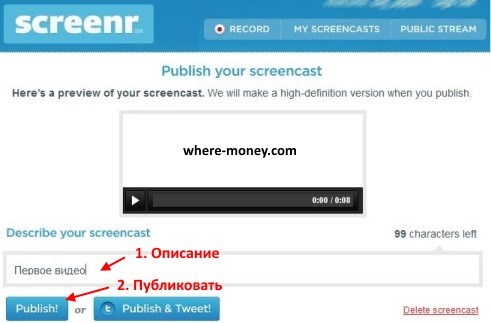
After some time, the recorded material will be available for download or publication on YouTube.

The captured videos are stored on the Screenr server. If you want, remove them from his site.
Recording what is happening on the screen of a computer or mobile device, called “scientifically” screening, is done in different ways - with the help of both paid and free applications and Internet services. To conduct a webinar or to boast of the successful passing of the game, paid (and very expensive) programs are often not needed. Let's talk about how to make a video recording from the screen available free tools.
YouTube
Screencasting is one of the functions. youTube Creative Studio . If you plan to shoot a video for placement on the channel of this service, then you will not need anything else.
To access the creative studio, you must have a Google account (YouTube service belongs to this corporation). If you use devices on Android, most likely, you already have it. Then you only need to log in to the site: open any YouTube page, click the "Login" button (located in the upper right corner) and enter the gmail address and password into the specified fields.
- After logging in to your Google Account, return to YouTube and click the Add Video button.
- On the next page in the “Live Broadcast” section, click “Start”.
- Confirm the login to your account using SMS or voice message, which will be sent to your phone number. After that you will find yourself in a creative studio.

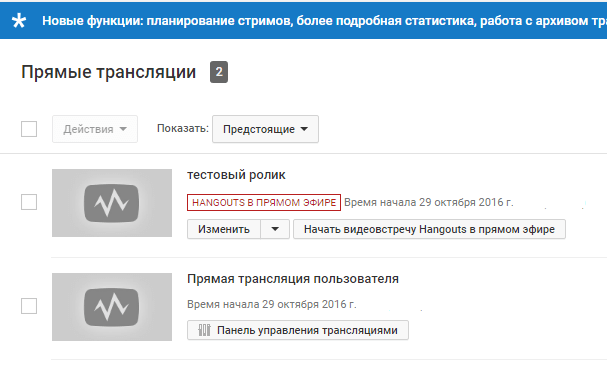
- In the "Live Broadcast" menu, select "All Broadcasts." Enter the name of the screencast in the indicated field, set the access option “Restricted” (so that it is only for you), the type of broadcasting is fast (Hangouts live) and click “Start live broadcast”.
When selecting the “Special” broadcast type, the service will ask you to specify a video coder. Video encoder is a separate program that requires installation on a hard disk and a special, sometimes quite complicated setup. Screening with video encoders provides more options, but before using them for the first time, you have to spend time tuning and mastering. 
- Clicking the “Start Live” button will open the Google Hangouts window. Click in the pop-up menu of the left panel “Show screen” (the icon is highlighted in the screenshot). After a picture from your monitor appears in the window, click “Start Broadcast” - this will start the recording process. Since the settings have limited access, only you will see it. By default, recording is done with sound (from a computer). If you wish, you can accompany her comments into the microphone.

- After you stop recording, the video will automatically be saved in the list of broadcasts of the creative studio YouTube. Then you can edit it or immediately publish it on the channel.
You no longer need the Google Hangouts window - just close it.
- another service intended for screencasting and recording images from webcams without programs (more precisely, almost without them). In the free version (Free) the duration of the recorded video is limited to 15 minutes.
Site features will be available after registration, which will take no more than 1-3 minutes. In addition to this, you will have to download and install a small video recorder application.
Screencast-O-Matic is an English-language resource, but it's easy to use. To start recording, simply click the "Start recorder" button.
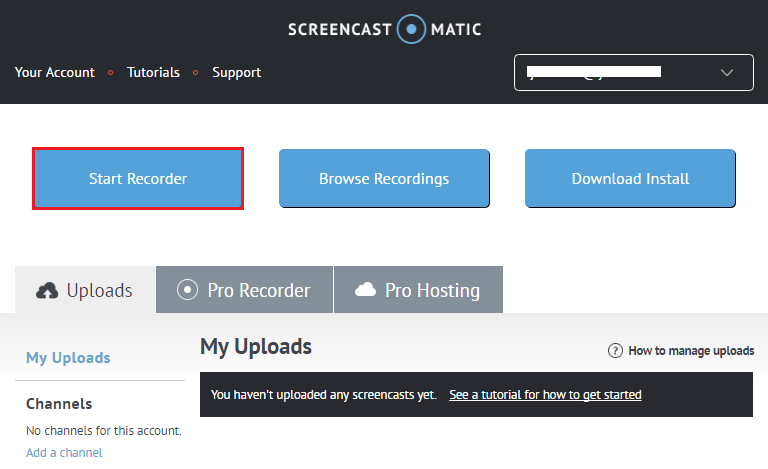
Next on the screen appears a dotted frame and a panel "Record". Frame an area you want to shoot in the panel, mark the type of recording - Screen (screen only) or Both (screen + webcam), set the duration of the video clip (up to 15 minutes), frame size, turn on the microphone if necessary. Shooting will begin after pressing the “Rec” button.
Record sound from your computer, unfortunately, will not work - in a free account, this feature is disabled. 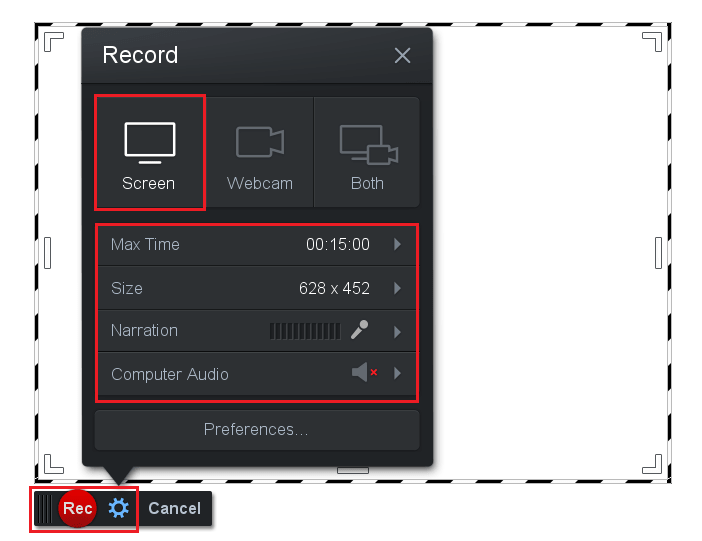
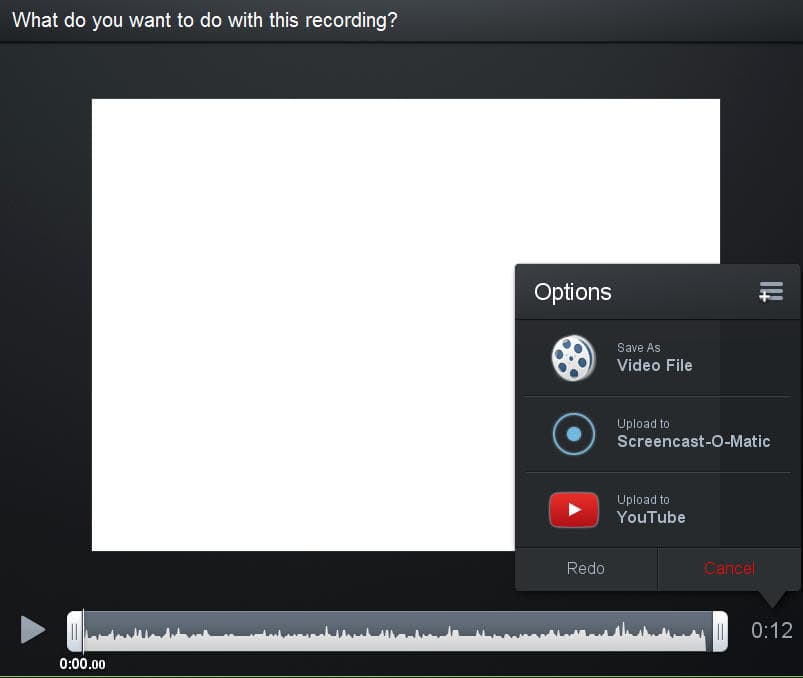
After stopping the recording, you can trim the screencast - by moving the sliders on the timeline, delete the first and last frames.
Own means of Windows
In addition to online, there are offline screencasting methods, and the second is much more than the first. Some of them do not even require installation of programs, as they are implemented by means of the operating system.
Xbox gamepad in Windows 10
In the set of built-in applications, Windows 10 has an Xbox, and in it is a game panel with a screen capture function. Although it is intended for games, it is capable of recording not only them. The results are saved in the C: \\ Users \\ current_user \\ Videos \\ Captures folder in mp4 format.
To launch the game panel, open any window application and press the key combination Windows + G. In the "Open Game Panel?" Box, check the box next to "Yes, this is a game."

The panel will change to look like this:
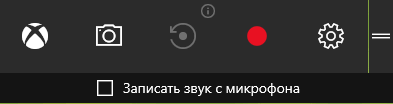
Clicking on the icon in the form of a red circle (Record) will start the beginning of screencasting.
In the settings of the Game panel (to open, click the icon in the form of a gear) you can define the recording duration - from 30 minutes to 2 hours, and other parameters that are shown in the screenshot.

Unfortunately, screening with the Xbox Game Panel is not possible on all computers. The minimum system requirements are a video card / discrete video chip not lower than the AMD Radeon HD 7000 or nVidia GeForce 600 (800M). Or integrated graphics, starting with Intel HD Graphics 4000.
Action Recorder
The next tool, Windiws, is “Action Recording Tool” - the PSR.exe utility. It is present in all versions of the system, starting with Windows 7, and is designed to fix computer problems. The result of the shooting utility saves as a sequence of slides, and not a video, as in the previous case.
PSR, of course, is not suitable for recording gameplay, but for seeking technical assistance (for example, in the case of an incorrect application), creating step-by-step instructions and mini-presentations is fine.
You can run PSR.exe from the Start menu - Applications - Accessories or through Windows search.
To start recording, click on the button of the same name.
If you want to focus on a specific area of the slide, click "Add a comment", select the desired fragment with the mouse (i.e., circle the frame) and enter the explanations in the text box.
After stopping the recording, slides with comments will be displayed in the program window. To save them, click the appropriate button. Saving is in zip-archive format.

Free Third Party Applications

Perhaps one of the most famous free applications for screening is a kind of classic of the genre. It is designed to create demos and commercial information products, fixing technical problems and much more. For example, with its help, you can record the passing of a game or a training video tutorial on working in an application.
Here is a partial list of CamStudio features:
- 4 recording regions (optional): the entire screen, a separate window, an arbitrary area (will move after the cursor) and a fixed area.
- Audio recording in the video - from a microphone or from computer speakers.
- Auto sync audio and video.
- Control with hotkeys. Reassign hotkeys of your choice.
- Enable or disable the visibility of the cursor on the screencast. Highlight the cursor when you click the mouse buttons.
- Virtual pencil for marking and drawing (Autopan).
- Automatic stop recording (after so many seconds from the beginning).
- Saving the finished results in various formats (depending on the availability of codecs).
CamStudio does not impose special requirements on computer hardware - it successfully starts and runs even on weak machines with integrated graphics. The only noticeable drawback of the program is the absence of the Russian language, but the minimalistic design of the main window and simplicity (as the “record”, “pause”, “stop” icons look, I think everyone knows) easily compensate for it.
To start shooting, select the region of the screen and press the “Record” button. Settings for sound, visibility of the cursor, "pencil" and other things are set through the "Options" menu.
iSpring Free Cam
iSpring Free Cam is a relatively new free program for screening with sound (the sound is removed from the speakers of a computer, microphone, or both). Unlike many - in Russian and extremely easy to use.
The main functions of Free Cam:
- Record the entire screen, individual windows or a selected area. The latter - with an aspect ratio of 1280 × 720, 960 × 720 or arbitrary.
- Capture the cursor, highlight mouse clicks.
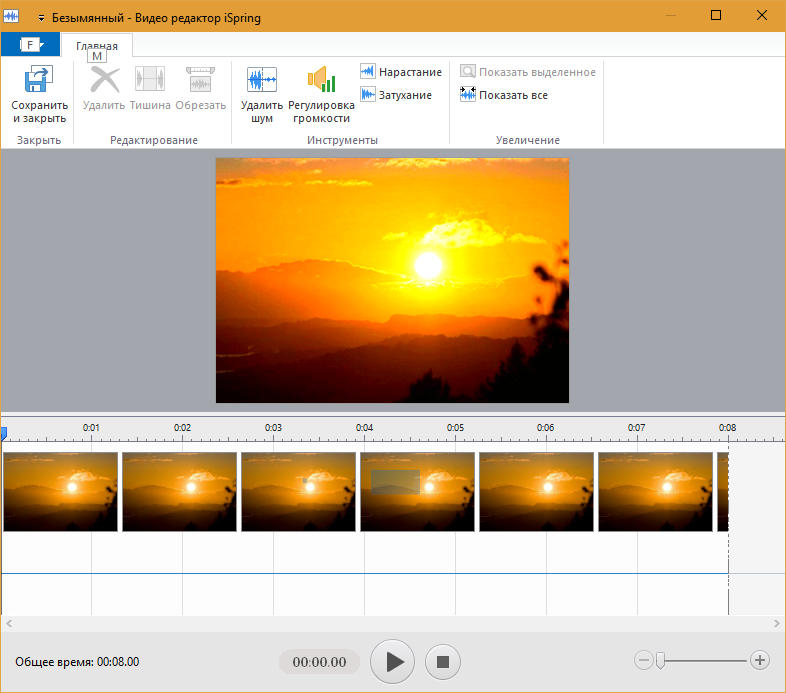
- Built-in editor, with which you can trim the clip at the edges, clear the audio track from noise and change the volume level.
- 2 ways to save the video - on your hard drive in wmv format or on YouTube.
- Russian-language help (online).
iSpring Free Cam is well suited for recording games, video instructions and other non-commercial tasks. To start recording, determine the capture area on the screen, turn on the microphone, if necessary, and press the red circle (“Record” button). After stopping you can load the video into the editor or save it immediately.
![]()
The only difficulty that sometimes arises when working with iSpring Free Cam is registration. In order to download the program, you will have to leave your email address on the developer’s site. After installing Free Cam will require to receive and enter a free registration code. To do this, you will have to go back to the site and specify the remaining data - what is usually requested when creating accounts on Internet services: name, password, etc. After that, the code will be sent to you to the specified mailbox. Perhaps not immediately.
With good Internet speed, registration with iSpring Free Cam does not take much time, but if the network is slow or there is no access to it at all, you will have to be nervous.
The program in addition to screencasts allows you to record video from a webcam and take screenshots. And not only video, but also sound.
In the free (Basic) version of this application there is a temporary limitation: the maximum duration of shooting is 5 minutes. Screen capture area is determined only arbitrarily.
Other features of TinyTake Basic:
- 2 GB of free storage for footage. Download - directly from the program interface.
- Online web gallery.
- Built-in editor for processing static images (screenshots).
- Save the video on your PC hard disk (locally) or on the TinyTake server.
Subscription versions (from $ 9.95) provide the user with additional features:
- Increase recording time - from 15 to 120 minutes.
- Larger storage - 20 GB - 2 TB.
- Ability to complement screencasts annotations.
- Integration with YouTube.
- Technical support.
The program is quite “gluttonous”: on machines where the RAM is less than 4 GB, it mercilessly slows down. Like iSpring, when you first start it requires mandatory registration (although it happens faster).
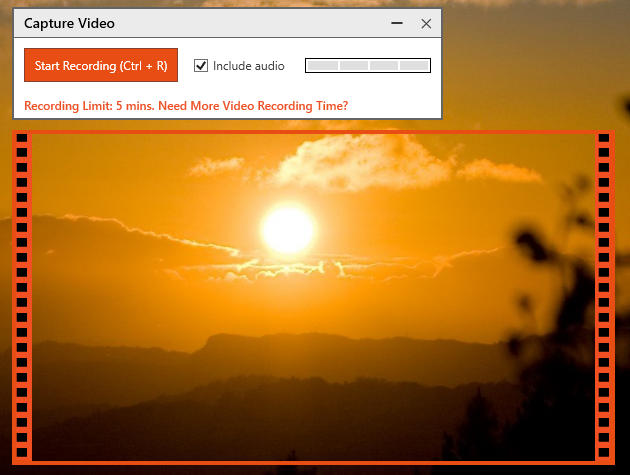
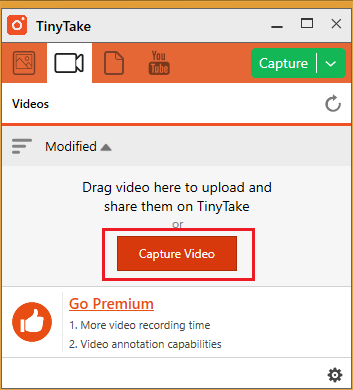
To make a screencast, open the tab with a camera image in the TinyTake main window, click “Capture video” and select the screen area. Next, if necessary, check “Include audio” and click “Start Recording”. After 5 minutes, the recording will automatically stop. After that, you can save the video on a PC or upload it to an online gallery.