Do you back up cell phone data?
Today at your fingertips you always have a mobile phone with which you can call from any place and at any time. More recently, this opportunity seemed incredible, and today mobile phones have become a central element in the communication of people among themselves. That is why you should think about the synchronization of data on your PC and cellular.
Current trends are as follows: in addition to reducing the size of modern cell phones, color displays with high resolution and quality never seen before appear. Smartphones become the equivalent of a PDA in terms of feature set. Microsoft Windows Mobile OS is responsible for the program side of the question, but there are other operating systems, the same Series 60.
Phones acquire additional features: an email client, chat, MP3 player, digital camera with video recording function, or even a mobile TV. A decrease in prices for flash memory only increases the attractiveness of new features.
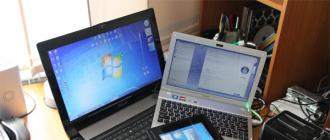
But, as is the case with ordinary computers, many users are in no hurry to back up their data. Imagine what happens to your phonebook, organizer, calendar, photos or songs if you lose your phone or steal it? Therefore, the issue of data synchronization between a PC and a cell phone is becoming increasingly important.
Cellphone owners can use a cable, infrared or Bluetooth to connect to a computer. Although many cell phones use their own interfaces, today there is still a trend: the infrared ports are gradually disappearing, and they are replaced by a USB port.
If your phone supports Bluetooth, then everything is much easier: in Windows Service Pack 2, the Bluetooth stack is already built in, so no problems will arise.
Cell Phone: Mobile Data Center
Today we use cell phones even more than stationary devices. "Mobile" is already firmly established in our lives. We always take the phone with us, use it to store the entire address book, send SMS through it. And thanks to the proliferation of 3G (Third Generation Wireless) technology, in the future you can rely on mobile email and video. Life develops so rapidly that now it is important not to miss anything. Even the fact that today you can always be in touch and communicate anywhere is impressive.
At the same time, many cell phones are acquiring entry-level digital cameras. Today, three megapixels in a cell phone will not surprise anyone. Is that the optical characteristics and the lack of optical zoom distinguish telephone cameras from the "normal". Cell phones are unlikely to replace digital cameras in the near future. But for some intermediate photos "mobile phone" can still be used.
Cell phones have become a mobile database. They take and store photos, play your favorite songs, display a calendar and keep all the data in the memory - email and SMS. On the one hand, a wide range of functions allows cell phones to be more versatile. On the other hand, our dependence on mobile phones is also increasing. What happens if you lose your phone?
Is your data safe?
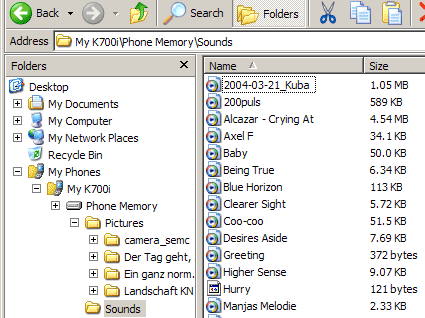
Many modern cell phone models offer expansion slots for flash cards. You can install RS-MMC, MMC Micro, Mini SD or Micro SD format cards with capacities from 64 MB to 2 GB. With the help of a USB reader and an adapter, all "small" formats can be turned into SD cards, that is, it is easy to read all the data on a computer.
It is through flash cards that it is easiest to back up data such as photos, video clips, SMS, emails, music. However, data arrays such as a calendar and an address book are usually not written to flash cards. They are in the internal memory of the phone. To transfer or synchronize a calendar or phonebook, you need to establish a connection between your phone and a computer.
To do this, you can use a special USB-cable, as well as Bluetooth. Usually the cable is sold separately at a price of approximately $ 20 and up. Bluetooth, in our opinion, is a more convenient solution, since this interface can be used for other purposes.
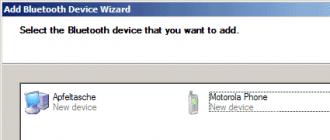
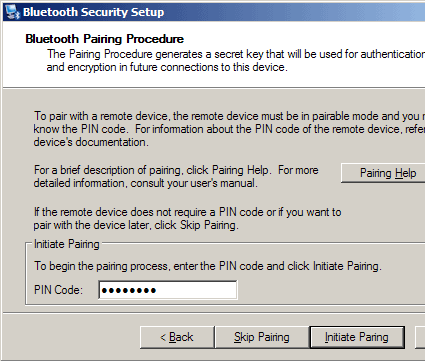
Right-click on the Bluetooth icon. After that, select the "Add Bluetooth Device / Add a Bluetooth Device" command, which will add a new cell phone.
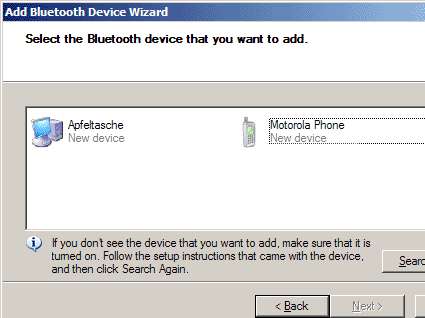
If the Bluetooth device is already on the list, then simply select it. Otherwise you have to search. In this case, the phone with Bluetooth must be included in the "visible" mode. Do not forget, first of all, to turn on the Bluetooth connection on the “mobile phone”.
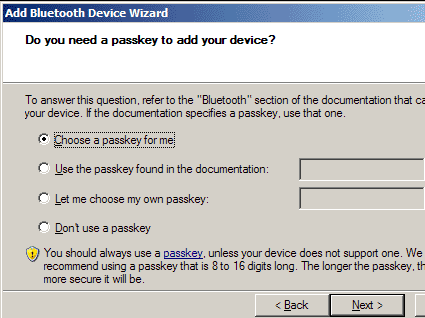
To ensure protection, only authorized devices can be connected. Here we create a new password key ...
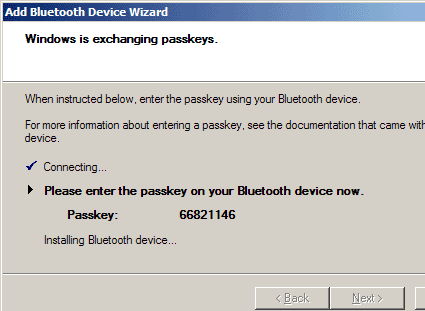
... which should be entered on the "mobile phone". All is ready!
The option "Send file / Send a file" allows you to send a file to a Bluetooth device.
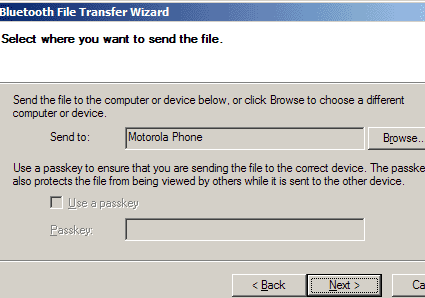
Select target device ...

... and the file being transferred.

After starting the copy, you must confirm the reception on a cell phone.
We recommend connecting an external Bluetooth adapter directly to the USB port of your computer. As experience shows, if you use a USB hub, then side effects may occur: the Bluetooth adapter may not be recognized, or you will have to reinstall the driver every time you connect.
Motorola cell phones use Mobile Phone Tools 4.0 to communicate with a PC. During its installation, Windows complained several times about drivers not certified by WHQL. However, warnings can be ignored.
Despite all the concerns, the Motorola program worked correctly. The "Phone Tools" icon appeared in the quick launch menu. And in the Outlook options menu, we found the sync key. But when we chose a Bluetooth connection, the phone simply “hung” for several tens of seconds. The problem was observed on the Compaq Evo N800v with several external Bluetooth adapters, as well as on the Toshiba Satellite 5200 with integrated Bluetooth.
It seems that the integration of Bluetooth into the RAZR V3 (i) phone is still too “raw”, even if you use the Bluetooth control panel from Windows. When the user connects the phone to the computer, the phone will ask for a password. If you spend too much time on input, the connection will be lost. Even if the connection is established, the phone does not send a response signal for about half a minute. Other phones are more responsive.
Bad bluetooth connection

First, create a connection profile.
![]()
Then you need to configure the type of connection. If you want to simultaneously recharge and battery RAZR, it is better to choose USB.

Finally, choose your phone.
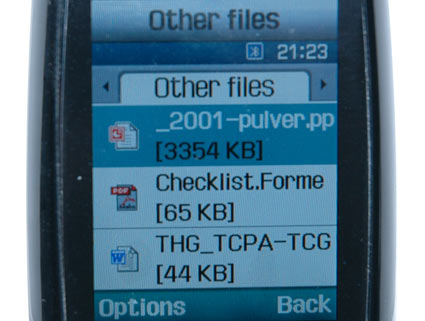
Once the connection with the RAZR V3i is established, you can send or receive files by right-clicking on the Bluetooth icon. V3i is very slow in transferring large amounts of data. In RAZR V3 with 5 MB of memory, this problem does not arise. But the V3i is equipped with 12 MB of internal memory and a slot for flash cards (it comes with a 64 MB Mini SD card). The program should definitely be finalized so that it can cope with the increased V3i memory normally.
V3i interrupted the transfer of an MS Word document (.doc), reporting an unknown file type. The phone refused to accept text files, although the .vcf files (personal business card), .wav or .mp3 were transferred without problems and were recorded in the appropriate directory.
Problems arose when we tried to transfer a file of about 6.8 MB in size. We received a file transfer status window, but nothing came to the phone. In addition, the connection speed was very slow. For example, the transfer of a 4-MB file took 6 minutes 31 seconds, which corresponds to a speed of 10 kB / s. So transferring big data takes a lot of time. Bluetooth 2.0 could be faster, but this standard is not supported by every phone.
USB connection
Well, we tried to connect the phone via a USB cable. Two USB connection modes can be selected: as removable media or in fax / data mode. If you select the first mode, the memory card is automatically recognized as a drive in Windows Explorer. And the data can be copied without any restrictions. The file size is not limited, but a slow USB 1.1 connection becomes the bottleneck. If you transfer data that any applications use and run the application in parallel, the transfer will be interrupted without warning.
The Phone Tools program works great on a USB connection. The following options are available.
Motorola Phone Tools main window. With some approximations, you can work with the program in the same way as with a real V3i phone.

To prepare and transfer photos to your phone, use Multimedia Studio. The illustrations show photo processing ...

... and file browser. The phone display displays an MP3 file.
Synchronization
With your phone, you can synchronize Outlook contacts and calendar. You can write an SMS on a PC and send them to the recipients of the phone book (item "Text message"). The "Multimedia studio" option allows you to view media files (music, photos, MP4 movies) that you want to upload to V3i. You can transfer individual files (calls, wallpapers, etc.) to the phone, as well as change the information already contained.
Using the "Internet connection" item, you can use the GPRS-modem V3i on your PC. But remember that you will pay for traffic. And the ability to dial the telephone keypad with the help of mouse clicks seemed useless to us.
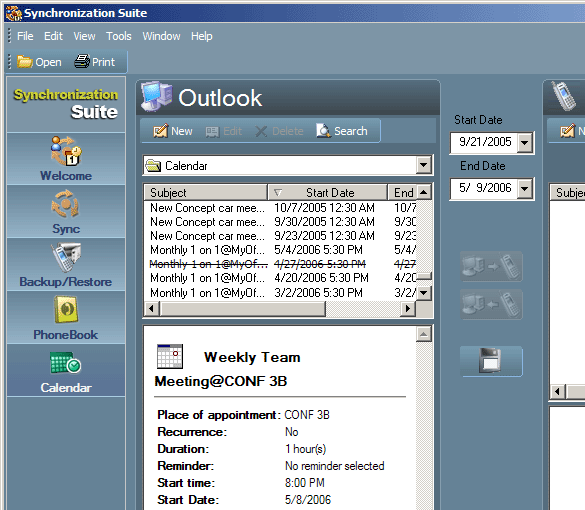
Sync calendar.
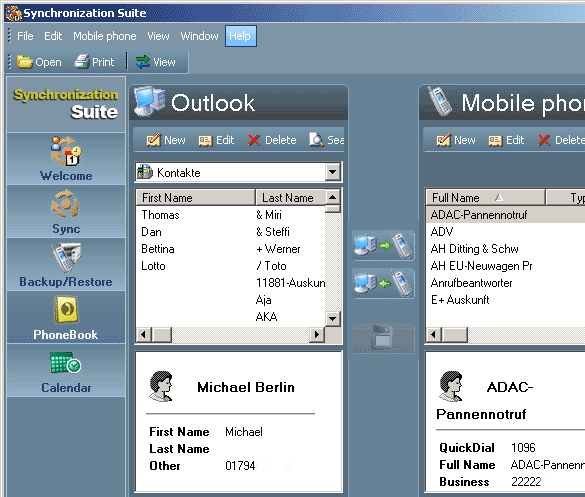
Sync contacts.

Synchronization options: we selected Outlook from a short list of programs.
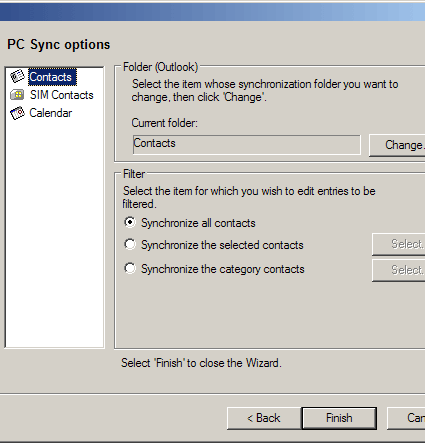
Which item will sync? You can choose several options.
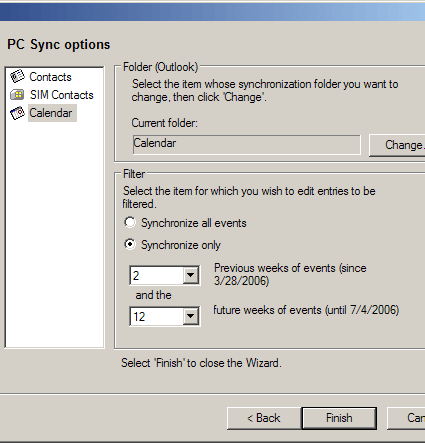
For how long should the calendar be synchronized?
![]()
Synchronization in progress. Everything proceeds pretty quickly, because you only need to synchronize contacts and calendar.
All is ready! The data is synchronized with the phone RAZR V3i.
Siemens put a lot of effort into creating its own line of phones, which is now sold by BenQ. We do not know what change this will lead in the product line and in the software. Some phone models, the same S65 and S75, are very popular. And their owners probably will not want to part with their pets. We decided to choose a S65 phone with 11 MB of internal memory. It also uses an additional RS-MMC slot.
Siemens offers its own software version for each phone model. First, we installed a very simple version 3.04.40. But then, having learned that the software of new models is backward compatible with the old ones, we installed the current version of the Mobile Phone Manager package (v4.05.51), which can be downloaded from the Siemens website. This package works much better with Bluetooth.
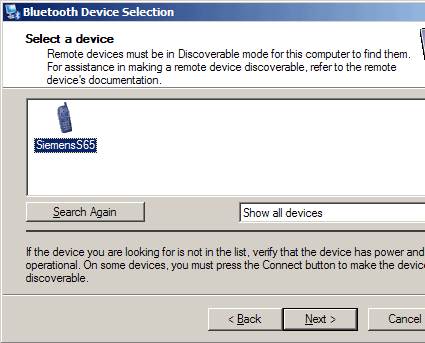
To synchronize the Siemens S65, we used Wildcomm drivers. As with the Bluetooth stack of Windows, add a new device ...
... and complete the connection by entering the password on the cell phone.
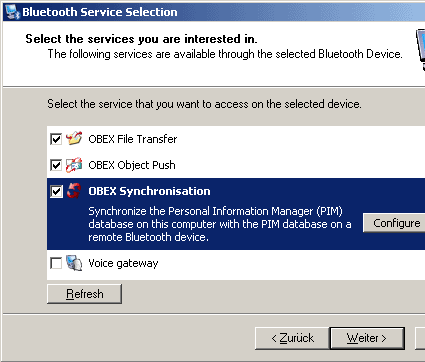
Wildcomm drivers offer a wide range of configuration options. It is important that the required services be activated.
As with most other packages, Siemens software integrates itself into Windows Explorer. Thus, you can easily manage phone data. As you can see, Siemens displays the phone's memory and a flash card in different directories.

Siemens S65 is integrated into Windows Explorer.
Outlook sync in detail
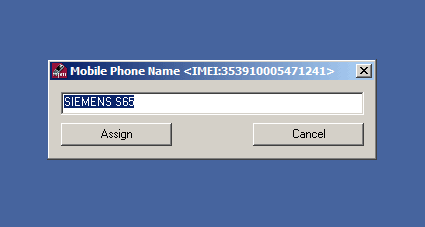
After starting the program, Mobile Phone Manager asks for the name of the phone to which it will connect.

Then the main window of the Siemens program opens. At the bottom you can see the status of the battery and reception.
We were immediately interested in the utility Smart Sync, which can be run separately from the base program. Separate customizable shortcuts allow you to manage music and photos. Item "Organizer" provides access to the organizer, tasks, calendar, as well as to the memory of voice messages. Item "Messages" allows you to type on the SMS on the keyboard. The "Backup / Restore" function allows you to easily copy all data to your computer, as well as restore data from a computer on your phone.
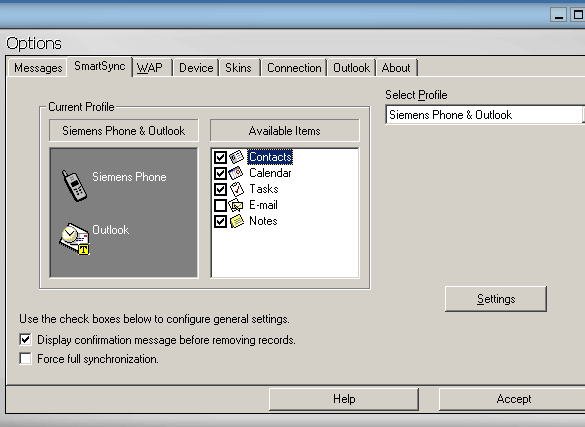
In the settings you can specify the data that will be synchronized with the phone.
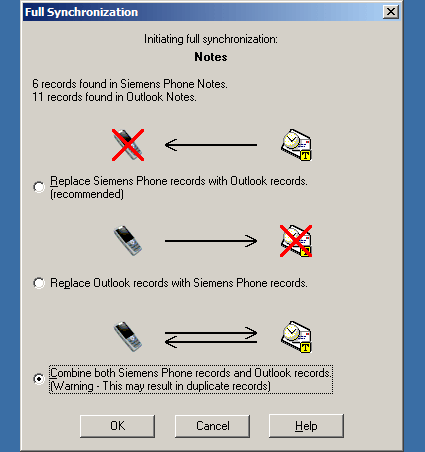
Synchronization is done safely: you can select the desired mode. That is, replace the data on the phone, replace the data in Outlook, and also select the data merging mode. Similar modes should be specified for all data (contacts, notes, etc.).
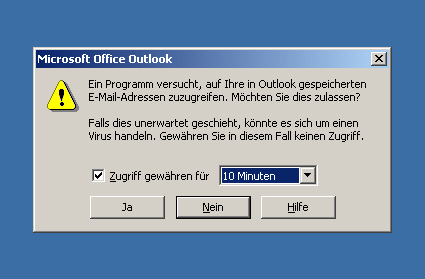
Outlook requests confirmation of access to the database.

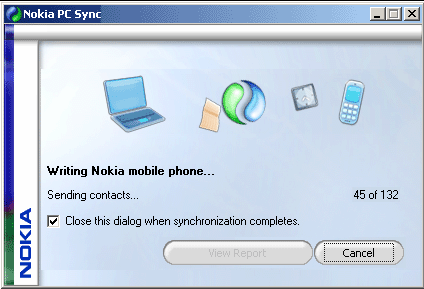
If there is a lot of data (in our MS Outlook there are more than 1000 entries), then the whole process may take a lot of time.
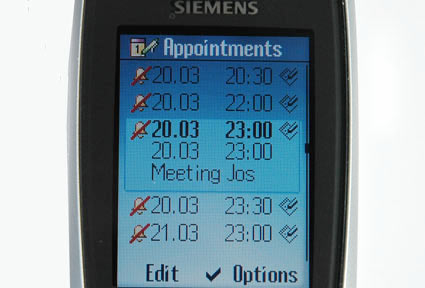
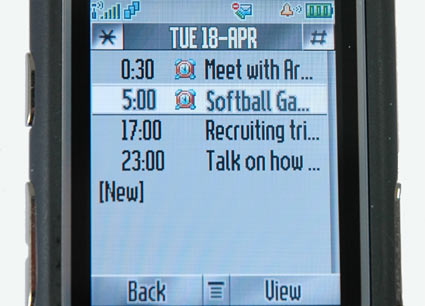
Sync done! Part 1: view events.

Part 2: view in calendar mode.

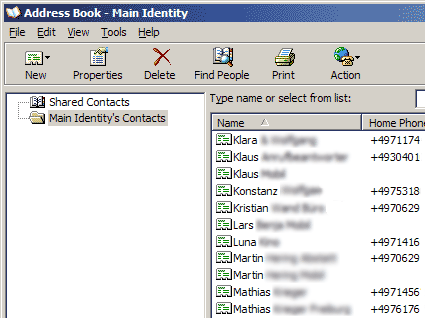
All contacts were successfully transferred to the phone. The result is easy to check on the computer.
Sony Ericsson K700i is a good example of a popular multifunctional business phone. It is equipped with 40 MB of memory and a very good display. In general, the phone can accommodate a decent amount of data. The package includes a package of Sony Ericsson PC Suite, running under Windows 2000 and XP. It is compatible with the latest versions of Outlook and Outlook Express.
Unfortunately, the installation takes too much time. In addition, the components are installed without any confirmation of the state. The user is completely eliminated from the installation process, with the exception of appearing items in the Start menu and on the taskbar. Until the end of the installation, you still do not know that the Sony Ericsson PC Suite package consists of the utilities SyncStation, File Manager, Mobile Networking Wizard, Sound & Image editor and Mobile Phone Manager.
But even further we had complaints. At first, the Sony Ericsson program could not identify the K700i. When we called to support, we learned that the Windows Bluetooth stack (it appeared with the release of Service Pack 2) paired with the old drivers does not allow Sony to work properly. Sony decided not to bother with software updates and sent us to the German magazine "c" t ", which describes the solution to the problem with the Windows Bluetooth stack. We had to turn on deactivated COM ports, after which the phone was recognized.
Note to the users of the infrared port: the phone does not support high speed transmission, therefore, in the control panel, it should be limited to 115200 bps ("configuration\u003e wireless connection\u003e hardware").
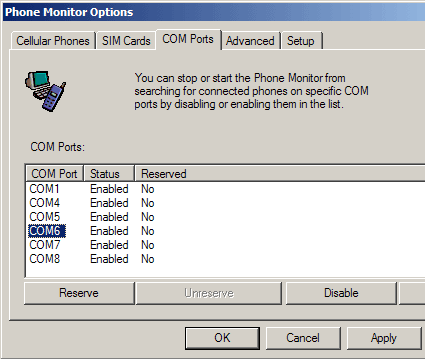
During installation, you must specify the COM ports that will be used for communication. Do not forget to activate the ports in Phone Monitor.
Phone memory can be freely viewed in Windows Explorer and transfer files manually
During the first synchronization, you should specify where to get the data: from the phone or from the computer. Setting allows you to copy phone data to a computer and vice versa.
Sync started.

The program shows which items are currently being synchronized. And also notifies of any conflicts.
Everything went well. Computer and mobile phone data is synchronized.
The Nokia 6230 and the new 6230i are very popular today. In the MMC slot, you can install memory cards up to 2 GB. The display of the 6230 is not very good, but the model of the 6230i has been refined, as a result of which the resolution has grown to 208x208 pixels.
We tested Nokia PC Suite version 6.70.22, which we downloaded on the Nokia website. Immediately after a successful installation, two icons appeared in the taskbar: the first one for synchronization and the second one for displaying the connection status. The second icon provides access to all the utilities of the package. Unlike previous versions, synchronization now works more reliably. The program supports synchronization with MS Outlook, Outlook Express, Lotus and and Lotus Organizer.
To transfer a 4-MB MP3-file via Bluetooth, the Nokia phone took 1 minute 23 seconds, which corresponds to a speed of 46 Kb / s. So the Nokia 6230 turned out to be the fastest model in our testing. 6230 does not understand MS Office documents, but can display text and photos.
Clicking on the Nokia PC Suite icon launches the corresponding program. And, for example, the "Contacts" icon opens a new Explorer window in which you can view the list of contacts.

Synchronization settings, part 1. Using the "Settings / Create new settings" option, you can select the program with which synchronization will be performed. You cannot set profiles for multiple users.

Synchronization settings, part 2. You should select the data you plan to synchronize.

Synchronization settings, part 3. You should set the time period for which calendar synchronization will be performed. On the third tab "Microsoft Outlook" you can set the path to mailboxes.
Synchronization runs smoothly and without problems. You can also set the synchronization schedule.

Nokia received all data without error. So on the phone looks like a calendar after synchronization.
The Samsung SGH-D600 is pleasantly distinguished by a fabulous display with a high resolution of 240x320. The phone has 76 MB of memory built in. It supports several formats of office documents and is also equipped with a tiny TransFlash slot (SD micro). SGH-D600 allows you to perform various types of synchronization or file transfer. Samsung supplied the included USB cable, so you can get to work right away. If you prefer Bluetooth, you should purchase a Bluetooth USB stick, or get a laptop with a built-in Bluetooth controller. The phone does not have an IR interface.

Connection window Samsung PC Studio. Depending on the phone and computer, you can choose different options.
The transfer of 4 MB of music file via Bluetooth took 1 minute 51 seconds, which gives a very fast speed of 36 kb / s. The speed is not a record, but still three times faster than the Motorola RAZR.
The phone accepts large files without any problems. The built-in utility Picsel Viewer allowed to view MS Word, PowerPoint and Acrobat documents on the SGH-D600. Of course, most of the time will have to increase the text or scroll through it, but all the graphics and text are displayed in full.

Smallest PDF viewer in the world?
You can view and presentation PowerPoint.
Serious sync program
After installing Samsung Software PC Studio 3.0 and the drivers, we decided to check the cable connection with Phone Explorer. For some reason, this type of connection was two times slower than Bluetooth.
After we had several Bluetooth syncs with other devices, Samsung Studio refused to establish a Bluetooth connection with the phone. And the Windows Bluetooth stack continued to work normally. As we suspect, several synchronization programs could not share the COM ports of our test notebook among themselves, and on ordinary users' computers everything should go fine, since there is usually one synchronization program used.
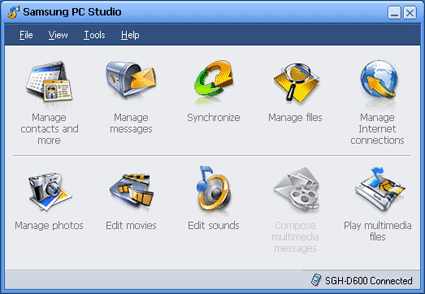
The main window of the Samsung PC Studio.
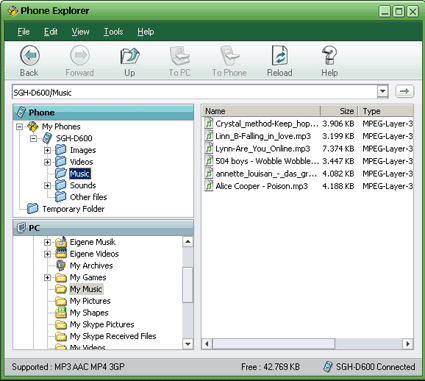
Using Phone Explorer, you can easily sort out files on your phone.
The software package covers almost all the functions of a mobile phone. You can manage contacts and Outlook appointments, as well as add various information, for example, in .vcf or .csv files from MS Excel. Using the "Manage messages" option, you can write SMS on a computer or copy existing SMS to a computer. The sync key starts the corresponding process with the phone.
If you click on "Manage files", the file manager will start, allowing you to copy music, documents or other files to your computer or phone. Completed package of the program processing music, photos and videos, as well as a multimedia player. In addition, the phone can be used as a modem.
We decided to send Outlook to the phone. In the main window, we selected the corresponding Manage contacts and more utility. Then they were able to import and work with contacts and tasks. If any necessary data is present on the computer (lower left), but it is not on the phone, then you can just import everything.
Calendar for SGH-D600.
Microsoft has long been trying to break into the mobile sector. After the company released the more or less successful shell of Windows CE, already a considerable number of PDAs switched to Windows Mobile. Windows Mobile 2003 works on some smart phones, as well as on our Motorola MPX 220.
The Microsoft Active Sync utility was developed for Windows mobile devices. With Active Sync and Windows Explorer, you can view the contents of a mobile device in a new Explorer branch called "Mobile device".
On the Microsoft website you can download the latest version of Active Sync 4.1. PDAs with Active Sync usually use a docking station for synchronization. First, we will try to establish an IR connection, since it is also based on the serial port. Bluetooth and USB options available.
Synchronized calendar for the week ...
... and a list of synced contacts.
Apple iSync Sync supports a wide range of sync options. Initially, Apple wanted to provide iPod users with the service of copying an address book to the iPod player. Today, the program is not only able to synchronize events iCal (calendar), but also supports about 60 different mobile devices: mobile phones, iPods and some PDAs. Some third-party software vendors offer software such as The Missing Sync from Mark / Space to ensure device compatibility. Microsoft has developed an update for Mac Office 2004 users that allows you to synchronize Entourage data via iSync.
Apple’s own list is also constantly updated. The latest OS X.4.6 update added new devices to the list, the same Nokia 6230 and Motorola RAZR V3i. A list of compatible devices can be found at next page .
If you need a finer synchronization control, you can use the Apple .mac Sync program. It allows you to transfer data to other devices, including over the Internet.
Address Book Contacts Mac OS X.

ICal calendar.

All this data can be quickly synchronized with external devices using iSync. But the device must be supported by the program (see Apple website).

.mac Sync allows you to synchronize also over the Internet.
Conclusion: make sure the data is synchronized
Motorola, Nokia, Samsung, Siemens, Sony, Microsoft and Apple use their own data synchronization solutions. In our testing, all synchronization and data transfer programs for cell phones and mobile devices have successfully shown themselves. Each solution allows you to synchronize your calendar and address book with Outlook or Outlook Express. Some programs provide more options than others, and problems sometimes arise.
But before synchronization, select the appropriate connection. Bluetooth wireless protocol provides maximum flexibility, and is supported by all decent phone models. But because of the relatively slow speed, we recommend using Bluetooth for synchronization, and transfer large amounts of data in another way. You can also connect your phone to a computer using a cable. But we still do not recommend buying a cable: it is much better to invest in a Bluetooth USB adapter, which can be used for other purposes. Yes, and buying a new cable every time when changing the phone is also not the best option.
We advise you to back up your mobile phone data at least once every three months. Or more often, depending on how often you change the phone book and calendar. If the data is important, then it is better to write it on a CD or DVD. The reservation takes 15-30 minutes, which is quite reasonable, considering that you are protecting your mobile phone data from loss or damage.
Do not forget to turn off the Bluetooth function after synchronization. In addition to saving battery power, such a step will protect against those who want to profit from the data of your phone.
Today, a mobile gadget is no longer a luxury or a geek toy, the purpose of which is known only to itself, but just as common as a TV or a microwave. Most of us own not only a smartphone, but also a tablet, laptop, portable game console, and many have smart HDMI sticks running Android. The problem of all this diversity is only in the fact that in mobile OS there are no means for synchronization and remote interaction of multiple devices.
Instead of introducing
Google and Apple have done much to make their devices as convenient to use as possible. A single account for access to services, transparent data synchronization, cloud storage for settings are only a part of the functions implemented by software giants that make gadgets extremely user-friendly and save a lot of time.
However, when it comes to synchronizing multiple devices with each other, serious problems arise. There is simply no such functionality in any OS. Of course, we can link all devices to a single Google-and Apple-account, which will allow us to install the latest software, receive letters, messages and other notifications on all devices at once. However, there is no talk of synchronization of settings, lists of installed applications and data on the memory card, each device is a “thing in itself” that can have access to one cloud storage, but no more.
We will not understand why this situation has arisen, but instead discuss ways to solve the problem, that is, we will try to find tools and modifications that would help us set up the synchronization and interaction of various devices. Android devices of various purposes in our latitudes are much more common than iOS, so we’ll talk about a green robot.
What is what
When we say “synchronization of several devices”, we often mean a smartphone and a tablet, these two devices are the most popular. However, besides them, there are a lot of other Android devices on the market, including smart TVs, Chinese HDMI dongles that have gained popularity, as well as more exotic things, such as the OUYA game console and NVIDIA Shield handheld console.
Personally, I have a total of six different Android devices, of which I use three and one more at least several times a week every day. This is a smartphone, tablet, gaming console and HDMI dongle. Devices, as can be seen, vary greatly in purpose, functionality, as well as installed versions of Android. Therefore, the task of their synchronization and interaction was rather nontrivial, it was necessary to provide general access of all devices to the file storage, synchronize applications between the necessary devices, make a universal remote control from a smartphone, and also raise a DLNA server from which all devices could pull multimedia files.
Application data
The first thing to do is to organize the synchronization of settings and application data between devices. In fact, this is the main problem, which contains the greatest number of pitfalls. The fact is that in Android, making the synchronization of settings and application data is far from being as simple as in classic desktop OS. If on the same Windows or Linux it is enough just to copy the files and directories of the application settings to another machine, here we will, first, face the problem of rights differentiation, which does not allow one application to access the data of another, and second, we can get the problem of incompatibility between devices.
Due to the first limitation, synchronization of application settings is possible only if you have root rights on both devices, because of the second, you cannot do without specialized tools that can fix problems if they occur. In total there are two types of tools that suit us, these are applications for backup such as Titanium Backup and Helium, as well as specialized synchronization applications like DataSync and AppSync. The advantage of the first in the asynchronous operation: copied the settings today, restored on another device tomorrow. The advantage of the second is the ability to set up time synchronization, for example every night.
Fortunately, there is a tool that combines the merits of both approaches. DataSync not only can copy application settings and files on a memory card to any device on the same local network, but also allows you to backup to Dropbox or Box.com, and as an add-on has support for Bluetooth and NFC, which is useful on the road.
The algorithm for using DataSync is as follows. Install the application on all devices that should participate in the synchronization, run it. Next on the device, which must accept or transfer its settings to another, select the necessary applications and files. All of them will be added to the Queue, which can be accessed by sliding the panel below. After that, click on the sync icon on top (two arrows) and select the desired device from the list. Tap on the device will open a dialog to select the type of synchronization: in both directions (the option is available only in the paid version), to or from here. After selecting, the synchronization process will begin.
It goes without saying that launching an application each time and turning on synchronization is not the most interesting thing, so DataSync has the ability to set up synchronization on a schedule. To do this, just save the queue using the diskette icon at the top of the screen, then hold your finger on its name in the list for a long time and select the Schedule Queue item in the menu. So you will be able to customize the selective synchronization of the desired applications on different devices.
By the principle of its work, DataSync is a typical backup. He takes the package with the application, then copies all its settings and files and sends it to the remote device. Therefore, it can also be used for: a) the actual backup of applications, b) installing the necessary applications along with the settings for a new / flashed device from another device and c) for asynchronous synchronization: one device saves to Dropbox, the other (others) restores.
Files
In addition to application synchronization, DataSync can be used to exchange files between devices. In the case of rare copies of small amounts of data (books, for example), its capabilities will be quite enough, but if we are talking about constant synchronization of files in both directions, as well as access to large data stores (home media archive), DataSync will not work.
After a lot of experiments with different synchronization utilities, I came to the conclusion that CifsManager is the most convenient, allowing you to connect SMB disks to any directory on the memory card (we can see to all applications), SSHFSAndroid connecting the balls using SSH protocol, and DropSync, which automatically synchronizes the specified directory with a dropbox drive.
Mounting SMB Ball
To connect a shared Windows folder manually, you need to run the following sequence of commands:
$ insmod /sdcard/ko/dns_resolver.ko $ insmod /sdcard/ko/md4.ko $ insmod /sdcard/ko/cifs.ko $ insmod /sdcard/ko/nls_utf8.ko $ mount -t cifs -o iocharset = utf8 , username = user, password = password, file_mode = 0777, dir_mode = 0777 // IP / share / sdcard / cifs
INFO
In addition to UPnP / DLNA, XBMC also supports Apple AirPlay streaming technology: “Settings -\u003e Services -\u003e AirPlay -\u003e Allow XBMC to receive AirPlay content”.Unlike many other SMB, SSH and Dropbox clients that can be found in the market, these three applications do not restrict access to the balls only through themselves, but instead mount them to publicly accessible directories, so you can work with data from any program. CifsManager and SSHFSAndroid are useful for accessing your home file system; We connect a network drive and work with files as with local ones (although the media server will not index them).
DropSync is ideal for synchronizing small amounts of data between different devices and a PC: to, for example, distribute an e-book to all devices, just download it to a laptop and put it somewhere in ~ / Dropbox / Books, in just a few seconds it will appear on all devices installed and configured DropSync. And no dependence on the local network and the Internet connection as such (synchronization will occur as soon as access to the network appears).
Now how to set it all up. Let's start with CifsManager. Everything is very simple and difficult at the same time. On the one hand, it is enough to start the application, click the “Add New Share ...” button and enter the server address in IP / name-ball format in the opened window, specify the user name: password and mount point, for example / sdcard / cifs, creating the directory in advance. Then click on the configured ball, and it will be mounted.
But this is only a theory, in practice everything is somewhat more complicated. In fact, CifsManager is just a shell to run something like this:
$ mount -t cifs -o username = user, password = password, file_mode = 0777, dir_mode = 0777 // IP / ball-name / sdcard / cifs
However, it will work only if the cifs.ko module is embedded in the kernel, or it can be found at /system/lib/cifs.ko. If this is not the case, the file system will not be connected, and the “wrong” is on very many smartphones. What if there is no module? There are two options: either flash the kernel with cifs support, or find / compile the module suitable for your kernel.
We already had a whole article on how to choose and flash kernels, so we’ll dwell on the second option. In total, in addition to the cifs.ko module, for new versions of Android, we also need the modules md4.ko, dns resolver.ko, as well as optional nlsutf8.ko, if there are files with Russian names in the balloon. In this case, all modules must be compiled for the version of the Linux kernel that is stitched into the device. Far from every device can find them, but it’s worth trying using search queries like galaxy s3 cifs.ko. Usually all the necessary modules are packed into one zip-archive, which is enough to expand and copy to a memory card. Next, go to the CifsManager settings, tick the option Load vid insmod, and in the Path to cifs.ko field we list the paths to all modules by a colon, for example: “/sdcard/md4.ko:/sdcard/dns resolver.ko: / sdcard / nlsutf8.ko: /sdcard/cifs.ko ". After this, the program should start to mount the balls normally.
If such perversions for the sake of being able to access the balloon are not at all pleasing to you, then I would like to draw attention to SSHFSAndroid, which allows you to mount remote filesystems using the SSH protocol. In fact, this is just a wrapper around the well-known sshfs user-space file system that uses the FUSE Linux kernel module included in all stock kernels starting with Android version 2.2 (using FUSE, Android installs applications and virtual memory cards installed on the memory card).
Using SSHFSAndroid is pretty simple. After launch, the main application window will be empty, except for the “+” and “Settings” buttons at the top of the window. To connect a new file system, press the “+” button and successively fill in all the fields of the menu displayed: Name - arbitrary name, Host - IP or host name (for example, 192.168.0.100), Remote path - path to the directory on the remote side (for example , / home / vasya), Mount point - mount point (/ sdcard / share), Username - user name and Password - password, respectively. Next, click the "Save" button (icon in the form of a floppy disk) and, returning to the main screen, simply click on the item with the name of the connection. After requesting root rights, the file system will be mounted to the specified directory, with which you can work using any file manager.
Now about DropSync. In fact, this application performs the same task as the desktop version of Dropbox: it allows you to store files on a flash drive, periodically synchronizing them with the cloud storage. Synchronization happens only in relation to changed files, and directories for synchronization can be selected individually, sending and receiving from the cloud only what you really need on your smartphone, without having to download a few gigabytes.

DropSync is very easy to use, you just need to select the directory for synchronization, the directory in Dropbox and the synchronization method: one way or both. After that, the software will hang in the background and will periodically copy the changes in the files to the Dropbox disk and back. Immediately I recommend to purchase the Pro-version, it supports Linux inotify technology for instant synchronization immediately after changing files, and also removed the limit on the file size of 5 MB and on one synchronized directory.
UPnP / DLNA
The main problem of all these file-sharing methods is the need to get root, configure, and even install different modules. In the 21st century, when smartphones almost make you coffee, it looks somewhat archaic. Some time ago, UPnP (Universal Plug and Play) technology was invented, which allows you to connect all available "smart" devices into a common network with the ability to access various functions. Unfortunately, software and operating system developers underestimated the power of UPnP, and today the technology is mainly used only for the exchange and remote playback of multimedia files as part of the DLNA technology, which became the ideological heir and extension of UPnP. These two technologies (often referred to as a single technology stack) are used everywhere today, including various media players and televisions. There is no support for UPnP / DLNA in Android as such, but it can be found in a large number of multimedia applications, as well as specialized software, like BubbleUPnP and torrent clients.
Basically, the UPnP / DLNA stack is based on the classic client-server interaction model, in which the server acts as a multimedia content distributor, and the client receives it and loses it. The only difference from other technologies is that each device here is often universal, acting as both a server and a client, and can also be a controller that controls other devices and allows you to determine what will play from where (and where it all depends on the implementation, of course).
This architecture, combined with the automatic integration of devices into a network, allows you to implement a wide variety of device interaction schemes. In our case, we can literally make a few tapes so that the film stored in the memory of the tablet starts playing on the HDMI dongle, using a smartphone as a control panel. And also in a few tapas - so that the music from the dongle played on the smartphone.
There are three main Android apps that support UPnP / DLNA. These are VPlayer (via VPlayer uPnP DLNA Plugin), XBMC and BubbleUPnP. The first one allows you to play content from a DLNA server, the second one is to distribute and play, and the third one is an all-in-one combine that plays, distributes and manages other clients and servers. Built-in client support for DLNA is also available in HDMI dongles based on Rockchip 3066 and Rockchip 3166 chips (this is almost any modern dongle).
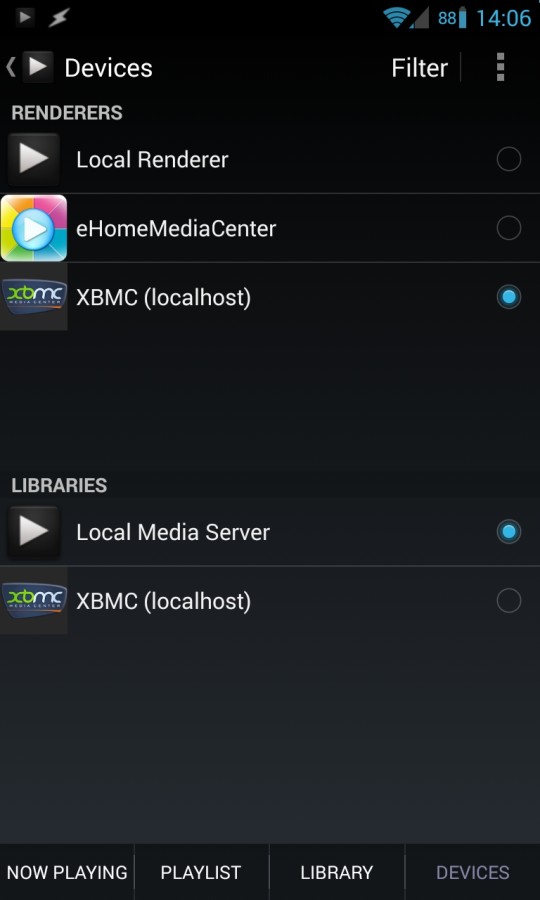
In my home configuration, which includes an OUYA TV-box with a hard drive connected, as well as an HDMI dongle, a phone and a tablet, the following applications are used: OUYA, which, in addition to playing media content on the TV, is also responsible for storing all multimedia data. XBMC, in the settings of which all DLNA operation modes are enabled (Services -\u003e UPnP -\u003e All options). BubbleUPnP is installed on the phone and tablet, HDMI-stick comes with a built-in DLNA client.

In order to play one or another media file on any device, now it is enough to launch BubbleUPnP, select the device for content display (RENDERERS) on the Devices tab, select XBMC as the content distributor - that's all. Then you find the necessary file in the library (the “LIBRARY” tab) and tap it. At any time, I can change the device to display or distribute content, and playback will continue on it. No settings, no IP addresses and port numbers.
Chromecast
DLNA is an excellent technology, but it is not designed for streaming from the Internet. In other words, if we want to watch the video on YouTube, we will have to launch the site client on the device itself, although it would be much more convenient to select the desired video on the smartphone and then automatically launch it on the TV.
INFO
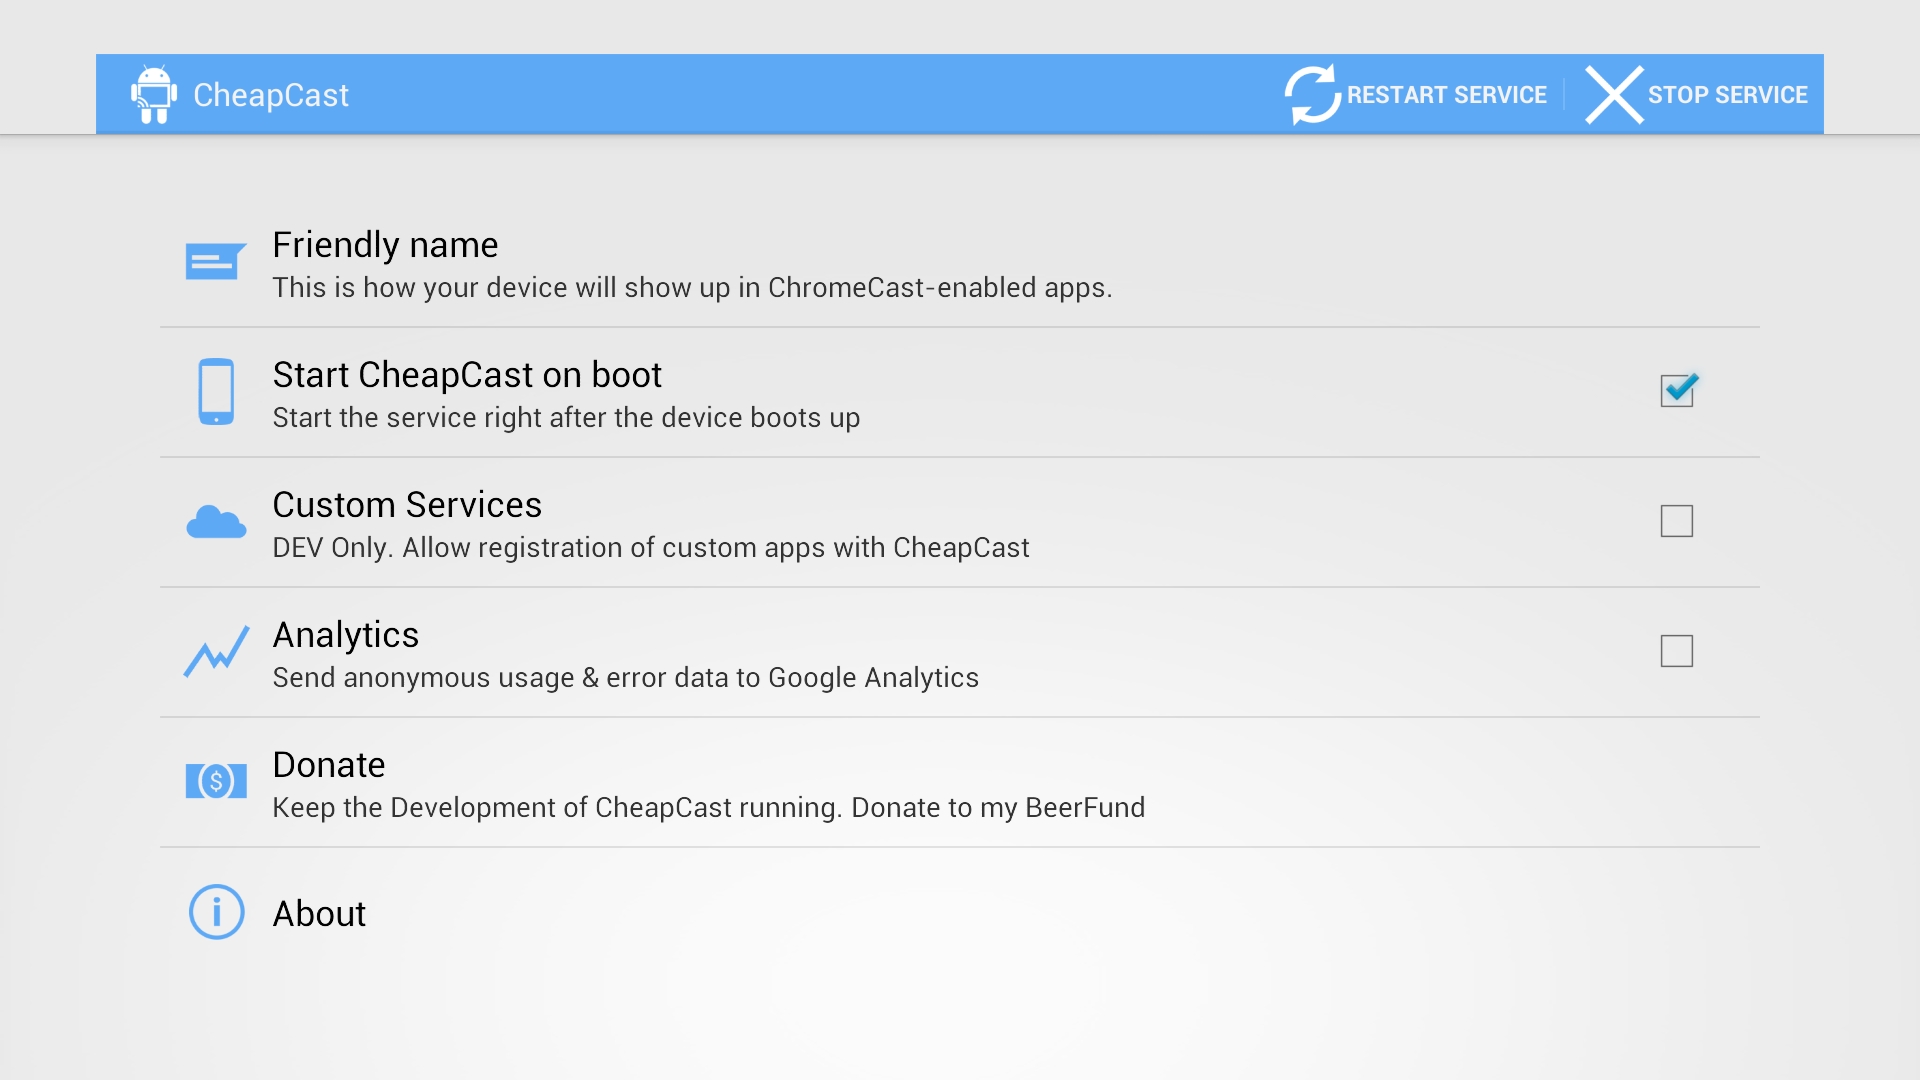
Chromecast streaming support is available in the YouTube for Google TV application. To activate, select the menu item Pair with mobile device in the menu and follow the instructions.Especially for such purposes, Google has invented a counterpart of the Apple AirPlay, called the Chromecast. Officially, this technology is supported only by the same HDMI dongle produced by Google itself, but the protocol turned out to be so simple that very soon enthusiasts took it apart and created an alternative implementation as part of the CheapCast application.
Now, to turn any Android device into a Chromecast, it is enough to install the CheapCast application from the market on it, start it and press the start button at the top of the screen. After that, in all applications supporting Chromecast, a button will automatically appear in the shape of a rectangle with a Wi-Fi logo in the corner. Click on the button, select the device, and the video is played on it.
The only problem is that at the moment Chromecast streaming only supports YouTube and the built-in media player, but Google has promised to add support for PLay Movies, Netflix and a few others. Kush from the CyanogenMod team worked on streaming from any application, but Google quickly wound up this development, disabling the streaming ability of any third-party applications.
Console / joystick
To control different TV set-top boxes, HDMI-stick and in some cases, the tablet will need a "remote" remote. I do not propose to buy special Bluetooth-consoles or equip devices with infrared receivers, instead turn the smartphone into a remote. Of the variety of console applications that can be found on Google Play, the only worthy option is DroidMote. The client is free, but the server for the Android device will have to pay 80 rubles.
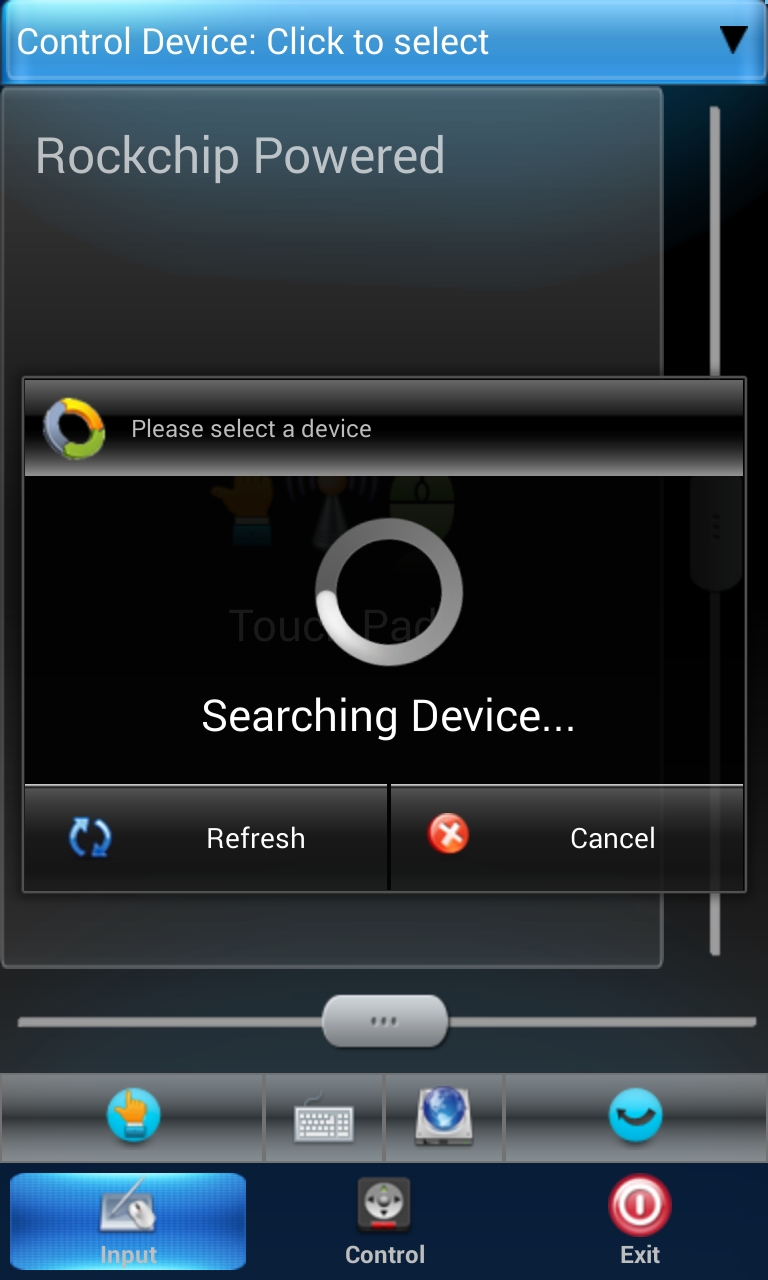
The client and server find each other and are connected automatically, so you do not have to configure anything. From the management tools are available: touchpad, keyboard, multimedia and joystick. The latter, by the way, is especially interesting in that it allows you to create a mapping of keys to points on the screen of a controlled device, so that you can play absolutely any games with it, even if they do not support the joystick.
INFO
SSHFSAndroid does not work in Android 4.2, but the author promises to fix the problem soon.The server functionality is available only in the paid version of BubbleUPnP, worth 140 rubles.
To share the memory card of any gadget, you can use the SambaDroid application. It does not require configuration and starts the Samba server automatically after the application starts.
findings
Integrating gadgets into one consistently working network is not an easy task, and the techniques described in this article are not perfect and will not work for everyone. However, so far we have no other tools, and we just have to wait for Google itself or the developers of CyanogenMod to add such features to Android. I am 100% sure that this will happen, the only question is when.
What is contact synchronization and why is it needed? How to save contacts with "Android" on the computer: step by step instructions.
In the gadgets that work on the basis of the operating system "Android", built-in function that allows you to synchronize contacts. However, not many are aware of this, and therefore smartphone owners often face the problem of how to keep contacts with Android on a computer or another phone. It is no secret that in recent years theft of smartphones has become more frequent. Also, many may simply lose the gadget. Sometimes in the course of unforeseen situations, the phone can be seriously affected. In such cases, it is difficult to restore all contacts, since almost no one uses a notebook. In order to avoid such problems, it is necessary to prepare in advance and learn how to keep contacts with Android on a computer. Due to the fact that the Android operating system was developed by Google, it’s pretty easy to synchronize contacts. All data is uploaded to the cloud storage, where the user can view and edit it. In addition, data access can be obtained from any device: smartphone, tablet, computer. This function is useful when changing the gadget, just connect your Google account to your smartphone, and all contacts will be automatically restored.
Synchronization of contacts in the smartphone is quite simple. Further information is provided on how to save contacts with the "Android" on a computer, step by step.
In order for data synchronization to succeed, you must be registered with Google. Then: - Open the “Settings” menu in the smartphone. - Go to the tab "Accounts and sync." - Click on the item "Add account". - From the list, select "Add a new account" if you need to register with Google. Or “Link already existing” if the mailbox is already registered. - Enter account details. - Exit the “Settings” menu and go to “Contacts”. - Open the settings menu and select "Import / Export". - From the drop-down list, select the place from which the data will be copied: a SIM card, phone memory or memory card. - After selecting the location of the contacts, you need to mark the account with which the data will be synchronized. - Select the desired contacts and click "Copy."
Contact sync completed. It remains to learn how to keep contacts with the "Android" on the computer. Now you can view all contacts transferred to the cloud storage from a computer. To do this, you must log in to Google through any browser. You can view the data in the Google Contacts tab, which is located on the e-mail page. Thus, you can not just view all contacts, but also perform several actions. Data can be edited, copied and deleted. The service allows the user to combine identical contacts.
It remains to understand how to keep contacts with the "Android" on the computer and back. In the case of a smartphone, simply enter the account information and it will appear in the phone book. Copying data to a computer is easy. Necessary: - Go to the tab "Contacts". Select the "Advanced" item. In the menu that appears, click on "Export". - Choose the format in which the data will be saved (vCard, CSV for Outlook and Google CSV). - Click "Export". Further, the data will be stored on a personal computer.