Your friends, acquaintances, colleagues? Of course, now no one in his mind remembers how our parents remembered before. Now we simply open contacts, find the person we need and connect with him. In this lesson, let's look at how to add contacts to your phone. To do this, open the phone, select the contacts icon and open the application.
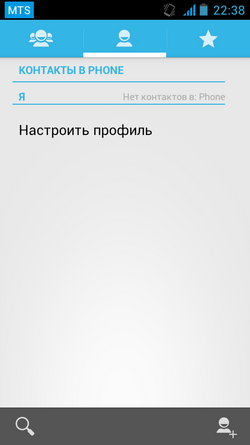
Since no contacts have been created yet, we see a blank area of the screen, and on top of a blue background we have three categories.
PS, the design will be different, but the meaning is the same everywhere.
Well, let's get started and let's move on to the second category (click on one little man) and set up your profile. (fill in information about yourself) I will call my profileTelefania.
![]()
Click on the word Customize profile and add your data. If your entire field is empty and there is no word Configure Profile, then we create the first contact and then everything will appear.
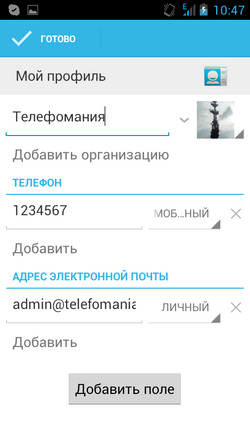

And here we have created our profile.
Now let's start adding new contacts to our phone book. To do this, in the same category (with one little man), click on the little man at the bottom right and in the pop-up prompt we will be asked to choose where to store the contact. Or on the SIM card or on the phone or add an account.Let's now consider storing a contact on an android phone without synchronization. We select the item to store contacts in the phone without synchronization.
And in the window that appears, fill in the profile of the new contact

Well here everything is intuitively clear how the data is filled in, click on the photo and insert a photo into the contact. After filling in the profile of the new contact information, click on the top is ready. Here we see the first contact appeared Mom, in our phone book.

Let's practice and create several contacts. I created a few contacts and that's what I got.

If you need to edit contacts, select the desired contact, click on it, on my phone, press the left key (you can have another key) and see a drop-down list. In which we select the desired action, by changing the settings in the edited contact.
In this article, we got acquainted with the easiest way to add contacts to the phonebook, without synchronization. Our contacts will be stored in the phone, and if trouble happens to the phone, we can lose all of our contacts. Whatever happens, in the next article we will look at how to keep contacts synchronized with Google.
How to create a group in Windows Phone and add a contact there?
When you create a group, it will be displayed at the very beginning of our contact list. Touching it, we will see the icons of the members of our group. In addition, right from here we will be able to follow the updates of friends on social networks, missed calls, SMS messages, e-mail and so on.
Touch the “Contacts” icon on the desktop and drag your finger across the display to go to the “All” section. Next, click on the round button "New" with a plus sign. Select "Create a group." Give the name of your group.
Now we can click “Add contact” and select the participant we want to add. Touch the icon with the image of a floppy disk (button "Save"). The group created by us will be displayed at the very beginning of the list. To edit a group on the desktop, touch and hold it with your finger.
If you wish, we can also add new contacts to it or delete them. Go to the "Contacts" through the desktop and go to the above section "All". Find the group that interests us and click "Edit". To add a new member, select “Add contact”. In order to remove it, select the participant, click "Remove from group", then click the "Delete" button.
To rename a group, click on its name two times and enter a new one (just like we do on a Windows PC).
We now turn to how to add a contact in the phone to the group on Android. This is done a little differently than on Windows Phone.
How to create a group in the Android phone and add a contact there?
This operating system also offers to organize your contact list by category ("Work", "Friends", "Family" and so on). To create a group, simply open the Contacts application and the corresponding category. In different versions of the system, its location is different; Usually the button shows a lot of little people and a plus sign. For example, this button may be located in the lower right corner. When you click on it, we see the message "Creating a group in the account." We select the creation of a group in the phone, after which the settings window opens. We give the name of our group and click "Finish".
Now, having entered the appropriate category, we see a tab with our group. So far, it is empty. To add a new member, go to the contacts and in turn select those users from the list that we want to add. Click "Add" (the location of this button can also be different; usually a little man with a plus sign is drawn on it). In the tooltip indicate "Edit".
In the new window we should have a menu section called “Groups”. Choose the group that we need for a specific contact. Click "Finish".
Now, if we select “Groups” in the contacts section, the group we added should be displayed in the group we have chosen. When you click on it, we will be able to make a call.
Related videos:
Other related news:
Viewed: 9 926 times
__________ _____________ __________ ______ ____ ______ ______________ __________ ________ ______ ________ _____ ________ _______ _____ _________ ____ ______ _____ ______ ___ __________ ____ _______ ______ ______ ______ ________ ______ ____ ________ ____ ________ _______ ______
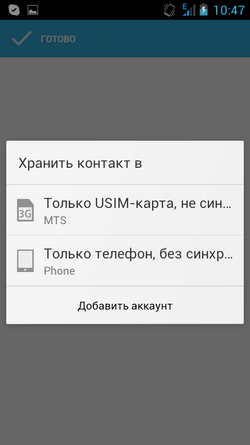
To add a new contact, open the phone book and click the button. A menu will be available to select the place where you want to save the contact - the phone’s memory or a SIM card (Fig. 3.16). What is the difference between them?
Fig. 3.16. Choosing a place to save a new contact
The SIM card memory contains a limited number of contacts, while you can only save the phone number, first name and last name of the subscriber. Contacts stored in the phone’s memory contain much more information: address, email, date of birth, etc. However, remember that contacts stored on the SIM card will be transferred with it to the new device in case of his shift; contacts from the phone's memory in it and remain.
First Name and Last Name - by tapping on the appropriate field, call up the touch keyboard, use it to type the first and last name of the contact and press the save button ”(Fig. 3.17).

Fig. 3.17. Enter data in the Name field
Phone - by pressing the button. You can add several phone numbers of one contact (mobile, work, home). As in the previous paragraph, click on the input field and dial the phone number (Fig. 3.18).
Groups, Call melody, Postal address, Organization, Nickname, Website, Birthday, Anniversary - in the same way, add information to these fields (Fig. 3.19-3.21).

Fig. 3.18. Enter the phone number in the Mobile field
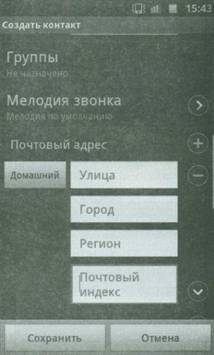
Fig. 3.19. Enter data in the fields of the Group, Ringtone

Fig. 3.20. Enter data in the fields Mailing Address, Organization
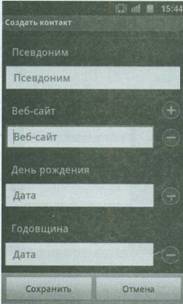
Fig. 3.21. Entering data in the fields Alias, Website, Birthday, Anniversary
When creating a new contact, enter as much information as possible about it. This will allow not to forget important information and, for example, in time to wish a friend a happy birthday.
When all necessary items are filled, press the button - a new entry will appear in the phone book.
To change a contact created earlier, go back to the phone book, find the desired name and click on it (Fig. 3.22).
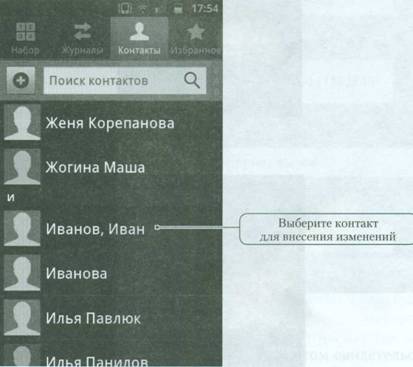
Fig. 3.22. Choosing a contact to make changes
You will see a list with available information about the contact (Fig. 3.23). To change part of this data or add new ones, click.
It will bring up the menu of work with the contact (Fig. 3.24).

Fig. 3.23. Contact details
![]()
Fig. 3.24. Contact menu
Now you can see a contact card (fig. 3.25) in which you can replace any data. The principle of replacement is the same as when creating a contact. After completing the job, click save.
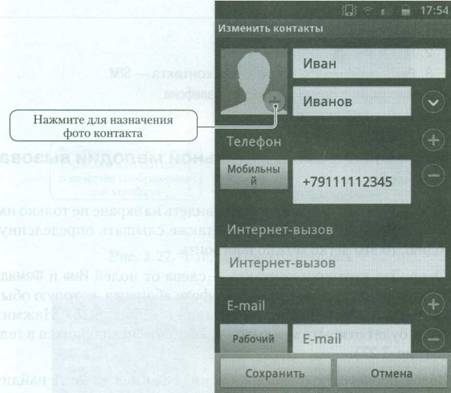
Fig. 3.25. Contact card
The contact was successfully edited - an inscription on the screen indicates this (Fig. 3.26).
![]()
Fig. 3.26. Confirmation of saving changes in contact
To delete a contact, instead of Edit, select Delete (see Figure 3.24).
Create a new contact on the SIM card, fill in all of its fields, and then delete.
1. Open Contacts.
2. Click.
3. Select the location to save the contact - SIM.
4. Fill in the Name and Phone Number fields.