Let's go step by step: What do we need?
1. I want to record the game / your monitor in high quality.
What software to choose to record video?
There are very, very many programs for video capture, kamtazia studios, bendikam, Snejit, and others. Most of them need to buy or break. I tested all these programs on myself and they have one common drawback, they heavily load the system, FPS sags during recording, FPS is the number of frames per second in the game. I needed a prog that hardly consumes the company's resources, thereby giving out more FPS. At that time, my computer was so weak that for me it was vitally important!
Why most YouTube masturbate on FPS. It's simple, many viewers have weak computers and see their favorite game at maximum settings in FPS 60 rush. Kaif is equal to subscribers. What would be clear about what subject, I will show the picture in the game in 20 FPS, 40 FPS and 60 FPS.
My choice is OBS
Outwardly meager outfit, but inside a deep and beautiful soul. At first, it will be difficult for you with OBS, but I will go along with you this difficult path and you can record your video clearly, from the heart. Just to say, all these bendiki suck on the sidelines after OBS ...
I had the first recordings on such an ancient PC that all programs showed a maximum of 12 - 16FPS and after an hour of recording the computer went into non-existence. And OBS gave out from 23 to 28 FPS stably and without lags. On the same hardware, this is something that says yes.
Having installed the program we will see the following window:
In the lower left block, we see scenes, this chip is needed by streamers to switch between scenes. In fact, we don’t need this feature, for now the topic is how to write your game videos with high quality.
The next window "Sources" - what is it? Everything is simple, the source can be a window such as a browser game, a browser, a desktop or your favorite igruha incentive, a capture device — for example, a webcam — you need to shoot your dull, tense face during a game, etc. Sources are created with the right mouse button.
We are interested in only three tabs, the Desktop Window and the Capture Devices, but now we need to configure the program because the program is not ready to record. To capture the video, we will return later.
We press the settings -\u003e There are general settings that can be changed at will, but they do not play a special role.
Go ahead -\u003e Coding
We select the x264 encoder, the quality is set to 10. The maximum bit rate and the size of the buffer are set according to the power of your PC. It's all individually. I show my settings on my gaming machine, in the description of the video I will give a link to the page with the characteristics of my PC and its video review. Bitrate and buffer directly affect the quality of the picture, if you make values like 1000 for example, then there will be such a picture, which one you see on the screen now, the higher the values, the higher the quality. In general, this is the only thing you need to steam up to experiment. But less than 4,000 thousand is better not to bet. The reserve of RAM also affects this crap, I have 32 gig, demanding games appreciate it. With 16 gigs, I freely wrote up to 40 - FPS at a resolution of 1920 by 1080.
Go ahead -\u003e Broadcast
In this tab, we select the place where the record field will be stored. We press the review we give the name to the file and so on. Ideal for storing records to choose high-speed SSD. It is worth it but it is worth it. In the review of my PC, I will tell you more about it.
Go ahead -\u003e Video
Here we select our video card, you want to write the resolution in which. The higher the resolution, the greater the load on the computer. Ideal when 1920 is at 1080, 1280 is tolerable at 720, but this is no longer ice.
Right now, I'll tell you something, I had a trouble one connected to the monitor. The resolution costs 1920 by 1080, but during the recording Actually the size of the picture was smaller than it was set everywhere, something around 1870 for 980 because of this there were black edges. It was necessary to stretch the image during installation. I will not tell this long story, just say how to solve this problem, if it arises. The feature plows if the monitor is connected via HDMI. On the example of my monitor VievSonic ... We leave in the monitor settings menu, select the input selection, HDMI PC. All ... If you do as I said, the size of the monitor image will match the resolution everywhere and in everything. So this topic can be taken out as a separate vidos, and it’s enough to tell what and what depends on, but I think the solution’s decision algorithm is enough, what difference does it make, the main thing works.
In this tab, we are still interested in FPS, I usually write 60FPS. The FPS that is on record and will be the final FPS.
On the FPS again affects the power of the PC, the game and the configuration of Windows.
If the computer does not pull 60FPS, you can write in 35 - 40FPS, when rendering, set the value to 60FPS during installation. So that the picture was a bit smoother. If the FPS is below 25, this is poor, But PUUr has a way to raise my FPS, on my old computer I pulled FPS with a special program for 8-10 units. Which adjusts Windows for performance. Like the likes, we subscribe to the description of this video and I’ll see a link to the FPS guideline in online games. For full teapots, I’ll also clarify that putting FPS in OBS in the game itself should be no less. Usually FPS in the game can be found in the game console. You can check it with the developers of your games or you can use special programs for measuring FPS in games. All topic FPS otsavim, if you have any questions, there are comments to the video.
Further, it makes no sense to disassemble the OBS, for this is the basic principle. What would all work chiki bunches, the information that I gave enough. I tested this program on different PCs of different cost of different builds, it is the best, also free. You can download it by the link below the video. So another important aspect, windows should be 64 bit. 32 bits for gaming vidos does not roll in any way, naturally all drivers must be installed. And then one guy bought a powerful computer and he rolled without drivers, and complained that his games were lagging.
Now the most interesting video capture:
Window and Capture Devices, these are two methods of capturing video from the screen, one eats the resources of a PC, while the second doesn’t eat much.
Window mode:
Go to the sources, right-click, add a window. We give the name. But before we launch our game, I launched a browser game, but it can be a game from a stim the principle is the same. Open the tab window and select your game that we want to record. Tick the mouse capture remove and tick a specific area. If the game does not get captured, it turns out that something like what you see with me.
What does if the game is not recorded? Solve the problem like this:
Create a new source - the desktop - and write through it, so the record went. All the worlds, It all depends on the Windows version and many other factors, it also happens that it is enough to change the standard Windows theme to start recording the game correctly, the glitches of the developers.
Now is the coolest way to record games: capture device.
What is he cool!? so that there is no load strong on the PC, everything makes the capture device. This gives a high FPS, lack of lags during the game, writes everything on the screen, any game, everything on the screen gets into the record. In short, the capture device is a YouTube grail, which by the way is not cheap. But it's worth it, I answer!
Overview of my device for capturing video links ... I'll tell you about all the fine-tuning and why I like this device.
Well, we connect our capture device, click add source, capture device, video device in this case, I have connected to PC aver media. Click OK
Well, let's see a preview, yeah, it’s all clear. Now we press record, everything works. I will clarify that for recording with a capture device, you need an SSD drive. Conventional HDD discs do not cope with the speed of data transfer and are often not suitable for recording streaming video.
Summarize, now I can confidently say that you know everything about how and what to record your game videos. I wish you chic gaming moments, there will be questions, ask how I can help. On this I say goodbye, you were PUERMAN until new meetings of the dude!
HOW TO RECORD YOUR GAME VIDEOS THROUGH OBS:Today, streaming of games and other content on the Internet is more popular than ever. Contribute to this very substantial income of some streamers. That is why many also turn to this type of earnings and leisure. In this case, a completely logical question arises: what exactly is streaming and how to do it?
Open Broadcaster Studio
One of the most common streaming solutions is the Open Broadcaster application. Among its advantages is relative simplicity, but with ample opportunities. The program is available completely free on the official website https://obsproject.com/download. Today, developers have presented versions for Windows, MacOS and Linux. You can download the program in the archive, immediately by the installer or through torrent - options for every taste.
After downloading the application you need to install. There are no special tricks here - the process is completely standard, so that no one will cause difficulties. The only point: you need to specify which directory Open Broadcaster will be installed.
YouTube
The next step is to set up the YouTube service itself. To do this, you must log in to the official video service portal with your username and password. In the upper right corner of the screen you will need to click on the user's avatar and in the appeared menu select the item “Creative Studio”.
On the next page on the left side you should find the item “Live Broadcasts” and select it. Here we are interested in the “Title / Key of the Broadcast” item. You will need to remember it and transfer it later to the Open Broadcaster settings.
OBS Studio settings
Next we move on to the general settings of the application. You can find them in the File-Settings menu.
Are common
On this tab, you can configure the display of pop-up notifications on the beginning and end of the broadcast, as well as enable automatic recording of the stream to the file. The latter is highly desirable - an extra copy is never superfluous, but keep in mind this creates an additional load on the processor.
Broadcasting
On this tab, select the service, which will be broadcast. In our case, this is YouTube. The key point is the indication of the stream key (we recently found it in the settings of the video service).
Conclusion
It is recommended to immediately switch to advanced broadcast settings. The most important thing here is setting the video bitrate, that is, its quality. The maximum bitrate should be no more than 80% of the speed of the Internet connection. For owners of a dedicated channel, this is not so important, but users with a low speed of access to the network should experiment. Thus, if the broadcast is interrupted, it makes sense to reduce the bitrate. Otherwise, all settings can be left as default.
Similarly, the “Write” to the file is also configured. Just specify the type of output "To file", and also specify the path to the directory in which our records will be stored.
Finally, in the tab "Audio" will indicate the sound quality. There will be quite enough recommended bitrate of 160.
Audio
More advanced sound recording settings. In the overwhelming majority of cases, it is recommended to leave the default settings, but in some programs the program does not intercept the sound very well and therefore it is required to choose which device will be recorded from. You should also select this option if you have more than one audio device.
It is also highly recommended to tick the on and off points of the microphone at the touch of a key. Otherwise, everyone will hear how you press the keys, click the mouse, etc. In general, this will create only unnecessary noise.
Video
The basic basic resolution is the resolution of the monitor or laptop screen. The output resolution is the resolution of the video in which it is sent to the YouTube server. If the connection speed does not allow setting the quality too high (it doesn’t have a special meaning above the basic meaning), but you should just reduce this parameter.
The overall value of FPS is most often the recommended 30 frames per second. However, the quality of graphics in games is growing and it already makes sense in some cases to include 60 frames per minute. Remember that recording at 720p and with 60 fps most often looks much better than video at 1080p and 30 fps.
Hotkeys
In this menu, if you wish, you can configure keyboard shortcuts to quickly start-stop broadcasting, as well as to turn sound recording on and off. The importance of the latter has already been mentioned earlier.
Extended
In the last menu item you can configure the priority of the process, that is, the amount of CPU resources that OBS Studio will consume. It is important to keep a balance here - give away too little and problems with video encoding are possible, give away too much - the system capacity may not be enough for the game itself.
Otherwise, you can leave all the default settings. Is that if you want you can change the name of the file that will be used for automatic recording.
This is done with the settings and you can proceed to direct experiments.
Source selection in OBS Studio
Before you start the broadcast, you will need to choose what will be broadcast. For this, the first step is to select a new scene in the lower left corner (by pressing +). Further work begins with sources. We will consider three main options.
Game capture
Here you can choose to capture the first application that will be launched in full screen mode. Most often this will be the game. If this option does not work, you can choose to capture a specific window and select it by name or by the name of the executable file of the game.
As additional options, you can enable cursor capture, display alerts from Steam, and similar features.
Window capture
Here you can select any window among currently running applications. At the same time, it is not even necessary to have it in the foreground.
Screen capture
This option allows you to automatically broadcast the entire working screen of the user.
An important point: as practice shows, the first two options do not always work and instead of the desired recording only a black screen will be broadcast. If this happens, it makes sense to try alternatives.
Start broadcasting in OBS Studio
Now that all the presets have been completed, all that remains is to start the broadcast itself. To do this, go back to the already familiar YouTube menu “Live Broadcasts”. Here we will only have to choose the name of the stream, its brief description, and also indicate the category. In the advanced settings, various trifles are set, for example, a location and the like. In general, you can leave all the default settings.
Important point: do not forget to specify the correct option in the "Privacy" menu. Will the broadcast be available to all or only your friends.
Finally, it remains to go back to OBS Studio and click on the “Start Broadcast” button (or use the hot keys if they have been configured). If everything was done correctly, then in the YouTube window you can see the post. Next to it is a chat where you can chat with viewers, viewing statistics, as well as a lot of similar service information.
At the end of the broadcast, the full video can be seen in the Video Manager menu. There is also editing available if you wish, although the service does not have any special features in this regard, but it will allow you to quickly cut off the beginning or end if there is something undesirable there, for example, switching to OBS Studio to turn the broadcast on or off.
This draft has been lying around for quite some time, but due to the fact that some visitors to the gametop are still using filthy fraps, and then take a long time to do unnecessary video conversion, we lose possibly interesting content. It’s written enough about recording content here, you can write more about a twitch, but apparently some other time.
Open Broadcaster Software is a free, cross-platform program for recording and broadcasting (streaming) open source video. With its help, you can encode the video stream in h264 in real time, this is enough for simple clips and speeds up further processing. Under the cut, I'll tell you how to use obs, as well as twitch.
A few words about iron. Starting with i5-2xxx, the intel processors use h264 video hardware coding, specifically I use i5-3570k. It is enough to record simple things, without 3d graphics, but the quality of recording and fps in modern games will depend on the video card. Empirically obtained drop in the frame rate when recording at 5-10, with respect to the usual game. It is worth bearing in mind, most likely you will have to lower the graphics settings in some demanding projects.
Channel width is only important when broadcasting. The twitch allows you to stream at a speed of up to 3.5 mbits / s, that is, you must have a return channel of at least 5 mbits / s.
Everything described below was done on windows.
So let's go. Install obs, it is advisable to immediately make a shortcut to launch the 64-bit version of the program with administrator rights, many games do not give a picture or block pressing hotkeys without administrator rights.
Run and open the settings:
Broadcast tab, set up live broadcast, choose twitch service, FMS URL is the location of the servers of the match, for most people living in the CIS, EU: Stockholm, SE is relevant. JTVPing can show ping to different servers to choose the best one. The path to the file, specify where the videos will be saved if necessary. At the bottom of the tab in red will be marked with settings that do not meet the requirements of the match and should be corrected.
Tab Coding, Put a tick CBR (constant bit rate) and CBR padding. The maximum bitrate is 3500 and the audio bit rate is 160 if the channel allows.
In the Advanced Settings tab, x264 CPU Preset - veryfast, Main encoding profile, Key frame interval - 2s
Video tab. The basic resolution is set to Custom and we register 1280 720, the resolution should be scaled No.
Close the settings.
Now we will try to record a short video for testing, select any game and set up its screen resolution of 1280x720 and windowed mode. I used for testing Fallout New vegas, you need to wait until the game is fully loaded before the main menu before returning to obs. Other games may have their own nuances.
In our program, right-click on the list of scenes and add a scene with any name. Next in the selected scene, right-click on the sources-\u003e add-\u003e game. Choose our game in the list of applications. Put a tick Mouse capture. Click OK. We put the program window in such a way to see it playing in window mode.
Now click the preview button. If the image does not appear immediately, switch to the game and back. If it still does not appear, then for the test it is better to take something else, such games are also recorded, but do not give an opportunity to check the performance at the same time. We press the button to start recording, switch to the game and try to play for a couple of minutes. We look at the fps in the lower right corner of the obs. It should show 30 frames per second. If it shows less, maybe something is set up incorrectly, relative to what was written above, but most likely your computer simply does not pull the recording of this game. We stop the recording, go and check out the video, there should not be any lags in it either, if they exist, the computer most likely does not pull the recording of this game.
If the speed is all right, you can try better settings, because the above are the minimum. Good options for streaming are 1280x720 and 60 frames per second (also indicated in the video settings), 1920x1080 and 30 frames per second. And the first option is better than the second in the output image. Another option for those games where for some reason there is no 1280x720, but there is 1600x900. We put exactly this custom resolution and enable scaling by 25% to get 1280x720. the frame rate is also 60. In all cases, the bitrate is 3500, this is a limitation of the match.
For recording video with subsequent processing and the Gulf for example on youtube, you can use 5-8 Mbit / s for 1280x720, and up to 15 Mbit / s for 1920x1080. But the main thing is to check that obs had time to encode such a volume of information and did not miss frames.
In general, practice has shown that twitch do not care for resolution, now basically 1600x900. It is important to maintain the 16: 9 aspect ratio, which is the default for the output stream. For serious videos on YouTube, it’s worth preparing material either at 720p or 1080p, but random videos can also be recorded as intermediate videos to illustrate something.
To record a microphone you need to check the settings in the audio tab. First, the correct device must be selected, it must be heard on the recordings. Secondly, the amplification factors of the applications (sound in the system) and the microphone must be chosen so that the game can be heard well in the video, and your voice can be clearly heard in the background of the game.
Configure Twitch.
1. Register.
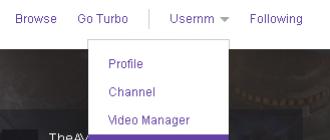
2. We need a stream-key. It is located in the dashboard. This option itself is in the user menu, which is accessible from the main page. The interface of the service is not obvious, so here are two illustrations of where to look for it. 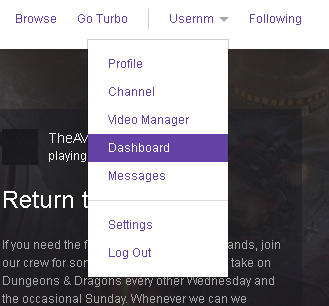
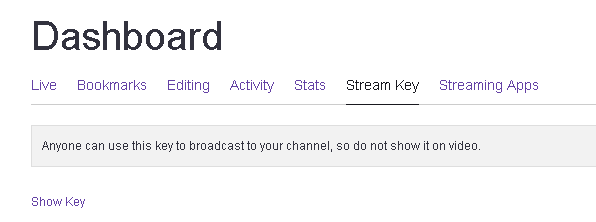
Click the Show key button, copy the key and paste it into obs, in the settings, the translation tab.
3. Go to http://www.twitch.tv/settings/channel and tick Automatically archive my broadcasts. Now your videos will be available from your profile, past broadcasts section. The clips are stored for about 2-3 weeks, so if the clip is valid, then it should be saved, for this you can use the highlight function under your video or link your account to YouTube and use the export "video.
Now you can run the broadcast in the program.
In the same dashboard on the live tab, you can check what stream is showing, the image is backed up for 20+ seconds, it must be kept in mind. You also need to turn off the sound on your own stream so that sounds are not duplicated.