Most computer users use the Microsoft Office suite in their daily work. Quite often, documentation files may contain important information that needs to be protected from third parties. So that only you can open and edit your documents, it is possible to close them with a password in the system. Not all users are aware of this.
However, we have this opportunity. In fact, putting a password on an Excel or Word file and thus protecting it is quite easy, it is enough to do some simple manipulations.
How to put a password on an Excel 2007 file
These actions are performed after you have created a document with the above title. First you need to open the item using the menu Save as.
In the appeared window we find the button in the left part of the bottom. Service, click and in the list that appears we find Common parameters. In the newly opened window we find the string Password to open.
It is recommended to come up with medium and high degree of complexity, containing letters and numbers, to reduce the likelihood of breaking an Excel file that has important information. After you have entered the password in the appropriate line, you will need to re-enter it, after clicking on OK. This operation exists to eliminate the input error. The above actions are performed in the same way with Word documents.
How to put a password on an Excel 2003 file
- After creating the file you need to open the menu item File and select the line with the name Save as.
- In the window that appears, look for the item Service and in the pop-up menu we find the line Common parameters.
- Next, a window appears requesting a password, enter and save all changes.
After the above steps, you can once again try to open your document to make sure it is password protected.
Today we will discuss how to password the Excel file. This tool is included with Microsoft Office. Excel allows you to create tables of different complexity, use formulas, as well as individual design. All current versions of the application support password setup.
Instruction
We proceed to a phased description of the process of how to password the Excel file. This feature is provided to files in * .xls format, like any other Microsoft Office documents, including Word and Access. So, after finishing work with the document, press the "File" button, which is located in the menu at the top of the Microsoft Excel window. In the list that appears, we turn to the item “Save As” by clicking on it once with the left mouse button. A window for saving the document will appear, in it we will find the “Service” menu, click the inverted triangle, and then use the appeared function “General parameters”.
Customization
 Moving on to the next step in deciding how to password-protect an Excel file. The “General Settings” section appears on the screen. Here you must enter the password to change or open the document. In addition, if you activate the "Read Only" function, when you try to open a password-protected Excel file, it will be disabled by default.
If you set security only to launch the document, a prompt will appear every time you open the table. In this case, all users who will know the secret combination will be able to create arrays and edit data. As for the question of how to open a password-protected file, the protection is set to change the material, the launch will take place as standard, without any requests. However, if you add new data to the table and try to save the document, the application will ask you to specify a secret combination.
When both types of passwords are set, double entry is required during start-up and closure. It is important to know what to install. different passwords for editing and opening a file.
We return to the setting. When the password (or their pair) is set, click in the "General parameters" button "OK". In the explorer enter the name of the document, save the file using the appropriate function.
Remove protection
 Further we will discuss how the password is disabled in Excel. To solve the problem does not need additional softwarebecause the function is provided by the application’s built-in tools.
Run Excel. Open the document that you need to get rid of password protection. Use the menu "File". Specify "Save As", and then open the "Service" menu. Go to the "General settings", use a double click on the asterisks in the password bar. Use the "Del" key for the desired action. Confirm the operation by pressing the "OK" button. Click "Save" and then "Yes" in a new window.
That's all, the password in the Excel workbook is removed. With the sheet, everything happens in a similar way. Open the "Service" menu, use the "Unprotect" command. To confirm the cancellation action, you will have to enter a previously assigned password. From now on, you know how to password-protect an Excel file, and how to cancel protection if necessary.
![]()
Good all the time of day, dear friends! How are you feeling? Personally, I have it Friday, but the street is not so hot. Anyway. Tell me please, which office suite do you use? I’m sure most of you use Microsoft Office, and I’m no exception. And of course everyone knows about excel too. So you know what turns out Excel has a built-in protection?
No, I do not mean antivirus. I mean, you can protect this document with a password. I told you in one of my articles, but I see no point in using the program presented in that article if you need to protect an Excel document or information that you can put in text Document (for example names, passwords, etc.).
So today I’ll show you how to put a password on an excel file, if you don’t know it yet. And all these methods work fine in both the 2010 version and the 2013 version. Let's go!
Opening password protection
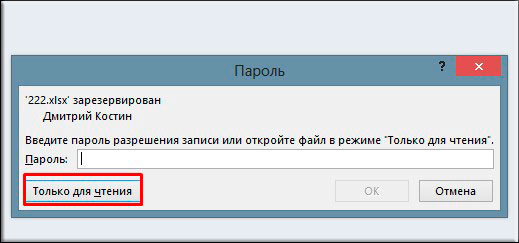
Everything. Now exit and Excel and open this document again. You will pop up a window where you will need to enter your password. Just do not forget the passwords from the document, otherwise, unlike other Internet services, you cannot recover by e-mail or phone.

Editing Protection
In addition to the usual password protection, you can block some specific functions on a separate sheet, or on the entire book. Let's see how this is done.

Well? Everything worked out? I think that you should have no problems. But if you still have problems, please contact us. I will help you).
Alternative way
You can put the password in a slightly different way.

Now we will try to enter the saved document and see how it works in action. If you set both passwords, you will first have to break through the opening protection and then the editing protection (or open the document only for reading).
In general, as you can see, there are a whole bunch of ways to protect an Excel document. So you can choose any.
Well, on this I finish the article. I really hope that these tips will be useful to you in life. Be sure to subscribe to updates of my blog to be aware of all the most interesting. Best wishes to you. See you in other articles. Bye Bye!
Sincerely, Dmitry Kostin
Many put passwords on certain documents. If the file has not been used for a long time, the secret word may be forgotten. It is not always possible to recall it, but there are still ways by which it will be possible to open a document.
Consider how you can remove the password in the Excel file.
Remove the password in the Excel file using a script
You can open a password-protected document using the free VBA script Excel Password Remover. After downloading the program you need to run it. The utility will immediately integrate into Excel, which will display a message on the launch of the macro. You can safely run it, after which you should open your password-protected file and select the item "Straxx" in the Excel menu.
The important thing is that the script does not attempt to crack the Excel password by selecting random phrases, it disables the protection call in the document from the inside, which is much simpler. The whole procedure takes about 2 minutes.
Remove the password from the Excel document manually
You can remove the password in the Excel file and manually.
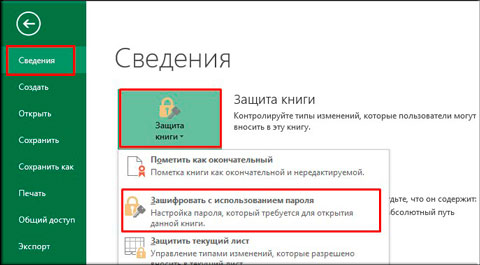
- To do this, you need to open the document, go to the "File" tab, select "Details", and then in the drop-down list the heading "Permissions".
- In the new window, click "Encrypt with password", then a window will open in which the previously entered password will be displayed. It is necessary to remove it and click on the OK button.
- Close the document. The application will ask you about the need to save the changes, you must click on the "Yes" button.
- Run the document again, and you will see that Excel does not require a password.
How to crack a password in Excel: a simple way
It is necessary to touch upon such an important question: how to password-protect an Excel file. The presented tool is an integral part of Microsoft Office. Excel allows you to create tables of various levels of complexity, apply formulas, change the design. To date, all versions of the program support password configuration.
detailed instructions
The process description can be divided into several stages. Excel files can be protected by * .xls files, as well as any other Microsoft Office documents, including Word and Access. The following steps are required to complete the procedure:
1. At the end of the process, click "File". It is located in the menu at the top of the Microsoft Excel window.
2. When the list appears, you need to go to the "Save As" section. To do this, click on it with the left mouse button.
3. In the file saving window, find the “Tools” menu and click the inverted triangle.
4. After this, the “General settings” function will appear, which should be applied.
Password setting
Now you should go to the basic steps that allow you to password-protect the Excel file. When the “General options” section appears, you will need to enter a password that will allow you to enter the document and also edit it if necessary. When the “Read Only” function is activated, the toolbar is disabled by default when a password is set. When providing a document with protection only for its launch, the input request appears constantly at the moment of opening the table. In order to use it, as well as edit its data, you need to know the secret combination.
To open the password-protected Excel file, provided that the protection is set to change the material, the launch is carried out as standard, without making any requests. Difficulties arise when introducing new data into the table, as well as trying to save the document. As a result, the user will be required to enter a secret combination. Setting both types of passwords involves double entry in the process of opening and closing a file.
It is worth noting that you can set different passwords for opening and editing material. Now we need to return to the setting. After the password is created, you must click "OK", which is in the "General settings". In the explorer you need to enter the name of the file, save it using the appropriate function.
Deleting a password It is also worthwhile to raise a question that concerns disabling installed protection in excel. To solve this problem is not required additional program. The application is equipped with built-in tools that can perform these actions. First you need to run Excel, and also open the file you want to get rid of the password. Then you need to use the menu "File". In it you need to specify "Save As" and the "Tools" menu.
After that you should go to the "General settings". To do this, double-click the asterisks in the password bar. Then use the "Del" button to perform the necessary actions. The correctness of the operation is confirmed by pressing "OK". After that, you need to click "Save" and then the "Yes" button, which will open in a new window. After performing such simple actions, the password in Excel will be removed.
When using the sheet carried out similar operations. You need to open the "Service" menu, then use the "Unprotect" command. To cancel the action, you will need to enter the previously set password.
The above methods can be password-protected Excel-file, as well as unprotect the document.