Even not advanced Windows users have probably once heard that there are several ways to reinstall this operating system: using a DVD-ROM and USB-drive. These two options are now most common among users. However, there is another one that allows you to perform a “clean” installation of Windows OS or upgrade it to a newer version using a hard disk partition. It can help in those cases when you do not have a USB-drive or a DVD-ROM on which you can burn an image of the operating system. If you want to know how to install Windows 10 from the hard disk partitionWe recommend you read this manual. Perhaps you need it in the future.
Make sure you have:
- ISO file with Windows 10 operating system.
- Programs EasyBCD and UltraISO.
- At least 5 GB of free space on the system partition.
Installing Windows 10 from a hard disk
What is interesting, so you can install not only Windows 10, but also Windows 7, 8 and 8.1. If you want to install any of these operating systems, you will only need to delete the Windows 10 files, copy the files of your preferred system and specify the path to "boot.wim".
Many of those who are faced with the installation or reinstallation of Windows-based systems know that in most cases external storage devices like USB-drives are used for this operation. If you try to run the installation file from the hard drive, the user will not get the desired result. Therefore, for Windows 7, installation from a hard disk should be done using completely different methods. For an ordinary user, you can bring five main options, which now will be discussed.
Windows 7: Install from hard disk. Installation options
So, we will consider some directions in carrying out the installation of the seventh version of the system. Among the main options are the following:
- installation over the old "seven";
- installation as a second OS;
- installation using the command line;
- use of special utilities;
- system installation on an external HDD.
Each of these methods has its advantages and disadvantages; however, for all of them, one common rule is to have an image of the installation distribution kit of the system, which we will have to work with later. In addition, if the computer has already created the hard disk partitions, when installing Windows 7 you can not touch them. Otherwise, they will need to be created. But more on that later.
Preliminary information
Now we will look at some initial conditions, which, when necessary, must be complied with without fail.
The system requirements are such that a system with a 32-bit architecture requires at least 16 GB of free disk space, and for a x64 system, about 20 GB. And this is on condition that there is an already installed system, the directory of which, after installation, will be renamed to Windows.old. You can not delete it manually in any case (unless you do a disk cleaning). Then it will simply be impossible to roll back.
Install over old system
Using this technique, you just need to understand that formatting the hard disk when installing Windows 7 will not work, even if it is a system partition. But we will rely on the fact that the distribution kit is on the C drive when the partition is done. How to partition a disk will be discussed later.
As is already clear, first the downloaded distribution kit should be placed on an independent partition (usually, this is disk D). You can, of course, start the installation from it, but then errors will come out. Now we simply select the installation file Setup.exe from the Archive directory, followed by the installation of Windows 7, which is no different from the standard procedure.
In this case, for Windows 7, installing from the hard disk is rather a means of updating system files, since the new configuration may inherit the errors of the old one. It is not comfortable.
An alternative method for installing Windows 7 as a second OS: what might be needed?
However, you can do otherwise. To install the system, there is a way to install it not on top of the existing OS, but as an additional OS, which can then be loaded when selecting from the boot menu (Boot). The main thing is to create a boot partition in the source volume.
For all operations, you only need an application that can work with images and create a utility that creates the MBR boot sector on the selected partition. As an example, use Daemon Tools and the EasyBCD program.
Creating a partition
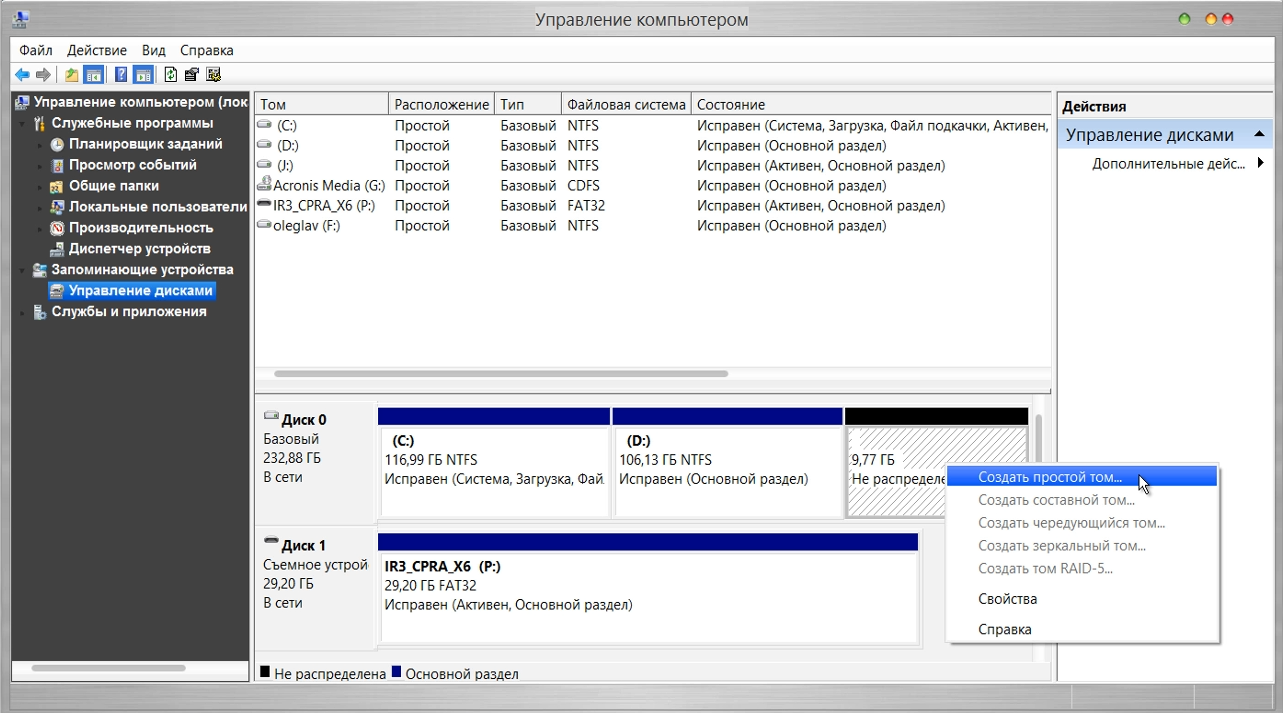
It is just impossible to download the installation distribution kit, even if it is on the system disk. This is due only to the fact that the system itself does not recognize it, and, if it sees it, it sets a ban on downloading. Here you need to refer to the disk management section, which you can get through the computer administration.

The benefit of Windows 7, like all subsequent versions, has such a tool. First, we look at the virtual section D. Call the menu and select the volume compression (the indicated size should slightly exceed the volume of the distribution kit). Next, right-click to call the menu and use the command to create a simple volume (without this, the system will not determine that this section is operational).
How to split the hard disk when installing Windows 7, of course. Getting to the most critical part.
System installation
Now we are directly interested in installing Window 7. The hard disk systems are such that they still do not see the distribution kit.
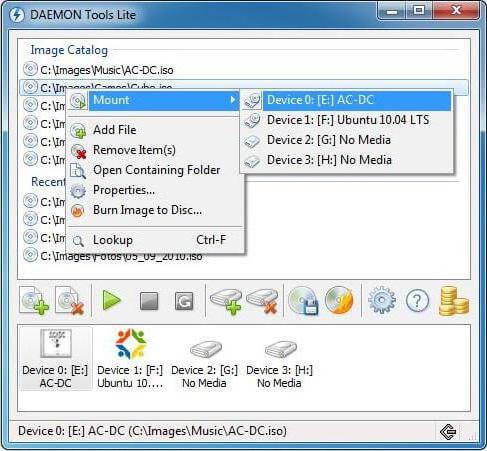
Run the Daemon Tools program and mount the image using the appropriate command, indicating the path to the saved file. Copy it to the newly created partition (unpacked image file).
Now we start the EasyBCD application and press the add record button, then select the WinPE tab at the bottom, and then in the name field enter “New Volume”, and in the path line we define the location of the boot.wim file.

After the entry is added, simply reboot the computer or laptop. At the same time, the standard installation of the "seven" starts.
Installing Windows 7 using the command line
Again, this option cannot be used when the initial system has damage or errors. But in the case of recovery will do.
![]()
When Windows starts, press the F8 key (the standard method as opposed to Windows 10) and select the troubleshooting string from the menu (the first one in the list). In the additional parameters, we specify the same thing, after which we use what we need in the language selection window and proceed to the system recovery, where we select the command line.
In the console, write two lines:
- X: \\\u003e windows \\ system32\u003e E;
- E:\u003e setup.exe
Do not be afraid to make a mistake. Drive letters in DOS and Windows do not match. In the extreme case, an error will simply be issued, after which it will be necessary to correct the corresponding symbol, but, as a rule, this is not required. Well, then the process starts, no different from the standard. Note that in this case even the system does not need to be rebooted.
Install over any system using the BOOTICE utility
Now suppose we need another installation of Windows 7. There is a formatted hard disk. The catch is to create a boot device in the form of an HDD partition.
The BOOTICE utility is designed to emulate the continuation of the installation of Windows 7, creating and overwriting the boot sector (for this, the unpacked distribution has the bootmgr folder).
To start the installation, you need to change the MBR boot record to GRUB4DOS. But here you need to take into account one feature. The fact is that the utility requires the creation of the name of the bootloader manager of no more than five characters (letters).
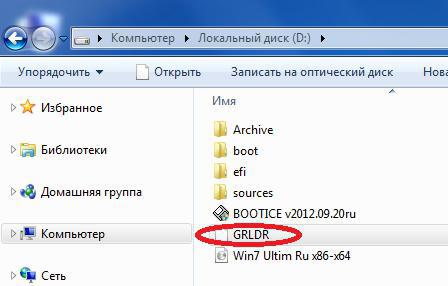
Rename the bootmgr file to GRLDR, and then run the utility itself. A new entry is immediately visible in the menu, so we tick the (assignment disk) there, and then press the button to change the installation and in the configuration select save to disk. It remains only to restart the device, after which the installation of Windows 7 will be activated. The installation from the hard disk will follow immediately. As a rule, problems should not arise.
Installing Windows 7 on an external hard drive
But, despite all the nuances of installing the "seven" on the hard disk, some users are trying to install the system on removable media, in particular USB-HDD. What to say? This is fundamentally not true!

The question is: why create problems for yourself out of the blue? From any USB device, loading is much slower than from a hard disk. The external drive itself (hard drive) is exposed to a stronger physical impact and is not immune from the appearance of failures and errors. Nevertheless, the "especially gifted" users will have to use (at least) a virtual machine. And many of these “geeks” have no idea what it is.
Of course, for the rest, we can say that any virtual emulation, for example, using WMWare or the same built-in Hyper-V module can be carried out quite simply. But the matter is not limited to automatic settings. Here it is necessary to set the appropriate system configuration parameters. And all those who claim that with the operating system installed in it you can create in a couple of clicks in five minutes are absolutely wrong. Nothing like this!
Possible errors and failures
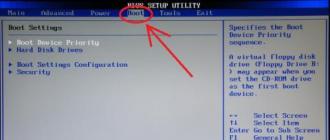
Now the saddest thing. What to do if the installation Issues of equipment failure are not considered fundamentally. The external hard drive must be enabled in the BIOS, as well as the boot priority from the main device.
If there are problems with the file system, you can always use a command like sfc / scannow or chkntfs x / c (if you chose partition C as the system disk). Well, if the hard drive "crumbled", there's nothing you can do. Have to change. Although ... Many experts advise to first use the program supposedly peremagnetizing the surface of the disk, but this method is hard to believe.
On the other hand, when installing the system on an external drive, you cannot do without utilities like ImageX included with the Windows AIK package. In addition, the PWBoot module does not recognize Cyrillic characters at all, but works by the command line type. So is it worth doing this?
And that is not all! When the selection of several simultaneous installations begins, you will have to choose between the standard VHD container format and a regular removable device. It is believed that the VHD format is read faster, but the problem of enabling this type of media is precisely the use of BIOS settings. And when switching from BIOS to UEFI (which is not always supported), there may be much more problems. However, for Windows 7, installation can be done by any of the above methods. But formatting partitions in most cases will not work.
Thus, the conclusion suggests itself that the simplest is the ideal solution. The use of specific methods with the creation of boot sectors ordinary user will not use. It's obvious. But the method of updating the system looks much simpler, but it also has its flaws. In general, it is better to make a “clean” installation by first copying the necessary information to another medium.
The disk with the operating system may be dusty in the table or completely absent. For some users, the drives simply do not function or work, but too slowly. In addition, do not have to revise the BIOS settings. The user does not urgently need to copy the required files to the media type before formatting.
How can I install Windows from my hard disk?
To start, download a program called Daemon Tools Lite with a utility called Easy BCD. Then we find the ISO image of the Windows system.
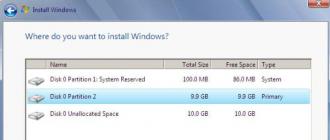
On the disk where the files will be copied, a special partition is created. In "My Computer" click on the shortcut with the right side of the mouse and go to the section with disk management.
 Here there is information about the hard drive, and it is necessary that he was immediately divided into two. After you have to make the separation of the disk D by pointing and clicking on it with the right mouse button. There, the compression of the volume is selected, the location and file size are indicated. The size should not exceed the volume of the ISO image. The compression process is carried out fairly quickly, and then there is no distributed space, which turns into a regular volume.
Now you can open the Daemon program and click on the appropriate phrase “add image”. Remembering where the ISO image is, you can add it to the program. The image is highlighted in the catalog and the installation process starts. The program is closed, and the image will be mounted in the virtual drive. All information is copied to the newly created disk (New Volume). Next, the EasyBCD utility is launched to add a boot record and start the installation process.

In order to check the appearance of a new entry, click on “Current Settings”. Now the program is closed, and the device is restarted. A new OS selection menu pops up where a new volume is selected. After this, the standard installation process begins.
You need to understand that the method does not work on devices with BIOS UEFI.
The process of starting the system is not much different from installing an internal disk. In this case, you can install Windows from a hard drive without using bootable devices.
Many users who have encountered the installation of Windows operating systems know that they usually use external media such as USB drives or optical disks. If you try to run the installation file from the hard disk, the user may not get the desired result. For this reason, for the Windows 7 operating system, installation from the hard disk should be performed using other methods. There are five main options for the average user. About them now and will be discussed.
Installing Windows 7 from hard disk: options
Let's look at some directions in the implementation of the installation of the seventh version of the Windows operating system. The main installation options include the following:
- install over old Windows 7;
- installation as a second operating system;
- installation using the command line;
- use of special tools;
- installation of the system on an external hard drive.
Each of the above methods has its advantages and disadvantages. However, the general rule for all the described methods is to have an image of the installation distribution kit of the system, which you will have to work with later. If there are already created hard disk partitions on the computer, you can not touch them when installing Windows 7. Otherwise, you will need to create them. However, this will be discussed later.
Installing Windows 7 from a hard disk: preliminary information
Let's look at some of the initial conditions that must necessarily be met during the installation of the system. The system requirements of Windows 7 are such that to install the 32-bit version you need less than 16 GB of free disk space. To install the 64-bit version, you need about 20 GB. This is on the condition that there is already an installed system, the directory of which after installation will be renamed to Windows old. It can never be manually deleted. Just then it will be impossible to perform a rollback.
Install over old operating system
Using this technique, you should immediately understand that when you install Windows 7, you will not be able to format the hard disk, even if we are talking about the system partition. But let's rely on the fact that the distribution is on drive C when the partition is done. Later it will be discussed how to partition the disk. As it should already be clear, the downloaded section must first be placed in an independent section. As a rule, this is drive D. Of course, you can start the installation from it, but then errors can come out. Now you just need to select the installation file Setup.exe from the Archive directory. Then follows the installation of Windows 7, which is no different from the standard procedure. For Windows 7 in this case, the installation from the hard disk is rather a means of updating the system files, since the new configuration may inherit the errors of the old one. It is not very convenient.
Installing Windows 7 as a second operating system: what may be required
You can choose another scenario. To install the system, there is a way to install it not on top of the existing operating system, but as an additional OS, which can then be loaded when selecting from the Boot menu. In this case, the main thing is to create a boot partition in the source volume. To perform such operations, it is enough to have only one application that can work with images and create virtual drives, as well as a utility that creates the MBR boot sector on the selected partition. For example, we will use DaemonTools and EasyBCD.
Installing Windows 7: how to create a partition?
It is impossible to just download the installation distribution, even if it is on the system disk. This is due to the fact that the system itself does not recognize it, and even if it does, it will block the download. Here you should refer to the disk management section. You can get into it through the administration panel of the computer. The operating system Windows 7, like all subsequent versions, has this tool. First you need to look at the virtual section D. At this stage, you need to call the menu and select the volume compression. You need to specify a size that is slightly larger than the distribution. After that, using the right mouse click, we call the menu and use the command to create a simple volume. The system without this will not determine that this section is operational. Now it should be clear how to split the hard disk when installing the Windows 7 operating system. You can proceed to the most important part.
Install Windows 7
We will understand directly with the installation of Windows 7. The hard disk systems are designed in such a way that they do not see the distribution kit. You need to run the Daemon Tools program and mount the image using the appropriate command, specifying the path to the saved file. You need to copy it to the newly created section. Then run the Easy BCD application and click on the add record button. After that, select the bottom tab Win PE. In the name field, enter "New Volume". In the path you need to determine the location of the file boot.wim. When the record is added, it remains only to restart the laptop or computer. This will start the standard installation of Windows 7.
Installing Windows 7 using the command line
This option may not apply if there are errors or damages in the initial system. However, in the case of recovery, it is suitable. When starting Windows, you need to press the F8 key and select a troubleshooting line from the menu. She will be first on the list. In the advanced settings you need to specify the same. After that, use what you need in the language selection window. We proceed to restore the system. In this case, you need to select the command line. Two commands must be entered in the line: X: \\\u003e windows \\ system32\u003e E; E\u003e setup.exe. Do not be afraid to make a mistake. In Windows and DOS, drive letters do not match. The system may give an error, after which it will be necessary to correct the corresponding symbol, but usually this is not required. Then starts the process, which is practically no different from the standard. It is worth noting that in this case it is not even necessary to perform a system reboot.
Installing Windows 7 on top of any system using the BOOTICE utility
Suppose now that we need a different type of Windows 7 installation. A formatted hard disk is already there. The problem is that you need to create a boot device in the form of an HDD partition. The utility BOOTICE is designed specifically to emulate the continuation of the installation of the Windows 7 operating system, while creating and overwriting the boot sector. To do this, the unpacked distribution has a folder called bootmgr. First of all, you need to change the MBR boot record to GRUB4DOS. However, there should be taken into account one feature. The problem is that the utility requires you to create a boot loader name of no more than five characters. You need to rename the bootmgr file to GRLDR, and then run the utility itself. In the menu here you will immediately see a new entry. Therefore, it is necessary to tick, and then click on the button to change the installation. In the configuration you need to select save to disk. Now it remains only to restart the device. After that, the installation of Windows 7 will be activated. The installation from the hard disk will immediately follow. Problems at this stage, as a rule, does not arise.
Installing the Windows 7 operating system on an external hard drive
Despite all the features of installing Windows 7 on a hard disk, some users are trying to install the system on removable media, such as USB-HDD. It should be said that such a decision is fundamentally wrong. A completely natural question arises: why create extra problems for yourself? Booting from any USB device is much slower than from a hard disk. The external drive itself is more prone to physical impact. He is not immune from the appearance of errors and failures. "Talented" users will have to use a virtual machine. Many of them have no idea what it is. For the rest, we can say that using the built-in Hyper-V module or WMWare, it can be implemented very simply. However, it is not limited to automatic settings. It is necessary to set the parameters corresponding to the system configuration. Those who claim that you can create a virtual machine with an operating system installed in it in just a few minutes and a couple of mouse clicks are completely wrong. All this is not true.
Possible failures and errors
Now let's talk about the saddest thing. Suppose that when you install Windows 7, the hard disk is not visible. In principle, we will not consider issues of equipment failure. The external hard disk must be enabled in the BIOS, as well as the boot priority from the main device. If you have problems with the file system, you can use the sfc / scannow or chkntfsx / c command. If the hard drive is called “spilled”, then here you can not do anything. Have to change it. Although many experts recommend trying the program HDD Regenerator. Some argue that this utility remagnetizes the surface of the disk, but this method is hard to believe. On the other hand, you cannot do without ImageX utilities when installing the system on an external drive. The PW Boot module does not recognize Cyrillic characters at all, it works on the command line principle. Is it worth doing? And that's not all ... When the choice of several simultaneous installations begins, you have to choose between a regular removable device and a standard VHD container format. It is believed that the VHD format is read much faster, but the problem of enabling this type of media is precisely the use of BIOS settings. There may be a lot more problems when switching from BIOS to UEFI. However, for Windows 7, the installation can be done by any of the methods listed above. However, formatting partitions in most cases will not work. Thus, it is possible to make a completely logical conclusion that this simplest solution is ideal. It is unlikely that an ordinary user will use specific methods with the creation of boot sectors. This is so clear. The method of updating the system looks much simpler, but it also has its shortcomings. In general, it is better to do a “clean” installation by copying all the necessary information to removable media.
There are times when we have been using the optical disk with the operating system for a long time as a stand for hot tea. Winchester died a brave death. To buy a flash drive or external hard drive has not yet earned. And in general the wife left us and the End of the World came. The situations are not pleasant and probably familiar to everyone. If you somehow can accept the departure of your wife 🙂, then it is impossible to reinstall the operating system right now and immediately, alas.
What should we do? Consider how to install a clean operating system from the main hard disk HDD, without using the above described gadgets.
Take a handful of flour. Stir with eggs and milk. Then a tablespoon of sugar and a pinch of salt ... Sorry friends друзья, one eye mows into the kitchen and therefore such hallucinations.
Of course, download the program from the official website of the developers (you can use WinRaR). And a free utility. Where to find ISO - Windows imageI hope you do not need to learn.
First we need to create a partition on the disk where we copy the installation files of Windows 7, 8, 8.1. Alas with the piggy (WindowsXP), this method does not work.
So proceed. For this label My computer we press right click → Manage → Disk Management.
We see all the information about the hard drive connected to the computer. It is desirable that the disk has already been divided into two parts. Getting to the separation The disk (D :). We hover over it with the mouse cursor and right-click. Choose → Compress Tom.

There is a request for a place to compress, to what size can be compressed.
![]()
At the moment, the size of the compressible space is important for us (MB :) It needs to be set not much larger than your ISO image. After the desired size has been set, press the button Compress. A short process and there is no distributed space, we will convert it into a simple volume. We direct the mouse to an unallocated space. Next, click the right mouse button and in the drop-down menu, select Create a simple volume.
A simple volume creation wizard will start. In all windows, click Further and in the very last window click Is done. Our new volume has been successfully created.
Brushing the sweat from his face, open the program DAEMON Tools Lite. Push the button Add image.

Remember where we have on the computer "hidden" ISO - operating system image. Successfully add an image to the program. In the image directory with the cursor, select it and click on the button. To mount.

Close the program DAEMON Tools Lite. The installation image of the operating system is successfully mounted in a virtual drive (look in the explorer). Copy all content to our new disk. In our case it is New volume (E :).
Run Easybcd to add a boot record and start the installation system.
- We press the button Add a note
- Select the tab below WinPE
- In field Name: We write the same as on the new, just created section, in our case: New tom
- In field Way choose a file boot.wim from folder sources our created disc

- Push button To add
If it is not clear what you wrote, carefully watch the video (there all actions are described clearly)
Pressing the button Current settings You can check whether a new entry has appeared. Easybcd can shut down and restart the computer. The OS selection menu appears in which we select our installation disc. New tom. And begin the standard installation of the system. Detailed installation of the system and all the above described, see the video. Daaaaaa! Many will think this “zapara”. And breathe a sigh of relief when his wife returns to them 🙂. Now there is something to do, and not read these abstruse tips on reinstalling the operating system.
This method does not work on computers with BIOS UEFI. For cooler computers can apply.
Help the victim of a capitalist cataclysm. Share the post in social. networks: