After prolonged use, the computer keyboard becomes dirty or may be flooded with something, in most cases you can simply disassemble and clean it. The article describes how to disassemble and clean the dirty and flooded computer keyboard.
The need to clean the computer keyboard usually occurs in two cases: a heavily polluted keyboard or flooded keyboard. The keyboard can be cleaned in different ways, but since my keyboard was already very dirty and besides, I accidentally poured coffee on it, after which some buttons were stopped, I decided to disassemble and clean my flooded keyboard thoroughly. The method described below is suitable for most computer keyboards, but everything you do, you do at your own peril and risk.
The cleaning procedure usually does not cause any difficulties, but there are some points about which you need to know. So, let's begin.
Format laptop with hidden partition
Well, you already have records. If this is your case, and you have almost all the work, you have several cases, and your computer will be restored as it is received from the factory. 
Most modern laptops already have a small hidden partition, which includes the installer of the operating system. This is much better than the previous one, because in the previous case, if you do not have a dikos, and you spoil the installation of the operating system, you will have a problem creating them. However, this does not happen with laptops that have a hidden partition, since you can start the process without the need for disks.
In order to disassemble and clean the computer keyboard you will need:
1) Package;
2) A bit of washing powder;
3) Phillips screwdriver;
4) Old toothbrush
The process of disassembling and cleaning the keyboard
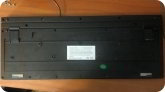
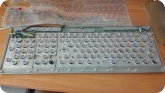
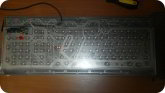
On my flooded keyboard, some buttons were no longer pressed, apparently the coffee was dry and the keys just stuck. So the keyboard looked before cleaning.
How to format a desktop computer
This process is very similar to the previous one, but it is even easier. We have saved the steps to create system disks. Here are the steps to format a laptop with a hidden section. 
The process has no more complications, you have nothing to fear. With these types of computers, the process is usually not as automatic as with laptops. This does not necessarily complicate the process. It's just a bit more expensive, since we have to install the operating system and drivers ourselves. With laptops, to restore them to the factory mode, these two steps were performed automatically, and we did not have to worry.

Before you disassemble the keyboard, you need to take a picture or sketch the key layout on it, otherwise you will have to disassemble and assemble it several times.
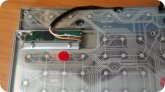
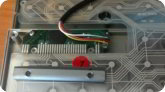
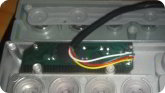
To disassemble the keyboard, first we disconnect it from the computer, turn it down with the keys and unscrew all the bolts. After that, remove the bottom cover, it is usually removed easily because there are no snaps, but still need to remove it carefully, without making much effort. Under the cover is a thin film with contact tracks, which is connected to the keyboard board, so this film does not need to be removed while it is attached to the board. The film connects to the keyboard board through a conductor that is screwed with two bolts. Turn off these bolts and remove the film.
In essence, the steps are very simple. And that's all, but we still have something else for you. If you have read and are still not sure whether you can install an operating system, we can still help you. You can try to install it on a virtual machine. Do not you know that this is a virtual machine?
That is why it is a powerful tool for viewing certain disks that are not displayed in the “Disk Manager”, converting a basic disk to a dynamic disk, using the “clean” command, deleting all information from the disk, Manage partitions, assign, change and delete email from format the partition with many features. There are many commands to manage your disks.
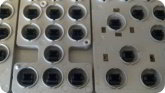
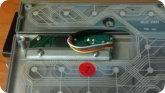
Further above each key there is an elastic contact - we remove them all, the main thing is not to lose. After that, you can take out the keys. To do this, hook the latch on each key with a screwdriver and push it out. On some keys, for example, on the Shift or Enter space, there is also a metal clip, so these keys need to be pulled out carefully.
Here we will see commands for enumerating, selecting, cleaning, splitting and formatting a disk. Connect the drive you want to clean and format it on your computer. In case you need to delete keys from a mechanical keyboard, in order to clear them or change keys with customizable ones, you will definitely have to use an extractor key. These are small accessories that are wrapped around the key and allow us to remove them without risking damage to the keyboard or keys. Using a knife to snatch and remove them is a thing of the past.


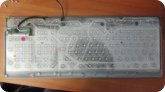
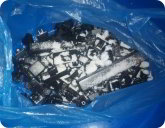
Now we put all the keys in a bag, we fall asleep with powder and mix for a few minutes, then rinse in clean water, we can in the same bag, and leave to dry. The main part of the keyboard is cleaned with a toothbrush under a stream of cold water. For clarification: you only need to wash the keys, the upper and lower parts of the keyboard, elastic contacts, a film with contacts and a board do not need to be washed.
With a keystroke is very simple
Depending on the keyboard used, some manufacturers include a key puller. If this is not the case, you can buy one that should not cost more than 8 euros in any specialized house. There is a choice between a device for transferring wire and plastic, but both of them work in a similar way for this task.
Beware of deleting keys from the backlit keyboard
As you can see in the captures, the method is simple, but there are comments that we should keep in mind. It is strongly recommended to turn off the keyboard or turn off the backlight, as this type of lighting is harmful to the eyes, and to avoid other possible situations.


After washing, you need to dry the keys and parts of the keyboard so that there is no water left on them. When everything is dry, you can begin to assemble. We do the assembly in the reverse order, first insert all the keys according to the photo or picture that was made before disassembling the keyboard, then put an elastic contact on each key, put the keyboard board in place and then cover it with a film with conductors and screw it to the keyboard case. To make it easier to insert elastic conductors and film with contacts, it is better to lift the keyboard above the table surface, for example, you can put two pencils on the sides of the keyboard.
To perform an update or reset, you must first check some things. There are two ways to update the surface.
- All your personal files will be deleted, and your settings will be reset.
- All applications that you have installed will be removed.
- In section.
How to clean the keyboard inside
To clean the dirt between the keys of our keyboard, we need to disassemble it. How do we end this situation? "For proper operation of the keyboard, it is recommended to clean it at least once every three months." You will agree with me that the dirt gets inside the keyboard and it is very difficult to clean it, then how will we do it? Just putting the keyboard "legs up."

That's basically it. We put the cable from the board neatly, put the keyboard cover in place and tighten all the bolts. Now you can connect it to your computer. I have all the keys earned and the keyboard itself looks like new.
How to disarm and clean the keyboard
Screwdriver Small water and soap Container, where to put water Something that can be used for "scratches". When you have material, you must take a screwdriver and a lever to jump over the keys. You can also use the image of the window to which the keyboard came, or make a small picture with the arrangement of the keys.
Once we have removed all the keys, put them in water and soap to leave mud there. Although sucking the keyboard with a vacuum cleaner and with the fact that “something that can scratch” turns off the dirt, if you dare, you can wet the tip of the rag and skip it there.

After prolonged use, the computer keyboard becomes heavily contaminated. This problem is especially relevant for people who are accustomed to eat, not looking up from their favorite gadget. Even if you take food very carefully, the crumbs still settle on the “clave”. If we add to this the dust, which by all means settles all over the room, we get “in the dry residue” the contaminated surface, a fertile soil for the reproduction of bacteria. How to disassemble the keyboard and clean it from dirt? This question is quite relevant.
Recommendations should do this every three months. You will see that the keyboard literally glows. Thanks for reading if you enjoyed this article, subscribe to any of our social networks and receive outstanding posts every day. In the following links you can find the action of the piano mechanism and the name of the different parts.
Illustrative photos of my work on cleaning, adjusting, repairing, intonation, restoring and transporting the piano. On the piano, the exterior and interior can be cleaned. For external cleaning only a thin cloth is required to remove dust without scratching the lacquer or polyester piano finish. In case of loss of brightness of the piano, you can carefully polish certain products so as not to damage the varnish or polyester, as in the following figure.
When do I need to clean the keyboard?
For a caring owner, dust and settled on the surface is sufficient for cleaning. More disturbing symptoms are:
- key dropping;
- dirty streaks and streaks over the entire surface of the keyboard;
- pieces of dirt and crumbs are clearly visible between the keys;
- when you press the button, it does not immediately react or there are uncharacteristic sounds.
So, we start to struggle with pollution.
You can also polish the pedals and hinges, and in the case of the piano - also lyre bars with polished metals. Internal piano cleaning may include. Vacuuming the top and bottom of the upright piano or under the piano mechanism. Cleaning the bed of the keyboard by removing the keys and mechanism.
Cleaning the keys, you can put a small soap, always wiping quickly and making sure that you do not touch the key tree. Grinding dirty hammers - pre-staining. The piano can be customized to optimize its performance. A piano is a mechanism of connected levers that rotate around their axes so that the hammer is on the shock string in accordance with the sensitivity of the interpreter when the key is touched, without creating other noises.
Light pollution
This is the easiest case. The action algorithm is as follows:
- Turn off the computer and disconnect the keyboard.
- Use a regular hair dryer or vacuum cleaner to blow out dust or dust.
- Use a thin brush to clean the space between the buttons.
- Wipe the keys with a lint-free cloth or computer napkin.
Heavy pollution
If the keyboard is very dirty or even worse - flooded, you will have to work thoroughly. You will need the following items:
In general, it is done to equalize all keys so that they work in the same way: so that the mechanism and its use are the same for all keys of the piano: the keys should not be twisted, they must have the same height and lower it Depth, working with the same weight and creating a note of intensity and a similar tone for each key.
Sometimes it is convenient to change the parameter for all keys, which affects the regulation of other parts of the piano: this is due to the keystroke, the movement of the hammers, the distance of the hammers to the ropes at the time of escape, and the emphasis. In the case of a grand piano, it is even more difficult to have a relationship between the exhaust equation with the roller and the presence of a repetition lever that can change the pitch.
- Plastic bag.
- Old toothbrush.
- Washing powder (quite a bit).
- Crosshead screwdriver.
Important! Before disassembling the keyboard, take a picture of the key layout. If there is a lot of time and artistic ability is better than Ostap Bender, you can sketch. It is important not to do the disassembly several times.
Typically, standard distances or distances are used by the piano manufacturer, but in reality there is a big difference in the regulation of the piano. For each millimeter of movement of the key, the hammer moves between 4, 5 and 5 millimeters, from there you can enter various parameters, such as pressing a key.
The rules that can be met are as follows. Change the height of the key. You can adjust the depth and initial height. Adjustment is made by wiping residual felt and the entire keyboard layer by placing or removing paper washing machines on the guides or replacing the washing machines on the guides if they are worn out. Also make sure that the keys are not rubbed into the next and do not have transverse movement. Lateral movement is checked by immobilizing the central or front guide and moving the key to other guides.
We disassemble the keyboard
How to remove the buttons from the keyboard? - The procedure is as follows:
- Disconnect the keyboard from the computer.
- Turn it down with the keys and loosen the bolts.
- Carefully remove the bottom cover.
- Under the cover there is a film on which the contact tracks are applied. You can remove the film by removing the bolts with which it is attached to the board.
- Over each of the keys there are elastic contacts. Take them off. It is important to carefully fold them so as not to lose.
- Remove the keys by screwing on the latch with a screwdriver. There are also metal clips on the Shift or Enter keys. For this reason, take maximum care when removing the buttons.
- Fold the keys in a plastic bag, pour in detergent and stir. Without removing them from the bag, rinse under running water.
- Rinse the base of the keyboard under a stream of cold water and brush it with a powder with a toothbrush.
Important! The board, the film with the applied contacts and the elastic contacts must not be washed!
Keys that remain trapped and do not lift are usually connected with holes in the key, and the surrounding fabric is rubbed onto metal guides, because the key's wood and fabric are swollen with moisture can also be rubbed on the side panel or on the front panel. If the problem is not in the diaphragm, it may be due to a problem with the axes of the mechanism or the displacement of the exhaust lever. Noise may also occur if the fabric of the hole is worn and the wood of the key with the metal guide is in contact.
Adjusting the keyboard of the keyboard so that when you press any key, the mechanism works correctly. The mechanism is supported by the pilot key, forcing the hammers to rest slightly on the rack. Many piano learners have a low pistol, which makes a small gap between the exhaust and the nut, which leads to the fact that there is 1 mm of paving in which the mechanism is turned off and the key smoother than in the rest of the course. It is advisable to remove this game from the key. It may be useful to polish these pilots to make the mechanism thinner.
After the base of the keyboard and the buttons are washed, they need to be dried thoroughly. The assembly is carried out in the reverse order:
- Insert the keys.
- Place elastic contacts on each of the buttons.
- Replace the construction board.
- Cover the board with a film with contacts and tighten the screws.
- Carefully lay the cable that comes from the board.
- Replace the cover and tighten all screws.
It remains only to connect the keyboard to the computer. She will look like new!
Adjustment of the moment when the damper is disconnected from the rope. Usually it stops turning in the middle of the hammer stroke, when the hammer is 22 mm from the rope or what is the same when we pressed a 4-5 mm key stroke. It is adjusted on a vertical piano by moving a teaspoon from the back of the balance or on pianos, moving a teaspoon of a damper or adjusting the height of the damper. If the damper is loosened, you can tighten the screw, and if the flap is not aligned, you can unscrew, re-move and tighten.
If the damper has a low force, the spring should be folded to restore or replace the spring, although often the problem is that the felt is worn and the teaspoon needs to be adjusted so that the damper is closer to the ropes. It may also require a felt condition that cuts off the strings. The dampers must also be configured to simultaneously lift all the shock absorbers when the resonance pedal is pressed.
We disassemble the laptop keyboard
With prolonged and not very careful use of the laptop often have problems with the keyboard. The keys “stick”, are badly pressed, some of them stop responding to pressing altogether.
Perhaps the laptop keyboard just needs preventative cleaning. To do this, it is not necessary to send the gadget to the workshop. You can cope with this problem yourself. We will figure out how to pull out the buttons from the laptop keyboard, and then assemble it back.
Important! The “Klava” of a laptop is sorted out and assembled more complicated than a regular computer. If you do not have certain technical skills, do not undertake this job. It is better to pay the master of the service center than to lose an expensive gadget.
Unlike old-style equipment, the buttons on modern equipment have a flat shape. The laptop key can be divided into 4 parts:
- The upper part is a plate with two grooves and a latch at the bottom.
- Two levers are attached to the button, connected in the center (such a design resembles a swing remotely).
- In addition, the design is equipped with four pins, which are included in the grooves on the keyboard board.
- The return movement of the key is carried out using a silicone spring.
Important! On the inner side of the spring there is a protrusion that ensures the closure of contacts on the base of the keyboard.
To remove the buttons on the keyboard, a regular toothpick and a screwdriver are useful (preferably with a curved end). Remove the keys at the beginning is more convenient at the bottom of the keyboard. The action algorithm is as follows:
- Pry the lower edge of the key with a screwdriver.
- Carefully remove the lower levers from the slots. Make it pretty easy. Simply click on the place where the antennae are connected and they will leave the slots.
Important! It often happens that the small keys pop up after such manipulations themselves. If this does not happen, the upper plate is removed with tweezers or with the help of fingers.
- Now about how to disassemble the keyboard in the space. The large space bar mechanism is somewhat different from the small buttons. Along the edges of a long key secured with two latches. There is an additional latch, which is located along the entire length of the key. To remove the large button, first unplug the side amplifiers, then remove the amplifiers near the lower edge of the button (from left to right). The following procedure is the same as with the small keys.
- After you have completely coped with the process of removing keys, you need to thoroughly clean up not only the buttons themselves, but also the keyboard mechanism:
- a soap solution is best for cleaning the buttons;
- you can use ear sticks and a toothpick to clean the mechanism from dirt.
Important! Before you assemble the keyboard back, all components must be dried well.
How to assemble the keyboard after cleaning?
If all mounts and grooves remain intact, you can install the button in place without much difficulty:
- Attach the button to the desired location.
- Align it and click to the characteristic click.
The button will sit in its place as if it had not been removed. If it was not possible to snap the button, then most likely, the mount was damaged.
Important! The procedure for installing the space bar is somewhat different. First you need to insert metal amplifiers into the slots of the base. After that, put the key in place. First, click on the top edge, and then on the bottom, until it clicks.
All work on disassembling the laptop keyboard should be done with utmost care. Fixing fixtures is quite difficult, and replacing the keyboard, especially on a laptop, can be unscheduled, but heavily beating on the wallet, costs.