Wired or Wi-Fi and found that computers "do not see" each other. And these computers are managed by Windows 7, while computers with an old, but beloved, XP perfectly detect each other on the network and see the folders open to shared access.
In windows 7, work with networks and public access was drastically redesigned. “Network placements” appeared (home, work, public network and domain network) and this was done for our benefit, of course, but it turned out, as they say, as always.
We cannot centrally manage user accounts, but on each computer we can create a separate account with appropriate permissions by assigning a user to a specific group. Using a network of working groups, we can freely share resources. For easy sharing and security settings, you must deactivate the “Simple file and folder exchange” option.
To do this, in "My Computer" select "Tools", "Folder Settings", and then "View" and uncheck the "Use simple file sharing" checkbox. Figure 11 Folder Properties Dialog Box To share a specific folder, select Share and Security using the pop-up menu, and then select Share This Folder. Figure 12 Public folder properties.
By default, the seven defines all new networks as public, and very strict security rules are set for them: network discovery is disabled (the computer is blind and cannot be seen by other machines), file and printer sharing is turned off (other computers do not see shared folders, folders, printers ), access to the computer from the network is password-protected.
On the next tab “Security” we can determine which user and what rights he / she can use this folder. The "File and Folder Security" dialog box. This shared folder is already visible on the network and can be used. We have access to it through my network locations. Figure 14 Working group. In our shared network folder, we can assign a drive letter and access it through a network location and use My Computer. To do this, in the "My Computer" window, select "Tools", then "Network Drive Map".
Since dark times Windows vista Many people remember this screen for selecting network locations, which appears whenever a computer connects to a new network.

So, how to open access to files over the network in windows 7 ( to share files)?
You can choose each time when choosing a network location home network. And you can once set up a computer for convenient use when connecting to any network, with inhabitants of which you want to share files. If you are concerned about the safety of your confidential data, simply do not provide access to it and try not to open files and folders with full access (for writing and reading).
We select the appropriate drive letter and specify the folder that we want to create a network drive. Figure 16 Network Drive. We have a printer connected to our network. This address has also been reserved on the router. We want this printer to be able to use all the computers running on our subnet. We will give one of several ways to share it online. On each computer that should have access to the printer, after installing the printer drivers, open the "Printers and Faxes" dialog box.
The same operation will be performed on all computers that should have access to printing. On one of these computers, we install and configure the system. We select the option to create an image and specify where the image should be saved. Then we accept the customer. We can distribute this image to all computers at the same time.
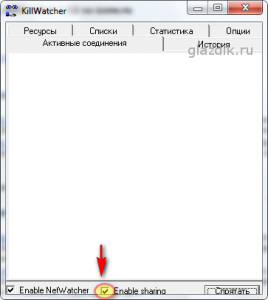
If you fear that third parties will have access to your files when, for example, you are at the airport and are connected to a Wi-FI network, install the program
Kill watcher
and close access to your computer from the outside with two mouse clicks. Kill watcher stops the server service and your files become inaccessible over the network even for reading.
Then we select the recovery option. At this time, all computers will begin to recover at the same time. When you finish the restoration of the image, we will restart the computers by changing their names. Unfortunately, it does not include data stored on your computer. If you want to use them on different devices, you must manually transfer them between them if you do not use shared folders. Just because of the files that you often use, or you want to easily share with other people to place in public folders.
Then they will be easily accessible to all who log on to this computer or connect to it via the network. All devices must be connected to the same workgroup, and people connecting to the computer will not need to log in and provide access passwords to use this data. In addition, you do not need to perform any additional operations each time, for example, to define sharing or assign privileges. You only need to configure shared folders once to determine which ones should be available.
Preparation for sharing
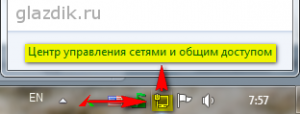
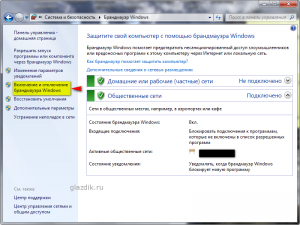
Click on the network icon in tray and follow the link in Network and Sharing Center.
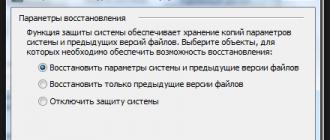
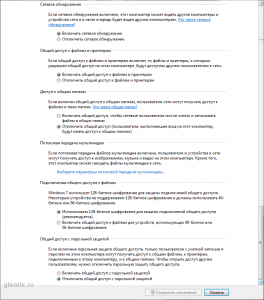
In the window that appears, set the values of the switches, as shown in screenshot:
This greatly improves the rapid exchange of data, and access to data stored in public folders is much easier than before. You can use it when using different devices, but you want to have easy access to the files you create on your device, no matter which device you are working on.
They are designed to store documents, music files, movies and images. Just remember that when sharing these folders, anyone who uses one computer or connects to it through a network can edit and delete files in these folders. You can open shared folders in two ways. In any case, you need to open the "Desktop" and then click the "Explorer" icon on the taskbar. Now you can expand the library folder. In this folder, subfolders are created for four types of files, namely documents, music, images and videos.
Note. I do not recommend to open access so that network users can read and write files in public folders. These folders are located on the “C” drive, and having access to them for recording, you open the way for Trojans and viruses to your machine. Do this only if all the computers on the network are familiar to you and have anti-virus software installed on them.
Expand each subfolder and find that there are two more folders in each folder. One is for the local and other public. In a public folder, you must place data that can be accessible to someone, or log in to another user or to someone who connects to your computer through a home group.
You can also open shared folders in another way. In the “Explorer” window, double-click “Computer”, then “ Local disk"And expand" Users "and" Shared Folders. " It appears that the shared folder contains all the folders intended for shared files. This is the actual location of these folders. In the folder "Library" there are only links to them. Thus, you can place files directly into shared folders created on the system disk.
How to Share a file or folder
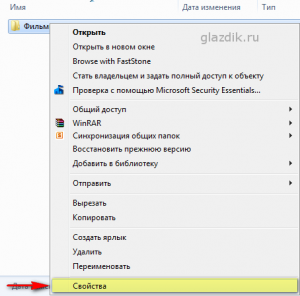
Click on a folder or file with the right mouse button and go to Properties.
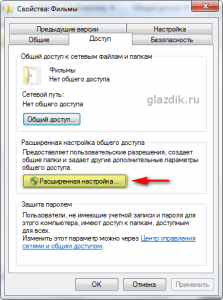
Click the tab Access and press the button Advanced Setup
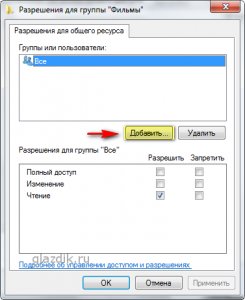
Check the box near Share this folder and press the button Permissions
Before you begin to enter the files of public folders that you want to see others, make sure that these folders are included. By the way, you can restrict access to selected folders only. In the "Charm" panel, click "Settings", and then change the settings of your computer. In the "Settings" window, click "Home group". Then, by clicking the corresponding radio buttons in the right pane, in the “Libraries and devices” field, enable or disable the sharing of selected file types. By the way, you can also enable sharing of printers and other devices.

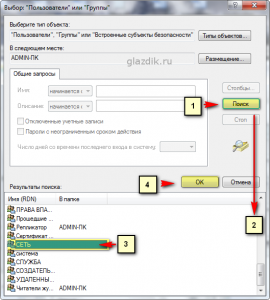
Click To add
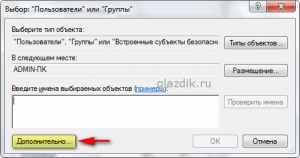
In the window that appears, click Additionally
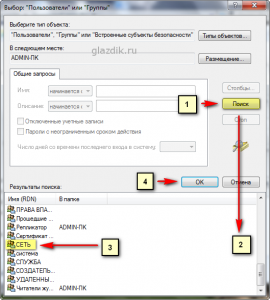
Press the button Search middle right (1) - a list of services and users (2) will appear in the bottom field of the window. Scroll down to the bottom and find Network. Highlight Network(3) left-click and click Ok(four). Then again Ok.
You can use shared folders at any time to share selected files with other users on the same computer. However, if you want to make it available to people who connect to your computer over the network, for this you need to use your home group. If you previously created this group on a computer connected to the network to which you are connected, your computer will join this group. However, if the homegroup does not already exist, you must create it.
Open Desktop and click the "Explorer" icon in the taskbar. Then in the “Explorer” window select “Main group”, and in the right pane of the window click “Create a home group”. In the next window, click "Next", and then specify which files you want to share, more precisely, which of the shared folders you want to have in your home group. For the correct document type only, click on the list in the "Permissions" column and select "General or Not General".
In the field highlighted in yellow, you can set permissions for users who will connect to you over the network.

The differences between full access, change, and reading are shown in this table (material from Windows Help).
After selecting the appropriate options, click Next. The system creates a homegroup, and then displays a window with a password that allows you to connect other computers to your homegroup. Click this command. Print the password and printing instructions, and in the next window click "Print this page". If you want to use a printer connected to another computer on a network, you must search for it using the method described below. When the printer is available, print the password. It simplifies connecting to other devices.
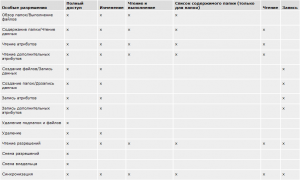
In short, the difference between full access and change is that you can delete files with full access.
When you set up the desired permissions for users, click Ok twice and go to the window properties folder on tab Security. Next you need to perform actions similar to those that we performed when setting permissions.
They will then have full access to all shares. After the password is typed, click Finish. If you want to connect another device to your home group, launch it, open the "Desktop" and turn on the "Explorer". On the left pane of the explorer, click "Homegroup", and then in the right pane, click "Attach Now."
A window will appear informing you of the possibilities offered by your home group. Click “Next” and in the next window determine which elements from the computer that are connected to the home group should be available to other users of this group. Turn on document sharing, which is turned off by default and possibly share printers and other devices, and then click Next.
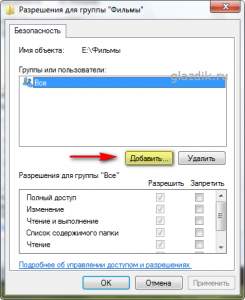
Press the button Change.
In the window that appears, click To add.
Press the button Additionally in the next window.
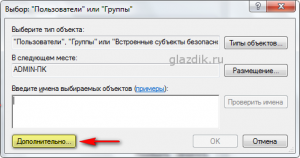
Next, click Search and find at the bottom of the list Network. Highlight Network left-click and click Ok. Confirm the selection twice by pressing Ok.
In the empty field, enter the password you received when creating your home group, and click "Next". In the next window that appears, click Finish. From this point on, the computer connects to the homegroup. You can see at a glance whether or not your computer is connected to a homegroup. In the left pane of File Explorer, double-click the main group. Below it should appear the names of devices attached to the home group. Among them will be a computer with which you work. Double-click the name of one of the devices, and you must have access to the contents of the public folders that were available on this device.
In this window, as before in the access settings, set the desired security settings. If you leave the list unchanged, the default per folder will be set to read. Confirm your choice by pressing twice Ok.
That's basically it. You can start transferring files over the network.
If you are not connected to the computer on which you are creating a homegroup, you can immediately use a printer that is connected to another computer that is connected to your network, provided it is shared with the network. When you enable the password printing feature, the Print window appears. If the printer is not connected to another computer, make sure that the computer to which the printer is connected is working and connected to the network, and the printer is turned on. Then click the “Find Printer” button in the “Print” window.
In the next window, wait patiently until the system detects computers connected to the network. When the list of computers appears, double-click the name of the computer to which the printer is connected. The system will expand the list of printers available on the selected computer, from which you can specify the name of the printer. The system does not always display the printer names defined on the selected computer, but you just need to position the cursor over the display name of the printer for a moment, and the correct model name of the selected device should appear below it.
If, despite all the above measures, the computer is still inaccessible to others, try disabling Windows Firewall or one that is built into your Anti-Virus.

When you select the correct device, click “Select”. When the Print window is displayed again, the symbol for the correct device will be highlighted in the "Select Printer" field. So just press the “Print” button. The system prints the password information for the home group for which you can connect other devices.
If we have more than one computer at home, we want each device to have one. Therefore, we buy a router to which we connect our PCs, and we are happy to connect to the global network. When computers are connected to the router, they immediately form a local area network, which allows us to have easy and convenient access to files stored on separate PCs.
This is especially true for users. Eset smart Security, which by default loves to block all network connections. KIS, too, happens to sin.
If the computer still cannot be shared, try rebooting and accessing it by typing in the address bar of the explorer (in any window) it is the address. There must be two backslashes (\\\\) in front of the address.
In addition to unlimited access to the virtual world wide web the most important task local network is the exchange of information between the various devices connected to it. And this information is usually packed in a folder and lies in the bins hard drive network computer.
Accordingly, the question arises: how to share a folder in windows 7 on the local network, which we will consider in this article.
By the way, to open access to folders on windows 8 and windows 10, you need to perform similar actions: the only difference here is the operating system interface.
How to open shared access windows 7?
So, to share a folder in windows 7 over a local area network (LAN) you first need to:
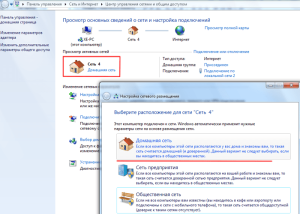
Assign the local network the value “Home” (if all members of the network enjoy absolute trust) or “Enterprise network” (or “Work”).
To check or change this option, you need to go to "Start" -\u003e "Control Panel" -\u003e "Network and Internet" -\u003e "Network Control Center" and click the link in the left part of the active networks
In the home group you should add only those users to whom you are ready to provide unlimited access to any network resources.
It is necessary that the firewall does not block access to the folder for of this type LAN connections.
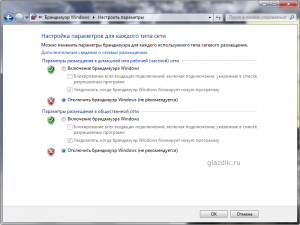
Change network profile properties.
To do this, go to "Start" -\u003e "Control Panel" -\u003e "Network and Internet" -\u003e "Network Control Center" -\u003e "Change advanced sharing settings",
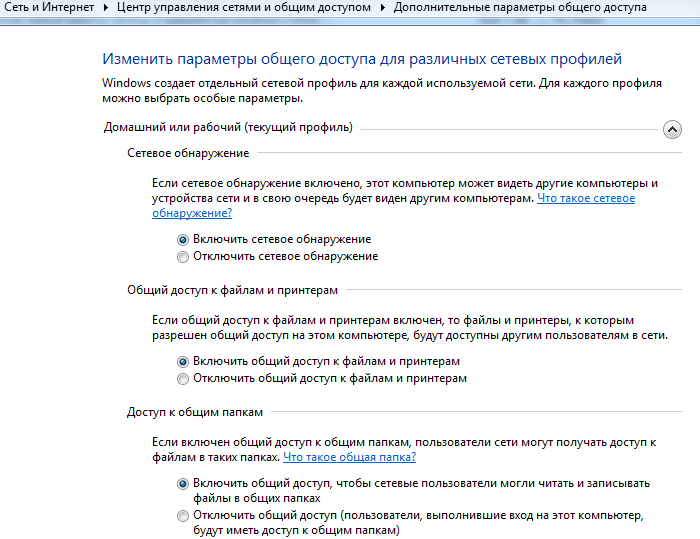
open the line "Home or Work" here and set the marker on all items with the words "enable" and "allow" (with the exception of "password protection" - it is recommended to disable it).
Encryption can be left at the default (128 bits), and skip the “Multimedia” section for now.
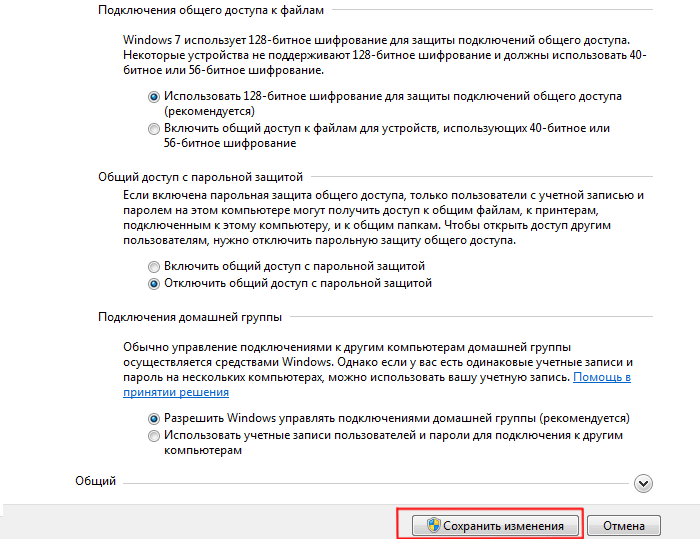
These options will allow other systems to “see” computer disks, open the path to shared resources, and also enable you to manage your Homegroup yourself.
At this preparatory stage is over - you can open a shared access to the folder on windows 7. To do this:
Single click the right mouse button on the desired network folder;
Go to the "Sharing" column, and then in the right context menu select the capabilities of other users of the local network with respect to this folder. 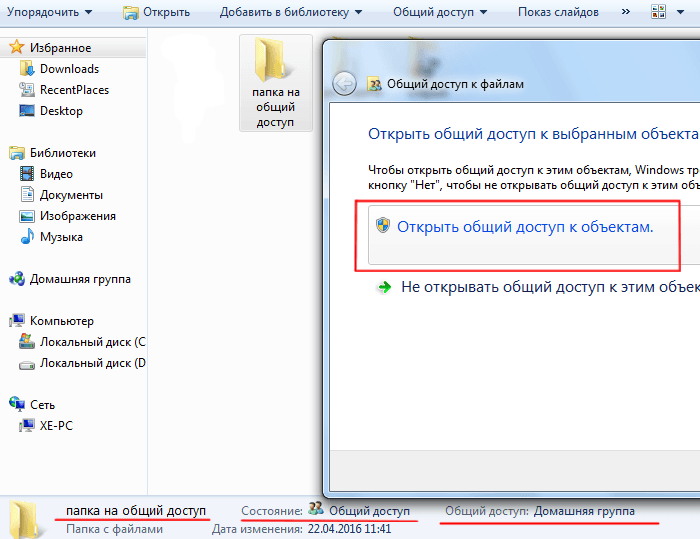
How to restrict access to the folder to other users?
To partially block access to windows folder 7 should go to subsection context menu “Specific users” and in the opened window select “Home group” or one particular user to whom you allow access to network folder. For other computers on the local network, this directory will still remain inaccessible.
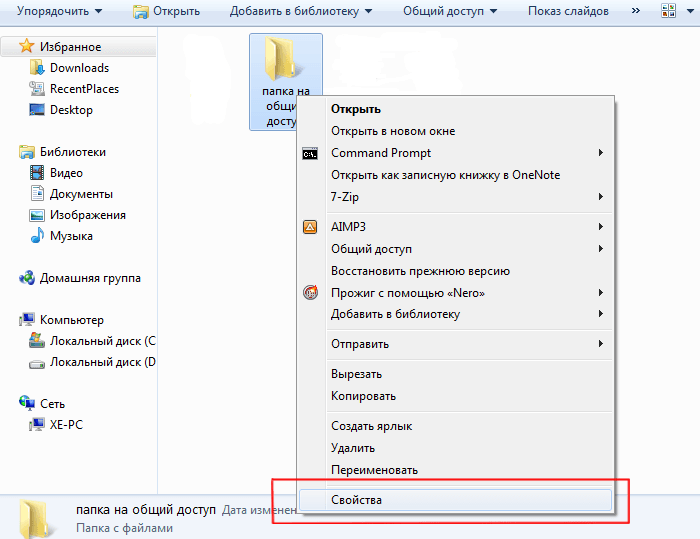
Also create shared folder in the local network, you can use the properties of the object:
Single-click the right mouse button on the future network folder and select the “Properties” menu item;
Here go to the “Access” tab;
In the window that opens, click "Share" and select the users that you allow access to the specified network folder;
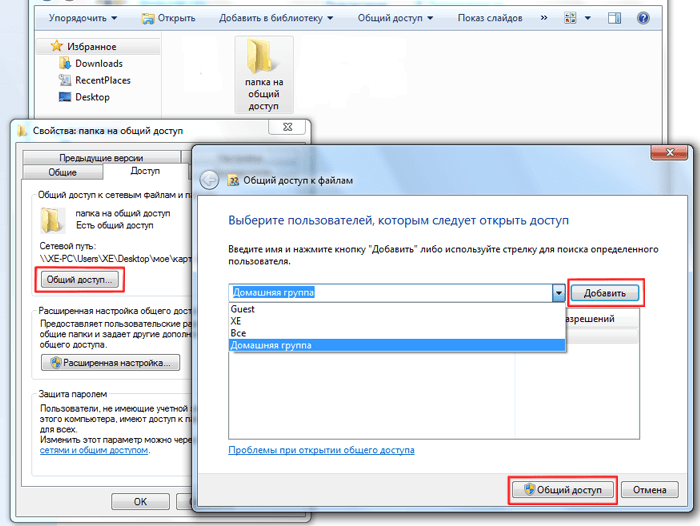
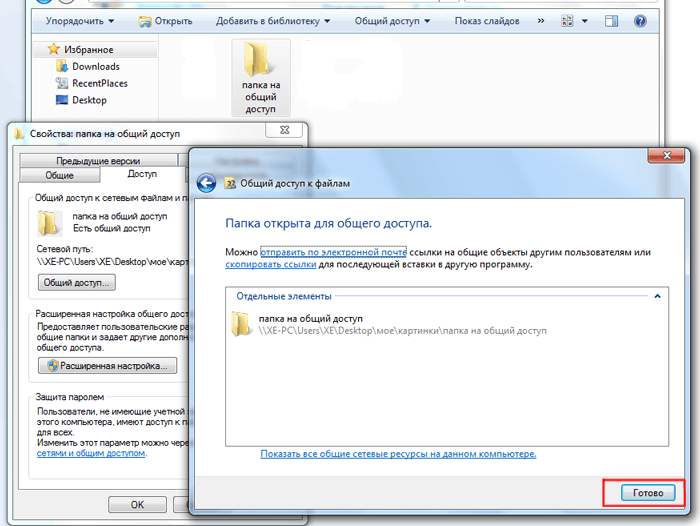
Click “Sharing” and “Done” again to save the settings.
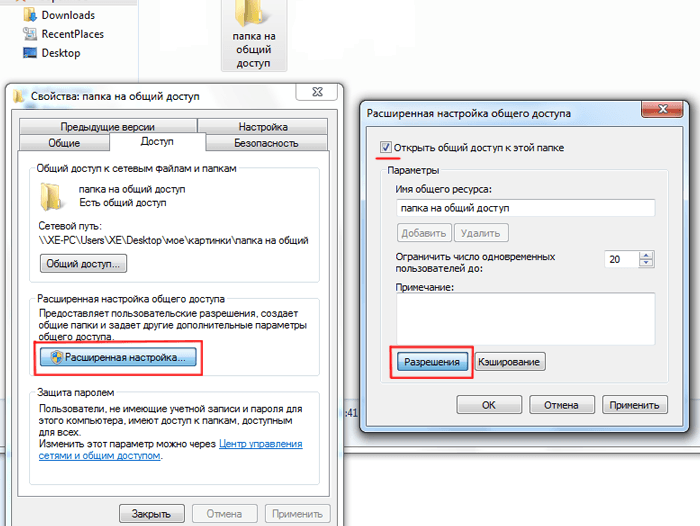
For settings additional parameters sharing click "Advanced Setup".
In the window that opens, select the "Share" checkbox, then click the "Permissions" button.
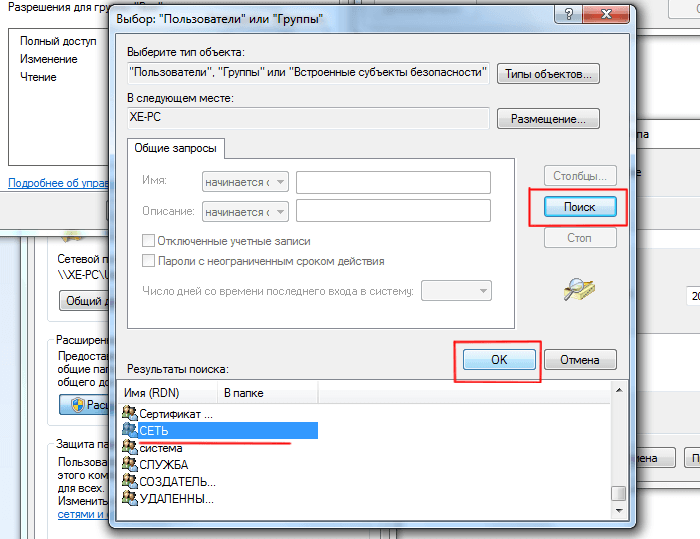
You will proceed to the next dialog, where you need to click the “Add” button, in the window that opens, click on the “Advanced” command, and then click “Search”.
A list opens in which you need to select the “Network” line, and then double-click the “OK” command to save the changes.
Returning to the “Advanced Setup”, at the bottom of the window, provide the necessary permissions or restrictions for the selected user group.
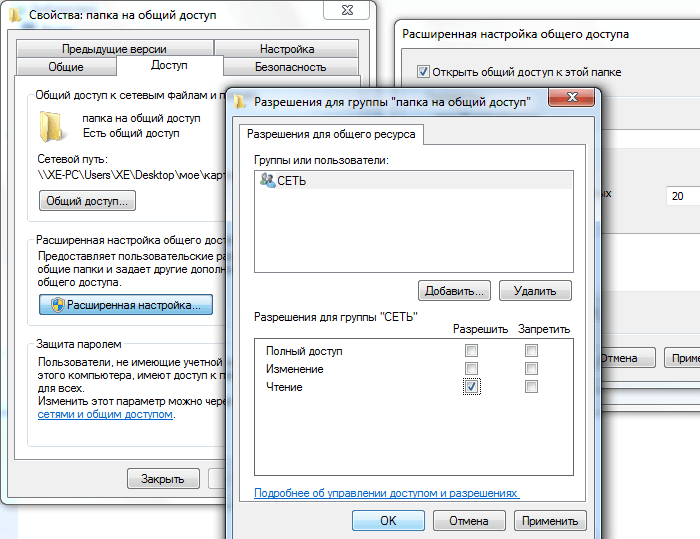
• By default, the right to open and view files from this folder is given.
• If you allow "Change", then visitors can not only read them, but also make changes. But they cannot create new files or delete existing ones. This also applies to running programs, if any, in this folder.
• « Full access»Removes all of the above limitations.
Confirm public access to the folder by clicking the “OK” button.
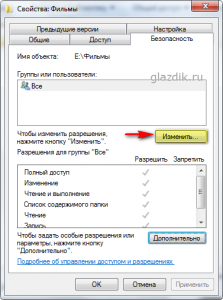
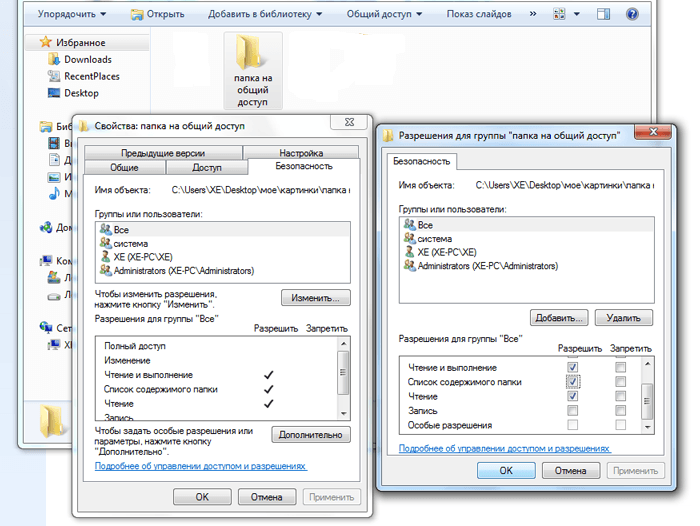
If after such “operations” there is still no access to the network folder of windows 7, go to the “Security” tab in the properties window and do the same manipulations there:
At the top of the window, click the "Edit" button;
Select the user group you need and assign it the right to access the network folder (here the permissions are much higher, but check only the above rights).
To configure access to a network folder with a password, you should enable the password protection item in the “Modifying advanced sharing settings” step