To use this feature, you must have a Microsoft Exchange Server 2000, Exchange Server 2003 or Exchange Server 2007 account. Most personal accounts email Do not use Microsoft Exchange. Additional information about credentials microsoft records Exchange and determining the version of Exchange to which the account is connected, see the links in the "See also" section.
In this console we find.
- "Quota models" are the rules that we will apply.
- Quotas are where we create a quota for a file using a model.
Then simply create a quota on the Quota tab, focusing on the articles and using the template created earlier. I hope you enjoyed this article, do you have any comments? It remains only to install the network card and the necessary protocols and inform the system that it is connected to the network!
Shared folders are an effective way to collect, organize, and provide information for sharing within an organization. Usually, public folders are used by project teams or groups of users to exchange information in a specific area. These folders can be managed from Microsoft Outlook. Shared folders can contain items of Microsoft Outlook folders, such as messages, appointments, contacts, tasks, diary entries, notes, forms, files, and notes.
To create a local network, you already need computers with network card. And depending on the number of computers on the network, hub or switch. If the PC does not work, the rest of the network will not work and will work fine. There are two differences between a hub and a switch. First of all, the price, the hub is cheaper than the switch, because it is less perfect. The second difference is based on the principle of operation, which is significantly different. With the hub, the sent data will circulate throughout the network until you reach the desired PC, which, of course, will cause unnecessary traffic.
Creature shared folder and provision shared access to the information in it is performed in several stages ..
Anticipated action:
Creating a shared folder and choosing permissions, views, forms and rules
To create shared folders, you must have the right to create folders in any existing shared folder. For information about obtaining such rights, contact your administrator.
Although the switch knows perfectly well or is your computer, and therefore sends data to this computer And not for those who avoid generating additional traffic. Here we will talk only about networks with a speed of 10 Mbps and 100 Mbps, and these rates are theoretical. In this chain we pay attention to the cables used, there are also standards on this topic, ask very well before buying your equipment!
Note 2: If you do not comply with current standards, you can damage the entire network. We are not moving further in the material part, which can become very technical and self-sufficient to make a file of remarkable size. Creating a network between computers and other relevant gadgets allows them to easily share different resources: an Internet connection, printers, and even your files. This is a simple network mode in which files are divided, and everyone can enjoy without much risk: music, video, photos, as well as a printer family. Then select “Live Grouping” in the right pane.
On the menu File highlight item Create and select the command Folder.
In field Name enter folder name.
In the list Folder contents select the type of folder to create.
In the list Place folder in select folder location.
Quick start public folder with existing items.
When you create or join a residential group, you choose libraries that you want to share, but only with your own account. In the window that appears, she will have to click the Edit link that you report with the residential group, then select the items and confirm.
Have you changed your mind what would you like to share in a residential group? Refer to the previous paragraph to override your options. Did you forget the password associated with the group? Open any folder, right-click in the navigation pane in the “Home group” line and select “Show group password” in the pop-up menu.
In the folder list, in the navigation pane, click the folder that you want to copy.
On the menu file select item Folder and click folder name Copy.
Select from the list where you want to copy the folder.
In the Folder List in the Navigation Pane, right-click the shared folder that you want to share and select the command Properties in the context menu.
Access to other users
In the main part of the window on the right, the names and icons of each of the accounts that choose to share files in the home group are displayed. You can also find out who is connected to your network, either by cable or wirelessly, by clicking on the “Network” line while still in the navigation pane.
These libraries appear instantly. They are at your disposal as if they were yours. You can not only move, but also perform other actions. Open: To open a file in a shared folder, simply double-click its icon. The program associated with it will begin. If you see an error message, it is possible that the format of this file is not recognized by your own applications. Buy or download a suitable program or ask the interested person to save his file in the format recognized by your computer.
You must have owner permission for the shared folder to set permissions for the shared folder. You can set permissions for only one folder at a time.
Click the tab Permissions.
Press the button To add.
In field Name enter the name of the user to whom you want to grant sharing rights.
Copy: To copy a file, drag it to one of your libraries or one of your folders. To do this, click on the icon and by pressing left button mouse, move this icon towards the name of one of your libraries. When you arrive at the right place, release the mouse button. Another way is to right-click the source icon and select “Copy” from the context menu.
Then activate the destination folder, right-click at the bottom of the window and select "Paste" from the menu. Delete and edit: as stated above, you can perform these more “violent” actions depending on whether the owner of the libraries has authorized this type of operation. In any case, and if you do not go wrong, changing or deleting someone else's work is wrong and may cost you to be rejected from the residential group.
Press the button To addand then the button OK.
In field Name select the entered name.
In Group Permissions select the required parameters.
Note: To assign the same rights to all users who have access to the folder, click the value Default in field Name.
Creating a view from scratch
On the menu View select team Current presentationand then the team Define view.
Press the button Create.
Enter the name in the field The name of the new view.
In the list Type of Presentation select the required type of presentation.
Sharing files and folders in local network - A fairly simple procedure that can cause only a few headaches when you are not fully aware of the steps that need to be performed. When using a potentially unsafe network, you will never have to choose a home network or network, but always drop it on the public network. In the case of public networks, by default, the system is invisible to other clients connected to the local network, and the shared access to files and shared folders is completely disabled.
To specify where this view will be available, select the appropriate radio button in the group. Can be used.
Press the button OK.
To further customize the presentation in the section Description press the button and highlight the desired parameters.
At the end of the choice of parameters, click OK.
If you want to use a network other than your corporate or home network, you will need to select a public network element for security reasons. The mechanism is designed to facilitate the exchange of files, folders and hardware devices. Unlike a home network that requires one-time password protection for shared networkEach system in a business network is considered an “autonomous unit.” In the example in the figure, the physical network interface, for example, is only one, and the network on which it is confirmed is configured as a company.
To use this view immediately, click To apply.
Navigate to the view from which you want to create a new view.
On the menu View select item Current presentationand then item Customize current view.
In the main network and sharing center's main window, we recommend that you click the “Change advanced access settings” link, select “Internal” or “Work”, and then select “Enable network location” and “Allow sharing of files and printers”.
What are shared folders? This is a location that can be used, for example, to send files to the system or to retrieve material. If this option does not work, you can leave the "Shut Down Share" option. The system clock, if set incorrectly, can be one of the main reasons that prevent access to a shared resource. By adjusting the clock so that it is substantially synchronized with the synchronization of other systems connected to the local network, you can immediately access various shared resources.
For all kinds of changes in the section Description Click the button and select the options you want.
After completing the changes, close the dialog box. Customize the view.
On the menu View select team Current presentationand then the team Define view.
In field views for folder_name select item Current presentation.
To open a new folder on the target system, simply right-click, select "Properties", then select the "Sharing" tab and click "Share." Thus, the default folder will be used for reading and writing. If you are interested in setting specific permissions, you can refer to the “Advanced Access” button.
So let's immediately trust our users and try to figure out how best to handle them. Local Users are defined on one computer and can work only on this computer, limited by the allowed permissions. Fill out the proposed forms by entering the user name, initials and last name of the user, and then select the user name with which our user will log in. The "Full Name" field is self-generated depending on the previously entered data and, together with the "Username" field, must be unique throughout the network.
Press the button Copy
Enter the name in the field The name of the new view.
To indicate where this presentation will be available, set the appropriate switch in the group Can be used.
Note: New views are added to Current presentation submenu (in the menu View select item Sort by).
On the next screen, we select a password that will be delivered to the user for the first login, and let's specify the required parameter to change the password during the next access, so that users are completely autonomous and confident in choosing their password. Then the window will inform you about all the data that you have selected, and clicking "Finish", we have finished creating our first user.
Of course, one of the most important and decent note cards is related to the user profile. On this screen, you can essentially configure three properties. Thus, each user will have a subfolder from a common share. For example, we can consider type configuration. Below we will show how users perceive these changes. First of all, we need to connect the computer with our domain, this operation is usually called "Join a domain" and is very easy to perform.
Properties in the context menu.
Click the tab Control.
Let's go to the System Properties panel of the computer that we want to link to the domain, and on the Computer Name tab, click the Edit button associated with the workgroup or domain name. We select the Domain option and insert a previously configured domain name. Then we will request the credentials of the user with domain support.
At this stage, the domain is successfully connected, and a reboot will allow us to log in with our previously created user. When logging in with the Adam user, we note that a new network unit, specified by us, has been added to My Computer.
If tab Control missing means you do not have the "Owner" permission.
In the list Initial presentation select the view that should be displayed when you open the folder.
By default for items of this type Microsoft Outlook uses the view Ordinary.
- Local to domain: applicable to all domain objects.
- Global: applies to all trusted domains and trusted domains.
- Universal: applicable to all elements of the forest.
In the Folder List in the Navigation Pane, right-click the shared folder and select Properties in the context menu.
Click the tab Forms.
To add a form to the list Mapped folder formspress the button Organizethen select a form.
Press the button Close.
To limit the list of forms available to other users of the folder, select the corresponding switch in the group Allow use.
In the Folder List in the Navigation Pane, right-click the shared folder for which you want to create or edit rules, and select Properties in the context menu.
Click the tab Control.
Press the button Folder Assistant.
Perform one of the following actions:
To create a rule, click To add.
To modify an existing rule, click it in the list and click the button. Change.
Normal response
"Thank. Some folders and discussions are reviewed to determine if they should be shared. In these cases, there may be a delay before the message is available for general viewing. ”
Set the switch own and click Template. Enter your reply.
Facilitators do not receive these answers when they post messages in a folder.
Creating a shared folder
Set access levels.
Creating a view for organizing and searching data.
Sharing a printer on a network
If you created a homegroup, sharing a printer is easy. In a short time, the name and icon of the printer should appear on all computers and in the print menu. In the window that appears, click "Devices". All you have to do is left-click on the "Printers and Scanners" link to view all available hardware, including those that are available on the network. In the "Hardware and Sound" category, select "Show devices and printers."
Again, your shared printer should appear in the section network printers. Your hardware should appear in the "Printers and Faxes" section. In the “Equipment and Sound” category, select “Printer” or “Printers and Faxes” to see the icon of the new equipment.
Perform one of the following actions.
Creating a view based on a standard view
Change the view used in the default folder.
To change the presentation of a public folder used by default, you must have the rights of the owner of the folder and define for it at least one custom view accessible to all.
Specify the forms available to other users when placing information in a shared folder.
At the same time, a custom folder was created for Adam in the Common Profile folder, where we can find all the user's own folders. To manage each user, we can access the corresponding menu with the right mouse button and open the various available operations, such as.
Users can also be organized into groups. Distribution: used mainly for email applications: sending messages to all users in a group. In addition to typology, the group also has its own reach.
To add a form to a private shared folder or to a shared folder, you must have the rights of an editor, a responsible editor, or the owner. The owner of the public folder may restrict access to forms for users of the folder.
Create rules for handling items to be placed in the folder.
You must have owner permission for the shared folder to create or change rules for it.
Enter the conditions for performing any action for this item. To set additional conditions, click the button. Additionally.
In Group Perform the following steps select the required actions.
Note: The created rule becomes active by default. and click OK.
Add the meetings and events to the folder.
Opening a shared list of contacts
Folder contents value Contact type items.
In the list Place folder in click folder Contacts and click OK.
Add contacts to the folder.
Note: The list of shared contacts is displayed in the "Contacts" address source of the Microsoft Outlook Address Book.
Opening shared access to the task list
Create a new folder and select from the list Folder contents value Items of type Task.
In the list Place folder in click folder Tasks and click OK.
Add to the task folder.
Note: Although the task list can be copied to a shared folder, tasks cannot be copied to a shared folder and created in it.
Putting data in a shared folder
Open the shared folder where you want to put the data.
To place data using a standard form, choose in the menu File the team Createand then the team A note in the folder.
Enter the information you want to put in the folder in the form.
Press the button Move to folder.
Creating a managed shared folder
To assign a managed folder, you must have owner permission for the shared folder.
In the Folder List in the Navigation Pane, right-click the shared folder and select Properties in the context menu.
Tab Control press the button Managed folder.
Check the box Set folder as managed.
In field Forward New Posts Enter the name of the user who receives incoming messages, or the name of another public folder in which messages are saved for viewing. The manager who views the messages is defined in step 6.
(Optional.) To automatically send notifications when a new mail arrives to the master, select the necessary parameter in the group Reply to new posts.
Select one of the following radio buttons.
Custom response
To add or remove a leader, click To add or Delete.
(Optional) To view the properties of the selected master, click Properties.
Note: Machine translation disclaimer. This article was translated using a computer system without human intervention. Microsoft offers these machine translations to help users who do not know in English, familiarize yourself with materials about Microsoft products, services and technologies. Since the article was translated using machine translation, it may contain lexical, syntactic and grammatical errors.
If you have a network configured between two computers, and you want to implement network communicationwithout network folder settings not enough. There are many steps to configure a shared network folder, but they are all simple. So, for the work!
HOW TO SET UP THE NETWORK FOLDER?
1. On the desktop (or in any other place) create a folder. We created a folder and named it. " Network sharing"with the number 1.
2. Click on it with the right mouse button, select "Properties."
![]()
3. For the time being network folder unavailable. In the window that opens, in the "Access" tab, select "Advanced Setup ...". Now tick the "Share this folder" and click "Ok".
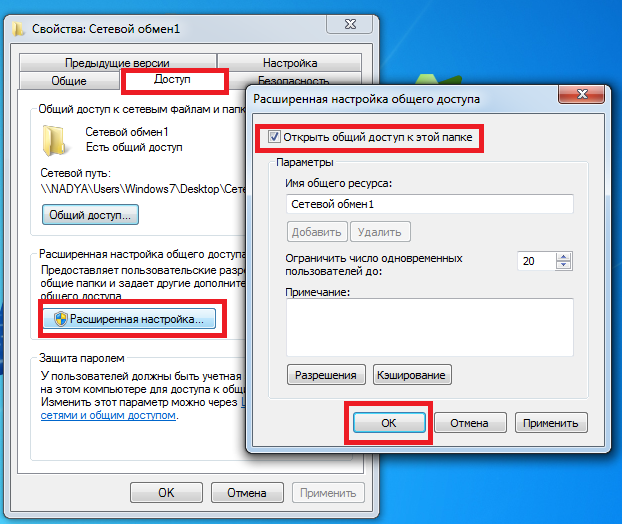
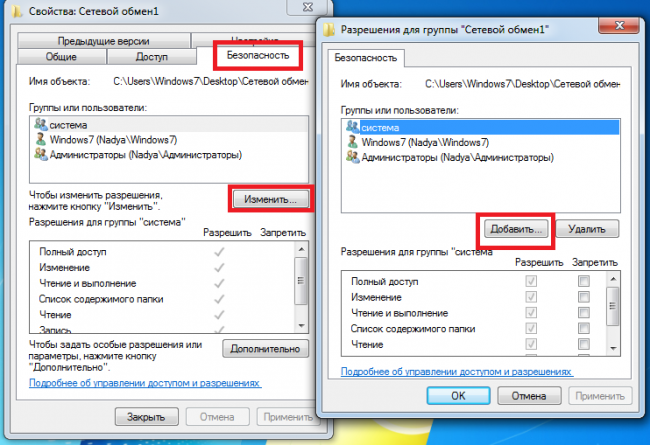
5. A small window will appear, select "Advanced."

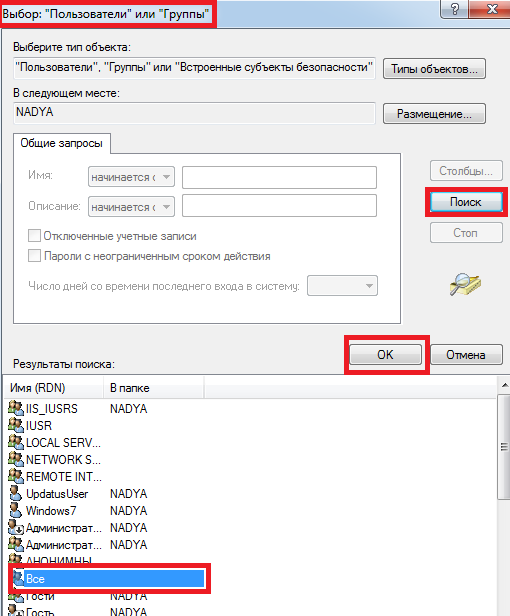
6. Another window appeared, it is called<Выбор: "Пользователи" и "Группы">, here you need to click on the "Search" button. In the list that opens, select "All" and click "Ok."
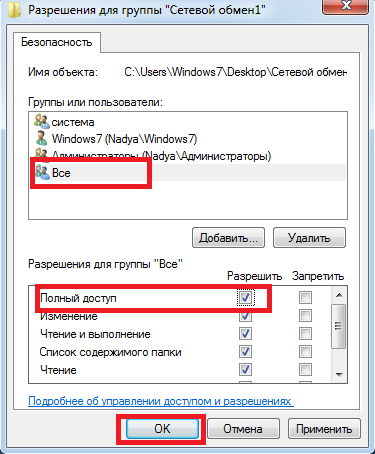
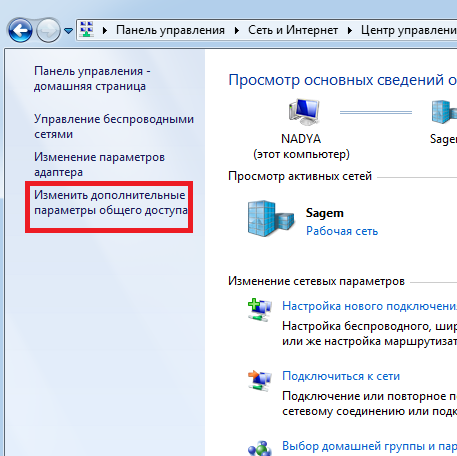
8. Now it remains to perform the action that cancels the password request to enter the network folder. If you do not cancel the password request, then for each user you will need to create account, under which he can access with a password. So, go to "Start-\u003e Control Panel-\u003e Network and Internet-\u003e Network and Sharing Center." Next, click on "Change sharing options".
9. Put a checkmark, as shown in the picture, that is, on the points:
- "Enable Network Discovery"
- "Enable File and Printer Sharing"
- "Enable sharing so that network users can read and write files in shared folders"
- "Use 128-bit encryption to protect shared connections (recommended)"
- "Disable sharing with password protection"
- "Allow Windows to manage homegroup connections (recommended)"
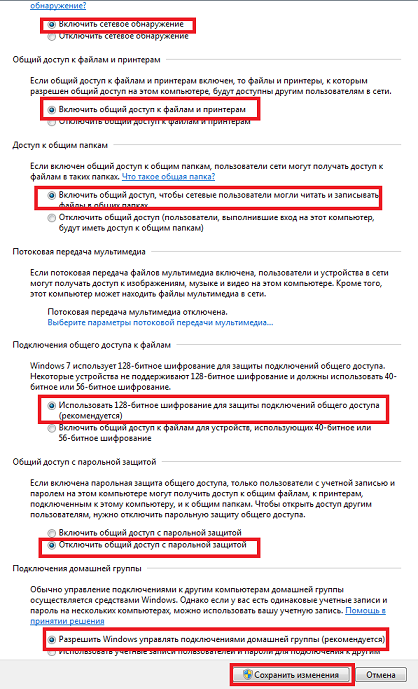
On this create network folder completed.