No doubt, the printer is a very convenient and useful device in the household. That's just this device is quite cumbersome, especially in comparison with a miniature netbook or tablet. And to tie a mobile PC to a heavy stationary device by means of a "standard" cable connection - at least, irrationally.
Therefore, in this article we will consider in detail how to connect the printer to the laptop via wifi, and also what to do if the printer does not see the Wi-Fi.
And first of all, let's dwell on the "classic of the genre": how to make wifi from a standard printer?
After all, you will agree, to configure wireless connection of the printer to the laptop, both devices must support this function.
How to connect a standard printer to the laptop by wifi?
Unfortunately, developers of budget models rarely provide devices with a built-in wifi transmitter, so for conventional printers the following methods of remote connection to a computer are used:
1. Installation of additional network equipment - a print server, with which you can make the printer a wireless node local Area Networks;
2. Cable connection of the printer to the computer, which has access to the local network wi-fi: thus, any wifi-device can communicate with the printer through the "intermediary".
The advantage of this method is its economy: you do not have to spend money on additional expensive equipment. However, you can not do without a second computer, which must constantly work throughout the "communication session."
To configure a wifi printer connection in this way:
Connect the printer to the "intermediate" computer with a cable and install the necessary software (driver);
Go to "Start" -\u003e "Control Panel" -\u003e "Printers and Faxes" and open this printer on general access;
Connect the printer to the laptop by wifi. To do this on the local network, go to the "serving" printer computer (see the link at the end of the article) , find the shortcut to the shared printer, right-click on it and select the menu item "Use by default".
Now, under the "Print" command, your laptop will automatically print on a connected printer.
3. Using a wifi router with built-in Print Server function and the presence of USB-connector for external network devices on the case. To configure this connection, you should:
Connect the printer to the router using a cable;
Connect to the printer from the laptop on the local wifi network (see the link at the end of the article).
However, such complexity is justified only when a wi-fi configuration is required on an old good printer that has long been "adopted" and almost native. In other cases it is more logical to immediately acquire a modern wifi printer with a built-in network module and not suffer from the adjustment of all kinds of additional equipment.
Of the most popular time-tested vendors here can be noted: HP, Canon, Epson, Konica, Panasonic, Samsung, Xerox, Brother and Minolta: such a printer can easily be connected to a laptop, router, tablet, etc.
In this case, depending on the specific situation, you can create a wireless connection with the laptop in different ways: we will consider the main options for connecting the printer via wifi in more detail.
How to connect wifi printer to computer and laptop?
From the "classic" ways to connect wifi printer, you can note:
1. Using an internal LAN between the printer and the laptop.
This is possible in the case when connected to wireless network the computer is able to independently distribute wifi.
Here to customize wifi connection printer, you should:
Via the integrated printer interface, connect to the LAN of your laptop (see the link at the end of the article) .
2. Connecting the printer through the wifi router:
- in automatic mode (using WPS technology).
To do this, first, and then use the WPS (QSS) button to connect your printer to the home network wifi.
To print through wi-fi, it's enough from your laptop to connect to the installed printer over the local network (see the link at the end of the article).
- in manual mode: via the "Setup Wizard" of your printer.
To do this, in the printer control panel, start "Search" available networks"And by SSID, select the network of your router. Here you need to specify a password for the wi-fi and confirm the connection to the network, after which the corresponding wifi indicator should light up on the printer.
Run the driver installation and select wifi connection with manual settings, after which the printer will be available for wireless LAN connection.
There are several common connection options:
- driver installation;
- manual setting.
For the third method, you need the name of your network (SSID) and a key or password. This information can be obtained using the HP Print and Scan Doctor utility (see the video in the article).
Consider each of the ways to connect the printer via Wi-Fi to the router in more detail.
Driver Installation
For some devices, a feature is available HP Smart Install. In this case, you can connect the printer to a computer or laptop via USB and the installation program will automatically start. Choose a Wi-Fi connection and follow the wizard's prompts. HP Smart Install will configure the wireless connection on the printer and the USB cable can be disabled (at the command of the installation wizard).
You can find out if the HP Smart Install function is available in the instruction manual of your device. If the printer does not support this function, you will need to software for the device .. How to download drivers from the official site of Epson and with Hewlett-Packard.
Do NOT connect the device to the computer yet. Download the driver (preferably full), start and follow the prompts on the screen. During the installation, the wizard will prompt you to select the connection type. Choose wireless - over Wi-Fi. Follow the prompts and enter your network data (SSID and password) if necessary. For more details, see this article on setting up the HP LaserJet Pro P1102w over Wi-Fi.
WPS
This method is the simplest. To configure the printer and the router must support WPS (Wi-Fi Protected Setup). See if your equipment works with this function in the instructions. If WPS is supported by both devices, then you must enable this function in one of the following ways:
- programmatically (through the printer menu and via the web interface of the router);
- hardware (by pressing a special button on the printer, and then on the router).
How to click see the instructions. Sometimes you just need to press, and sometimes you need to press and do not release for 2-3 seconds. For a more complete idea of connecting the printer via Wi-Fi to the router, see the video below.
Manual setting
This method is more secure than WPS. The network name (SSID) and password will be required.
1. Connect the printer to your network. Go to the printer control panel in the wireless settings and start the setup wizard. All available networks will be searched. Choose your own name (SSID). If your network is not visible or hidden, you can enter the name manually. Enter the password for your network. If the data is entered correctly, the Wi-Fi indicator on the control panel will be on, indicating that the device is on your network.
2. Run the driver installation (preferably complete) for your printer. Follow the wizard's prompts and select a Wi-Fi connection with manual settings. You will need to select a printer that is already on your network and print a test page.
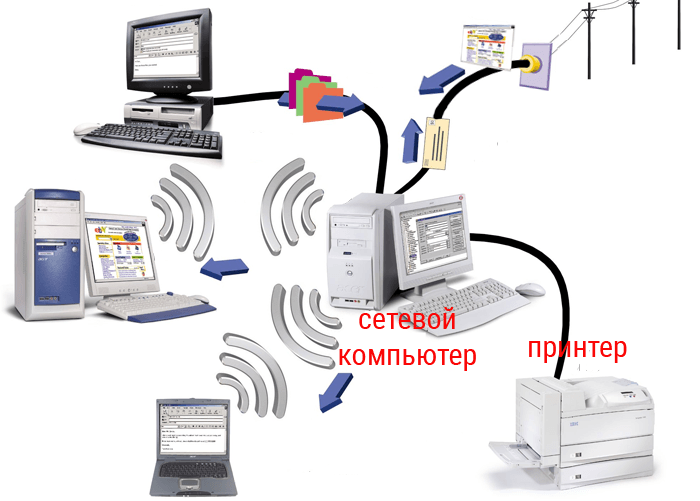
Many today, at home and in the office, have their own local network on several computers. More often, you can build such a network using a router. If the router is equipped with a USB port, in any case you can print any documents if you connect the printer to the router. Network technology - will allow you this. Connecting the printer through the router - it is always possible if the router has a USB port. The only limitation is that the function of "network" printing - not all will be supported by the software (that is, firmware) of the router itself.
Most of the modern models of routers - have the support of "printing". We will look at how to configure the printer through a router, using an example of a typical wi-fi router WL-500gP from ASUS.
Configuring the Router
I would like to draw attention to the following. If even your router, with the version of firmware that is currently installed, supports the option to connect the printer, first familiarize yourself with the list of printer models supported by this firmware. The list should be listed on the manufacturer's site of the router (or - the manufacturer of the firmware).
How to connect the printer to the router, probably, will not cause any questions.
Note: The USB cable is connected to the router when the adapter (power supply) is off.
If necessary, you can use the USB-splitter. After turning on the power of the router, go from the LAN computer to the web interface (the IP address is usually indicated on the box):
After entering the login with the password, on the main tab ("Network map") - it is reported that the printer was detected and successfully recognized by the router. If the router does not see the printer, or writes the wrong model name, then perhaps this USB printer, firmware of your router - is not supported. But if everything is correct - go to the next stage (from the web-interface, now you can exit).
Setting up the printer on your computer
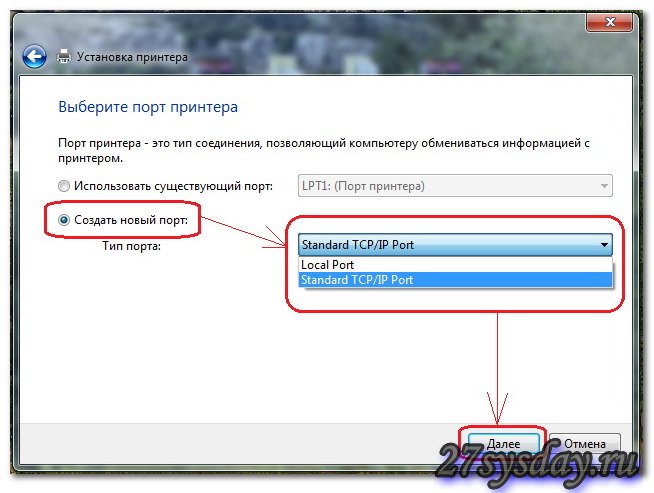
In Windows 7, the setting looks like this: go to "Start" -\u003e "Search", type "installation":
We need a "Printer Setup". Clicking on the link, we will see the window:
In this window, we add the "Local" printer ("Next"). Then, we make the choice of the port (as in the figure):
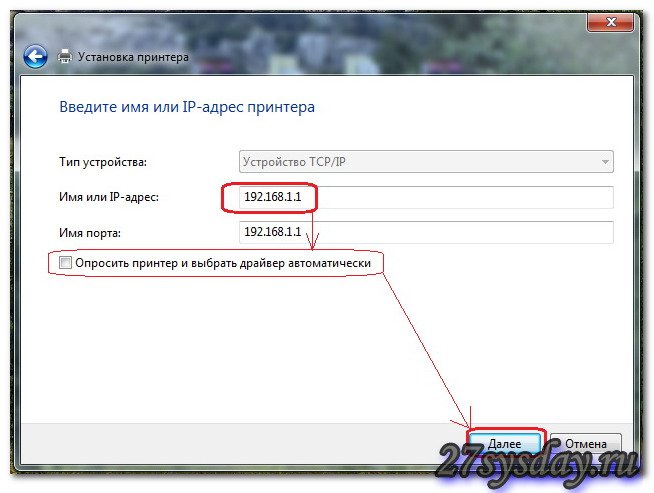
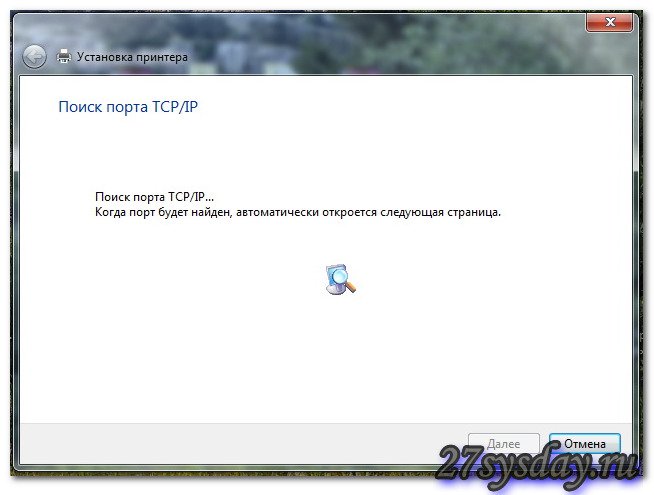
Here we need the IP-address, which went into the web-interface (ie, the address of the router). The tick "Interrogate ..." should be removed. We press "Next", and we expect:
As a result, you should see a window like this:
Do not worry: the printer through the router, indeed, "sees". Choose the type - "Normal", and "Generic Network Card", click "Next".
Note: you need to pay attention to the correctness of the given IP-address (it coincides with the address of the router, that is, the web-interface address).
Printer Driver
You need to click "Install from disk", and then select the path to the folder with the driver. Normally, the driver for the printer is written to the CD-ROM that comes with it.
Before installing, create a name for the printer:
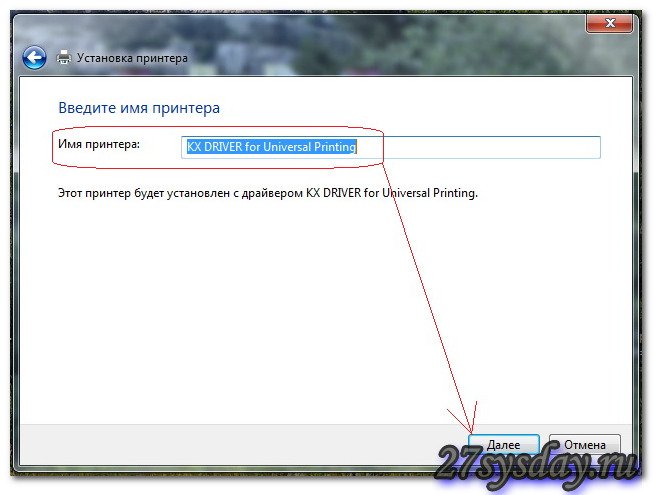
Under this name, you will see this printer in the computer. Click "Next":
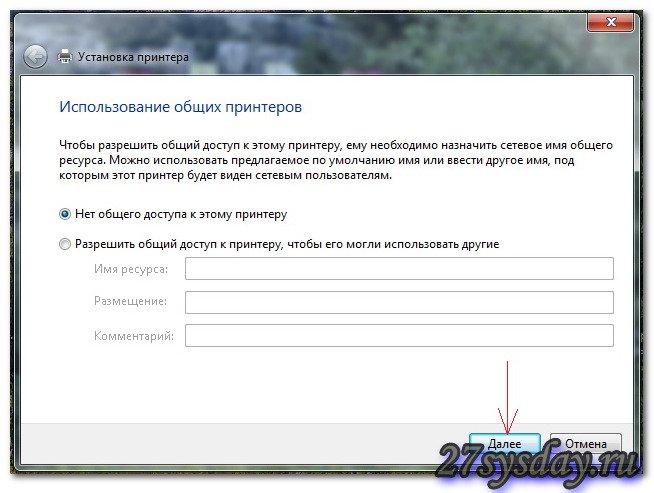
At the end of the installation, select "No sharing" (which is important):
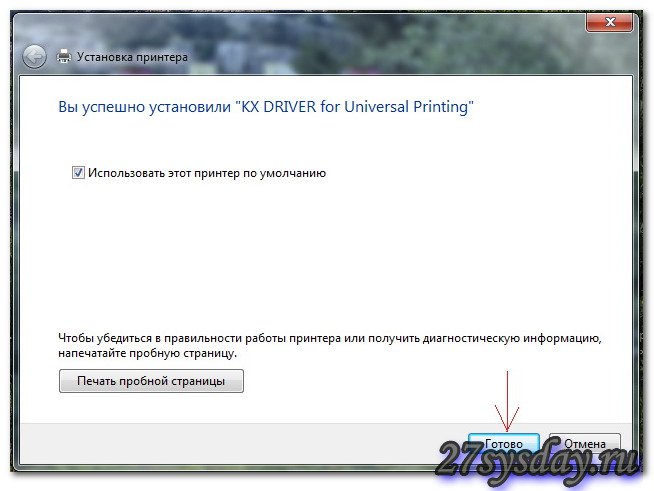
And, you can make this printer the default printer:
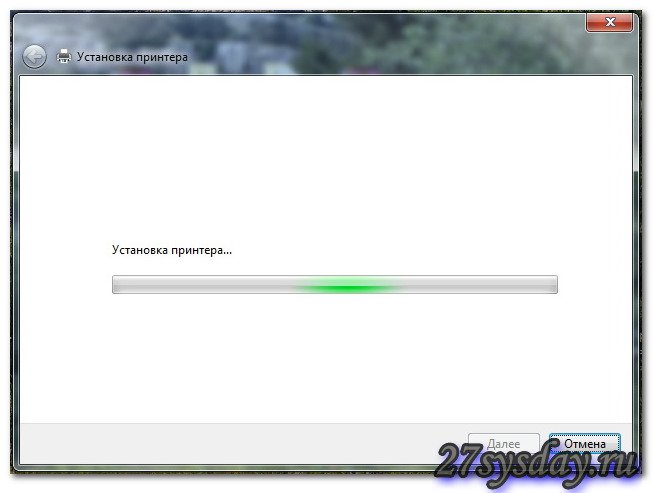
Click "Done". In fact, setting up the printer through the router requires another action.
Finishing touch
On the "Control Panel", select the printer we are interested in (in "devices"):
In the "Printer Properties", we will change exactly one parameter - the port protocol. Ports tab, tick - on the desired printer (you can navigate to the IP-address of the port), the button "Configure port":
Then, select, as in the figure (LPR-protocol). A "Queue Name" - you can do any:
Congratulations! After clicking "OK", you can print a test page.
We managed to connect the printer through the router, but from the computer, the printer is seen as one of the "local" printers (but not as "network"). Therefore, similar settings will have to be performed on each computer (laptop) from which you want to print.
Additionally
In the same way, in principle, you can also connect the MFP to the router (then, in the local devices of the computer, the scanner will appear). The technology discussed above is called "Share Port". If there is such a setting in the router - with a high probability, everything will work.
Another thing, if it is configured network connection printer to the router ("network" printer):
Samba-service (implementing this "option"), usually in routers is not provided. And even with "dd-wrt", it's hard to set up (charmlab.ru/podklyuchenie-printera-k-routeru-dlink-dir-320-pod-upravleniem-dd-wrt/). The choice is yours.
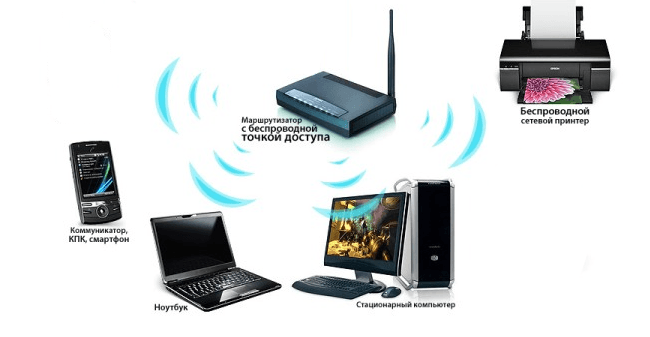
Connecting a printer to a laptop is not much different from connecting to a computer. The only difference is that in the case of a laptop there is the possibility of wireless connection via Wi Fi.
To connect, you must connect the USB cable that comes with the printer to the laptop. Next, you need to insert the driver disk into the laptop drive. In the absence of such a driver disk can be downloaded from the official website of the manufacturer. If the laptop is installed operating system Windows 7, then it, perhaps, itself will find or update the printer driver via the Internet.
It is desirable to copy the driver separately to one of the notebook drives, so that it will always be at hand. Installing the driver is simple, just follow the installation instructions. The printer is now ready for use. It should appear in the list of printers. After selecting the installed printer, you must run a trial print. If the page is printed, then the installation was successful.
In order for the printer to be accessible over the local network, it must be connected to the computer on this network and shared to it. To enable sharing, go to the Start menu, go to Control Panel, and then click Printers and Faxes. After finding the desired printer, go to its properties and select "access" to share the printer. After that, the printer will be available to other computers on the network.
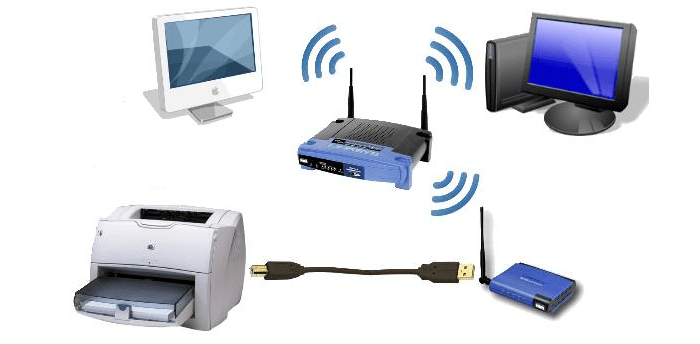
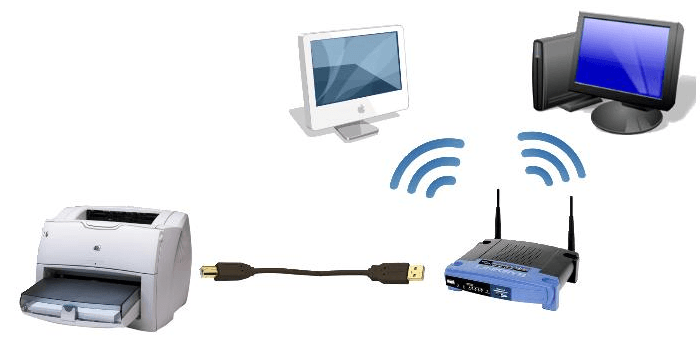
Connecting the printer through wifi
Many modern printers connect via Wi-Fi. In this case, you do not need to use cords, which is much more convenient when connecting the printer to several laptops. Wireless connection of the laptop is via a router.
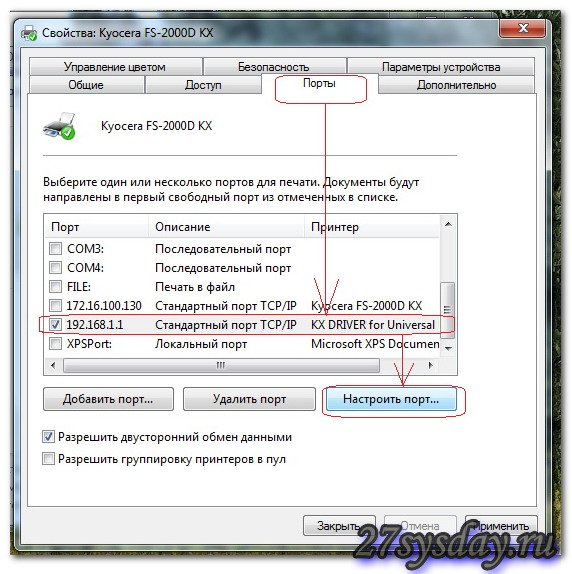
When connecting, go to the "Control Panel" and go to the "Add Printer" menu. Then you must select "Add a local printer" in a new window. Then check the "Create a new port" checkbox and select "Standart TCP / IP Port". Then you need to register the local IP address of the router to which the printer is connected. After finding the device, select the item "Special" and go to the "Options" menu. Opposite the menu "Port Name" we register "Local Printer". On the menu Ip address prescribe the address 192.168.1.1. Choose the protocol Raw. The port number is 9100. Then we install the driver from the disk. Because the printer is connected to a wifi router, you do not need to share it. Therefore, we put on the checkmark "No common access".
The article was prepared with the support of the site shopciss.ru - printers in Dzerzhinsk.
Wireless technology is convenient and modern. However, the connection and use of WiFi devices requires special clarification and a special approach. Once you learn how to connect such a printer to a laptop, you can manipulate any similar device.
A simple way to connect a printer to a laptop via wifi
In the most "friendly" version of events, which the developers of our devices suggest, the user will have enough:
- connect the printer to a power outlet and press the power button;
- start the PC;
- ensure that devices are in the WiFi coverage area;
- install the drivers from the CD from the kit (or find them on the official website of the manufacturer on the model number);
- sometimes the drivers are located and installed by the Windows OS automatically - in this case, you will see a window with a notification on the desktop (which means that the need to install from the disk disappears and saves us time);
- restart the PC and go to the "Start" -\u003e "Devices and printers";
- here we need to display our WiFi printer;
- if it is not one, right-click on the shortcut and select the line "Use by default" (that is, as the main one);
- a printer that is working and properly connected will be marked with a green mug with a daw.
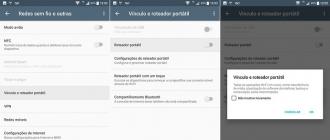
Connecting the printer to the laptop via wifi using WPS
- go to the menu of the printer, moving arrows to the section wireless connections (WLAN);
- specify the method of connection - WPS (can be already selected as a "default" option);
- press the WPS button on the router and hold until the indicator flashes;
- on the printer, press the "OK" button until the device completes the connection.
To protect the printer with a password from the network:
- go to the menu with a list of wireless networks;
- select your and enter the login / password using the virtual keyboard;
- confirm input - the printer will try to contact the router and will start to function, if all is specified correctly.
![]()
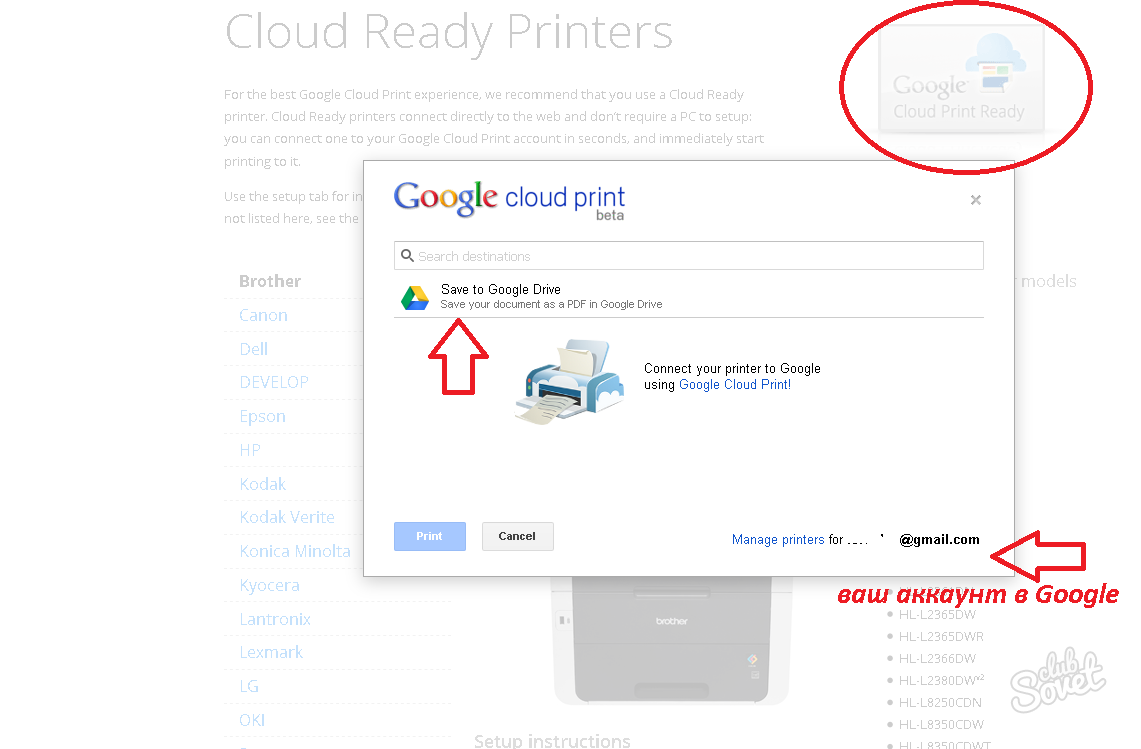
Work WiFi router through Google Cloud Print
Curious dignity this method is that you can send documents to your WiFi printer from anywhere in the world using your Google account. For this:
- check if the printer is Web-accessible;
- start the browser Google Chrome and enter chrome: // devices;
- now the printer appears in the "My devices" section and will be ready for use.
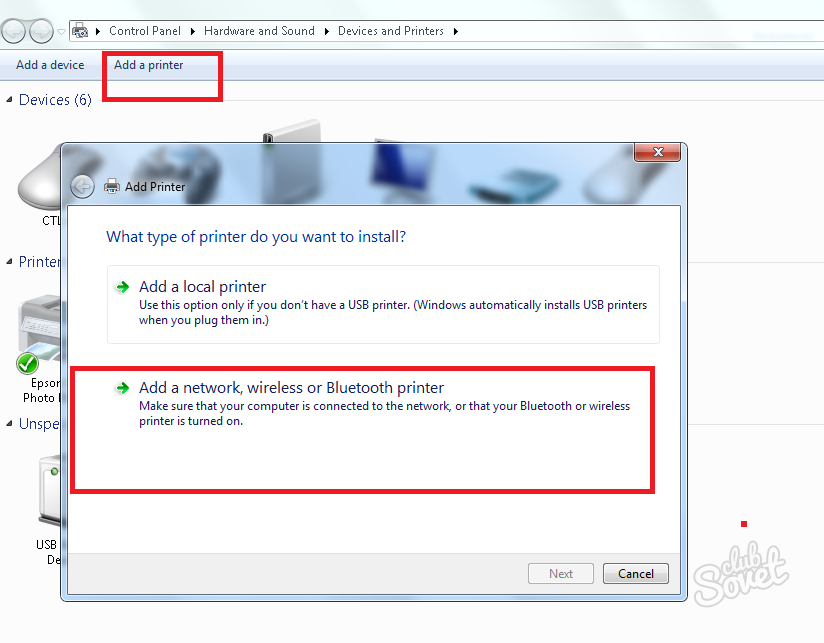
Connecting the printer to the laptop via wifi over IP
If the printer is not detected by one of the listed methods, or it is displayed in the system, but does not print, you should assign the IP address specified in the instruction (attached when purchasing) to it. We do this:
- go to "Devices and printers";
- click the "Install Printer" button;
- select "Add wireless";
- the installer will automatically find the device - click on it;
- a window will open in which you must specify an IP address;
- enter the data, save the changes, reboot the computer.
If the printer is connected but does not print, check the amount of ink in the cartridges.