What to do if there is no Security tab in the folder properties.
First, you need to check the type of the disk file system (should be NTFS), on which the desired folder is located.
To do this, open My Computer -\u003e Select the desired disk -\u003e Open its properties (through right click).
If the type of the FAT or FAT32 file system (currently used mainly on flash cards), then the Security tab can not be opened. These file systems do not allow you to define the access rights to files and folders. In this case, you need to format or convert the disk to NTFS.
Therefore, this is something more simplistic. This panel contains information about the name of the computer on the network, as well as the workgroup and the button to configure it. The Screen Properties screen has five tabs. Problems. To customize the visual theme that we want to use. The theme covers most graphic elements of the desktop and window system, defining its color, size, text font, desktop background, etc. in fact, there is only a preinstalled theme, although the system allows you to install other topics that will be available in this section.
For NTFS disks, you must disable simple file sharing, if that does not work, you should check the registry or Group Policy setting.
Disable Simple File Sharing
By default, "Simple File Sharing" is enabled in Windows:
We need to turn it off. To do this, open any folder. In the top menu, select Tools -\u003e Folder Options -\u003e click the View tab. In the list, uncheck "Use simple file sharing (recommended)" and click OK:
A guest group can only use a computer, can not store files in it, and can not perform any configuration. Network user accounts are registered on the server and can be logged on to any computer on the network, except for restrictions. Only network administrators can create accounts of this type, and also manage groups and privileges for them.
There we have all the possibilities of creating, modifying, changing the password, eliminating, etc. The computer management console also allows us to access the management of users and groups, albeit with a different interface. But first consider some essential concepts.
Desk. To customize the image that will be used as wallpaper. The Configure Desktop button provides access to the Desktop Elements screen, which consists of two parts. The main thing is to determine which system icons we want to display on the desktop and change the default icon. Below we have a button that allows us to customize the cleaning of the desktop using a wizard that detects desktop icons that are not normally used to delete them or save them to a folder.
This starts the wizard in 60 days. In this window there is a second tab called "Web", with which we can configure it for the appearance of Web elements on the desktop. Screen protector. To set the screen saver and its operating parameters, if any. Here's a button that lets you access the power settings that are discussed below.
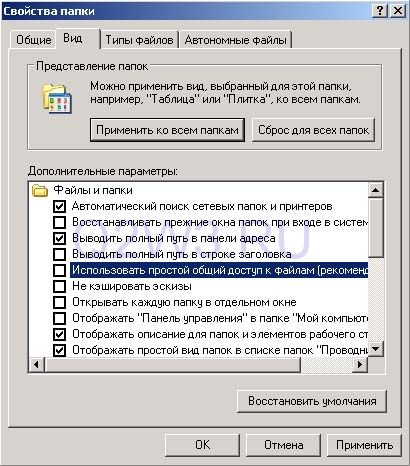
After that, the Security tab should appear in the folder properties:
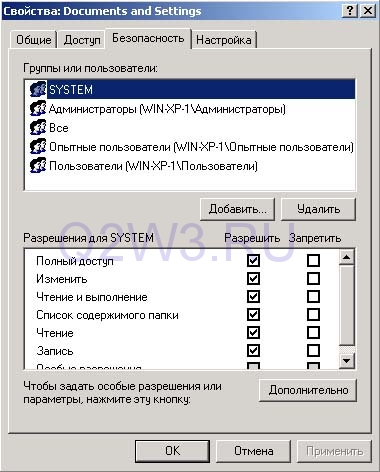
However, this method does not work in all cases.
Disabling the Security tab through the registry
In principle, we understand how to print the translation to paper support documents, which we process using a computer. And the printer is a device that we will use for this purpose. However, in the long term, printing includes all the processes that we can perform from print settings of programs running on the system and which can lead to the creation of an image or other file.
For printing, we must have a printer installed on the computer. Printers, like other hardware, have a corresponding device driver or driver. And it is this software, properly installed, that we will see in the system and the one that will allow us to use the device. With the peculiarity that we can have instances of print drivers that are not related to a real printer.
Appearance. To customize the color system and text fonts for windows and menus. Let's not forget that visual effects consume system resources, so in teams that are not very powerful, it is recommended to configure them as a minimum. Configuration. Here we check the correctness of the driver driver for the video card. When this is the case, we will have more resolution and color depth capabilities, depending on the power of the equipment, we can use a higher resolution and greater color depth.
The visual effects in these systems are particularly relevant, this is one of the reasons why they require more powerful equipment. However, the trend is to simplify the configuration, as we can see, the number of controls that appear first is irreplaceable. Below, we have only four controls: Desktop, Window Color, Sounds, and Screen Saver, which allow the user to change these values relative to those made by the selected theme. It shows us open programs, as well as running processes, but the main function of this utility is to close the program that does not respond.
At the command prompt, execute the regedit command. In the Registry Editor, open the path:
HKEY_CURRENT_USER \\ Software \\ Microsoft \\ Windows \\ CurrentVersion \\ Policies \\ Explorer
If there is a NoSecurityTab parameter with a value of 1, in this case, the Security tab will not be displayed:
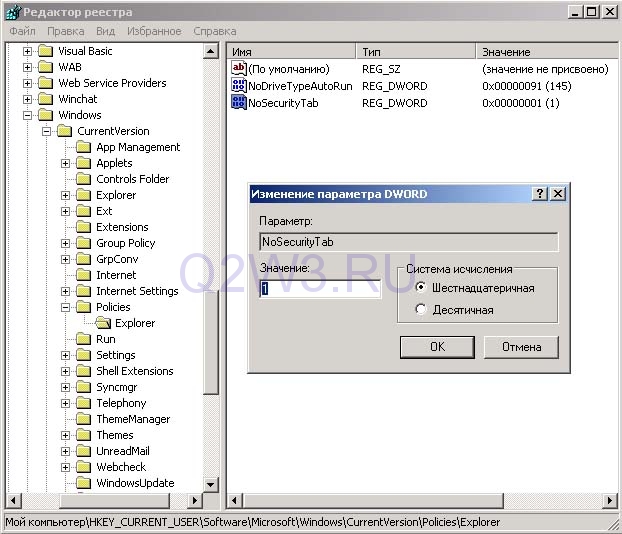
In order for the tab to be displayed, the NoSecurityTab parameter must be deleted or assigned to it. The setting takes effect immediately after the application.
By default, there is no need for an administrator user to configure network printers, if we do not need to install the software. If the computer belongs to a network domain, it may be that the domain administrator has configured the system so that users have access to some printers on the network by default and have already been installed. However, often users configure printers to which they can access.
In the left pane, we will see the Add Printer Entry as the first parameter. In the list of printers there will be one that the system considers by default, this is the one that will be used when you press the direct print button from any application in the system. You can also distinguish between local printers, network printers or common rooms, for different icons, and for describing them. In the details of each element we are informed about the number of documents that we ordered, and if we have a good connection with it, the word "List" or "No connection" is used for this.
This application allows us to schedule the execution of the program either individually or periodically. From this application, we can configure some aspects related to turning the computer on and off, as well as in laptop computers running on battery, we can configure some aspects that provide greater battery autonomy.
There are several tabs in the window, which we briefly describe. Combinations of energy. Here we can set the action that will take place when we leave the computer on, but inactive for a certain time. It can be turned off at all, the monitor is off or the hard disk is turned off. The difference is whether it works with power from the mains or with batteries.
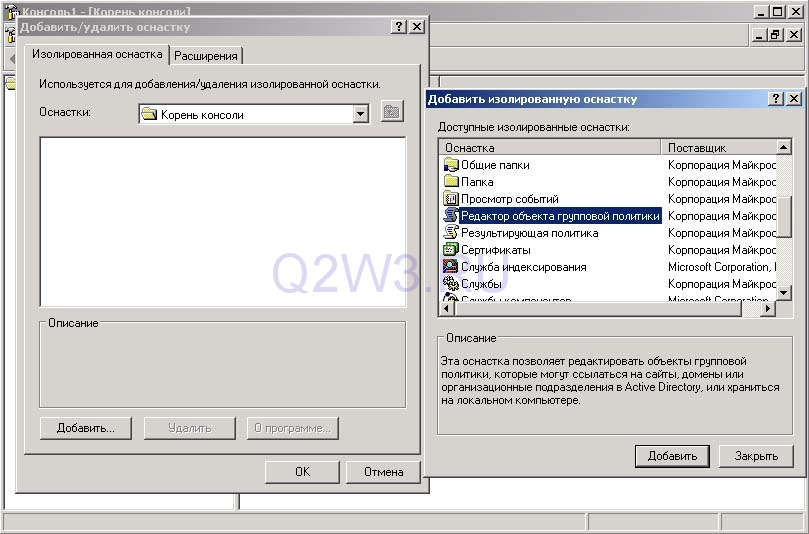
Disabling the Security tab through the Group Policy setting
At the command prompt, execute the mmc command.
The console window opens.
Open the Console menu -\u003e Add or remove the snap -\u003e in the opened window, click the Add -\u003e button in the list, select the "Group Policy Object Editor":
This aspect should be checked during our work session, especially if we are using network printers, because our printer may not work by default due to a lack of connection, because it is disabled or because the equipment to which it belongs is disabled .
Thus, when we select an item from the list and see its context menu, we'll see several options that should be highlighted. Open. View the print queue of the selected printer. Set the default value. Print settings. This allows us to change some of the parameters of the impression, this element changes with the make and model of the device. We need to learn what we have in our work environment to learn their capabilities. This window can also be obtained during printing from a specific application, provided that we do this through the appropriate dialog box.
Alarm signals. In this tab, we set up alarms to alert us that the battery is dead and when it is critical. In this latter case, the action of the alarm is usually to disconnect or suspend the equipment until it is connected to the network current.
Power meter. It indicates the level of the battery charge at this time, and also allows you to put an icon in the tray of icons, which indicates to us at any time the level of battery charge. This tab is used to configure the action that is performed when the computer cover is closed or the power button is pressed. Sleep mode. Here we can enable or disable the system sleep mode, note that this action will reserve a small part of the disk space for this function. This allows you to significantly reduce the turn-off and start-up time.
Click the Add button. In the next window, do not change anything and click Finish. Then close the list of snap-ins and click OK.
Expand the Local Computer Policy and open the following path:
User Configuration -\u003e Administrative Templates -\u003e Windows Components -\u003e Explorer
Select the option Delete the Security tab
To share it with other computers on the local network. We'll look at another topic, use an online printer. Cut or drop the connection. Properties. With this option, we access the "General Properties" window of the device. Here you will find a button that provides access to the print settings, and the other, which allows us to print a test page.
After clicking the "Add Printer" button, the corresponding wizard is launched, on the first screen we click "Next". In the case of a network printer, we'll see three options, the first two are equivalent. Both will try to automatically find the available network printers to which we can access.
However, we will not find the controls when you turn off or turn off the hibernation. This option is activated by default, and it is not possible to deactivate it in the GUI. Let's start this section with some definitions, and then comment on the various controls that will allow us to manage at the base level by users and groups of our team.
A user is a person who uses computer equipment. The user account. The operating system has a security system designed to differentiate users who can use it. Basically it consists of a username and password that a person needs to know in order to use it. In computer slang often, when we talk about the user, we usually refer to the user account.
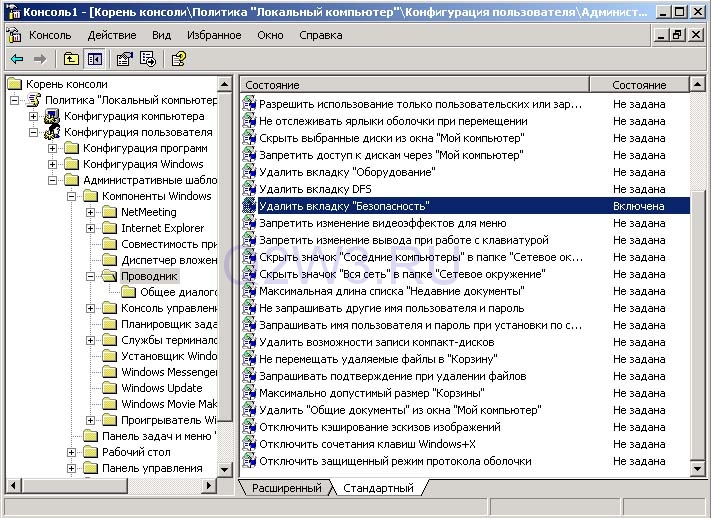
In order for the tab to be displayed, the parameter must be "Disabled" or "Not set". The setting takes effect immediately after the application.


