Today it is enough just to organize a wireless network at home using Wifi technology. The most common method involves the use of a special router, which allows you to greatly simplify the connection to the Internet. At the same time, none of the users are immune from the unfavorable situation “cannot connect to wifi network". What is the reason for this and how to solve this kind of problem, we will talk in the framework of this article.
Difficult to live - “Without access to the Internet”
Such a message urges the user to the inability of the computer to enter the global network. Basically, this kind of misunderstanding occurs as a result of incorrect settings made to the work of interacting network devices. Sometimes the solution to a problematic situation lies in the banal switching on of the router. Let's look at the main reasons for a failed connection and how to fix them.
Search for the originator of the "celebration" - can not connect to the Wifi network
First of all, you need to be convinced that the monthly fee for the Internet services provided by your provider has been paid on time and in full. Then try to connect to the network using any other electronic device: laptop, tablet or mobile phone. If the access point is working properly, it is reasonable to assume that the problem is hidden in the "conflicting" device - a computer.
Is the driver installed for your wireless adapter?
Windows 10 is now in trend, and therefore this particular OS will be considered as pre-installed. However, tips and advice are also effective for previous versions of the Microsoft product - Windows 7 and 8.
If in the system tray the network connection icon is crossed out with a red cross, then you need to make sure that it works network driver. Possibly mentioned software and is not installed on your PC at all.
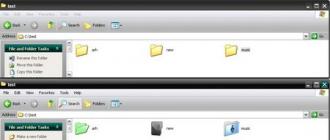
- Go to the "Start" menu.
- Then, hold the marker on the "Computer" section and right-click to call context menufrom which you should select the item "Management".

- Next, activate the "Device Manager".
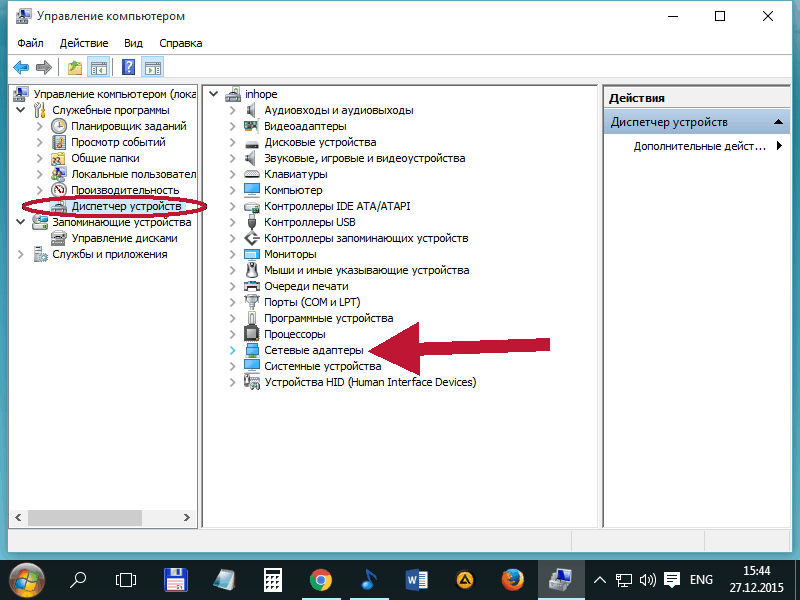
- Pay attention to the section "Network adapters".
- If your “Wierilles” adapter is in the list of active equipment - click on it with the right key of the manipulator and select the “Properties” item from the drop-down list.
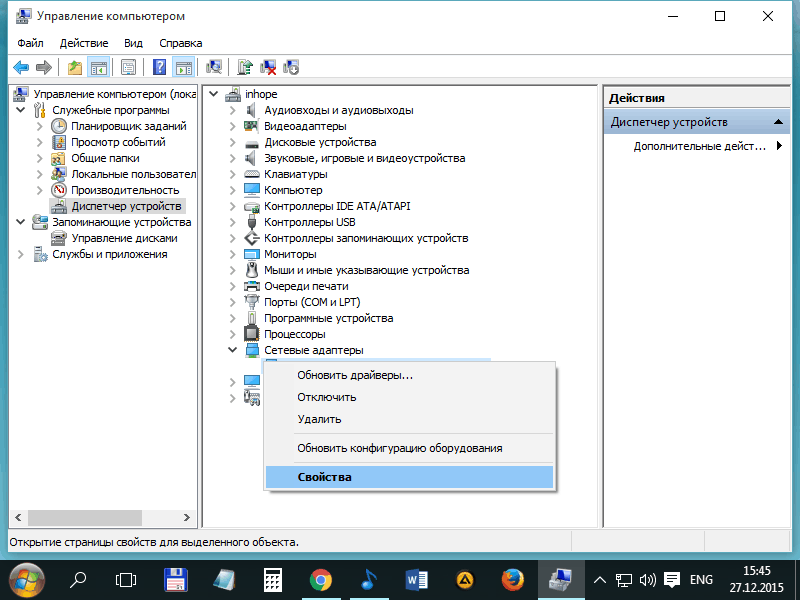
- In the "Device Status" block, the value "Works fine ..." should be set. Otherwise, you need to reinstall the driver wireless equipment.

How to know if the Wifi adapter is enabled on the laptop: mechanical activation type
The problem we have raised is highly relevant for portable computers. Since activation wireless adapter on laptops can also be produced mechanically. That is, by means of special function keys or a lever control element. Depending on the type of laptop and its manufacturer, the adapter on / off circuit may be used in different ways.

In any case, it is worth asking for help to the technical documentation for the device or the operational passport of a specific device. Typically, the activation of wireless equipment occurs when the user presses the key combination "Fn" and a manufacturer-defined service key from the top row of the keyboard module (F1, F2, F3, or other). You can navigate by the characteristic marking in the form of diverging radio waves from the antenna.
Wifi on the computer
This method of enabling wireless equipment is literally effective for all computing devices controlled operating system Windows
- Click the network connection status icon with the right mouse button.
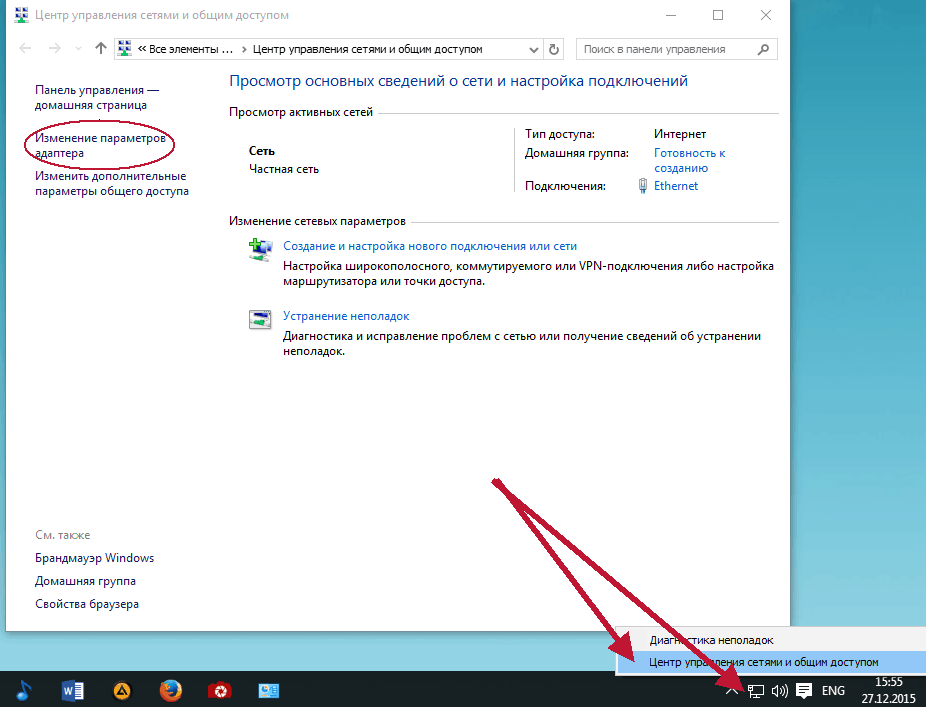
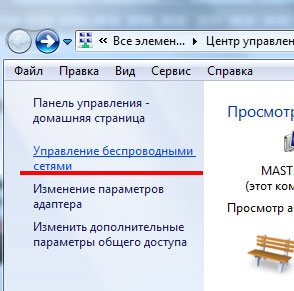
- Go to the "Network Control Center and shared».
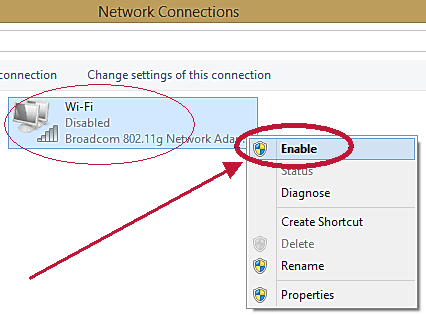
- On the left, in the window that opens, activate the "Change adapter settings" link.
- Highlight label wireless connection and click the right mouse button - click "Enable".
If the equipment is active, but still it is impossible to connect to the Wifi network
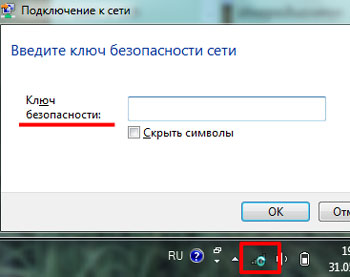
Most likely, you incorrectly enter the connection protection key. Check the keyboard layout involved, and also make sure that the “Caps Lock” key is turned off. Make sure that you connect to your access point (your router). In some cases, the distance also plays a role - perhaps the signal is not strong enough.
And finally, in a particularly critical situation, you can use the troubleshooting service.
- Go to the already known work area of the Network and Sharing Center.
- Activate the item "Troubleshooting network adapters."
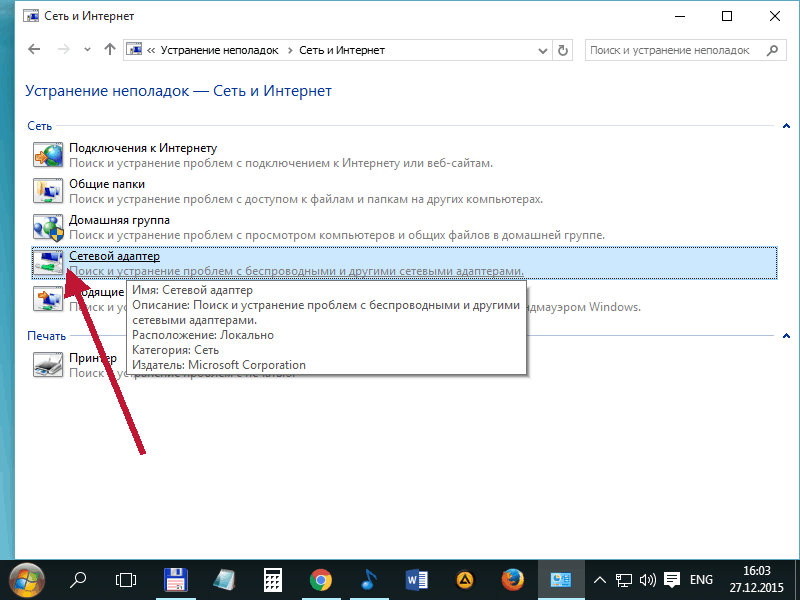
- Select the wireless equipment and wait for the running service to fix everything.
In conclusion
Well, as you can see, everything is fixable! However, returning to the problematic options with laptops, it is worth noting one important point: sometimes you need to use the "High Performance" power supply, as with other options there may be a conflict when using wireless equipment. Stable connection to you by Wifi!
That’s how a seemingly working laptop (netbook, etc.) works with a Wi-Fi network and no questions. And one of the days you turn it on - and the error takes off: "Windows could not connect to Wi-Fi ...". What to do?
So actually it was with my home laptop. In this article I want to tell how you can eliminate this error (besides, as practice shows, this error is quite common).
The most common causes are:
1. Lack of drivers.
2. The settings of the router got lost (or changed).
3. Antivirus software and firewalls.
4. Conflict of programs and drivers.
And now how to eliminate them.
Eliminating the error "Windows could not connect to the Wi-Fi network"
1) Setting up Windows OS (using Windows 7 as an example, similarly in Windows 8).

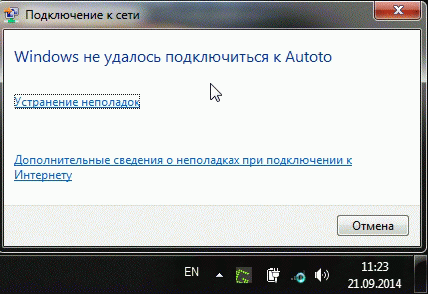
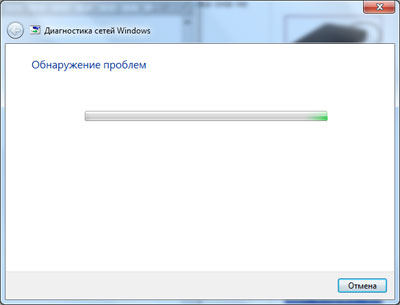
If the error about connecting to the network is still not possible (as in the picture below), click on the "troubleshooting" button (I know that many people are very skeptical about it (he also treated it until it helped restore it a couple of times). network)).
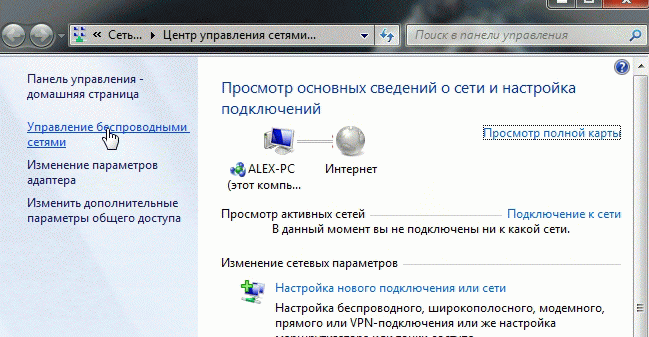
If the diagnostics did not help, go to the "Network and Sharing Center" (to enter this section, just right-click on the network icon next to the clock).

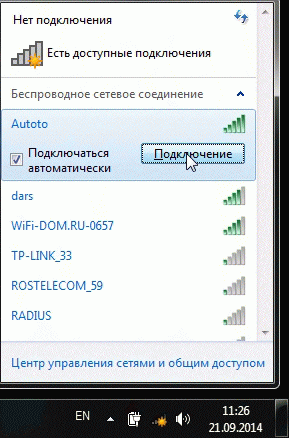
Now we simply delete our wireless network, to which Windows cannot connect in any way (by the way, you will have your own network name, in my case it is “Autoto”).
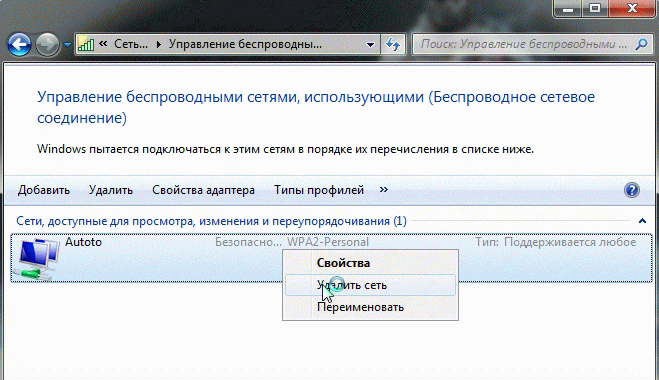
Again, try to connect to wi-Fi networks which we removed in the previous step.
In my case, Windows was able to connect to the network, with no questions asked. The reason turned out to be trivial: one "friend" changed the password in the settings of the router, and in Windows in the settings of the network connection, the old password was saved ...
![]()
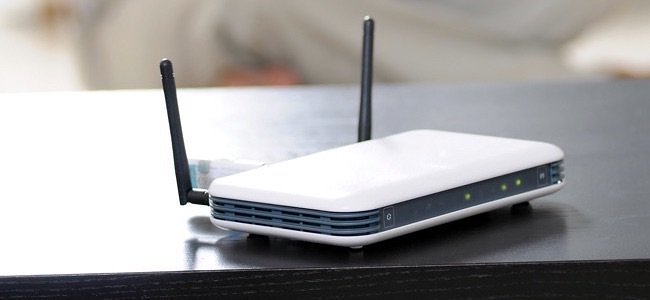
2) Setting up a Wi-Fi network in the router
After checking the settings of the wireless connection in Windows, the second thing to do is to check the settings of the router. In 50% of cases, it is they who are to blame: either they got lost (what could happen, for example, during a power outage), or someone changed them ...
Since from the laptop to the Wi-Fi network you could not enter, then configure Wi-Fi connection you need a computer that is connected to the router using a cable (twisted pair).
In the settings of the router We are interested in the "Wireless" section (if in Russian, then configure Wi-Fi settings).
For example, in TP-link routers, this section looks like this:
Configuring TP-link router.
By the wayIn some cases, it may be necessary to reset the router (router). On its body there is a special button for this. Hold it and hold for 10-15 seconds.
Task: change the password and try to configure the wireless connection in Windows (see clause 1 of this article).
3) Update drivers
The lack of drivers (however, as well as the installation of drivers that do not fit the hardware) can cause much more serious errors and failures. Therefore, after checking the settings of the router and network connection in Windows, you need to check the drivers for the network adapter.
How to do it?
1. The easiest and fastest option (in my opinion) is to download the DriverPack Solution package.
2. Manually remove all the drivers for your adapter (which were installed earlier), and then download from the official website of the manufacturer of your laptop / netbook.
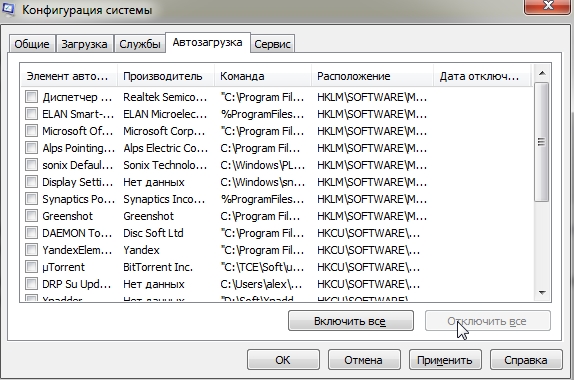
4) Setting up autorun and disabling antiviruses
Antiviruses and firewalls (with certain settings) can block all network connections, supposedly protecting you from dangerous threats. Therefore, the easiest option is to simply disable or delete them at the time of setup.
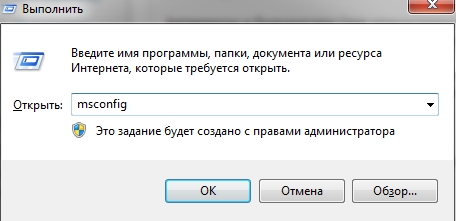
Regarding autoload: at the time of setup, it is also desirable to remove all programs that are automatically loaded along with Windows. To do this, press the "Win + R" button combination (valid in Windows 7/8).
Then we enter the following command in the "open" line: msconfig
5) If nothing helps ...
If Windows still cannot connect to the Wi-Fi network, you can try to open command line and successively enter the following commands (enter the first command - press Enter, then the second and again Enter, etc.):
route -f
ipconfig / flushdns
netsh int ip reset
netsh int ipv4 reset
netsh int tcp reset
netsh winsock reset
This will reset the parameters. network adapterroutes, clear DNS and Winsock. After that, you need to restart the computer and re-configure the network connection settings.
In this article we will look at the situation that many users face. You click on the wireless network icon in the lower right corner of the desktop, select the desired network from the list, click Connect, but instead of accessing the Internet mistake: "Windows could not connect to ... ".
There may be several reasons why this window may appear. Some of them we will look at in this article, and figure out why wi-Fi may not connect on the laptop.
Let's start with settings in the operating system.
Perform network diagnostics. Click on the icon wireless network In the tray, select the network and click "Connect". Enter the password if the network is protected.
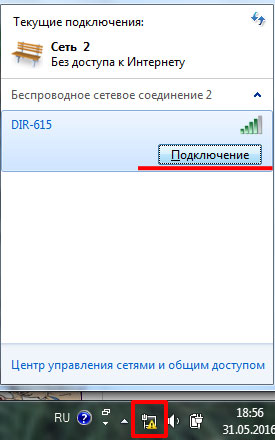
When the error window appears, click the button in it. "Troubleshooting". Windows will search for problems and suggest solutions. Just follow the recommendations. In some cases it helps, and the laptop successfully connects to the Wi-Fi network.
If the laptop still does not connect to Wi-Fi, then remove the network to which we want to connect, and reconnect. This can help if you, or someone else, have recently changed the network access password. There are other settings saved on the laptop that do not match the current settings, which is why it does not connect to wi-fi.
Right click on the network icon and select "Network and Sharing Center".

In the list, select the network to which the laptop cannot connect, right-click on it and select "Delete Network".

After that, again click on the network icon in the tray and connect to the desired Wi-Fi network. You may need to know and enter the current network password. After that, internet access should appear.
Go to router settings. They could get off, for any reason, or someone replaced them. Since you do not have access to the network in a laptop, open your favorite browser on a computer that is connected to the same router using a cable, and enter the IP address in the address bar: 192.168.1.1 or 192.168.0.1.
route -f
ipconfig / flushdns
netsh int ip reset
netsh int ipv4 reset
netsh int tcp reset
netsh winsock reset
After each press "Enter". This will help to clear the data in DNS and Winsock, reset the parameters of routes and network adapter.
That's all. I hope you helped at least one of the methods described. And now you will know what to do if the laptop sees the Wi-Fi network but cannot connect to it, as a result of which, an error window appears.