Since now in each apartment there are several computers and mobile devices with Wi-Fi, often ordinary users have a question about how the wireless network is configured. In this article, we will shed light on this slippery issue. As an example, you will configure the wireless network in Windows 7.
First you need to configure the host computer of our future network. They can be a laptop, and For this, activate the Wi-Fi-adapter on our computer. Then open the menu and right-click on the mouse click on the computer, where in the context menu, click on the properties. After that, we just go into the additional parameters of the system and click on the computer name, and in the "Description" column we give our description, for example, "Vladimir Ilyich's Computer". Then choose "Edit" and give a name to this device, which should not be duplicated by others on the network. In the "Working Group" column, specify the name of this group, which should be the same on all devices of our network, and reboot.
When the computer restarts, the wireless network setup continues. Select the wired connection icon and go to "Network Management", where we click on "Manage wireless network". In the menu that appears, select "Add" and then go wireless setup. Here you also need to come up with a name for your network that you want. Then select "WPA2 Personal Security". If there are devices on the Windows XP platform, then select "WEP".
After that, we set the password, click "Next" and in the new dialog that appears, we allow sharing the Internet for network computers, and then close the window.
But on this wireless network setting Now our task is to configure the rest of the computers in this network. Turn on wireless adapter, open the menu button "Start". Continue by clicking the button on the right of the manipulator on the "Computer" icon where we select "Properties and additional system parameters". Now click the "Computer name" section and give it your individual name. Next, specify the name of the group, which should match the name of the group on the host computer.

Again we go to network management, where we go to the "Changes to the adapter parameters" section and select "Properties", then jump to the protocol line of version 4. Here we mark the point of setting the IP address. In the column "IP-address" we assign this computer, and this must be done, starting from the IP of the main PC. For example, if the IP of the main device is 192.168.0.1, then the IP of all computers will be the same, except for the last digit. It is very important that the network does not have the same IP. In the column we print 255.255.255.0, and the line will contain the IP address of the main computer. In the fields "Preferred DNS-server" and "Alternate DNS-server" we indicate the addresses of the provider.
After all these manipulations, we accept the changes. And only now we go into network connections, choose our network, enter the password, and that's it. If there are no more computers on the network, this completes the wireless network setup. If there are still any computers or laptops, then in this case, you need to repeat the procedure for setting up the last computer.

I would like to add recommendations for securing the network. In recent times, incidents of invasion of wireless networks by extraneous users. Be sure to install on the host computer antivirus program. Also, come up with a long and complex password with large and small letters interspersed with numbers. This will increase security and minimize the risk of interference in the work of unauthorized persons, as well as prevent theft of valuable information and the downloading of third-party software.
Just imagine: web pages can be viewed sitting on the couch in the living room, you can chat with your friends while lying in bed, and you can send documents to your home office printer from your computer in the kitchen. The wireless network provides exceptionally wide possibilities, and it is very easy to configure it. This article lists the step-by-step instructions by configuring a Wireless Network and the beginning of its use.
The equipment needed to connect Windows to a wireless network
To configure the wireless network, the following components are required:
Broadband Internet connection and modem
Broadband Internet connectionguarantees a high data transfer speed - unlike slow remote access, not powerful enough to support a wireless network. Typically, a broadband connection is established using a digital subscriber line (DSL) or cable. To get a broadband connection, contact your ISP. Usually DSL connections are provided by telephone companies, and cable connections are made by cable companies.
Internet providers often provide and even install broadband modems. Some Internet providers offer a combination of a modem and wireless routers. This equipment can be purchased in the shops of computer and electronic equipment.
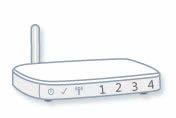
Wireless Router
The router transfers data between the network and the Internet. A wireless router allows connect the computer to the network with the help of not cables, but radio signals.
There are several types of wireless network technologies, in particular 802.11a, 802.11b, 802.11g and 802.11n. We recommend using a router that supports 802.11g or 802.11n technology, because such models can provide the proper data transfer speed and maintain sufficient radio signal power.
Wireless Network Adapters
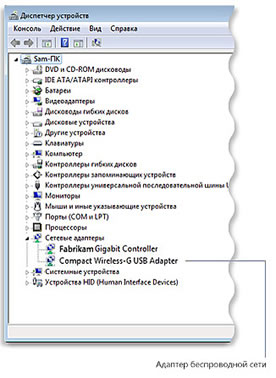
AC adapter is a device that connects the computer to the network. To connect a laptop or desktop computer to a wireless network, they must be equipped with a wireless network adapter. Most laptops and desktops come with a pre-installed wireless network adapter. To find out whether your wireless network adapter is installed on your computer, follow these steps:
- Open the device Manager
- Double-click the Network adapters .
- Find the network adapter, in the name of which there is the word "wireless".
If your computer requires a wireless network adapter, you can purchase it from a computer and electronics store and install it yourself.
It is recommended to choose Universal Serial Bus (USB) type adapters: they are small in size, easy to install and can be moved from computer to computer. Make sure that the adapter type is the same as the wireless router. Typically, the type of adapter is indicated on the package and labeled with a letter (for example, G or A).
Setting up a modem and an Internet connection
When all necessary equipment is installed, you need to configure the modem and connect to the Internet.
If the ISP did not configure the modem, connect the modem to the computer and the Internet, following the instructions in the modem documentation. If using a digital subscriber line (DSL), connect the modem to the telephone jack. If you are using a cable, connect the modem to the cable connector.
Location of the wireless router on the network
A wireless router should be located where it can receive a powerful signal with minimal interference. For the best results, use the following tips.
- Place the wireless router in the center. The router should be located closer to the center of the house to provide a powerful wireless signal throughout the house.
- Do not place the wireless router on the floor or near walls and metal objects, for example, with metal files. The fewer physical obstacles between the computer and the router, the stronger the router signal.
- Reduce interference. In the network equipment standard "802.11g" uses a radio frequency of 2.4 gigahertz (GHz). At this frequency, microwave ovens and many cordless phones usually work. When the microwave oven is switched on or when a call is received on the cordless telephone, the wireless network signal may temporarily be interrupted. Most of these problems can be avoided by using a cordless phone with a high frequency (for example, 5.8 GHz).
Windows wireless security
Security is always important, and in the case of using a wireless network, this issue becomes even more acute, since the signal can spread out of the premises. If you do not protect the network, users of other nearby computers will be able to access data stored on computers on your network and use an Internet connection. To protect wireless network, follow these steps.
- Protect your router, changing the default user name and password. Most manufacturers specify the user name, password, and default network name for the router. This information can be used to access the router without the knowledge of its owner. To avoid, change the default username and password on the router. For more information, refer to the device documentation.
- Configure the security key for the network. The card files are protected with a key, a safe code, and wireless networks protect against unauthorized access with a network security key.
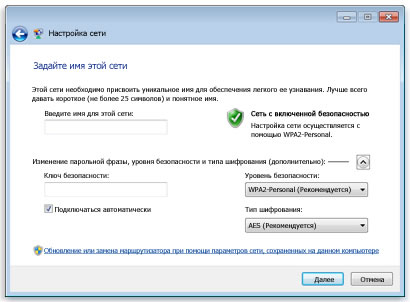
How to configure the network security key in Windows?
- Open the Network and Sharing Center .
- Click the item Configuring a new connection or network .
- Menu setting up a new network and select Next.
The wizard will provide step-by-step instructions for creating a network name and security key. If the router supports Wi-Fi protected access (WPA or WPA2), the wizard will configure it by default.
In addition, the technology WPA2 or WPA allows you to use a passphrase - hence there is no need to remember a complex sequence of letters and numbers.
Write down the security key and store in a safe place. The security key can be written to USB flash memory following the instructions of the wizard.
- Use a firewall. A firewall is an equipment or softwarewhich helps to protect your computer from hackers and malware. The use of firewalls on all computers on the network will help control the spread of malware in it, and also protect computers when accessing the Internet. Windows Firewall comes bundled with Windows!
Adding computers to a wireless network
To connect your laptop or desktop computer to a wireless network, follow these steps:
- Open the "Connect to a network" window.
- Select the network you want to connect to from the list and click the Connect button.
- Enter the security key. The key is to enter or connect a USB flash memory with the entry of this key to the USB port of the computer.
Sharing files and printers
Preferably, the wireless network is installed in order to have Internet access from any room in the home, but users also need wireless access to files and printers.
File Sharing
The easiest way to share files on the network - configure sharing for the homegroup. If there is no homegroup, you can share files by placing them in the Public folders folder. People who are connected to the network are automatically granted access to all files or folders located in the shared folder. To grant access to a shared folder, follow these steps:
- Open the window advanced settings sharing .
- Click the double arrow to expand the current network profile .
- In the Sharing field of the General folder, select one of the following options:
- enable sharing so that all users who have access to the network can read and write files in public folders;
- disable access to the shared folder (users who are connected to the computer have the right to access these folders).
- Click the button Save Changes . If you are prompted for an administrator password or for confirmation, type the password or confirm.
The above steps are necessary run on all computers, on which the files are shared.
To provide access to your own files, save or copy these files to a folder on your computer. For each type of library ("Documents", "Music", "Images" and "Video"), there is a shared folder. Each person who has an account on the computer has access to these folders. For example, to open the Shared Documents folder, follow these steps:
- Open the document library.
- In the navigation pane, under Libraries, double-click Documents, and then double-click Shared Documents.
Sharing the printer
If a printer is connected to one of the computers on the network, you can print to it from any computer connected to this wireless network. The easiest way to share a printer is to check the box Printers when setting up their homegroup. If there is no homegroup, you can perform the following steps.
- Sign in to windows system, to which the printer is connected.
- Open the "Advanced Sharing Settings" window.
- Click the double arrow to expand the current network profile.
- In the File and Printer Sharing section, click Enable file and printer sharing , then click the Save Changes button. If you are prompted for an administrator password or for confirmation, type the password or confirm.
Note: If password-protected sharing is enabled, users can use an account with a password to access the printer.
To access the printer from any computer on the network, follow these steps:
- Open the Network folder.
- Double-click the computer to which the printer is connected.
- Double-click the printer icon. Windows automatically adds to the computer and installs the printer driver.
Enjoy the freedom!
That's it - the wireless network is ready for use. Now you can surf the Internet, send e-mail and visit shops on the Internet, lying on the couch or relaxing on the terrace.
This article will examine how to quickly and efficiently organize a wireless high-performance network with an output in.
Simple and cheap wireless connection
So, suppose you have a desktop computer with a permanent connection to the Internet, and a laptop that you would like to connect to a local network with a desktop computer, and also provide a joint Internet connection. To date, there are several solutions to this problem, but not all of them can be called simple and affordable, especially for users who do not have special network knowledge.
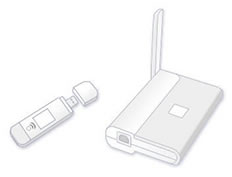
In our opinion, the simplest and most affordable way is to use two adapters (the so-called Ad-Hoc or point-to-point connection) operating in accordance with the 802.11b standard and providing the exchange rate of 11 Mbit / s, which is quite enough for normal operation.
For our experiments, we used a USB controller WNC-0101 USB and built-in laptop MaxSelect Mission Hammer Wide, Mini - PCI controller Realtek RTL 8180 Wireless LAN.
Why a USB Wi-Fi controller? In fact, it does not matter which controller to use, you can choose PCI, PCMCIA, CF or SD. All of them provide approximately the same level of functionality and quality of communication. The main advantage of the USB controller is its ease of installation and versatility. In other words, to install the controller there is no need to open the computer, and you can use it not only with a regular desktop computer, but also with an old laptop that does not have a built-in Wi-Fi controller, as well as with various compact Barebone platforms where you can not always find it free PCI slot.
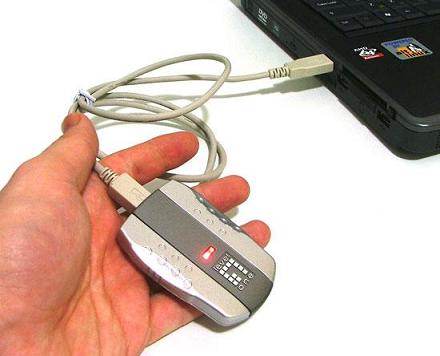
As for the shortcomings of USB Wi-Fi controllers, we can note the built-in antenna, which somewhat limits the range, but considering that we are talking about a home network where the wireless network's short range is uncritical, we do not pay attention to this feature.
Features of the installation ...
First of all, we recommend installing the driver and utility to configure the settings and monitor the connection, and only then connect the USB Wi-Fi controller LevelOne WNC -0101 USB. These recommendations apply not only to the LevelOne controller being used, but also to any other USB Wi-Fi controllers.
Once you have installed the USB Wi-Fi controller, you can start setting up the network. There are two ways to do this. In the first case, you can use your own utility IEEE 802.11b WPC Utility (USB), and in the second, you can use the tools of Windows XP. Moreover, it is important to note that before the second service pack, which we strongly recommend to install in case you really care about the security and stability of your computer, the XP built-in tools somewhat limited the possibilities of wireless connection, although they were quite workable. In the second service package, Microsoft significantly expanded the capabilities and greatly simplified the work with wireless connections.
In order that you can fully understand the settings, we show both ways and start with XP-built tools.
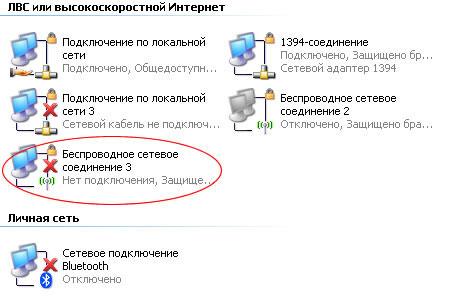
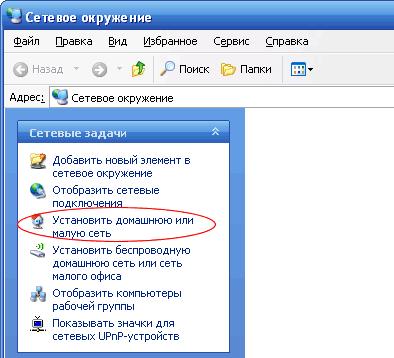
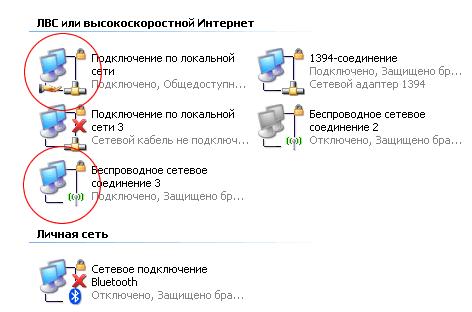
So, first of all, we open the properties of the network environment, where all the network connections available on your computer are displayed. As you can see, our computer has many different networked wired and wireless controllers, but now we are only interested in the "wireless connection 3" based on the LevelOne WNC -0101 USB controller. Now open the properties of this connection, where we are interested in the second tab "Wireless Networks". It is here that we will make all the settings of our wireless network.
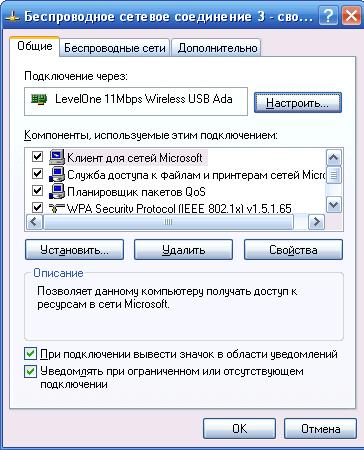
First of all, pay attention to the checkmark in the topmost item "Use Windows to configure the network", this option allows you to choose which tools will be customized.
The next step is to create your first wireless network, for which we press the button add in the "Preferred networks" section, where you need to enter the name of your network (we chose the name MyHome), and also set some special parameters that provide a certain level of security for your wireless network.
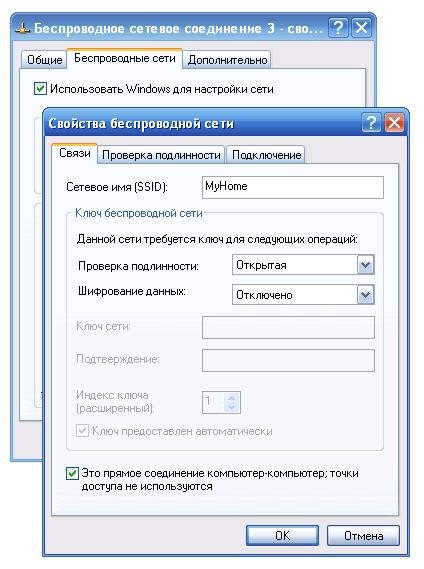
To simplify our first connection, we decided to use an open network without enabling data encryption. As you understand, such a network does not provide sufficient security for your data, but for home connection type Ad - Hoc or computer - computer it is quite sufficient.
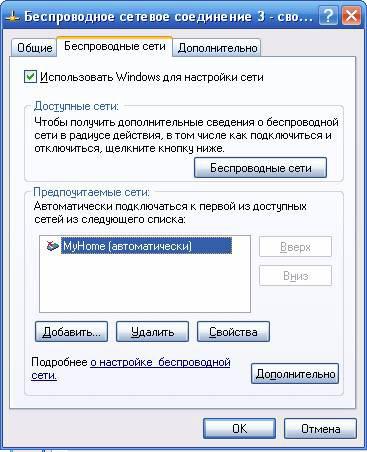
Tools Windows XP allow you to create a wireless network using a special wizard, available in the " Available networks". To do this, you need to click the button "Wireless networks" and in the opened wireless network manager, click the button "Install wireless network". The main difference of this wizard is the ability to save the settings of the wireless network on the Flash drive, which makes it much easier to transfer the network configuration to other computers on your network, but for our situation, when we need to connect two computers, this feature is not relevant.
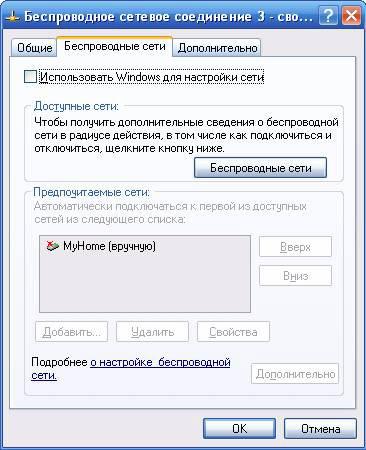
A little later we will return to this manager, but for now consider the second method of configuration using the utility supplied with the LevelOne WNC -0101 USB controller. Recall, in order to allow the use of the proprietary utility, you must uncheck the box "Use Windows to configure the network" in the "Wireless Networks" tab.
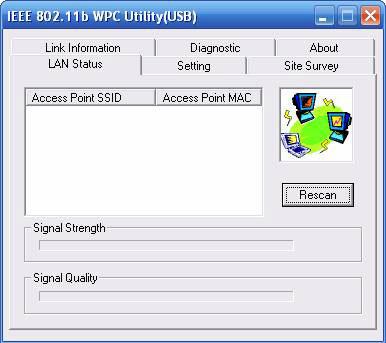
The utility includes a slightly larger set of features than windows tools. There are six bookmarks here. The first tab "LAN Status" displays all the wireless networks found around, in our case they are not present yet, and also shows the power and quality of the signal (when an Ad-Hoc connection is also not displayed).
You can create a new network by opening the "Setting" tab. As you can see here everything is very similar to what we saw above, but the several features that are available make it possible to make work in wireless networks much more convenient.
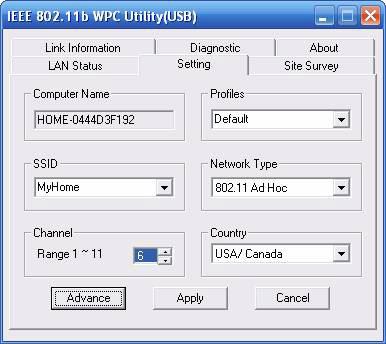
First of all, pay attention to the ability to create up to five profiles, allowing you to quickly change the connection settings. So, we create the first profile, initially we specify the network name (SSID), the network type (AD - Hoc). The used communication channel and the country can be left unchanged. Additional connection properties are available in the Advance window. Here, the user can select the transmission speed, the energy saving mode (important for laptops), and the encryption mode.

Other bookmarks perform informational functions and are not particularly in demand if everything is working fine.
In principle, on this first stage of the desktop configuration can be considered complete, and it's time to configure the wireless network on the laptop.
In general, this process is completely identical to the one described above, and we will not repeat, we just remind that depending on the Wi-Fi controller used, the utility of the setup utility may differ, but the basic settings remain identical.
Establishing a connection
It's time to establish a connection between the two computers. For this you can use both proprietary utility, and the manager of the network connection Windows XP, about which we said a couple of words above, but before doing this, reboot both computers, which will allow automatic connection of two computers, as indicated by the icon in the system area of the desktop.

If the connection does not occur, open the utility wi-Fi settings controller or network connection manager Windows XP. Personally, we recommend using the manager. It provides a more simple and intuitive operation with a wireless connection.
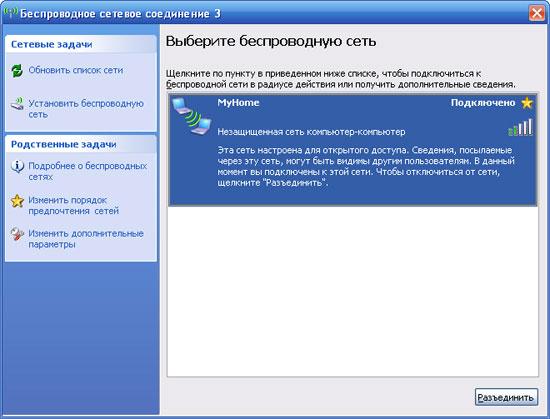
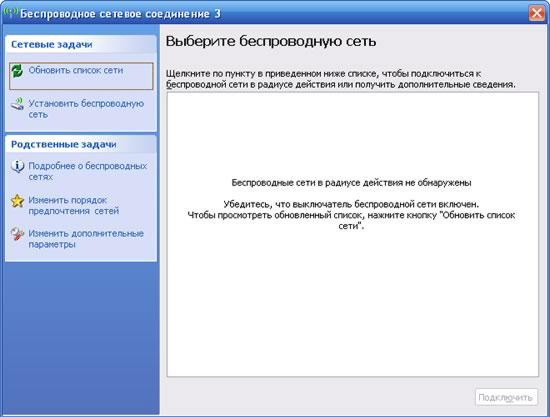
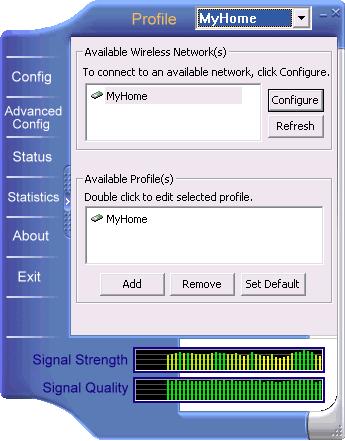
The main window of the manager displays a list of detected networks. If you see something similar to our screenshot, then you can assume that you have almost reached the main goal - to connect the two computers to the network.
If this is not the case, we recommend clicking the Update Network List button. If in this case nothing happened, check if the second computer is turned on, whether the Wi-Fi controller is working, and whether there is an error in setting up the wireless connection.
The last steps ...
So, we came to the final stage of networking computers, - IP connection settings, gateway settings and file and printer sharing. Despite such a complex name for the upcoming procedure, everything is done very simply, for which special thanks to the developers of Windows XP.
However, before proceeding with the setup, we recommend that you pay attention to some hidden pitfalls that we encountered when the wireless network was first set up.
If your desktop computer is connected to a dedicated Internet channel and uses an internal IP address (for example, 192.168.0.0 ... 255 or in another internal band), we recommend that you disable network cable. The thing is that during setup your wireless controller on the desktop computer will be assigned the address 192.168.0.1, which is usually used on the internal network, which will cause an address conflict and you will not be able to configure the gateway.
The second "stone" that made us tinker with the installation of a wireless connection - a firewall built-in Panda Internet Security. For the wireless network to work, you must configure the firewall as appropriate, either on the desktop computer or on a laptop computer, or simply temporarily turn it off. By the way, built-in second service pack firewall does not cause any problems.
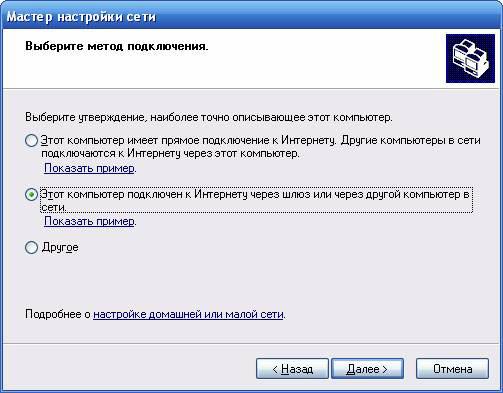
So, run the wizard on the desktop computer, which has an Internet connection. After answering a couple of trivial questions, you need to perform some actions that indicate to the wizard what connection is used for what.
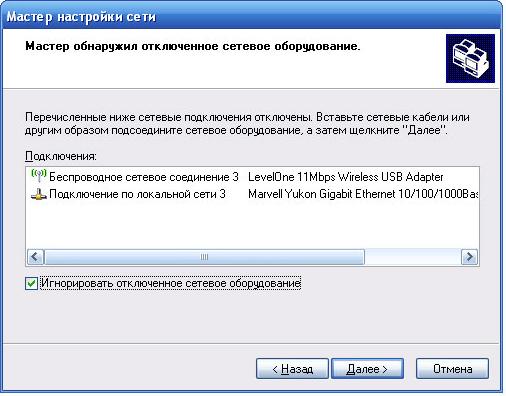
First you need to check the "Ignore the disconnected network equipment" checkbox, which will enable the wired controller disconnected from the network. In the next window you must select the role of this computer on your network.
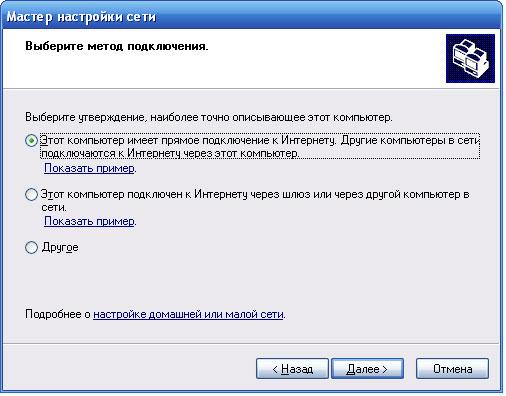
Given that our desktop computer has a permanent connection to an external network, and the laptop will connect to the Internet through it, we choose the first method of connection.
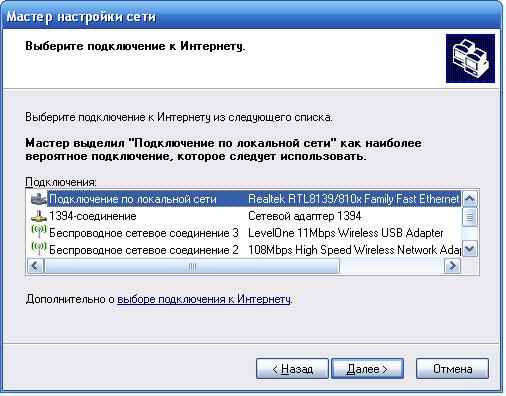
In the next step, you specify which connection is used to connect to the Internet. In our case, this is "Connecting to local Area Networks».
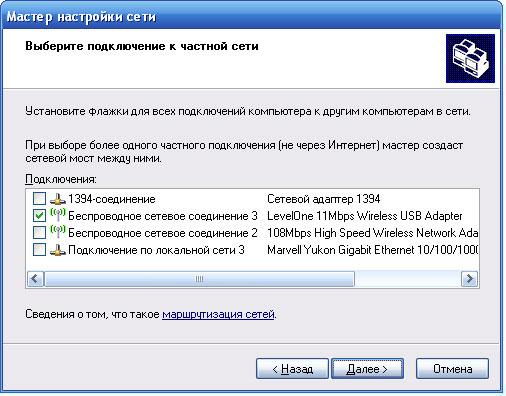
Next, choose which connections are used to connect to other computers on the network. Note that here you can combine wired and wireless connections. In our case, we chose only "Wireless connection 3" based on the LevelOne WNC -0101 USB controller.
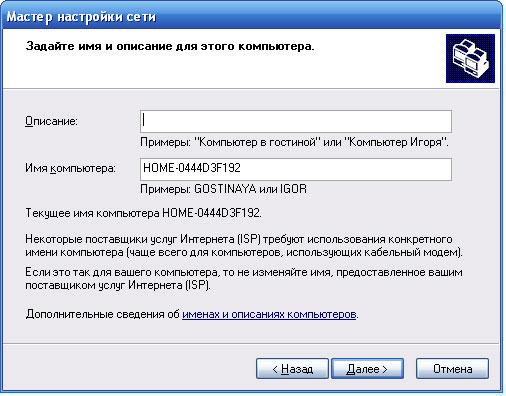
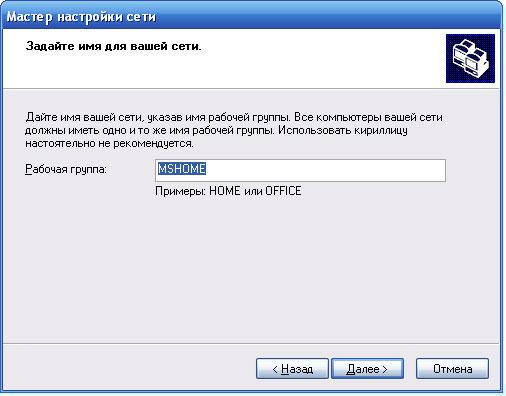
In the next two windows, you specify the computer name and description (optional), as well as the name of the workgroup.
Take into account that computers on your local network must belong to the same workgroup, otherwise you will not be able to see them on the network.
Finally, the last window allows you to enable or disable sharing of files and printers.
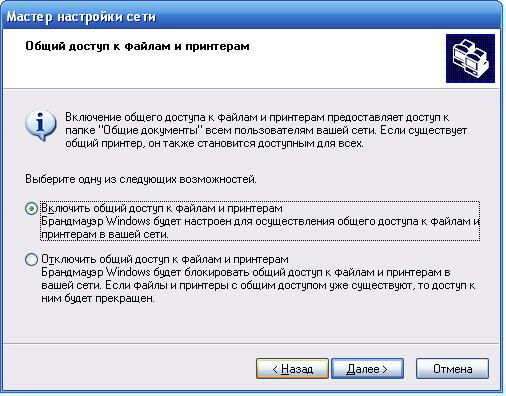
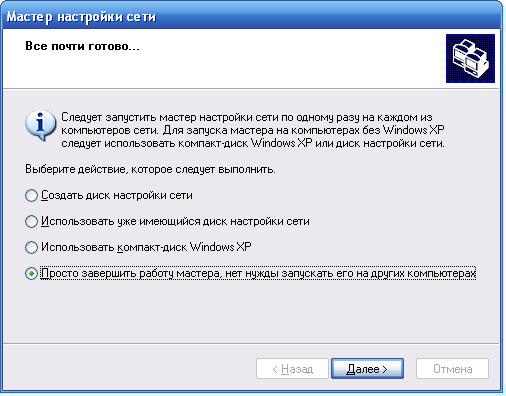
After clicking the "Next" button the wizard will begin to configure IP connection settings, as well as sharing and protection. If you did everything correctly, the last screen will open, where you will be asked to save the settings or just finish the wizard, which we will happily do.
After the configuration, you will find some changes to the network connection settings.
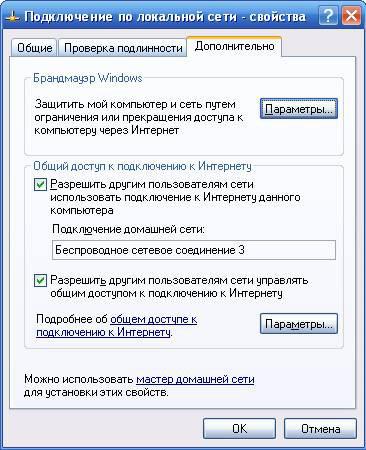
So, in the properties of "Local Area Network Connections" in the "Advanced" tab, all the checkboxes will be checked, and connections for the home network will be defined.
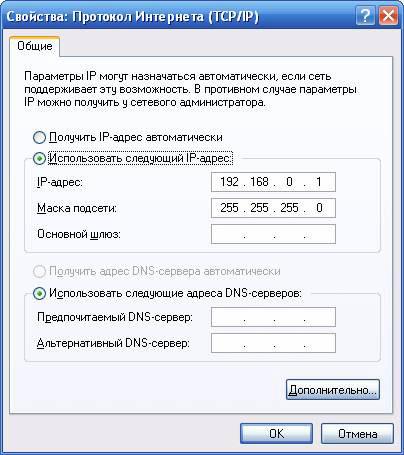
And the TCP / IP properties of the "Wireless Connection 3" protocol will have a fixed IP address and a subnet mask.
Now you can go to start the wizard on the laptop. Here everything happens much faster and you only need to establish a second type of connection. Everything else the master will do for you.
Everything, on this process of tuning can be considered complete, and you as a full owner of a home wireless network can launch any Internet applications, including. In addition, you can easily work with both disks on another computer, and with printers, providing wireless printing from a laptop located in another room.
A few words about the speed and range of the wireless network ...
As we said above, our first wireless network used 802.11b controllers with a maximum transfer rate of 11 Mbit / s. Of course, for today's times it's not much, and against the background of modern controllers working on the protocol 802.11 g and 802.11 Super G, providing the exchange rate of 54 Mbit / s and 108 Mbit / s does not look very. However, for the first experiment, this solution is sufficient, allowing to achieve quite good features without having to deal with some specific features of high-speed connections, which we still have to tinker with in the future.
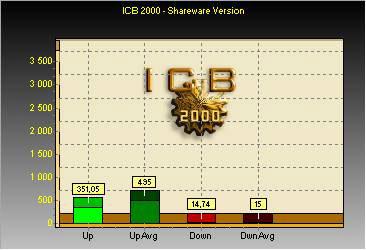
As for the actual exchange rate, we used the ICB 2000 program to examine it, which allows us to measure network traffic. And we are interested in the speed of not artificially generated traffic, but the speed at actual transfer of files and other information.
So, first we'll see what our wireless network is capable of copying large file from a desktop computer to a laptop with simultaneous on-line viewing on a laptop computer recorded on a desktop computer. In this mode, we load the wireless channel as much as possible.
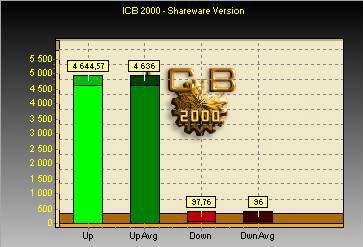
As you can see, the maximum bandwidth of a wireless channel in this mode is on average 4636 Kb / s. It is very important to note here that we did not observe braking when watching the movie, which allows us to conclude that in small home networks, the possibilities of 802.11b networks are enough.
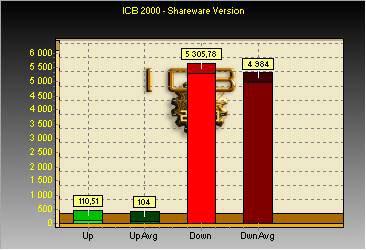
If you start copying in the opposite direction, i.e. in the Download mode for the desktop computer, the maximum bandwidth of our channel will be slightly higher - 4984 Kb / s with a peak value of 5305 Kb / s.
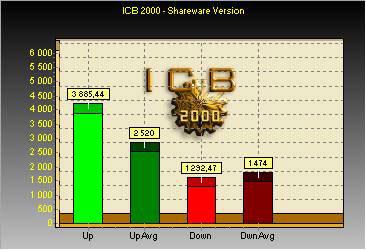
If, while copying a file from the desktop computer to the laptop, we run the same task, but in the opposite direction, the speed will drop a little. And the speed in the Upload mode does not drop significantly, but in Download mode we see a noticeable decrease in performance.
And, finally, let's see what happens when we run some network application that generates a balanced load on the channel. Here we just started watching a movie recorded on a desktop computer on a laptop.
As you can see, in this mode the load on the channel is so insignificant that it makes it possible to launch a network scan without a problem on a couple of computers. This explains the lack of braking when watching a movie with parallel copying of the file. As for the range, in such a network it is not very large, and depends on the configuration of the room. In fact, in an ordinary apartment or small office everything will work well.
How many computers can be combined into such a wireless network?
A pleasant surprise for many of you is that a simple Ad-Hoc network can include several computers at once, which can be linked without problems and provide a simple Internet connection. However, remember that increasing the number of computers running simultaneously on the network significantly reduces network performance, which is due to the need to transfer all data through a desktop computer, which in our case is a gateway.
Conclusion ...
So, we hope that the above detailed recommendations will simplify your first experience of creating a wireless home network. Despite the external complexity of the process, everything turned out to be more than simple. However, we can not argue that the solution presented is universal and will be equally correct for all cases. Experience shows that almost every installation of a wireless network with new equipment raises some questions, especially for users who do not have special training. The main thing is that you must clearly understand and represent the sequence of actions that should lead to a successful launch of the wireless network. In the next article we will introduce you to equipment that allows you to significantly increase the performance of your home network.
Thank you for attention!
Leave your feedback:
Many users of laptops and communicators are accustomed to the fact that airports, business centers, hotels, universities, libraries, cafes or restaurants provide the opportunity to use wireless Internet. This is very convenient, because it allows you to stay in touch more or less, while moving around the city or the building. At the same time, the communication channel speed is high, the signal is stable, but it is not necessary to connect to any wires. "Mobile" access to the Internet can be obtained at home, if you configure wireless Internet on Wi-Fi.
Wi-Fi technology was developed for Wireless LAN wireless equipment. Its name comes from the English Wireless Fidelity, which means "wireless accuracy," similar to the Hi-Fi standard (High Fidelity) for sound reproducing equipment.

[b] The Wi-Fi trademark belongs to the developer - the consortium Wi-Fi Alliance
Wi-Fi is based on the international standards of IEEE 802.11, the last of the approved releases of which, called IEEE 802.11n, allows the data transfer rate to be increased up to 480 Mb / s, provided simultaneous use of compatible devices. When building a home wireless network, it is worth choosing equipment that supports one standard, so as not to interfere with the situation when devices simply "do not see" each other. By creating a protection mechanism for a heterogeneous network, we end up with a network in which all devices run at a much slower rate than if they all had adapters, even with an earlier standard.
The transmission of information occurs by means of radio waves emitted by the source in the frequency range corresponding to the IEEE 802.11 standard. Connection is via wireless access points. The network coverage around one access point is called a "hot spot" or "hot spot" (from an English hot spot). Minimal configuration wi-Fi networks - One access point plus one client.
[b] Network Equipment
To configure a home wireless Internet within an ordinary apartment, you need at least one access point. It can also be enough for neighboring apartments, and even for the neighboring house, because the range of the network in the room is 45 m, and on the street - all 450 m. The access point is nothing more than a network hub.
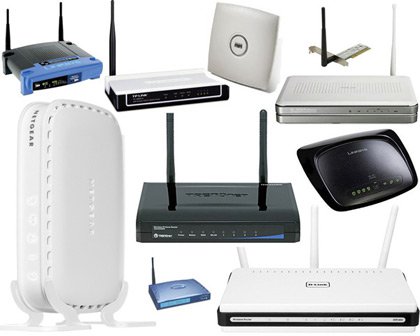
[b] The variety of models makes it possible to choose an access point that meets all the wishes of users
In addition, the access point can be built into the wireless router - this device is also widely used for building wireless networks. The router (router) works on the border of two networks - internal and external. The LAN is connected to the internal LAN port, and the Internet is connected to the external WAN port. Internal ports are usually several, they are combined into a switch. An Ethernet cable or an ADSL modem is connected to an external port. The wireless router has the ability to connect wireless devices wirelessly, and they, along with those connected to the LAN port, will have access to the external network.
Most modern routers designed for small offices and home use have built-in firewalls that can protect the internal network from unauthorized access from outside.
Choose, based on which of the two devices - access point or wireless router - to plan your network, you need depending on its future use.
[b] Building a network
In order to build a wireless home network on the technology of Wi-Fi, you can go in two ways. The first of these is called Ad-hoc. It is used to connect several groups of computers that have wireless network adapters to separate networks. For this mode, the access point is not required. If one of the computers does not have a wireless adapter, then it is connected to the access point. This mode is convenient if you need to merge several closely located devices into a single local network. But you can not go online in this mode.
The second way is called "infrastructure" (infrastructure). It is relevant in the case when you need access to the Internet. There are two modes of operation of this network: basic (BSS) and advanced (ESS). In the basic mode, all devices are connected through a single access point, it also serves as a network bridge between the cable and wireless sections of the network and is the channel for accessing the external network. In the extended mode, several access points are connected, connected either by means of a radio signal or via a cable connection. Each access point has its own network, and they can transfer superfluous traffic to each other. Each computer is configured to access the Internet through a local network.
There is another way in which access to the Internet occurs using DSL technology, via an Ethernet connection or using a cable modem. In this case, of course, you need to select a wireless router.
[b] Network setup
In order for the local network to have an Internet connection, you need to configure each computer and the selected wireless equipment. All devices must have one IP address, and it must be entered into the network settings on each one.
Each network device, including the access point and the wireless router, has the factory settings for the IP address. These settings and the password for making changes to the device are provided in the user manual.
Then you need to connect the access point or router to a computer that has an Ethernet controller. If you use a wireless router instead of an access point, you must connect the computer to its LAN port.
Suppose that by default the access point is configured to the IP address 192.168.1.254. It is necessary to change the IP address of the connected computer to the address from the same subnet, for example 192.168.1.100. To do this, right-click on the "Network Neighborhood" icon on the desktop and select the "Properties" menu - the "Network Connections" window will open. In it you need to select "Local network" and again "Properties". The "Network connection properties" window opens, in which you need to configure the network adapter.
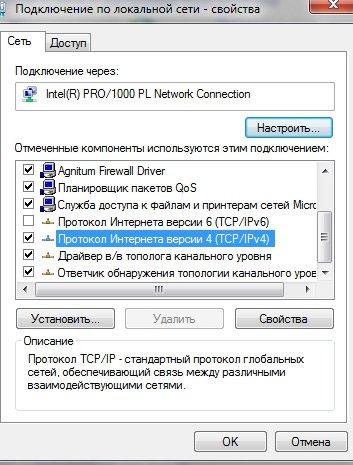
[b] In the "Network connection properties" window, select "Internet Protocol (TCP / IP)"
Having selected the item "Internet Protocol (TCP / IP)", you need to click on the "Properties" button. In the window that opens, point the item "Use the following IP address" and carefully enter the new IP address and network mask data. In this example, this will be 192.168.1.100 and 255.255.255.0, respectively.
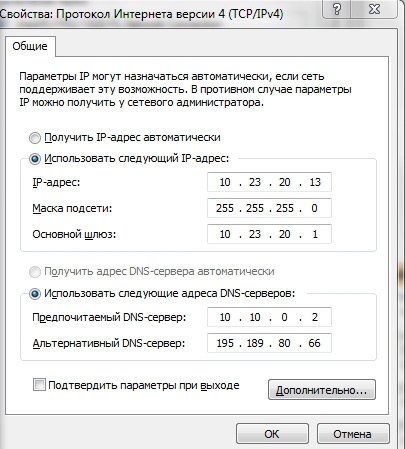
[b] In this window, you need to change the settings of the computer's IP address
After you set the computer to a new static IP address, you must go to the settings of the access point or wireless router. Enter the IP address (192.168.1.254) in the address bar of the browser you are using. The access point or router settings will be opened (if the system asks to enter the login and password contained in the instruction, do it). If you need to make changes to the IP address of the access point, you will then have to assign a new IP address and network adapter to the computer, otherwise it will be impossible to keep in touch with the point.
In the settings dialog of the access point (router), you should also specify which standards you intend to use in the created wireless network. If there are devices that support different protocols on the network, specify this (for example: 802.11b / g). When selecting the frequency channels, it makes sense to specify an automatic selection point. In the hardware settings, you also need to reflect the unique identifier of the future wireless SSID network. It must be the same for the access point and for each network client. The speed of the created connection manually is better not to choose, and also to entrust it to automation.
[b] Configuring Network Computers
After configuring the access point, you must configure all computers on the network. To do this, you need to create a wireless connection on each of them, following the wireless adapter configuration wizard. This is a fairly simple and versatile way. Right-click the Network Neighborhood icon and select Properties. In the "Network connections" list that opens, click "Wireless connections" and click "Properties". The Wireless Network Connection Properties window opens. In this window, select the "Wireless Networks" tab and click the "Add" button. In the "Wireless connection properties" dialog that opens, enter the SSID. The remaining items should not be touched.
After completing the configuration of the wireless adapter, it establishes its own connection with an access point or a wireless router.
Then you can create logical disk or shared folder with shared resources, to which all users of the network will have access. To do this, on each of the computers you need to select in the "My Computer" window any disk or folder to which you are going to make a collective access, and right-click. From the list that opens, select "Properties" and on the "Access" tab, click the single warning label.

[b] Warning message indicates a risk in case of opening a disk share
In the dialog box that opens, check the boxes, allowing clients of your network to use this disk (folder) and change the data on it (if necessary).
Now you have a wireless network at home, whose users can access the Internet and share files.
Igor Ananchenko (St. Petersburg)
Wireless connection of a PC to a computer network is possible using different technologies. For example, a computer can be equipped with an adapter that supports the standard Wi-Fi (802.11g) or BlueTooth (v.1.2). Also available are adapters that support multiple wireless standards. For example, the SunCore BlueWiFly USB2.0 adapter can work with both standards.
Why this is necessary
Let's consider some typical situations when people are interested in using wireless connections.
First, a fairly common option, when a person, when traveling on a laptop trip, wants to connect to the Internet using a wireless access point. The connection can be either paid or free. On the page http://wifi.yandex.ru/where.xml?city=2&mode=list you can find information about restaurants and cafes where you can access the Internet for free using wireless wi-Fi access. At the time of publication in the list of 202 participants providing access, and another three dozen who wished to provide wireless access services in the near future.
Secondly, a person bought himself another computer - a notebook or PDA with support for Wi-Fi (for example, HP iPAQ hx4705, Fujitsu-Siemens LOOX 420, ASUS MyPal A730W, etc.) - and begins to reflect on the purchase of a wireless adapter and for its a stationary computer. The result of thinking is embodied in a home wireless network of two computers - stylishly, although in essence the same as the connection of computers using two conventional (wired) adapters and a crossed patch cord. Using wireless connections at home gives you freedom: the devices are unrelated - you can rearrange furniture as you like, without thinking about cable wiring.
Plus one, but two minuses in contrast.
Minus one - the computer adapter emits radio waves, and in your apartment or near the nearest neighbor there may be a device working in the same radio wave band. According to manufacturers, modern household radio equipment should not interfere with other devices, but the theory is one, and practice, at times, is completely different. From these positions, a shielded twisted pair of the fifth category will reliably connect your two computers in a single whole in comparison with the radio channel.
Minus the second. When two cards are connected together by one cable, someone from the third party can not connect to it from the side. The genre of science fiction and super-agent secretly penetrating into your apartment and installing on a 10-meter cable that connects two computers, a device for the removal and modification of information, I do not consider. But do not discount the option that in one doorway you live a young "talent", who consider themselves a tough hacker. Do not forget that the distance between two computers on a Wi-Fi network can be more than 100 meters (theoretically up to 300 meters), and walls and doors, although they cut this distance, do not completely isolate your wireless network from the outside of the world.
In addition, there is a wonderful compact device that allows you to find the existing wireless networks without a computer. Of course, a wireless network can and should be protected, but some are lazy to do this: why, if only I know about the network and only I use it !?
And, finally, the third typical version - it is required not only to wirelessly connect two computers, but to deploy a full-fledged wireless network from several computers. Naturally, this option is more for the organization, not for home use.
Access points
To deploy a wireless network of three or more computers, you will need a special device called an access point. I will mention several brands of such devices. For example, the Bluetooth-to-LAN access point D-Link DBT-900AP is designed to extend LAN services to Bluetooth devices such as laptop computers and PDAs. The device allows mobile users to wirelessly connect to the local network and the Internet, using devices with Bluetooth support. The cost of the device is about 2 thousand rubles. The Zyxel G-3000 access point is for operator hotspots and wireless corporate networks. The device has two detachable antennas with a gain of 2 dBi, allows wall mounting and can be powered by a data cable (PoE).
The main difference between the G-3000 is the ability to work on two non-overlapping frequency bands 802.11g (with the release of a PC Card of the 802.11a standard it will be possible to work simultaneously in the 802.11a and 802.11g bands), the possibility of using in distributed wireless networks (WDS) and the presence of an integrated full-featured RADIUS server. Naturally, such wide opportunities will cost the owner not cheap, - the cost of the device is about 12 thousand rubles.
And the last device in this series - d-Link Router DI-524 cost about 2 thousand rubles. According to the manufacturer, the device is an ideal solution for home networks and small office. The router combines 802.11g high-speed wireless data transmission technology and advanced firewall features, providing a secure broadband Internet connection for a small workgroup. Ideal solution for those who are looking for a device that provides network protection and filtering the contents of data packets.
Selecting and installing an adapter
As already mentioned, you can use adapters designed to meet these or other standards to set up a wireless connection. I do not recommend without weighty arguments "for" buying adapters that support only Bluetooth. The advantage of 802.11g Wi-Fi is the increased stability of communication in multipath signal conditions due to OFDM modulation (orthogonal frequency division multiplexing of channels). Devices supporting the 802.11g specification operate at a nominal speed of 54 Mbit / s in the 2.4 GHz band, that is, theoretically almost 5 times faster than 802.11b equipment using the same range but DSSS modulation.
Which wireless adapter to buy? In the store you can find three types of devices that differ in the way they connect to the computer.
Firstly, these are adapters only for laptops, that is, devices in the name of which PCMCIA stands. For example, Wi-Fi Asus WL-100G Deluxe PCMCIA, 802.11g or Wi-Fi D-Link DWL-AB650 PCMCIA. It should be noted that not every laptop is equipped with a PCMCIA slot, some budget models are equipped with only USB-ports (for example, a laptop Stilo 1515).
Secondly, there are adapters, "sharpened" only for stationary computers, namely - for motherboards computers that have a PCI slot. For example, a D-Link DWL-G510 Wireless LAN PCI Card or wi-Fi adapter Edimax EW-7105PC + PCMCIA 22M wireless. Advantages of the two groups of devices mentioned above are that the cards are placed inside the computer and do not take up additional space. Compactness as an additional plus, the lack of universality is a minus.
The third version of adapters is devices connected to the USB port, which is de facto on both a modern desktop computer and a laptop. As an example I'll call the Wi-Fi adapter Asus WL-167g USB 802.11g and Wi-Fi Level One WNC-0301USB. Pros - versatility and the ability to quickly reconnect the device from one computer to another (no need to open the case, as in the version with PCI). The minus is an external device, and therefore takes up space, besides, the external "horn" sticking out of the laptop has a habit of clinging to something and jumping out of the USB port jack at the most inopportune moment. And one more minus, which is not fundamentally connected with the technology, but probably is present in all USB-adapters. These devices are equipped with a built-in antenna housing. This is not bad in itself, but sometimes you want to connect an external antenna (for example, Level One WAN-2085 8.5dBi with a cost of about 2 thousand rubles or Level One WAN-1160 6 / 8dBi for 600 rubles) in an area of uncertain reception. I want to, but can not, since there is no socket for connecting an external antenna!
In the very connection of the adapter to the computer, there is nothing complicated - you should carefully look at the connector and insert the card, avoiding distortion. Before doing this, be sure to read the instructions, as for some cards the driver must be installed before the device is connected, and others allow the driver to be installed both before and after installing the adapter. If a PCI card is installed, the computer must be turned off before installation. When uSB connection, like PCMCIA, in most cases, you do not need to turn off the computer.
Connect to a Wi-Fi network
I assume that the device driver is installed, the adapter itself is connected and working correctly, and the computer is running a widespread Windows XP OS. A typical situation is that in the notification area (the area in the taskbar to the right of the task buttons, for example, the current time is displayed), a crossed out with a red cross wireless connection to the network (the computer and the arcs of radio waves running away from it). Why crossed out, it is clear: the connection has not yet been established.
We strictly follow the instructions (remember that you can get help at any time by pressing the F1 key and selecting the appropriate section). So, to connect to an available wireless network, right-click the network connection icon in the notification area, and then click View Available Wireless Networks. In the Connect to a wireless network window, on the Available networks tab, click the wireless network to which you want to connect. If the Wired Equivalent Privacy (WEP) service requires a network key, do one of the following:
If the key of this network is received automatically (for example, it is contained in the wireless network adapter issued by the network administrator), leave the Network key field blank.
If the key was not automatically provided, enter it in the Network key field.
Click the Connect button. For settings additional parameters connect to a wireless network, or if you are having difficulty connecting to the selected network, click the Advanced button and configure the settings on the Wireless Networks tab. Note that to change the settings on this tab, you must be a member of the local Administrators group and have a wireless network adapter that supports the Wireless Zero Configuration service. However, by default, the notebook user account for this group is, and is, unless the settings have been specifically modified. Most modern network adapters support this service.
In open networks Wi-Fi free access key is not required. If you travel a lot with a laptop and do not want to deal with network selection each time, you can make sure that the connection is established immediately if the available network is within the range of the adapter. The sequence of actions gives brief instruction with the name "To install automatic setting wireless network, you need »:
1. Open the window Network connections.
2. Right-click the Wireless Network Connection icon, select the Properties command.
3. On the Wireless Networks tab, do one of the following:
- To enable automatic configuration of the wireless network, select the Use for the wireless network configuration check box.
- To disable the automatic configuration of the wireless network, uncheck the Use for the wireless network configuration check box.
4. To connect to an existing wireless network, do one of the following:
Access point (infrastructure)
To connect to an existing network access point, select the network name on the Available Networks tab and click the Configure button. In the Wireless Properties section, specify the wireless network key parameters (WEP, Wired Equivalent Privacy). If not used broadcast name network, the network name will not be displayed on the Available networks tab. If the access point name does not appear on the Available networks tab, but you know that it is available, click Add on the Preferences Networks tab to connect. In the Wireless Network Properties window, specify the network name (service set identifier) and, if necessary, the wireless network key settings.
Peer-to-peer network
To connect to a peer-to-peer network, select its name on the Available Networks tab and click the Configure button. In the Wireless Network Properties section, specify the wireless network key (WEP, Wired Equivalent Privacy) parameters, or, if it is provided automatically (for example, stored in the wireless adapter issued by the administrator), check the Key provided automatically.
If you want to connect to a peer-to-peer network, and in the range of the adapter there are both peer-to-peer networks and networks with an access point (infrastructure), click the Advanced button and select Computer-Computer Network only. To change the order of the networks to which you are connected, on the Preferences Networks tab, click the name of the wireless network that you want to move to another position in the list, and then click the Up or Down button.
Wireless network of two computers
I hope that, using the above instructions, you can easily connect your computer to an affordable wireless network Wi-Fi. Next on the line is one short instruction for those wishing to create a home wireless network of two computers.
In suggesting this option, I proceed from a common household situation. A person is constantly working on the main stationary computer, it is possible that he is constantly connected to the Internet using ADSL. Sometimes it would be desirable, being in the kitchen, not only to watch how the dinner is prepared, but also to flip through the pages of the Network. Or work with a computer, lay down on the couch. Obviously, you can not take a big computer with you, but a laptop will give you the desired comfort. Therefore, you need to be able to work on a laptop with everything that is on a stationary computer.
In practice, this is achieved simply. First, a wireless communication channel is established between the two computers, and then a program called a terminal is launched on the laptop. You can download the program at http://aiv.spb.ru/ufiles/terminal.zip, and read the details about settings and usage - at http://aiv.spb.ru/47.htm. In the program, you can specify that the sound with remote computer will be transferred to yours, that you will be able to access serial ports, printers and disk devices of the remote computer to which you connect.
On the computer that you are connecting to, you need to do the following settings. Move the mouse cursor to the My Computer icon and click the right mouse button. In the menu that opens, select Properties. The System Properties window opens. In this window, select the Remote Sessions tab and check the Allow remote access to this computer check box. You can work either under your permanent login (with which you work on a stationary computer), or to get a special one. But in any case, you must set a password - the Start button\u003e Settings\u003e Control Panel\u003e Accounts users. For the selected entry, create a password
After the connection is established, there is no fundamental difference whether it is wired or wireless. You can set the wireless settings as follows. Assign, for example, the IP address for the desktop computer 192.168.1.1, and for the laptop 192.168.1.2. The network mask must be the same, for example, 255.255.255.0. Go to the Network Connections folder and double-click on the picture Wireless Network Connection. Click the Properties button. Double-click on the Internet Protocol (TCP / IP) and enter the IP address and subnet mask in the window that opens. Then go to the Wireless Networks tab. Remove all networks from the list, if any, and click the Add button. Specify the network name (SSID): 0. Authentication: Joint. Data encryption: WEP. Network key: 12345. Put a tick in the window This is a direct computer-to-computer connection, access points are not used. On the Connection tab, check the Connect to box if the network is in range.
After the installation is done on two computers, the connection is established, and the red cross disappears from the wireless connection icon - you can start working! The key length is 5 or 13 characters, and the 12345 key is optional - it is possible to specify any other named length, but it must be the same on each of the computers.
Wireless network with access point
As you remember, a device called an access point is used when it is necessary to create a network of three or more computers connected via a wireless connection. I note that in general terms, without qualifications, an access point is often referred to as an access device (for example, Zyxel G-560 EE) and a wireless router (for example, Asus WL-500G 802.11g).
A router, as a rule, costs more than an access point, but besides routing it usually supports additional functions, such as DHCP server, IP sharing, Firewall, VPN and others. Typically, a device that allows you to organize wireless access for many computers is configured using a browser. It is connected via a cable to the computer's standard network adapter.
The access point must have at least one port for connecting the cable to another hub, router, network adapter computer or other similar device. The access point is responsible for transferring information from the wireless network to the regular network and vice versa. The device itself, by default, has an IP address of 192.168.0.1, and for editing it is necessary in the browser (http://192.168.0.1) to specify the user admin and an empty password. Naturally, during the editing process, you can set another IP, password (possibly several, for example, one password is read-only - see the statistics of the device, and the other for editing the settings).
On each device, as a rule, there is a special reset button for all settings so that you can return to the default settings if, for example, you forget the password. The device is not much more complicated to configure than a standard wireless adapter. It is more difficult to configure advanced wireless routers with Firewall, because you need to correctly configure the rules (which packets and where to skip or not skip, etc.), but everything is solved, if you carefully read the instructions.
A small practical safety advice. Most access points allow you to set the settings that hide the SSID (network name). If you do not know the SSID, you can not connect to the network. In other words, do not broadcast information about SSID to the outside world, if its users already know what it is for this network, and people from outside know about it just do not need it. Of course, this advice does not cancel all other measures aimed at protecting the network, including encryption. In practice, there must be a compromise between the security requirements and the user experience. Naturally, for a public access point, security requirements are much milder than for an access point closed network mode object.
Network Attendant
In conclusion, a few words on how to find Wi-Fi networks. On the one hand, the number of officially available public networks is small, but on the other hand, given the affordable price of devices for organizing an access point, virtually wireless networks are not that small. Many organize an access point only to amaze guests who sometimes come with laptops. If you do not put special protection and leave the default settings, then access to the network is usually provided automatically. Why think about the settings, if so everything works? Indeed, it works fine. Until the interest in the network will not show someone else's!
There was an opinion that if you made your wireless network and live quietly, without wide advertising, then strangers about it will never know. It seems quite logical, but everyday logic does not always get along with scientific progress.
Walking around the city with an open laptop and looking for networks would be strange and, in general, not particularly decent. However, recently in stores appeared the device Trendnet TEW-429UB 54Mbps USB 2.0 Adapter with Wi-Fi Detector. The name shows that this device can be used as a regular wireless adapter, but not only. The second function of the device is to determine the working Wi-Fi networks. Dimensions of the device 95 x 28 x 15 mm, weight 30 g, the price is only about $ 80. It looks like a flash player, only the liquid crystal panel shows not the names of the songs, but information about the name of the network found, signal level and protection, if any. You can take your device with you for a walk, find interesting places, which you then visit with a laptop. After such hikes, confidential information pops up from competitors. It is not very pleasant even if the information was not stolen, but simply spammed at your expense a couple of million addresses, using your Internet connection. Keep in mind that while you read my calls for vigilance, many people are urgently buying this relatively inexpensive but very useful device on the farm.
However, for administrators, the device is also useful because it allows you to see how far your wireless network extends, and if the coverage area is too large (for example, it gets out of office and covers an office of a neighbor), then the signal strength access point settings).
I hope that this story will be useful to you in the theoretical and practical terms, allowing with minimal effort to create your wireless network.