In our time, modern gadgets have become very affordable and technologically advanced. They have several data transfer modules, including Wi-Fi. This module allows you to connect to the worldwide network and even connect several modules at the same time.
Creating an access point using standard tools Windows 7, 8, 10
This option is possible due to the standard features of Windows. The procedure is almost the same, so consider the instructions in the example of the "Seven".
Click on the icon Win + R, write in the search for cmd and open a special window, where we carefully register
netsh wlan set hostednetwork mode = allow ssid = "New Name" key = "New Pass" keyUsage = persistent.
Using the Latin alphabet, enter the name of our network (instead of the New Name) and the password (instead of the New Pass). At the end, we confirm and wait for the message that the procedure was successful. To start, we use a text phrase
and again we confirm.
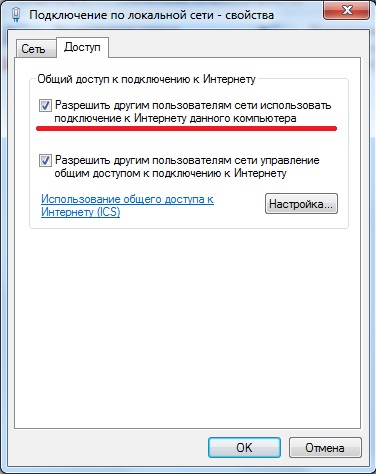
In response, a text appears about the successful completion of the process. Now go to the Network Connection Center and find the connection icon with the home network or "Ethernet". Incorporate a mise context menu and select "Properties". Now we allow other users to use the Internet access by selecting the new network connection "Wireless Network 2" in the second tab and confirm by clicking "OK".
Now everything is ready, we check the work.
* Notes for newer versions of Windows 8, 10
Command line Start by clicking the right mouse button on the Windows icon in the corresponding item. We select the launch in the admin mode.
In network connections, the network you created is local Area Networks* 2 ". Instead of the number 2 there can be another.
When we use the command line, after restarting the laptop you need to do the same operations. You can simplify your life by saving the necessary settings to startup.
Open the notebook and copy the text phrase
netsh wlan set hostednetwork mode = allow ssid = "New Name" key = "New Pass" keyUsage = persistent
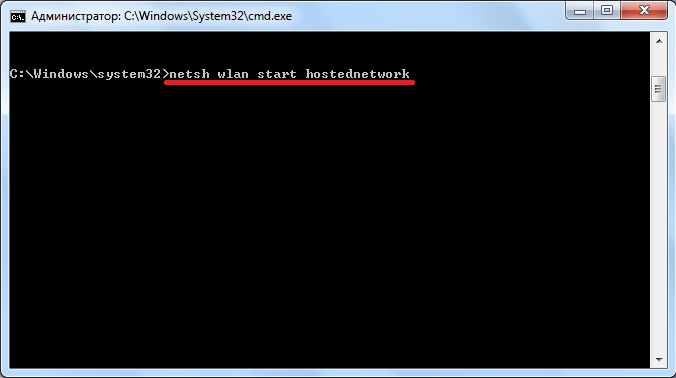
netsh wlan start hostednetwork
and edit the name and password according to the above instructions. We keep text file and at the end of the title we write ".cmd".
We go through Start in the Startup and copy there the created file.
* Notes for newer OS versions
Startup is opened by pressing the "Win" + "R" keys and entering the shell text: Startup. After that press "Enter".
Also pay attention to the command netsh wlan start hostednetwork - start distribution. Replacing the word start with stop will stop the distribution. netsh wlan set hostednetwork mode = disallow - destroy the distribution (to re-enable, you need to create an access point again)
Creating an Access Point Using Programs
The connection issue is solved by the necessary software. Download one of the special utilities.
Configuring an Access Point in Windows 7
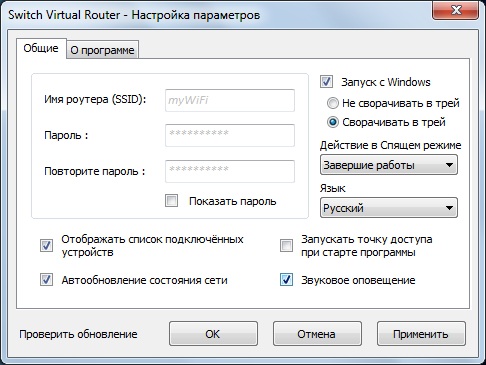
- For Windows 7, the Switch Virtual Router is perfect. Its feature is a low consumption of system resources and the ability to configure auto-shutdown of the computer. This program offers to enter the name of the virtual router and password in special fields. When you have all entered just press "OK" and the program will create a new access point with the specified name.
Download Switch Virtual Router - https://yadi.sk/d/lfp2ynkTg3jr2

Configuring an Access Point in Windows 8
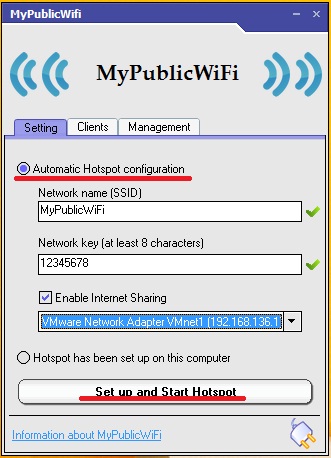
- For the same principle, the program works with the intuitive interface MyPublicWiFi, which is suitable for Windows 8. After installing it, you need to restart the laptop and open it on behalf of the administrator. In the Settings tab, activate the Automatic HotSpot configuration checkbox. In the Network Name and Network Key lines, enter the name of the new connection and the password, respectively. The last step is to choose the permission to distribute the Internet and specify the network connection for distribution. Click "Set up and Start Hotspot", the virtual router is created.
Download MyPublicWiFi - http://www.softportal.com/get-38317-mypublicwifi.html
Configuring the Access Point in Windows 10
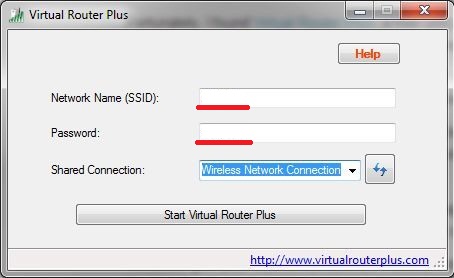
- Virtual Router Plus is a good alternative to previous programs, it has a simple and fast setup, and the main thing is for 7,8,10 versions of Windows. To use the access point, you need its name, password to connect and choose a standard network connection for the distribution of the Internet. The program is easily minimized and very conveniently monitored in the notification panel.
Download Virtual Router Plus - http://awesoft.ru/virtualrouter-plus.html
We looked at a number of options for distributing via Wi-Fi. I hope you will find the optimal and most comfortable way for yourself, because both the manual method and the software have their advantages.
WiFi wireless technology allows you to create homegroups by combining several laptops, PCs and other devices that support this connection into groups for data exchange, communication and joint games. However, as a rule, a router is used to organize such a group, which is not always at hand. Many are interested in the question of whether a WiFi access point can be organized on a laptop with Windows 7?
After all, every modern laptop has a built-in Wi-Fi adapter, which theoretically can work as a wireless module of the router. In other words, can I create a virtual group without a router? The answer is yes, it is possible. How to do this you will learn by reading this article.
In fact, everything is very simple. There are a lot of programs for this. Moreover, the developers of the Windows 7 operating system provided such an opportunity, allowing users to use the built-in tools to organize a virtual network, saving you from searching for any programs. So, as you've already guessed, you can make a virtual group in two ways:
- By installing a special program (for example - Connectify).
- Use built-in windows tools 7 and a laptop wireless adapter.
How to create a virtual WiFi access point in Windows 7: Video
Let's look at both options. After that, you yourself can determine which one is best used.
Create a virtual group in Windows 7 using built-in tools
It should be noted that this method does not require a search and installation third-party programs, it works more stably. In addition, the laptop can be used as a WiFi access point in Windows 7 with simultaneous reception and distribution of the Internet wirelessly.
The fact is that the Wi-Fi adapter of the laptop is able to work simultaneously both on reception and on the return of the signal. Accordingly, he can take the Internet and at the same time distribute it.
So, what is needed for this? First, check the driver updates for the wireless module and install them. The fact is that outdated drivers may not support the function of creating a virtual mini-port WiFi. Everything is solved by simply updating the software.
It is worth noting that there are two ways how to create a WiFi access point on a laptop with Windows 7 OS using built-in tools:
- Using the command line.
- By creating a computer-to-computer connection.
How to distribute Wi-Fi from a computer without a router: Video
Create a home network on a laptop using the command line
To do this, run the command prompt with administrator rights. Do this as follows: press the keyboard combination of keys Windows + R. In the appeared window, write CMD and press "Enter". The service will automatically start the required service with administrator rights.
Run the command line through the service run
- Creating a local network: netsh wlan set hostednetwork mode = allow ssid = My_virtual_WiFi key = 12345678 keyUsage = persistent. Here SSID = My_virtual_WiFi is the name of the network, and Key = 12345678 is the password. These data can be different, the only rule is to use only Latin letters and numbers.
- Start the wireless group: netsh wlan start hostednetwork.
- Stop the network: netsh wlan stop hostednetwork.
Related articles
After writing the first command on the command line, press "Enter". If everything is done correctly, the new equipment will appear in the dispatcher "Microsoft Virtual WiFi Mini Port Adapter". In addition, a new connection "Wireless Network Connection 2" will appear.
Create a virtual WiFi access point in Windows 7 using the command line: Video
This completes the creation of the virtual group. If you want to share files, you must do the following: Open the network and sharing control center through the tray (as in the photo) and go to the "Change extra options sharing ".
Here, you must enable network discovery. In addition, you should disable shared access with password protection. After that, you can rassharit any folder or file, by right-clicking on it, and selecting " General accessHome group (reading) »
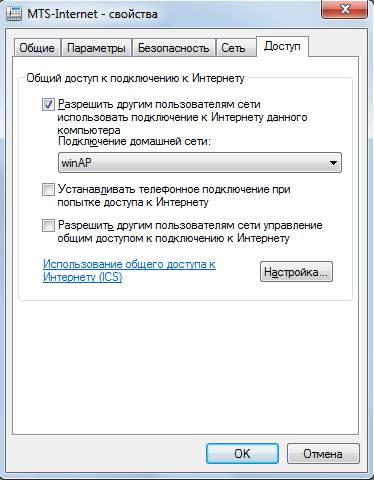
If it is required that your virtual WiFi access point in Windows 7 distributes the Internet to all group members, you should return to the network management center and go to the "Changing the adapter settings" section. Here we find the connection with which the computer goes online, click on it with the right mouse button and select "properties".
In the window that appears, go to the "Access" tab, where you need to set two checkmarks as in the photo, and in the line "Connection home network"You must select the created group" Wireless Network Connection 2 ". After that, click "Ok" and close all the windows. WiFi access point from the laptop adapter with OS Windows 7 is ready, now you can connect to it other devices.
Creating a Wireless Computer-Computer Connection
Let's move right to the point. Creating a WiFi access point on a laptop with Windows 7 is to do the following:
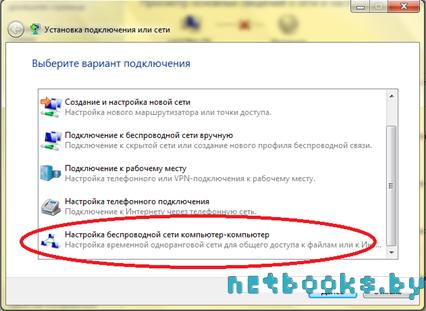
- Start the network management center and click "New connection or network settings".
- In the window that appears, choose "Set up the computer-to-computer wireless network".
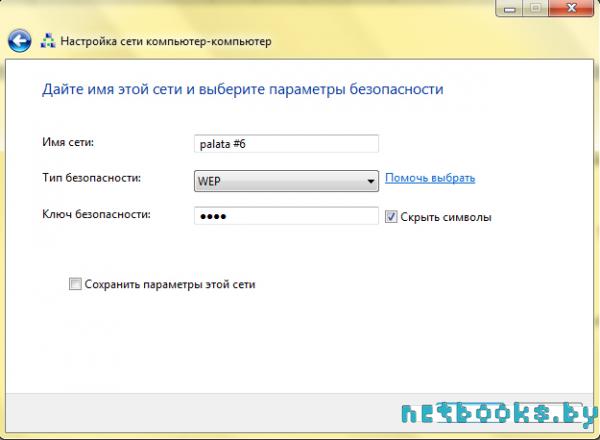
- Then enter the name of the group, select the type of security and set the password (security key). The group name is the name of the connection to which other devices will be connected in the future. A network key is required to connect. At the bottom, select the "Save this network settings" check box.
- Introduction of the network name.
- Set the type of security.
- Set the network key.
- Select the connection by which the computer is connected to the Internet (if required).
- Windows 7 Basic or later. Windows 7 Starter (initial) will not work. More precisely, on Windows 7 Starter will have to solve a routing problem with the help of a third-party program ( for Windows 7 Starter a separate note at the end of the article).
- An old wifi adapter. For example, the USB wifi adapter TP-Link TL-WN722NC was used for this article.
- Connection to the Internet. For this article, the GSM connection was used through the MTS operator (USB MTS modem). But it can be any connection - PPPoE, VPN, Dail-Up, Ethernet, WiFi.
- Laptop (or computer) under Windows - Configuring WiFi in Windows 7.
- Laptop (or computer) under Linux - Laptop (or on the computer) under Ubuntu.
- The WiFi adapter driver on which you create the access point.
- The WiFi adapter itself.
- You did something wrong.
- Any "left" services or drivers / programs that use a WiFi adapter or a USB port (if your adapter is connected via USB).
- You have Windows 7 Starter.
- One of the necessary services is stopped, for example, see the article "Routing and Remote Access Service Windows 7 stops".
It remains only to share. This is done in a similar way to the previous method. At this point, the creation of a WiFi access point on a laptop with Windows 7 is complete.
Create a wireless group in Windows 7 using third-party programs
This method is the simplest. The main task is to find and download a suitable program. It should be noted that such software is quite a lot, from a wide variety of developers and with different capabilities. However, despite such diversity, they all have the same operating principle, and, accordingly, the settings.
Everything comes down to four parameters:
Perhaps there will be additional settings, however, in each program they are different, so it is impossible to describe the universal method. As a rule, to software is attached instructions.
How to distribute WiFi in Windows 7 using Conectify Hotspot: Video
Now you know that the laptop's WiFi adapter can be used as an access point in Windows 7 - it's quite real. Moreover, the creation of such groups is easily accomplished without special difficulties and problems.
Which option to choose in this or that situation is your choice. We can say only one thing: embedded tools work more stably, although third-party programs are much easier in settings.
How to create a WiFi access point using Windows 7. Instruction, step by step with illustrations. Although basically people are interested in the question of how to make a laptop a wifi access point, it does not really matter whether it's a laptop or a regular desktop computer. Creating a wifi access point is the same in both cases.
Similar articles for other operating systems:
How to create a WiFi access point on Windows 7
We need to create a software wifi router based on Windows 7, which will receive the Internet in some way and will be able to distribute this Internet via wifi.
What we need.
The first step is to install the wifi adapter, if it is not already installed, and make sure that it is turned on and running.
After that, you need to check whether the "WLAN autotune service" service is started. Usually the mode of its start is "Manual", which means it can be stopped. If you plan to use the created access point permanently, it is better to put this service into the "Automatic" launch mode.
Also, you need to check that the Internet Connection Sharing (ICS) service also had an "Automatic" launch mode.
These checks are made through the "Control Panel - Administration - Services".
After that, open the Windows console (cmd.exe) with administrator rights. This can be done through the "Start - Programs - Standard - Command Prompt" menu, then right-click and "Run as Administrator".
In the console, type and execute the command:
netsh wlan set hostednetwork mode = allow ssid = "winap" key = "123456789" keyusage = persistent.
Instead winap and 123456789 enter your access point name and password to it:
Note.Important! The password must be at least 8 characters long, this is a requirement for the type of WPA2 protection that is used in Windows when creating an access point. It is better not to use Cyrillic in the password. The case of letters has a value - a and A these are different characters!
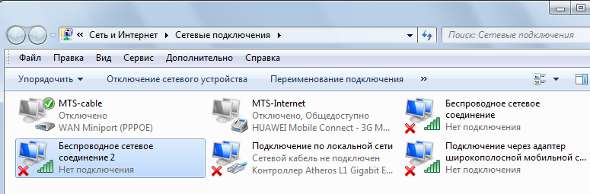
Next, verify that the connection for the access point is created. Open "Start - Run - ncpa.cpl" and after opening the " Network connections", in this window find a wireless connection for which the physical adapter is not specified:
Click the right mouse button, then "Properties" and there look - there should be "MicroSoft Virtual Miniport Adapter":
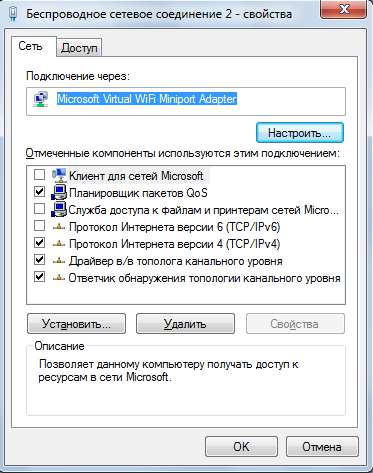
At the same time, you can delete protocols that are unnecessary for this connection.
Immediately in ncpa.cpl rename this connection - for example, in "winAP":
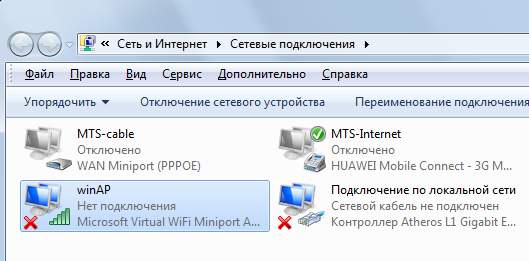
Next, here, in ncpa.cpl you need to share (enable Windows ICS) connection to the Internet. Select this connection, the right button - "Properties", the "Access" tab. Enable ICS and specify the connection to which the Internet will be distributed - to the wifi access point connection ("winAP"):
Now you need to connect to the Internet. Or reconnect if the connection was established earlier.
After that, in the console type and execute the command:
netsh wlan start hostednetwork.
Everything, the access point should already work. Now you can connect the client to this access point (this illustration is from the client computer):
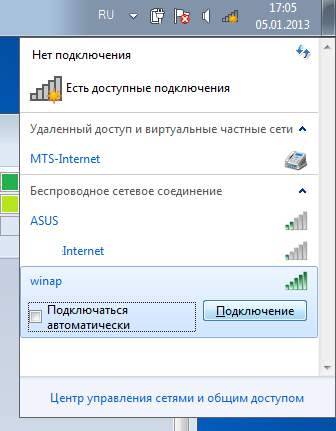
How to connect a wifi client to:
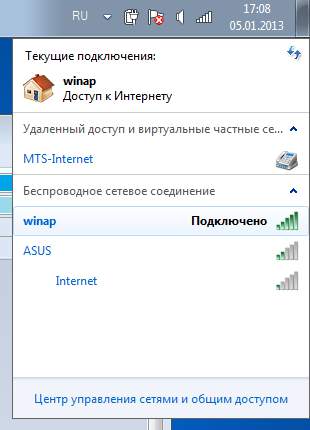
Client connected:
On the computer where the access point is running, you can check its status. To do this, enter the following command in the console:
netsh wlan show hostednetwork
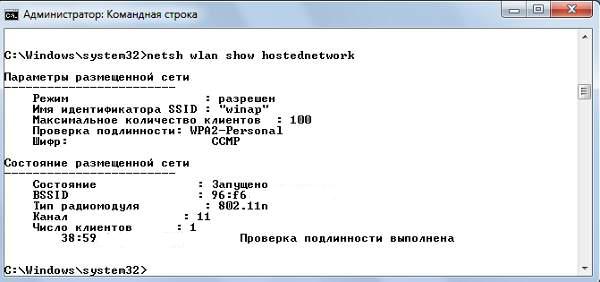
It is seen that one client is connected.
Stopping the access point with the command netsh wlan stop hostednetwork
Full destruction of the access point with the command netsh wlan set hostednetwork mode = disallow
If you want the access point to turn on automatically, when you start Windows, then you need to add the start command to the autorun. It's about the team netsh wlan start hostednetwork.The command can be written to the cmd script, you must specify the "Run as Administrator" in the properties of this script. Then the script is included in the autorun.
It is necessary that the connection to the Internet is also installed when Windows starts. Otherwise, you will have an access point, and the Internet will not be through it.
Of course this is a very simple access point. But everything is at hand. No third-party programs are needed. Just Windows 7. It's all set up in a couple of minutes. Yes, there are programs like Connectify and Virtual Router. However, you need to understand that they are doing just the work that is done by the two commands in the Windows console. These are just add-ins over the functionality of Windows 7. It's easier to write two commands in the console than to download and install some kind of pribluda.
Someone might say that in this version, there are not many possibilities that the access point should have. Well, yes, it is. Only this is an option when you need to make a wifi router very quickly and without problems. And just such an opportunity Windows 7 provides - with a minimum of body movements, which is called "on the knee" to create an access point.
And if your needs are wider and deeper, if you need an access point for every day, or in complex configurations - then you do not need to use Windows, but buy decent, or even good ones WiFi router. A decent WiFi router costs now less than a thousand rubles. And in such a situation to sculpt a design based on a computer and Windows is somehow absurd.
Another thing is if the access point is needed once a month, for a day or for a couple of days. Or on a business trip. Or on vacation. This is where Windows will help us out. You can quickly distribute the Internet through WiFi laptop on a tablet, smartphone or other laptops.
But if there is a need to make a permanent access point on the computer, then it's better to do it under Linux. As it is actually implemented in WiFi routers. For example, as in this article - the Access Point on Ubuntu.
The access point on Windows 7 does not work
No need to swear on Microsoft, on Windows - in general look for the guilty on the side. The problem in such cases always on your own computer (or laptop). It can be:
For example, in the process start Windows The WiFi adapter driver can put the adapter into standby mode. And when Windows starts the service hostednetwork the adapter does not wake up.
At normal WiFi adapter and if you do not mess up your Windows with curved programs and drivers - everything will work fine.
In general, always look for the source of the problem on your computer.
Protect your WiFi network
Access point on Windows 7 Starter (initial)
With it, Microsoft has found it. ICS is locked on it, and you can make an access point as such. Paradox. Why do I need a hostednetwork mechanism if there is no routing? Whatever it was, you can make a wifi access point on Windows 7 Starter (initial). It is only necessary to find a program with which to perform routing between the Internet interfaces and winAP. There are many options, for example, you can use a proxy server, such as 3proxy.
Ivan Sukhov, 2013, 2014
The vast majority of Wi-Fi adapters with USB-interface support two modes: infrastructure and Ad-Hoc. The adapter must be configured in infrastructure mode if there is a wireless access point.
After configuring the access point, the computer will gain access to the local wireless network, as well as to the Internet (if available). When there is no access point, the Wi-Fi adapter must be set to Ad-Hoc mode. This will allow you to connect cell phones and laptops (supporting Wi-Fi) to a computer that works with the adapter.
Setting the computer-to-computer mode (otherwise Ad-Hoc) on the Wi-Fi adapter makes it possible to open access to the contents of the computer. If the computer is still connected to the World Wide Web, the connecting devices will also have an Internet connection.
How to configure a Wi-Fi adapter in Windows 7?
As an example, the setting Wi-Fi adapter TP-Link TL-WN721N in operating system Windows 7 Ultimate.
The first step is to install the driver when connecting the adapter. The driver can always be found on the disk that comes with the device, as well as download on the official website of the manufacturer.
When the device is connected and the driver is installed, you can start configuring the computer. It should be noted that the point settings windows Access 7 greatly simplifies, if compared with earlier versions of operating systems.
You need to open the "Control Panel" and click "View network status and tasks" (highlighted in red in the screenshot).

After going to the specified menu item, you will be taken to the following page:

Here you must select "Configure a new connection or network". A list opens. Below there is the item "Set up a computer-to-computer wireless network", which you must select.
Then you will have to click on the "Next" button again, which will allow you to go to the wifi access point settings. Here it is necessary to write a name (in this case it's palata # 6) and a password (more than 5 characters). In order to better compatibility, it is better to choose the type of security "WEP".

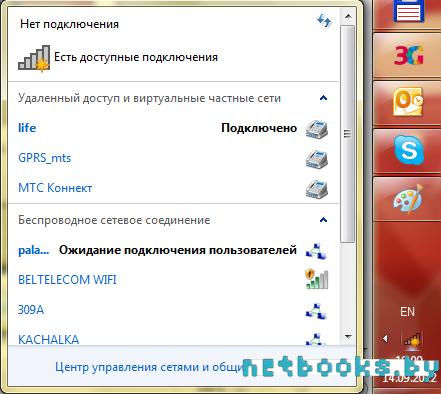
The icon for the new connection can be seen on the taskbar. As you can see, on the site of the new wireless network there is an inscription "Waiting for users to connect". In order for users to connect, you need to change a number of settings.
To synchronize devices, you need to register IP addresses. To do this, go to "Control Panel"\u003e "Network and Internet"\u003e "Network Connections". Right-click on the "Wireless connection" and select "Properties". We find in the list "Internet Protocol version 4 (TCP / IPv4). Click on the "Properties" button. After that, the following window opens.
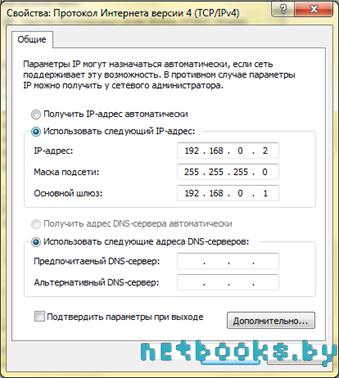
In this window you need to register everything as shown in the screenshot above. Then, on the taskbar, connect the computer to the wireless network (you will need to enter a password). Then you can make sure that other devices see our access point. On the phone we are looking for wi-Fi networks, we find the one that was created (in this case, the network is called palata # 6). Before you can connect, you need to register the address, subnet mask and default gateway. It registers everything exactly as it does on the computer, but there is only one change in the IP address. Instead of 192.168.0.2 you need to register, for example, 192.168.0.3. Then we connect to the network "palata # 6", you will also need to enter a password. Now the settings for the wifi access point and the connected device can be considered ready for use.

As you can see on the last screen, the phone identified the network and connected to it. If you want to share the Internet with other devices, go to Control Panel\u003e Network and Internet\u003e Network Connections. There you can right-click on the Internet connection, go to "Properties" and open the "Access" tab. Allow access to other users of the network, as in the screenshot below:

Now the access point settings are fully ready for use. All devices that support Wi-Fi will be able to connect to your computer. So you can create local wireless network for several computers, tablets or mobile phones.


