Consider the general Tp-Link WR740N / Tp-Link WR741ND connection scheme, as you noticed in this article, the setup of two routers will be considered at once, since they differ from each other only by antennas (741ND has a removable antenna and 740N does not have a removable one).
As you can see everything is quite simple, connect the router to a power supply of 220 V, then network cableIn the kit, connect the computer / laptop, insert the provider's cable into the WAN port, to turn it on, press the Power button.
Now I propose to deal with the display on the router Tp-Link WR740N / Tp-Link WR741ND.
Power Indicator
Does not burn
Tp-Link WR740N / Tp-Link WR741ND is turned off.
Is burning
Power is on.
Indicator - System
Is burning
The router is loading.
Flashes
The router is in operation.
Does not burn
Presence of system error
Indicator- Wireless network Wi-Fi
Does not burn
Wi-Fi is turned off.
Is burning
Wi-Fi network is on.
Flashes
Wi-Fi data transfer in progress
LAN ports 1-4,
Wan
Connect to network connectors
Does not burn
The cable is not connected to the corresponding connector of the Internet center, or the network connection is not established.
Lights or flashes
Network connection is established, information is being transmitted.
WPS Indicator (QSS)
Flashing slowly
The wireless device connects to the network. This process will take about 2 minutes.
Is burning
The wireless device has been successfully added to the network.
Blinking fast
The device was not connected to the network.
Does not burn
WPS function is disabled.
Tp-Link WR740N / Tp-Link WR741ND firmware update.
The first thing you need to start is to update the firmware Tp-Link WR740N / Tp-Link WR741ND. To do this, connect the computer / laptop with a cable as described above in the diagram.
Attention!!! Firmware update should not be performed by wireless wifi network.
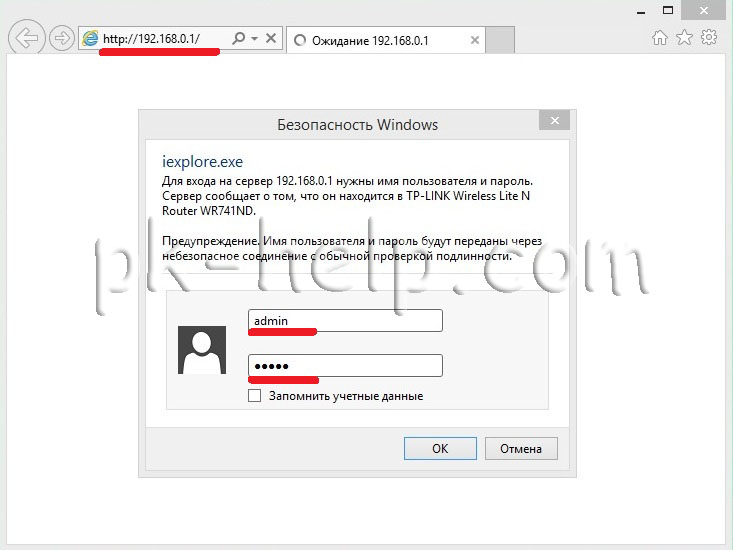
Set up on computer / laptop auto retrieve network settings . Then open any browser (IE, Chrome, Yandex, Firefox, Opera) in the address bar type in the IP address of the router 192.168.0.1 , after that you need to enter a login and password to connect to the web interface, the standard login is admin, the password is admin.
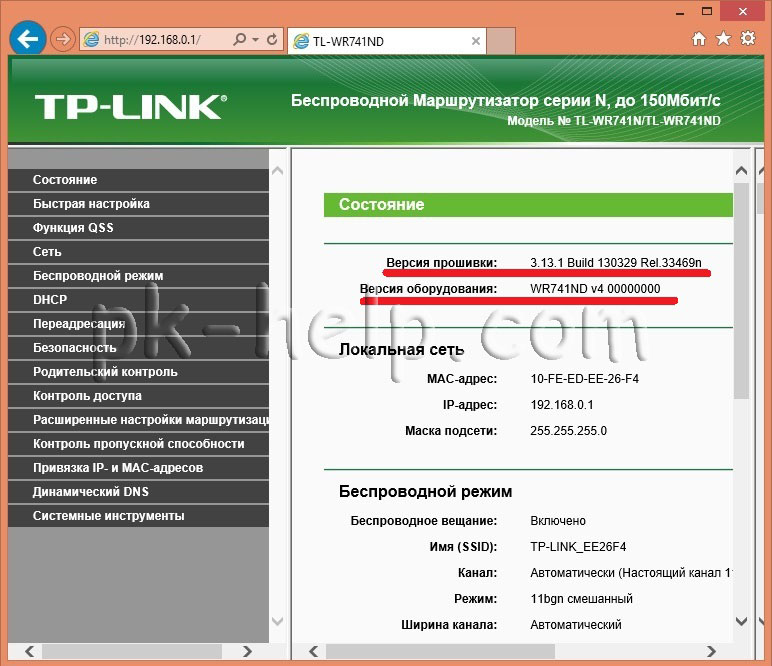
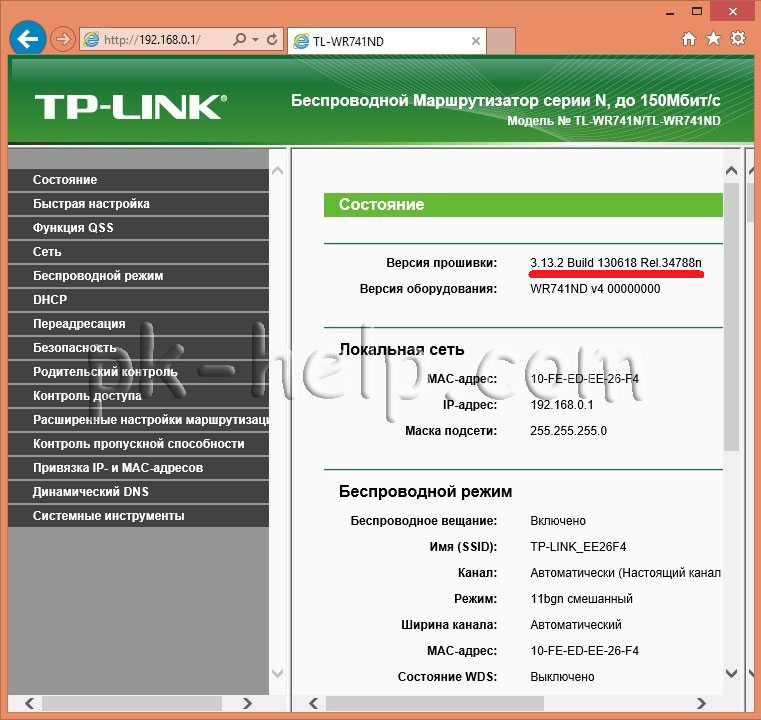
After that, you will not get the web interface of the router, pay attention to the firmware version and the hardware version.
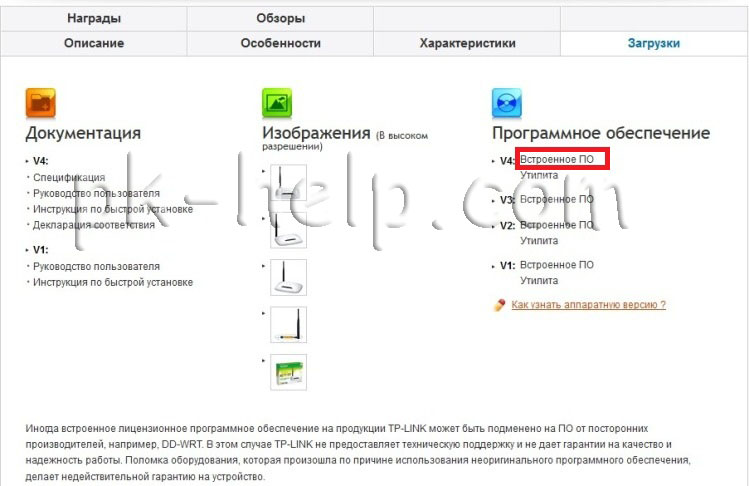
After that, on a computer / laptop with Internet access, go to the Tp-Link website and download the latest firmware for your version of the equipment.
Attention!!! Choose your version of the equipment, the firmware of another version can harm the router and disable it.
Download the latest firmware on the site.
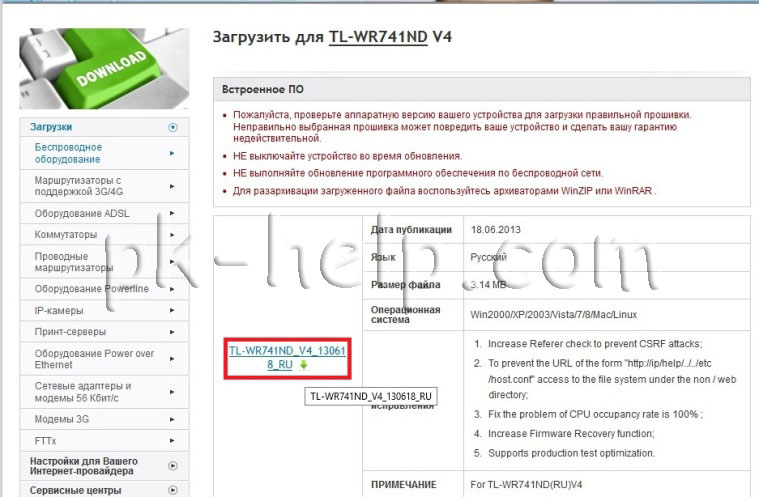
Unzip the downloaded archive, as a result you should get a file with extension .bin. On the web interface of the router go "System Tools" - "Firmware Update" - "Overview", specify the path to the firmware file and click "Refresh".
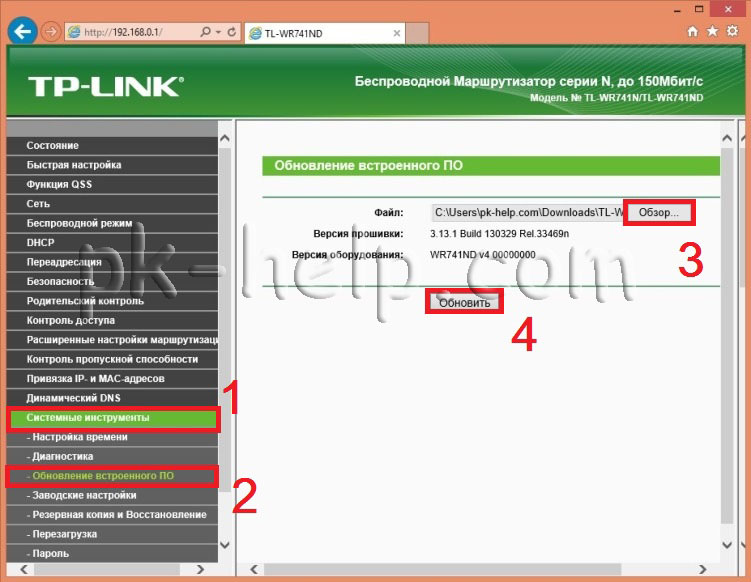
The Tp-Link WR740N / Tp-Link WR741ND firmware update will take a few minutes, as a result, the firmware version will be changed to a newer one.
Attention!!! During the firmware update, do not turn off the computer / laptop, router. This can damage the router and disable it.
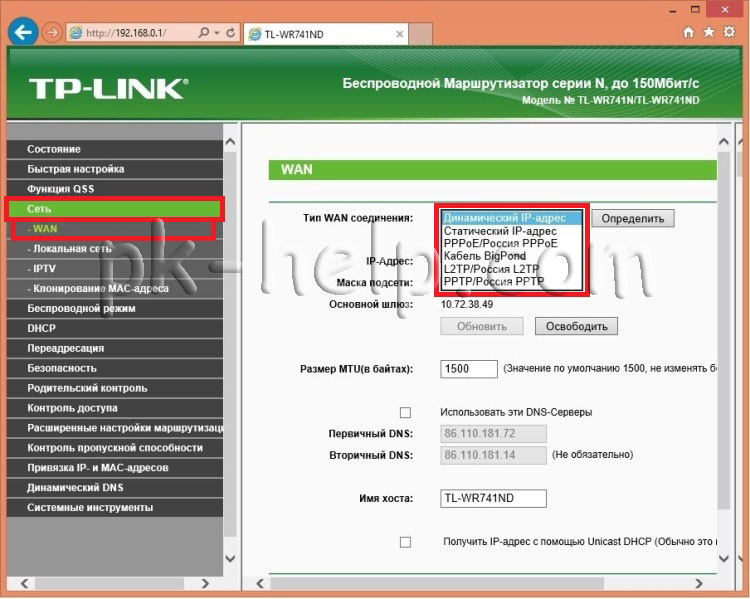
Setup Internet on Tp-Link WR740N / Tp-Link WR741ND.
To configure the Internet on the router you need to go to "Network" - "WAN", then you need to specify the type of WAN connection, you can learn more detailed information from the provider agreement or by contacting those. support provider. Further, depending on the type of connection, you must specify a username and password.
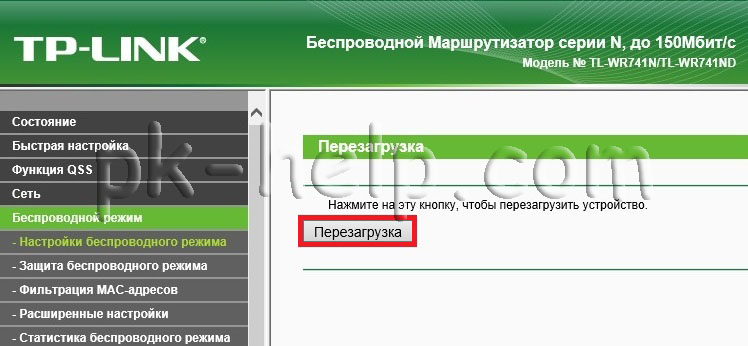
Press the button "Save" and reboot the device. In the future, to apply all changes, you must click " Save", then a line will appear asking you to restart the router, click" click here ".

And reboot the router.
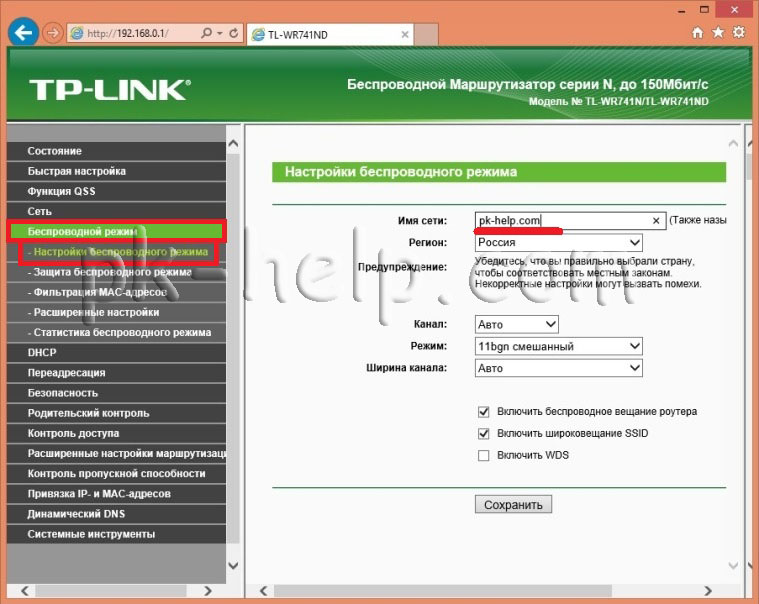
Set up a Wi-Fi network on Tp-Link WR740N / Tp-Link WR741ND.
To set up Wi-Fi network on the router you need to go to the web interface "Wireless Mode" - "Wireless Mode Setting" in line:
Network name - specify how your Wi-Fi network will be called, in this example the site
Region - Russia (specify your region of residence)
11bgn mixed mode
Channel width - Auto
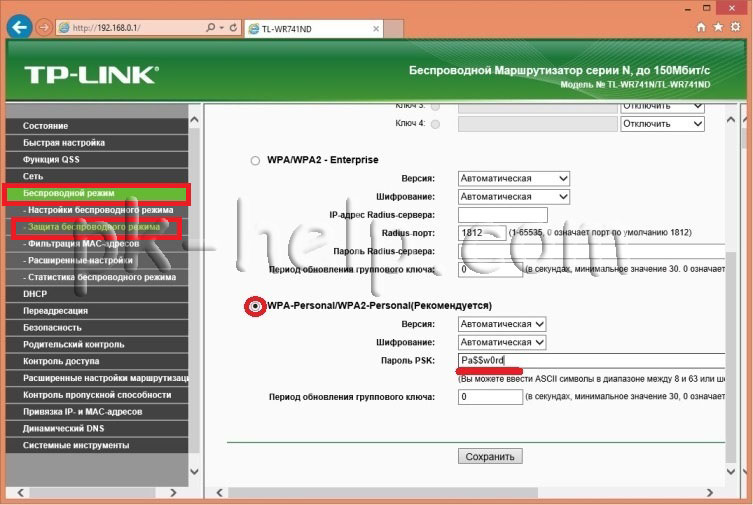
Next, you need to secure the connection via Wi-Fi and specify a password to connect to it, for this, go to the web interface "Wireless Mode" - "Wireless Protection". Select " WPA-Personal / WPA2-Personal"enter the password. I recommend to use complex password- at least 8 characters with letters, numbers and specials. signs (! @ # $%).
Change password for web interface on Tp-Link WR740N / Tp-Link WR741ND.
For safer operation of the router, I strongly recommend changing the login and password to log into the web interface. To do this in the web interface of the router, go to "System Tools" - "Password". Enter the previous login and password (login-admin, password-admin) and new.
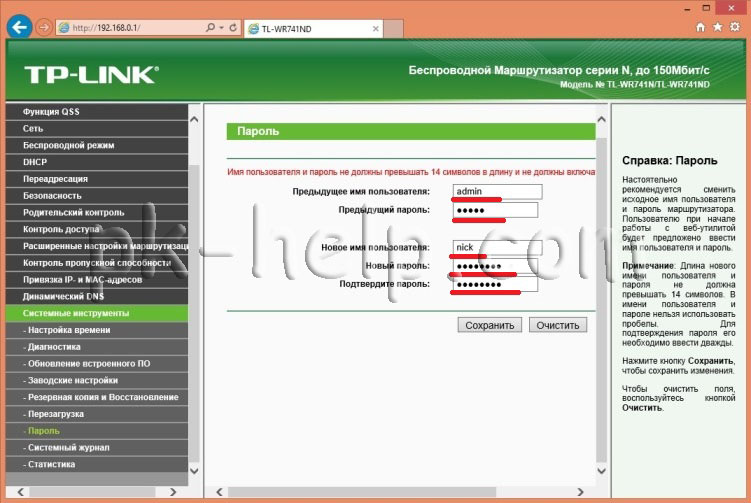
Save the settings.
In case you forget the specified login and password, you will need to reset the settings to factory defaults, by holding the Reset button. Note that resetting to factory settings will remove all your configurations and you will have to set everything up again.
After configuring the router, you can proceed to configure local network on Windows xp or Windows 7 , make a network folder or set up a network printer .
For wi-Fi settings we will need 2 subsections. First, go to the Wireless section and the Wireless Settings subsection.
Here you just need to select your country from the list and enter the network SSID. The ID needs to come up with a unique one so that it does not accidentally coincide with the network ID of your neighbors, otherwise failures may occur. Usually it is enough to add an apartment number to the name of the network (for example, TPLINK33)
Let us briefly review the remaining parameters (in most cases, they do not need to be changed):
Channel - the choice of the radio channel, if the devices do not connect well to the wi-fi network, then you can try to specify the channel explicitly (I usually choose 6 or 11)
Mode - standard selection, if you do not have devices that can work according to the 802.11n standard (according to which standard the device can usually work is indicated on the box or in the documentation on the wi-fi icon), then you can put bg mixed.
Channel width - the width of the data transmission channel.
Max TX Rate - the maximum transfer rate.
Enable Wireless router Radio - enables and disables the wireless module on the router (i.e., enables and disables wi-fi)
Enable SSID Broadcast - allows you to enable or disable the visibility of the wi-fi network, if this option is disabled, you can connect to the wi-fi network only by knowing its identifier (SSID) in the usual wi-fi search this network will not be.
Enable WDS - this option is needed to expand the coverage of an existing wi-fi network.
After finishing the setup, do not forget to click the Save button.
5. Configure Wi-Fi network security
To configure network security settings, go to the Wireless section and the Wireless Security subsection.
Here you can configure the encryption method and password. I recommend choosing the WPA2-PSK encryption method. Encryption type can leave Automatic. The most important thing is to come up with a more complicated password (containing letters and numbers), 10-15 characters. You still have to enter it only once on each new device, and for those who want to find a password to your network, a complex password will become a more significant obstacle than a simple one. (For example, put something like ERG345tr4R). After you set up wi-fi password network - do not forget to click on Save
6. Configure the local network (if needed)
To configure the local network on the TP-LINK router, you need to go to the Network section and the LAN subsection. Here you can set the IP address of the router. From the same range of IP addresses, the router will distribute addresses to devices connected to it. In this section, you can not change anything at all.
7. Setting an administrator password
Finally, to ensure complete security, change the administrator's password on the router (agree that the admin password does not seem to be secure). This password is used to log into the admin panel of the router.
To do this, go to the System Tools section, subsection Password. Enter the old login (admin) and password (admin), and below enter the new name (you can leave it the same) and password (but you must change it).
8. Reboot the router
You have probably already noticed that when you click on the Save button, the following message appears below: This label says that you need to restart the router to make changes. Click on the words click here and in the window that appears, click the reboot button. The router will reboot with the new settings.
9. Connect and work
Well, the setup of the router is completed. Now you need to connect a cable to it through which the provider provides Internet access. (In the blue port on the router). Up to 4 PCs or laptops can be connected to the yellow ports.
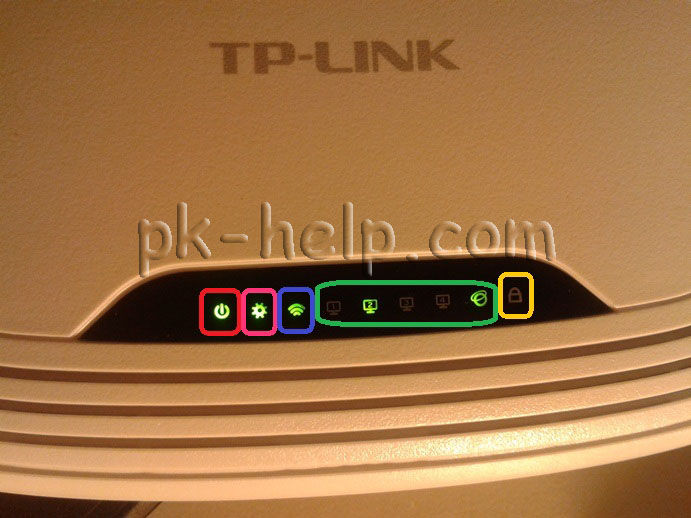
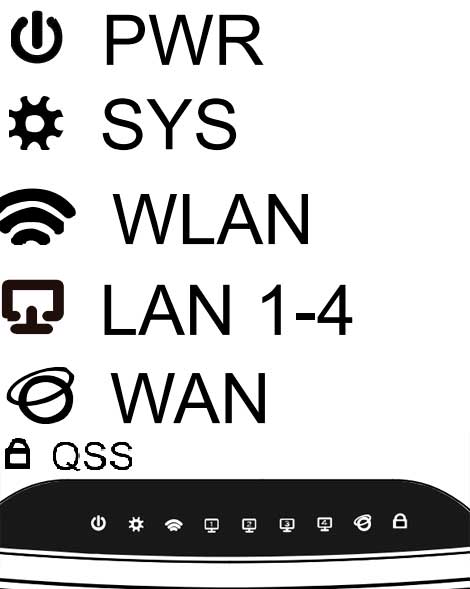
10. Assigning router indicators
And finally, let's consider what the indicators on the top panel of the router show. The first indicator. - Power (power indicator) - indicates whether the router is on or off.
The second indicator - System (system indicator) - blinks in normal condition, if it is just lit - the route is initialized or an error has occurred, if it is not lit - then a system error has occurred.
The third indicator shows the status of the Wi-Fi network. Blinks when wi-fi is on and off when it is off.
Indicators 4 through 7 show the status of the local area network connection. Lit - the cable is connected, but there is no network activity, Flashing - data exchange between the router and PC, Off - no connection.
The eighth indicator - Internet - shows whether the connection to the Internet is active. Lit - the Internet is connected, Flashing - there is a connection or data exchange, Not lit - the Internet cable is not connected.
The last indicator shows the status of the QSS function (Fast Secure Setup). This function is used for quick connect devices to the router. Used mainly to connect to wi-fi router TP-LINK cards.
Conclusion
Well, that's basically all you need to know for basic setup router. As you can see it is not so difficult. If something did not work, write in the comments or on the forum “Free Computer help"- we will understand together.
The appearance of the new 740 router is no different from the 741, and in terms of functionality, they are almost the same.
Let's begin by analyzing the front panel of the indicators. This will help you to understand the basic level if there are any problems (such as: the Internet does not work, does not connect via Wi Fi, or there is no connection to the router on a stationary computer). So, this is what all the 740n bulbs look like:
- PWR - This is a network indicator. If this indicator is lit in green - everything is in order, the router is successfully connected to the mains. If it does not burn, then the router is not powered. This may mean that it is broken, or the power supply burned out, or your outlet simply does not work.
- SYS - System parameter indicator, if blinking - everything is in order. If this light is on when turned on, it means that the system is being configured. If not lit - a system error.
- WLAN - indicator Wi-Fi connectionWhen successful, it flashes. If it is just burning, a failure has occurred (the simplest solution to the problem is to turn on / off the power of the tl wr740n router).
- LAN (1-4) - This light indicates the device is being connected via wire to the LAN port. If it flashes, then everything is in order and data is transferred between devices and routers. If it does not blink, but just lights up, a system failure may have occurred (restart the computer and turn off and then turn on the power of the router). There may also be problems with the network card.
- WAN - This is the WAN port indicator. An “Internet” wire is inserted into this port, the indicator should flash. If it is not lit, it means that the signal is not going, the provider wire may be damaged or the provider has stopped providing the service.
Connect tp link tl wr740n via wire to computer
To begin with, in order to better understand what and where to connect, let's analyze the back panel of the router:
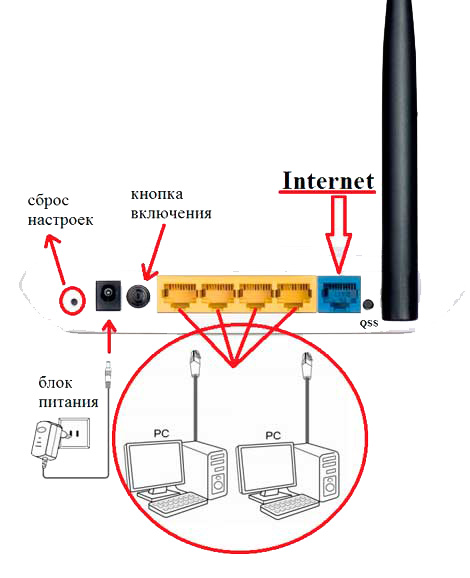
Let's start in order:
Reset settings - Reset button, on different models may be recessed and located in another place, but the function performs the same. When you press and hold for about 10-20 seconds, the settings of the router will be reset to the factory settings. Used when wrong setting router, i.e. If you do not know what went wrong, it is best to reset the settings and start everything over again.
Power Connector — A power supply is inserted into this connector.
The on / off button turns the power of the router on and off. Often people forget about it and think that their router is faulty.
LAN ports (1-4) - These ports are used to connect devices to a router (computer, laptop, netbook, TV, etc.) over a wire with RJ-45 connectors.
Port WAN (Internet) - the port into which the provider wire is inserted or through which the Internet is fed.
After we figured out what each port is responsible for, you can build this connection scheme:
We insert into the LAN port (in any of 4) Patchcort (short wire that came in the kit), insert the other end of the wire into the network card.
Berm Internet provider wire, and insert it into the port WAN (internet).
We insert the power supply unit into the connector on tl wr740n and plug it into the network (into the socket), also do not forget about the power button of the router.
That's all, your computer should connect to the router. Sometimes in settings network card The ip address is set, and even though you have connected to the router, you will not have access to the configuration interface. To prevent this from happening, let's check the network card settings right away.
Checking the settings of the network card for connecting the router to the computer (Windows XP, 7)
It's very simple, we need to check that the settings were set to automatic. For this:
On Windows XP:
- Start \u003e\u003e Control Panel \u003e\u003e we will find “Network Connections”
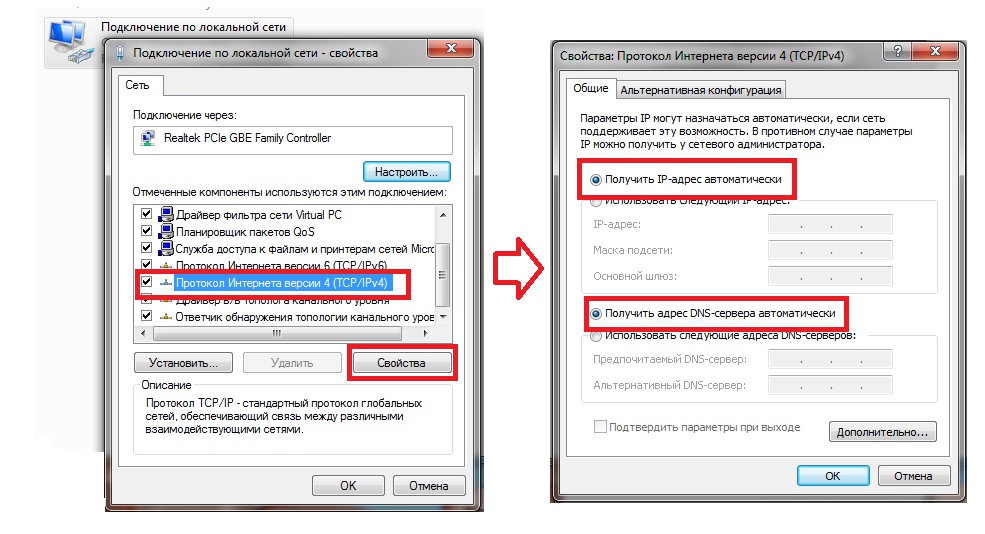
- Local network connection, right-click and select “Properties” \u003e\u003e
- In the list with checkboxes we find “Internet protocols TCP / IP” we double click on the label.
- In the appeared window we put dots on against points where there are words “Automatic”
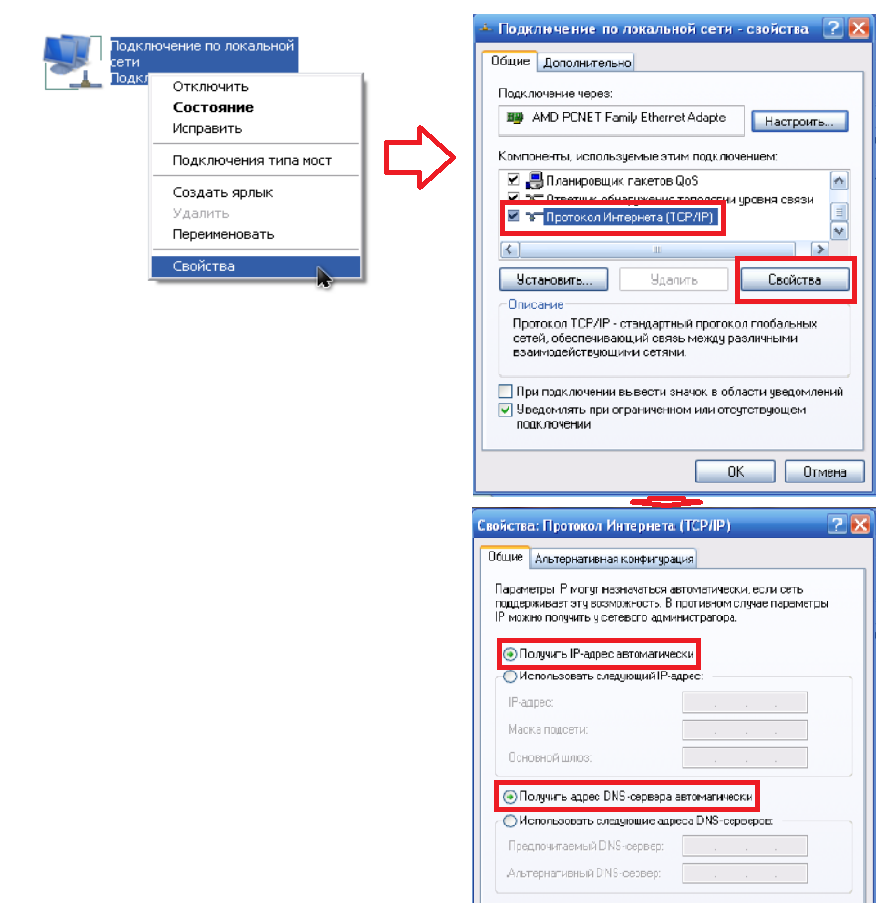
Now everywhere click on the button "OK". Yes, and also, if the fields in the last window were filled, write down everything that was there, on a piece of paper - this will be useful when setting up the Internet.
On Windows 7:
In the lower right corner (near the clock) there will be a network icon in the form of a monitor, click on it and select the words “Network and Sharing Center”
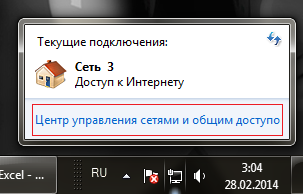
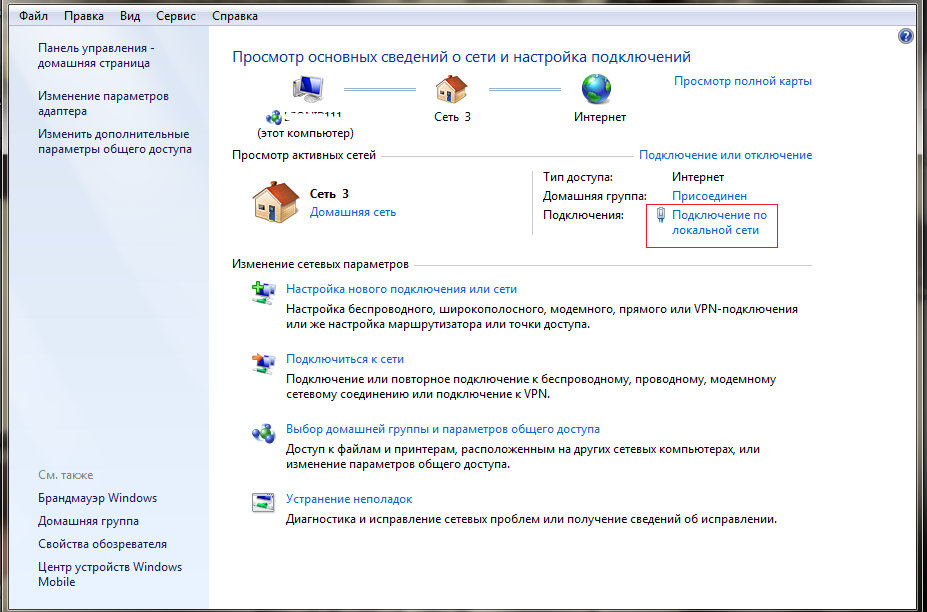
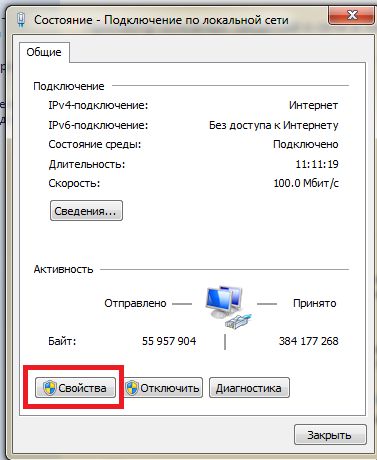
Now the Status window will appear, click on the "Properties" button in it.
The “Properties” window will open, in the list we look for “Internet Protocols version 4 (TCP / IPv4)”, select and click “Properties.” \u003e\u003e Next, put dots in front of “Obtain an ip address automatically” and “Obtain DNS server address automatically.”
Now everywhere click on the button "OK". Yes, and also, if the fields in the last window were filled in, then write down everything that was there, on a piece of paper - this is useful when setting up the Internet.
Connecting to the router via Wi-Fi laptop, netbook
M It is necessary to configure the router by cable, this will help to avoid unnecessary reconnection during Wi-Fi setup on the router. But sometimes there is no other way out, so I decided to explain how to do it. Let's get started
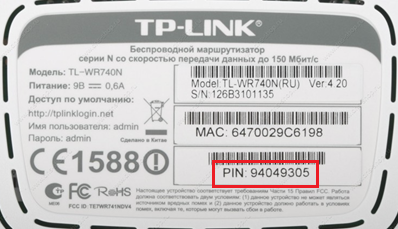
After turning on the router in the network and connecting the Internet to it, turn on the laptop and connect to Wi Fi (if you do not know how to do this, read the article How to connect wifi on the laptop). Your network name will start Tp-link tl-wr740n, and it will have the highest signal level. Key to WiFi network will be listed on the back of the router after the word "PIN"
That's all you can say about tp-link connections tl-wr740n.