Good day to day, my dear friends. Today I want to tell you about how to connect a hard drive via usb to a computer or laptop. Personally, I had this question when I replaced it on my laptop, after which the old "hard" remained unattended, although completely serviceable. Therefore I hasten to make you happy. If you have such a device, then you can make it an excellent mobile data store.
There is one small condition. These methods are suitable only for less modern hard disks, which have an interface not lower than SATA.
USB Box (containers, pockets)
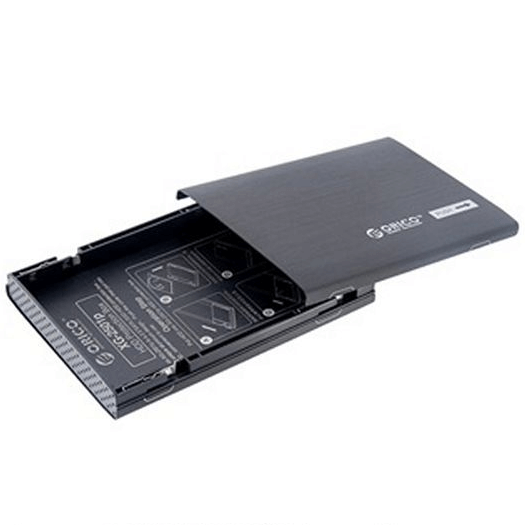
Cam Box - This (as you understand) a certain box (plastic or metal), inside which is a special slot for a particular disc. It's natural to note that there are boxes for both large HDD (3.5) and small (2.5), which go under laptops.
Inserting the HDD into the box is simply elementary, and after the assembly it will not be different from the usual external hard drive. After that, you just need to insert the USB cable into it and connect it to the computer. So you get a double benefit:
- You bring the old device back to life and use it;
- You are almost free to get an external HDD
On such media, you can store any backup and archive copies, or use it in everyday life.
All the fun will cost you an average of 300-500 rubles.
Adapter (SATA-USB)
The simplest and least expensive way is to purchase a special SATA-USB adapter. The adapter itself is a cable, on one end of which is a connector for connecting a disk, and on the second end is a USB port.
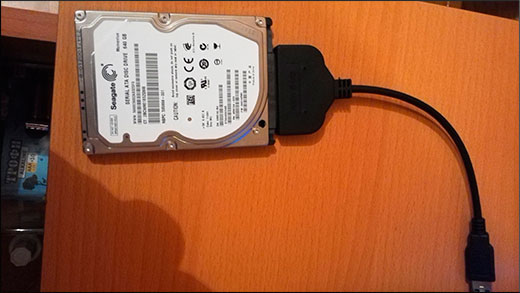
Well, I think that you guessed what you need to do in this case. Yes, it's simple. Connect hDD to the connector, and the other end is inserted into the usb-port of your computer or laptop.
But just take into account that the usual HDD (3.5) may not be enough power of one USB-cable, so buy a cable with two connectors and use them simultaneously.
Depending on the company and the quality of the products, such cables will cost you about 200-600 rubles.
Dock station
The most expensive, but very effective option is to purchase a docking station. These devices resemble something like old Dendy or Sega devices. The similarity is that instead of the connector for the cartridges, there are connectors under the HDD. You just need to just insert into this station hard, then connect it via USB to your computer.
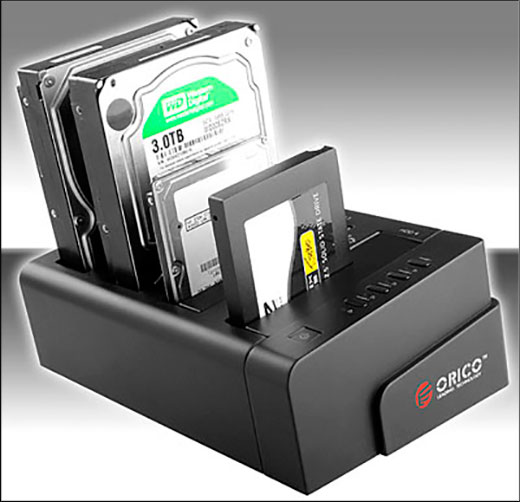
Such devices are of different types, and in many cases you will be able to work not only with one disk, but at once with several, and even different form factors (2.5 and 3.5).
The cheapest versions with one device will cost you no less than 1000 rubles, or even more. More powerful stations cost 3 and 4 thousand rubles each.
As you can see, how to connect a hard drive via usb to a computer is enough, and for every taste and color. Therefore, you no longer have to leave all your devices unattended.
Well, on this I finish my article. I hope that you liked it, so do not forget to subscribe to my blog updates, and also to share your blog articles in in social networks. Good luck to you. Bye Bye!
Sincerely, Dmitry Costin
To connect a hard drive via USB
Sometimes, in order to repair and restore the hard drive or to transfer information from it to another device, it becomes necessary to connect the hard drive from one computer to another. However, this is not always possible. We offer to consider the most common situations and ways to solve them.
A hard disk from one PC completely fits to another PC.
To connect it, you need to remove it and connect where we need it. The problem is not obvious. But! Many users do not know what their illiterate actions can lead to.
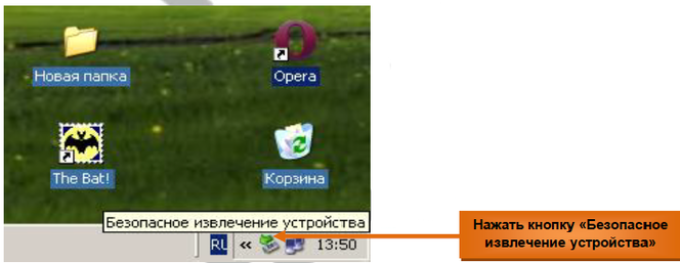
In order to remove the HDD from the PC system unit or from the laptop, it is necessary to ADJUST it. No devices other than USB and memory cards (MemoryStick, SD, MicroSD and others) can be disconnected from the computer without de-energizing it. More information about the security rules can be found in this article. How to properly disconnect the PC from the power network read.
By de-energizing your PC or laptop (you also need to remove the battery from the laptop), you can start disassembling. Remove the side cover of the system unit (or the bottom cover of the laptop), carefully disconnect the cables, while remembering their location. After that, unscrew the screws fixing the hard drive in the case, and remove it. Connect the hard drive to another PC in the reverse order, before de-energizing it.
Remember: manipulation of the internal devices of the computer with the simultaneous supply of electric current can lead to the most unfortunate consequences: the voltage jump and, consequently, the failure of the HDD or the PC as a whole, or even the defeat of the master electrician. Be careful not to endanger yourself and your computer!
The hard drive of one PC does not match another
There's a catch, is not it? The matter is that modern operating systems practically block access to the user to HDD. Rather, to write down, erase, read the information you can in full. But, for example, it is not always possible to format a hard disk. However, this is often necessary. For example, if you try to install another operating system on it. This problem is particularly acute with laptops, because they can not be connected to a PC due to different hardware configurations, and two hard disks can not be connected to another laptop.
- way the first:
There is one cunning way to solve this problem. If you are a happy owner of an external hard drive in a dismountable case, then you have the opportunity to replace the hard drive in it. To do this, you need the technical specifications of your HDD to match the disc in the "box". If the disk size, operating voltage and type of connection are the same, then remove the hard drive from the PC as described in the first case. Then open the case of the external disk, disconnect all loops from it, remove it. In its place, insert your hard drive from the PC, close the "box". It's simple! Now you can connect your hard drive to any computer via a USB port, like a normal removable disk.
But what if the hard drive from your PC or laptop does not fit to another computer or is there no way to "make" a removable disk from it? Not everything is so sad! There is an exit.
- way two:
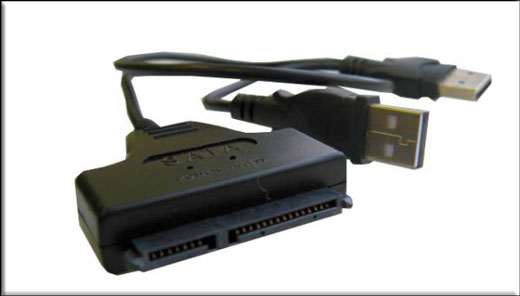
In one store selling frankly Chinese electronics and computer equipment, I managed to buy a HDD / USB-adapter, which allows you to connect a hard drive via USB. Honestly, I myself did not know that such things happen. This device consists of three parts:
- the actual device, which is a body the size of a cigarette pack
- USB cable, tightly attached to the adapter body. The cable has two USB-plugs, then I'll explain why
- power supply to the output voltage 5/12 V.
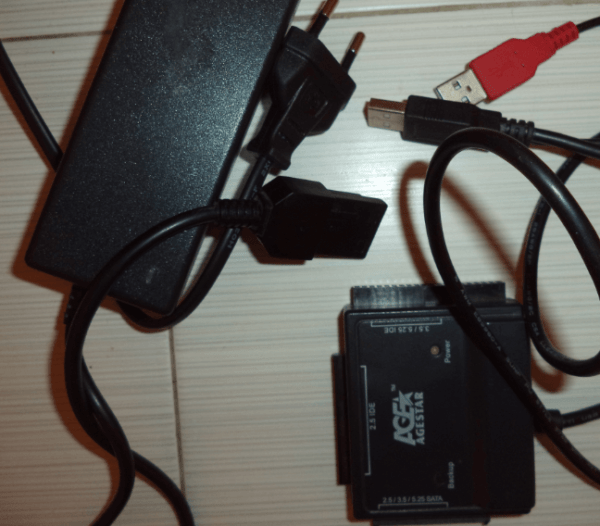
I note at once that this adapter is universal and allows USB hard drives to be connected to any existing SATA 2.5 / 3.5 / 5.25, IDE 2.5 / 3.5 / 5.25 standard.
USEFUL:
Now let's talk about the connection method:
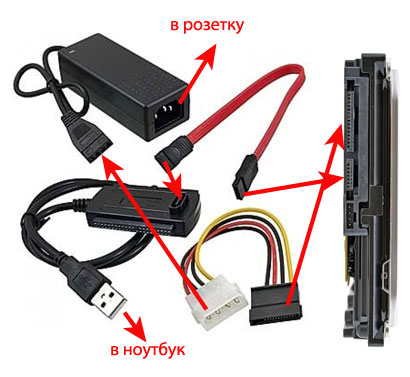
- for SATA disks everything is simple: we insert a suitable adapter connector into the hard disk slot, connect the adapter to the computer with a black USB cable and turn on the adapter with the switch in the end of the case. From now on, you can work with your SATA HDD as with a regular external drive or as a USB flash drive;
- for IDE 2.5 drives all the same, only you need to connect the red USB cable to the computer in addition. It will provide power to your HDD;
- for drives from old format IDE 3.5 PCs and very ancient IDE 5.25 Instead of the red USB cable, connect the power adapter to the adapter and insert it into the network. I remind you that all the manipulations for connecting disks must be done before the current is applied, that is, first connect everything, then plug it into the socket, and then turn on the power button on the adapter case. Disconnect in the reverse order.
ON A NOTE:
A very useful thing, I often helped out at home and when working with clients, when I was doing private repairs and setting up computers. This device cost me in 2014 at 700 rubles at a dollar rate of 35 rubles per dollar, that is, $ 20. It's in a retail store in a small county town. I think that such a gizmo can be found in online stores much cheaper, but for the Chinese themselves at online auctions - in general for pennies. About prices, other similar devices and your experience of using these devices, please write in the comments.
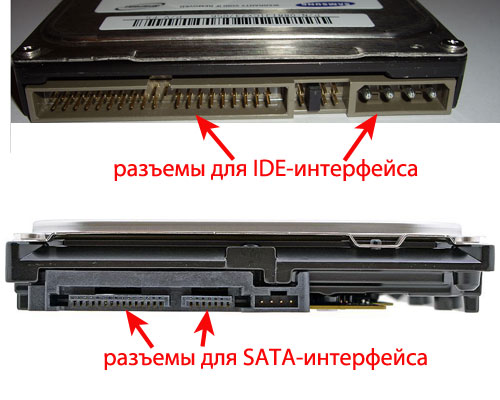
Hard disks there are two types - internal and external (by the type of USB-stick). Hard drives are connected via the IDE interface, which is used on all older hard drive models. Or - SATA, which is much narrower and the connector, and the width of the loop.
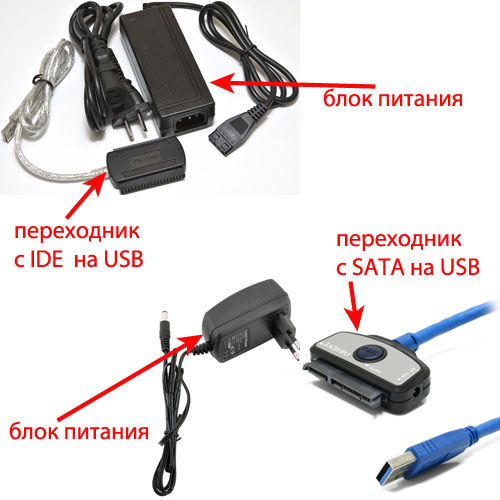
When hard drive connection drive to the laptop should be remembered that not all modern laptops have external connectors for this connection. Then you can connect using the USB interface. But for these purposes, you need a specialized SATA / IDE adapter to the USB input. Such an adapter can be found in the kit with the power supply of the hard drive. The unit is required due to a lack of power from the USB interface.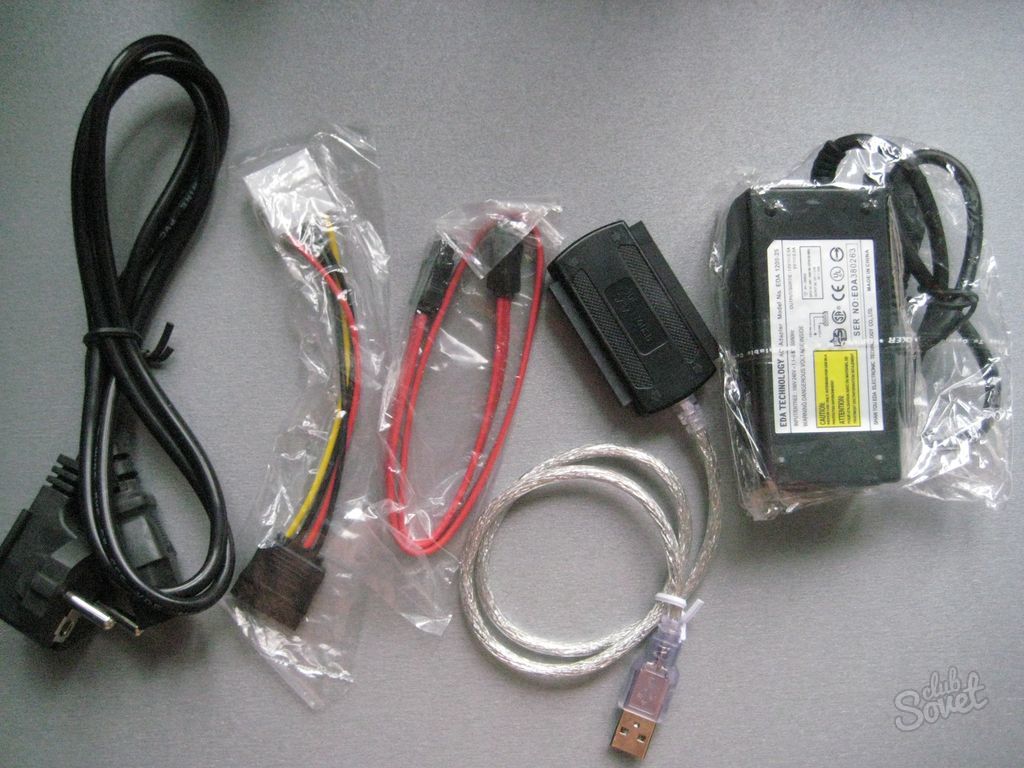

This way of connecting a hard disk is no different from connecting any other USB-media. However, there is a strict rule with this. To prevent irreversible damage to the HDD, you can not turn off the power while the disc is still running. You must also use the safe removal of the device after working with hard drive, before disconnecting it from the laptop.
If you often have to transfer information from your computer's hard drive to your laptop or vice versa, you should purchase a special portable HDD. This kind of hard drives has a USB connection cable, is protected from external damage by a sturdy casing and is used specifically as a portable drive.
This question could interest you for several reasons. First: Do you want to put on laptop hard drive more memory or your old one just burned. Second: You want to drop information from your computer's hard drive to your laptop.
Replacing the Hard Drive on the Notebook
To replace a hard drive in a laptop, you need to perform several simple operations.
Purchase a hard drive for a laptop, at the same time it must be remembered that it differs from a computer one, since its size is not 3.5 ", but 2.5". The interface for hard drives in laptops released recently, SATA. But this is better to be convinced, because it can be, though outdated, but the IDE interface.
Turn off the laptop and turn it bottom to yourself. Then remove the battery, pushing the latches.
Now remove the plastic cover, which closes the hard drive. We unscrew all the cogs with which it is attached to the laptop.

We unscrew the screws that hold the hard drive itself.
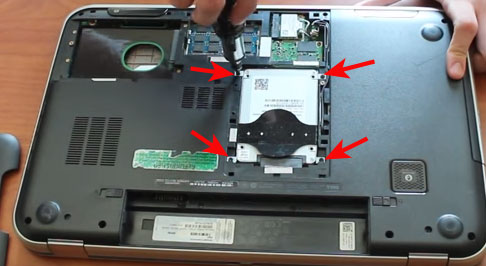
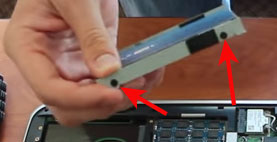
To remove the hard drive, you need to move it down from the contacts. To do this, grasp the pins by the fingers near the pins, do not touch them, so as not to damage them, and move the arrows along the way as shown in the figure.
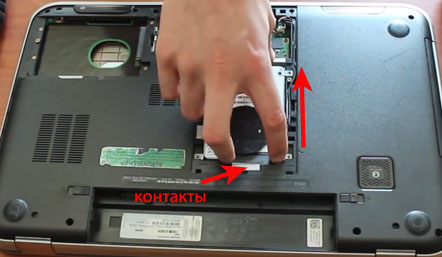
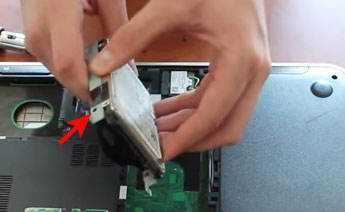
Remove the hard drive by holding the same recesses.
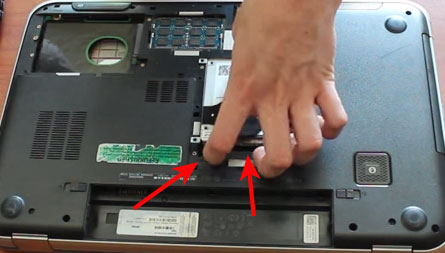
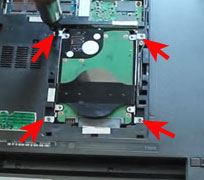
The hard drive in the laptop is in a sled - a metal case. It must be carefully extracted from there. To do this, unscrew the screws: two on one side and two on the other.
We insert a new hard disk in the metal case and screw the screws back.
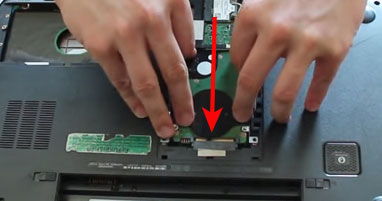
We put new disk in place and move towards contactsto connect it.
Screw the disc to the casing of the laptop with cogs.
Replace the plastic cover and we insert the battery. This completes the replacement of the hard drive on the laptop.
Connecting a Hard Drive from a Computer to a Notebook
If you have a problem, how to transfer information from your computer to your laptop, then you can use it in several ways.
1. You can connect your computer and laptop through network cable . Details on how to do this, you can read in the article:.
3. But in the event that you need to transfer hundreds of gigabytes of information to your laptop from your computer, it's better to use the third method: connect the computer hard drive to the laptop. When connecting a hard disk, the laptop must be turned off.
Internal hard drives are usually connected via the IDE or SATA interface. IDE - an outdated interface, provides a connection speed of 133 MB / s. SATA interface hard drive connections disks, which is used since 2003. Speed of connection: SATA 1.0 - 150 Mb / s, SATA 2.0 - 300 MB / s, SATA 3.0 - 600 Mb / s. The connectors and the cable for the interfaces differ in width, for SATA they are much smaller.
It should also be noted that most notebook models lack external interfaces for connecting hard drives. In this case, you can connect the hard drive to it only through the USB port. To do this you will need to purchase a special adapter from IDE to USB, or from SATA to USB. In the complete set with adapters the power unit usually goes. It will also be necessary, since the power supplied via the USB interface to the hard disk may not be enough.
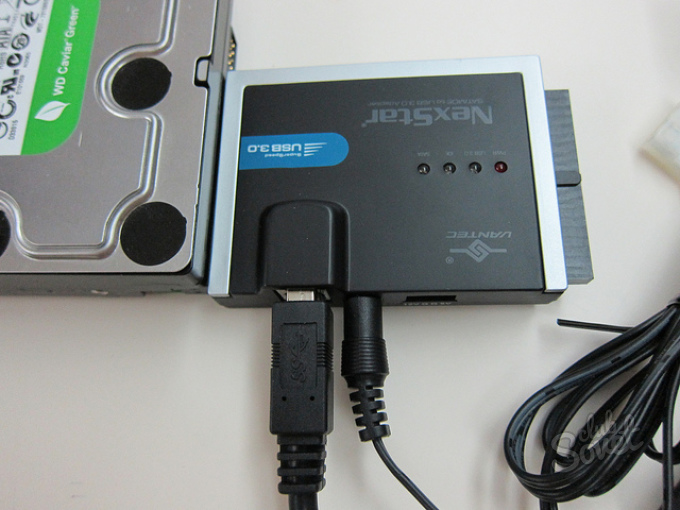
Methods of connecting a hard disk for different interfaces are shown below. The adapter is connected to the hard drive, the USB plug on the other end is connected to the laptop. The power supply can be connected in various ways: either to the adapter, or directly to the hard drive.
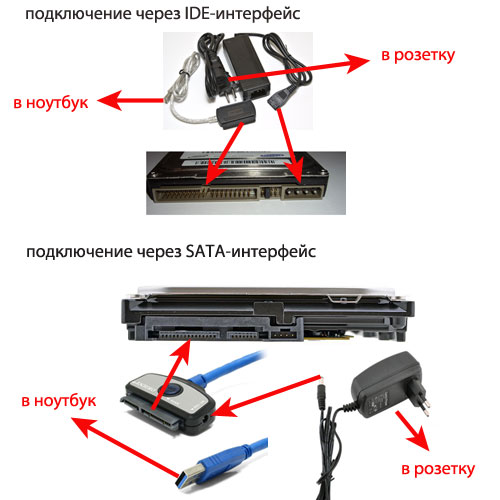
If you have purchased iDE / SATA - USB adapter, then when the hard disk is connected via the SATA interface, the power supply is connected to the hard drive via an adapter.
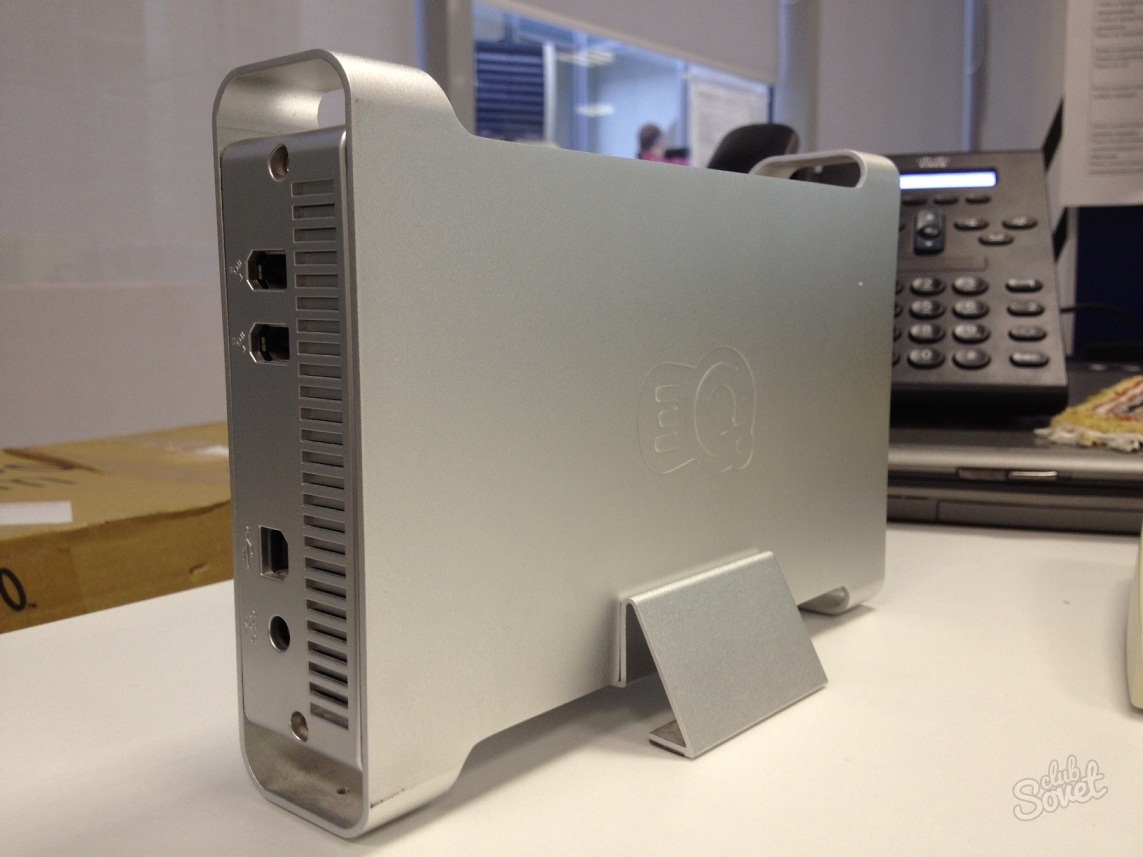
In the event that you plan to use a hard drive connected to the laptop for a long time, it is better to purchase for it external container with adapter. Thus, you can avoid accidental damage to the disc. Moreover, now you can use it as a normal external hard drive. The container looks like a hard case, and is equipped with an IDE / SATA-USB adapter, it can also connect external power.
![]()
To avoid damage to the hard disk, when working with it you can not turn off the external power. You can disconnect the device from the laptop only if you have performed safely remove the device on a laptop.
I hope that the article will be useful for you, and you will be able to connect the hard drive to the laptop no problem.
The amount of constant memory on computers has never been superfluous. Modern films can weigh up to 20GB, games up to 50, songs reach 2GB, but there are sizes and more. The cheapest and most effective type of memory for today is the hard drive. Let's find out how to connect second hard drive to computer with a cable SATA or IDE, so you can not be afraid that tomorrow you will not be able to upload your favorite game or copy a couple dozen movies from the hard drive that the friend brought.
To begin with, you will need to master the theory to understand what actions need to be taken at one time or another.
Types of Hard Drives
Hard drives are external - when you connect a hard drive through a USB wire and internal, which are directly in the computer or laptop. So if you need to connect a hard drive inside the computer or connect a new one external disk to your computer or laptop, then find the appropriate heading in this article.
On the type of USB, I'll stop in detail. AT modern computers There are two main types of USB ports / versions: USB 2.0 and 3.0. Hard drives supporting the third version of the port are approximately 7 times faster than the supporting 2.0 ports. But before buying a hard disk with the version of USB 3.0, make sure that you have such a port on your computer or laptop.
It's easy to check, the third version of USB is marked in blue, but sometimes also in red. It depends on the producers. That's how they look:
If you do not have such a port on your computer, then you will have to be content with a hard disk with USB 2.0 port support. This check must be done! To ensure that after the purchase, do not worry that your device does not work with a particular technology.
Also, when buying a hard disk, pay attention to the speed of writing and reading data from the disk. If you buy a hard disk with bad characteristics, you will wait more time when working with the disc, for example, when copying.
How to see a new external or internal hard drive in Windows
So, you bought a hard drive, came home and happily connect it to a computer or laptop. But you are waited by a constant problem faced by users - the hard drive does not see Windows. It seems that everything was done right and even the indicator lights, which tells you that there is power, but the computer shows that it is not.
This situation is normal! To solve this issue, you need to go to "Computer Management". To do this, right click on the "Computer" and select "Management".
Now select "Disk Management" on the left. After a while, the right side will display information about the disks that are connected to the computer. If your portable hard drive is connected and the indicator is lit (if there is one), then there will be a new hard disk in this list. The next step is to right-click on the hard drive and select "Format".
Click OK. After this, the formatting process will occur. At the end of the procedure, your hard drive should appear in the computer or laptop.
I think the above information completely explained how to connect the second hard drive to your device. Now let's find out the procedure with the internal hard drive.
Internal Hard Drives
In order to understand how to connect the second hard drive inside the computer, you need to remove the left cover of the system unit (if you look at the front of the case). Usually it keeps it on two bolts behind the body, but it happens more. In order to unscrew them you may need a screwdriver, although very often they are easily untwisted with your fingers. After you removed the case cover, it's time to connect the hard drive itself. Do not forget to turn off the computer and remove the voltage from the power supply by moving the button on the back cover to the "0" position and removing the power plug from the outlet!
There are two types of connection for hard disks: IDE and SATA. The IDE bus is morally obsolete in the early 2000s, so we will not consider this type of connection in detail. But the information below will be useful for owners of these hard drives. I will only say that on hard disks with such a connection there is a small jumper that helps the system determine which hard drive is the main one and which is the extra one. On the additional drive, the jumper should be removed. Then place the hard drive in a special compartment in which you already have your main disk installed and secure it with the bolts.
Connect the IDE cable to the motherboard and to the hard disk:
In order for the hard disk to work, connect the cable from the power supply to it. Here's how it should turn out:
Now your second disk is ready for use. You can safely start the computer and enjoy additional memory. If the computer does not see the hard drive, then perform the formatting procedure that I described at the very beginning of the article.
SATA drives it is preferable to use, since they have a higher information transfer rate, consume more energy and contribute to a longer service life of the hard disk. However, before buying such a drive, make sure that your motherboard has the appropriate connectors. They look like this:
The order of installation of such hard disks is similar to IDE disks: insert the disk into the trash (system unit), fix it with bolts. Now connect the SATA cable to the motherboard and also it must be connected to the hard drive. And so that the drive can work, connect the power.
Please note that the power connector is different from the one we connected to disk IDE. But do not worry if you do not have such power connectors - there are special adapters that will help you power a new hard drive. They are inexpensive and they are connected quickly.
More to say about how to connect the second hard drive to the computer, there is nothing. The main thing is to be careful with fragile components and do not forget to turn off the power on the system unit, the rest of the computer will do it yourself. Well, or you will help him! 😉


