, before that, we considered the option when, that is, it doesn’t react to any of our actions, the computer turns on in the same article, but the operating system boots up with an error, namely, the installed hard drive cannot be detected.
In principle, this fault is somehow connected with the hardware of our computer, that is, with the malfunctions and errors of the operating system itself or wrong settings.
So, our computer turned on safely, went through the procedure, but on the screen instead of a greeting, the inscription "" Non-System disk "or" Operating system not found "she says that the operating system cannot find system files required to download it. Let's look at everything possible reasons this error.
Windows does not see the hard drive
- The most common is incorrectly exposed in BIOS priority boot devices, that is, in the menu Setup BIOS in the settings responsible for loading the operating system, the first device is set up, for example, a CD-ROM, the second is a hard disk, and the drive is currently not boot disk or first boot device A floppy drive is set up and there is no bootable diskette in it, you need to remove them and try to boot again.
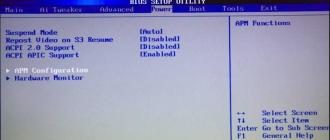
- There is no disk in the drive, and the floppy drive is empty, in which case the operating system should by all the rules boot, because the second device has a hard disk installed and the operating system is on it, but the boot does not occur and Windows does not see hDD . In this case, you need to go into the BIOS parameters of the First Boot Device and set the hard disk as the first boot device. In this photo we see that the first boot device is exposed to a hard disk.
- Suppose it did not help and Windows does not see the hard driveanyway, let's think further. If the hard disk is not detected at all in the BIOS, we look correctly and whether it is well connected with us. We try to connect it to another controller on the motherboard, we change the cable, it sometimes fails, we try to load bIOS settings at optimal settings. How to do this our article. If you have a hard disk interface "IDE" see if this controller is disabled in the BIOS, for example, it can be called so "Marvell IDE controller", if disabled, turn it on, save the settings and reboot.
Marvell IDE controller state enabled.
First you need to define the hard disk. Hard disk or “hard drive”, also known as HDD, is used to save data. All computer files are here (there are only minor exceptions). It contains Windows 10, as well as all the information. Thus, in the case of not displaying the hard drive, information from it will also be unavailable.
HDD Diagnostics
If the system does not determine the hard drive, then it is necessary to determine the cause.
Find out: the problem is in the hard disk itself or in the operating system.
You need to connect the hard drive to the system unit. If the device is successfully detected, there may be a problem in the software, otherwise a hard drive defect.
Work with software
If after the update of Windows 7 / 8.1 to Windows 10, the operating system stopped seeing second hard disk, then the following are the best steps to fix the problem. This instruction will also help if the user has installed an HDD or SSD in the system unit, but only the BIOS can see it, and the operating system guide does not display it. And if it does not show the BIOS, then it is required to analyze the correctness of the equipment connection.
"Turn on" correctly the second hard drive
It is necessary, by pressing the + R keys, to call the "Run" menu, to print diskmgmt.msc. Next, press Enter. The Disk Management utility in Windows 10 starts. At the bottom of the window there will be an area where the disks are listed, examine the following information about them:
- “There is no data. Not initialized "- so it will be written, if not displayed physical hard drive or SSD;
- Whether there are parts on the disk where “Not distributed” is written - this is in the absence of a partition on a virtually divided space;
- In the absence of the above, the RAW section is displayed and nTFS partitions or FAT32, they are not visible in Windows and the volume letter is not assigned. It is required to click on it with the right mouse button and click on "Format" (if RAW) or "Assign a letter".
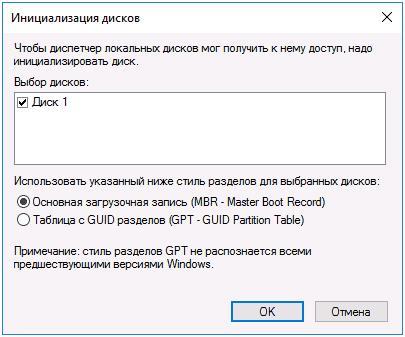
- Right-click on the name of the area and click "Initialize".
![]() In the menu that appears, define the partition structure - MBR (in Windows 7), or GPT (GUID). For Windows 10, GPT is better.
In the menu that appears, define the partition structure - MBR (in Windows 7), or GPT (GUID). For Windows 10, GPT is better.
 Next, you need to right-click on the unallocated part, select the item "Create a simple volume".
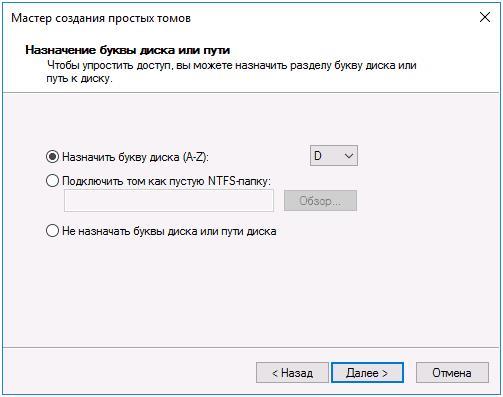
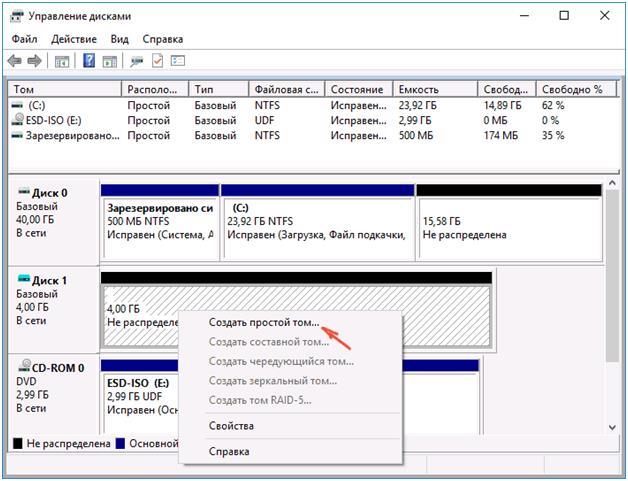 To follow step by step instructions create a volume: select a letter, define file system (better NTFS) and the number of gigabytes of space. If you do not specify how many gigabytes there will be, then it will take all the unallocated space.
 After completing these steps, the second disk will appear in Windows 10, ready for use.
Use the command line to make the second disk visible.
This option is for information only and is not recommended. If you do not have a positive result after completing the steps above and if you do not know the essence of the steps below, then it is strongly not recommended to use them.
It is required to display a command prompt with administrator privileges, then enter the following commands sequentially:
- diskpart
- list disk
Write on a sheet of paper or remember the number of the non-displayed disk (hereinafter - X). Run the select disk X command by pressing Enter.
If the second hard disk is not visible, then use the following commands. Caution! Files will be erased! If it is necessary to save files on a non-displayed section, the above actions cannot be performed. So, consistently enter into the console command:
- clean (removes all files);
- create partition primary (it is possible to set size = S, the size of the segment in MB, in case of the requirement of having several partitions);
- format fs = ntfs quick
- assign letter = D (prescribe - D).
By means of command line more complicated operations can be done, but it is recommended to use it only if you have the necessary knowledge in this area. Also before this you should save the necessary information in advance.
An alternative way to the built-in features of Windows is to use special applications for partition recovery.
Related posts:
Surely, many are faced with a situation where Windows 7 does not see the hard disk. The majority immediately thought that a part had burned or something else. But, as practice shows, this is not always the case.
There are many reasons when the OS may not see the hard drive. Let's look at the most basic ones.
Operating system problems
Almost always, when Windows 7 does not see the second hard disk, the problem lies precisely with the OS itself. As a rule, to connect a new device, the system must define it and configure it. Almost always, new hard drives are connected and configured automatically. But in rare cases, it does not work.
It's not a problem. All this can be customized.
Go to the “Start” menu - “Administration” - “Computer Management”.
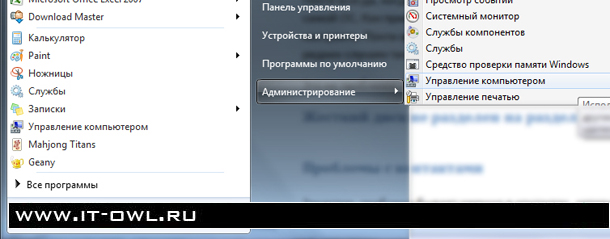
After that, you will open the Computer Management program.

Here you will need to click on the left item "disk management."
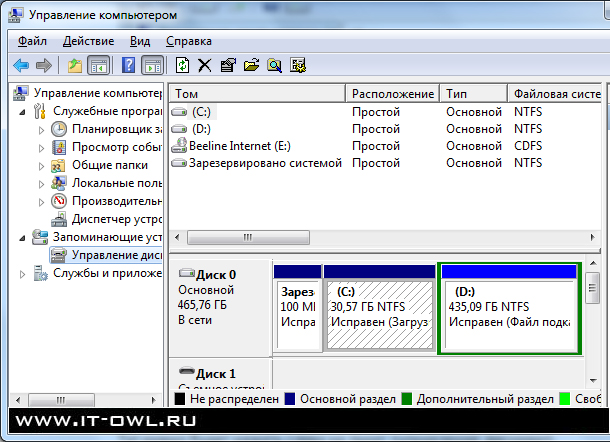
Look at the list of devices. If Windows 7 does not see the hard disk, then it is possible that these local partitions do not have letters. As you can see, the screenshot indicates that there are two sections: “C” and “D”.
If this is not the case, then right-click on this local section.
![]()
Click on the item “Change drive letter or drive path”.
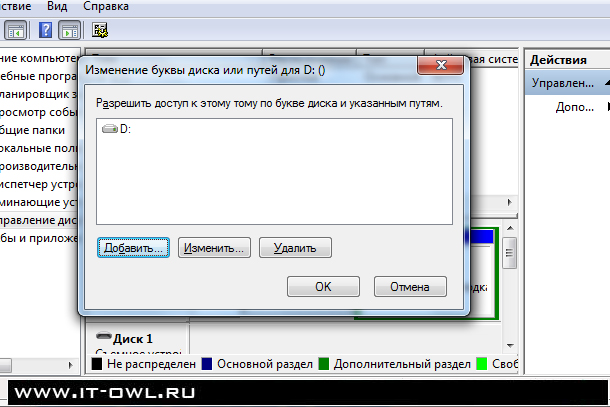
Here you can customize and change the path to your local disk as you like.
The hard disk is not divided into sections.
It is also possible that your hard drive is new, and it is not divided into sections. That is, it is not formatted and not broken.
Do all this, and then you can use this device.
Contact problems
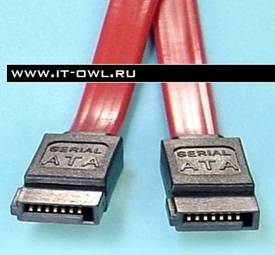
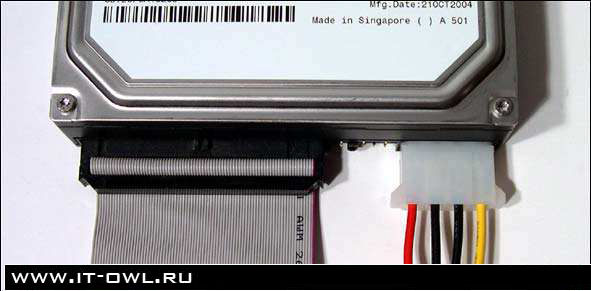
Often, the problem is precisely in the contacts that connect the devices inside system unit. Each hard drive is connected by two "wires". One is needed to power the device, and the second is to transfer data to the motherboard.
This is what SATA cables look like.
They are needed to transfer data from the hard drive to the motherboard. But, in addition to data transmission, a power cable is also connected to the device.
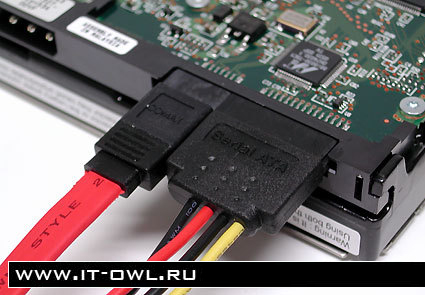
On the photo:
On the left is the power cable;
Right - SATA cable;

If you turn the hard drive, it will look like this.
Older hard drives use ATA connectors. Surely, many saw them.
The essence this method in that it will be necessary to pull out all the contacts and re-insert them. Perhaps there may be dust. Therefore, pull them out and blow them. And then put them in place.
Turn on the computer and watch. If the problem is this, then the hard disk will be determined by the system and will work as before.
Windows 7 does not see an external hard drive
There are also situations where the OS does not see external hard. In such cases, you need to try to reconnect the device. It is also recommended to connect the hard drive in different connectors, and not just the same.
If all else fails, check the integrity of the USB cable and the USB connector. Some of this may be damaged and therefore no data or power is transmitted.
Hard disk burned
In the worst case, when all options have been tried, you should think about what might be a hard drive out of order. Maybe it burned out. Disassemble it. Remove the fee. Maybe something burned there. In this case, it must be taken for repair.
The brainchild of Microsoft, Windows, is incredibly popular, but even in it, sometimes there are certain failures. One of these problems can be called a situation where Windows 7 does not see the hard disk. How to resolve this complexity, we will discuss today.
New name
Windows 7 does not see the hard disk for several reasons, we consider them in order. First you need to perform a number of the following actions. Right-click on the icon "My Computer", which is on your desktop, and in the resulting context menu, select "Management". A window will appear titled "Computer Management", in it you need to select the "Disk Management" column. Call the menu again by right-clicking on the second item. open window. Further, in the menu that appears, we turn to the “Change the drive letter” item. Sometimes it can also help if Windows 7 does not see the second hard drive. Next, rename the hard drive, changing the letter for the title.
Windows 7 does not see the hard disk when reinstalling
Under normal conditions, with stable work personal computer to go ![]() on Windows 7 with XP, we just need to transfer “My Documents”, as well as the settings of previously installed programs, adding all this to the content system folder "Windows 7", then enjoy new system. However, from time to time there is a problem with determining hard drives after reinstalling the system. There are several reasons for this situation, as well as ways to resolve it. Next, we proceed to their consideration.
on Windows 7 with XP, we just need to transfer “My Documents”, as well as the settings of previously installed programs, adding all this to the content system folder "Windows 7", then enjoy new system. However, from time to time there is a problem with determining hard drives after reinstalling the system. There are several reasons for this situation, as well as ways to resolve it. Next, we proceed to their consideration.
Windows 7 does not see the hard drive, and the motherboard is to blame
Probably the conflict comes from motherboard. This happens regardless of which version of the operating system you are using. In this case, you need to load the drivers for the computer's motherboard and add them to the contents of the root folder of the operating system through the drive. Insert the disk with the necessary software for the motherboard into your reader. In this case, during the procedure for restarting the computer, it may be necessary to press the “F6” key. In some cases, Windows 7 does not see external hard the disk, however, this may be due to malfunctions of the drive itself.
Work with BIOS
In the BIOS settings, we will find the parameter responsible for the operation of AHCI, by disabling this setting, you can achieve the definition hard drive. To this end, before loading the operating system, call the BIOS by pressing the "F2" or "delete" key. Using the operating system settings, you must disable AHCI mode. If the options described above have not solved the problem, we will work on integrating the SATA driver into the distribution of your operating system. The official website of the manufacturer will help us determine the exact choice of the necessary updates and drivers. In this case, we can determine the type of installed motherboard using the documentation that has been preserved after the purchase of components for a personal computer or in the “Properties” section by right-clicking on the “My Computer” icon. A more common problem that PC users may encounter is the inability to detect a hard disk during the installation of the operating system. To begin with, when reinstalling or first installing the operating system, various problems may arise, among which are identical to those described above.
Based on this, in this situation, you should also try disabling the AHCI option by going to the BIOS, or integrate the motherboard drivers by adding them to the distribution kit on your personal computer. If the system still does not detect the disk, you need to check whether the connector of your HDD is properly connected. Whatever used windows version you need to know that the special device with which the hard disk connects to your motherboard has two main connectors, one blue and one black. The blue connector works with external reading devices, which include a CD drive, as well as the hard drive of a personal computer. It is necessary to connect a hard disk to the blue connector, since black is often unstable. If all that has been done does not help, the driver was probably chosen incorrectly.
One of the rare but very unpleasant problems when installing an operating system is the inability of the installation program to determine the hard disk. Often, if users simply do not know what to do next and where to look for the roots of this problem. Usually the question arises - Can do in what? We want to say right away that everything is not always so serious and, as a rule, this situation is completely solved, and with minimal computer skills, you can cope with it on your own. So why when windows installation 7 can not see the hard drive?
No hard disk connection
The first reason may be that the hard disk is not connected to the computer. Perhaps, prior to installation, the user for some reason turned off the power of the hard drive and simply forgot to plug it back, or the plug did not fully enter the connector. This version is, of course, banal, but you should never discount the human factor. Therefore, first of all, it is worth checking the correctness and reliability of connecting cables from the motherboard and power supply to the hard disk.
Hard Drive Failure
The second reason - failure of the drive. You can confirm or deny this option if you go to Computer BIOS (by pressing Del, F1, F2 or other keys - depends on the specific motherboard) and see if the hard disk is detected there. If the required hard drive is not in the list of connected drives, then it most likely does not work. If it is in the BIOS, but the Windows installer does not see it, it means that you need to switch to other methods of solving the problem.
Equipment conflict
The third reason is the hardware conflict with the motherboard. In this case at installing windows 7 does not see the hard drive and asks for a driver. To correct this error, you need on another computer to download the SATA / RAID drivers for the motherboard (respectively, after finding out the exact name of its model) and write them to the media where the Windows distribution kit is located. After that, in the installation window of the operating system, when the hard drive selection window appears (where, of course, it will not be displayed), you must click the link Download and specify the path to the SATA / RAID driver.
The driver will be installed, after which the installation program will be able to detect the hard disk.
The same problem can be corrected in a slightly different way: write the driver to a floppy or flash drive, insert the drive into the appropriate drive and press the F6 key during the installation of the operating system. After this, the installer will see the hard drive without any problems.
You can also use unofficial Windows builds with integrated drivers and applications. Such an assembly will automatically download all the necessary drivers and recognize the hard disk when installing the OS.
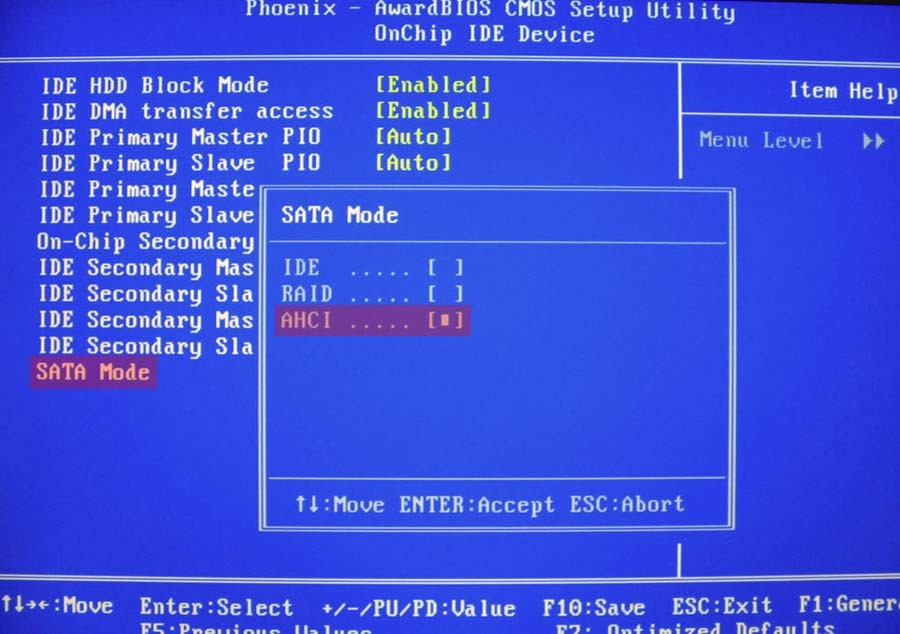
AHCI connection
The fourth reason - the hard drive is connected in AHCI mode. Because of this, in some cases, the computer does not see the hard disk when installing Windows 7. To remedy this situation, you need to go into the BIOS (by pressing Del, F1, F2 or another key) and go to the section responsible for managing drives. There you need to find a menu that allows you to change modes connect hard disk - it can be, for example, Configure SATA As, SATA Mode, AHCI Mode and so on. Here you should switch the mode from AHCI to another available, and then restart the computer.
If everything is done correctly, the installation program will determine the hard drive and be able to install operating system. Problem the user is facing if when installing Windows 7 does not see the hard diskin most cases enough easy solved. Having corrected it by the methods described above, you can proceed to the further installation of the operating system.
By the way, if you want to install the system not from a disk, but from a USB drive, then we suggest reading the article. This article reviewed 3 best programs for this purpose, and also demonstrated the process of creating a bootable flash drive.