Problems when registering on the site? CLICK HERE ! The Antivirus Updates section is working full-time again - always up-to-date free updates for Dr Web, NOD, Kaspersky all versions. Always fresh versions of the best free programs for daily use in the section Necessary programs. There's almost everything that is required for daily work. Begin to gradually abandon the pirated versions in favor of more convenient and functional free analogs. If you still do not use our chat, it's highly advisable to get to know him. There you will find many new friends. In addition, this is the fastest and most effective way to contact project administrators. Do not pass by a very interesting section of our site - the projects of visitors. There you will always find the latest news, jokes, weather forecast (in the ADSL-newspaper), the TV program of the air and ADSL-TV channels, the latest and interesting news from the high-tech world, the most original and amazing pictures from the Internet, a large archive of magazines in recent years , appetizing recipes in pictures, informative. The section is updated daily. Do not have time to read something? The complete content of the creeping line can be found at this link.
BIOS Setup FAQ and BIOS Setup Guide
BIOS Setup FAQ: how to configure BIOS
Introduction
The basic input output system (Basic Input Output System, BIOS) is written in a small chip of flash memory on the motherboard. Most often this memory is used for reading, but with the help of special utilities and technologies, the BIOS can also be overwritten. During the start-up of the PC, the processor on the motherboard performs the BIOS program for initial verification and initialization of equipment, and then transfers control of the OS.
If the PC does not pass through the boot process, if the system is running too slowly, Windows "crashes", "hardware" fails, then the cause may be an improperly configured BIOS. In this article we will show how to solve a particular task with the help of competent BIOS Setup.
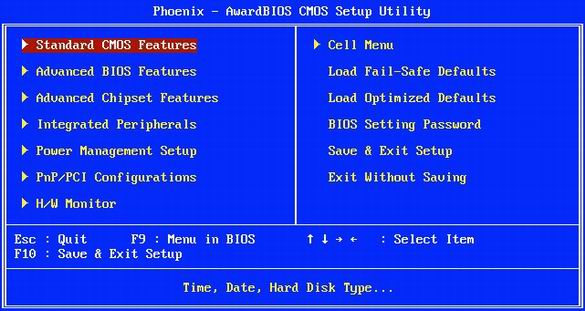
The "Basics" section provides basic information about the BIOS. In it you will learn what the BIOS is, how to go into BIOS settings and deal with them. The "Key settings" section contains information about the main BIOS options that each user should know about. Experienced users can be recommended to go directly to the section " Tweaking BIOS ", where you can learn about the use of hidden settings, activation of new functions, bypassing" bottlenecks ", etc.
BIOS: basics and principles
When the computer starts, the BIOS "presents" the processor to the main components motherboard and tells the processor which program to run next, after bIOS Completion. Typically, the BIOS transfers control to the boot sector of the drive, which can be a floppy disk, CD-ROM, DVD or hDD. The boot sector starts the loader, which activates the primary operating system, the same Windows or Linux.
The BIOS responds not only for the boot process. Many operating systems use the BIOS as an intermediary to access different hardware.
1. BIOS versions
Each motherboard uses its own BIOS version, specially designed for its hardware stuffing. The most common BIOS is the Phoenix Award, and in two varieties. In addition, some computers use the BIOS of American Megatrends (AMI).
The BIOS menu structure and the designations used vary from one manufacturer to another. Even the BIOS menu for two consecutive motherboard models may differ to some extent. That's why we can not give an exact description of the BIOS options of each computer known to mankind. But do not despair. You can easily find a correspondence between the sections discussed below (based on Phoenix Award BIOS) and the BIOS items of your PC. Do not worry if you do not find some settings: this means that the BIOS of your PC does not allow you to manage these settings directly.
2. Exit the BIOS
At boot time, when the BIOS checks the hardware components of the system, considers the available memory and finds hard disks and other drives or devices, you can go to the BIOS Setup program using a special key. It is often enough to press a key, but other options are also used, for example. Look carefully at the screen at boot time: most BIOS displays a line like "F10 = Setup" near the bottom of the monitor. If nothing happens, open the manual for the motherboard, where the magic combination should be indicated. Press the specified key (or combination) and hold for a second or two while the PC is loading.
If it works, the BIOS will calculate the amount of available memory, after which the main BIOS menu will appear. If it does not work, restart your computer and try using a different key combination. For example, many laptops go to the BIOS by pressing the or key. Sometimes the keys work, or a combination like.
3. Changing BIOS settings
BIOS setup: use the cursor to select the desired line and press "Enter".
To select a menu in the BIOS, use the cursor and use the arrows to move it to the desired item. By pressing the "Enter" key, you will go to the section or get the window for selecting the setting (as in the picture below). To change the specified setting, you should press the plus or minus keys, or another combination like. From the main BIOS setup menu, you will be taken to various configuration sections that can be divided into their own subsections.
Open the subsection. The values of many options can be changed with the plus (+) and minus (-) keys, while others can be set using the drop-down menu.
Let me briefly go through the sections of the main BIOS setup menu.
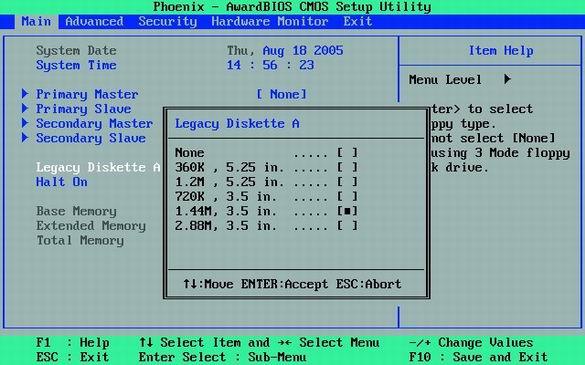
- In the "Main" or "Standard CMOS Setup" section, you can set the date and time, as well as the parameters hard disks.
- The "BIOS Features Setup" section contains various general settings.
- Section " Integrated Peripherals"is responsible for interfaces and additional system functions.
- The "Power Management Setup" section allows you to configure all power and power options.
- In the "PnP / PCI Configurations" section, you can tie interrupts (IRQs) to expansion cards of your PC. If such functions are not available in the section, they can be found in the subsection "Advanced".
- The "Hardware Monitor" section allows you to find the values of system sensors: processor temperature or fan speed (rpm). Usually the processor and chassis fan speeds are shown, but also the fan parameters of the power supply unit or others may be present here.
- The "Load Setup Defaults" item restores the default BIOS settings and eliminates any changes you might make. This point will be useful if your actions have led to any problems in the system.
4. Exit the BIOS Setup
To complete the BIOS setup, press the key, or select the main menu item "Save & Exit Setup". Sometimes you first need to select "Exit", then specify the option "Exit & Save Changes". Then the choice is usually to save the changes: "Yes" [Y] or "No" [N]. Select the option you want, after which the computer will be restarted.
Key BIOS Settings
Below we show how to change the BIOS sequence for selecting bootable disks for the computer, turn on the PC by pressing a key or click on the mouse, activate the support for USB 2.0, and also solve problems with the fans or change the hardware configuration.
5. Set BIOS priority of boot devices
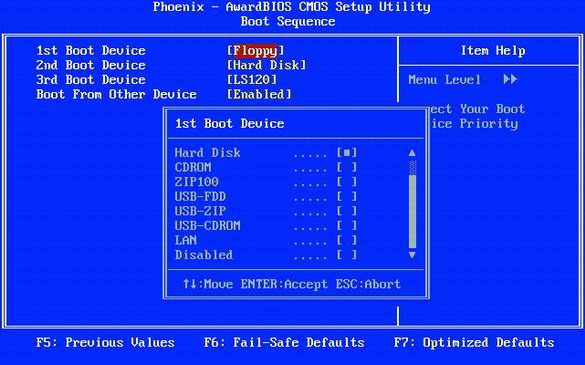
In the BIOS, it is best not to put the floppy drive as the first boot device. Instead of the drive, specify the hard disk.
Most PCs default to the drive as the priority boot device. This option for a couple of seconds slows down the boot of the PC, because it will check the presence of a boot floppy disk in the drive. You do not need to do this either because there is a danger of getting infected with a boot virus from a dirty floppy. Do you often boot from a floppy disk at all? And why do you need this vile sound of addressing an empty drive? It is better to set the hard disk as the first boot device.
In the BIOS Setup, it is possible to specify the devices from which the download can be performed, as well as the order of their verification. Let's look at how to remove the drive from the first boot device. To do this, select "Advanced BIOS Features, Boot Sequence", then select "1st Boot Device" and change its value from "Floppy" to "Hard Disk", as shown in the illustration above. In principle, a hard disk can be called "HDD-0". As a result, the computer will hard drive, bypassing the floppy disk. Of course, if necessary, the boot order can always be restored by returning to the BIOS Setup.
But now, even if the computer does not attempt to boot from a floppy disk, it will still check the drive at boot time, losing time. To avoid checking the drive, set the "Boot Up Floppy Seek" option to "Disabled".
6. Speed up PC boot up help with BIOS
As you understand, to speed up the download it is important that the PC did not check for extra devices, and loaded immediately from the hard drive. In addition, it is better to disable the search for new hard drives and other devices. If you do not often change the set of hard disks in the system, set zero search time. To do this, in the "Main" menu, set the value "Timeout" to "0".
7. How to include in BIOS support USB 2.0
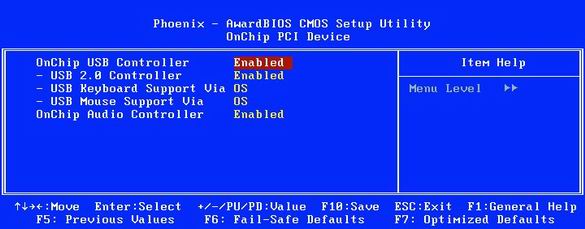
USB: If you installed Windows XP with Service Pack 2, you should enable the "USB 2.0 Controller" option.
On many motherboards, the "USB Controllers" option is set to USB 1.1 by default. This is due to the fact that Windows XP without service packs Service Pack (and special patches) does not support USB 2.0. That's why USB 2.0 support usually needs to be turned on manually.
To enable USB 2.0 in the BIOS Setup, set the option to "Enabled" (as shown in the illustration above) or "V1.1 + V2.0". But remember that to use the USB 2.0 interface you need to install, at a minimum, Service Pack 1 for Windows XP.
8. How to solve problems with USB-devices using BIOS
Some flash drives, MP3 players and USB drives are powered by a USB port. If the power is insufficient, the device will not work. That's why you should make sure that the USB port provides enough power for such devices.
Check if there is an option in your BIOS called "USB 2.0 HS Reference Voltage". If there is, then set the value from "Low" or "Medium" to "High" or "Maximum".
9. How do I change the PC's reaction to the power outage in the BIOS?
In the "Power Management" section of the BIOS Setup, you can specify how the computer will react to the power outage. The "AC Power Loss Restart" or "Restore on AC Power Loss" options in the BIOS are responsible for the behavior of the computer after emergency shutdown electricity and subsequent recovery of food. Set this option to "On" or "Enabled" if you want the computer to automatically boot. Either "Off" or "Disabled" otherwise.
10. How to check the temperature and status of the PC via BIOS
The BIOS provides information about the operating parameters of your PC. You can track in real time the state of vital system components, including CPU, fans, power supply and hard drives. For example, you can turn on BIOS alarms if the processor exceeds a certain temperature, or even realize an emergency shutdown. As a result, your system will not overheat.
Various items in the "Health" or "H / W Control" section allow you to monitor the change in voltages as well as temperature sensors. Most BIOS displays values for CPU and chassis temperatures, and in some versions, other temperatures for, say, the hard disk or the chipset of the motherboard. In addition, in the BIOS you can find the speed of the fans (in rpm).
11. How to fix cooler problems with BIOS
If your PC does not boot up, it may be caused by a too low fan speed or even a stoppage. Especially often this situation occurs with high-end coolers, whose rotation speed depends on the temperature. They can rotate very slowly (or generally stop) at low temperature, as a result of which the BIOS can calculate that the fan has failed. In such cases, the correct BIOS setup helps.
Set the BIOS option to "CPU Fan Failure Warning" in "Disabled". When you turn this option off, the computer will boot even if the fan rotates at a low speed. Of course, there is one more problem: you can not enter the BIOS at all, because the computer may refuse to boot for the reason mentioned above (in many BIOS this option is set to the default value of "Enabled"). In this case, you'll have to connect to the motherboard any cheap cooler for a while, which always rotates at maximum speed. And after disabling the settings, you can connect already high-end model.
12. How to avoid system crash?
Modern hard drives can detect symptoms or problems that precede the drive failure, warning the BIOS. This function is called "Self Monitoring And Reporting Technology" (SMART). Enabling the "HDD SMART Capability" feature allows the BIOS to send warnings to programs like Norton System Works or the well-known free utility SpeedFan. As a result, the user receives information about the status of the drives. Such a possibility allows taking the necessary measures as soon as the first symptoms of the impending failure begin to appear.
13. We connect old printers and scanners (LPT)
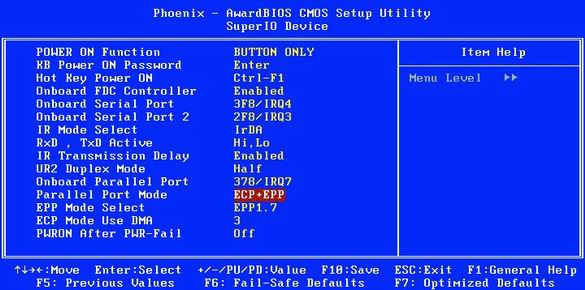
Parallel Port: The fastest mode is "ECP + EPP".
The parallel computer port (LPT) usually works in one direction only. This setting is suitable for almost all devices, although the transmission speed is limited to 100 kbps. You can transfer the LPT port to a more modern mode, which gives a speed of up to 1 Mbps.
To do this, enable the "ECP" (Extended Capability Port) or "EPP" (Enhanced Parallel Port) mode. In fact, you can enable both modes at once by setting the option "ECP / EPP" or "ECP + EPP".
A warning: If you have several devices connected to the same port, then there may be problems with high-speed modes. In such situations, you can recommend buying a PCI expansion card, which will add a second LPT port. Or buy a USB-LPT adapter. Or, of course, go to a more modern scanner or printer.
Tweaking the BIOS
This part of the article is addressed to demanding users who want to maximize the download time, optimize the system parameters, fully use the computing resources of the PC, the chipset's capabilities of the motherboard and memory.
14. How to enable BIOS output of POST test results at boot time
When the PC is booted, many computers display multicolored manufacturer logos instead of the POST (Power-on Self-Test) lines. But, it seems to us, it will be much more useful to see which element of the computer is being tested, and with what results.
In the "Advanced BIOS Features" section, find the "Full Screen LOGO Display" item and set it to "Disabled". After that, you will be able to see the results of all the PC tests at boot time.
15. How to configure the BIOS so that the PC boots faster
Using the BIOS, you can further reduce PC boot time by reducing the time of the first test. Of course, we recommend doing this only if all the components of the PC work stably. For example, you can turn on the BIOS in a single scan of available memory instead of three. To do this, go to the "Advanced" or "Advanced BIOS Features" section, find the "Quick Power On Self Test" or "Quick Boot" option and set it to "Enabled".
Warning: if there are any problems with the hardware, we recommend to go back to the BIOS and turn off the quick test, setting the value to "Disabled". This BIOS is more likely to find an error.
16. How to enable a different graphics card in the BIOS
If your computer has several interfaces, in which a graphics card (built-in graphics, AGP, PCI Express, PCI) can be installed, the BIOS will try to determine which one the work card is in when downloading it. But this is not necessary, because you know all the necessary information!
Select an option in the BIOS Setup called "Init Display First", which can also be called "Primary VGA BIOS" or "VGA Boot From" depending on the BIOS version. Specify the value of "AGP" if you are using an AGP graphics card. In new systems with PCI Express, this option is usually called "PEG Port / Graphic Adapter Priority". In this case, set it to "PEG" if you are using a PCI Express card.
17. How to disable superfluous functions of video cards in BIOS
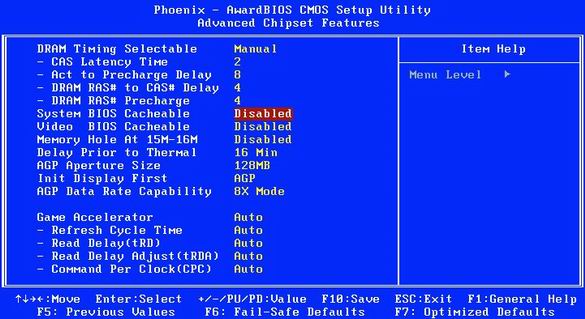
BIOS Cacheable: this option will improve performance only in MS-DOS.
Options "Video RAM Cacheable" and "Video BIOS Cacheable" improve the performance of graphics on older machines under DOS. But for Windows they are useless. Include them no reason.
Set the BIOS options "Video RAM Cacheable" and "Video BIOS Cacheable" to "Disabled". At the same time, disable the option "VGA Palette Snoop", if it is. Finally, you can disable the option "System BIOS Cacheable": it no longer increases performance, and in some cases can even negatively affect the stability of the system.
18. How to properly configure the memory for the video card in the BIOS
The option "Graphics Aperture Size" (which may also be called "AGP Aperture Size") was originally designed to make AGP graphics cards more efficient random access memory PC during the output of textures. This function is already outdated, since many graphics cards have built-in memory of 128, 256 or even 512 MB. In addition, the built-in video memory card runs faster than an operational PC. If previously recommended to set the value of the texture memory in half the amount of RAM of your system, today it is better to choose the optimal size. That is 128 or 64 MB.
19. How to set the BIOS clock frequency AGP correctly
This "trick" helps to avoid problems with graphics card AGP when overclocking the Front Side Bus (FSB).
On the motherboards equipped with the overclocking function, you can find the menu item "AGPCLK / CPUCLK" (it can also be called "AGP Clock"). If it is, set the value to "Fix". It prevents the effect of FSB overclocking on AGP frequencies. A value of "1/1" causes the AGP to operate at the same frequency as the FSB. A value of "2/3" sets AGP at 2/3 of the FSB frequency, so for example, 100 MHz FSB goes to 66 MHz for an AGP graphics card.
20. How to increase the clock speed of the AGP in the BIOS
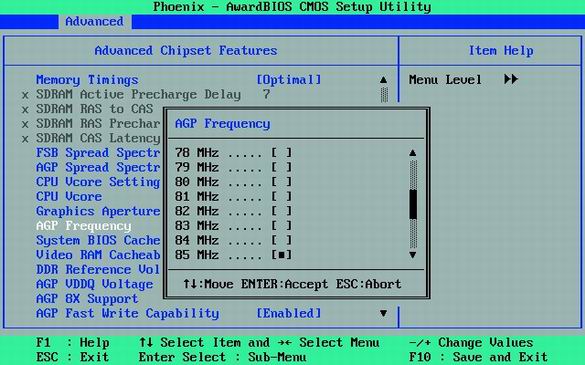
Increasing the frequency of AGP increases performance, but there may be problems.
Some motherboards allow you to increase the frequency of AGP. In principle, you can try to increase this frequency (the "AGP Frequency" item) in small steps, and reboot the PC after each change. Test each setting on a 3D type shooter Doom 3 or Quake 4 to check the stability of the system. If any malfunctions occur, go to the previous AGP frequency value.
21. How to increase BIOS voltage on AGP
Higher clock speeds require more power. The "AGP Voltage" option allows you to increase the AGP voltage, most often in 0.1V increments. Voltage can be increased if the increase in the AGP frequency leads to instability, and the need for productivity growth is acute.
Warning: in some situations, excessive voltage increase can burn the graphics card. If the voltage rise does not lead to the desired effect, return the value to a lower level and lower the AGP frequency to ensure stable operation of the system.
22. How to enable and disable the CPU cache in BIOS
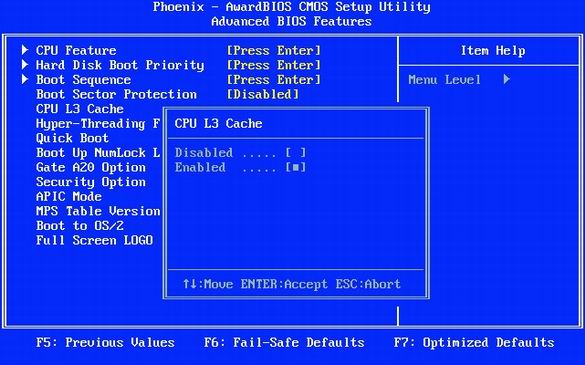
The inclusion of a processor cache at any level (1, 2 or 3) provides a significant performance boost.
The CPU runs significantly faster than other components on the motherboard, and it often has to wait for the data to arrive. Speed up data exchange allows the processor cache, which is a high-speed memory, located between the CPU and the computer's RAM.
The L1 cache is very small, but it is on the processor core, close to the computational units, providing a very fast storage for temporary data. The second level cache (L2) is much larger in size and can store some program elements entirely or pieces of data. When a processor requests data, it first checks their presence in the cache. If the required data is there, then the performance of the computer is significantly increased, because the memory can not react with the same speed as the cache. Some processors, as a rule of a professional level, also have an L3 cache. As you know, the cache should always be enabled.
23. How to enable APIC in the BIOS
The chipset of the motherboard usually consists of two chips, which are called the north and south bridges. They are responsible for transferring data between the processor, RAM, expansion cards and peripherals. The inclusion in the BIOS of the APIC (advanced programmable interrupt controller) mode allows to improve the work with the devices. The number of interrupts increases from 16 to 24, and their management with APIC is much easier and more convenient.
All you need is to go to the "Advanced BIOS Features" menu and set the "APIC Mode" option to "Enabled".
24. How to enable the BIOS in burst mode (Burst Mode)
Batch mode (Burst Mode) allows you to speed up a lot: work with hard drives, PCI cards and RAM. Batch mode allows you to transfer several pieces of data in one transfer instead of processing all the pieces individually.
If, during the BIOS setup, you encounter anywhere the option "Burst Mode", then set it to the "Enabled" mode. Of course, after this we recommend checking the stability of the system.
Caution: Many PCI cards may not work properly if the "PCI Dynamic Bursting" option is set to "Enabled".
25. Turn on bus management (Bus Mastering)
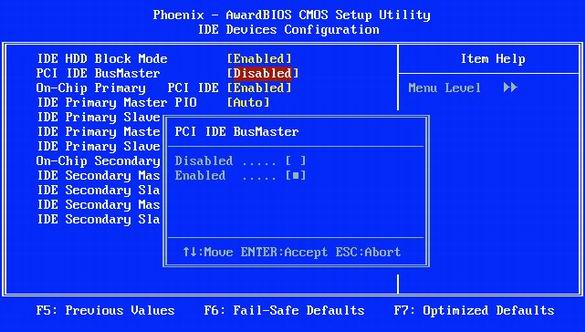
Turn on bus management (Bus Mastering): this option speeds up the work with the hard disk.
This BIOS setting allows Windows to use a faster mode of direct access to DMA (Direct Memory Access) memory when reading or writing to a hard disk. DMA mode provides direct access to the hard disk controller to memory, bypassing the CPU. As a result, access to the hard drive is accelerated and precious CPU resources are saved.
If the option "PCI IDE BusMaster" is present in the "Integrated Peripherals" menu, set its value to "Enabled", as shown in the illustration above. When you do, go to Windows in the "Start, Settings, Control Panel, System" and click the "Device Manager" button on the "Hardware / Hardware" tab. There, find the item "IDE ATA / ATAPI Controllers / IDE ATA / ATAPI Controller" (it depends on the chipset, so it may be slightly different in your case). Find the "Primary IDE / Primary IDE Channel" entry and go to the "Advanced Settings" tab. There, find the item "Current Transfer Mode". Its value must be set to "Ultra DMA Mode / Ultra DMA Mode". Hard drives usually have Mode 5, and CD / DVD drives have Mode 2.
26. How to change the memory timings in the BIOS
Reduce memory latencies. This operation makes sense only for high-quality memory modules. But if it works, you will get a performance boost.
Each SDRAM and DDR / DDR-2 memory module carries a special Serial Presence Detect (SPD) chip, which stores the default latency values (timings). Memory manufacturers usually specify SPD values for guaranteed stable and reliable performance. Therefore, it often makes sense to slightly speed up the delay, since this step allows you to squeeze a few percent more performance.
The corresponding options can be called like "System Performance", "Memory Timings" or "Configure DRAM Timing". Typically, the default value for these options is "By SPD". It forces the computer to read the recommended values from the SPD memory chip and automatically use them. In addition, the value of "Enabled" is also unlikely to cause problems with the PC.
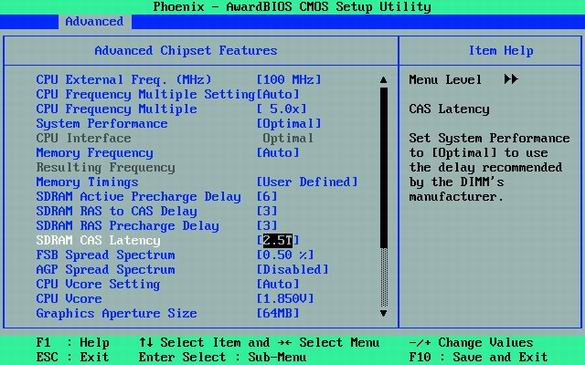
If you want to try to configure systems for better performance, set the option value to "Disabled" or "User Defined" (if any, see the illustration above). Then set the parameters manually, as indicated in the following paragraphs.
27. How to reduce latency in RAS-to-CAS in BIOS
Memory is better represented as a two-dimensional array. To obtain the data, you specify a column using the Row Address Strobe (RAS) signal, and then a line using the Column Address Strobe (CAS) signal. Between RAS and CAS signals, a certain time interval is required to ensure that addressing does not go astray. Typically, the delay of the RAS-to-CAS is two or more clock cycles.
The value of "SDRAM RAS to CAS Delay" allows you to precisely set how many beats pass between RAS and CAS signals. Settings from 2 to 5 are possible, and 2 is the fastest. Try to reduce the delay and test the stability of your system. The more quality your memory modules, the less delay you can get.
28. Reduce the delay in the BIOS CAS
When you receive data from memory, you should wait for a certain time interval between setting the address and transmitting data. It is also indicated in cycles: 2T for two measures, 3T for three, and so on. A smaller value of "SDRAM CAS Latency" provides better performance.
The correct (and safe) "SDRAM CAS Latency" value is usually printed on the module labeling or even burned on the chips themselves. For cheap modules, the values 3T or 2.5T are usually encountered. Set the value to 2.5T or even 2T, then check the stability of the system. Some memory manufacturers claim that memory supporting 2T mode is capable of operating at higher frequencies. If you reduce the delay of the CAS, you can try to increase the memory frequency using the "Memory Frequency" option.
Warning: Change only one parameter per test run. Then you can immediately determine the cause not stable work and return to the checked value.
29. Reduce the BIOS RAS Precharge Delay
For memory cells to work quickly, they must be properly charged. The "SDRAM RAS Precharge Delay" option indicates the gap (in beats) between the charging of cells and the sending of the RAS signal. With a smaller value, say, "2", the memory runs faster, but often unstable. Try to reduce the charge delay and each time check the stability of the system.
30. Reduce in the BIOS SDRAM Precharge
The delay "SDRAM Active Precharge Delay" is also set in cycles. It indicates a delay between successive accesses to memory, so that its reduction can speed up the work with memory.
Typically, the delay is calculated as follows: Active Precharge Delay = CAS-Latency + RAS Precharge Delay + 2 (for stability). As in the case of other delays, try to lower its value by one cycle and check the stability of the system. If you have any problems, return the value back.
31. Reducing memory timings: general tips
RAM latency: reducing delays allows you to speed up the performance of the memory subsystem.
The recommended values for board tips 27-30 depend on the modules themselves. If the module indicates "2.5-4-4-8", then the delay of CAS Latency is 2.5 cycles, RAS to CAS Delay is 4 cycles, RAS Precharge Delay is 4 cycles and Active Precharge Delay is 8 cycles. It is these values that the manufacturer recommends for memory modules. Of course, smaller delays can also be earned, but there is a danger of system failures. If you want optimal performance, we recommend in turn to reduce delays for one value and test the stability of the system each time.
32. Increase the BIOS voltage for memory
If the memory runs faster, it will need more power. That's why, along with the increase in frequency, you should also increase the supply voltage.
The "DDR Reference Voltage" option allows you to increase the memory voltage normally in 0.1V increments. Increasing the voltage makes sense if you have reduced the delay or increased the memory frequency. Or if there are problems with stable work.
Warning: too high voltage can burn memory modules!
33. How to turn off the built-in sound in the BIOS
Often the built-in sound controller of the motherboard is not used. Say, if you installed a powerful PCI sound card or even use a computer without speakers. Then it makes sense to turn off the sound on the motherboard. In some cases, this can improve overall system performance and stability.
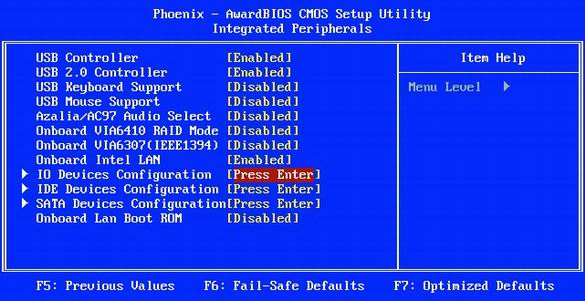
In the "Integrated Peripherals" menu, set the "AC97 Audio Select" to "Disabled" (as shown in the illustration above).
34. How to turn off the game port in BIOS
The game port is useful only to owners of old joysticks or those users who apply it as a MIDI interface. Then it makes sense to allocate two I / O ports and an interruption to the game port. (By the way, if you have a joystick, then it most likely uses uSB connection). All other users should disable the game port.
In the "Integrated Peripherals" menu, set the value of "Game Port" to "Disabled".
35. How to turn off the network port in the BIOS
Some motherboards have two network interfaces, but as a rule, most users only need one. It is better to disable non-working interfaces. In some cases, this increases the system's performance and stability.
In the "Integrated Peripherals" menu, set the "Onboard Intel LAN" item to "Disabled".
36. How to turn off BIOS extra ports
Today only old PDAs and modems need serial COM1 and COM2 ports. Disabling ports saves two IRQ interrupts, reducing the number of interrupts that the processor should check. And the parallel interface LPT today hardly anyone needs. Moreover, modern printers and scanners are connected to the USB port.
From the "Integrated Peripherals" menu, disable the COM1 and COM2 interfaces (the "IO Devices, Com-Port" option, but can also be called "Serial Port 1/2"). Turn off the LPT port by setting the "Parallel Port" to "Disabled".
37. How to turn off the FireWire BIOS (IEEE1394)
The FireWire interface is only needed if you need to download video from the camcorder or connect the FireWire peripherals. In all other situations, the interface should be turned off.
In the "Integrated Peripherals" menu, set the "Onboard 1394 device" to "Disabled".
BIOS Update
From time to time, motherboard manufacturers are releasing new BIOS versions. BIOS updates, as a rule, contain various optimizations, as well as new functions. Say, the same overclocking functions. We recommend updating the BIOS only when a new final version appears (and it's better to skip the beta and alpha versions).
The BIOS is written to a special flash memory chip. During the firmware update, it is written in place of the old one. To update the BIOS, you need special utilities that motherboard manufacturers put into the package. In addition, some BIOS versions support the firmware themselves, using a combination of keys.
As for the BIOS update, there are usually two alternatives here. You can use the utility under Windows, which can usually be found on the CD from the motherboard or downloaded from the manufacturer's website. You can also install a utility that will periodically check for a new version of the BIOS and, if necessary, download it. This method is simple, but the test utility takes a place in memory and consumes some resources.
Updating the BIOS under Windows is an easy and easy way, unless your system works stably. For greater reliability, you can recommend upgrading via DOS.
To do this, you need to download the firmware from the manufacturer's web site. Then create a bootable DOS floppy disk and write the utility along with the new BIOS version to it. Then you should boot from the floppy and run the utility via the command line (if you downloaded the utility and the BIOS in the ZIP archive, you should copy them to the floppy disk in the unpacked form). This approach is considered by many to be more reliable, since there are no extraneous drivers in DOS.
Warning: if you update the BIOS of the laptop, you should not do this while the battery is powered. The laptop should be flashed when the power is supplied from the mains.
Choose your motherboard: use only those BIOS versions that are designed specifically for your model.
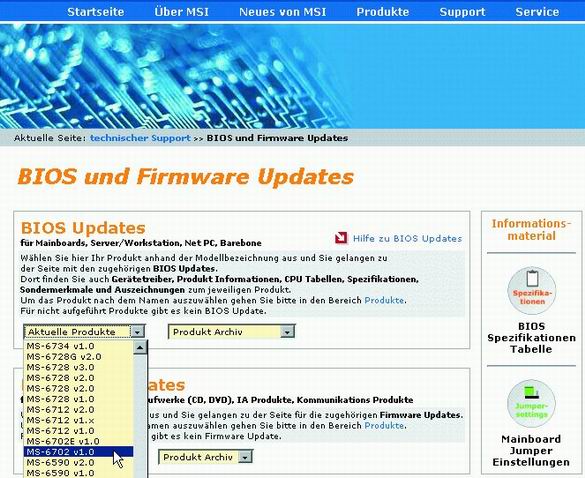
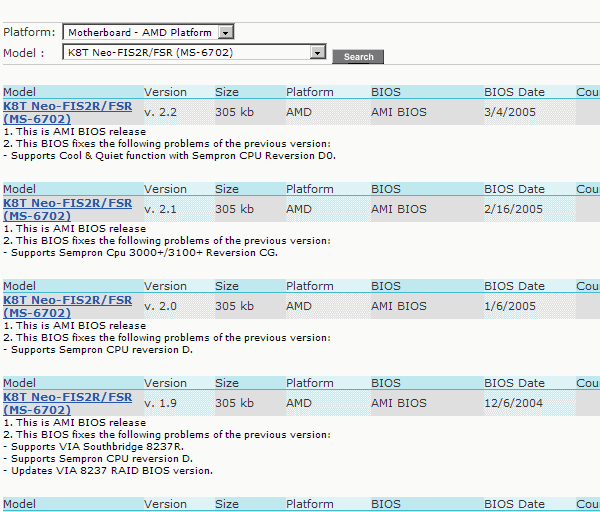
Visit the website of the manufacturer of the motherboard (or computer), then find the model you need. Most often, motherboard models are called "GA-686BX", "A7N8X-E" or "K8T Neo2". Sometimes motherboards have two names: retail (say, "K8T-Neo") and technical (for example, "MS-6702 Version 1.0"). The latter is usually indicated on the PCB of the board. When you find a page with your model, go to the "Downloads" or "Support" link.
39. Keep the old BIOS version
We recommend that you keep the old BIOS version in case the new BIOS becomes unstable or causes any problems. You can always flash the old BIOS instead of the new version. In addition, we recommend that you carefully read the Readme file, which is in the archive with the BIOS. It indicates the changes and additions made to the new version.
40. Think twice before updating the BIOS
The notes in each version of the BIOS help you decide if you need to update the BIOS or not.
If the BIOS update solves any particular problem (see the illustration above), then you need to decide how relevant it is to your system. If the problem does not concern you, then you can skip the BIOS update. Of course, if it does not give any other improvements. Note that the new BIOS version often allows you to install more modern processors.
If you did not buy the motherboard separately, or bought a branded PC immediately, then in such cases it is better to contact the PC manufacturer's website. Of course, it is possible that there you will find the same BIOS update as on the motherboard manufacturer's website. However, some PC manufacturers are releasing their own BIOS versions. If you do not know where to download the BIOS update (from the manufacturer's website of the motherboard or PC), find out the answer to this question from the manufacturer. If you do not get a clear answer, then it's probably not worth the BIOS update.
41. How to prepare a boot disk from the BIOS
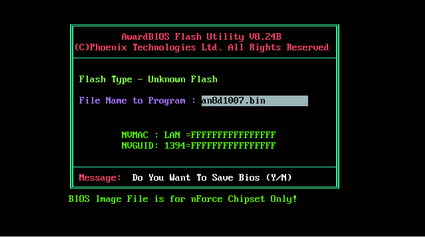
When you download the BIOS from the manufacturer's website, you usually get a ZIP archive containing several files. In one of the files is directly a new version of the BIOS, and this file is often called very mysteriously: "W7176IMS.110" or "AN8D1007.BIN". In addition, in the archive you can find and text Document with instructions for installation.
As a rule, the archive also contains an executable file. EXE - a utility for BIOS firmware. For the BIOS Award, it is called "awdflash.exe". In addition, the archive usually contains a batch file that simplifies the process of the firmware. Most often it's called "start.cmd", "flash.bat" or "autoexec.bat". Extract these files to any folder. For example, in "C: \\ BIOS \\". If the BIOS archive is self-extracting, then copy it to this folder and run it.
Important: while you are not starting the firmware procedure, print out the Readme file, because it can contain important information. Keep the printout together with other documentation. By the way, if you do not have the documentation, you can almost always download it from the manufacturer's website as PDF files.
42. How to write the BIOS to the boot floppy
The BIOS requires a DOS boot floppy. To create it, click on the icon "My Computer / My Computer". Right-click the drive icon and select "Format ... / Format ...". In the appeared window put a tick "Creation the boot disk MS-DOS / Create an MS-DOS startup disk. "Then click" Start / Start "to start the formatting.Copy the BIOS file and the firmware utility on the floppy disk (for example, the files" awdflash.exe "and" w6330vms.360 "for the new version Award BIOS).
Then you need to reboot the computer and boot from the floppy disk. To do this, make sure that the drive in the BIOS is set by the first boot device. After rebooting, enter the BIOS setup menu by pressing the appropriate key. Select "Advanced BIOS Features, Boot Sequence", which can also be called "Advanced, Advanced BIOS Features" on some PCs. Make sure that "1st Boot Device" is set to "Floppy". Exit to the main BIOS setup menu on the key, then use the key to exit the BIOS setup menu. If you want to save the changes you made, then press the [Y] ("Yes") key.
43. How to flash BIOS under DOS
Ensure that the computer is supplied with a stable power supply. As we mentioned earlier, do not flash the BIOS in the laptop if it is running on battery power. Plug the laptop into a power outlet.
Download the PC from the floppy disk to which you wrote down the firmware utility and the BIOS file. AT the command line enter the name of the firmware utility, and after space - the name of the file with the BIOS. In our example for Award BIOS this will be a string like this:
A: \\\u003e awdflash.exe w6330vms.360
The utility will run, which will guide you through all other processes.
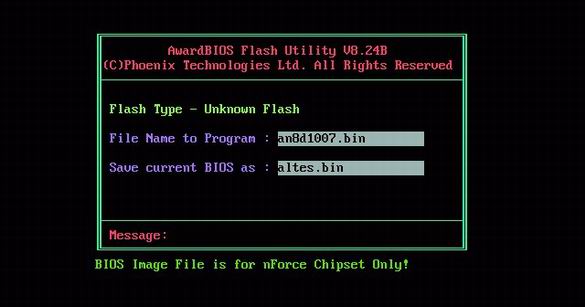
Keep the old BIOS. Before flashing the new BIOS, we recommend that you save the old version by entering the file name.
Although the name of the firmware and the BIOS file in your case may vary (for example, "awdfl789.exe" and "w6330vms.250"), the approach does not change. Follow the instructions of the utility and answer correctly. During each BIOS update, keep the old version just in case. It will allow you to go back if there are any problems with the new BIOS version.
Finally, the firmware utility will overwrite the BIOS image in flash memory with the new version. After the successful completion, restart the PC. During the firmware, you must ensure that the computer does not turn off the power. Otherwise, you will have to contact the service center (or to the craftsmen) and flash the BIOS through the programmer.
44. Setting up a new BIOS
When the BIOS update is complete, restart the computer, preferably in a "cold" way (by turning the power off and on). In some cases, you may need to reset the CMOS (see below). After enabling, the BIOS boot lines will be displayed, where the new version should be listed. Enter the BIOS setup using the desired keys. Select the option "Load Optimized Defaults" (which in some PCs can be called "Exit, Load Setup Defaults"), which will load the default settings. Make any required changes to the BIOS settings. Exit the setting with the key, then press [Y] to save the setting. Then enjoy the products of your work!
Golden BIOS Firmware Rules
In principle, by changing BIOS settings, you can hardly do irreparable damage to the computer, unless you overcharge the power supply too much. In any case, it is better to remember a few golden rules.
- Create backup copy the current BIOS version. Before you patch a new BIOS, save the old one. In each BIOS firmware, you can save the old version, for example, "Save current BIOS as". If the new version turns out to be a problem, you can always go back to the old one.
- Change only one setting at a time. If you have switched to BIOS setup, then make the changes carefully, one at a time and in small steps, if possible. After each process, reboot the computer and test under Windows to detect any instability. This is the only way to determine how a particular setting will affect the performance and stability of your PC.
- Use stress tests. To test the stability of a PC, it is best to load the computer to the maximum. You can run games, an application for editing video, 3D tests like 3DMark 2005, etc.
- If nothing helps, try a "cold" reboot. If the computer refuses to boot after pressing the Reset key, then shut down the computer from the network and wait a couple of minutes. Use a disconnecting power cable or toggle switch on the power supply, rather than the shutdown keys on the front of the PC.
- Reset the CMOS. If the PC refuses to boot after the changes made in the BIOS, then you can not return the settings back. In such cases, reset the CMOS settings. Follow the CMOS reset instructions for your motherboard. In some cases, to reset the CMOS, you should close (or open) the jumper by sending a "Clear CMOS" signal. Or, you need to use the DIP switch. Do not forget that after resetting the CMOS, you need to return the jumper to its original position. Alternatively, you can get the battery of the motherboard and disconnect the computer from the network. But sometimes it takes a few hours.
BIOS Setup Guide
Introduction to BIOS setup
The basic input-output system (BIOS) is an important part of the procedures of any PC, which is stored in a separate chip of the motherboard. In its bIOS Essentials is an intermediary between the hardware "hardware" and the operating system. Without BIOS, the operating system would not be able to communicate with and manage hardware.
In other words, the BIOS is the most important component of any computer. If the BIOS parameters are not set correctly, then the performance of your PC can be reduced up to 40%. Unfortunately, with the release of new processors and motherboards, the BIOS options continue to become increasingly confusing. As a result, many users simply do not understand the meaning of many options of modern BIOS.
But do not despair - THG comes to the rescue! Each motherboard and / or computer uses a different BIOS, so we'll look at an example of BIOS optimization based on the Asus A7N8X-E Deluxe motherboard. We chose this motherboard, because after it came out a large number of other ASUS motherboards with similar BIOS. In addition, the A7N8X-E is one of the most popular models of ASUS: it has been on the market for almost two years and is still sold for AMD systems. It is likely that your motherboard will have some differences from this model, but you can get an idea of possible adjustments.
Remember that improperly setting BIOS parameters can lead to unstable operation of the PC. In this case, you have to reset BIOS settings to the factory default (that is, to unoptimized ones). Usually this is done using the motherboard jumper, but how do I reset the BIOS from the laptop? None of the parameters considered here should not adversely affect the operation of your PC, but follow exactly every step.
Many large computer manufacturers, like Dell, HP, Gateway and Micron, limit the available options in the BIOS to reduce the number of calls to the support desk due to improper configuration. Therefore, for computers from some manufacturers, you can not include some of the advanced options mentioned in our article.
During boot-up, most PCs display a message for a short time about how you can go into setting up the BIOS (setup). You will have a few seconds to press the required key - if you do not have time, the operating system will start to boot. To enter the BIOS after turning on the PC, hold down or repeatedly press the desired key. On most PCs it is "DEL", "F1" or "F2". If your PC is not part of the BIOS setup for these keys or does not display a message on how to do this, you will have to consult the documentation or support service of the manufacturer of your PC.
We recommend that you reboot the computer after changing each BIOS option to make sure the system is stable. Think about it: if you make several options changes in the BIOS and your system stops loading, how will you look for the cause of the error?
We start with the main options menu of the BIOS (Main Options), which you can call by clicking on the "Main" tab in the upper left corner.
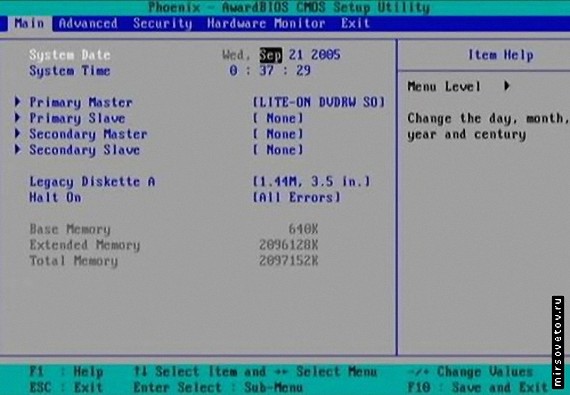
Below you can set the time and date, as well as the parameters of your hard drives and other installed drives. Each time the PC is booted, it most likely automatically detects the drives installed in the system. Most computers take a second or two to do this, but if you manually enter the required parameters, then somewhat speed up the boot time.
To do this, select the drive by moving the cursor to it, and press "Enter". Then write down the value of the parameters "Cylinders", "Heads", "Sectors" and LBA. In some BIOS, there are options for block mode ("Block Mode") and for 32-bit transfer mode ("32-Bit Transfer Mode"). Change the drive type from "AUTO" to "USER". Then enter the same numbers that were displayed. On most modern computers "LBA Mode", "Block Mode" and "32-bit Transfer Mode" modes should be ON, even if they were turned off before.
If none of the drives are connected to this channel of the controller, select NONE. For example, if your hard disk is configured as primary on the Primary Master, and the CD-RW drive as the primary on the Secondary Master, make sure that the secondary drives (Primary / Secondary Slave) on each channel are set to NONE. If you leave the AUTO option without having a device, the computer will check the presence of the drive every time. Setting the value of NONE where there are no drives, you will speed up the download a little.
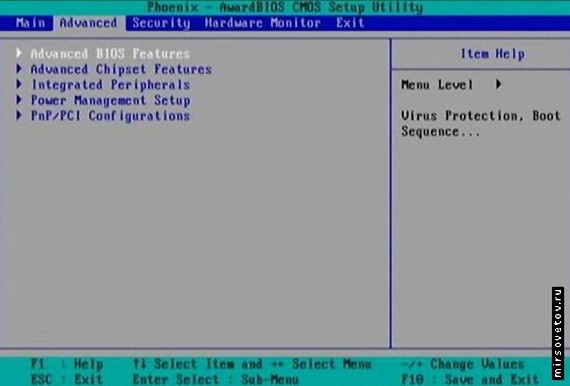
Then select the "Advanced" tab, which will be divided into several submenus. The first branch is called "Advanced BIOS Features."
Do you need to thoroughly test your memory and drive each time you turn on the computer? Unless you suspect a problem with one of these components, it hardly makes sense every time to perform BIOS diagnostics. In this part of the BIOS, you can reduce the system startup time by enabling or disabling certain functions. For example, those that we indicated above. Below are the recommended settings.
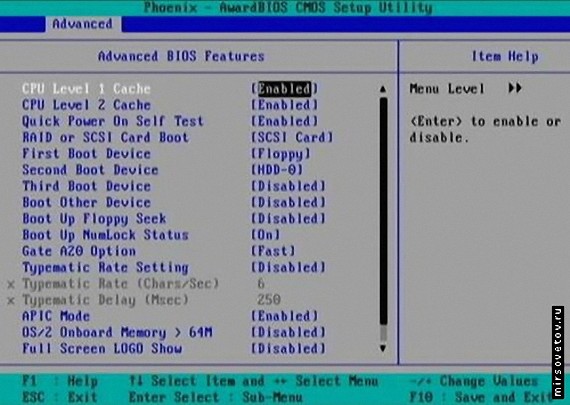
Boot Virus Detection (definition of boot viruses): "Enabled". Sometimes this item is in the main BIOS section ("Standard" or "Main"). Today, boot viruses are no longer as prevalent as before, but this feature will protect your data when booting from an infected floppy or CD-ROM.
CPU Level 1 Cache (processor L1 cache): "Enabled".
CPU Level 2 Cache (L2 cache of the processor): "Enabled".
Quick Power On Self Test (fast test): "Enabled" (enabled). This item allows to avoid repeatedly testing the memory when turning on the PC. If you have a bad memory, then this test will still not determine it.
First, Second, or Third Boot Device (first, second or third boot devices): set the boot order and disable all devices from which you do not plan to boot.
Boot Other Device (boot from another device): "Disabled", unless you plan to boot from a network card or SCSI device.
Boot Up Floppy Seek (checking the drive during boot): "Disabled". Extra time loss, and extra noise.
Boot Up NumLock Status (the state of the "NumLock when the" button is loaded): here you choose. Some people like that the "NumLock" key is activated when windows Startup, others do not.
Gate A20 Option (option Gate A20): FAST (fast). Although this function under Windows XP has already lost its value, we still recommend leaving it turned on. Old versions of Windows and OS / 2 work better if the parameter is set to FAST. The only reason for setting this parameter to "Normal" is to load DOS.
Typematic Rate Setting (speed dial): "Disabled" (disabled). Here, choose for yourself. This parameter determines how often the keyboard symbols will be pressed if you hold down a certain key.
APIC Mode (APIC mode): "Enabled". APIC hides an advanced programmable interrupt controller (Advanced Programmable Interrupt Controller), which is responsible for supporting multiple processors, additional IRQs and faster interrupt processing.
OS / 2 Onboard Memory\u003e 64M (OS / 2\u003e 64 MB memory): "Disabled". This setting applies only to those users who will now run the now outdated OS / 2 operating system from IBM.
Full Screen LOGO Show (full screen logo display): your choice. When the option is turned on, the memory counter and the Power-On Self-Test (POST) test are hidden behind the graphic image. If this option is disabled, then you see a normal boot screen. Actually, it is present in most computers. Some users like to hide the POST screen, while others like to watch the process.
POST Complete Report (full POST report): choose yourself. If you enable this option, you will receive a full POST report.
Overclockers and enthusiasts trying to increase system performance often increase the bus and processor core frequencies. In addition, they often increase the voltage of the components, since higher clock speeds can be achieved, but more heat is released.
Overclocking no longer leads to such a performance difference, which we are accustomed to several years ago. In addition, overclocking deprives the user of a guarantee, can lead to failure of components, and the system can be unstable. For this reason, for most frequency and voltage settings in this BIOS section, leave the "AUTO" option. If you want to adjust the settings, click the "Advanced" tab the BIOS screen, then select the "Advanced Chipset Features" branch.
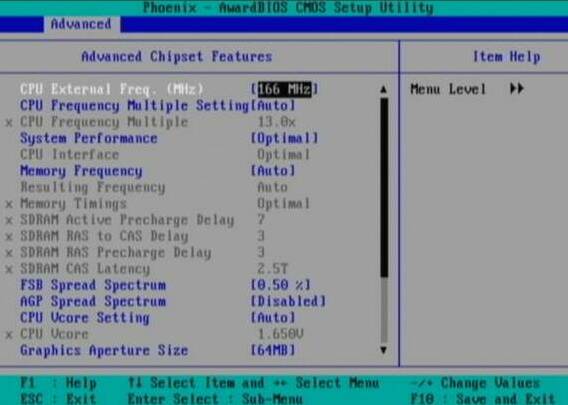
CPU External Freq. (MHz) (external processor frequency, MHz): make sure that it is set according to the specifications of your processor.
CPU Frequency Multiple Setting (CPU multiplier setting): AUTO.
CPU Frequency Multiple (CPU multiplier): make sure that the multiplier is set according to the processor specifications.
In other BIOSes, the multiplier point may be called "CPU Multiplier". To understand the value of the multiplier, remember that the frequency of the processor is different from the rest of your system. In our example, the AMD Athlon 2600+ processor is used, whose frequency is 2133 MHz. The bus frequency of the FSB processor is 133.33 MHz. The frequency of the processor 2133 MHz (2.133 GHz) is set by multiplying the frequency FSB by a factor. In this case, we just get 16 x 133.33 = 2133.
With the help of testing, AMD determined that the 2133-MHz processor works just as fast (or even faster) as the Intel processor at 2.6 GHz. Since consumers use the clock frequency for performance evaluation, AMD had to find a way to convince customers that the lower clock speed of AMD processors does not mean less performance. To do this, model numbers were introduced. So do not be surprised that AMD Athlon 2600+ (in our example) actually works at 2.133 GHz, and not at 2.6 GHz.
System Performance (system performance): "Optimal" (optimal).
CPU Interface (CPU interface): "Optimal" (optimal).
Memory Frequency (memory interface): "By SPD" (via SPD). Most manufacturers of memory modules add a special chip (Serial Presence Detect, SPD), which reports Computer BIOS module size, frequency, voltage and other memory parameters. These settings are determined by the manufacturer to ensure maximum performance and reliability. That's why we recommend leaving the "By SPD" option. If you adjust the memory settings manually, you can squeeze out a bit more performance. But be careful: at the same time the system can start to "fly off" at random times, do not load properly, or refuse to load at all.
Overclocking options in advanced BIOS settings, continued
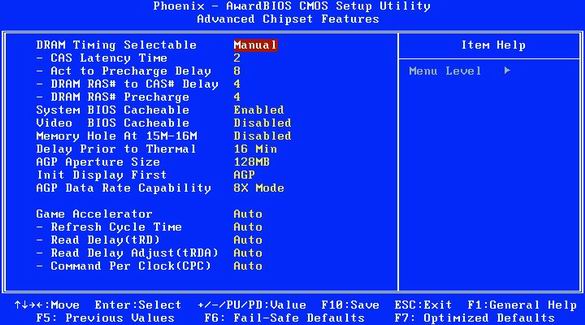
Memory Timings (memory latency): "Optimal" (optimal).
FSB Spread Spectrum: "Disabled". This function allows systems to pass European EMI tests. It constantly changes, albeit slightly, the frequency of the Front Side Bus (FSB). It should be remembered that the inclusion of this function can affect the interruption of the Internet connection, as well as cause stability problems when overclocking the system.
AGP Spread Spectrum: "Disabled". Here the same is true, which is indicated in the previous paragraph. Except that the frequency of the Advanced Graphics Port (AGP) interface is modulated.
CPU VCore Setting (setting the CPU core voltage): "AUTO".
CPU VCore (CPU core voltage): make sure that this setting is set according to the processor specifications.
Today there are so many different processors on the market that hardly one example can outline them. Below is a partial table showing the name of the CPU, the actual operating frequency, the nominal core voltage and the maximum permissible temperature.
| Athlon Processors | Frequency (GHz) | The voltage of the core (B) | Max. temperature (° C) |
| XP 1700 | 1,467 | 1,50 | 90 |
| XP 1900 | 1,60 | 1,50 | 90 |
| XP 2000 | 1,667 | 1,60 | 90 |
| XP 2100 | 1,733 | 1,60 | 90 |
| XP 2200 | 1,80 | 1,60 | 90 |
| XP 2400 | 2,0 | 1,60 | 85 |
| XP 2600 | 2,133 | 1,65 | 85 |
| XP 2700 | 2,171 | 1,65 | 85 |
| XP 2800 | 2,250 | 1,65 | 85 |
Graphics Aperture Size (AGP aperture size): 64 MB or 128 MB. This function controls the Graphics Address Relocation Table (GART) and the amount of memory that the AGP bus can address. Regardless of the memory capacity of your graphics card, we recommend that you specify 64 or 128 MB. As a result, the graphics card will provide optimized performance, even if the application requires additional memory for textures - at the same time, GART will not go beyond reasonable limits.
AGP Frequency (AGP frequency): "AUTO".
System BIOS Cacheable (caching the system BIOS): "Disabled". You might think that caching is good. Yes, but not always. Enabling this feature can cause the system to crash if the program attempts to write data to the cached area of the BIOS. If you use DOS, then the function is better to include.
Video RAM Cacheable (video memory caching): "Disabled". This option allows you to copy video memory directly to the L2 cache, which works faster than the ROM of the video card. However, Windows today has moved much further than DOS, so the ROM of the video card is used very rarely. Since the L2 cache is limited in size, we recommend using it to increase the efficiency of other tasks.
DDR Reference Voltage (voltage of DDR modules): 2.6V. The setting is responsible for the voltage of the Double Data Rate (DDR) memory modules of your system.
AGP VDDQ Voltage (voltage AGP VDDQ): 1.5V. VDDQ is a technical abbreviation (Voltage between Drain and common for Data Quad-band). But we will not go into details. It is enough for you to understand that the voltage of the AGP-port of the video card is set here.
AGP 8X Support (AGP 8X support): enable this option if your video card supports the 8X AGP interface. In addition, VIA 4-in-1 drivers should be installed on VIA chipset motherboards.
AGP Fast Write Capability (support fast recording AGP): we recommend enabling this option. This function allows you to bypass the main memory when writing from the chipset to the AGP device, increasing performance up to 10%. However, some cards and games may have problems when you enable this feature. We recommend experimenting to determine which setting is best for your PC.
This BIOS section contains settings for embedded peripheralsinstalled on the motherboard. This includes serial and parallel ports, sound, LAN, USB ports, etc. If some ports are not used, but they are enabled in the BIOS, then the ports consume extra system resources. It's better to turn them off.
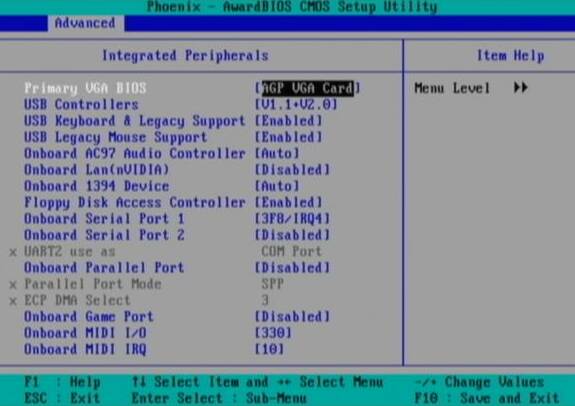
Primary VGA BIOS (main VGA BIOS): this function is used only if two graphics cards are installed in your PC: one AGP (accelerated graphics port) and one PCI (peripheral component interconnect). The system should know which card to initialize first and count the primary. If you have one video card, then most likely it supports the AGP interface. For most cases, the default setting is not correct and should be changed to AGP VGA Card. If you really have two video cards, then choose the main one from them. It will display information about the POST test and boot the OS.
USB Controllers (USB controllers): the function allows you to limit the functionality of the Universal Serial Bus (USB) controllers on your PC. You can select "only USB 1.1", "USB 1.1 and 2.0" and turn off USB at all. For most users, the best option is to configure USB 1.1 and 2.0
.USB Legacy Support (support of hereditary uSB devices): this function should be enabled if your PC is equipped with a USB keyboard, and you want to use it in a DOS environment or before booting the OS (in the boot menu, for example). If the setting is off, the keyboard will not work after boot from a floppy disk or CD-ROM. And you can not enter BIOS either. If your PC uses a USB keyboard (rectangular cross-sectional connector), then set the setting to "Enabled". If you have a PS / 2 keyboard (a round connector in the cross section), set "Disabled". Remember that turning on this function can cause awakening problems from the "Standby" or "Hibernate" modes, or cause the PC to turn off incorrectly. In other words, activate the function only if necessary.
USB Mouse Support (USB mouse support): the same is true for the previous item. It is best to disable this option.
Onboard AC97 Audio Controller (built-in AC97 sound controller): if your PC is equipped with an additional sound card, for example Sound Blaster Audigy, or your system does not have speakers, disable the built-in sound card ("Disabled"). Then you will free precious resources and prevent potential conflicts. However, many computers use integrated sound solutions, so there should be left the option turned on ( "Enabled").
Onboard AC97 Modem Controller (built-in modem controller AC97): some motherboards use a built-in modem for dial-up access. If the modem jack is not present, the modem is not needed at all, or a separate modem card is used, then the option should be disabled ("Disabled"). Otherwise, enable ("Enabled").
Onboard LAN (nVidia) (built-in LAN controller): the option allows you to enable or disable the built-in network card. The options are "Auto" or "Disabled". The ASUS motherboard used for our review has two built-in network cards, which are especially useful when the PC is used as a router for distributing an Internet connection: one network Card connects to the cable / DSL modem, and the second - to the switch of your network. If you only use one network port or no network at all, then turn off the controller to free up valuable resources.
Onboard LAN (3Com) (built-in LAN controller): this option applies to the second integrated LAN controller. Here the same is true as stated above.
Peripheral settings in the BIOS (Integrated Peripherals), continued
Onboard 1394 Device (FireWire) (built-in 1394 controller): this function enables or disables the built-in IEEE 1394 (FireWire) port of your PC. If you do not use any FireWire devices, turn off the option to release valuable resources.
Floppy Disk Access Controller (drive controller): most modern boards do not have disk drives. If this is true for your PC, or you do not need a drive, then disable it and free up resources. Note: if you have a floppy drive installed and you turn it off in the BIOS, you can not work with it until you turn it on again in the BIOS.
Onboard Serial Port 1 (built-in serial port): most users no longer use serial ports to connect peripherals, since today this interface has almost completely replaced USB. If you do not use serial ports, then disable them to free up resources. On the other hand, if the serial port is used, set the option "3F8 / IRQ4".
Onboard Serial Port 2 (built-in serial port): the same as above. If the port is used, set the value to "2F8 / IRQ3".
UART2 Use As (UART2 usage type): UART (Universal Asynchronous Receiver / Transmitter) is a chip that receives and transmits data in series. Each serial port uses this chip, although it is possible to integrate several UARTs into a single chip. Many motherboards offer contacts for connecting an infrared port instead of COM2, so choose it yourself. But remember that for the infrared port, you must install an IR adapter, usually sold separately.
Onboard Parallel Port (built-in parallel port): this function allows you to select the parallel port mode or even disable it altogether. If you do not use a parallel port, turning off the option will release valuable system resources. If the port is used, we recommend setting the value "378 / IRQ7".
Parallel Port Mode (parallel port mode): if you disable the parallel port, then this setting does not matter. However, when you turn on the parallel port, you can set the modes "EPP" (enhanced parallel port) or "ECP" (enhanced capabilities port). The "EPP" mode is recommended if your system is equipped with only one device using a parallel port (for example, a printer). Select "ECP" if several devices are connected to the port: say, an external zip drive, a scanner, a printer or a tape drive. Make sure you are using IEEE 1284-certified parallel cables.
ECP DMA Select (ECP DMA channel selection): if you select ECP or EPP plus ECP for a parallel port, this option also appears. With it, you can set up a direct memory access channel (DMA, Direct Memory Access) that you plan to use. We recommend the default value of "3".
Onboard Game Port (built-in game port): if your system has a separate sound card, or you do not use MIDI devices or old joysticks, then this function should be disabled in order to free up valuable resources. If you use the built-in game port, set the default value to "201".
Onboard MIDI I / O (built-in MIDI interface): MIDI interface (Musical Instrument Digital Interface) allows you to connect musical instruments with the hardware and software components of the PC. If the computer is not used to connect external MIDI devices, then safely turn off the option. Otherwise, we recommend the default value of "330".
Onboard MIDI IRQ: the same as above. If you are using MIDI devices, set the default setting to "10".
In this area of the BIOS, most users are confused. If here are not exhibited correct settings, the system will stop shutting down properly, and it will not exit the "Standby" or "Hibernate" states correctly. Since Windows already has built-in power management, all the relevant options in the BIOS can be turned off. Otherwise they will conflict with each other, and none will work correctly. Motherboard manufacturers understand that Windows does not use everything, so most of the settings are intended for users of other OSes.
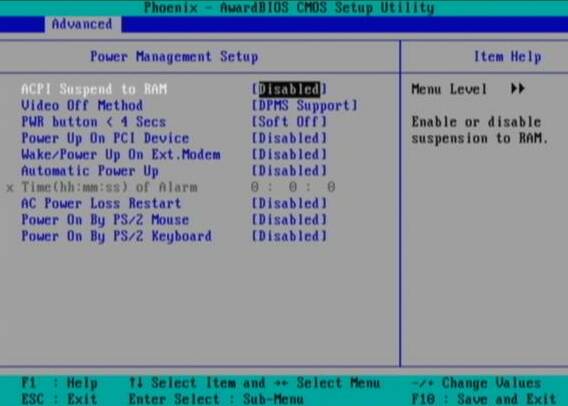
ACPI Suspend to RAM: ACPI stands for "Advanced Configuration and Power Interface" - do not confuse it with APIC or IPCA, which are also present as options in some BIOSes. The "Suspend to RAM" function, also called S3 / STR, allows the computer to save more power in standby mode, but all devices connected to the computer must be ACPI-compliant. Some BIOS for this script have the option "S1 / POS". If you turn this feature on and you have problems with the standby mode, go back to the BIOS and turn it off.
Video Off Method (video deactivation method): DPMS stands for "Display Power Management System." This option allows the BIOS to manage a graphics card that supports the "DPMS" function. The option "black screen" (Blank Screen) simply gives out an empty black screen - it should be used for those monitors that do not support the "green" options or the energy saving mode. The option "V / H SYNC Blank" not only produces a black screen, but also turns off vertical and horizontal scanning. If your computer and monitor are released in the last five years, then we recommend the option "DPMS".
HDD Down In Suspend (HDD shutdown in Suspend mode): the function determines whether the hard disk will automatically turn off in the "Suspend" mode. Most of these settings are controlled by Windows, but if your hard drive does not turn off when the computer enters Sleep mode "Suspend", then enable this option. Otherwise, it's best to leave it disabled ("Disabled").
PWR Button< 4 Secs (power key): By default, all ATX computers are turned off if you hold down the power key for more than four seconds. This setting tells the computer what to do if the power key is held down for less than four seconds. You can both turn off the system and put it into "Suspend" mode. So decide for yourself.
Power Up On PCI Device (PCI activation): if you use Wake-On-LAN - this option is often used in large office environments for remote inclusion of computers - then leave the option enabled ("Enabled"). Otherwise, we recommend that you disable this option ("Disabled").
Wake / Power Up on Ext. Modem (external modem activation): this feature allows the computer to automatically turn on when activated telephone line modem. Yet again, convenient function for remote control. In other environments, that is, for most users, it is better to turn it off ("Disabled").
Automatic Power Up (auto power on): this function allows you to set the time when your computer will automatically turn on. If you need this function, then enable it ("Enabled"). Otherwise turn off ("Disabled").
Time (hh: mm: ss) of Alarm (on-time): the time for automatic activation is set here. Do not forget to enable the "Automatic Power Up" function.
AC Power Loss Restart (power on after power loss): this option tells the computer what to do after an unexpected power loss and recovery. If the option is disabled ("Disabled"), the system will not start. If enabled ("Enabled") - the system will be rebooted. We recommend that you disable this option ("Disabled").
Power On By PS / 2 Mouse (PS / 2 mouse on): if this option is enabled, the PS / 2 mouse (not USB) can be used to turn on the PC. Turn this option off ("Disabled") to not turn on the computer by accidentally touching the mouse.
Power On By PS / 2 Keyboard (PS / 2 keyboard activation): when this function is activated, you can turn on the system using special keys. It is better to turn off the function ("Disabled"), so as not to accidentally accidentally key.
This BIOS area exists, basically, to solve compatibility problems with the old hardware. Most users do not need to change the default settings here.
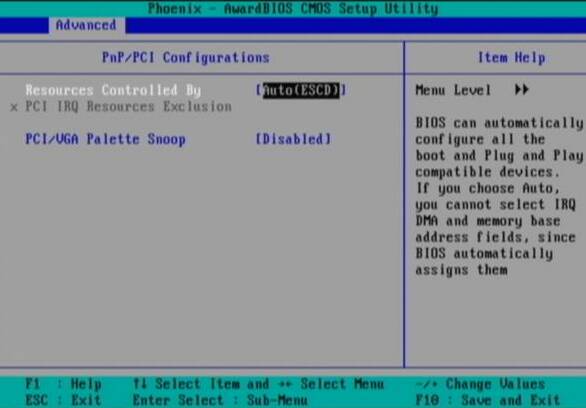
Reset Configuration Data (reset of configuration data): ESCD (Extended System Configuration Data) data contains information about all non-PnP devices (plug and play). It also stores information about the system since the previous download. Enable this option to clear data during the Power-On-Self-Test (POST) test. Usually, cleaning is performed when you diagnose any component that does not work properly. After enabling the option ("Enabled") and exiting the BIOS, the configuration data will be cleared and the option will be automatically disabled ("Disabled").
Resources Controlled By (resource management): this setting allows the computer to either set IRQ automatically, or manually assign all IRQ devices. Remember that manually specifying an IRQ can cause problems. This option is necessary only when working with the old, non-PnP, peripherals. It is recommended to set "AUTO" (ESCD).
IRQ Resources (IRQ resources): this option will allow you to manually configure the IRQ. It is activated only if in the previous paragraph you have selected the manual indication ("MANUAL").
PCI / VGA Palette Snoop: this function usually refers to additional video cards like MPEG-encoders. They do not have their own color palette, so they should get (snoop) the palette from the system video card. If, like most users, you do not have an additional video device connected to the video card, then disable this setting ("Disabled").
The BIOS security options allow you to limit the access of others to the BIOS or the computer so that they do not make any changes. Because the BIOS settings are critical to the proper operation of the PC, many administrators in companies block the BIOS with a password.
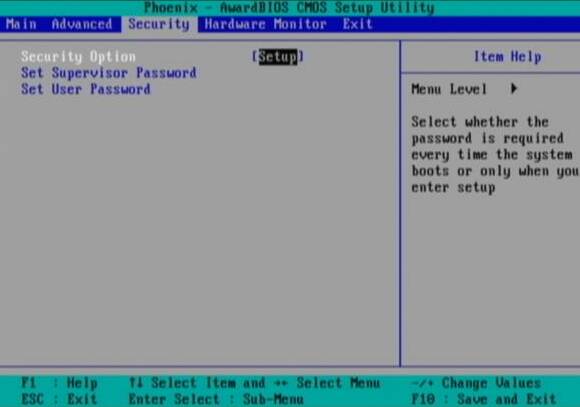
Security Option (security option): this option allows you to protect the BIOS changes with a password ("Setup" option). In addition, here you can specify that the password is requested each time the PC is booted (option "System").
Set Supervisor Password (set administrative password): if you specify an administrative password, it will be requested when entering the BIOS (if you select "Setup" above). If in the paragraph above you have specified the option "System", then the password is required for "cold" loading.
Set User Password (set a user password): here you can specify the password that will be requested from users when the PC is booted. If Supervisor Password is specified, then in the BIOS the user can only change the time and date.
Note: If you forget or lose passwords, you will have to reset the BIOS to the factory settings by temporarily resetting the jumper on the motherboard.
In this part of the BIOS, you can track the voltage, fan speed and temperature. On the motherboard ASUS, used in our article, you can also change the speed of the fans depending on the temperature parameters. In addition, you can set the alarm temperature of the CPU, which will be activated during overheating. Another option is to turn off the computer after exceeding the threshold temperature. Then your processor will not burn out from overheating or in any extreme situations.
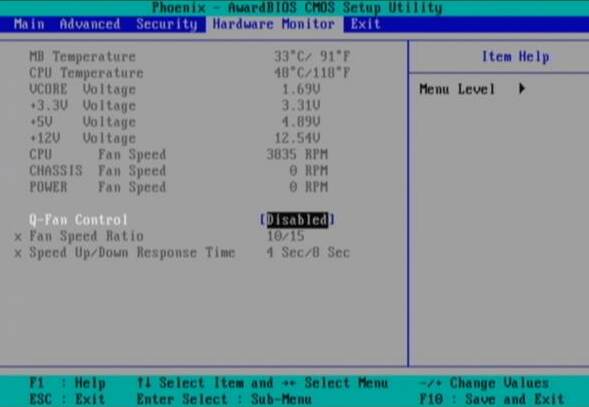
If the BIOS has similar capabilities, then they are all listed and clearly signed. Since modern processors are very hot, we recommend to include monitoring functions to prevent potential hazards.
Each CPU has its own temperature limits. For example, for AMD Athlon, they are listed at the beginning of this article. In general, if the BIOS contains the option "issue a warning beep" or "shut down the computer when it reaches a certain temperature", then they usually indicate several temperature values from which you can select any. We recommend setting the second temperature after the hottest.
Conclusion on setting up the BIOS
Since the BIOS of modern computers is largely different, the BIOS of your computer may have some functions not considered in the article. For more information and answers to questions, we recommend contacting the following websites: Wim's BIOS and Adrian "s RojakPot .
Have fun with the BIOS setup and optimization!
The situation when the user turns on the computer or laptop, and sees that instead of loading the operating system, the program for setting BIOS options opens, does not occur very often. Nevertheless, it can not be attributed to the category of problems with which the user has no chance to encounter. A similar problem is unpleasant in that it makes it impossible to use the computer for its intended purpose.
It should be noted that the automatic input to the BIOS when you turn on the computer or laptop is not provided in all BIOS. In most cases, if any faults are detected, the BIOS stops loading the computer or laptop. Automatic input to the BIOS is designed to show the user that he needs to fix something in the BIOS, before continuing.
From this it follows that the source of the problem is usually incorrect BIOS settings. First of all, spontaneous input to the BIOS can be caused by overestimated frequency or memory voltages or processor - in the event that the user was involved in overclocking hardware components. In addition, many motherboards react with the help of the BIOS boot-up to unexpected power outages, perceiving them as evidence of system instability due to overclocking.
Very often spontaneous bIOS boot when you turn on your computer or laptop, it can also indicate problems with the BIOS itself. In most cases, these problems can be caused by a malfunction of the CMOS memory battery. Also, the problem can be manifested when changing the hardware of a computer or laptop, for example, when installing a new video card.
Well, finally, do not discount such a banal reason as a malfunction of the keyboard or even simply a separate sinking key. It is possible that a faulty keyboard continually sends a signal that is interpreted by the BIOS as a signal from a key for entering the BIOS.
What you need to do to fix the problem
If you encounter a situation where the computer automatically loads the BIOS of a computer or laptop, then, first of all, you should try to restart the computer again. It is possible that you yourself could accidentally click on the BIOS login button when you restart or turn on your computer or laptop. Also, the BIOS setup program can appear after rebooting the computer or laptop caused by an unexpected loss of voltage in the network.
However, if you are convinced that the cause of the problem is not a random error, then other ways of correcting it should be applied. First of all, you can try changing the keyboard. Then try to remember if you made any changes to the BIOS before. If so, then the options you have edited should return the original values. The most reliable way is to reset the BIOS to the default settings. Also, you should try to remove the newly installed motherboards from the computer, if any.
If this operation does not help, then you can try changing the BIOS battery to a new one. Practice shows that in most cases, changing the battery helps to solve the problem. However, if the problem still remains, then with a high probability it can be concluded that the cause of the situation is a faulty BIOS chip or motherboard.
Conclusion
The reasons for the situation where the computer spontaneously loads the BIOS instead of booting the operating system may be various. A similar phenomenon can be caused by wrong settings BIOS, and hardware failure. If the situation does not appear due to an accidental malfunction, for example, caused by a surge of external voltage, in most cases the problem can correct the reset of the BIOS to the default settings.
If you encounter the fact that the BIOS brakes, crashes, the BIOS does not start, the BIOS is not installed, the BIOS does not work, there is no sound, the errors pop up, the BIOS does not work saving - we offer you the most common ways to solve these problems.
First, check if your PC meets the minimum system requirements:
- OS: Win7 64-bit, Win8 / 8.1 64-bit
- Processor: Intel Core i3-530 2.93 GHz / AMD Phenom II X4 810 2.60 GHz
- Memory: 8 GB
- Video: GeForce GTX 560 or Radeon HD 6950
- HDD: 10 GB free space
- DirectX 11
Be sure to update the graphics card drivers and other software
Before remembering the most bad words and expressing them in the direction of developers, do not forget to go to the official website of the manufacturer of your video card and download the latest drivers. Often, the release of games are prepared specially optimized for them drivers. You can also try to install a later version of the drivers if the problem does not resolve the installation of the current version.
It is important to remember that you should only download the final versions of video cards - try not to use the beta version, because they can have a large number of errors not found and not corrected.
Do not forget that for the stable operation of games you often need to install latest version DirectX, which can always be downloaded from the official Microsoft website.
BIOS does not start
Many problems with the launch of games happen due to incorrect installation. Check if there were any errors during the installation, try to uninstall the game and run the installer again, having previously disabled the antivirus - often the files needed for the game will be deleted by mistake. It is also important to remember that there are no Cyrillic characters in the path to the folder with the game installed - use only Latin letters and digits for directory names.
Still it does not hurt to check if there is enough space on the HDD for installation. You can try to start the game on behalf of the Administrator in compatibility mode with different versions of Windows.
BIOS slows down. Low FPS. Laghi. Friezes. Hangs up
First, install fresh drivers on the video card, from this FPS in the game can significantly rise. Also check the workload of the computer in the task manager (opens by pressing CTRL + SHIFT + ESCAPE). If before starting the game you see that some process consumes too much resources - turn off its program or simply complete this process from the task manager.
Next, go to the graphics settings in the game. First, turn off anti-aliasing and try to lower the settings responsible for post-processing. Many of them consume a lot of resources and their disconnection will significantly increase the performance, not greatly affecting the quality of the picture.
BIOS crashes to the desktop
If the BIOS you often takes off on the working slot, try to start solving the problem with reducing the quality of graphics. It is possible that your computer simply does not have enough performance and the game can not work correctly. Also worth checking out for updates - most modern games have a system for automatically installing new patches. Check if this option is disabled in the settings.
Black screen in BIOS
The most common problem with a black screen is the problem with the graphics processor. Check if your video card satisfies minimum requirements and install the latest version of the drivers. Sometimes a black screen is the result of insufficient CPU performance.
If everything is fine with the hardware, and it meets the minimum requirements - try switching to another window (ALT + TAB), and then go back to the game window.
The BIOS is not installed. The installation is hung up
First of all, check if you have enough space on the HDD for installation. Remember that for the correct operation of the installation program requires the amount of space claimed, plus 1-2 gigabytes of free space on system drive. In general, remember the rule - on the system disk there should always be at least 2 gigabytes of free space for temporary files. Otherwise, both games and programs can not work correctly or refuse to start at all.
Help in removing temporary files that clog your PC, but not necessary for windows Workflows and other applications, the MaxiDisk program will help. It will automatically scan your PC and offer a list of files to delete. After its work, you are likely to get a lot of disk space, which you did not even know about.
Installation problems can also occur due to a lack of Internet connection or unstable work. Also, do not forget to suspend the antivirus during the installation of the game - sometimes it interferes with the correct copying of files or deletes them by mistake, counting viruses.
The BIOS does not work saving
By analogy with the previous solution, check for free space on the HDD - both on where the game is installed and on the system drive. Often, save files are stored in a folder of documents that is located separately from the game itself.
The BIOS does not work
Sometimes control in the game does not work because of the simultaneous connection of several input devices. Try to disable the gamepad or, if for some reason you have two keyboards or mice connected, leave only one pair of devices. If you do not have a gamepad, then remember - officially the games are supported only by controllers, defined as Xbox joysticks. If your controller is defined differently - try using programs that emulate Xbox joysticks (for example, x360ce).
Sound does not work in BIOS
Check if the sound is working in other programs. After that, check if the sound in the game settings is turned off and whether the audio playback device is selected, to which your speakers or headset are connected. Then, during the game, open the mixer and check if the sound is switched off there.
If you use an external sound card - check for new drivers on the manufacturer's website.
If the BIOS is on your PC or laptop, then this is not a reason to panic, although, of course, this situation can not be called very pleasant. Nevertheless, in many cases you can independently cope with such a problem and restore the working capacity of a PC or laptop, without resorting to the help of computer specialists.
Suppose that you turn on the computer and, instead of the usual picture of its download, see some text message about the error, after which the computer stops its download. Or do you hear, testifying about the error of BIOS.
The first thing to do in this case is to restart the computer. Perhaps, this error is related to the failure of BIOS, which occurred, for example, as a result of a power surge. If such a method does not help, then it means that the problem really lies in some hardware fault, either with the BIOS itself, or with some other hardware component.
It should be borne in mind that not every error message that appears on the screen indicates a malfunction of the BIOS itself. In most cases, text messages about the error are displayed when there are problems with any other components of the PC, such as RAM, hard disks or floppy disk drives. More details about text messages about errors are told in a separate article. Therefore, you should carefully read the message displayed on the screen and check the hardware component that is mentioned in it.
However, if you see an error message that mentions the BIOS (or CMOS), then the speech is most likely about the BIOS-related malfunction. Also, in some cases BIOS errors may indicate sound signals, supplied by the dynamics of the motherboard. Information on which signals in which BIOS versions can indicate a BIOS failure, you can get from the corresponding article on our website.
Solving problems with the dropped BIOS
If you are faced with an error, the source of which is really the BIOS itself, then first of all it is worth trying to reset the BIOS to initial settings. There is a high probability that after reset BIOS the BIOS default setting will disappear. More information on how to reset the BIOS settings, and what you need to do for this, you can read in the relevant article on our website.
The BIOS error can often be associated with a discharged BIOS battery. Therefore, try replacing the battery with a new one. About where to find this battery, and what you need to do to replace it, you can also read the article on our website.
But what if the BIOS reset and battery replacement do not help? Then you will have to resort to another method of repairing the faulty BIOS - to re-flash it. BIOS firmware is implemented using a file containing the updated BIOS version. As a rule, a new version of the firmware can be downloaded on the site of the manufacturer of your computer or motherboard. In the same place, you can usually find instructions on the firmware itself.
As a rule, external media are used for firmware, on which the update file is written. The firmware itself is performed when the PC is restarted. There are also programs that allow you to flash BIOS from Windows without rebooting, however, in the described case, most likely, they will not be useful to you, because, as a rule, if you have serious problems with BIOS, you can not load the operating system.
If all the above methods did not help restore the BIOS, then you only need to carry a computer or motherboard with a faulty BIOS to the computer service center. Or buy a new motherboard.
Conclusion
Not a single computer is immune to problems related to BIOS failure. And so any user should know what to do in such a case, which can not be called pleasant. Nevertheless, the statistics show that the cases of physical failure of the BIOS chip occur infrequently in comparison with the failures of other components of the motherboard. Therefore, methods such as resetting bIOS settings, replacing the battery-powered BIOS with batteries and re-flashing the BIOS on a PC or laptop will in most cases help solve this problem. But if none of the above methods help, then you have nothing left to do but take the computer to a service center.