In view of the ever-increasing demands of modern software, the user can reconsider the question of the self-sufficiency of the configuration of his computer after a while. Typically, the owner of the computer produces a primary upgrade by increasing the RAM of his PC. At the same time, in addition to the hardware upgrade (installing additional memory slots), the user can also use a number of software tools that allow optimizing the operation of the mentioned system component. What, in the end, will also have a positive impact on the solution of the question: "How to add random access memory in the computer? ". If you want to achieve the best result in the process of improving the speed and performance of your OS, but do not quite understand how to do this and how much you can do it - devote a few minutes of your time reading this article. You will receive an invaluable benefit from free acquaintance with the material provided.
So, top solutions "How to add RAM to your computer?"
The illuminated methods (software and hardware upgrade of RAM) can be used as independent of each other or correctly interacting solutions. It is worth noting that an integrated approach is preferable to a simple action - add one or more to the free slot. Somewhat later, you will find out why.
Method number 1: I bought, installed, launched
For stable work operating room the Windows system 7 need 1.5 GB of RAM. As a rule, the purchased PC of the office configuration has two gigabytes of RAM. For resource-intensive programs (video editors or computer games) this amount is not always enough. Consequently, the user has a need to expand the capabilities of RAM. However, before implementing such a scenario of hardware upgrade, you need to ask the question: "Can I add RAM?". Since in the case where you use a 32-bit version of Windows, added two or more gigabytes to the current RAM volume may simply not be involved in the system due to some limitations that the BIOS firmware initiates. Another unpleasant moment for the user may be a discrepancy between the purchased memory module and the type connector motherboard. In other words, before going to the store you need to know exactly what kind of RAM is supported by your PC or laptop, as well as the technical characteristics of the installed memory.
Forced valuable retreat
Often the question of the beginner: how much RAM costs, needs some concretization. As in modern computer technology there are several types of RAM: DDR, DDR2, DDR3, which, in turn, have a number of significant differences. Depending on the manufacturer and the technical characteristics of memory, the cost of the product also varies. However, the example of the Kingston brand can lead to a price comparison of different types of produced RAM.
- DDR2 at 1 GB - about 1400 rubles. And 2 GB will cost 2300 rubles;
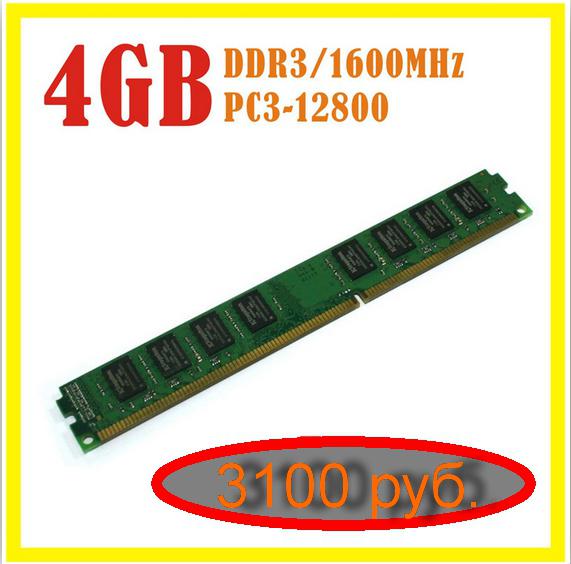
- DDR3 at 2 GB - will cost 1900 rubles., 4 GB - 3100 rubles. But the RAM is 8 GB of this type - 6400 rubles;
- SODIMM DDR2 at 2 GB - 1800 rubles;
- SODIMM DDR3 at 4 GB - 3200 rubles. And at 8 GB, the price will be around 6200 rubles.

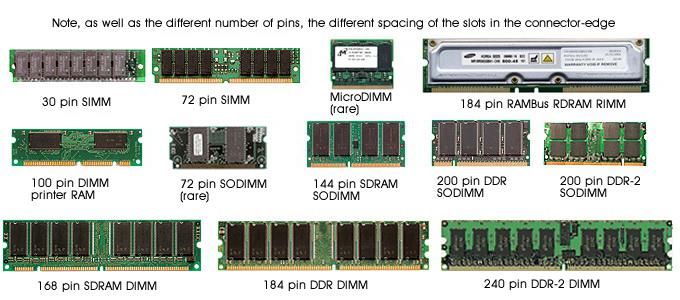
In addition to information about how much RAM costs, you will also benefit from another: each type of "RAM" in its segment is divided according to technical specifications: nominal volume, bus bandwidth and data rate (frequency), which are indicators of performance and effectiveness of a modification. In laptop computers, similar memory is used, but somewhat modified and having the designation SODIMM, which, in fact, is a kind of RAM. By the way, the cost of "minimized" memory practically does not differ in any way from a stationary version. However, some modifications of laptop memory modules still bypass "desktop colleagues" in price.
Installing an additional memory strip
To equip one more RAM module, follow the recommendations below. As a result, you get a practical answer to the question: "How to add RAM to your computer".
1). Disconnect from the electrical power source.
2). Typically, access to the internal components of the PC is done by unscrewing a group of fixing screws that hold the protective cover of the device. Important: in case of self-disclosure of the "systemist", you will not have to rely on the guarantee for more. Since when opening the cover you will inevitably damage the service seals.

3). Install the new memory module in the appropriate slot. If there are several, pay attention to the marking of the connectors. Usually the correct sequence is indicated as a digital value. In some cases, a special order is established for the installed memory slots. Interconnecting connectors (for example, 2 modules of the same manufacturer and 2 others) are painted in two different colors.
Accept your first congratulations! Now you know how to properly add RAM.
Portable solution
Despite the design features of the laptop, the process of installing RAM, in general, quite simple action ... if you have a thin cross-head screwdriver. 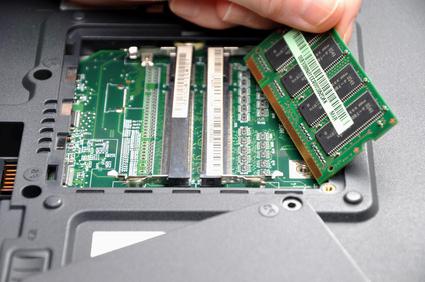
1). Turn off the laptop and disconnect it.
2). Remove the battery from the device.
3). Carefully consider the back of the laptop - a corrugated, or inscribed designation, in the form of "DIMM" or "MEMORY" - this is the place where the RAM is located.
4). Unscrew the retaining cover screws and gently pry out the edge of the protective cover.
5). Install the optional memory module and close the cover.
Method number 2: flash drive as an additional amount of RAM
On Windows 7 and its functional add-on Ready Boost, we will consider a hybrid version of the expansion of RAM resources. 
Insert the USB flash drive into the USB port of the PC or laptop. Format the removable media partition. Hover the marker on the flash drive label and, while holding the right mouse button, call context menu, from which select "Properties". In the window that opens, go to the Ready Boost tab. Activate the "Use this device" check box, then click "Apply" and "OK."
As you can see, the question: "How to add RAM to a computer?" Can be resolved by this method.
Method # 3: Optimizing RAM
Installing on your PC a special utility Memory Booster, you will greatly accelerate the operation of its OS. Despite the small size and compact interface, the program easily copes with the optimization of RAM, freeing up the PC memory reserved by various software. This significantly increases system performance. The utility always works in the background. So the control over especially "gluttonous" programs will be organized very vigilant.
Method # 4: Virtual OS memory
This method is exclusively a software tool for increasing RAM. A standard Windows tool provides for the expansion of operational resources by allocating a specific disk space for the needs of temporary files. Do not confuse the special virtual OS section, it's fundamentally different services. The generated OS has a value equal to the amount of installed RAM. When physical memory is not enough, the system uses virtual volumes of RAM. The size of the paging file can be either reduced or increased. It all depends on the needs of the user.
Practical solution 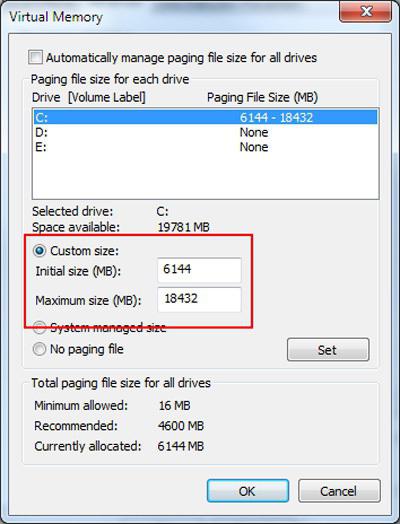
1). Open the Start menu.
2). Hold the marker on the "Computer" section and right-click the context list, from which go to "Properties".
3). While in the "System" service window, activate the link "Additional parameters" on the left.
4). In the "Performance" block, click on the button.
5). Go to the "Options" window, click the "Advanced" tab.
If you activate the "Change" button, you will be given the opportunity to make changes to the settings specified by default.
Finally
"So how much memory can you add?", You ask. The meaning is strictly predetermined. It all depends on the functionality of your motherboard. The BIOS version also has a big impact on the "hardware perception" of the PC. Finally, the 64-bit operating system removes almost all the limitations on the amount of RAM. But, as you know, in this situation, the OS is a secondary authority. Therefore, only the BIOS determines whether the motherboard is able to "accept" the desired amount of RAM. So before you upgrade your PC, check the computer's technical data sheet.
Speed of work personal computer directly depends on the correct selection and installation of all its components. Correct selection and installation of RAM memory modules is the most important guarantee for the successful operation of your PC.
In the previous article we have considered,. In this article we will consider the selection of RAM and its competent layout in the connectors of the motherboard.
The main recommendations applicable to all types and types of memory:
- install the best DIMMs with the same amount of memory;
- The modules must match the frequency of operation (Mhz), if you install modules with different operating frequencies, then in the end they will all work at the frequency of the slowest memory;
- It is desirable to combine timings, latencies (delays) of memory with the installed RAM boards;
- to select modules better from one manufacturer and one model.
Some enthusiasts try to buy modules from one party, but this, I think, is already a perversion!
These tips are not strictly enforced, situations are different. If the memory modules differ from each other by the manufacturer, volume and frequency of operation - this does not mean that they will not work. In this case, there are no special secrets to the layout of the memory - it's easy to install them.
Also there are no peculiarities when installing already obsolete types of SDRAM memory (here one rule is - the more, the better).
But in modern computers, motherboards support special modes of operation of RAM. It is in these modes that RAM memory performance will be most effective. Therefore, in order to achieve the best performance, it is necessary to take into account the modes of operation of DIMMs and their correct installation. Let's look at the most common operating modes of RAM.
Modes of operation of operative memory
SINGLE CHANELL MODE
Single Mode (single-channel or asymmetric mode) - this mode is implemented when only one memory module is installed in the system or all DIMMs differ in memory size, frequency of operation or manufacturer. It does not matter which connectors and what memory to install. All memory will work at the slowest speed of the installed memory.
If the module is only one, then it can be installed in any memory slot:
Two or three different memory modules can also be installed in any configuration:
This mode is more necessary when there is already an operative, and the first place is to increase the amount of memory and save money, and not to achieve the best PC performance. Of course, if you are just buying a computer, it is better to avoid such a memory setting.
DUAL CHANELL MODE
Dual Mode (two-channel or balanced mode) - the same amount of RAM is installed in each DIMM channel. Modules are selected according to the frequency of work. On motherboards DIMM connectors for each channel differ in color. Next to them is written the name of the connector, and sometimes the channel number. The purpose of the connectors and their location along the channels is always indicated in the manual of the motherboard. The total amount of memory is equal to the total volume of all installed modules. Each channel is served by its memory controller. System performance is increased by 5-10%.
Dual Mode can be implemented using two, three or four DIMMs.
If two identical memory RAM modules are used, they should be connected to the same name connectors (in one color) from different channels. For example, one module is installed in the connector 0 channel A, and the second - in the connector 0 channel B:
That is, to activate the mode Dual Channel (interleaved mode), the following conditions must be fulfilled:
- the same configuration of DIMMs is installed on each memory channel;
- the memory is inserted into the balanced channel connectors ( Slot 0 or Slot 1) .
Similarly, three memory modules are installed - the total amount of memory in each channel is equal to each other (memory in the channel A is equal in volume to the channel B):
And for the four modules, the same condition holds. Here works as though two parallel dual modes:
TRIPLE CHANELL MODE
(three-channel mode) - each of the three DIMM channels sets the same amount of RAM. Modules are selected by speed and volume. On motherboards supporting a three-channel memory mode, there are usually 6 memory slots (two for each channel). Sometimes there are motherboards with four connectors - two connectors make up one channel, the other two are connected to the second and third channel, respectively.
With six or three sockets, the installation is as simple as with dual-channel mode. With four memory slots installed, three of which can work in, memory should be installed in these connectors.
(flexible mode) - allows you to increase the performance of RAM, when installing two modules of different sizes, but the same frequency of operation. As in the dual-channel mode, memory cards are installed in the same name connectors of different channels. For example, if there are two 512Mb and 1Gb memory slots, one of them should be installed in the slot 0 channel A, and the second - in the slot 0 channel B:
In this case, the 512MB module will work in dual mode with 512Mb memory of the second module, and the remaining 512MB from the 1GB module will work in single-channel mode.
That's basically all the recommendations for combining RAM. Of course, the layout options can be more, it all depends on the amount of RAM, the motherboard model and your financial capabilities. Also on sale appeared motherboards with support four-channel mode work memory - this will give you the maximum performance of your computer!
One of the most simple ways Increase the performance of your computer - this will increase the amount of RAM installed in it. Every year, programs require more and more resources, and even browsers become more "gluttonous." Standard memory office computer can be spent if you open a dozen tabs in Google Chrome, but there are also other applications, for example, that operate in the background. Due to low cost, anyone can purchase an additional memory module. Correctly choosing a new component for the computer, you need to install it in the system unit, which can cause problems. If you do not know how to install RAM correctly, we will talk about this in this article.
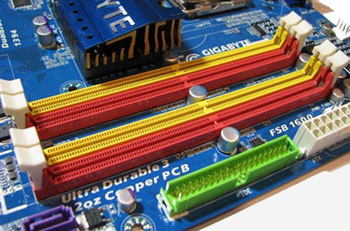
 Installing RAM is a matter of a couple of minutes, but before you start it, you need to select the ports on the motherboard into which the new component can be inserted. Here many computer users have a question, why are the slots for random-access memory of different colors, and is there a difference where to install it? The answer to this question is very simple - the motherboard developers have provided in their model the possibility of operating memory in the mode of several channels.
Example: You bought two 8 GB RAM slots and plan to install them into your computer. Both of them work at the same frequency and, preferably, are issued by one firm. In such a situation, for the computer to determine memory modules as a single 16 GB block, they must be installed in slots of the same color. If a memory of a different frequency or with different volumes is installed in the computer, there are no differences in which slots it will be placed in.
If we describe the situation from a technical point of view, then we must say that the technology used in motherboards to accelerate the parallel operation of identical memory slots is called Dual DDR. In most home computers, the motherboard is capable of supporting only a two-channel memory mode, while there are more professional solutions on the market for 3 or 4 channels. 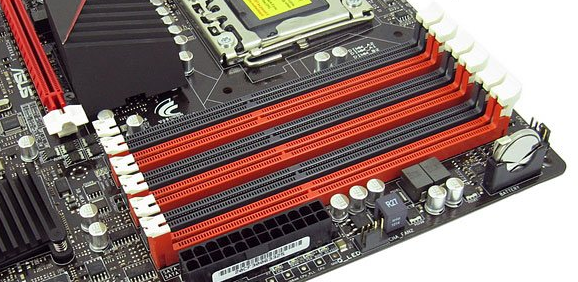
The connectors of one channel on the motherboard are indicated by a single color.
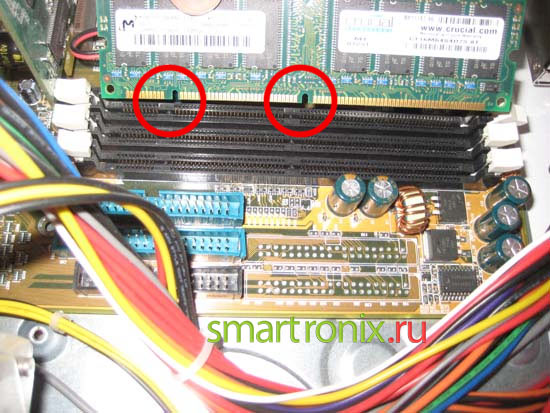
Should be made in the case, which already has a fixed motherboard and processor. Approximately here in this:
In the photo above, we see that the installation of RAM has already been made. Also we see the installed motherboard and power supply (indicated by an arrow).
In general, I must say that if you buy a computer case, then, often, it is already supplied with the power supply and you do not need to install it. But in any case, the very procedure of installing the power supply in the case does not represent anything complicated: place it in the space reserved for it (usually at the top the system unit)
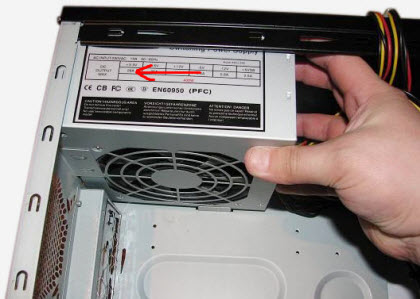
and securely fix the four bolts on the back wall.

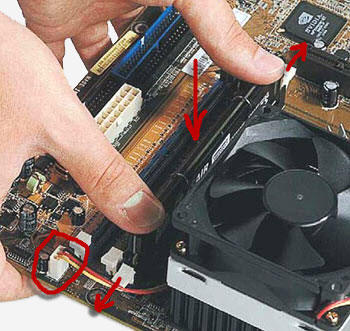
But we will not connect the power yet, but we will install the RAM. The figure below shows how this is done correctly. It is necessary to snap off the plastic clips at the connector itself, gently insert the RAM module into the groove passing through the entire connector and gently but firmly push it perpendicularly downwards until it snaps into place and firmly seated in the slot. In this case, the plastic clamps on the sides will snap themselves, if not - look carefully at the "village" whether the memory bar is the way you want and snap them.
In the figure, the fan power connector "CPU_FAN" is also circled.
Attention! You could damage your computer! Installing RAM is a responsible job.. Therefore, before installing it, it is very important to make sure that you install a suitable memory module in physical memory. For example, a DDR2 connector is installed only memory standard DDR2, in the connectors DDR3 - only memory of the form factor DDR3, etc.
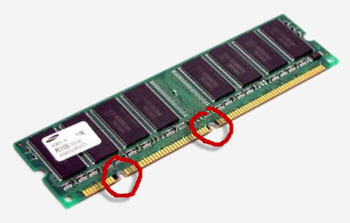
If, during the installation of the RAM, it was found that there is no sticker on it (a special label) indicating the type of memory, it is possible to orientate purely visually by the "key". The key is a special "cut", dividing it into several parts in the lower part of its operative memory. Accordingly, each memory slot has a protrusion in the same place. The "key" serves as a kind of protection from the attempt to establish the operative memory in an improper for it physical slot.
Here are two "keys" on the memory of the old standard "SD-RAM":
If you do not want to open the computer, then I recommend using the "CPU-Z" program to determine what type of RAM is installed in it. It will show what type of components your PC consists of. The work of this wonderful utility, we dismantled.
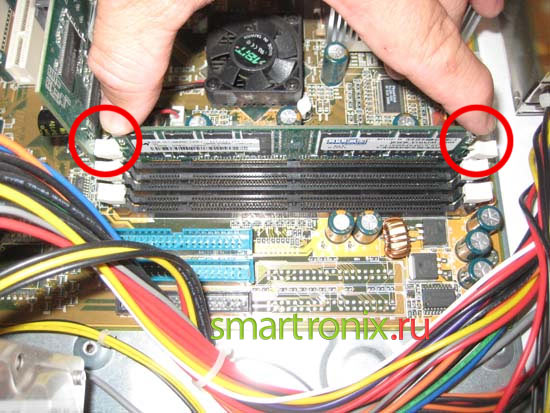
So, we install all available memory chips in our slots. On modern motherboards they are often marked with different colors (two yellow slots, two - red). This is a mode of dual-channel use of RAM, somewhat increasing its throughput.
To use two-channel (or - three-channel) RAM mode, we need to insert the strips in pairs: two identical modules are installed in connectors of the same color, then the other two - install in connectors of a different color. To obtain the maximum effect, the memory chips must be really the same by their operating characteristics of frequency, timings, "CAS" and "RAS" delays. Ideally, they should be purchased in a computer company at one time :)
And the colors of the memory slots alternate, for example: yellow, red, yellow, red.
We click all clamps, check that all memory modules "sit" in the connectors exactly (memory chips should be on the same height line, without raised edges and "protruding" latches).
This is how the RAM is installed in such a simple way. As you can see, everything is simple :)
Hello ! In today's article, I'll tell you how to properly install RAM. Those who decided to add RAM to the computer probably already have chosen the RAM for themselves. Nevertheless, we advise you to read one more of our publications, from which you will learn,.
By the link above, you will learn that the RAM is different and how much RAM you can put, and also that everything can be trivial in installing RAM for laptops. In addition, this article is useful if you want to install additional RAM.
How to install RAM in a regular computer
So, you have already bought and are holding the required module. Generation of this RAM module is suitable for your motherboard. Also, do not forget that the amount of RAM should be such that the module or memory modules can be supported by your motherboard.
In other words, before installing, make sure that your computer not only supports the available amount of memory modules, but this particular generation, since the RAM is different: DDR, DDR2, DDR3, EDO, MicroDIMM, SDRAM and SODIMM. This is especially true when you need to put additional RAM. When installing or replacing RAM, some "experts" say that the user can face the following problems:
- With electrostatic charges.
- Invalid parameters in the BIOS.
- Incorrect installation of DIMMs.
On this basis, you can find stupid advice about adding RAM:
- To prevent the accumulation of electrostatic electricity when working with sensitive microcircuits, do not wear synthetic clothes or shoes with leather soles (or stand on a rubber mat).
- Remove the accumulated electrostatic charge by grasping the body of the system unit.
- You can also use a special wrist ground strap, which can be purchased at the electronics store.
Just think about this nonsense! Can not put on a foil hat? Know that these problems are sucked out of a finger by people far from reality. Of course, there are problems with the static and grounding of the computer case, but they happen rarely and the installation of RAM is almost irrelevant.
True, here it's worth noting that if you want to install additional RAM, the question of incompatibility of modules may arise. But it has an indirect relationship to the installation process itself.
The main thing before installing to de-energize the computer and let it stand for five minutes. Usually, the installation of RAM of the correct form factor takes about five minutes. To replace the memory in standard PCs, the following tips should be used:
- Turn off the PC and disconnect network cable. Wait for a while until the residual charge on the card disappears.
- Open the system unit. Usually the lid is supported by two or less than four screws.
- Carefully move the cables away from the memory connectors. Before disconnecting the wire, remember where it was connected, but it's better not to turn it off - in most cases, you can install RAM without hindrance.
- If you need to remove the module, in order to place in its place the RAM of a larger volume or frequency, then it is sufficient to dilute the side retainers that hold the module.
- Most modern motherboards support dual-channel mode of operative memory. Its plus is that the memory modules work cooperating with each other. You need to determine which connectors should be used for correct operation of the board in two-channel mode. Such connectors have different colour (in pairs). That is, when installing two identical memory modules, they should be placed in the connectors of the same color.
![]()
There are special keys on the RIMM and DIMM slats, with which the correct orientation of the strap in the corresponding connector occurs. That is, any form factor or generation of memory has its own key, according to which the bar of the RAM must be installed. Before inserting the module, it is necessary to make sure that the plastic latches located on the sides are spread out to the sides:
After installing the RAM in the motherboard slot, it is enough to gently push the module and the latches will stand in place.
If the interfering wires were disconnected before installation, return them to their place and close the cover of the system unit by connecting the power cable. After installing additional RAM, you may need to run the application bIOS settings to save new settings, but usually the computer understands everything itself and will just start a regular download operating system. Overwhelming majority modern systems Automatically determine the new memory size and make the necessary changes in the BIOS.
How to add RAM to your laptop
So we got to the laptops. Installing RAM in a laptop is almost a lottery, because you first need to find out whether it is possible to install specifically your laptop model. At the beginning of the article, we already gave a link to the publication,. Therefore, we will not focus on this.
The first thing you need to find out before adding RAM to your laptop is whether the laptop has an extra slot, whether it is busy. This does not apply to the case where you want to replace the RAM. Laptops are all different, so an additional memory slot may be missing or be located in a hard-to-reach location. For example, here's this:

Or this:
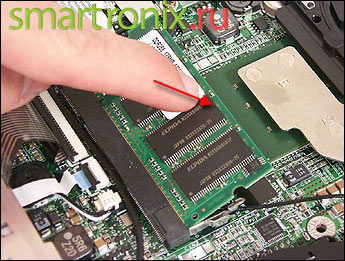
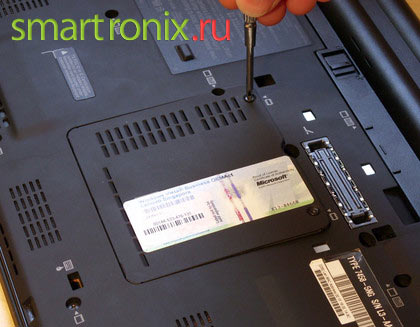
Therefore, for many models, adding RAM to a laptop can be a problem. But more often, simply unscrew the lid on the bottom of the laptop:
Pull out the memory module by releasing it from the special fasteners, if necessary:
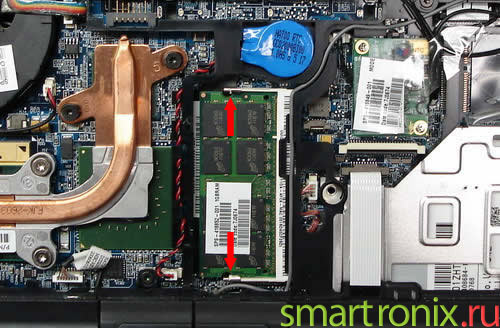
And install the new SODIMM memory in place:
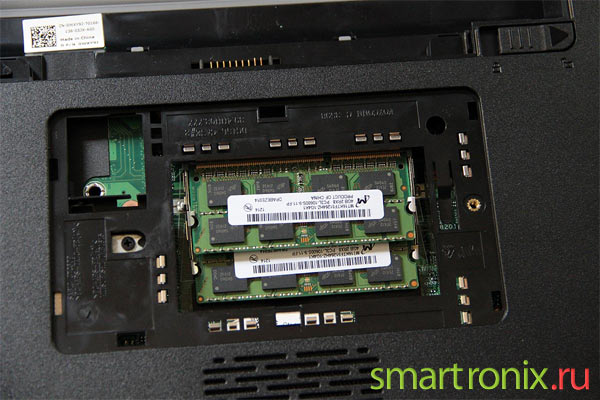
After adding RAM, you can use a special diagnostic utility and make sure that the memory is functioning correctly, but it's better to just go into the system properties and look at the amount of RAM used. We hope our article was useful and you managed to put the RAM correctly. Read it!


