In everyday work on the computer, after multiple installations and the removal of various programs, we notice that the operating system is running slower and slower, and in turn, the resulting warnings about the absence of a particular DLL interfere with its proper functioning. Even if special cleaning programs do not allow the system to return to normal operation, then the only thing we need to do is format hard drive before reinstalling operating system.
Formatting is not a complex process, but requires strict adherence to certain rules, so as not to lose important data. We will try to fully open the topic, how to format hDD.
A few words on how to format an external hard drive. External hard drive, as well as "internal" (the one that is installed in the system unit) are formatted in this way. Therefore, the steps described below are applicable to formatting both external and internal hard disks.
Fast or full format?
To perform a format operation, except file system fat32 or ntfs, you can choose fast or full formatting.
Quick formatting clears only the table of contents of the partition, while in the full completely erased all the data stored on the disk, after which they can not be restored. Therefore, if you have a new hard drive or you do not want the previously saved information after formatting to be restored by special programs, select "Full formatting".
What is important to do before formatting begins
- First of all, do not forget to transfer to another hard drive or flash drive all the data that you do not want to lose: documents, images, photos, videos and stuff.
- It will also be useful to save Outlook address book groups. Copies of the address book are saved in files with the extension wab.
- On an external USB drive or on a second disk, prepare all the necessary drivers and programs, especially anti-virus software, which must be installed before the first Internet connection to the newly installed operating system.
- Do not forget to write down the most important files and folders for you!
- All data that was not previously saved will be completely lost after formatting hard drive Information !!!
How to format a non-system disk partition
To format a partition that does not contain a Windows XP system, go to the Start menu, Programs, Administrative Tools, Computer Management.
In the left part of the window that opens, select "Disk Management". Then right-click on the disk and select "Format". In this window it is possible to format only non-system partitions, in system it is not active.
How to format HDD when installing Windows XP
The suggested method allows you to format a hard drive during windows installations XP, which means that, firstly, you save time, and secondly, the installer will perform formatting if you plan to reinstall Windows XP.
First, prepare a CD with Windows XP. Then in the BIOS, change the priority for booting from the installation CD. Restart the computer and select the appropriate installation process: first click "Install", then agree to the license agreement by pressing F8, and select the drive that you want to format.
If you previously installed Windows on the drive, press C. After selecting the file system (FAT32 or NTFS), the installer will prompt you to format the drive.
How to format hard drive when installing Windows 7
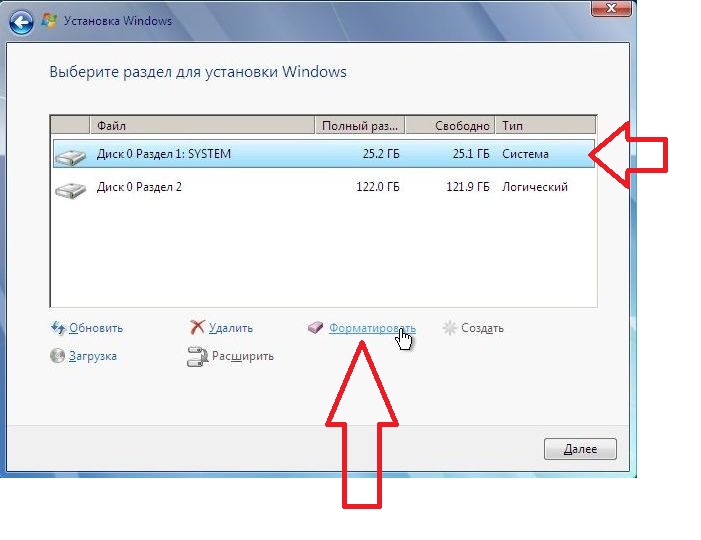
In the initial steps of installing Windows 7, the boot loader will ask you to select the partition of the drive in which the system will be installed. Then check the hard drive and select "Disk Setup".
An additional set of tools will appear, with which you can create and delete partitions, resize them, and also format them. From the list, select "Format" and use the system prompts.
How to format via DOS
Despite the fact that the MS-DOS operating system is not so much in demand, nevertheless, it is still necessary for BIOS updates.
To format a hard drive, you can use a bootable floppy disk with DOS. To create it, go to My Computer, right-click on drive A, choose Formatting from the drop-down menu. In this window, check the "Create the boot disk MS-DOS. "
In addition, you can make a bootable USB flash drive with DOS using the WinToFlash utility. To do this, in the "Advanced mode" select "Create a drive with MS-DOS", and then point to the drive that you want to make bootable.
So, after loading DOS from a floppy disk or drive, just type the following command: format C: (or D or E, depending on the partition for formatting).
How to format via command line
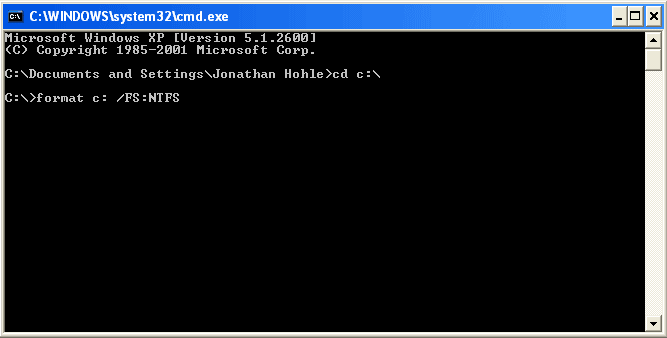
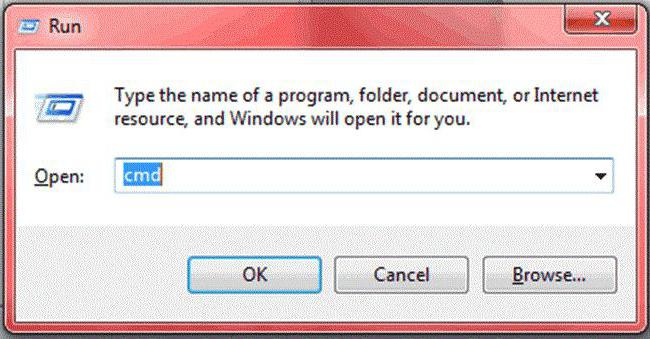
With this command, you can format the media through the command line. To do this, in Windows 7, click on "Start" and in the search bar enter cmd. Then, in the command-line console that opens, type format C: or another partition that you want to format.
For carrying out, you can use four different action algorithms. Each of them has its own advantages and disadvantages, which we'll display in the article.
Standard method
Method 1. Use for formatting standard operating tools windows systems. This method is most convenient in terms of implementation, but the process of formatting occurs in most cases by fairly simple algorithms. This leads to a superficial cleaning hard your computer and simplifies the task of data recovery.
To implement the method, proceed as follows.
Command line
Method 2: Use the Windows Console window to format. The advantage of this method will be the simplification of the action to achieve the final result. From the minuses, you can list all the same shortcomings as the first method, since the formatting method is used the same.
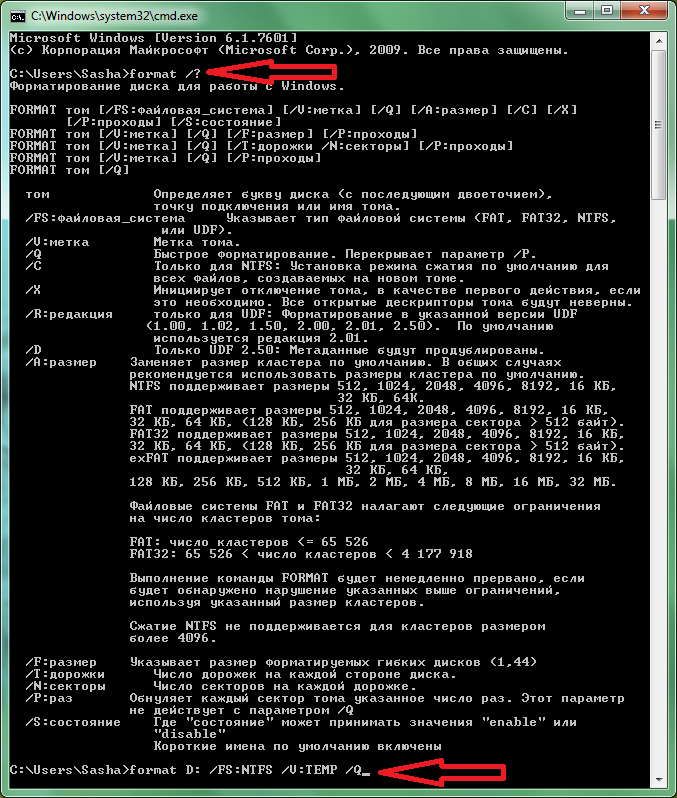
Format, like most of the service commands of the operating system Windows, has a number additional parameters and attributes. To call the full list, enter "format /?" In the console window.
Of the most important parameters, you can list the command "format / FS: filesystem" to explicitly set the disk's file system after formatting the computer and the "format / X" command to forcefully disconnect all connected descriptors. This is necessary to obtain full access to the disk and execute all the algorithms of the format command.
Using the Installation Disc
Method 3: Format the computer drive using the installation disk windows. This method has the same standard drawbacks in the small depth of information formatting as the format command, but it allows processing any disk and partition, including the system one.
To start the procedure, you must start the computer with the the Windows disk and set in the BIOSf settings the system startup parameter with CD-Rom. When starting the installation process, you will be asked to format the disk before installing the system. Selecting this item is easy enough to produce the fast format of the desired partition.
But you have to be careful. If you use the first three methods, when you try to format the drive with the Windows operating system installed on it, a warning appears with an action barring. In this case, this prohibition does not happen and it is enough to simply delete important information and disrupt the operation of the entire operating system. 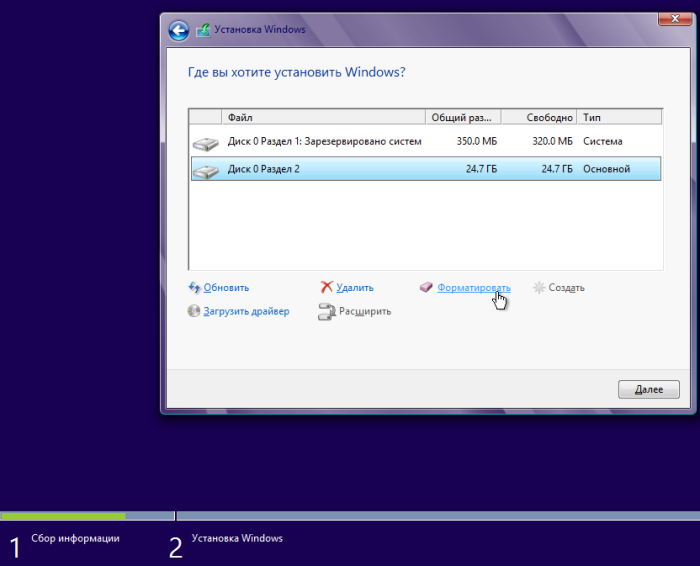
When starting the format, you will be prompted to choose one of two ways to format the computer: fast and complete. Quick formatting removes information, but does not fix it system errors and checking the physical space, which is critical for installing Windows. 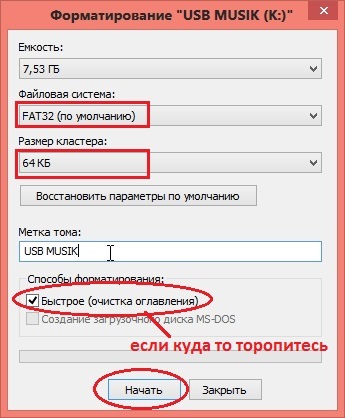
Third-Party Software
Method 4: Use the auxiliary software for Windows. There are a lot of specially developed applications with which you can perform this operation on your computer. Their advantages can be called the highest possible level
How to format a disk? This question is often asked by users who have just bought a new one. After connection, a new unformatted hard disk will be displayed in the system. However, it can not be opened and it will not work with it.
In order to bring such a disk into the working state, you must at least perform its formatting. In addition, if necessary, you can perform on logical partitions, we already talked about this in one of the previous articles.
Formatting a disk is preparing to write files. When formatting, the necessary logical information is written to store data and load the operating system (if necessary).
Format the disk using standard Windows utilities
With the Windows operating system, you can format a new disk in several ways. The simplest way is formatting through My Computer.
- Open My Computer
- Locate the desired drive
- Right-click and select "Format"
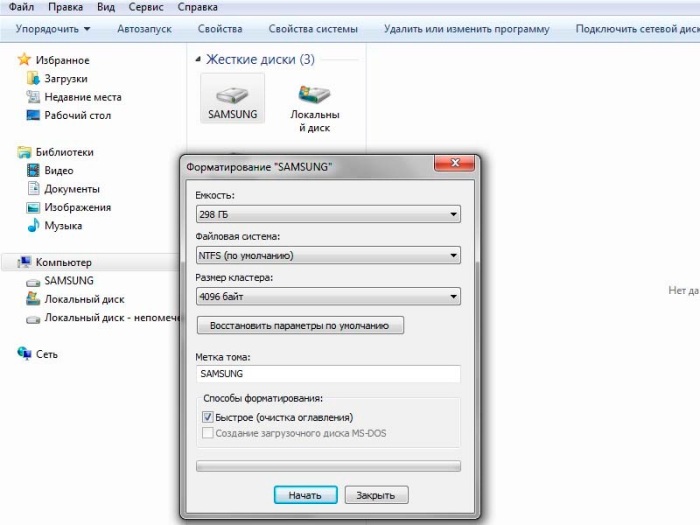
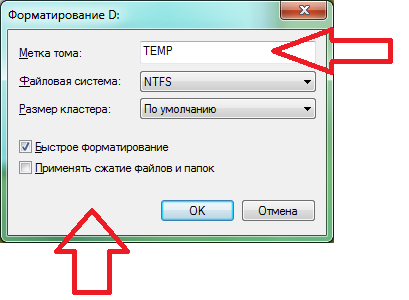
After that, the disk formatting window opens, where you can specify a volume label, select fast or full formatting, and specify other formatting options, if available.

After clicking on the "Start" button, the disk will be formatted. Similarly, any other removable drive can be used.
Another method of formatting a disk is formatting through Disk Management. In order to run this program built into the operating system, it is necessary to pass along the path: Start - Control Panel - System - Administration - Computer Management - Disk Management.
Here you also need to select the disk for formatting by right-clicking and selecting "Format". After that you will be able to specify the formatting options.

Another way to format the disk is formatting through. To start the console, click the Start button and type CMD in the search bar.
Formatting of disks through the console is performed using the FORMAT command in order to find out what parameters we can pass to this command it is necessary to enter FORMAT / ?. As you can see, after that we will get a detailed help on the FORMAT command. The command for formatting the disk might look like this: FORMAT D: / FS: NTFS / V: DATA / Q. In this case, the D: drive will be formatted in the NTFS file system, a DATA label is assigned to it, and the formatting itself will be executed in "Quick" mode.
If you need to format the C: drive, you are most likely planning to reinstall the operating system. The most simple way do this, will use the installer's features. Here you need to select drive C: and click on the text link "Format"
There are 2 types of installation of Windows 7, after which the operating system is working correctly:
- Direct upgrade via a previously installed system, for example, Vista.
- Clean installation with the removal of the old OS, produced by formatting.
Advice! For clean installation You will need a disk or USB flash drive with installation files new OS.
Why do I need to format?
In order to new system worked without bugs and crashes, you must prepare an even platform for it, deleting the old files. Manual removal is not effective, so it's better to format the disks by first copying the necessary information from them.
Deep formatting solves such problems:
- Zero all data and prepare the disk for a new OS. Formatting removes "dead" files that no longer carry a functional load. Prevents slippage of the system after installation, cleaning the remnants of old games and programs, invisible Internet files and much more.
- Removes viruses and malicious files.
- It makes marking and systematization.
Important! If you unformattedly formatted the disk with the necessary information, then the program Active Partition Recovery partially or completely will help to restore it. Advanced EFS Data Recovery software recovers and decrypts nTFS partitions.
Clean installation from a flash drive or a disk with formatting via BIOS (BIOS)
Before formatting, you must close all windows, and then reboot the system. After the start, log into the BIOS, usually, for this command, use the key Del, F12, F8. After login, select the Boot-Device Priority tab in the BIOS and the boot device disk or USB flash drive. Next, the priority of the device from which the download will be made and the F10 button will be pressed will be left to exit the BIOS.
When you restart your PC, the names of the disks are different from those to which you are accustomed. Therefore, you need to enter the formatted drive at the command prompt: for NTFS format / FS: NTFS X: / q, and for FAT32 format / FS: FAT32 X: / q. After that, press Enter and the process is expected to end.
Cleaning through the BIOS through the installer OS
On Windows 7 and older versions of the OS is made directly during the installation. At the selection stage the system disk, which will be installed, you need to go to the Settings section, select the formatting and confirm it. After the installation process is completed, the new operating system will continue automatically. All actions are performed in this order:
- Insert the media with the boot file of the new OS into the device, select the desired installation language.
- After defining the language, select Full installation.
- Now select the drive that requires formatting, and go to the Disk Settings section.
- All, click the "Format" button, wait for the process to finish and continue installing the new OS.
Important! Formatting permanently erases data that is on the hard disk. Therefore, copy the desired files to any media beforehand.
Formatting via cmd (command line)
Full cleaning through the command line is done in this order:
- Call the command line by pressing the Win-R keys.
- In the window that appears, enter CMD, press Enter.
- Directly on the command line enter "format *:", where * is the name the desired disk (C or D). Press Enter again.
- After clicking, a dialog box appears, which displays the question of your consent to the fact that all data from the selected disk will be deleted. Confirm and wait for the formatting to finish.
Perform an algorithm of actions, and formatting will not cause complications
Formatting with Acronis Disk Director
For hard formatting the most convenient way to use the program Acronis Disk Director, although there are many others.
Advice! To download the program, enter the search engine request "Acronis Disk Director Boot ISO". After loading, mount the image or burn the program to a CD / DVD.
Set the boot priority of the BIOS, wait when the program menu appears on your monitor:
- In the window that appears, select the "Formatting" section, left-click on the desired disk and select "Format" again.
- In the new pop-up window, you can change nothing except for the file system: it should be displayed as NTFS.
- Confirm the action in the window with the "Apply pending operations" check box.
- In the window that appears, click Confirm.
If you format the drive on which the OC was stored, the computer will not boot after formatting. Further installation of the operating system is performed from a USB flash drive or drive through the BIOS.
Acronis Disk Director is useful to you in the future, it has a number of useful functions:
- restores damaged or deleted disk partitions;
- has support for mirrored volumes;
- distributes volumes to different disks;
- converts ordinary disks to dynamic disks and vice versa;
- optimizes the structure and free place on the hard disk.
Updated versions of the program are indispensable helpers in working with system disks.
What other programs can I use?
For formatting under a new operating system, the most commonly used software:
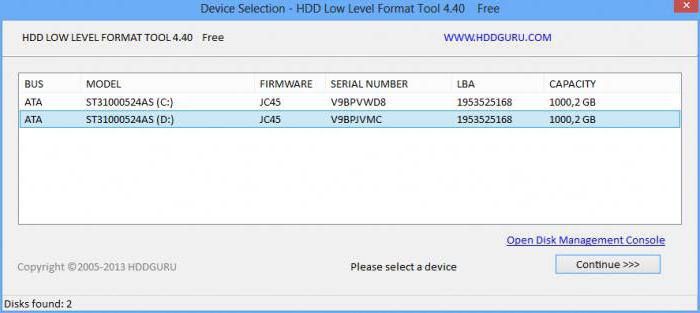
- Convenient free program HDD Low Level Format Tool. Be careful, the developer promises that after cleaning, files can not be restored.
- English-speaking paragon program Hard Disk Mananger, with the principle of operation as in Acronis Disk Director. Formatting is done through the Format Partition section.
- Another program of this type is Partition Magic, which received excellent reviews.
The formatting that precedes the installation of a new operating system significantly improves the quality and life of the operating system. Formatting in one fell swoop eliminates the old OS and all the garbage, along with the viruses that have accumulated on the disk for years of work.
Carefully follow the whole process, especially when choosing the right disk. Some information after formatting can not be restored, and in the service center this service costs more than 4 thousand rubles.
How to format a hard disk: video
One of the most common actions with hard disks of any type is their formatting. Situations where a logical partition or hard drive requires formatting can be quite a lot. But in some cases, in particular with regard to the system partition, the standard procedure windows tools it is impossible to produce. In this case, the command line (We use Windows 10 as an example), which can be started by booting from removable media. Next, several options will be considered for the process of formatting both in the operating system environment and when booting from optical disk or a regular flash drive.
Formatting the hard drive via the command line: why is this needed?
First of all, it should be said that absolutely all specialists note the fact that it is better to format from the command console, in spite of the fact that the system itself has its own tool.
First, you can apply additional attributes to the main formatting commands, which, in addition to carrying out the process itself, allow you to perform some additional actions. Secondly, the console becomes absolutely indispensable when reinstalling the operating system, fixing failures or when the hard disk does not open, for example, due to damage, and OS loading becomes impossible. If critical disruptions occur on the hard drive, whether you want it or not, you can not do without full formatting. Some users try to use fast formatting, however, as practice shows, it can only perform cleaning of the table of contents and in the end, when it is required to bring the hard drive to life, the best tool, as opposed to full formatting.
How is the Windows 10 command line invoked?
First, let's look at the console itself. In any Windows-system there are several simple ways.
The most used and most common method for Windows 10 is the use of a special "Run" menu, which is entered In systems with a rank below, this option can also be used, but in fact the link to the console was previously displayed directly in the main menu, called via the "Start" button , and in the tenth modification of this there.

An equally simple way is to enter a query in the search field, which can be called from the right-click menu on the "Start" button. Here, the console can be simply started, or it can be started via the PCM on behalf of the administrator (working with the command line very often requires the presence of administrative rights, especially for any critical actions in relation to the hard drive and to the operating system as a whole).
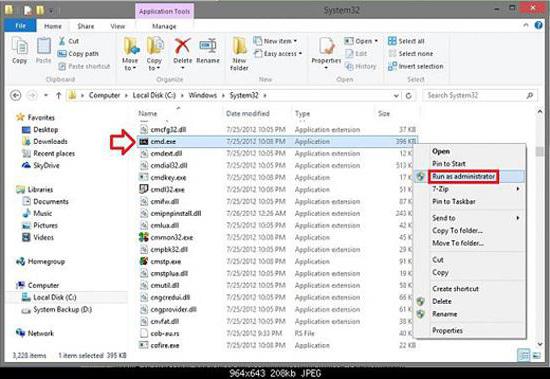
Finally, you can open the System32 directory in the standard "Explorer", located in the main system directory, and start the cmd.exe file with the methods shown above (opening the file as administrator).
When loading from removable media (installation, recovery media or USB-media), in most cases the combination Shift + F10 is used.
Some nuances of access to disks
Immediately I want to draw the attention of all users at that moment, that even when using the cmd.exe applet, it will not be possible to format the system partition. This is understandable. Well, the system can not format the drive on which it itself is located.
Therefore, the formatting of the hard disk through the command windows string in the environment of the operating system itself is applied exclusively to logical partitions, removable media (including USB HDD), as well as to other hard disks installed on the computer (RIAD arrays). By the way, even if the operating system is not installed on drive C, but, for example, in partition D, the formatting of the first partition will still be unavailable, since at boot the primary system BIOS refers to this section, and on it anyway there are files necessary to start the OS.
Standard logical partition formatting
Now directly about the process itself. Until we touch the system partition, and stop at the logical and optional installed disks any type.
After calling the console in the simplest case, the hard disk is formatted via the command line using the universal format command, after which a disk or a section with a colon is entered through a space. For example, the disk in the system is identified by the letter H. The command in this case will look like "format h:".
This is the complete formatting of the hard drive via the command line, although you can use another method, which will be described in more detail below.
Additional attributes of the format command
As already mentioned, this command is good because additional attributes can be added to it, due to which some other actions can be performed.
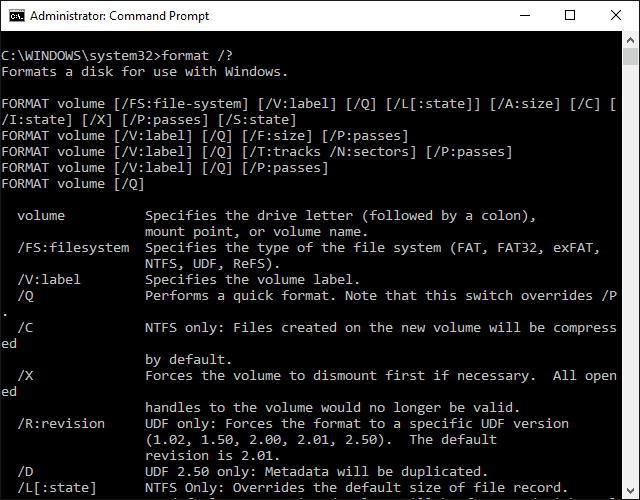
View full description of all possible options You can execute the command in the console itself if you enter the string format /? (this command opens a full list of add-ons). There are a lot of attributes, but one should note fast formatting with the input after the main command / q, formatting with the installation of a certain file system, for example fs: ntfs, and also using the combination V: NAME to specify a volume label, where NAME is an arbitrary disk name or section.
Download from removable media and call the command line
In situations where there are problems with access to the system partition, in particular, the hard disk does not open, its formatting is performed (if other troubleshooting methods do not help), it is possible exclusively from the command console that is started when booting from removable media. One of the most admired means is the start with the LiveCD.
Formatting the hard drive through the command line, access to which is done by the combination Shift + F10 (from the Recovery Console or without it) can be performed with the same format command with the system section letter and additional formatting parameters.
Using the diskpart tool
However, as most experts admit, it is not always appropriate to use the standard command. Another method is more effective, however, in most cases it is customary to use it for removable USB-devices, including for USB-hard drives, from which it is necessary to make a boot device.
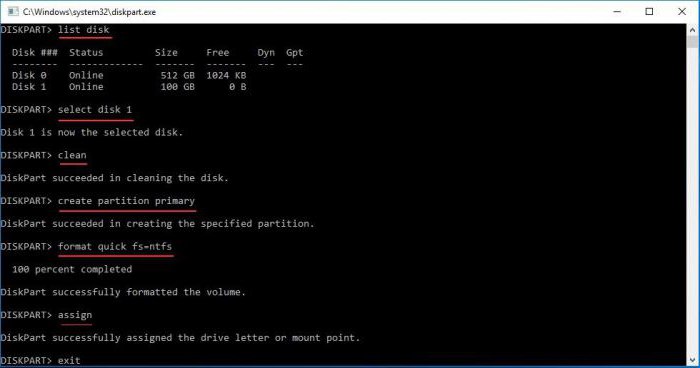
In this case, the formatting of the hard disk via the command line (diskpart) begins with the input of the same name command, after which a list disk is introduced to view all the drives installed on the system.
All disks are marked not by letters, but by numbers. Therefore, some users are faced with the problem of determining their device. The easiest way to find out is by the specified size (the same flash drive with a hard drive is clearly not confusing).
Next, select select disk X, where X is the number of the desired disk from the list. After that, the clean line cleans the contents of the media, and then creates the primary partition (the create partition primary command). After that, the current partition (select partition 1) is again selected and activated (active). This command is not always used. When you do not plan to make it bootable, you can skip it.
Only at this stage, directly formatting the active primary partition begins with the preferred file system, using the command format fs = ntfs (or fat32). If you want to make quick formatting, a quick line is added to the line with a space. But to achieve the optimal result, it should not be used.
At the end of the process, you need to assign a volume label to the partition (device). This is done by the assign command (the device letter will be assigned automatically). After that, you will only have to transfer the installation distribution files to the created drive.
Third-party utilities
If someone does not like these methods, any free utility such as Disk Director from Acronis, HDD Low Level Format Tool, Partition Magic, Paragon Hard Disk Manager, etc., can be used to simplify the work.
True, they are all equipped with graphical interface, and we are not talking about the use of the command console, although many users will be much easier to work with such utilities. But, since in this case the use of the command line is considered, there is no sense to dwell on such utilities and their capabilities.
Conclusion
As a result, it remains to be said that the use of a console, in which commands specially introduced in Windows-systems are introduced, which, incidentally, migrated to these OS from DOS, is not particularly complicated. In addition, it is the command line that allows you to eliminate many more problems, which can not always be corrected with Windows tools and system tools. And the process of formatting is a headache higher than if it were run in the operating system environment. It's no secret that you can often see the appearance of a message that Windows for some reason can not finish formatting. And under the condition of working with the console, such problems do not arise almost never. And that's why in the majority of cases, all processes related to cleaning, formatting disks and partitions, preparing bootable media, etc. are recommended only with the use of standard console commands, and not other built-in tools of the system.


