Having problems with Windows 10 and can't fix them? Damaged system files and traditional sfc / scannow command not working? See how to use the DISM function to repair damaged system files or restore them from the original system image without re- install windows 10.
As a rule, in case of problems with system files, use the SFC utility, which scans hDD for errors and fixes them. But still this first aid tool does not always bring the desired results. Another DISM utility is available in the system, which we briefly mentioned in previous articles that can fix problems with damaged files in Windows 10. This time we will look at the full range of DISM functions, describe various use cases and show how to use it to repair damaged system files. files from the original system image (component storage).
This feature is designed to fix and prepare images WIndows, such as the operating system boot disk, system recovery tools, etc. With these images you can reinstall or restore the system in case of problems. When using the SFC utility to scan and repair a disk, problems with damaged files are solved only with the help of the corresponding image from the component storage on the hard disk. When this image is damaged, the system cannot retrieve the system files from the component repository and therefore cannot restore them using the SFC function. In this case, the utility DISM will help us, which will solve the problem with the images for recovery and allow the SFC function to complete its work correctly.
How to use the utility DISM?
Recover system files through the utility is not difficult. With this application, you can repair components on the same principle as using SFC through command line. To call the command line, press the key combination Windows + X and in the menu that appears, select the item “command line (administrator). Then in the console you need to enter the DISM command with the appropriate parameters.
Up to the DISM team we can add extra optionswith which you can scan, scan and restore images different ways. Consider the most important combinations.
DISM with CheckHealth parameter
In the command line console, enter the following command:
DISM / Online / Cleanup-Image / CheckHealth
With this option, you can quickly check the image and the individual components of the system installation, which are stored on the disk for damage. This command does not make any changes - it is completely safe. CheckHealth provides package status information. operating system. This is a very useful option when we want to safe way check for any damage to the system file in the component store.
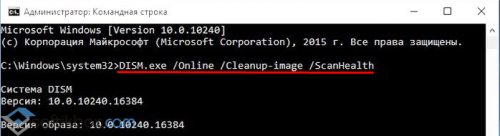
DISM with ScanHealth option
The effect of this parameter is similar to CheckHealth, but takes a little more time due to a more thorough scan, but also does not fix anything. It should be used when the previous / CheckHealth option informed that everything is in order, but we want to make sure that this is certainly the case. Enter:
DISM / Online / Cleanup-Image / ScanHealth
Scanning may take much longer than with the previous option (approximately 10 minutes). If the scan stops at 20% or 40%, then you need to wait - it may seem that the computer is frozen - but the scan is actually being performed.
DISM with RestoreHealth parameter
If the first and second teams have unloaded the message that the images are damaged, it is time to restore them. For this purpose, use the / RestoreHealth option. Enter the following command in the command line console:
DISM / Online / Cleanup-Image / RestoreHealth
The parameter uses Windows Update to repair damaged files in the component store. The scan and auto repair procedure may take about 20 minutes (sometimes longer). DISM detects a crash, creates a list of corrupted files, and then downloads them from Microsoft servers using Windows Update.
How to restore files from specified source using RestoreHealth parameter
Sometimes it happens that the damage to the operating system is much wider and affects the service windows updates. In this case, it will not be possible to repair damage to the image through the RestoreHealth parameter, because the system cannot connect to Microsoft servers. In this situation, you should perform another operation - specify the path to the installer (installer) of Windows, from which the "working" files will be downloaded without using the Internet and the update center.
To do this, you need the Windows 10 installer on a DVD, flash drive, or ISO image format. The latter can be downloaded through the Media Creation Tool for Windows 10 application.
Download the Windows 10 version (32 or 64 bit), launch the application and follow the wizard’s instructions to download the ISO to your computer. After the image is downloaded and saved, go to the explorer window and double click on the ISO file with the installer to mount it. In the "This Computer" window, check which letter was assigned to the mounted image (for example, the letter "E").
If you have boot disk DVD or USB drive with the installation of Windows 10, then you do not need to download anything - just insert a disk or connect external media and see which letter was assigned to this drive in the “This Computer” section.
After the drive with the installation of Windows is detected by the system and we know the letter, it is time to use the corresponding parameter DISM, which will indicate the path to this medium. To do this, enter the following command:
Dism / Online / Cleanup-Image / RestoreHealth /Source:wim:E:\\Sources\\install.wim:1 / limitaccess
Note again that in our case, a DVD, flash drive or iSO image will be given another letter than "E", then change it in the above command. After clicking on Enter, the damaged component storage files will be restored from the original Windows Installer at the specified path.
Windows Error Correction
After you have completed all of the above steps, you now need to use the SFC utility again to fix system errors from the restored windows images. Enter in the command window:
sfc / scannow
Sometimes it may be necessary to scan the system three times to completely eliminate all errors. SFC now has access to the recovered images in the component storage and can completely recover damaged system files.
Before starting the installation of the operating system, each user prepares the ground for this process, that is, checks the components of his PC for operability. However, the software may also work incorrectly if the OS system files are damaged. Therefore, users often wonder: how to check the integrity of system files in Windows 10 before installing new programs?
In Windows 10, as in many previous versions OS, there is an effective tool for checking and restoring system files. With it, you can not only check hard drive, but also restore, or rather replace the damaged files with integers.
This replacement takes place as follows. The program scans the PC for the presence of damaged system files, then takes the normal file from the “C” drive, the “Windows” and “WinSxS” folders and replaces it with a non-working one.
How to run file integrity check in Windows 10?
In order to run the system file integrity checker in Windows 10, you need to click Start, type in search bar “Command Prompt” and by issuing, right-click on the result, selecting “Run as Administrator” or select immediately “Command Prompt (Administrator)”.
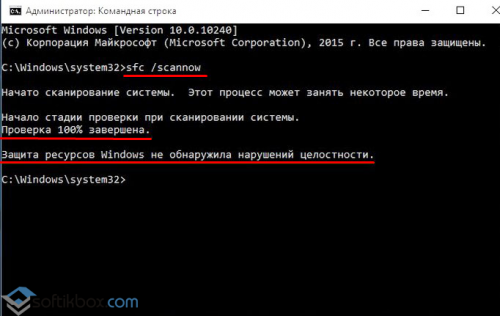
In the command line, enter "sfc / scannow" and click "Enter".
The file scan will start. It usually lasts a few minutes. After that, the system status notification will appear on the monitor screen. In this case, Windows 10 is in good condition.
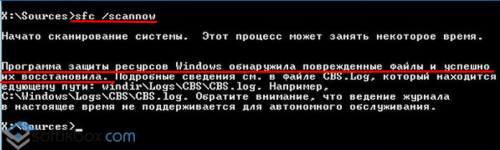
In the event that the system detects a damaged file or several, the notification will be of the following nature: “The Windows resource protection program detected the damaged files and successfully fixed them.
However, there are times when the program has detected damaged system files, but cannot fix them. This means that the repository of the original windows components 10 damaged. Therefore, initially it is necessary to restore this reserve. Deployment Image & Servicing Management (DSIM) is suitable for this action. Download and install this software. Next, in the command line, enter the command “Dism / Online / Cleanup-Image / ScanHealth”, which will check the integrity of the storage itself.
After we start the recovery of the storage with the command “DISM / Online / Cleanup-Image / RestoreHealth”.
![]()
After the component storage is restored, it is worth re-running the system files check and recovery using the “sfc / scannow” command. After performing the operations, we recommend restarting the PC. Now the files will be restored permanently.