A boot disk or Live CD is a disk from which you can boot the operating system. Boot disks are used for, solving computer problems or just for work.
There are many different boot disks available on the net. As a rule, such disks are distributed in the form of disk images in iso format. In order to turn the iso file into real boot disk It must be burned onto a CD or DVD. In this article we will discuss how to burn a boot disk.
How to burn a boot disk using ImgBurn
It is free. Its main advantage is a bit ascetic and as simple as possible interface. Deal with this program is not difficult, even for the most inexperienced user.
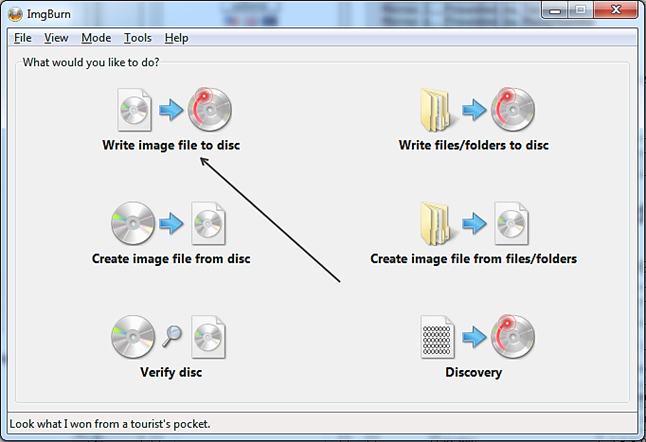
So, download and install the program ImgBurn. After the first launch of the program, you will see something like this window.
In order to write our iso file to disk and get a boot disk, click on the button "Write image file to disk".
After that, before you open a window to record a disk image. The first thing to do here is to specify the location of your iso file. To do this, click on the button “Browse” and select the desired iso file.
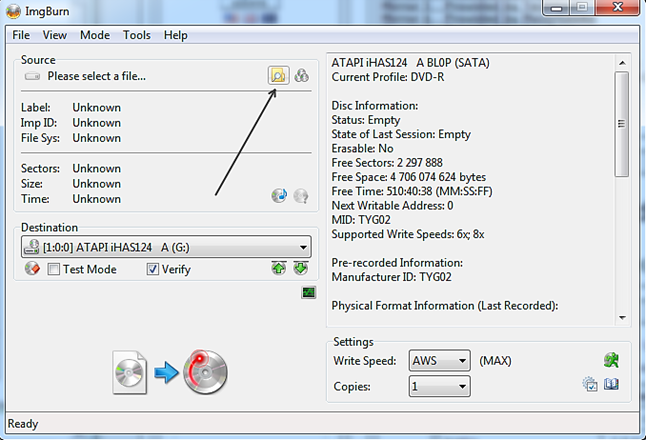
All these simple steps are enough to start recording a boot disk. In order to start the writing process, you need to click on the “Write” button.

If necessary, before you start recording, you can select the drive to be used for recording (useful if you have more than one drive in your computer), as well as select the recording speed and the number of copies of the disc. But, in most cases, these settings are not needed and you can immediately start recording a boot disk.
How to burn a boot disk using CDBurnerXP
This is a program for recording discs. Like ImgBurn, this program is completely free. The advantage of CDBurnerXP is a nice interface, a bit like Nero, a popular paid program to burn discs.
After downloading, installing and running the CDBurnerXP program for the first time, you will see this window.
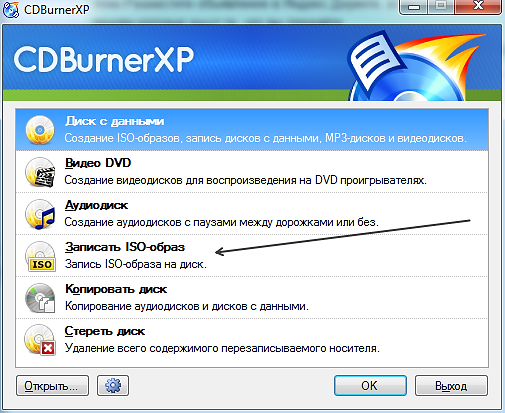
This is the main window of the program, with its help you can run all the functions of working with disks. In our case, we need a function. Therefore, select the appropriate item and click on the "OK" button.

After that, you should open a small window to burn bootable discs. The interface of this window is as simple as possible. The first thing to do is to specify the location of the ISO file that will be used to create the boot disk. To do this, click on the button “Browse” and select the desired file.
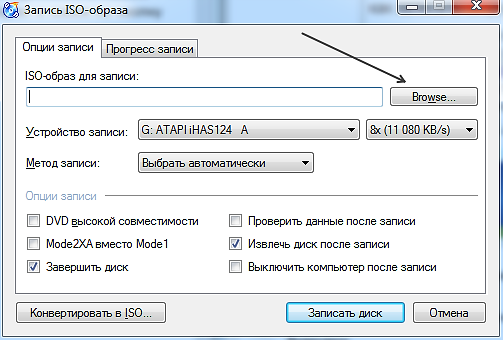
In principle, this is enough to start recording a boot disk. After you have selected an ISO file, you can click on the “Burn Disc” button.
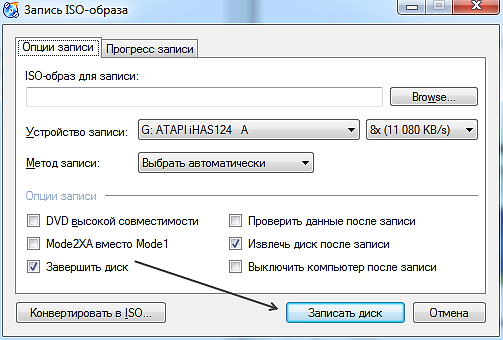
But if necessary, you can choose optical drive, select the recording speed, check the data after recording or turn off the computer after the recording process of the boot disk. All these functions are available in the same window.
How of iso image make a boot disk?
Creating a boot disk in the Ultraiso program is pretty simple action. All you need is the actual .iso image with the operating system, a blank disk and the Ultraiso program.
Now we will show in detail and tell about the process of recording a boot disk from an iso image using ultraiso.
Run the UltraIso program and insert a blank disk into the drive of your computer or laptop.
In the main window of the program, select “Tools” -\u003e “Burn CD image”.
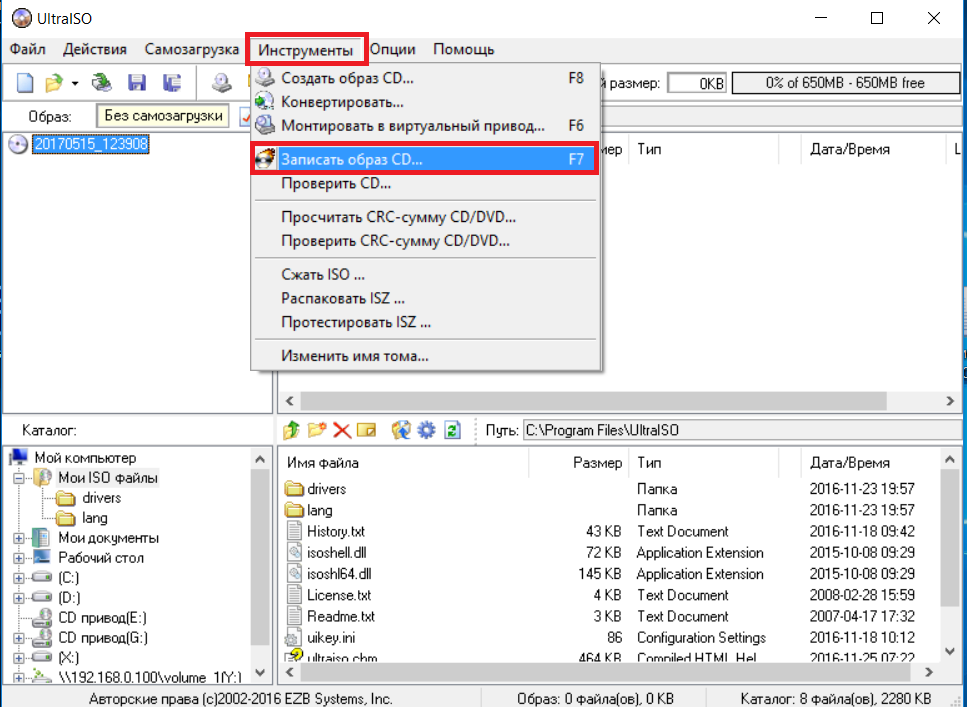
Transition to disk image write operation in UltraIso
A window will open in which you need to set some parameters for recording our future boot disk.

Setting the parameters for recording a boot disk and selecting the iso Image
Please note that in the “Drive” parameter your optical drive is selected, and in the “Write speed” it is better to choose the minimum value for better recording quality and a greater likelihood of reading the future boot disk on older computers.
To the right of the “Image File” line you need to click on the button with three dots and select the iso file to write to the disk.
Now you know how using the UltraIso program you can create a boot disk with just a few mouse clicks from an ISO image.
Operating systems are not rarely stored or distributed as disk images. Such images have. Inside the ISO file contains the entire contents of the disc and in order to get a ready-to-use disc, you must write the ISO to a blank disc.
Many users ask how to record windows image to disk. In fact, it is very easy to do this and in this article we will tell about it in as much detail as possible using such programs as UltraIso, CDBurnerXP and ImgBurn. In addition, we consider the process of recording a disk image using standard Windows tools.
In general terms, the process of recording a disk image with the Windows operating system looks like this:
- First we insert a blank disk into the drive. If you are burning a Windows XP image, then you will need a CD; if you are planning to burn Windows Vista, Windows 7 or Windows 8, then you will need a DVD;
- Next you need to open the ISO image using the program for recording discs and make some settings;
- Click on the "Record" button and wait until the disk is written;
The program is very popular. Therefore, we first consider the process of recording the operating room. windows systems on the example of this program.
So, insert the disc, run the UltraIso program and click on the button “Burn CD image”. This button is indicated by an arrow.
After that, before you open the window "". In addition to the toolbar button, this window can be opened using the Tools menu or using the F7 key.
In order to specify the path to the ISO disk image. To do this, click on the button, which is indicated by the arrow.
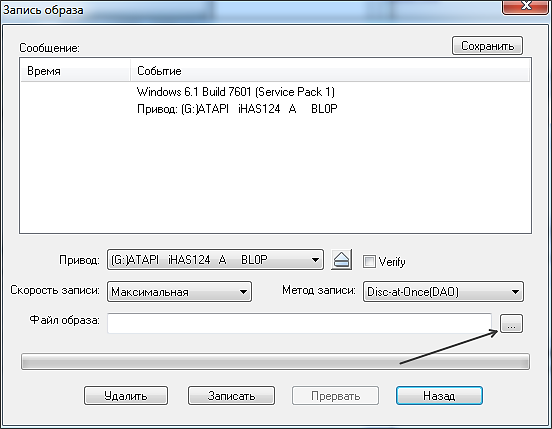
Also in this window, you can select the drive that will be used to burn the disc, as well as the speed of the disc writing. But in most cases it is not necessary to change these settings.
Having chosen an ISO image, click on the “Record” button. Then the process will begin. windows records on your CD.
The next program we’ll look at is CDBurnerXP. This program, unlike UltraIso, is completely free, so if you do not know how to burn Windows to disk, you can download it from the official site.
Insert the disc and run the program CDBurnerXP. After starting the program you will see a window with a list of available functions.
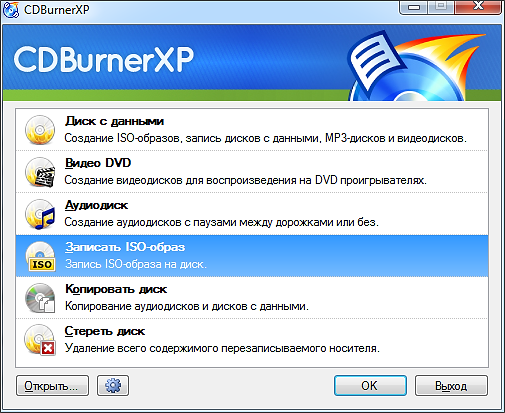
Choose the function “Burn ISO image” and click on the “OK” button. After that, you will see the "Burn ISO image" window.
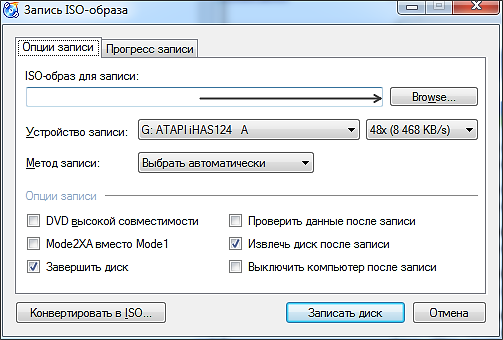
In order to burn your Windows image to disk, you need to click on the “Browse” button and select. In addition, the CDBurnerXP program provides the user with access to the following functions:
- Check data after recording;
- Removing disc after burning;
- Turn off the computer after recording;
You can enable or disable these features at your discretion. Changing the value of other available settings is not worth it. After making all the necessary settings, you can click on the "Burn Disc" button. No other settings are required.
The last program that we will look at in this article is ImgBurn. The program, like CDBurnerXP, is a free program. A distinctive feature of the program ImgBurn is its very simple, almost ascetic interface. But, despite the appearance, this program is very convenient to use. And most importantly, it can be used to write a Windows image to disk.
Insert the disc and run the program ImgBurn. After starting the program, you will see a window with a list of available functions.

Here you need to open the section "Write image file to disk". After that, before you open a window for recording disk images.
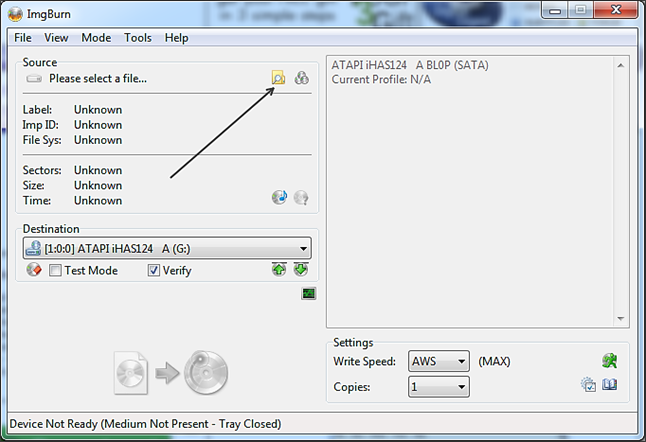
Click on the “Browse” button, which is indicated by an arrow, and select the desired ISO file. The program almost does not provide any settings, the user can turn on the disk check after recording (the Verify function), and also set the speed of the disk and the number of copies.
After we have selected an ISO file with the Windows operating system, you can click on the disc burning button.
Few people know that the Windows operating system is equipped with a built-in tool for recording disk images. In order to burn a Windows image to disk using the built-in tools, you must:
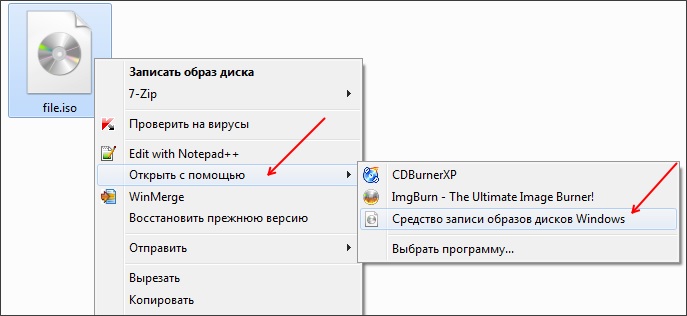
As you can see, this method of writing Windows to a disk is very simple. Simplicity of this method even a little surprised, especially considering Microsoft’s love for everything complicated and confusing.
Boot dVD disc or a CD may be required in order to install Windows or Linux, check the computer for viruses, remove the banner from the desktop, perform system recovery - in general, for various purposes. Creating such a disc in most cases is not particularly difficult, however, it may raise questions for a novice user.
In this manual I will try to explain in detail and in steps how exactly you can burn a boot disk in Windows 8, 7 or Windows XP, what exactly this will need and what tools and programs you can use.
Update 2015: additional relevant materials on a similar topic:
What you need to create a boot disk
As a rule, the only thing needed is a boot disk image and in most cases, it is a file with the .iso extension that you downloaded from the Internet.
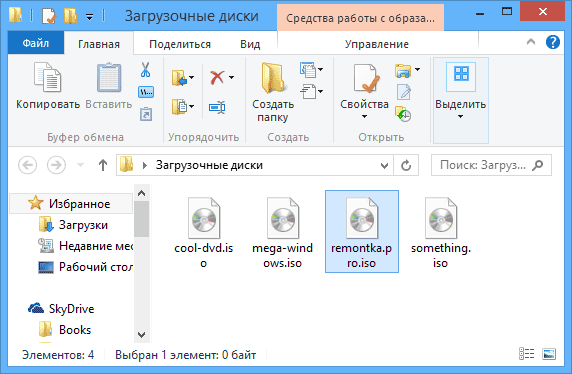
This is a bootable disk image.
Almost always, when downloading Windows, a recovery disk, a LiveCD or some Rescue Disk with an antivirus, you get exactly the image of the ISO boot disk and all that needs to be done to get the right media - burn this image to disk.
How to burn a boot disk in Windows 8 (8.1) and Windows 7
Burn boot disk from image to latest versions Windows operating system without the help of any additional programs (however, this may not be the most the best way, which will be discussed below). Here's how to do it:

The main advantage of this method is that it is simple and clear, and also does not require installation of programs. The main drawback is that there are no different recording options. The fact is that when creating a boot disk, it is recommended to set the minimum write speed (and using the described method, it will be recorded at maximum) in order to ensure reliable reading of the disk on most dVD drives without downloading additional drivers. This is especially important if you are going to install an operating system from this disk.
The following method - the use of special programs for recording discs is optimal for the purposes of creating bootable discs and is suitable not only for Windows 8 and 7, but also for XP.
Burn bootable disc in the free program ImgBurn
There are many programs for recording discs, among which the Nero product (which, by the way, is paid) seems to be the most famous. However, we will start with a completely free and at the same time excellent program ImgBurn.
You can download the ImgBurn disc burning program from the official website http://www.imgburn.com/index.php?act=download (note that you should use links to download Mirror -Provided byrather than the big green Download button. Also on the site you can download the Russian language for ImgBurn.
Install the program, while at the time of installation, discard two additional programs that will try to install (you will need to be careful and remove the marks).
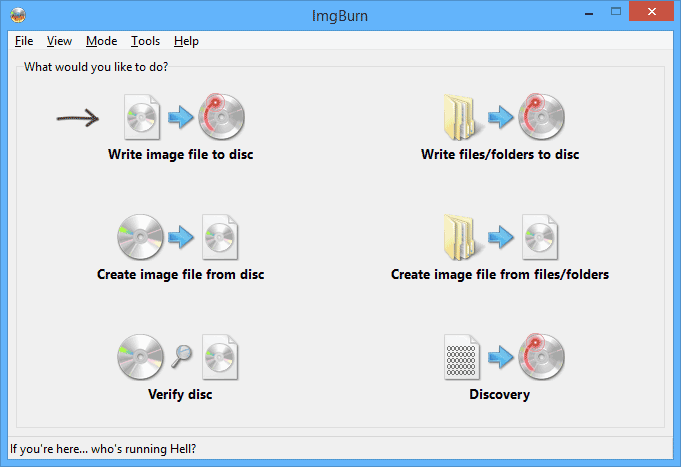
After launching ImgBurn you will see a simple main window in which we are interested in the item Write image file to disk.

After selecting this item, in the Source field, specify the path to the image of the boot disk, select the device to record in the Destination field, and specify the recording speed on the right, and it is best if you select the lowest possible one.
Then click the button to start recording and wait for the process to finish.
How to make a boot disk using UltraISO
Another popular program for creating bootable drives is UltraISO and creating a boot disk in this program is very simple.
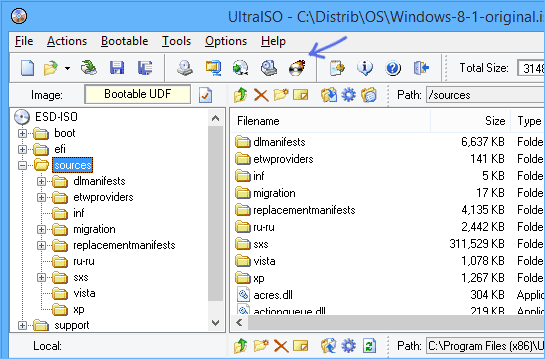
Start UltraISO, select “File” - “Open” in the menu and specify the path to the disk image. After that, click the button with the image of the burning disc “Burn CD DVD Image” (burn disc image).

Choose a writing device, speed (Write Speed), and write method (Write Method) - it is better to leave the default. After that, click the Burn button, wait a bit and the boot disk is ready!
Learn how to burn boot disks and create your own multi-boot builds with the tools you need to reinstall and repair the system.
What is the difference between a shaman and a sysadmin?
- The sysadmin has a tambourine with a hole :)
As you have already guessed, today we will talk about the "shaman" "magic" disks, which in many "are found" in the holders of various kinds of computer masters. And these are not only program disks. Some of them allow you to run even on a non-working computer almost full-fledged operating system! Such disks are called bootable ...
Windows boot
Before you start talking directly about boot disks, a few words should be said about how it happens windows boot and computer in general.
AT modern computers Two subsystems may be responsible for booting: BIOS and / or UEFI (in new PCs). In a simplified form, the process of starting a computer looks like this:
- When you turn on the BIOS checks the performance of all components of the PC.
- The BIOS determines where to boot from.
- The BIOS transfers the UEFI boot control (if any) or immediately to the master boot record (MBR) on the hard disk, after which the operating system starts.
By default, boot from hard drive after the BIOS tests the performance of the main components of the computer. In order to be able to boot a PC from disks or flash drives, you need to slightly reconfigure the BIOS to boot from external media. To do this, set the value of the First Boot Device parameter - CD-ROM (or USB). If you do not know how to do this, you can read about it.
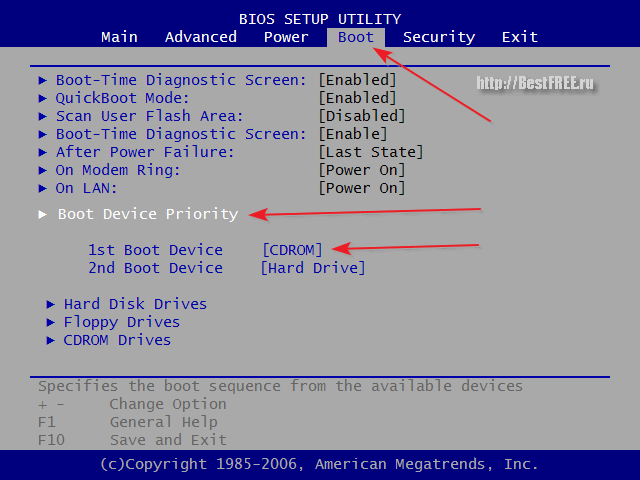
After you have done this setting, after checking the place where the boot files should be searched for, a check for the presence of a disk in the drive (or flash drives in the USB slot) and the search for the bootloader will be added. For many, by the way, the boot option from the disk drive is by default (PC assemblers simply did not change anything back), so perhaps no BIOS manipulations will be required :)
Types of boot disks
All boot disks by their scope can be roughly divided into 3 categories:
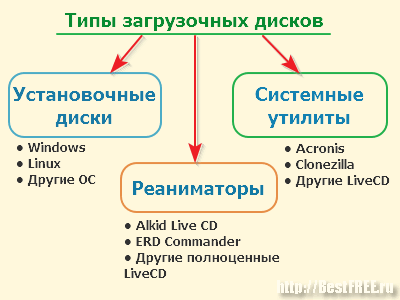
All can be referred to the first category installation diskswhich are used to install or reinstall a specific operating system. The usual Windows disk that we buy (kkh-kg-m :)) in a computer store or a Linux distribution from the Internet is of this type.
The second category includes disks that contain tools to restore the health of the primary OS. These rescuers are usually Windows-ready LiveCDs that can be run directly from the disk. The usefulness of such tools is increased by the inclusion of additional software to combat viruses, data recovery, etc.
The third category is the disks that do not have a full-fledged OS and contain programs designed to perform one or two tasks. Examples include hard disk partitioning or data backup.
The above classification is not universal, since, for example, a LiveCD disc can be installation at the same time. And there is the concept of multiboot, when several different systems or programs can be simultaneously located on one disk. To clarify the situation, consider the question of where to get the boot disk ...
We write the finished image
When we figured out what boot disks are and what they are for, the question arises: where can you get such a miracle tool? As in any business there are two ways: simple and complex ...
Simple is to download the finished disk image from any of the many torrent trackers, or copy the real disk taken from a friend. Complicated, however, involves the creation of a hand-made assembly containing all the tools you need. Let's start with a simple ...
Download a ready-made ISO image from a torrent, I think today there will be no problem for anyone, so consider the case of copying a real disk. For this case, we can use almost any CD and DVD burning program. Here we consider the algorithm of actions on the example of the program CDBurnerXP.
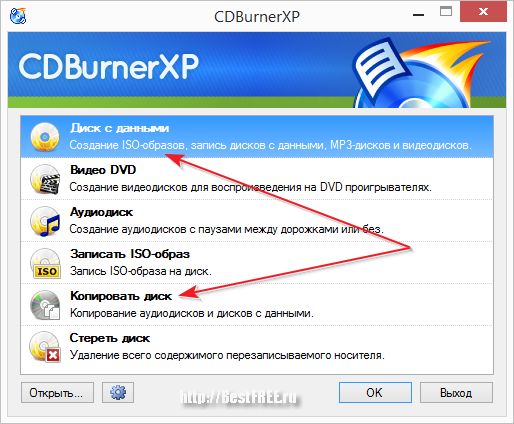
If you simply open a boot disk on your computer, copy its contents to a folder, and then write it to your disc, you won’t normal recording No data is written to the disk. We need to create an exact copy of your friend's boot disk (or its image in another way) and then burn this copy to yourself.
To do this, insert the disc into the drive and click on the "Copy Disc" button on the CDBurnerXP main screen. In the window that opens, you can select the drive into which you inserted the disc, the speed (if you are not in a hurry, it’s best to set about 8-x) and the copy method:

There are two copying methods. Direct copying is active by default. At the first stage, an image of the inserted disk is created in the temporary folder in the temporary folder, and then it is proposed to remove the disk and insert an empty one for recording the received image. After recording, the image from the temporary folder is deleted.
The second option is that you can only create an image and save it on a computer in order to record it on a real disk in the future or, for example, put it on the Internet. Since, with direct copying of questions should not arise, consider the second method in more detail.
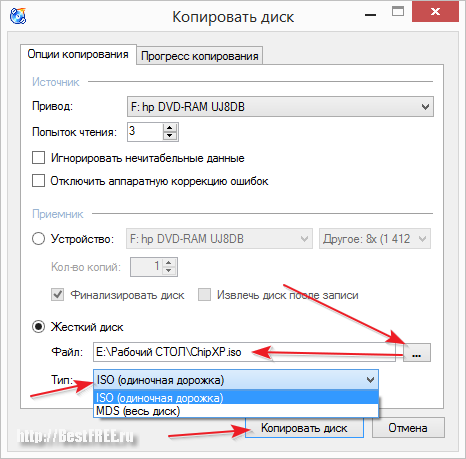
First of all, in the "Receiver" section, we need to switch to " HDD"Then it remains only to specify the path for the created image and select its format. The ISO and MDF / MDS formats are available in CDBurnerXP. I recommend saving to ISO, since this is the most common image storage option supported by most programs. Now click the" Copy Disc "and wait for the completion of our ISO image.
As I said, the image can then be written to a real disk without losing its boot properties (the same applies to images downloaded from the Internet). In CDBurnerXP in the main window for this there is a separate special section - "Write an ISO image":
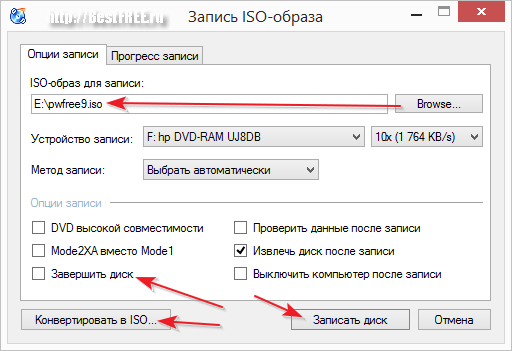
In the window that opens, we need to specify the path to our image in ISO or MDS format. If you downloaded the image from the Internet and it is in BIN or NRG format, then CDBurnerXP has a tool for converting such images to ISO. Click "Convert to ISO" and there indicate the path to the desired image.
After the image is selected, it remains only to tick the "Finish Disk" checkbox (some computers may not want to boot from a disk that has not been finalized) and click the "Burn Disk" button. We are waiting for the end of the recording and become the owners of our own boot disk :)
What is multiboot
Following the classification that we discussed above, the boot disk can be designed to solve one specific task, be it installation, repair or maintenance. Previously, it was. For each goal it was necessary to create a separate disk. However, today there is such a thing as "multiboot" ...
Its essence is that, using a nonstandard bootloader (for Windows, NTLDR is standard), we can start from one disk, for example, several operating systems or make it installation and repair, writing to it several images at the same time!
The most popular Windows downloaders that allow SysLinux and GRUB4DOS. Setting them up manually allows you to literally work wonders in terms of booting the PC, but this requires the user to have knowledge and ability to work with the code ... However, there are more simple ways self-build your own multiboot disks using third-party programs.
Create a multiboot disk
On the pages of our site I once wrote about a program that allows you to create boot disks and flash drives - xBoot. Here we will look at another way that may be even better and more convenient for you, using the SARDU program (abbr. From Shardana Antivirus Rescue Disk Utility):

For some reason, the latest version of the program, which is located on the official website, did not work for me, so I had to look for an older 3.0.0.0 Beta 5. When launched, it will inform you that the version is outdated, but at least it will work :)
Despite the fact that the program is in English, it will be easy to understand it. Its entire interface can be divided into four parts:
- Top menu bar and buttons. At the top are, as usual, the menu bar and toolbar. In the menu you can find almost all the functions of the program, but almost everything that needs to be placed on the top and side toolbars, so we can not go there. On the toolbar there are buttons for opening a folder with images, starting to download selected images, burning a disc and testing a finished disc or flash drive.
- Left toolbar. Here we have large buttons that allow you to download and add typical images of disks with antivirus, system utilities, Linux distros and even windows. In addition, it is possible to add any images that are not listed in the previous lists using the "Extra" button.
- Right toolbar. This panel contains tools for selecting a flash drive to write an autoloading image to it, a button for creating an image or a USB disk, a button to go to the developer’s website and an exit button from the program.
- Central area. This is the main work area, the content of which varies depending on the activated tool.
In order to create your multiboot build, it is advisable to place all the ISO images of the boot disks we need into the ISO folder. If you decide to download images directly from the Internet using the suggested links, they will automatically fall into this folder. Yet your images will need to be copied manually. There is one more nuance. On the way to the program and images there should not be Russian letters. Therefore, it is desirable to unpack the SARDU immediately to the root of the disk.

Here we press the "Add" button and fill in the proposed fields. The following fields should be noted:
- Name. Here we enter the name of the system, in the form in which we want to see it in the list and in the boot menu.
- Tick Derivate. If we know, on the basis of which system the image being added is built, we can activate the check mark and select the required one in the drop-down list. This will save us from having to choose a bootloader.
- Drop-down list Mode. Here we select the bootloader. I advise you to use the universal GRUB, which is the default.
- ISO Name. Here you can write either the full path to the image (if it is not in the ISO folder, which is undesirable), or simply the name of our image.
The remaining fields are optional and we can fill them in as desired. After completing the fields, click "Save" and our image appears in the list. However, in order for us to add it to the assembly, you need to manually specify the path to it again by clicking on the red button after the image name:
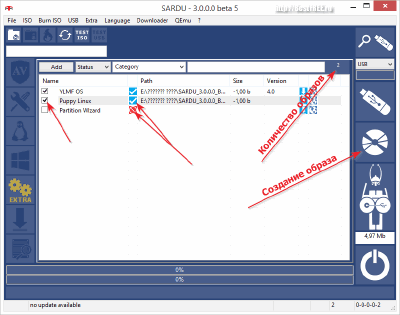
Now it remains only to tick the necessary and confirmed by the program (the red button is replaced with blue) images and click one of the buttons on the right panel: "Create SARDU USB" (to create a bootable USB flash drive) or "Create SARDU ISO" (to create a disk image). Upon completion, we can immediately test the performance of the new multiboot disk using the QUEmu built-in emulator by clicking the "Test ISO" (or USB) button on the top toolbar:
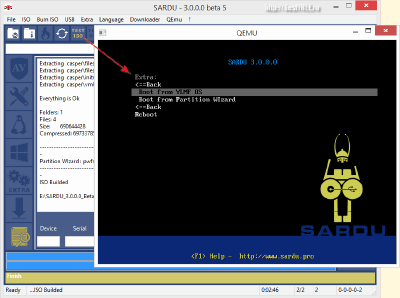
If everything went well, you can run your newly created image and find the systems added to it in the Extras section.
findings
So we figured out what boot disks are and how you can do them yourself. In the article we did not consider, unless the principles of working with the downloaders themselves directly, but this, I think, to simple users, like us and to you :) The result is important for us, which, I hope, we got.
Creating multiboot builds is not such a difficult task, but it brings tangible benefits when we are faced with the need to reinstall or repair something in the computer's OS. As for me, I have for myself quite a long time ago created an ideal USB flash drive, which has both Linux and a small Windows, which can be run or installed on a PC, as well as a set of the most necessary programs.
I wish you also to have such flash drives and disks in your arsenal. And even more I wish less any damage to your computer!
P.S. Permission is granted to copy and cite this article, provided that the active link to the source is indicated and the authorship of Ruslan Tertyshny is retained.

