The need to install or reinstall the operating system on your computer may arise at any time. In this case, you are very much rescued by the availability of a bootable flash drive or disk. The site already has an article,. But keep in mind that you may need to reformat it, to record other data, or you just lose it.
If you have a DWD-RW drive on your computer or laptop, then an excellent option would be to have a boot disk with the operating system you need at home just in case. In this article we will look at how to create a boot diskWindowsusing various programs.
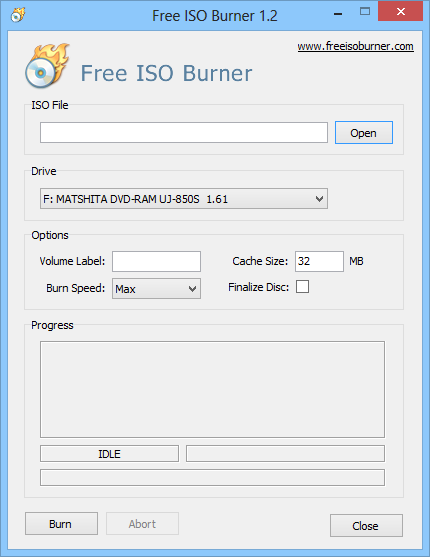
To burn a boot disk, you need a computer with a working operating system, the disk itself, the size of which should be larger than the image you have. operating system. Also, you need a program to record a boot disk and an image of the operating system that you want to burn to disk. The recording program can be downloaded from the Internet, better from official sites. The system image can be downloaded via torrent, most likely, it will be a file with the extension .iso.
So let's make a bootable Windows disk using Astroburn Lite. You can read by clicking on the link. Insert the disc into the drive and start Astroburn Lite by clicking on the appropriate shortcut on the desktop.
In the main window of the program, go to the “Image” tab and opposite the “Image” field, click on the “Review” magnifying glass.
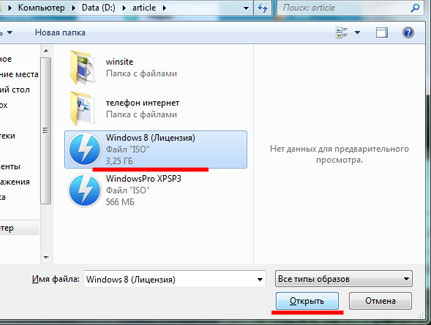
Through Explorer, find the folder on your computer where you have an image of the operating system, click on it with the mouse and click "Open."
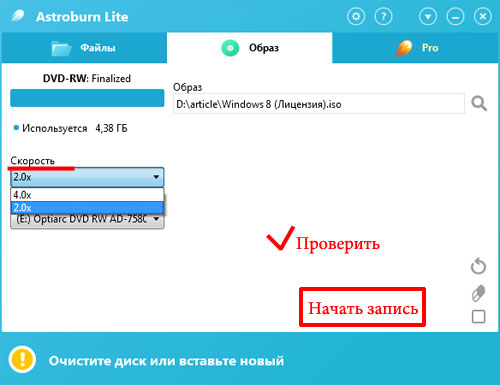
In the "Speed" field, select the speed to record. Here it is better to choose the lowest value from the list.
I don’t have an empty disk, so the program window looks like this. You will have a slightly different look. Check the “Check” box. In this case, immediately after recording, the program will check the disk for errors.
Click "Start recording" and wait for the process to complete.
This is what we recorded the Windows boot disk from an ISO image using Astroburn Lite.
Now let's make a boot disk using the program UltraISO. Download and install it on your computer.
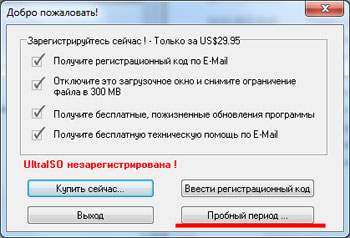
After starting UltraISO, the following window will appear. Click it on the button "Trial period".
Go to the "File" tab and select "Open" from the menu.
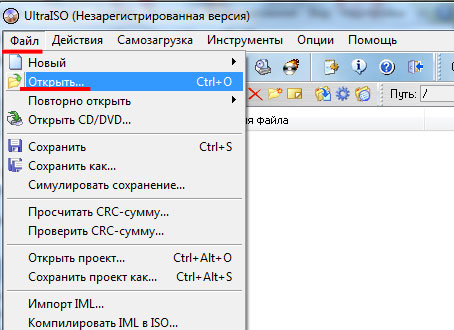
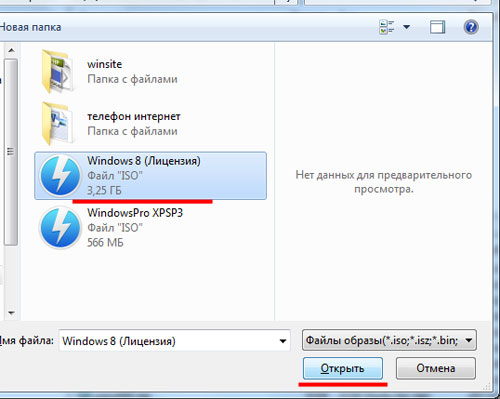
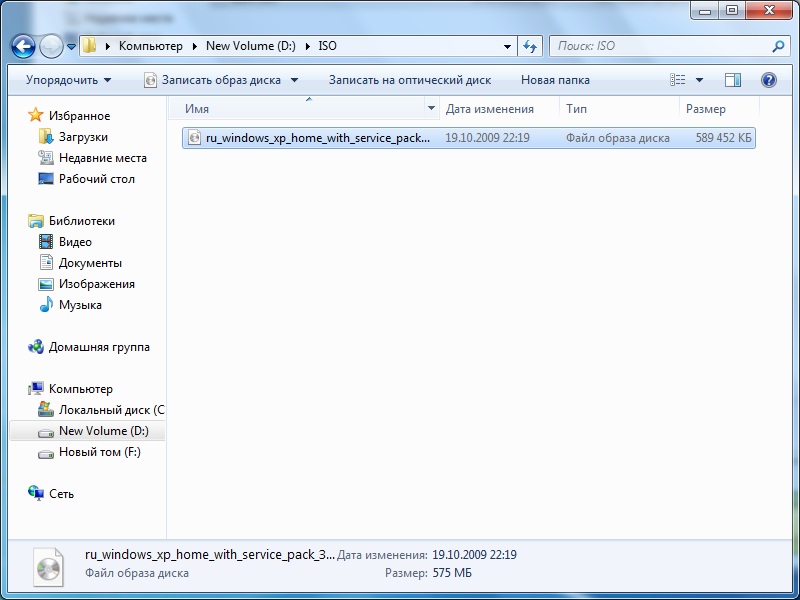
Locate on the computer an ISO image of the operating system you want to burn to disk, and click "Open."
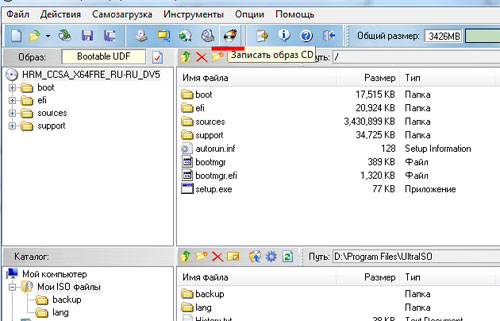
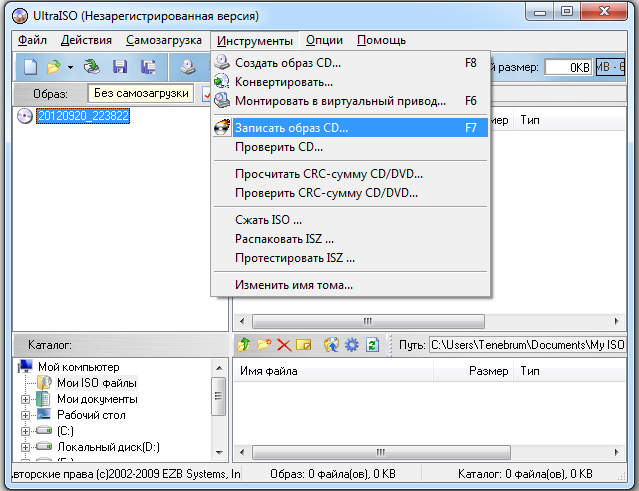
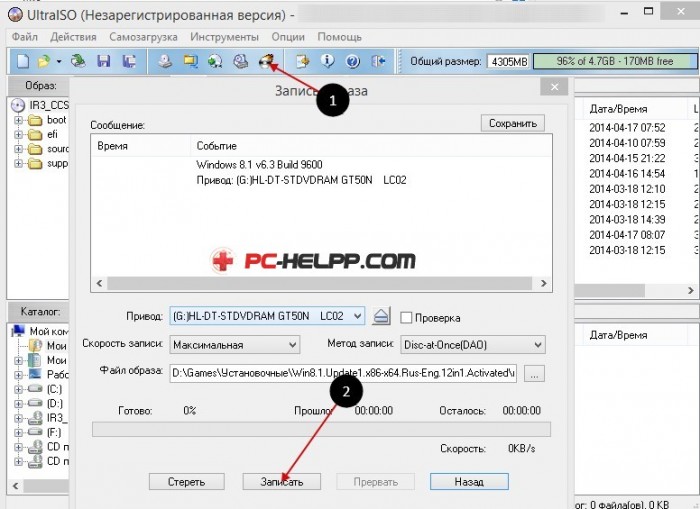
In the menu at the top, click "Burn CD image".
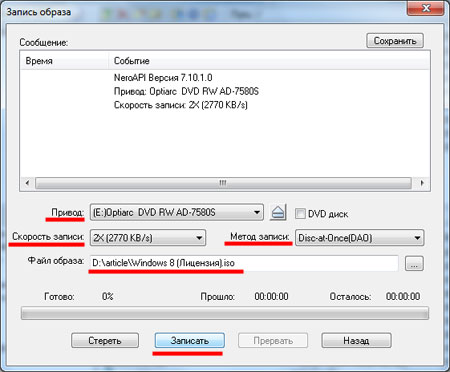
Make sure that the drive and image for recording are selected correctly, select the minimum write speed. There is no need to change anything in the “Recording Method” field. Click "Write".
Wait a moment and the boot disk will be ready.
On this I will finish. I think now you understand how to make a boot disk from an ISO image with a Windows operating system using one of the programs described in the article.
Learn to write boot disks and create your own multiboot builds with the tools you need to reinstall and restore the system.
What is the difference between a shaman and a sysadmin?
- The sysadmin has a tambourine with a hole :)
As you have already guessed, today we will talk about the "shaman" "magic" disks, which in many "are found" in the holders of various kinds of computer masters. And these are not only program disks. Some of them allow you to run even on a non-working computer almost full-fledged operating system! Such disks are called bootable ...
Windows boot
Before you start talking directly about boot disks, a few words should be said about how it happens windows boot and computer in general.
AT modern computers Two subsystems may be responsible for booting: BIOS and / or UEFI (in new PCs). In a simplified form, the process of starting a computer looks like this:
- When you turn on the BIOS checks the performance of all components of the PC.
- The BIOS determines where to boot from.
- The BIOS transfers the UEFI boot control (if any) or immediately to the main boot record (MBR) on the hard disk, after which the operating system starts.
By default, boot from hard drive after the BIOS tests the performance of the main components of the computer. In order to be able to boot a PC from disks or flash drives, you need to slightly reconfigure the BIOS to boot from external media. To do this, set the value of the First Boot Device parameter - CD-ROM (or USB). If you do not know how to do this, you can read about it.
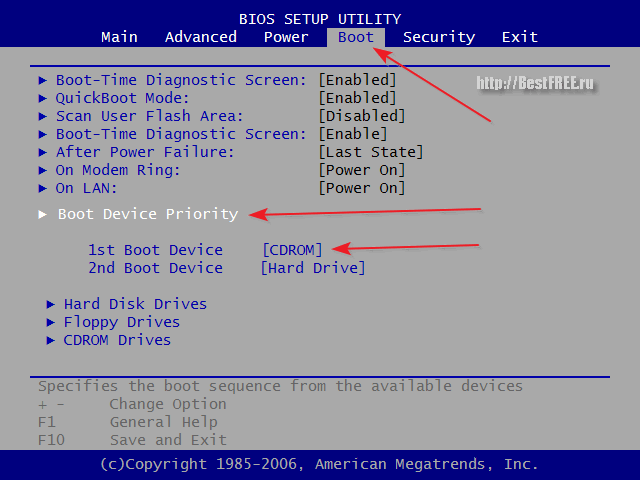
After you have done this setting, after the scan of the place where the boot files should be searched for, a check for the presence of the disk in the drive (or USB drives in the USB slot) and the search for the bootloader will be added to the boot cycle. For many, by the way, the boot option from the drive is by default (PC assemblers simply did not change anything back), so perhaps no BIOS manipulations will be required :)
Types of boot disks
All boot disks by their scope can be roughly divided into 3 categories:
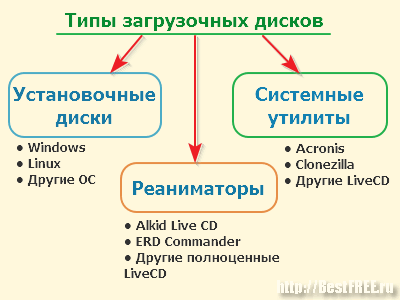
The first category includes all installation disks that are used to install or reinstall a specific operating system. The usual Windows disk that we buy (kkh-kg-m :)) in a computer store or a Linux distribution from the Internet is of this type.
The second category includes disks that contain tools to restore the health of the primary OS. These resuscitators are usually Windows-ready LiveCDs that can be run directly from disk. The usefulness of such tools is increased by the inclusion of additional software for anti-virus, data recovery, etc.
The third category is disks that do not have a full-fledged OS and contain programs designed to perform one or two tasks. Examples include hard disk partitioning or data backup.
The above classification is not universal, since, for example, a LiveCD disc can be installation at the same time. And there is the concept of multiboot, when several different systems or programs can be simultaneously located on one disk. To clarify the situation, consider the question of where to get the boot disk ...
We write the finished image
When we figured out what boot disks are and what they are for, the question arises: where can you get such a miracle tool? As in any business there are two ways: simple and complex ...
Simple is to download the finished disk image from any of the many torrent trackers, or copy the real disk, taken from a friend. Complicated, however, involves creating a hand-made assembly containing all the tools you need. Let's start with a simple ...
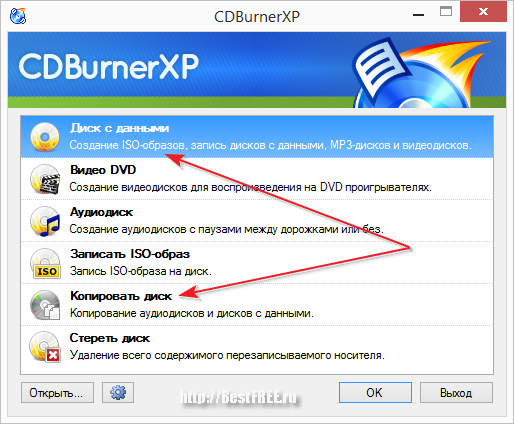
Download a ready-made ISO image from a torrent, I think today there will be no problem for anyone, so let's consider the case of copying a real disk. For this case, we can use almost any CD and DVD burning program. Here we consider the algorithm of actions on the example of the program CDBurnerXP.
If you simply open a boot disk on your computer, copy its contents into a folder, and then write it onto your disc, you won’t normal recording No data is written to the disk. We need to create an exact copy of your friend's boot disk (or its image in another way) and then burn this copy to yourself.
To do this, insert the disc into the drive and click on the "Copy Disc" button on the CDBurnerXP main screen. In the window that opens, you can select the drive into which you inserted the disc, the speed (if you are not in a hurry, it’s best to set about 8-x) and the copy method:
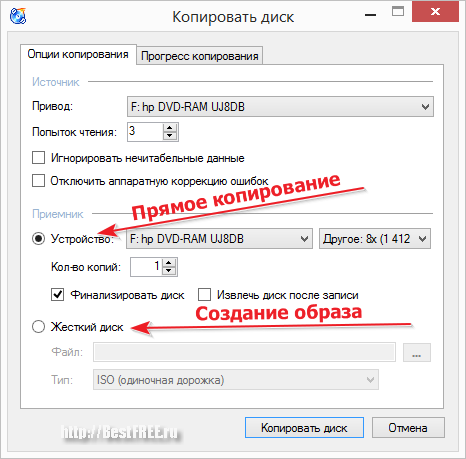
There are two copying methods. Direct copying is active by default. At the first stage, an image of the inserted disk is created in the temporary folder in the temporary folder, and then it is proposed to remove the disk and insert an empty one for recording the received image. After recording, the image from the temporary folder is deleted.
The second option is that you can only create an image and save it on a computer in order to record it on a real disk in the future or, for example, put it on the Internet. Since, with direct copying of questions should not arise, consider the second method in more detail.
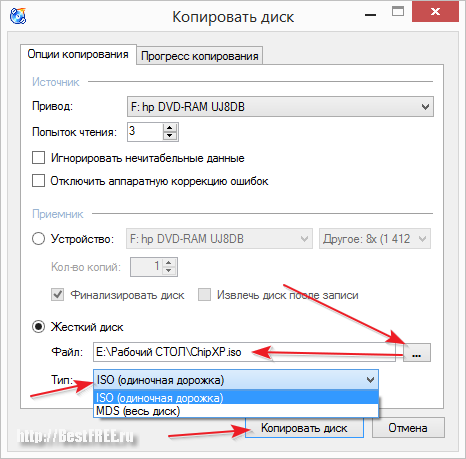
First of all, in the "Receiver" section, we need to switch to " HDD"Then it remains only to specify the path for the created image and select its format. ISO and MDF / MDS formats are available in CDBurnerXP. I recommend saving to ISO, since this is the most common image storage option supported by most programs. Now press the" Copy Disc "and wait for the completion of our ISO image.
As I said, the image can then be written to a real disk without losing its boot properties (the same applies to images downloaded from the Internet). In CDBurnerXP in the main window for this there is a separate special section - "Write an ISO image":
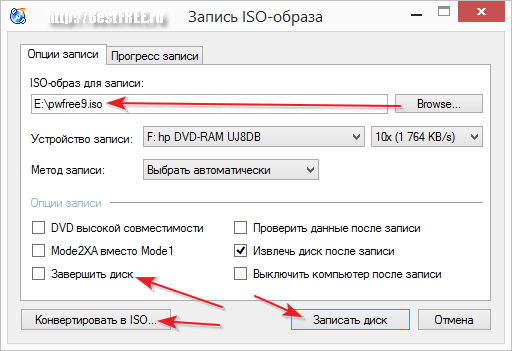
In the window that opens, we need to specify the path to our image in ISO or MDS format. If you downloaded an image from the Internet and it is in BIN or NRG format, then CDBurnerXP has a tool for converting such images to ISO. Click "Convert to ISO" and there indicate the path to the desired image.
After the image is selected, it remains only to tick the "Finish Disk" checkbox (some computers may not want to boot from a disk that has not been finalized) and click the "Burn Disc" button. We are waiting for the end of the recording and become the owners of our own boot disk :)
What is multiboot
Following the classification that we considered above, the boot disk can be designed to solve one specific task, be it installation, repair or maintenance. Previously, it was. For each goal it was necessary to create a separate disk. However, today there is such a thing as "multiboot" ...
Its essence is that using a nonstandard bootloader (NTLDR is standard for Windows), we can start from one disk, for example, several operating systems or make it installation and repair, recording several images on it at the same time!
The most popular Windows downloaders that allow SysLinux and GRUB4DOS. Setting them up manually allows you to literally work wonders in terms of booting the PC, but this requires the user to have knowledge and ability to work with the code ... However, there are more simple ways self-build your own multiboot disks using third-party programs.
Create a multiboot disk
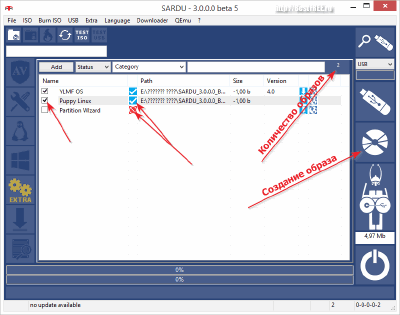
On the pages of our site I once wrote about a program that allows you to create boot disks and flash drives - xBoot. Here we will look at another way that may be even better and more convenient for you, using the SARDU program (abbr. From Shardana Antivirus Rescue Disk Utility):
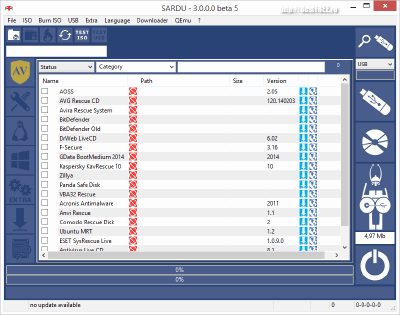
The latest version of the program, which is located on the official site, for some reason did not work for me, so I had to look for an older 3.0.0.0 Beta 5. When launched, it will inform you that the version is outdated, but at least it will work :)
Despite the fact that the program is in English, it will be easy to understand it. Its entire interface can be divided into four parts:
- Top menu bar and buttons. At the top are, as usual, the menu bar and toolbar. In the menu you can find almost all the functions of the program, but almost everything that needs to be placed on the top and side toolbars, so we can not go there. On the toolbar there are buttons for opening a folder with images, starting to download selected images, burning a disc and testing a finished disc or flash drive.
- Left toolbar. Here we have large buttons that allow you to download and add typical images of disks with antivirus, system utilities, Linux distros and even windows. In addition, it is possible to add any images that are not listed in the previous lists using the "Extra" button.
- Right toolbar. This panel contains tools for selecting a flash drive to write an autoloading image to it, a button for creating an image or a USB disk, a button to go to the developer’s website and an exit button from the program.
- Central area. This is the main work area, the content of which varies depending on the activated tool.
In order to create your multiboot build it is advisable to place all the ISO images of the boot disks we need into the ISO folder. If you decide to download images directly from the Internet using the suggested links, they will automatically fall into this folder. Yet your images will need to be copied manually. There is one more nuance. There should not be Russian letters on the way to the program and images. Therefore, it is desirable to unpack the SARDU immediately to the root of the disk.
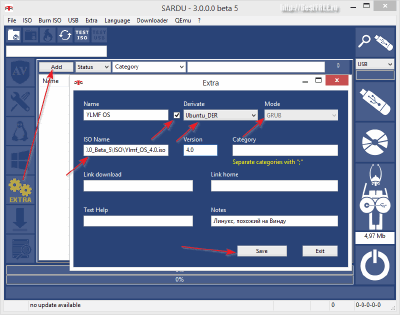
Here we press the "Add" button and fill in the proposed fields. The following fields should be noted:
- Name. Here we enter the name of the system, in the form in which we want to see it in the list and in the boot menu.
- Tick Derivate. If we know on the basis of which system the image being added is built, we can activate the check mark and select the required one in the drop-down list. This will save us from having to choose a bootloader.
- Drop-down list Mode. Here we select the bootloader. I advise you to use the universal GRUB, which is the default.
- ISO Name. Here you can write either the full path to the image (if it is not in the ISO folder, which is undesirable), or simply the name of our image.
The remaining fields are optional and we can fill them in as desired. After completing the fields, click "Save" and our image appears in the list. However, in order for us to add it to the assembly, you need to manually specify the path to it again by clicking on the red button after the image name:
Now it remains only to tick the required and confirmed by the program (the red button is replaced with blue) images and click one of the buttons on the right panel: "Create SARDU USB" (to create a bootable USB flash drive) or "Create SARDU ISO" (to create a disk image). Upon completion, we can immediately test the performance of the new multiboot disk using the QUEmu built-in emulator by clicking the "Test ISO" (or USB) button on the top toolbar:
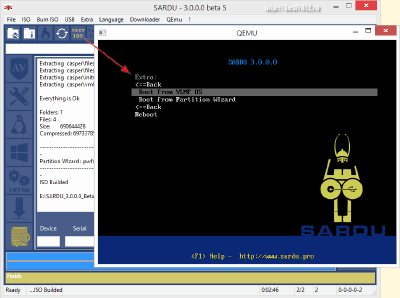
If everything went well, you can run your newly created image and find the systems added to it in the Extras section.
findings
So we figured out what boot disks are and how you can make them yourself. In the article we did not consider, unless the principles of working with the downloaders themselves directly, but this, I think, to simple users, like us and to you :) The result is important for us, which, I hope, we got.
Creating multiboot builds is not such a difficult task, but it brings tangible benefits when we are faced with the need to reinstall or repair something in the computer's OS. As for me, I have for a long time already created for myself an ideal USB flash drive, which has both Linux and a small Windows, which can be run or installed on a PC, as well as a set of the most necessary programs.
I wish you also to have such flash drives and disks in your arsenal. And even more I wish less any damage to your computer!
P.S. Permission is granted to copy and cite this article, provided that the active link to the source is indicated and the authorship of Ruslan Tertyshny is maintained.
The need to reinstall or replace Windows may arise at any time, in which case the simplest option would be installation of windows from boot disk. But even if the system is working normally, it is always useful to have a boot disk with Windows xp on hand, especially a proven working build. If you have internet access, write ISO imageand the disk is not particularly difficult.
Select a program to burn a disc
For most users, a freeware program or a paid one, but with a trial period, is enough to burn a boot disk. The most popular of paid programs - UltraISO, for 30 days you can use the demo version for free, full version will cost from 1000 rubles (you can download the program). You can also burn an ISO image in NERO Burning ROM, the trial version lasts 15 days, you have to pay 1700 rubles for further use (you can download it).
From free programs, with the help of which it is easy to burn a boot disk of Windows XP, we note:
- ImgBurn;
- CDBurn XP;
- Infra recoder.
In the network you can find many more options. If we evaluate them only as programs for windows records to disk, there is no big difference. Friendly interface and not overloaded with additional functions make free programs in something even more convenient paid. But to record the image of windows, any program with the desired function and support for the ISO format will do.
The most convenient way to create a Windows XP boot disk is to have an ISO image. If you simply copy the installation files windows disk XP or ISO file, it will be impossible to install the system from it. ISO is a file format in which information from a disc is recorded as a snapshot of a continuous spiral track. Therefore, the entire boot disk is presented as a single file. The image contains all the necessary data to create an exact copy of the boot disk, which will work just like the original.
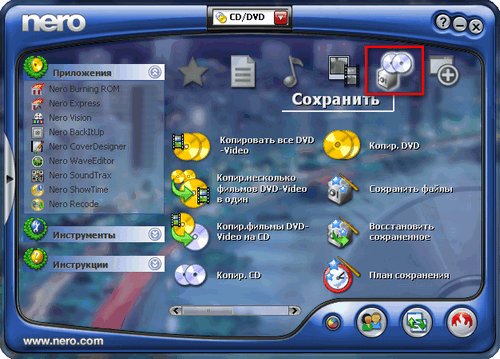
Burn ISO to disc using Nero Burning ROM
By installing the selected program and choosing a trial period as needed, you can start recording a boot disk with Windows XP. Consider how in Nero Burning ROM.
Burn ISO to disc using UltraISO
This, according to many users, is the most convenient program that allows you to write an ISO file to disk.
The program will do the rest of the work itself. The burning process can take from a couple of minutes to an hour.
Burn ISO to disc using ISOBurner
It is free and very easy to use program, you can download it. It does not require installation and takes up very little space.
After this, it is worth checking in the explorer whether the disc is enrolled, after which it can be used as a boot disk for Windows XP.
ISO recording with the integrated utility in Windows 7 and 8
In Windows XP, unlike in later versions of the system, there is no built-in ability to burn a boot disk, this makes it necessary to use third-party programs. Therefore, to save any such utility would be a wise decision in case of the absence of the Internet or other disasters.
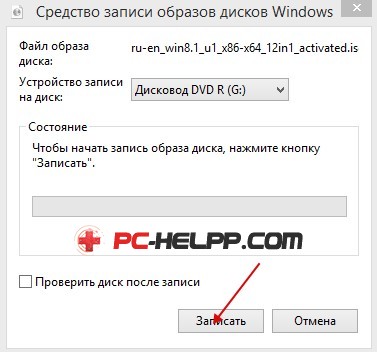
But if you are using a Windows 7 or 8 system, there is such a possibility. You can burn an ISO image without using third-party programs. To do this, created Windows Disc Image Burner, which greatly facilitates the task of writing an ISO image.
The same program can be run from the command line.
- Open a command prompt (Start\u003e Run\u003e cmd).
- Type isoburn.exe / q drive letter: “path_to_file” .iso.
- A window will open in which there will be all information about the recorded image, click "Burn" to start recording.
After the program has finished writing ISO to disk, the drive will automatically open. If you decide to work with the command line, keep in mind that in Windows command line is not case sensitive, therefore all data can be entered both in capital and in capital letters.
Possible errors when writing ISO to disc
Burning an ISO to a disc is not the most difficult task, but there may be some problems in the process.

- If the recorded disc does not open, the problem may be both in the media itself and in the fact that the recording was done at too high speed (it is better to set the value 4x in the speed parameters), in this case the probability of error increases. The disc must be rewritten;
- Installation problems can also be caused by errors that the image itself contains. It is better to use proven builds of Windows XP;
- If the program refuses to write the ISO file to disk, the problem is again in the media. It already has information, or the disk is damaged.
In order to avoid write errors, use high-quality discs and turn on the check function after the end of the burn. This will increase the time to create a boot disk, but reduce the risk of errors.
No matter which way you use to windows records XP to disk, the image should not contain errors. They are very often found in assemblies that are easy to find on the net. Using someone else's assembly, be prepared for the fact that you have to download another option. But otherwise the image is recorded and windows installation XP is not difficult.
Introduction
If you are not confident in your abilities, then, using the materials of this article, you will be able to learn how to burn an ISO image correctly. Windows 7 or Windows 10 (the process is the same for both windows versions) to DVD using the program UltraISO, Nero or free software Burnware free.Disk image is a file of a special format that contains the entire contents of the CD or DVD disc .
You can draw an analogy with the archive rar or zip.
In this case, we are considering ISO image. ISO (.iso) is a generally accepted format that most programs designed to burn information to CDs and DVDs can work with.
UltraISO can also burn an ISO image of Windows 7 or Windows 10.You must correctly select the bit depth of the Windows distribution that you are going to burn to disk for the subsequent installation of Windows.
How to record an image in UltraISO
If you have not installed UltraISO yet, you can download it from the link above. Then you will need to install it. Installation is very simple and takes place in just 3 mouse clicks. You can leave all settings (ticks) by default.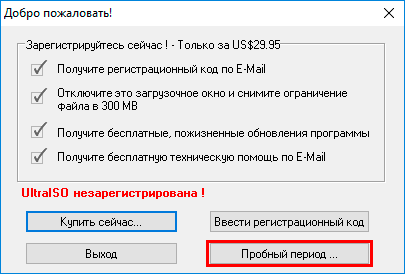
Burning a Windows 7 Image to BurnAware Free
BurnAware Free is a free and high-quality program for writing data to CD or DVD discs. Consider how to burn a Windows image with its help.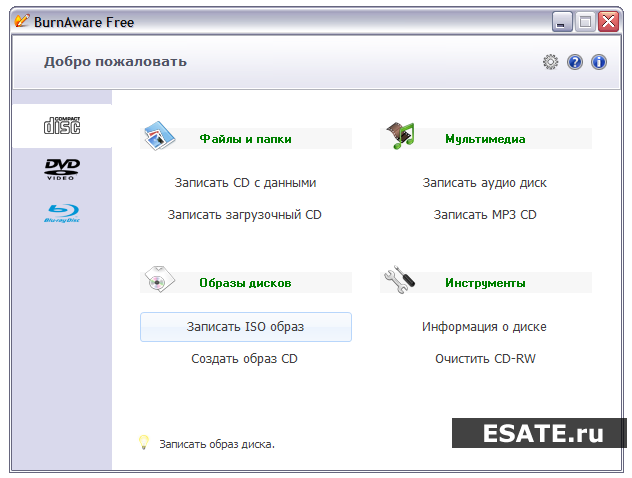
Capturing a Windows 7 image in Nero Burning
Nero burning rom - a very well-known and proven software for recording discs. If it turned out to be your computer, then below you will be able to familiarize yourself with the steps you need to perform in order to burn a Windows 7 or Windows 10 image for subsequent installation.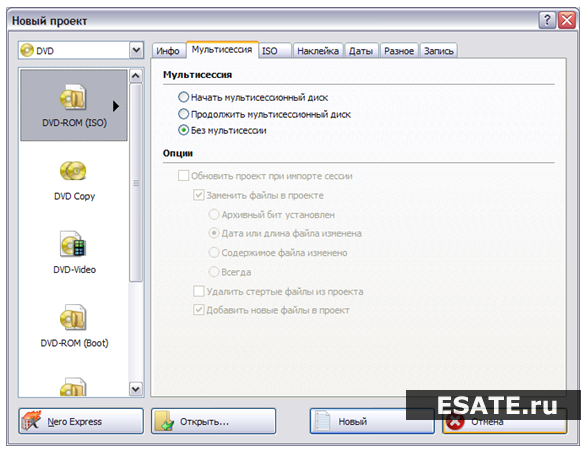
Why to write the image is better to use third-party programs, rather than built-in mechanism of Windows 7
Starting with Windows 7, Winodws has built-in CD burning mechanisms or DVD discs.But their quality leaves much to be desired: recording with standard Windows mechanisms often results in damage to a CD or DVD disc, therefore it is better to use known programs tested by time and millions of users (although even they sometimes fail).
This article will be filled useful informationon how to burn an image of any Windows operating system to disk. This is possible in many ways, but I prefer to do it with a special program. UltraISO. My choice is not accidental, as it is a simple and convenient program that allows you to burn discs with any information. If there is no desire to clutter up the computer’s memory with various programs, then standard windows tools 7-8 (in the version Windows vista there is also such a function).
When creating a disk-image, it is important to remember that this process is slightly different from the usual recording of a disk with information (music, movies, text files). After all, you need to create a special boot disk that will be recognized by the computer during startup.
When downloading from the Internet operating system Windows, Windows Vista or any other, it looks like a regular file with the extension iso. Many users wrote this finished file to disk, but noticed that downloading from installation disk when you start the computer does not start. This is due to the fact that
Then I will tell you how to write an image of the operating system with the iso extension to the disk so that when you start the computer, the installation from the disk starts. Then from such an installation disk you can reinstall the system on any computer.
Before directly creating an image for recording should mention the size of the future windows image. If for old versions of Windows (XP and below) it was enough just a blank CD or CD-RW, since the image was no more than 700 megabytes, then for Windows 7, 8, Windows Vista you will need a DVD. Although for some versions of Windows XP, 700 megabytes is not always enough, since there are different build options with different additional programs, useful utilities, etc. The image of newer systems (Windows 7, Vista or Windows Eight) takes at least three gigabytes.
Burn a Windows iso image to a DVD using UltraISO
First, I will talk about the convenience of the program for recording UltraISO image files, which are much more convenient and understandable for anyone than, for example, Nero. It is enough to find UltraISO on the Internet and download it to a computer or download it from. The small size allows you to do this very quickly, even with a slow Internet connection. Installation software will take no more than three minutes.After finishing the installation of UltraISO, it instantly associates itself with the iso extension. That is, any file with this extension will be opened exclusively using UltraISO.
To start recording a disc with an image of the selected operating system, open the image with a mouse click. On the screen, it looks like this:
The UltraISO program will start up, where a bootable disc will be ready for recording. Just insert a blank disc into a DVD burner, press the record button and confirm it by simply pressing the "Burn" button. You just need to wait until the UltraISO program writes the disk, and then you can safely use it to install Windows.
It is best to record a disc at low speed. The recording quality will be noticeably better. At high speed recording errors may occur when attempting to install the operating system.
Burn the installation disc with standard Windows tool
You can record the installation disk and standard windows programs. This feature is available in both Windows 7-8 and Windows Vista. Standard program no problem will write an iso-image, and the disk will be bootable, that is, allowing you to install the selected operating system.The iso files in Windows 7 look like this:
When you open such a file with a mouse click, “ Image writer windows drives ". You just need to insert a blank disc into the DVD drive and click " Write down".
After waiting for the end of the recording process, you can safely proceed to install the operating system recorded on the disc.