Quite often are situations where one computer is used by several people. It may be necessary to allow one user to one user, and another to allow another user. For example, one user can be allowed to install programs on the computer, and others not allowed. In addition, you can allow some users to use any program or file, and others to prohibit it. And, finally, you can make each user of the computer have their own settings and the design of the Desktop, windows, and Windows in general.
To make all this possible, it is necessary to register each of the intended users in the system — to create an account for it. It is like a registration card in the personnel department.
When the system boots, the welcome window displays a list of registered users who are allowed to log on to the system. To continue working, you must specify which user you are going to work under and enter the appropriate password. After that, the system will finally boot, and taking into account custom settings user
Account creation
To create a new account, go to the Control Panel (Start Control Panel) and click on the icon
User accounts. As a result, the same dialog box will appear on the screen (see Figure 5.1), in which you can perform various operations on your own account, under which you are working in the system at the moment. We will learn to edit accounts in the next section, but now let's find out how to create a new account.
Fig. 5.1. Dialog box "User Accounts"
After that, go to another window, shown in Fig. 5.2. This window is the most general and allows you to switch to editing not only yours, but also other accounts. However, we are now interested in the link to create an account. Click on it with the mouse. The first thing you need to specify is the type of account that you create, that is, the access rights that the owner of the account you want to have should have (see Figure 5.3). There are two possible meanings:
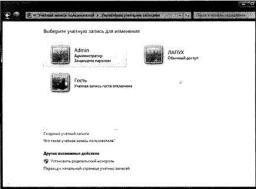
Fig. 5.2. Existing accounts in the system
Administrator - in this case, the user with this account will have administrative rights. He will get full control over the system resources and will be able to change any settings and perform all possible actions.
Normal access - in this case, the rights of the user who owns this account will be significantly reduced. He will not have access to the basic settings of the system, and also will not be able to use some programs. Also, he will not be able to install most programs.
In addition, you need to enter the name of the new account in the field above. To create an account, click the Create Account button. After that, the account will be created and will appear in the User Accounts window (Figure 5.3).
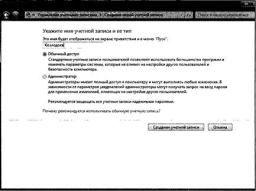
Fig. 5.3. Creating a new account - set permissions and name
It remains to configure it now (by default, it does not have a password).
Setting up and editing an account
To set up an accounting record, you must first click the one in the User Accounts window (see Figure 5.2). After that, you will see a list of possible settings and operations that can be performed with this account (Figure 5.4):
Name change.
Create a password (or Change password).
Change pattern.
Change account type.
Deleting an account.
Parental Control
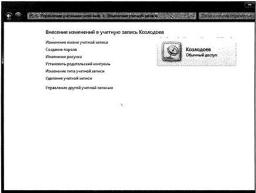
Fig. 5.4. Account editing
Setting an account password
In the future, you can do any of these actions, but right after creating a new account, you first need to set a password for it. Therefore, click on the link Create a password and in the window that appears (Figure 5.5), enter the password twice, v and at the bottom - a prompt. However, you can not enter a hint.
When finished, click the Create Password button.
Change account picture
It may not be superfluous to change the image used to indicate the account. To do this, after you select an account in the User Accounts window (Figure 5.2), click the Change Picture link.
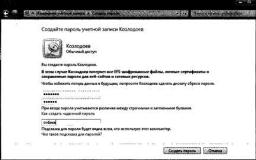
Fig. 5.5. Create password
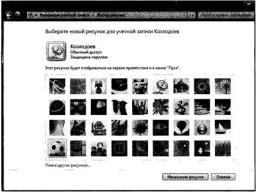
Fig. 5.6. We set a new picture for the account
As a result of these “super-complex” actions, a set of drawings will appear on the screen, which you can assign to your account (Fig. 5.6). Choose the one you like and click on the Change Picture button. If none of the proposed standard drawings you are not deceived, you can specify your drawing. To do this, click on the Search for other drawings link and indicate what image you want to use.
Deleting an account
To delete an accounting record, select the first line in the Accounts user accounts (Fig. 5.2), apologize for the new record (see Figure 5.4), click on the link Delete account. After that, you will be asked if you want to save personal files belonging to the user with the account being deleted (Fig. 5.7). If you agree to delete, the Documents, Images, etc. folders will be deleted, and therefore everything that was in these folders was placed when the user with this account worked on the computer.
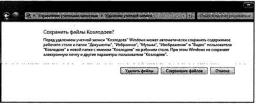
Fig. 5.7. Deleting an account
What is a user account? What types of accounts are there and how are they configured? About this and about the benefits of connecting an account microsoft records in Windows 7 we'll tell you in this article.
Accounts in the Windows operating system is a regular functionality that is designed to provide several users of the same computer comfortable work with him.
A personal account is a kind of personal space for a person, where he can most conveniently organize work with the system settings, files and programs within the authority of the account type, thereby not interfering with exactly the same process of working with the computer to another user.
So, as part of an individual recording, each user can choose a skin theme, customize the location of the icons on the desktop, set the position of the tiles on the initial screen (in the case of Windows 8.1) to configure the browser, media players or social applications. If different computer users have secrets from each other, they can protect their accounts with a password.
What types of accounts are there?
Administrator - the type of this account is intended for users who have the right to make changes to the operation of the operating system (by their own actions or through software). Administrators have access to all computer files, to all system services and installed programs, as well as to all available accounts system.
This is the first account that appears after installing Windows. An administrator's account in organizations is usually used only by IT specialists to maintain a computer and take security measures to keep confidential trade secrets, while the employee using the computer entrusted to him performs his duties using a standard user account. Often, IT executives use a supervisor account to block the computers of a game organizer or attendance on computers. social networksso that they do not use work time for entertainment.
Standard - it is a personalized user account, which provides for the full use of the computer, except for the ability to make changes to the operating system, change some settings or delete important files. The user can call such an account with his name, set his photo as an avatar, and also protect the entry with a password.
Users of home computers and laptops often use a single administrator account, not even suspecting that separate accounts can be created for individual family members. Few users create on home computer for children, separate accounts with some restrictions - for example, using the off timer, if the time allowed by the parents for working with a computer has expired, or with restrictions on access to sites harmful to children. It is also best to create a separate standard account if you trust your computer device to an adult but inexperienced user. This minimizes the risks of unwanted changes to the system.
Guestbook - this is not a personalized account. It is the most limited in functionality and provides for temporary work of the user with the computer. You can transfer the computer to the guest account if you are asked to use it by strangers - guests, visiting the honor of the holiday, or nice employees from the neighboring department of the organization. They will be able to sit on the Internet, work with some kind of installed program, watch a video or listen to music. And nothing more - nothing to install or delete guests without your knowledge can not.
Where are the system account settings?
To change the settings of an existing record, create a new one, or delete an unused one in the case of Windows 7, you can use the Start menu. You need to go to the “User Accounts and Family Safety” toolbar section.
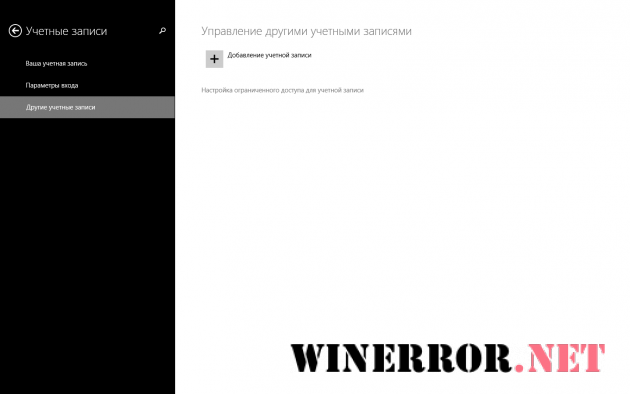
If you have Windows 8 / 8.1 installed, you can take advantage of the new interface: you need to call the pop-up panel on the right, select "Options", then - "Change computer settings - Accounts".
Benefits of a Windows 8.1 Account
AT previous versions Windows - on the 7th inclusive - the binding to the Microsoft account was not so hard. When installing the system, you are invited to register on the Internet resource of the software giant, but you can skip this action and continue installing the system under the local computer account. At the same time, the lack of a Microsoft account for full-fledged work with Windows XP, Vista or 7 systems will not affect much.
In Windows 8 and its evolutionary continuation - version 8.1 - you, in principle, can also skip the step of registering or logging into an existing Microsoft account. But in the future with the use of only a local computer account, you will not be able to actively use the Metro-interface functionality. You will need a Microsoft account to work with some regular Metro applications (Mail, Calendar, People, Messages) and Windows 8 / 8.1.
If the connection step of the Microsoft account is skipped when installing Windows 8 / 8.1, you can return to it at any time. To do this, you need to go to the above-mentioned path of Metro-settings "Settings - Change computer settings - Accounts".
What are the advantages of connecting a Microsoft account in Windows 8 / 8.1?
Single sign-on to Microsoft Internet services
A Microsoft account is a single key for using the Internet resources of the software giant, including: the mail service Outlook.Com, cloud storage OneDrive, a mobile OS service Windows Phone, gaming and multimedia service Xbox LIVE. And, of course, the aforementioned Metro application store for Windows 8 / 8.1. To register a Microsoft account, you will need an electronic mailboxwhich will be the next login.
Synchronization of data and settings of Windows 8 / 8.1
When you reinstall or use this system on another device, connecting a Microsoft account and synchronizing data gives you a previously configured system — with the update settings; network settings, with the selected theme, with language settings, etc.
Batch installation of applications from the Windows store
In addition to the synchronization of some regular applications, a list of applications that you have previously installed will be displayed in a separate section “Account” in the Windows store. From this list, you can select all or part of them and activate their batch installation on a computer. Given that the applications are installed quickly, you can restore the desired state very quickly.
In this article we will talk about the "User Account Control", which was based on the principle of the least privileged user. Compared with Windows vista and Server 2008 in Windows 7 and Server 2008 R 2, there have been several improvements in its functionality. Also we will tell in detail about the access tokens and the login process.
Most of the security problems in recent windows versions were caused by one main reason: most users started Windows with administrative privileges. Administrators can do anything with a computer running Windows: install programs, add devices, update drivers, install updates, change registry settings, run utilities, and create and modify user accounts. Despite the fact that it is very convenient, the presence of these rights gives rise to a huge problem: any spyware program that has embedded itself in the system can also work with administrator rights, and thus can cause enormous damage to both the computer itself and all that is connected to it.
In Windows XP, they tried to solve this problem by creating second-level accounts, called limited users, that had only the most necessary permissions, but had a number of flaws. In Windows Vista again tried to fix this problem. This solution is called "User Account Control", which was based on the principle of the least privileged user.
The idea is to create an account level that would have no more rights than it needed. Under such accounts, it is impossible to make changes to the registry and perform other administrative tasks. User Account Control is used to notify a user before making changes that require administrative rights.
With the advent of UAC, the access control model has changed in such a way as to help mitigate the consequences of malicious software. When a user tries to start certain components of a system or service, the User Account Control dialog appears, which gives the user the right to choose whether to continue the action to obtain administrative privileges or not. If the user does not have administrative rights, then he must provide the administrator account information in the appropriate dialog for running the program he needs.
To apply the settings, UAC only requires the approval of the administrator, so unauthorized applications can not be installed without the explicit consent of the administrator. This article describes in detail the principle of the work of "User Account Control" in operating system Windows 7
Compared to Windows Vista and Windows Server 2008, Windows 7 and Windows Server 2008 R2 have the following improvements in user account control functionality:
The number of tasks that a regular user can perform without an administrator asking for confirmation has increased;
A user with administrator rights is allowed to configure the UAC level from the Control Panel;
There are additional local security policy settings that allow local administrators to change the behavior of UAC messages for local administrators in administrator approval mode;
There are additional local security policy settings that allow local administrators to change the behavior of UAC messages for regular users.
Most users do not need such a high level of access to a computer and operating system. Most often, users are unaware that they are logged in as administrators when they check email, surf the web, or run software. Malware installed by the administrator can damage the system and affect all users. Due to the fact that UAC requires approval by the administrator of the installation, unauthorized applications will not be able to be installed automatically without the explicit consent of the system administrator.
Due to the fact that UAC allows users to run applications as regular users:
IT departments can be confident in the integrity of their environment, including system files, audit logs, and system settings;
Administrators no longer have to spend a lot of time determining permissions for tasks on individual computers;
Administrators are given more effective control over software licensing, as they can ensure that only authorized applications are installed. They no longer have to worry about possible threats from their networks due to unlicensed or malicious software.
UAC Specs
Access token. Access tokens contain login session security information that identifies the user, user groups, and privileges. The operating system uses an access token to control access to protected objects and controls the ability of the user to perform various system-related operations on local computer. UAC access tokens are a special kind of access tokens that define the minimum privileges required for operation — the default interactive access privileges for windows user in a system with the UAC feature enabled. The second token, the full administrator access token, has the maximum privileges allowed for the administrator account. When a user logs in, an access token is created for this user. The access token contains information about the access level that is issued to the user, including security identifiers (SIDs).
Admin Approval Mode. Admin Approval Mode is a user account management configuration in which a combined access user token is created for the administrator. When an administrator logs on to a Windows computer, he is assigned two separate access tokens. If administrator approval mode is not used, the administrator receives only one access token, which gives him access to all Windows resources.
Request consent. The consent request is displayed when the user tries to complete a task that requires administrative rights. The user agrees or refuses by clicking on the "Yes" or "No" button.
Request credentials. The credential query is displayed for ordinary users when they attempt to perform a task for which administrator access is required. The user must specify the name and password of the account that belongs to the local administrators group.
UAC working principle
User Account Control (UAC) helps prevent malware from infecting your computer by helping organizations deploy desktop applications more efficiently.
Using UAC, applications and tasks always start in a secure area from a non-administrative account, if the administrator gives rights to administrative access in the system.
The UAC control panel allows you to choose from four options:
Notify each time a change is made to the system: this behavior is present in Vista - the UAC dialog appears every time the user tries to make any change to the system ( windows setup, installation of applications, etc.);
Notify only when applications try to make changes to the system: in this case, the notification does not appear when making changes to Windows, for example, through the control panel and snap-ins;
Notify only when applications try to make changes to the system, without using a safe desktop: the same as item 2, except that the UAC dialog appears in the form of a traditional dialog, and not in the safe desktop mode. Although this may be convenient when using certain graphics drivers, making it difficult to switch between desktops, this mode is a barrier to applications that mimic UAC behavior;
Never Notify: This setting completely disables UAC.
Windows 7 login process
The following figure shows how the administrator login process differs from the standard user. 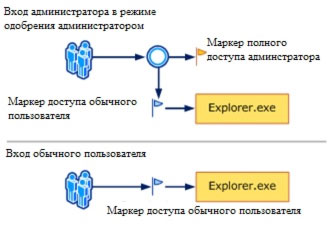
To ensure security, by default, access to system resources and applications, standard users and administrators, is provided as a standard user. When a user logs in, an access token is created for the user. The access token contains information about the access level, which is set to the user, including security identifiers (SID).
When an administrator logs in, two separate user tokens are created: a standard user access token and a full administrator access token. The standard user access contains the same user information as the full administrator access token, but without administrative privileges and SID. A standard user access token is used to start applications that do not perform administrative tasks. Standard user access is used only to display the desktop (explorer.exe). Explorer.exe is the parent process from which the user can start other processes inherited by its access token. As a result, all applications run as a regular user, unless the application requires the use of administrative access.
A user who is a member of the Administrators group can log in to browse the web and read messages. email when using the standard user access token. When an administrator needs to complete a task that requires him to be an administrative user token, Windows 7 will automatically show a notification to use administrative rights. This notification is called a credential request, and its behavior can be configured using the Local Security Policy snap-in (Secpol.msc) or Group Policy.
Each application that requires an administrator access token must be run with administrator consent. An exception is the relationship between the parent and child processes. Child processes inherit the user access token from the parent process. Both parent and child processes must have the same level of integration.
Windows 7 protects processes by marking integration levels. Levels of integration are measured by trust. Applications with "high" integration are applications that perform tasks that can change system data. And applications with "low" integration are tasks that can potentially cause damage to the operating system. Applications with a lower level of integration can not modify data in applications with a high level of integration.
When a standard user tries to start an application that requires an administrator access token, UAC requires the user to provide administrative information.
UAC User Capabilities
When UAC is enabled, user features are different from those of the administrator in administrator approval mode. There is an even safer method of entering windows system 7 - create a primary account with the rights of a regular user. Working as a regular user allows you to maximize security. With the built-in credentials component in UAC, standard users can easily perform administrative tasks by entering the local administrator account information.
An alternative way to run applications by an ordinary user is to run applications with elevated administrator privileges. Using the credentials built into UAC, members of the local Administrators group can easily perform administrative tasks by providing approving data. By default, the built-in credential component for an administrator account in approval mode is called a consent request. The UAC credential request can be configured using the local security policy snap-in (Secpol.msc) or group policies.
With UAC enabled, Windows 7 asks for the consent or credentials of the local administrator's record before running a program or task that requires a full administrator access token. This query does not guarantee that spyware can be installed in silent mode.
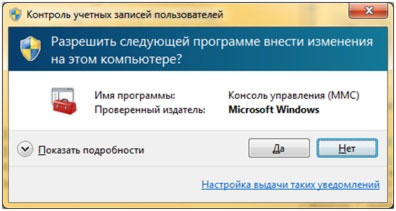
A consent request is displayed when the user attempts to perform a task that requires an administrator access token. Below is a screenshot of the UAC consent request.
A credential request is displayed when an ordinary user tries to start a task that requires an administrator access token. This request for a regular user can be configured using the local security policy snap-in (Secpol.msc) or group policies. A credential request can also be configured for administrators by changing the UAC policy: the behavior of an elevation request for administrators in an administrator-approved mode with the Request credential value.
The following screenshot shows an example of a UAC proxy request.

Requests to increase UAC rights
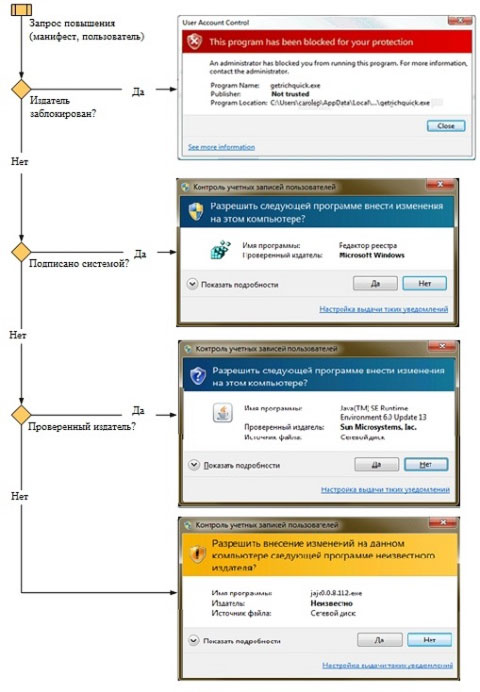
Requests for elevated UAC rights are color-coded for specific applications, allowing you to immediately identify a potential security risk. When an application tries to start up with a full administrator access token, Windows 7 first analyzes the executable file to determine the publisher. First of all, applications are divided into 3 categories of publishers of an executable file: Windows 7, verified publisher (signed), not verified publisher (not signed). The following image shows how Windows 7 determines which color of the enhancement request to display to the user.
The color coding of elevation requests is as follows:
A shield icon is displayed on a red background: the application is blocked using group policy or blocked due to an unknown publisher.
On a blue background a golden shield icon is displayed: the application is administrative the Windows application 7, such as "Control Panel".
A blue shield icon is displayed on a blue background: the application is signed and is trusted on the local computer.
A yellow shield icon is displayed on a yellow background: the application is not signed or signed, but is not trusted on the local computer.
Requests for increased rights use the same color marking as dialog boxes at Windows Internet Explorer 8.
Shield badge
Some elements of the "Control Panel", such as "Date and time" contain a combination of administrator operations and ordinary users. Regular users can see the time and change the time zone, a full administrator access token is required to change the date and time of the system. Below is a screenshot of the "Date and Time" dialog of the control panel.
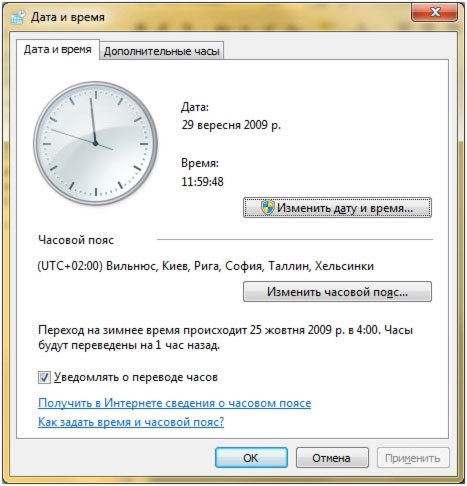
The shield icon on the "Change date and time" button indicates that this process requires a full administrator access token and will display a request for increasing UAC rights.
Providing a request for elevation
The elevation process provides direct requests to protect the desktop. Consent requests and credentials are displayed by default in Windows 7 to ensure system security. Only system processes can get full access to a safe working environment. To achieve a higher level of security, it is recommended to enable Group Policy User Account Control: Switch to a secure desktop when executing a request for elevation.
When executable files request elevation, the interactive desktop, also called the desktop, switches to a secure desktop. The secure desktop darkens the user and displays a request for elevation, in which the user must make a decision to continue the task. When the user clicks the "Yes" or "No" button, the desktop again switches to the user.
Malicious software can mimic a secure desktop, but with the Enable User Policy enabled: elevation prompting behavior for administrators in administrator approval mode with a value of “Request Consent” malware can not get elevated rights, even if the user clicks on the "Yes" button. If the policy setting is set to "Request Credentials", then the malicious software will be able to collect user credentials.