How to install the program from disk to computer?
To begin, insert the disc into the drive and wait for the response of the computer.
Most likely, the autorun disk will open, which will contain the disc menu. But, if nothing appears, then go to "My Computer" (it is located on the desktop and in the "Start" menu).
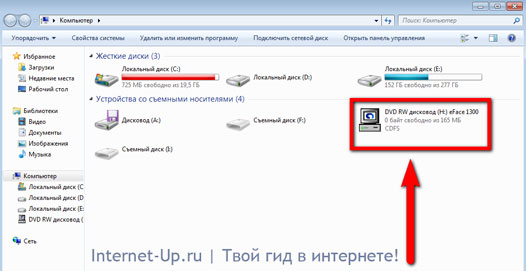
In the folder “My computer” we look at “Device with removable media” and look for our disk. Most likely the icon of the INSERTED disc will differ from the rest, in my case this is a DVD RW drive H. Open the disc with a double click.
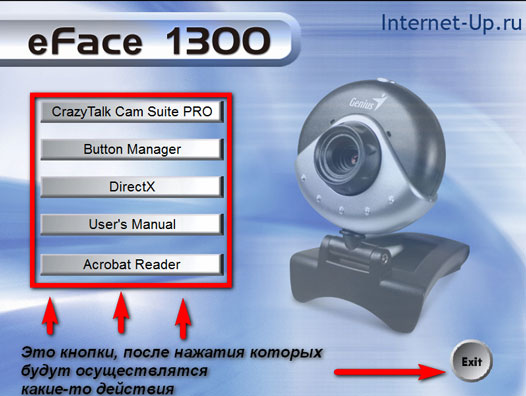
In all "avtorana" there is usually a button "Install", or "Install". After you click on this button, the program installation window will open. These windows often look different, but in principle all the buttons are the same there and you shouldn’t be afraid of them :) Below are examples of such windows:
Always when installing the program you need specify the installation path.The path might be something like this: C: \\ Program Files \\ Program Name.
C: \\ - this is the most important partition of the hard disk, which stores all system files. Only useful files are installed on this disk, i.e. programs, drivers, etc. Other sections (E: \\, D: \\) can store files for entertainment (music, movies, games). Always pay attention to this!
After you have chosen the path, click "Install". The installation process begins. The installation itself usually does not take much time. After installation, click "Finish" and I can congratulate you: you installed the program! :)
P.S. If you install the game, I advise you to compare it minimum requirements with .
That's all, good luck!
One of the everyday tasks of any user is installing programs. Despite their huge variety and some differences in installation, the overall process and the main points are the same. Let's take a look at the installation process using the example of the free program Winamp, one of the most popular players of music files.
Stage One - File Download
To start installing the program, you need to "get" executable filethat is, it contains a program that can be performed by computer. Usually executable files have .exe.In most cases, the first launch of such a file opens the installation program, and not the program itself immediately, but it also happens that installation is not required.
In our case, we download the Winampa executable file from one of the first links received in search engine on request "winamp". It is usually easy to distinguish the program itself from its installer by the .exe file. In the first case, the icon contains only the logo, and in the second case, the logo is on a box or another similar element. Compare two icons, which one of them foreshadows the installation?
Stage Two - Startup and Installation
Installing programs for the user is a series dialog boxes, that is, those that require user participation: agree with something or disagree, select the necessary installation items, etc. Many, without reading, always click “Next”, and then they are surprised that they appear on the computer third-party programsoften malicious.
Do not make common mistakes - follow the installation process, do not click thoughtlessly "ok" and "next"
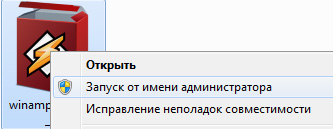
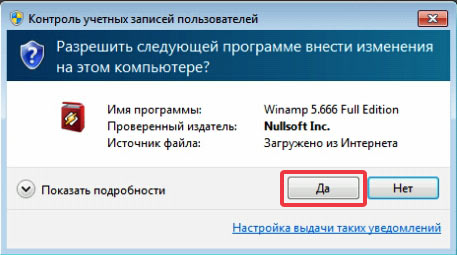
1. Often programs need access to important system folders computer, which by default they are not provided. For the correct installation, you need to do it manually - run them as administrator. There is nothing complicated about that - just right-click on the executable file and select the corresponding item in the list, it will be marked with a shield icon
2. After that, a dialog box pops up asking whether the program can make changes, in other words, are you sure that you want to install it? Click "Yes", if you do not change your mind
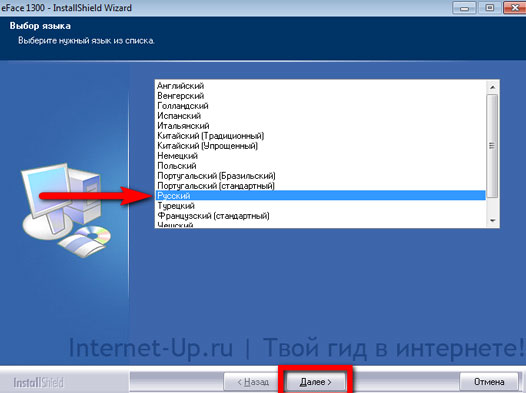
2.a The following dialog box does not appear in all programs and not always at this stage: language selection
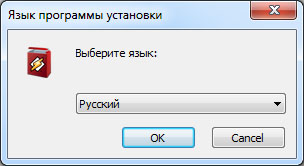
Selecting the language you need from the drop-down box, press “OK” - this confirms your consent.
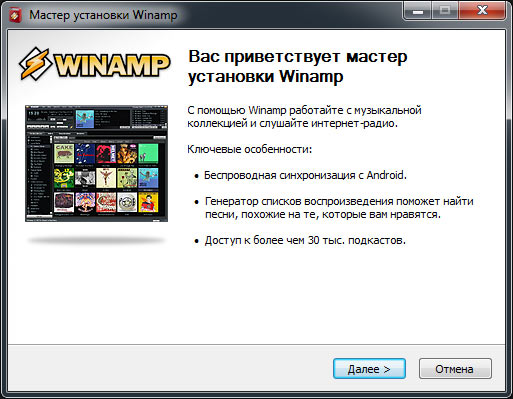
3. After agreeing to make changes, the welcome window for the installed program opens. It describes what this program or the latest innovations. In our example, the window looks like this:
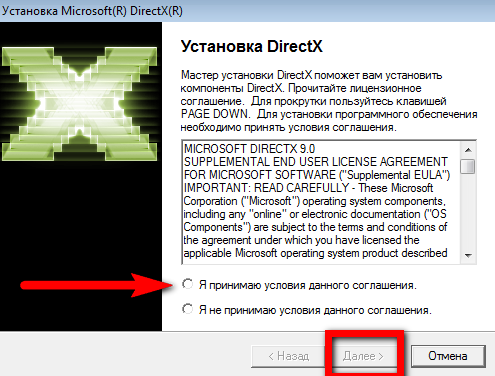
4. Accept the license agreement. Let's not be naive - almost no one reads this point, everyone accepts the terms together, perhaps selling the soul to the devil! But if the conditions are not accepted, the program will not be established, so the choice is small.
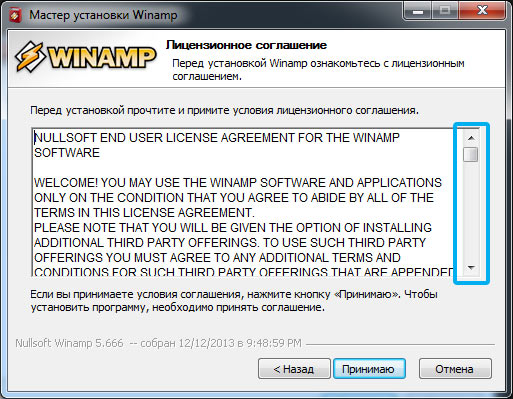 The "accept" button or the like is not always active right away as above, sometimes you need to tick or drag the slider to the right down, simulating a careful reading.
5. The choice of installation location. Standard item any installation program. By default, the installation goes to the program folder that is on your system disk (on where the operating system is installed). However, it is not always convenient to install it there (for example, there is not enough space).
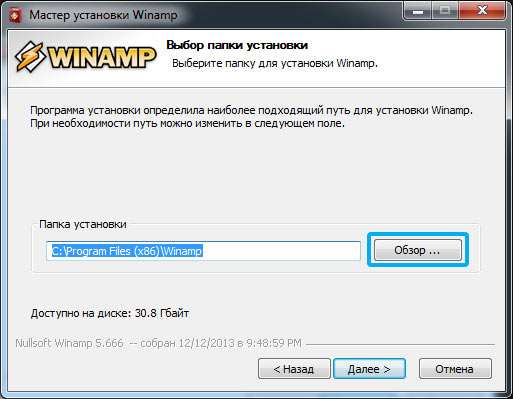
By clicking the "Browse" button, you can select any other folder on your computer. After the folder is selected, the installation itself takes place, that is, all files are unpacked and everything is prepared for further work.
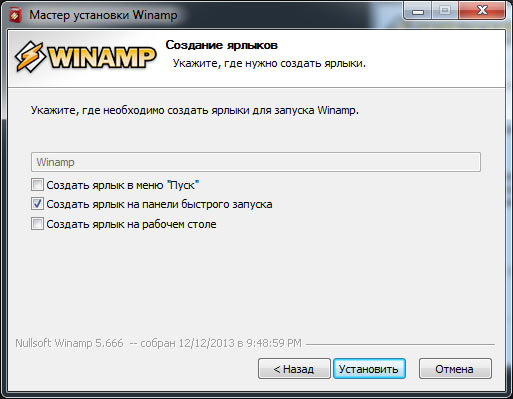
6. Creating shortcuts. You are invited to create shortcuts for quick launch of programs: in the start menu, on the taskbar or on the desktop. Choose the items that are convenient for you.
7. Select file types. A special point that is characteristic of player programs is the choice of file types being played. If you do not know what is needed specifically - leave the default values.

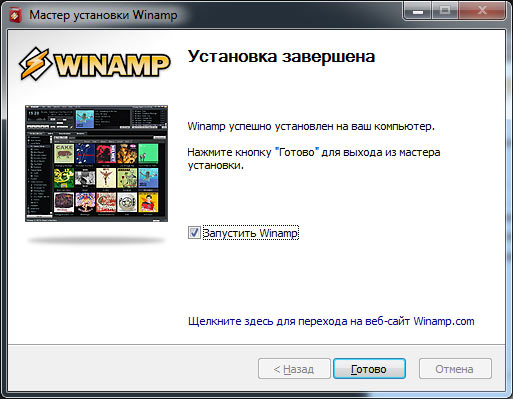
8. Window to complete the installation. Everything! The program is installed. Some require a reboot of the computer in order for all changes to take effect, but usually you can use it right away.
Carefully follow the installation points!
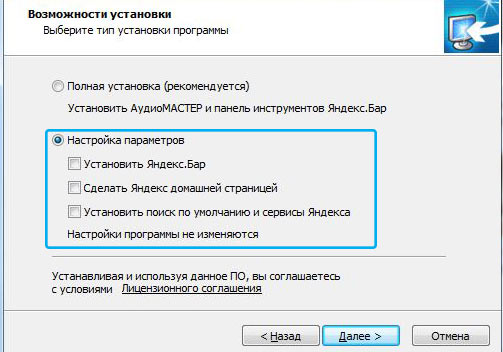
Under the recommended installation often slip unwanted programs. Here is a great example, installing the AudioMaster program (for recording audio) and with it the Yandex.Bar (the toolbar in the browser changes, changes start page and put the default search for Yandex), and unnoticed, making the names of the installed items gray.
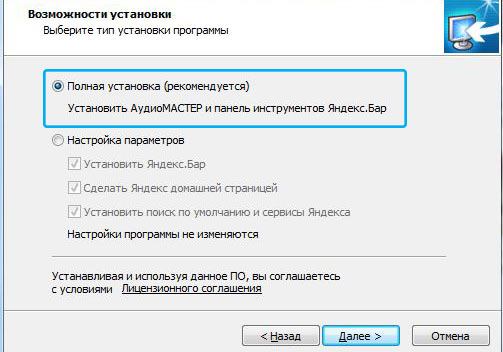
It is necessary to manually not only change the type of installation, but also remove all the checkboxes of the proposed components.
There is nothing difficult in the installation of programs, the main thing is to be attentive and follow the various unpleasant tricks of developers and advertisers who want to slip their product unnoticed.
Instruction
If the computer where you want to install the program enters a local network, then you can use a disk reader on another computer on that network. To do this, you first need to open access to the CD / DVD drive for network users on the computer where it is installed. Then, if you are using Windows, right-click the “My Computer” icon on the desktop of the computer without an optical drive and select “Map Network Drive” from the pop-up menu. The connection wizard will start, in which you will need to specify the device on the network using the dialog opened by clicking the "Browse" button. If an installation disc has already been placed in the device, then after the wizard’s work has finished, the program menu recorded on it will start immediately with a set of options for further actions, including program installation.
Use the file containing the “image” of the installation disk if you do not have access to the disk reader via the network. It is similar to a regular archive, but it contains not only copies of files, but also an exact copy of the structure of their placement on the original disk. This allows using a special emulator program to use the file in the same way as a regular optical disk. If you do not have a ready-made file with a disk image containing the necessary program, you will have to create it yourself.
Install an application on your computer that can create images and restore them from files (“mount”). For example, it could be Daemon Tools Lite - a free version of the program that can be downloaded from the manufacturer’s website (http://daemon-tools.cc/eng/products/dtLite). You need to install it on the computer on which the disk image will be created, and on the one where you need to install the program without using the disk. After installing the application, selecting the “DAEMON Tools Panel” item in its menu, open the control panel and click on the “Create Image” button. Following the instructions of the program, create an image optical disk and any convenient way (via flash drive, mobile phone, mp3 player, internet, etc.) copy it to the computer where you should go without the installation disk.
Click the Daemon Tools icon in the taskbar notification area of the second computer with the right mouse button, go to the Virtual CD / DVD-ROM section of the pop-up menu and in the “Drive 0” subsection select the “Mount image” line. The emulator will open a window in which you need to specify a file with a disk image and click the "Open" button. After that, you can use the virtual installation disk of the program in the same way as an ordinary optical disk.
For ease of use, distributions of programs are usually compiled into one installation, which is also an installation filethat deploys when the program is launched on the user's computer. To date, the creation of installation packages is automated and not difficult.
Instruction
Now select files that will be included in the installer.
Assemble the installation file.
Related videos
Virtual image the disk is a full copy the disk- the carrier from which the image was actually created. With the way the disk you can perform exactly the same operations as with a regular disk, that is, install programs or games. But in order to work with virtual the diskwe must have virtual drives on the computer, respectively. Only then can you enjoy in images disks and install programs from them. To create a virtual drive you need the appropriate applications.
You will need
- - Computer;
- - Daemon Tools Lite program
Instruction
Very comfortable and completely free program to work with in images Drives is Daemon Tools Lite. Download the program and install on your computer. During the installation process, a dialog box appears with the items “Free license” or “Paid license”. Mark the first item. After installation, restart the computer. Run the program. After its first launch, wait while it creates virtual drives. After that you will be taken to the main menu of Daemon Tools Lite. As you can see, the “Image Catalog” window is still empty. To get started, you first need to add an image to the directory.
Bottom on the toolbar, click on the image. the disk. In the window that appears, specify the path to the image the diskto install from the program. Click on the image the disk left mouse button, and then from the bottom of the window, click "Open." The image will be added to the directory.
Now in the main menu of the program, in the image catalog, click on the added image with the right mouse button. In the appeared context menu select "Mount", then - virtual optical driveon which to mount the image the disk. By default there will be only one virtual drive.
Now go to My Computer. There is now, in addition to the physical drive, also a virtual one. Click on the virtual drive icon with the right mouse button. In the context menu that appears, select the “Install or execute the program with the disk". The “Setup Wizard” will start. Next, follow the prompts of the "Master" set the program. The further installation process is no different then the installation of the program from the usual the disk.
If the "Program Installation Wizard" does not start this way, open the image the disk and find the autorun file in the root folder. Double-click on it with the left mouse button, then the “Program Installation Wizard” will launch exactly.
To work with disk images, you must use a certain software. Naturally, it is necessary to possess the necessary skills in order not to make mistakes in the process of working with this software.

You will need
- - Daemon Tools Lite;
- - Total commander;
Instruction
Connect to the Internet and go to http://www.daemon-tools.cc/eng/products/dtLite. Download the Daemon Tools Lite program by selecting “Free Download”. Open the downloaded exe file and select " Free license". To perform most of the necessary ISO manipulations in images it is not necessary to buy full version programs.
Restart your computer and open the Daemon Tools program. It usually starts automatically when you log on to Windows. Find the utility icon located in the system tray (lower right corner of the screen). Click on it with the right mouse button and select Mount’n’Drive.
In the menu that opens, click on the "Add file"(Icon the disk with a plus sign). Select the required ISO file or image the disk in a different format. Now right click on the title. filea, which is displayed in the program working menu.
Select "Mount" and select the desired virtual drive. After some time, the disk will be determined by the system. Open the “My Computer” menu and navigate to the contents of the new virtual drive.
Run necessary programs or just copy the necessary fileyou are on hDD computer. If you do not need to use ISO file as a virtual the disk, and you just need to extract information from it, then use the Total Commander program or the 7z archiver.
Using these utilities, open the ISO file and copy the necessary information to the hard disk of the computer or other media.
note
Programs such as Daemon Tools are wiser to use to create a copy of a disk using ISO images or to emulate a real game disk. Sometimes it allows you to bypass some protection systems.
To install the operating system you need to write diskwhich will be loaded before entering operating system. To create such a disk is recommended to use various utilities.
You will need
- - computer with DVD-drive;
- - blank disc;
- - the image of the installation disk.
Instruction
First download the image of the installation disk with the files of the desired operating system. It is best to use an ISO image. Now download the ISO File Burning program. it free utilitydesigned specifically for recording images to disk.
Install the program. Insert a blank DVD into the drive. Launch ISO File Burning and customize the image capture settings. First select the desired drive. Click the "Browse" button and select the downloaded ISO image.
Set the minimum write speed. This will allow you to run this disk on relatively old drives and reduce the likelihood of errors during burning. After setting up the program, click the “ISO Record” button.
Check the recorded files. To do this, restart the computer and hold F8. In the window that appears, select the item DVD-Rom and press Enter. Wait a while until the OS installation program starts.
Sometimes to installation disk add programs and utilities. This allows you to store a complete set of files on one media. If you have such a need, use the Nero program to record blanks. Run the specified utility and open the DVD-Rom (Boot) menu.
Select the ISO tab and specify the image file. Now click the “New” button. Find the necessary files in the right window of the started menu and move them to the contents of the disk.
Click the "Record" button. Go to the tab of the same name. Select the write speed of the disc, set extra optionsFor example, skipping errors.
Now click the Burn button and wait for the files to be copied to the disk. Check the quality of the recorded data. Remember that boot disks are created with a closed session. Those. you will not be able to add files in the future.
Related videos
The Windows 98 operating system is an upgraded version of the Windows 95 operating system. This system is based on MS-DOS 7.1 and is a 16/32 hybrid product. Windows 98 can be installed using the corresponding installation disk.

Instruction
To install the system from scratch, you must create a primary partition. hard drive and install on it file system. Windows 98 runs on FAT 16 and FAT 32 systems, which are different maximum sizes sections. To create disk partitions, you can use the Fdisk program.
Install the Windows 98 startup disk and restart the PC.
Select the menu item “Start computer without CD support”, press Enter, a command prompt will open, enter the fdisk command and press Enter. If the disk has a volume of more than 512Mb, then a message appears about the support of larger disks, press Y to install the FAT 32 system and, accordingly, support large disks.
The Fdisk menu appears. Using the items “Creating a DOS partition or logical drive DOS and Create Primary DOS Partition create disk partitions. To the question “Use all available space under the main DOS partition?”, Press Y, then Enter. Press the Esc key twice.
Restart the computer. Select the menu item “Start computer without CD support” again, press Enter.
Type format c: and press Enter. A message will appear, indicating that all data in the formatting process will be destroyed, press the Y and Enter keys. Thus format all disk partitions.
After splitting and formatting the disk, you can begin to install the system.
Install the Windows 98 startup disk and restart your computer, select the launch with support for devices and disks, press Enter.
Insert windows disk 98, in command line Enter x: \\ setup, where x is the label of the CD drive.
Press Enter and follow the onscreen instructions.
Related videos
note
A Windows 98 boot disk is included with the product.
Sources:
It is difficult in our time to find such a user who would not have to install computer programs. They can be downloaded from the Internet or found on disks. Programs can be in the form of installation filepackaged in an archive or run without installation at all. Installation any programs on a laptop will not differ from a similar procedure for a regular desktop computer.

Instruction
To properly install the program, you need to make sure that there is free space on the hard disk of the computer. But do not worry - not every program is able to fill in everything free place on modern hard drives of large volume. Your device configuration must also meet system requirements. programs. For example, powerful graphic editor or programs for video processing, they will be able to work normally only on sufficiently productive computers.
If the program is in front of you as an installation file, run it and follow the instructions of the Installation Wizard. By default, the Installation Wizard offers the most optimal parameters and you only need to click the Next button in a timely manner and wait for the installation to complete. After performing these simple steps, a shortcut will appear on your desktop. programsBy clicking on it twice, you can launch it.
How to install the program on the computer?
In today's world, almost everyone knows how to use a computer. Of course, almost every user can install programs. But still, there are cases when, for one reason or another, a person cannot figure out how to install a program on a computer. In this article we will look at how to install programs on the operating room. windows systemwhat problems users may encounter in the implementation of this procedure.
Ways to install the program on a PC
Install using CD
- To install any program using a CD, you will need to insert a disk with a licensed version of the program into the drive.
- After that, a message may appear stating that Windows Firewall requires confirmation from the administrator to install the software. Confirm the installation or, if necessary, enter the password.
- Next, you need to open the installation package (installer) of the program and wait for the installation wizard to start. This type of installation is called automatic.
- But it may happen that the installation wizard does not take effect. Then you need to use a custom installation type. To do this, open the attached text file, which should be instructions on how to install the program, and follow it.
Installing the program using the Internet
Now most users mostly download programs, not install them from disk. To install the program using the Internet, 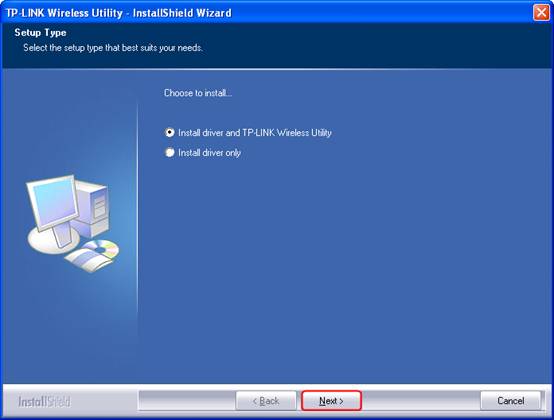 you just need to download it and then open the installer file.
Then repeat the steps described above, starting with the launch of the installation wizard. I would like to note that on the one hand such a method is more convenient than installing programs using a disk, but at the same time it carries a certain risk. It is possible that the program you download from a network resource may be malicious. Therefore, it is recommended to download programs only from trusted resources.
Installing the program using a local network
Every user whose computer is connected to local networkmaybe  use it to install the program. To do this, open the component "Get programs".
Typically, this component is located in the Start menu-Control Panel-Programs-Programs and components. In the last menu you need to select "Install a new program from the network." Then you just need to click the "Install" button and wait for the installation wizard to start.
"Pitfalls" when installing
Recently, many users are faced with a number of "pitfalls" when installing a program. The fact is that many software manufacturers integrate additional applications into the installation wizard, many of which are not needed by the user. For example, when installing any program 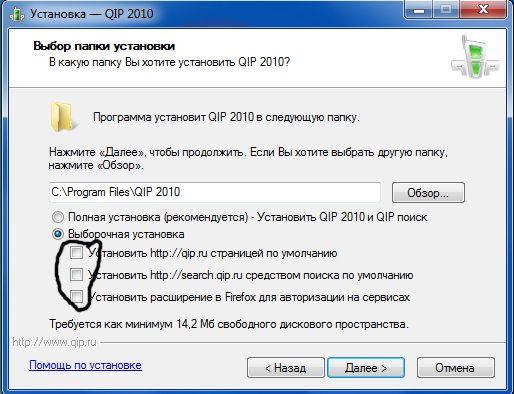 (AIMP or others.) The user is prompted to install elements of Yandex (or Mail), ostensibly for better program performance.
Therefore, it is worth to be more careful during the launch of the installation wizard, which always asks the user about the need to install this or that additional software. Simply remove the checkmarks in front of those products that you do not need. Even if the installation wizard strongly recommends them.
Batch download programs- this is what only select advanced users have known until recently. Previously, it was possible to download software from different developers with the help of English-language services, known mainly to system administrators and geeks. Now we have InstallPack, a Russian-language application for batch downloading of programs, designed for users of any level.
Questions:
How to install multiple programs at once?
How to install all necessary programs on several computers at once?
Advise software to install free software
Other questions about InstallPack
Step 1
Download the InstallPack application. You can do it from our website or from the official website: https://installpack.net/.
Step 2
Run the application and get acquainted with the interface. In the main window - a list of programs available for download. They can be sorted in alphabetical order by clicking on the "Name" tab, or by category - by clicking on the "Category" tab. The last option will certainly help when you know what the program is for, but do not remember what it is called. Opposite each of the applications you can also see its rating, price, size and a brief description.
Step 3
We will review the finished sets of programs by going to the dropdown, where “TOP-100” is selected by default. Here you should pay attention to the “Must have” package - it will be especially useful after reinstall windows. In the package "Patriot" you will find software from Russian developers. As for the others, their names speak for themselves.
Step 4
For convenience and time saving, we will use search linelocated in the upper left corner of the interface. Just start typing the first letters of the program, and you will immediately see it at the very top of the list. For example, if you set out to find opera browser, type on the keyboard Latin "op" - that will be enough.
Step 5
The programs we need are ticked. You can also put a tick in front of the inscription "Silent installation" - thus, we will save ourselves from notifications, which, as a rule, come from the installation wizard during installation. Programs will be installed alternately to minimize the impact on the CPU load.
Step 6
Finally, close InstallPack and make sure that the application shortcut is saved on the Desktop. Just in case, we recommend saving InstallPack to the USB flash drive as well - since the application runs without installation, it can also be used as a portable version. We will be able to quickly and conveniently install several programs at once in various situations, be it reinstalling the system, buying a new computer or working on a new project.