It often happens that the space on the hard disk is not very conveniently distributed, and sometimes it happens that you have only one Disk C:. But you can always separate it, without using it additional programs - everything is done in the system itself.
You can ask: "What is it for?". One of the most important reasons is security. For example, if you need to reinstall Windows, all data from Drive C: will be lost. At least for this reason it is necessary to break your hDD into several partitions: to C: to keep Windows itself, and for example to D: load all other files: documents, videos, photos and other data.
Read other helpful instructions:
How to split a hard disk in Windows 7, 8, 8.1 and Windows 10
1. Call command line, by pressing the key combination Win + R and enter diskmgmt.msc in the "Run" window. The Win button is a key with a Windows icon.
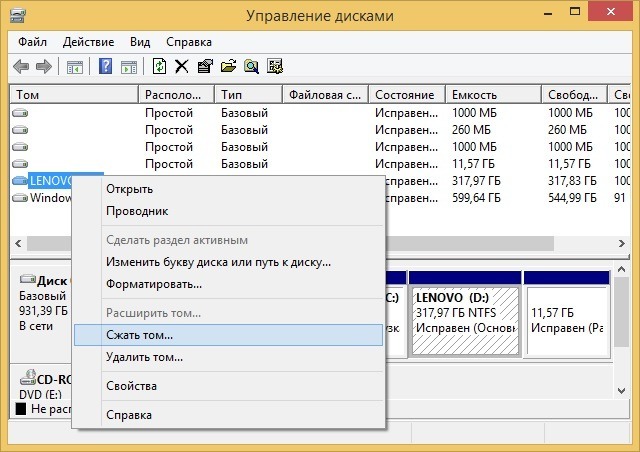
2. After that, right-click on the partition you want to divide and select "Compress Volume" from the menu.
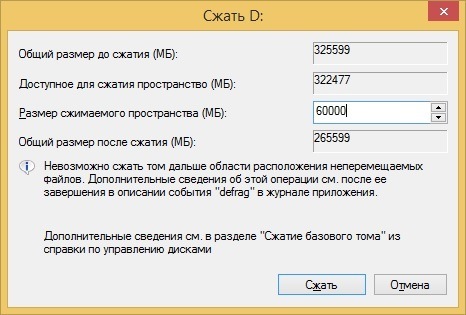
3. Set the size of the compressed space, that is, specify how much memory you are taking from this section. After that, click "Compress".
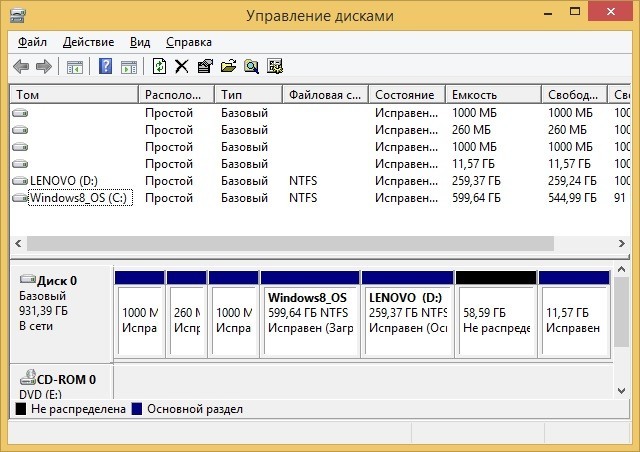
4. Now, not distributed memory will appear.
5. Click on it with the right mouse button and select "Create a simple volume".
6. After that, set the size of the new partition. You can not use all available memory if you want to add several new partitions.
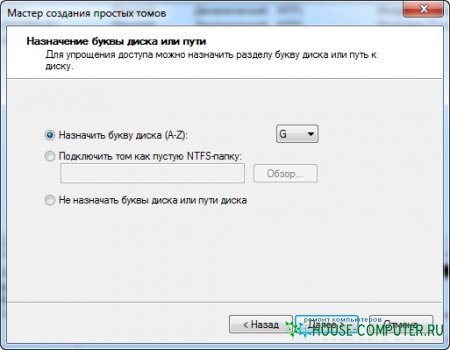
7. Assign a drive letter.
8. In the next window, create a name for the new disk instead of "New volume". The rest of the formatting options are best left unchanged.
After that, you will have a new disk. Also, when there is no distributed memory, you can add it to another disk. To do this, right-click on any section and click "Expand volume".
In the next window select how much memory from the available you want to transfer to this disc.
If you have never divided a hard desks into parts, then you are probably wondering why this is done at all. In fact, there are quite a lot of reasons - from banal convenience to security. Why share (break) the hard drive? Once upon a time hard disks there was a small volume - 20-40 Gb. Although even then, many began to break them into 2 parts: the operating system and user files. Today, in the "terabyte" era, this is especially true. High-quality video and music can occupy hundreds of gigabytes - why should not they take their section? Working files and study are much more important and therefore also a separate repository. Also, a computer can be used by several people - each with its own space. Or an example parental control: restrict access to discs with games and movies - just study. Convenient! In addition, there are users (I'm among them) who have several operating systems on their computer, for example Windows and Linux. And here the partitioning of the hard drive into a certain number of partitions is a natural necessity. A bit of theory
. What are the sections? This information is desirable to know, in order not to get confused elementary. First, the partition is unplaced: this is when you seem to have allocated space for a new partition ("bitten off" a piece from the "C" drive, for example), but its system does not see. Do not be scared - your hard drive has not become smaller and you have not made anything irreversible. Most likely, this section has not yet been marked. So, what are the sections? · "Basic", "Primary", "Primary partition » - something like this. If you have only one partition and the operating system is on it, then it is the primary one. It necessarily has a file system (NTFS, FAT). Such partitions on the hard drive can be up to 4. It happens that you bought a laptop, and add new section you can not. Perhaps there are already 4 of them, and some of them are hidden (Recovery - a hidden partition with a backupWindows, which is used for recovery). · "Additional", "Advanced", "Extended partition ".By itself, the extended partition does not have either an alphabetic label or a file system. If you seem to have created a partition, but it does NOT appear in the system, then most likely it is extended. An extended section can only be in a single copy. It is one of the main sections - that is, if you have an extended partition, then you can have 3 more main sections besides it. So why is it needed then? - you ask. I answer. The expanded section is therefore invented - so that you can bypass the restriction on 4 sections. It is within the extended partition that you can create as many as you like logical drives
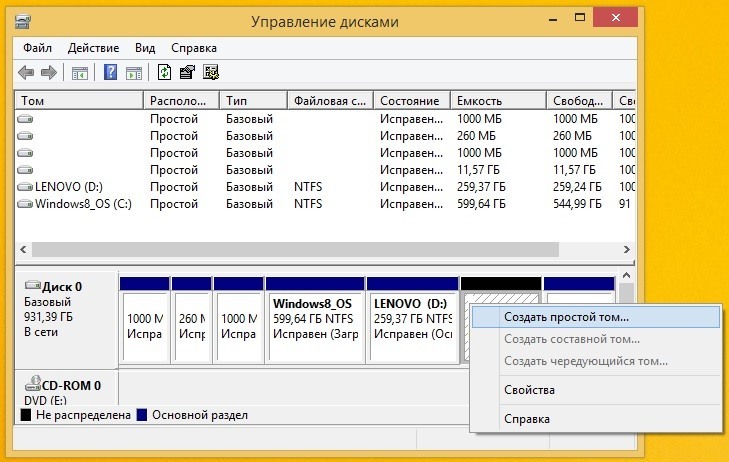
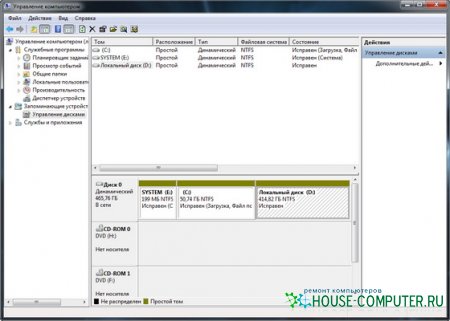
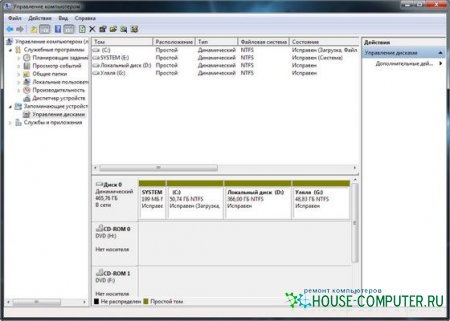
. But in the system you will see only these disks along with the main sections - they will all have their own letter designation and file system. An extended section will exist hidden. There may be confusion due to the fact that different programs can use different names. Or, for example, and at all "forget" about them - than sin system utility in Windows 7. But now, I hope, you understand this structure at least in general terms. I'll try to portray clearly: - The main section "C: "(Logical 1 NTFS or FAT) - The main section "D: "(Logical 2 NTFS or FAT) - Main section "Advanced" (Without letter and without file system) - Logical 4 "F: " (NTFS or FAT) - Logical 5 "G: " (NTFS or FAT) - Logical 6 "H: " (NTFS or FAT) - The main section "E: "(Logical 3: NTFS or FAT) The letters of the sections can be arbitrary - not necessarily in alphabetical order. File systems - too. FAT and NTFS are just commonly used on Windows. If you have less than 4 sections, then let them all be basic - there is no sense in doing an extended one. Methods for breaking a disk How many programs - so many ways. It should be noted that there are a lot of funds, most of them - paid programs. But in general, the ways of breaking a disk can be divided into 3 main directions. Method number 1. System The system utility is quite simple and not too functional. You can perform some operations with the main sections, such as: resizing, creating a partition. The easiest way to do this is: the "Computer" icon on the desktop (it's still in the "Start") - the right mouse button. Then select "Management" (you must have administrator rights). In the opened window, in the left column select the utility "disk management". We are waiting for a few seconds. 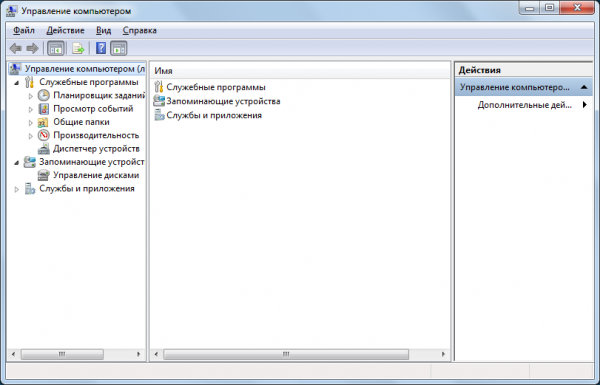 And here are our CDs. Drive 0 - and there is our hard drive with its sections. That in the CD-ROM - we do not interfere, but only adjusts to the right way. As you can see, the system utility is all 6
partitions of the hard disk is considered simple and basic. Although in fact it is not. The program does not see that the last 3 partitions have other file systems (not FAT and not NTFS) and that these are logical partitions inside the extended partition. This is a big minus. The program still does not know how much, but it can quickly and simply do basic operations on partitions. For example, we can very simply create a new main partition, by "nipping off" a piece from the disc "D" or "C".
And here are our CDs. Drive 0 - and there is our hard drive with its sections. That in the CD-ROM - we do not interfere, but only adjusts to the right way. As you can see, the system utility is all 6
partitions of the hard disk is considered simple and basic. Although in fact it is not. The program does not see that the last 3 partitions have other file systems (not FAT and not NTFS) and that these are logical partitions inside the extended partition. This is a big minus. The program still does not know how much, but it can quickly and simply do basic operations on partitions. For example, we can very simply create a new main partition, by "nipping off" a piece from the disc "D" or "C". 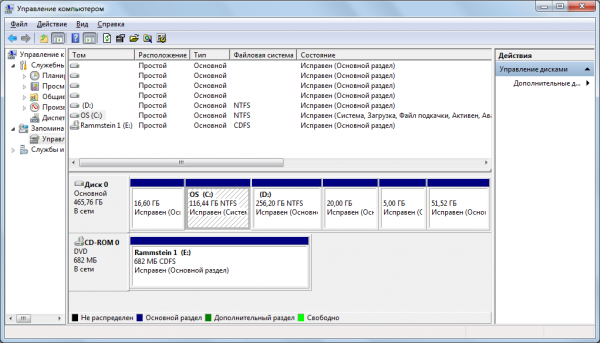 I forgot to say that the very first section is, as a rule, on Windows 7, the so-called. “
Recovery ", about which I mentioned at the very beginning. It should not be touched. This is generally a hidden section. It will help you to return the laptop or computer to the state "from the factory" by clearing the entire hard drive and returning Windows 7 from initial settings and the software package.
I forgot to say that the very first section is, as a rule, on Windows 7, the so-called. “
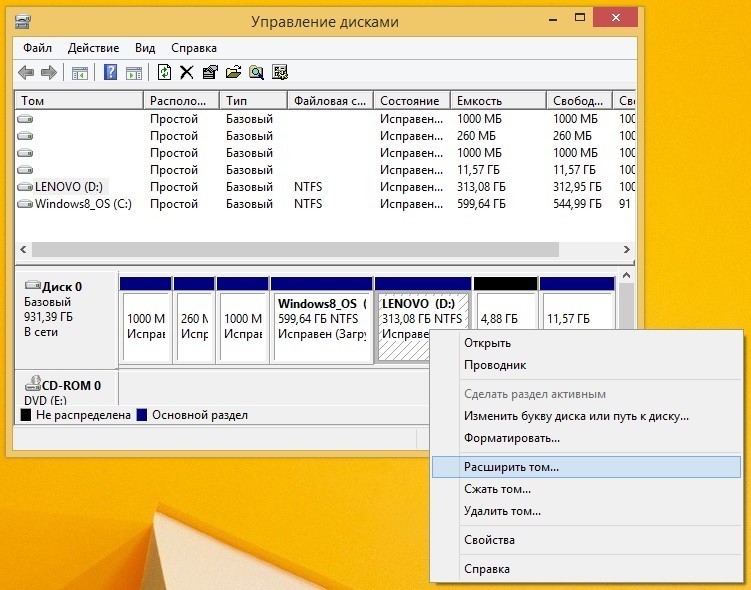
Recovery ", about which I mentioned at the very beginning. It should not be touched. This is generally a hidden section. It will help you to return the laptop or computer to the state "from the factory" by clearing the entire hard drive and returning Windows 7 from initial settings and the software package. 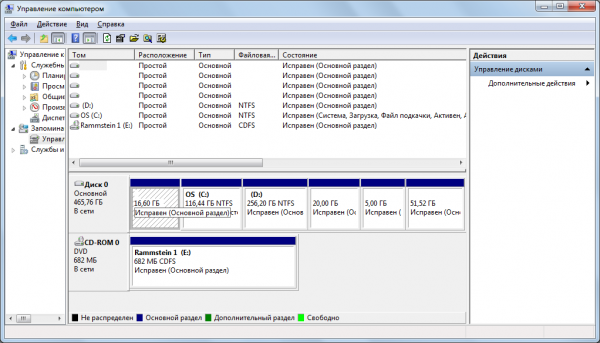 To separate a part from an existing volume, click on it with the right button and select "Compress volume ...". There appears such a window where you just need to select the necessary size for the new partition. I chose 1000 MB - all the same then I delete. You must choose the size yourself.
 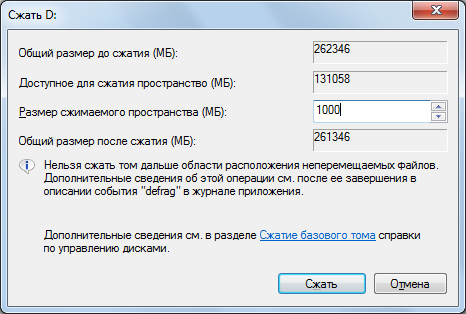 After that, we had an untagged area of 1000 MB. Click on it with the right mouse button and select "Create a simple volume".
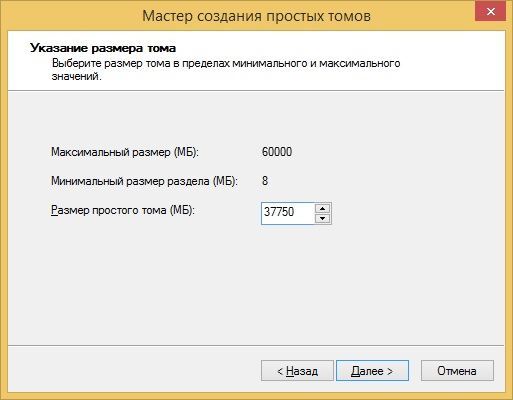
 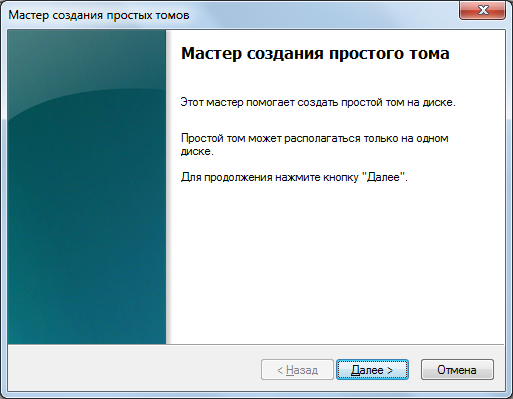 What are you waiting for? Click "Next"! Since the section we need completely, we leave maximum size.
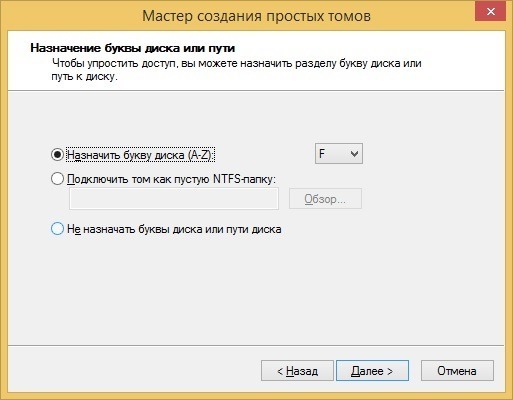
 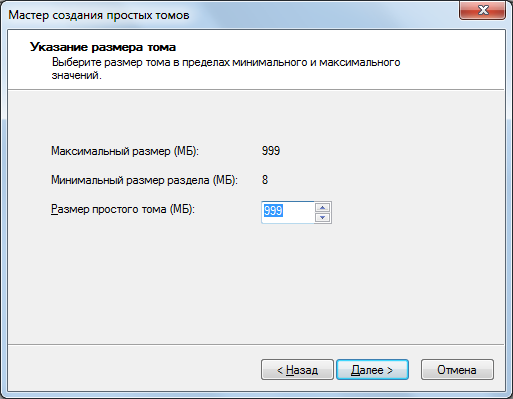 Next, assign a letter (any of the list) and go "Next".
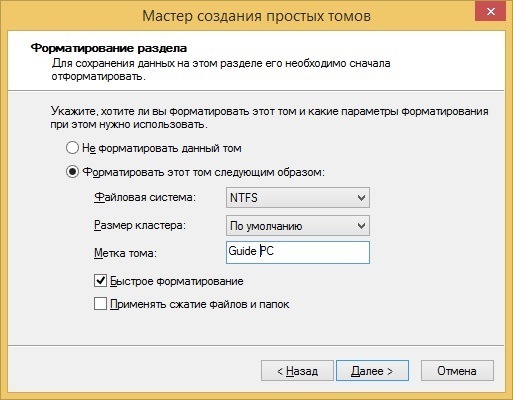
 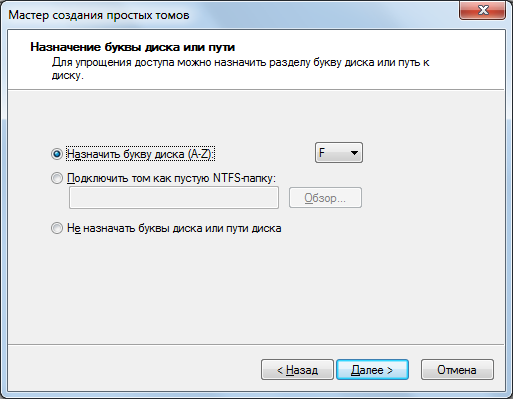 Choose a file system - without it. We chose what we need - NTFS, so we conclude with the "Next" button.
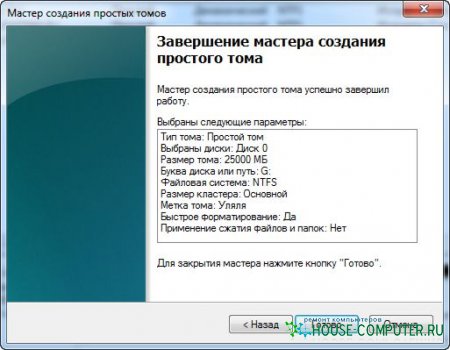
 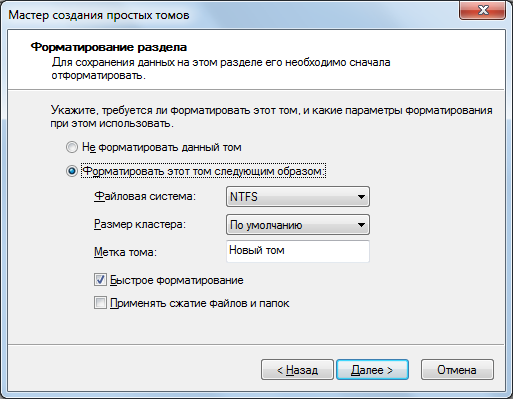 We get the table with preliminary summary and click "Finish" - to complete the procedure.
 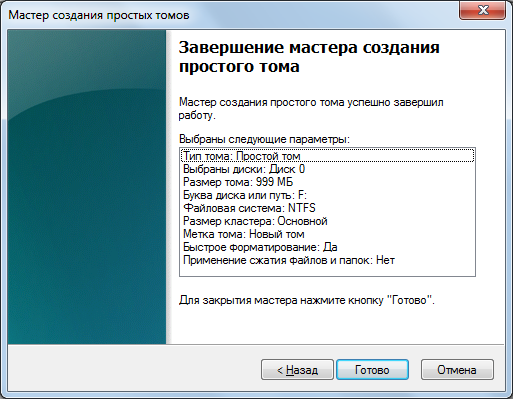 All. The new volume is created. Congratulations! And now I, like the owner of a well-functioning system, had a reasonable question: "Why did I do this ???". That's right - to show you. But now this new volume, 1 Gb in size, is like the fifth wheel. Therefore, we will immediately understand the procedure for returning the "bitten" disk space to its place. Suddenly, and you useful. First, delete the newly created volume (right button, "Delete volume"). Now, instead of the volume, an unplaced area. We go further. So, right click on the disc, from which we "stole" a little space. And choose "Expand the volume."
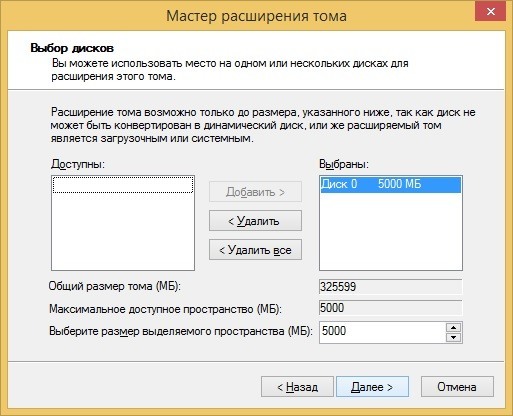
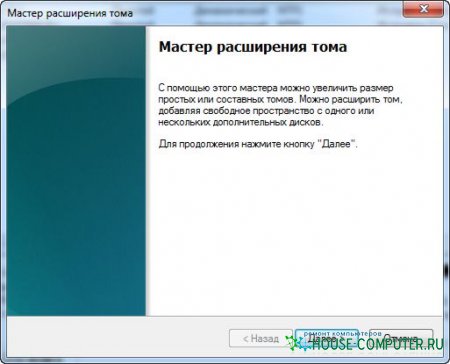
 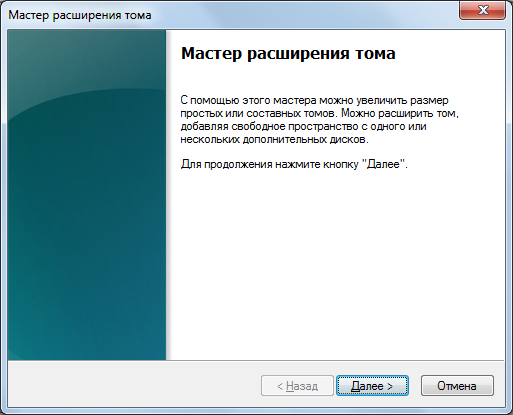 Clicking "Next", we see a completely new window.
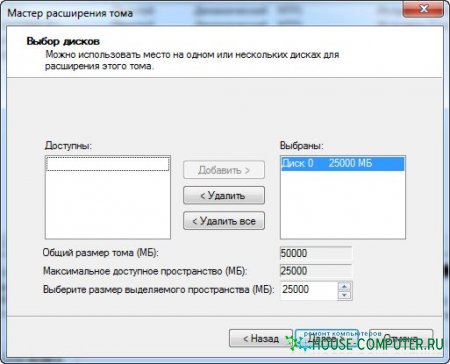
 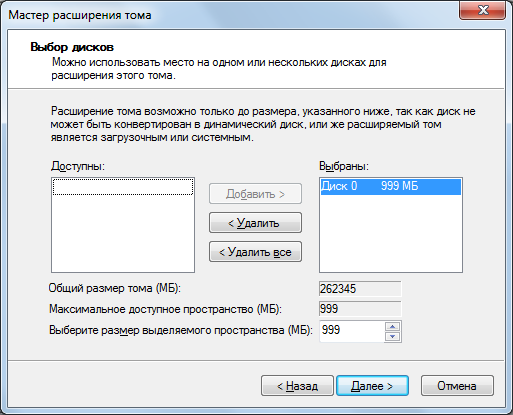 We do not touch the size settings. Actually, do not touch anything, but go further - because our unplaced area called "Disk 0" has already been added to the column "Selected". Again, we receive a preliminary summary and end the process with the "Finish" button.
  That's all. Everything has returned to its former state! Method No. 2. When installingWindows 7 Unfortunately, I can not provide screenshots of this method, but everything there is quite simple, in Russian. I'll give just a few tips. And remember that when you install, you will not be able to read the instructions if you do not have another device with the Internet at hand. So it's better to print out or write down all the steps. I will describe the sequence of actions. After you start the installation of Windows 7 and go through the language selection window, accept the license terms and select the "Full installation" option, a window with the choice of the partition for windows installations. In this window you will see if you have an unoccupied place. There will also be a "Disk Setup" button, press it - the tools for working with disk space will appear. Here you can format the disk or disks, as well as create new ones by clicking on the button of the same name, set the desired disk size. All changes will take effect after clicking the "Apply" button. That's actually all you need. If you do something wrong, quietly delete the partitions and create them again. Provided, of course, that there is no data, otherwise the formatting or deletion of the section will kill them. Method number 3. Specialized programs To tell about all the programs that help to break the site, the whole site will not suffice. I will simply list which programs are most popular today. Their functionality, as a rule, allows a lot. But we are only interested in partitioning the disk, so if the program is in Russian, you can easily figure out how to create the necessary partition structure, if you carefully read the article. So, the programs for working with disk space: · Acronis Disc Direktor; · Paragon Partition Manager; · Partition Magic; · Ranish, etc. I hope you will manage to distribute disk space. Good luck!
redistribute space on local disks, their. That is, the functionality of this tool is an almost lightweight version of such programs as Acronis Disk Director, Partition magic and other programs for disk management. And now I will show you how they are managed ...
Disk Management in windows 7 A great tool that allows redistribute space on local disks, delete local disks, create their. That is, the functionality of this tool is an almost lightweight version of such programs as Acronis Disk Director, Partition magic and other programs for disk management. And now I will show you how they are managed.
The plan of my actions is this:
1. Decrease local disk D to 50 GB.
2. Due to the released space, create a new local disk with the size of 25 GB.
3. For the remaining 25 GB increase this newly created disk.
4. Return everything to its proper place.
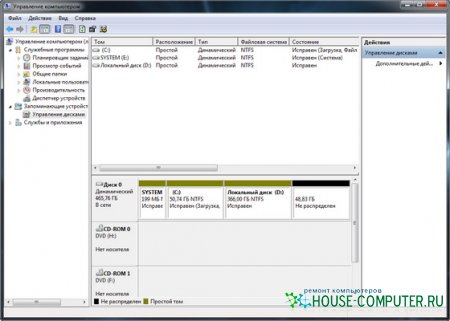
The Disk Management tool can be found at the following address: Start - Control Panel - Administrative Tools - Computer Management - Disk Management. In the upper block of this window there is a list of local disks, the lower one shows the distribution of the space between them and all connected media.
To reduce the local disk D, click on it with the right button and select the item " Compress volume... ". This window will appear
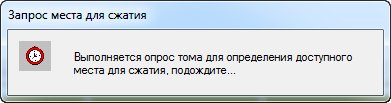
And then this.
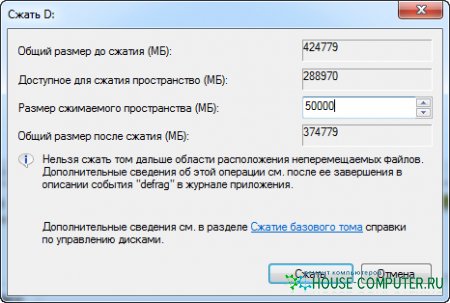
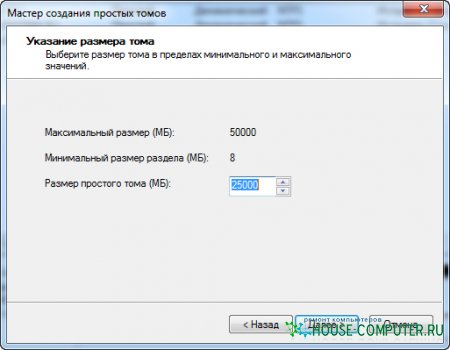
In this window we select how much to compress the local disk and we can immediately see how much space remains on this disk. So, we enter the size to which we will compress a disk and click " Compress».
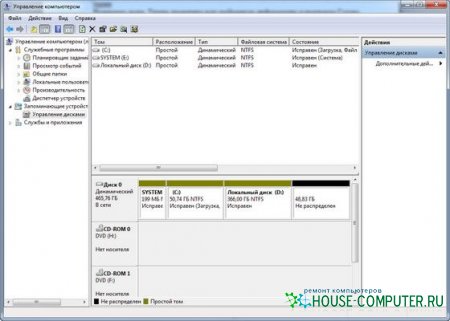
After some time at the bottom of the window " Disk Management"There will be a terrible black area, but do not be scared, everything goes according to plan.
This is a black area, there is an unplaced area hard drive.
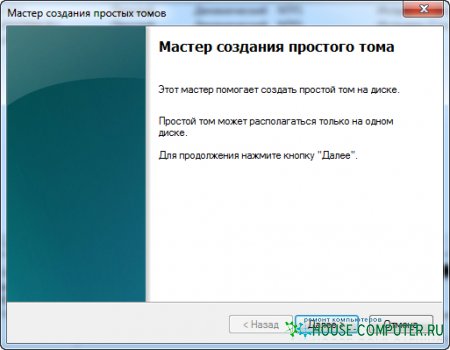
The first point of the plan is fulfilled, we proceed to the second: Creating a new local disk the size of 25 GB. To do this, click on this black area with the right button and select " Create a simple volume... ". The "Create Simple Volume Wizard" opens.
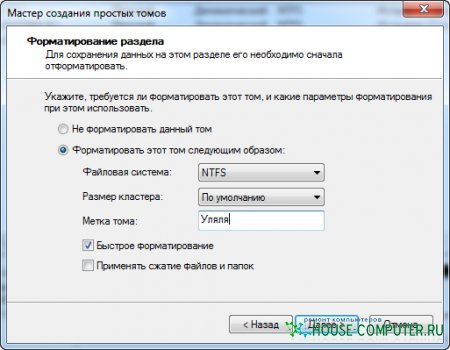
And here it is "Ulyaly".

Everything worked out. A new local drive with a size of 25 GB. created. And immediately, as soon as it is created, you will be asked to open it, as if you inserted a disk or a USB flash drive, this is good.
We proceed to point 3: Let's increase the created local disk for the remaining free place. To do this, click on the new disk with the right button and select " Expand the volume... ". The "Volume Expansion Wizard" window opens.
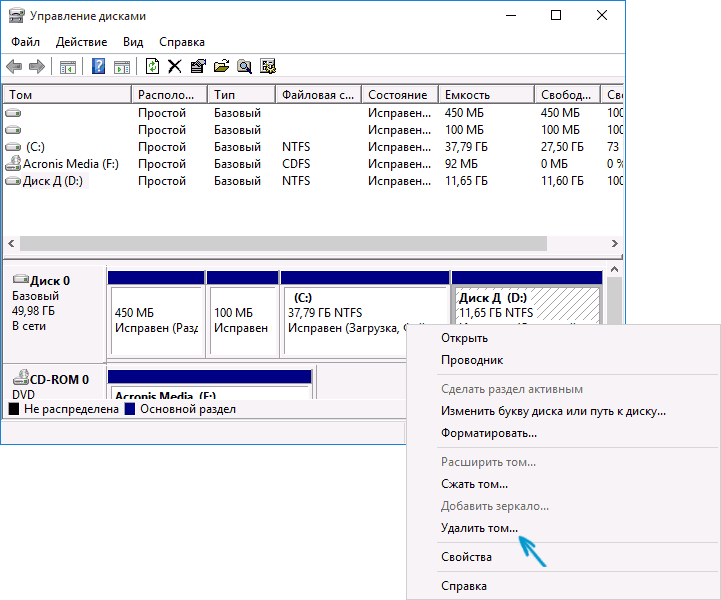
So, the last stage, to return everything back, for this it is necessary delete local disk "Ulyaly" and expand the disk D. To remove the local disk, we right-click on the the disk you need and select the item " Delete volume... ". We will see a warning that all data on this disk will be destroyed.
We agree. And again there is an unplaced area. And we are already able to expand the disk at the expense of the unallocated domain.
I would also like to say that it was not possible to expand the C drive due to this unplaced area, because it is possible to expand the local disk only when the unplaced area is adjacent to it. That is, this black area should be next to the local disk C. But there is a solution, albeit a bit "gemoral".
To expand the C drive (in my situation, when it is not adjacent to the unallocated area), it is necessary: compress the local disk D as much as possible, create a new volume, move the information from the D drive, remove the local disk D, and then expand local disk C, then assign the letter D to the newly created partition and extend it to the remaining space. This is such a long process ... Good luck!
The article is taken from open sources: http://www.goodkomp.com/page/upravlenie-diskami-windows-7#1
If you are experiencing the need to increase the size of the C drive due to the D drive (or partition under another letter) when using Windows, in this manual you will find two free programs for these purposes and detailed manual on how to do it. It can come in handy if you get messages that Windows does not have enough memory or the computer began to slow down due to the small free volume of the system disk.
I note that this is just an increase in the size of partition C due to partition D, that is, they must be on the same physical hard disk or SSD. And, of course, the space of disk D that you want to connect to C must be free. The instruction is suitable for Windows 8.1, Windows 7 and Windows 10. Also at the end of the manual you will find a video with ways to expand the system disk.
Unfortunately, standard windows tools you can not do this without losing data - you can compress disk D in the disk management utility, but the free space will be "after" disk D and you will not be able to increase C due to it. Therefore, we will have to resort to the use of third-party tools. But I will also talk about how to increase the C drive due to D and without using the programs at the end of the article.
Increase the volume of the C drive in Aomei Partition Assistant
The first of the free programs that will help to expand the system partition of the hard drive or SSD - Aomei Partition Assistant, which, in addition to being "clean" (does not install additional unnecessary software), also supports the Russian language, which can be important for our user. The program works in Windows 10, 8.1 and Windows 7.
Warning: incorrect actions on sections hard disks or accidentally turning off the power during the procedure may result in the loss of your data. Take care of the safety of what is important.
After installing the program and launching, you will see a simple and intuitive interface (the Russian language is selected during the installation phase), which displays all the disks on your computer and partitions on them.
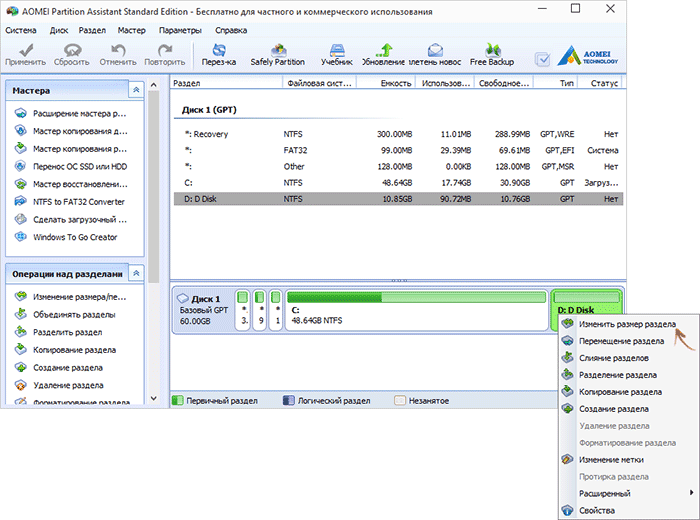
In this example, we will increase the size of the C drive due to D - this is the most common version of the problem. For this:
When all the operations and two reboots are completed (usually two, the time depends on the disk usage and the speed of their work), you get what you wanted - the larger the size of the system disk by reducing the second logical partition.
By the way, in the same program you can make a bootable USB flash drive to use Aomei Partiton Assistant, booted from it (this will allow you to perform actions without reboots). You can also create the same flash drive in Acronis Disk Director and then resize the partitions of the hard disk or SSD.
You can download the program for changing partitions of Aomei Partition Assistant Standard Edition from the official site http://www.disk-partition.com/free-partition-manager.html
Change the size of the system partition in the MiniTool Partition Wizard Free
Another simple, clean and free program to change the size of partitions on the hard disk - MiniTool Partition Wizard Free, however, unlike the previous one, it does not support the Russian language.
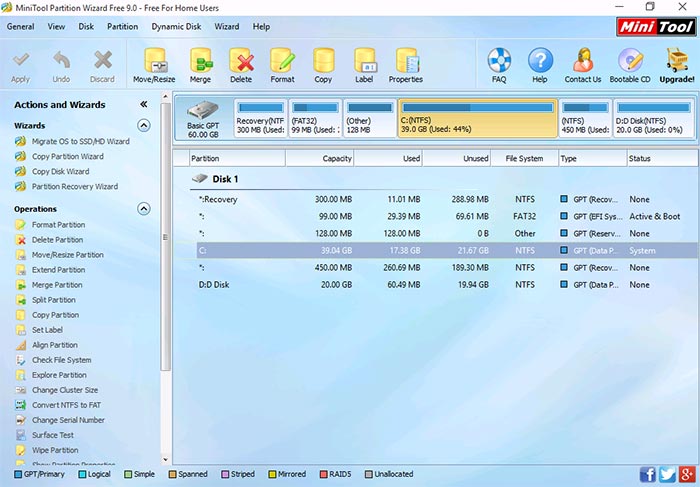
After starting the program, you will see almost the same interface as in the previous utility, and the necessary steps to extend the system drive C using free space on the D drive will be the same.
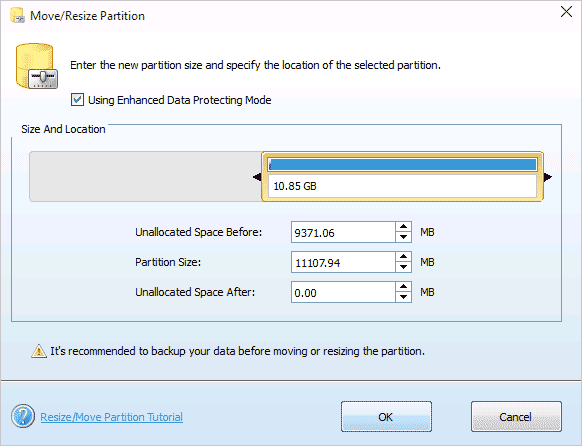
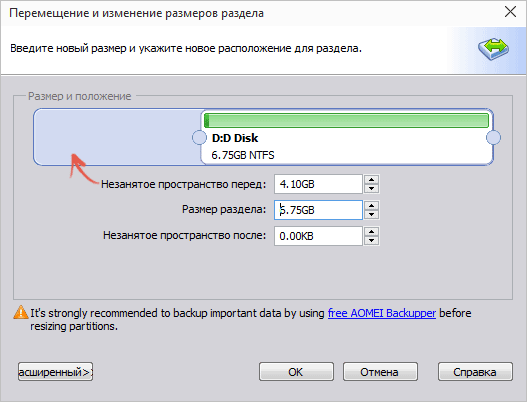
Right-click on drive D, select context menu "Move / Resize Partition" and change its size so that the unallocated space is "left" of the occupied one.
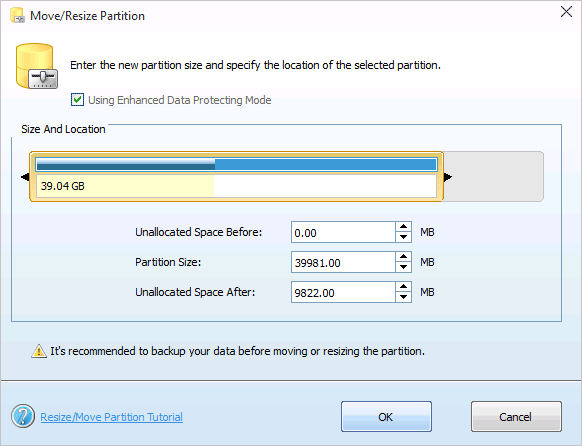
After that, with the same item for drive C, increase its size due to the appeared free space. Click Ok, and then apply it in the main Partition Wizard window.
After all operations on the partitions are completed, you can immediately see the changed sizes in Windows Explorer.
You can download MiniTool Partition Wizard Free from the official site http://www.partitionwizard.com/free-partition-manager.html
How to increase the C drive due to D without programs
There is also a way to increase the free space on the C drive due to the available space on D without using any programs, only by means of Windows 10, 8.1 or 7. However, this method has a serious drawback - the data from the D disk will have to be deleted somewhere to move, if they are of value). If this option suits you, then start by pressing the Windows + R keys on the keyboard and typing diskmgmt.msc, then click Ok or Enter.
The Windows Disk Management utility opens in which you can see all the drives connected to the computer, as well as partitions on these drives. Pay attention to the sections corresponding to disks C and D (to perform any actions with hidden partitions that are on the same physical disk, I do not recommend).
Right-click on the partition corresponding to the disk D and select "Delete volume" (remember, this will delete all data from the partition). After the deletion, to the right of the C drive, an unallocated unallocated space is created, which can be used to extend the system partition.
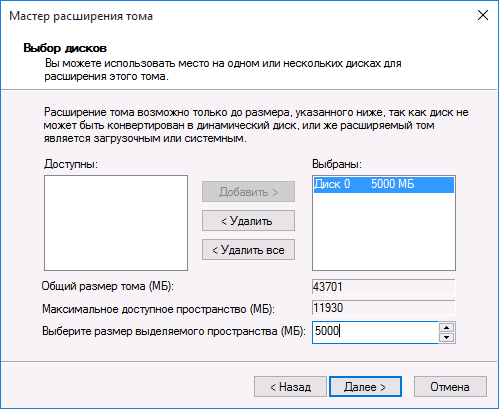
In order to enlarge the C drive, right-click on it and select "Expand volume". After that, in the Volume Expansion Wizard, specify how much disk space should be expanded (by default, all available ones are displayed, but I suspect you will decide to leave some gigabytes for the future drive D). On the screenshot, I increase the size by 5000 MB or slightly less than 5 GB. When the wizard completes, the disc will be expanded.
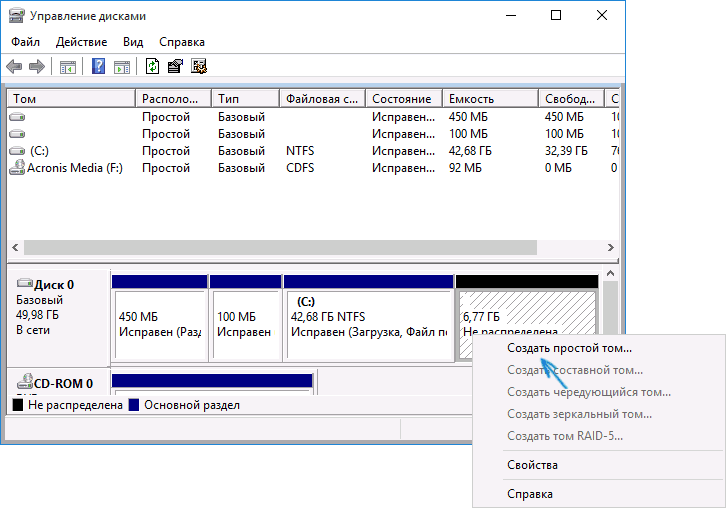
Now the last task remains - to convert the remaining unallocated space to disk D. To do this, right-click on the unallocated space - "create a simple volume" and use the Create Volume Wizard (by default, it will use all unallocated space for drive D). The disc will automatically be formatted and the letter you specify will be assigned to it.
That's it, it's ready. It remains to return important data (if any) to the second partition of the disk from the backup.
How to expand the space on the system drive - video
Also, if something was not clear, I propose a step-by-step video instruction that shows two ways to increase the C: drive due to the D: drive in Windows 10, 8.1, and Windows 7.
Additional Information
In the described programs there are other useful functions that can be useful:
- Transferring operating system from disk to disk or from HDD to SSD, converting FAT32 and NTFS, partition recovery (in both programs).
- Create a USB flash drive Windows To Go in Aomei Partition Assistant.
- Checking the file system and disk surface in the Minitool Partition Wizard.
In general, quite useful and convenient utilities, I recommend (though it happens that I recommend something, and in half a year the program gets potentially unwanted software, so be careful at all times.) At this point in time everything is clean.
Logging in with administrator rights, you can redistribute partitions of the hard drive using the "Compression" function in the "Disk Management" program. You can compress an existing partition or volume to create an unallocated disk space on which you can create a new partition or volume (note that the terms "partition" and "volume" are often interchangeable).
- Open the "Computer Management" section. To do this, click the button Start, select the components Control Panel, system and safety, Administration, and then double-click Computer Management. If you are prompted for an administrator password or confirmation, provide the password or provide confirmation.
- In the left pane, under Storage devices click Disk Management.
- Right-click the volume that you want to compress, and then click Compress volume.
- Follow the instructions.
Notes:
Here, under the "Compression" function Windows means changing the size of the partition (volume). Before you begin to compress, review the list of conditions necessary to perform compression. For more information, go to reference select item Calling Help, click the tab Search, enter Compress the base volume and click the Sections.
If there are several partitions on the disk, you can delete one of them and create new partitions on the released unallocated space. When you delete a section, all information stored on it will be destroyed.
You can also redistribute partitions using third-party program partition management. Some third-party vendors offer programs that allow you to re-partition hard disk partitions without deleting information.
Below is an example of deleting and creating partitions
As described above, we are entering Disk Management.
Picture 1
On Drive 0 the size of 465.76 GB can see 4 sections. Note that the fourth section F is a logical drive that is located in an additional section. An additional partition is the container in which the logical disk resides F.
For clarity, let's set a task, - delete partitions D and F and in their place create one section D.
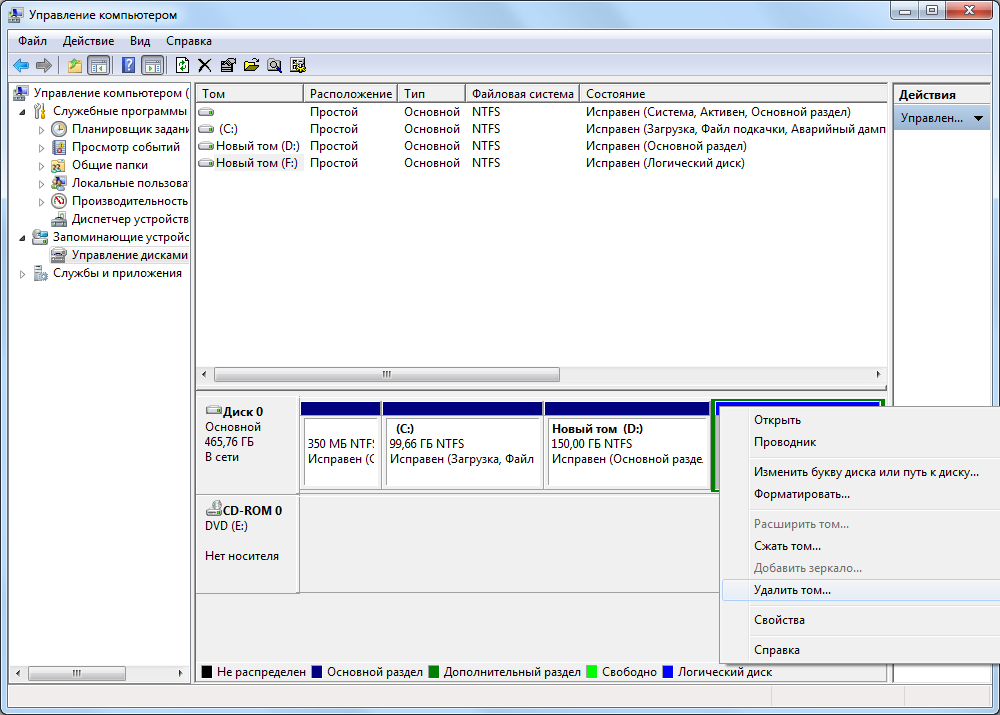
Figure 2
Move the mouse cursor over the section F and click the right mouse button. In the menu that opens, select "Delete volume".
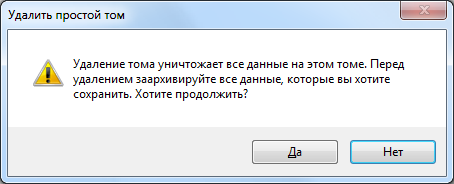
Figure 3
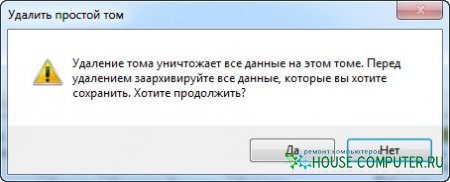
A window opens with a warning "Deleting a volume will destroy all data on this volume". Before deleting, archive all the data you want to save. Do you want to continue? "If you agree, we press the button Yes.
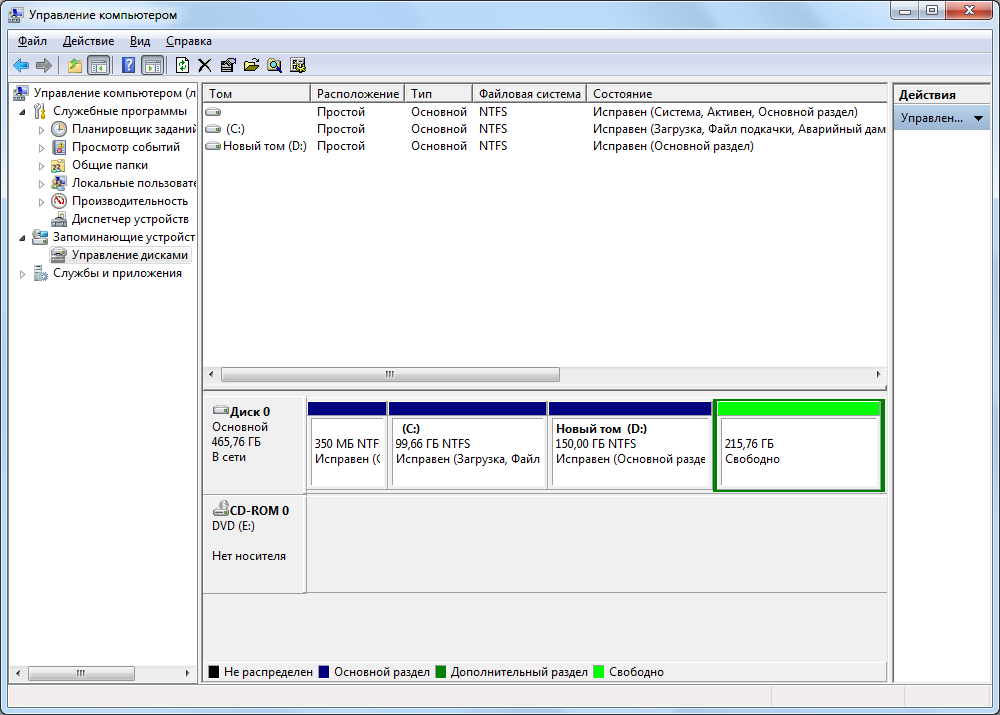
Figure 4
Logical drive F left - there was free space for the additional partition. We proceed to delete this additional section.
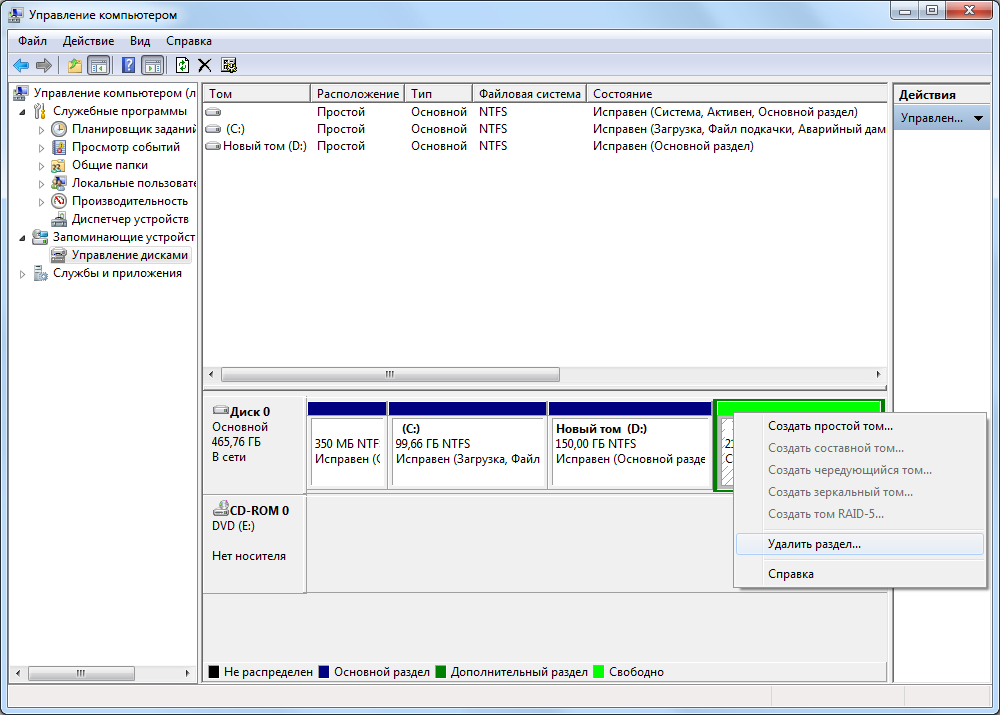
Figure 5
Move the mouse cursor over the free space of the secondary partition F and click the right mouse button. In the menu that opens, select "Delete Partition".
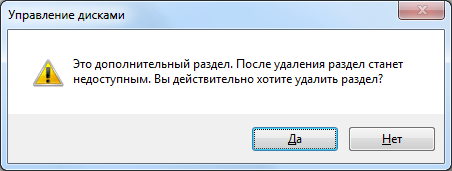
Figure 6
A warning window opens. "This is an additional section. After deleting, the partition becomes unavailable. Are you sure you want to delete the partition? ". In case of agreement, we press the button Yes.
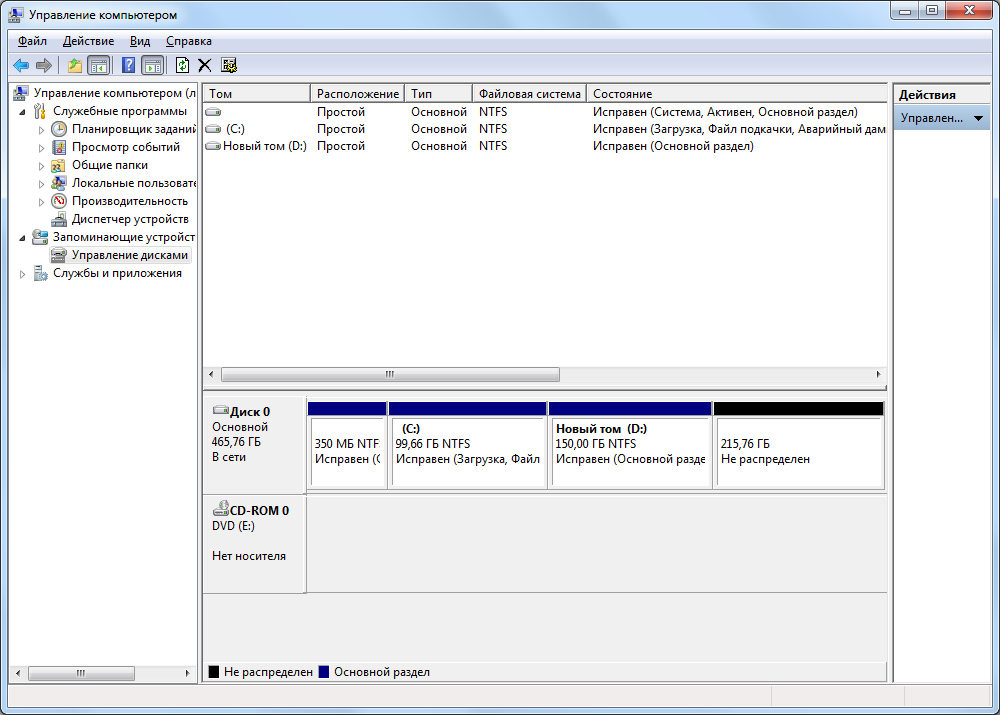
Figure 7
The additional partition was deleted, - in its place there remained not the distributed space of the hard disk. Similarly, delete the main partition D.
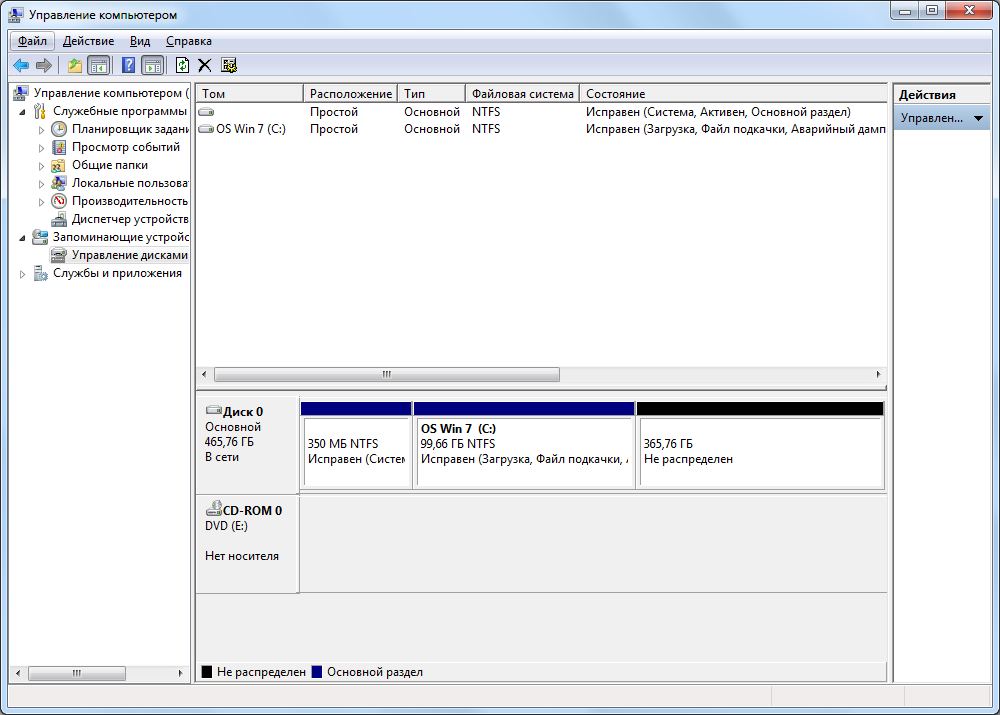
Figure 8
As a result, we get the unallocated space of the hard drive, on which we are breaking the creation of a new main partition.

Figure 9
Point the cursor over the unallocated space of the hard disk and click the right mouse button. In the menu that opens, select "Create a simple volume".

Figure 10
The "Create Simple Volume Wizard" window opens, - we press the button Further.
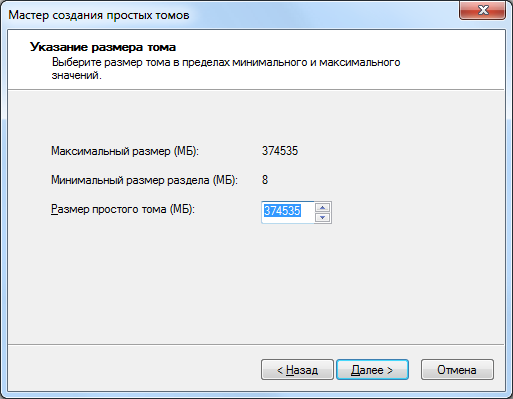
Figure 11
Since it was decided to occupy the remaining unallocated disk space under the partition being created, we leave the default "Simple Volume Size (MB)" unchanged) - press the button Further.

Figure 12
Assign the letter of the section (if not assigned, the section in the "My Computer" window will not be visible), - press the button Further.
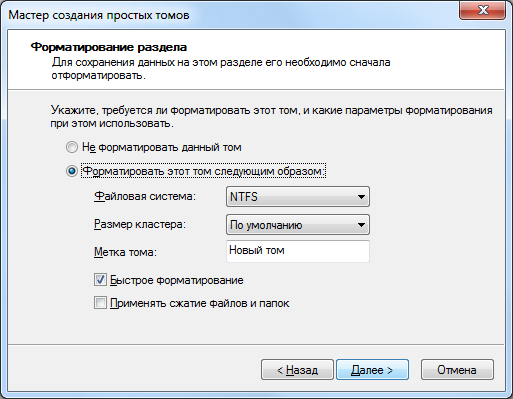
Figure 13
Set the formatting parameters and press the button Further.
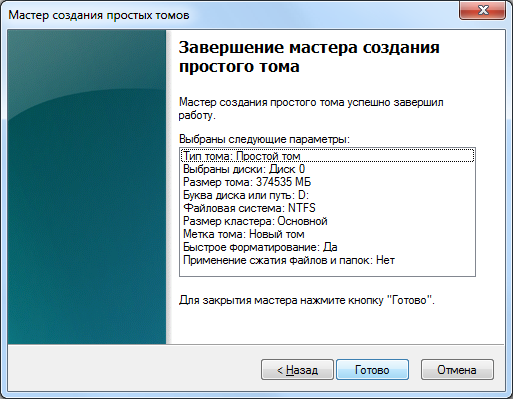
Figure 14
Push the button Done.
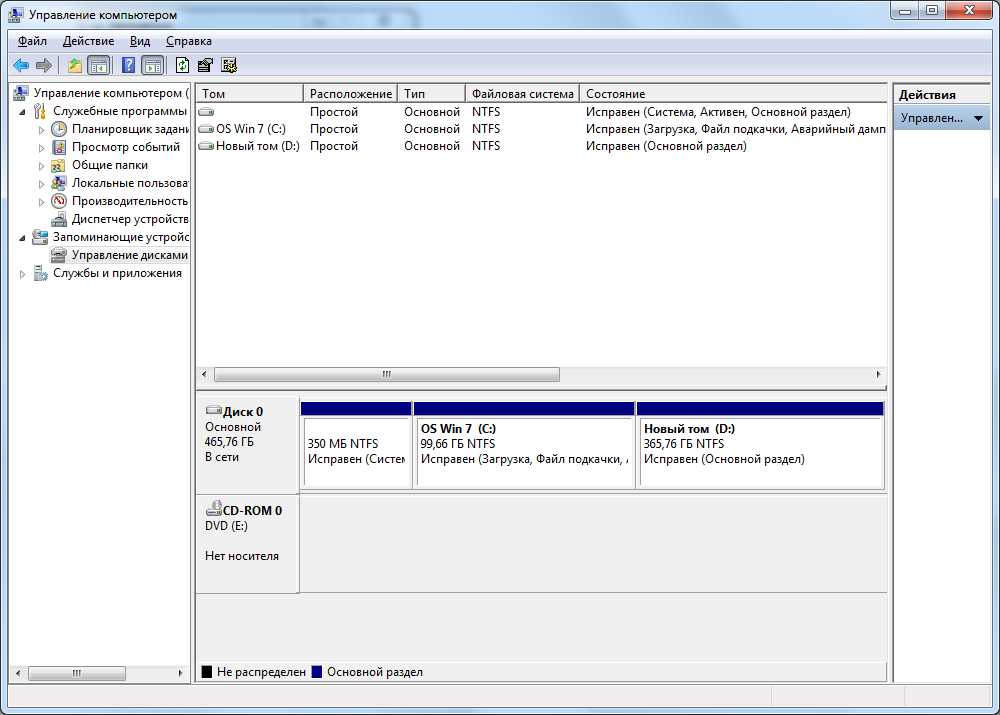
Figure 15
And we admire the result.
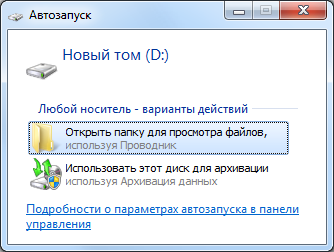
Figure 16
Opens the autoplay window, - open and use.
And in conclusion I want to note the features of expanding and compressing partitions.
Before performing these operations, make sure that the "Disk Defragmentation" service settings are set to the "Manual" startup type. If this service is disabled, then when you try to change the size of the partition, you receive an error: "The specified service can not be started because it is disabled or all connected devices are disabled."
The partition can be expanded only due to the unallocated area on the hard disk being adjacent to it.
An unregistered area can be obtained by removing or compressing existing partitions.
Note that an unallocated area can be used to expand only those partitions that are on the same physical hard disk.
For example, to expand the section C (when it is not adjacent to the unallocated area), you need:
Compress section D as much as possible, create a new partition in the appeared untagged area, move the information from section D (if it is located there), delete partition D, and then expand to the desired size section C, then assign a new partition to the letter D and extend it to the remaining unplaced area. This is such a complicated process ...