Many users who have at their disposal hDD with only one system partition "C", are often asked how to make a drive "D", which could act as a virtual partition or emulator for the drive of optical media. Here it is necessary to take into account some of the nuances, without which these procedures can fail unsuccessfully.
How to create a "D" disk: basic directions and techniques
First, you need to decide what exactly the user wants to create. Depending on this, the proposed solutions will be applied. For example, there is an option to create a virtual drive, and you can use the method of creating a virtual partition, either stationary or disconnected.
And if before all these operations required special programs, then with the advent of Windows 7 and modifications above, the problem is no longer possible, because you can use the built-in tools.
Mount the virtual drive
First, a few words about how to create a drive "D" on Windows 7, 8 and 10, which would perform the role of an optical subordinate. Naturally, the easiest way to install programs like Nero Burning ROM, UltraISO or Daemon Tools.
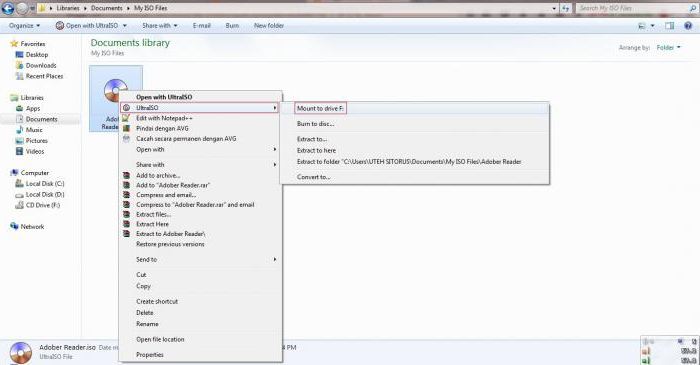
In any such application there is a special section for creating an emulator. In UltraISO, the mount command to the virtual drive is responsible for this, in the Daemon Tools it is the Virtual CD / DVD-ROM partition. But in all cases you will need previously created (recorded)
In Windows 10, this procedure is simplified to the limit. When a user double-clicks the image file, it is created immediately, and completely - in automatic mode, after which the system reports that a new device has been found. It works without preinstallation drivers in the same way as if the corresponding drive was inserted into the "iron" drive.
Creating a "D" disk (new) by means of Windows: where to start?
The previous procedure is quite simple, so there is no point in dwelling on its technology. In this case, we are more interested in the question of how to create sections hard drive.
The most primitive solution is to partition the hard drive into several partitions at the installation stage of the system. But in fact there are situations when it is necessary to break a disk with already existing information on it and installed programs, and even so that after that everything worked, and the data was not lost. The advantages of a virtual partition are obvious, because even with pere install Windows or formatting the system partition, the data on it is not affected. But first things first.
So, how do I create a "D" disk on Windows 7 and higher? To do this, you use computer management, where you select the same partition for disks. You can call up the corresponding menu by right clicking on the computer icon or from the "Control Panel".

Here, on the main panel, you need to use the action menu, where the command to create a virtual disk is selected. In the settings window that appears, specify the hard disk partition on which the image of the future virtual partition will be stored. In this case, there is no choice, because there is only one disk. Specify it.
Then enter the desired size and the preferred format (dynamically expandable or fixed). It is better to use a fixed type, because because of the excess of the volume used disk space its shortage will be compensated for by the system partition, which can sometimes lead to problems in the operability of the entire system (it is considered that for the normal functioning of Windows on the "C" disk there should be a minimum of 10% free space, compared with the total volume of the section). After entering all necessary parameters, we confirm them by clicking the "OK" button, after which the creation of a new partition will start automatically.
Initializing a new partition
But this was only the first step. In solving the problem of how to create an additional local disk, it should be noted that even after the completion of the "Wizard" creating a virtual partition, it will not work just like this. Initialization is necessary. This is done so that the so-called "Local Disk Manager" can access the control and management of the new partition.
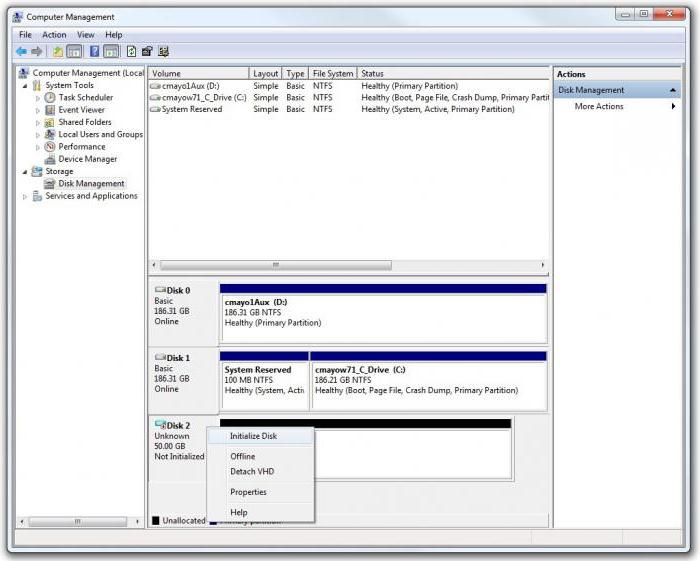
To do this, use the right click on the newly created section and select the appropriate line with the command in the menu. In the parameters window only the disk number will be visible, not the letter, as many users assume. This is normal. Leave the values unchanged and activate the process start.
Creating a volume
Now, in solving the problem of how to create a disc "D", a crucial moment comes. like it was created, but in fact it is not yet ready to work.
Again, use the right-click menu on the partition and select the command to create a simple volume, after which the "Wizards" window will appear. Basically, you can just follow the directions by clicking the continue button. In the window for specifying the size, you can also leave everything unchanged (you can reduce the volume of the created volume if the partition is planned to be divided into subsections in the future).
Next, you are prompted to enter a section letter. As already clear, choose "D". But here it is important to remember that if you initialize under the same letter, you will either have to change the letter of the virtual partition, or change the drive letter (the command is available from the right-click menu on the disk).
Formatting
Finally, it only remains to select the type of file system. As a rule, NTFS is offered, which can also be left unchanged. After that, the formatting process will start, after which the new section will become fully functional. If you want to make a partition bootable, in the action menu, select the virtual disk attachment command and specify the path to the saved image that was defined in the actions described above.
Specialized programs
Of course, not all users will want to decide how to create a "D" disk, solely with the built-in tools of Windows operating systems. The majority prefers to use special utilities, which allow to partition the hard drive into partitions using a simpler method.
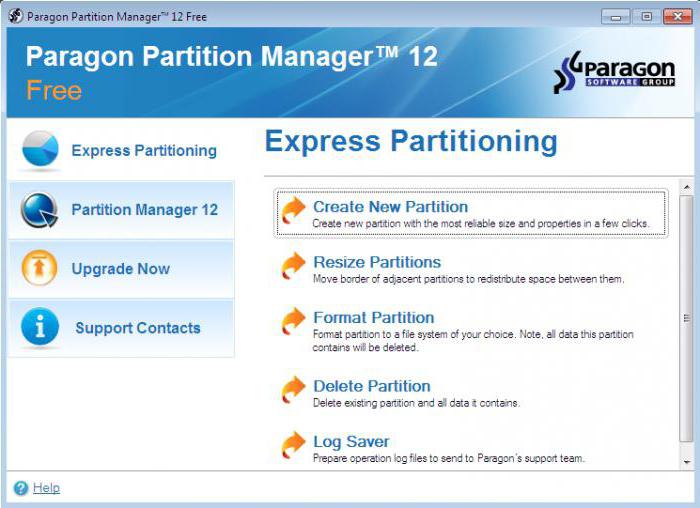
Among all software packages of this type, the most popular and popular are Acronis Disk Director, Partition Magic, Paragon Partition Manager and the like. Sometimes applications that represent themselves (VirtualBox, WMWare, Microsoft Virtual PC, etc.) can be useful. But with them an unprepared user will be much harder to work with, because such packages are not limited to just creating a virtual hard disk, but recreating a full-fledged computer configuration.
Preference questions
But, as you can already understand, the problem of how to create a "D" disk in a system with only one system partition is solved quite simply. By and large, you can give preference to highly focused software products, because in them all processes are facilitated by full or partial automation, and the proposed settings can in most cases be left unchanged. As for the tools of Windows-based systems, though they look somewhat cumbersome, nevertheless, in the absence of special software, they can also be used. That's only available in the seventh version and above. For other modifications, you will have to install the applications for the partitions in addition.
It is not always possible to create the required number of local disks during the installation of the operating system. Some users need such a need during the operation of the computer - an excess of information requires order. In this case, the flexibility of the operating room windows systems 10 allows you to configure the hard disk at any time.
How to Distribute Local Disks to Windows 10
Why is this necessary? Initially, when you install Windows on a new machine, there is only one medium known to most users as under the letter "C". It stores the operating system itself, all the system files and programs installed during the operation. If you do not split the hard disk, then all user files (movies, music, photos and documents) will be saved here. Then, if Windows crashes or reinstalles, these files will disappear along with the system files, if they are not transferred to any third-party media (which takes a long time and is rather inconvenient).
All these problems are solved simply - before you start using Windows, it is desirable to split the hard disk into several partitions (maximum 4) and store user files on a separate partition from the system.
How to distribute a hard disk and create a partition on it
The allocation of railways to sections is possible both with the help of third-party programs, and the means of the operating system itself. And as long as standard tools help in managing disk space, we see no reason to use other methods. Therefore, we describe in stages how to create partitions using Windows 10 itself.

Important! The size is indicated in megabytes. In 1 gigabyte contains 1024 megabytes. So, if we want to release 10 GB, then it will be equal to 10240 MB. Consider this when entering a number.
How to change the letter of a logical medium
In general, what for all this circulation on the English alphabet? Sometimes the reason is the desire to "bring beauty". Another reason is habit. For example, the old computer was certain system in ordering the sections, and on the new one you want to transfer this order. But basically it's necessary for the order in Windows itself. The fact is that when installing Windows 10 letters are assigned automatically: the store with the sytem files gets the letter C, the DVD (CD) drive is the letter D, and the remaining letters are "distributed" to the local stores and USB devices.
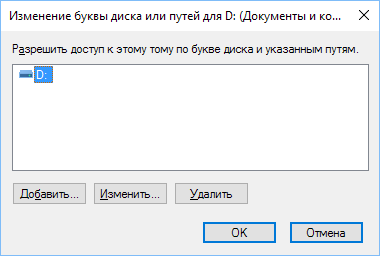
Change the name for the media is all in the same utility "Disk Management", in which we created a new partition (local). Select the desired media, click on it with the right mouse button, select "Change drive letter ...". Then everything is simple. And, of course, you understand that just changing letters in places does not work. First, we assign the letter F to the disk D, for example. Then the carrier E is changed to D. And only then we return to F (the former D) and give it the letter E.
How to delete a local disk
Everything happens in the same Disk Management utility. Select the media to remove, right mouse button, change the drive letter .... In the opened dialog box, we click the "Delete" button, agree with the appeared question. Done. Now we see the vacant place as a memory sector with the signature "Not Distributed".
Select the "Delete" button, press
Important! Before deleting, transfer all the necessary data from one medium to another, as when deleting all data will be erased.
Why you can not delete a volume
There are several reasons for this:
- You can not delete a local drive on which system windows files, boot files, or the so-called "swap file".
- At your account there are no rights of the System Administrator. Then try to enter the management utility via Start - Control Panel - System and Security - Administration - Creating and formatting hard disk partitions.
- Well, sometimes they confuse the impossibility of deleting a volume with the impossibility of deleting a partition. If you can not delete a partition, then first you need to remove all volumes from it (remember copying the required information) and only then delete the partition.
"Reserved by Windows 10"
A section with such an inscription contains the official data necessary for windows Workflows (Windows boot loader settings and data for HDD encryption). The disk itself, as a rule, takes up a little space - about 100-350 MB. Sometimes the user wants to remove it, despite the small size. However, the removal of this disk requires special skills, so we describe the method of hiding this disk from the conductor.
Open the utility "Disk Management", select the section with the words "Reserved by the system", click the right mouse button and choose "Change the letter ...". Press the "Delete" button. In this case, we will confirm deletion twice - as a warning will appear to use this section. Now you need to restart the computer. Done - the disc disappeared from the conductor.
How to create a network drive
It is necessary for simultaneous access to data on local Area Networks (work in the office, schools, universities).
In the "Explorer" we right-click on the "My Computer" icon. Select "Connect network drive". Choose a letter for the name. Choose the path to the shared resource (the folder that will be in the general access) by clicking on the "Browse" button. Next we enter the username and password of the account with which we will connect to this media.
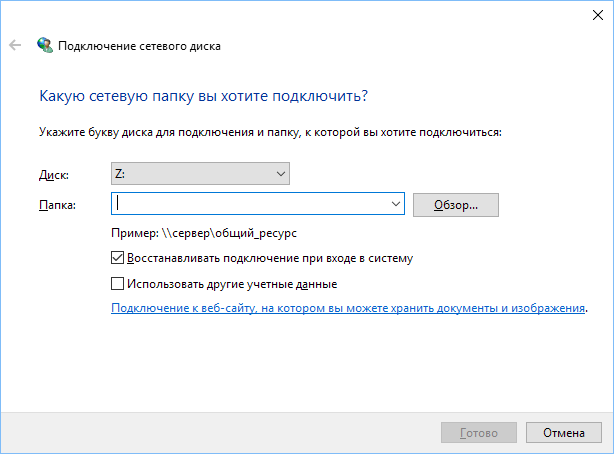
Dialog box of the wizard for creating a network drive
Done. Now in the explorer there is a network drive created by us.
Flexibility of the operating system Windows 10 allows standard tools when working with the system to configure local drives: create, merge, rename, delete. The main rule of all manipulations is to save information before every serious action. Successful work!
September 05, 2014 admin
How to create a new partition on the hard drive without formatting?
A hard disk is a single disk space for storing all kinds of information. As a rule, they have hard disks, on which there is one single logical partition. In this section, the operating system, programs are installed and all sorts of user data are stored.
Using one single system partition leads to a decrease in performance, because during the operation of the system, temporary and system file, which can be located in any place of hard disk. As a result, the speed of reading data decreases and, as a consequence, the performance of the system itself. And the performance of operations for defragmenting and cleaning the disk will be performed much more slowly if the logical partition has a large volume. That's why it is recommended to create one or more additional logical partitions of the hard disk.
Also, many users prefer to use two operating systems on the same computer. For example, to be able to work in the operating system (OS), where there is support for many programs and games, and at the same time it is easy to switch to a more secure Linux. This combination is possible only if there are separate logical partitions for each OS.
It's quite easy to create a partition on your hard disk. For this there is a mass of third-party utilities, for example, one of the most popular. Utilities allow you to manage partitions of the hard disk: delete, create new partitions, split and merge partitions and much more. However, to create a new partition, you must format the hard disk partition, which will inevitably lead to loss of information on the disk. Of course, you can copy all the necessary information to a separate external disk or burn to DVD. But this is a waste of time, and not always available, the user has the storage of disk space on external media.
However, there is a way to create a new partition with all the data you have on your computer, and you do not even need to install additional programs.
How to partition a hard disk with an operating system without formatting
Open the ( Control Panel) and go to the section ( Administration).
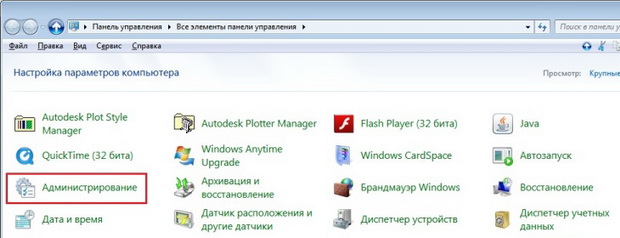
Here click on subsection ( Computer Management). This utility allows you to manage the main parameters of the computer, including the management of hard disk partitions.
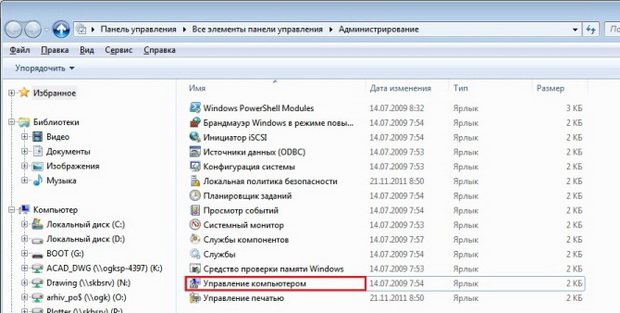
In the left box, click on the subsection ( Disk Management) and you will see a map of the hard drive where the hard disk partitions will be presented. Right click on that section, which should be divided into parts, and from which we will take a part of the free space.

In the context menu, click on (Compress volume) and wait for the system to analyze the available space for compression. Now set the desired size of the new disk partition to the free space of the compressed volume and press the (Compress) button.

It is better not to use all available space, as this is fraught with problems while the system is running and it is possible to lose some of the data on the disk. It is desirable to leave a reserve of disk space on the system partition of the hard disk at least 15 GBytes. After the volume is compressed (within a few minutes) on the disk map, you will see a new partition that will not be yet usable, since it is not formatted. You should format the partition in the desired FAT or NTFS file system (the latter is preferable). To do this, right click on the created section and select the item (Formatting).
With the built-in "Disk Management" (Disk Management), you can add a new volume to the hard disk to create a new logical partition. In the article "" I told how to compress the existing volume of the hard disk. In the released space, you can create a new volume and a new logical partition for the operating system. Here's how to do it.Disk Management
To start, you need to run the Disk Management tool with administrator rights. Open the Start menu, type "diskmgmt.msc" in the search bar without quotes, click the "diskmgmt" link in the search results with the right mouse button and select the "Run as Administrator" option from the context menu (Figure A).
Figure A. Start Disk Management with administrator rights.
The window shown in Fig. B. As you can see, after compression of the volume on the disk, a free unallocated space was formed.
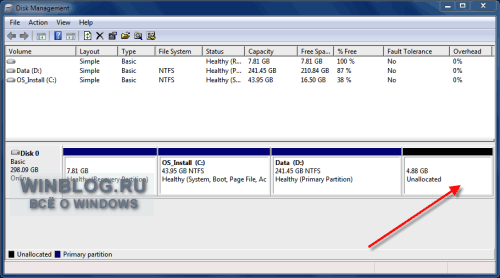
Figure B. There is free space on the disk.
Click on the unallocated space with the right mouse button and select the option "Create a simple volume" (New Simple Volume, Figure C) to start the New Simple Volume Wizard.
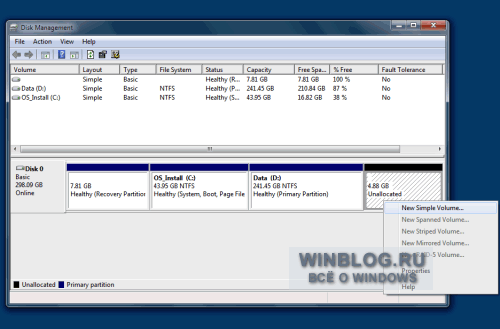
Figure C. Start the Create Simple Volume Wizard.

Figure D. The first page of the Simple Volume Wizard.
In unallocated space, you can create several partitions at once, but I'm going to use all available space to create a new simple volume (Figure E).
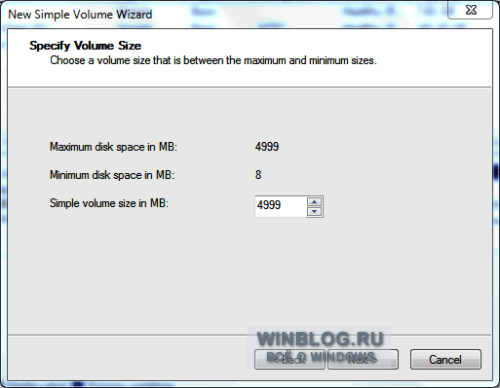
Figure E. Specify the size of the volume.
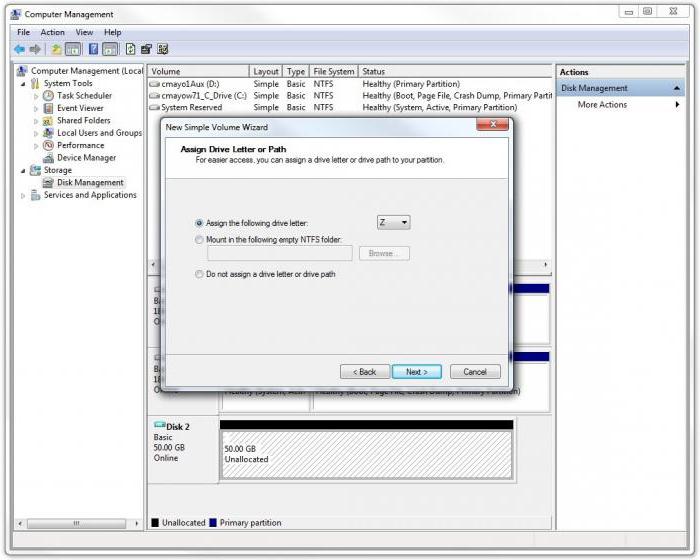
On the next page, you are asked to assign a drive letter for the new volume or specify the path to it (Figure F). There are three options:
Assign the following drive letter. By default, Windows offers the first free letter, and as a rule, this is the best option.
"Mount the volume as an empty NTFS folder" (Mount in the following empty NTFS folder). Instead of assigning a drive letter, you can mount the volume as a folder - in that case it will look and work as a simple Windows directory.
"Do not assign drive letters or drive paths." (Do not assign a drive letter or drive path). In the future, the drive letter or path will still need to be specified so that the volume can be used for data storage.
For example, leave the default option selected and assign the disk to letter "E".
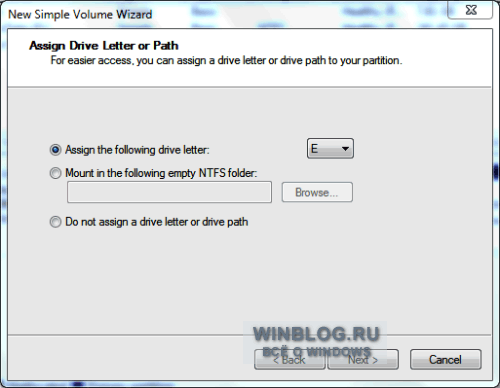
Figure F. Assign the letter to the drive or specify the path to it.
The next step is to specify the formatting options for the volume (Figure G). Typically, it is recommended that you format the volumes, but you can also select FAT32. The other option by default is not to be touched, unless you have specific reasons for changing the cluster size.
It's worth tagging to make it easier to distinguish it from other sections. If you select a quick format, the operation takes less time, but the system does not note in this case damaged sectors on the hard disk, which in the future can lead to problems.
NTFS has a built-in compression system that acts imperceptibly for users and can come in handy if there is not enough free disk space.

Figure G. Setting the formatting options.
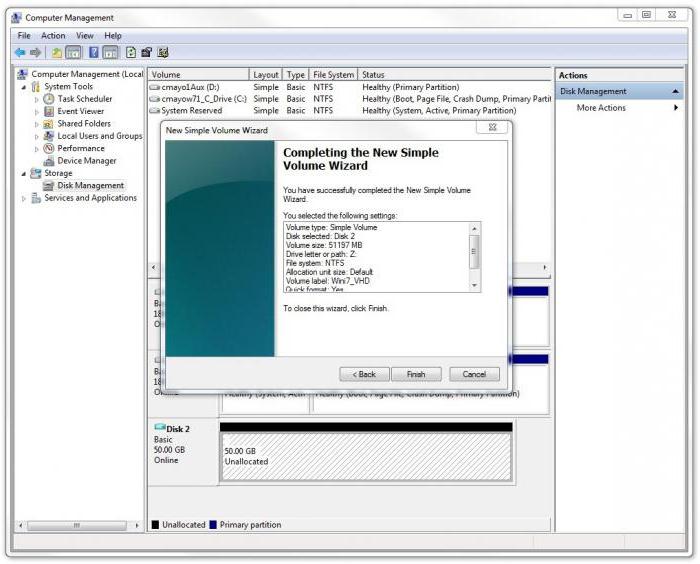
The last page of the wizard lists the selected options with the option to go back and change them if necessary (Figure H). If you are satisfied, click the Finished button.
What is the difference between a disk partition and a volume?
The concepts of "partition" and "volume" for the mass of users are the same in meaning, but in reality they are fundamentally different in the context of computer architecture. The term "volume" is a synonym for the word "disk", and is a separate area of data storage with its own file system, while the section is a basic structural unit that can be split into 1 or more volumes. Unfortunately, the release of computer hardware with first partitioned and formatted disks led to the fact that most users have no idea of the differences between the partition and the volume. However, if you are going to change the disk structure of the computer, then you need to understand this well, all the information about it.
Disk Partitions
Types of partitions
There are 2 types of partitions: primary and extended. Most operating systems require only the main partition for normal operation. Only 1 volume can be created on each main partition. An extended partition is a special type of partition that can contain several volumes (or logical drives) of your choice, the total volume of which can not exceed the volume of the extended section. In total, you can make up to 4 sections on one physical disk, 1 of which may be extended.
Tom is an analog of the system disk. After creating the disk structure from the partitions, you can make a logical disk or volume from any partition, format it and get several separate disks in the operating system, just as it looks when you attach a certain number of physical disks to the computer. Any of these volumes is self-contained and you can format them without fear of damaging the data on other logical disks. Managing all the volumes possible ch / s utility "disk management" ("disk management"), which runs the h / s context menu computer "(" computer ") or the control panel.
The advantages of creating a number of partitions and logical drives
Despite the fact that creating a certain number of partitions and volumes on the same physical disk requires a certain amount of time, there are many advantages to such a disk structure. Thanks to the partitioning of the disk, it is possible to maintain the performance of one partition, while file system (FS) of another section became ineffective due to system errors FS or detection bad sectors. In addition, the time for scanning, formatting and defragmenting logical drives of small capacity is significantly less than for entire disks. This division also makes it possible to separate system disk from other information, which makes it possible to re-install without any problems operating system or restore it from an image, while preserving your multimedia and personal data.