Hard disk cloning is a procedure that simplifies installation. operating system and software when transferring data to the hard drive or SSD-drive. In the framework of this procedure, a second hard disk is connected to the PC, onto which partitions of the first one are copied system disk and all the data available on it. Also on a removable hard drive is fully transferred working windows 10 with all the settings and installed equipment.
You can clone a hard disk in Windows 10 using programs such as Paragon Hard Disk Manager, AOMEI Backupper and Acronis True Image. A distinctive feature of the latest program is the system cloning function with the ability to exclude individual files. Therefore, we consider the cloning procedure on the example of this particular software.
A few words about Acronis True Image
Acronis True image - This is a development by Acronis, the master of the software market, which offers PC users a wide range of professional data recovery tools. Acronis True Image software includes not only the information recovery function, but also creating a backup copy, cleaning the system, canceling actions that caused the error.
Acronis True Image exists in two versions. The first is a free 30 day version with organic functionality. In this program, the disk cloning function is blocked. The second is a paid version with a full set of tools. It is the latter that allows you to make a correct copy of the disk.
What is the source and target disk?
According to Acronis True Image terminology, the source disk is the hard disk from which the system data and partition structure will be copied. The disk that will eventually become a clone of the source is the target disk.
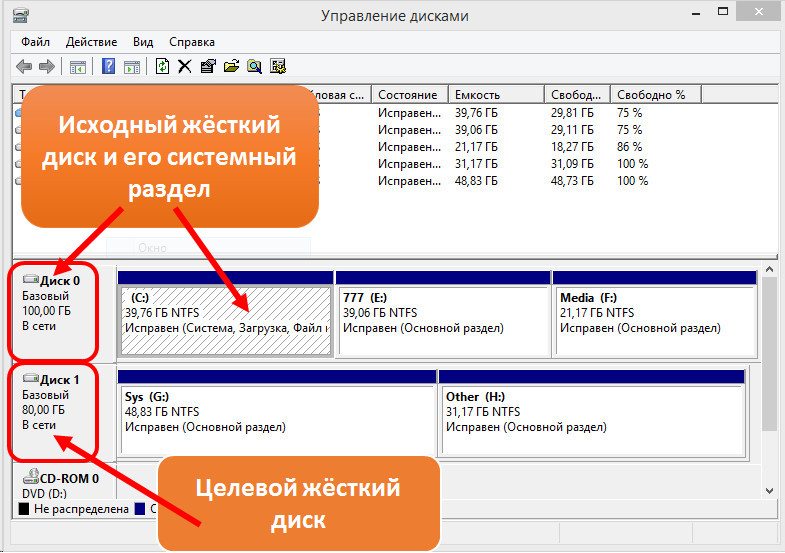
In order to see which disk will be selected mainly in Windows 10, you should click “Start”, “Disk Management” or type “Win + R” on the keyboard and enter “diskmgmt.msc”.
The "Manage Hard Drives" window will open. A disk that is marked as zero is the source disk on which the operating system is installed. Disk number 1 is a future clone or target drive.
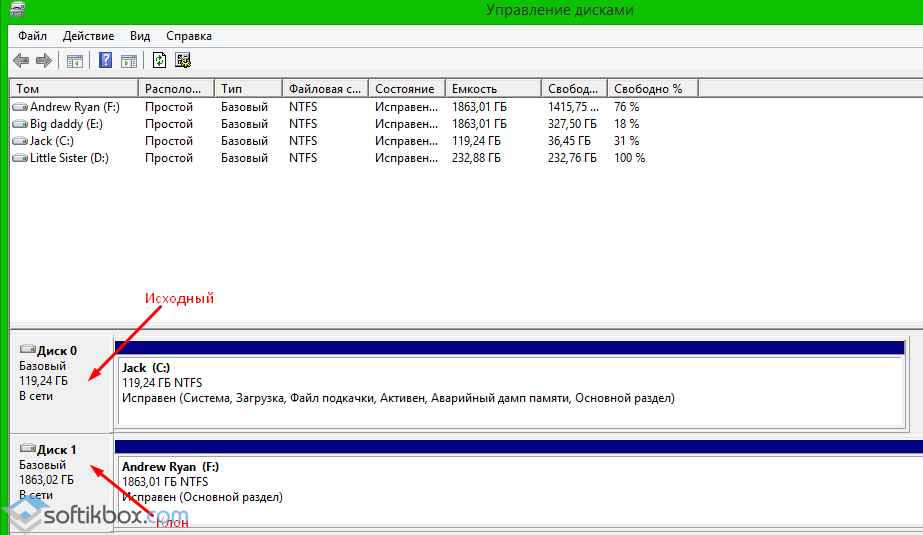
The target disk has its own structure. However, during the cloning of the original disk, all available data is destroyed. Therefore, all important information should be copied before you start cloning.
Hard disk cloning
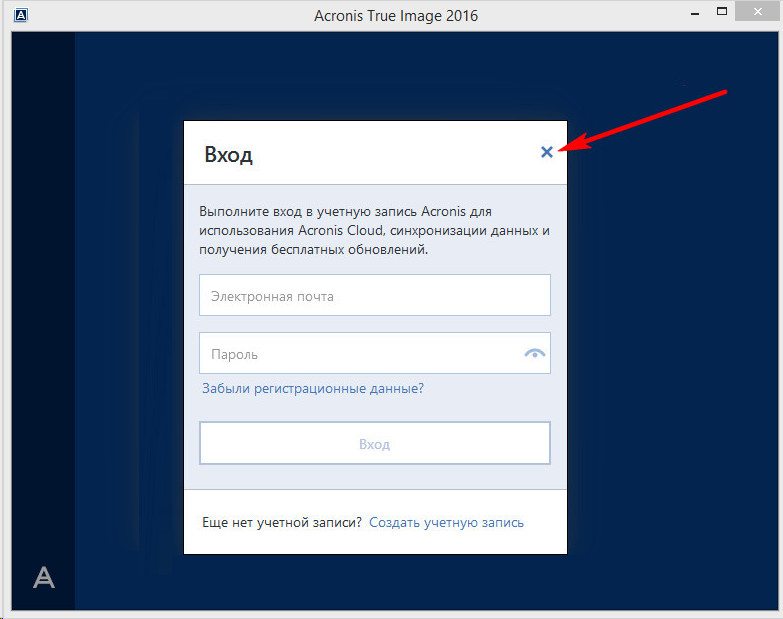
Run latest version programs. We refuse to enter cloud storageby clicking on the cross.

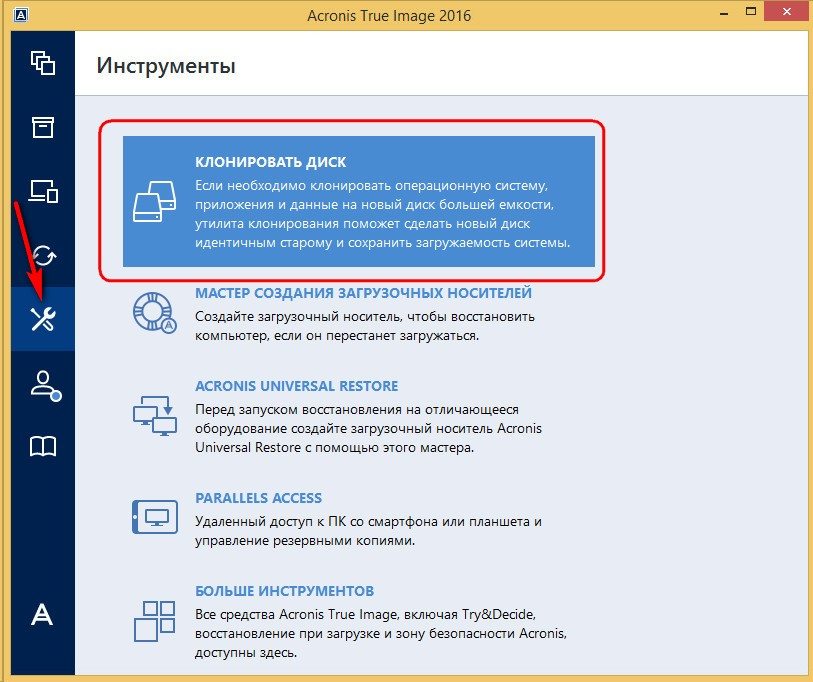
The program's working interface will open. In the left menu, select "Tools", and then "Clone the disk" (the version of the program must be complete).

The next step is to select the source hard disk. Select the disk from which the data will be copied. In the program, they will be displayed as follows: the disk that was at number 0 will now become 1, and the second disk is the desired drive or second hard drive. However, you should pay attention to the volume of devices.
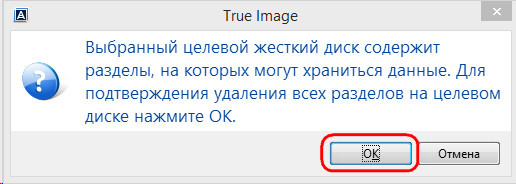
After selecting the source disk, a window will appear with the selection of the target disk. Select the desired and click "Next." Because a disc clone is not new drive, Acronis True Image will warn you about data loss. Click "OK".

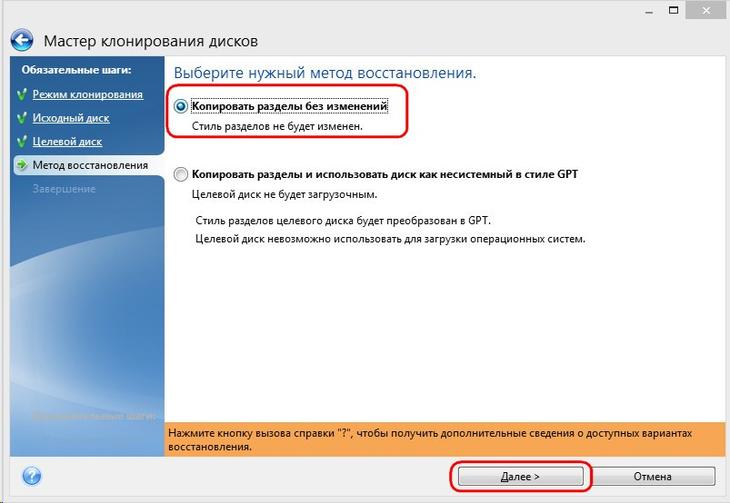
The next step is to choose a method for cloning materials. Select "Copy sections without changes" and click "Next."

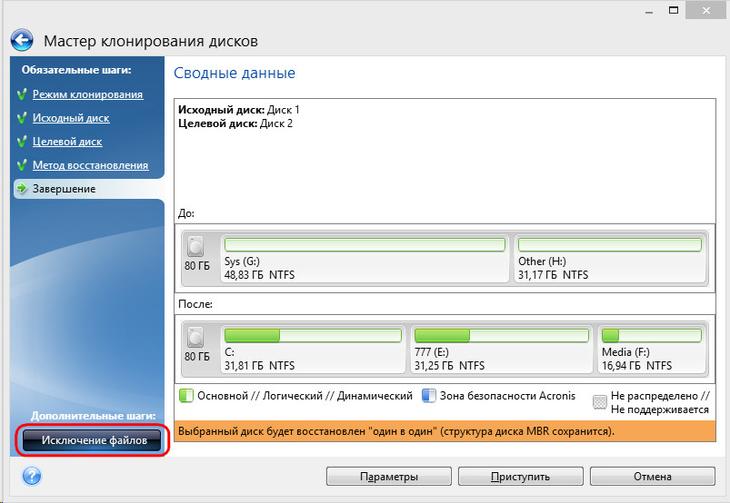
At the final stage, you can click the "Start" button and start disk cloning. However, there is a “File Exclusion” button in this section. We press it and get into a new window.

Select the files that should be excluded, and wait until the program removes them from the main cloning list.
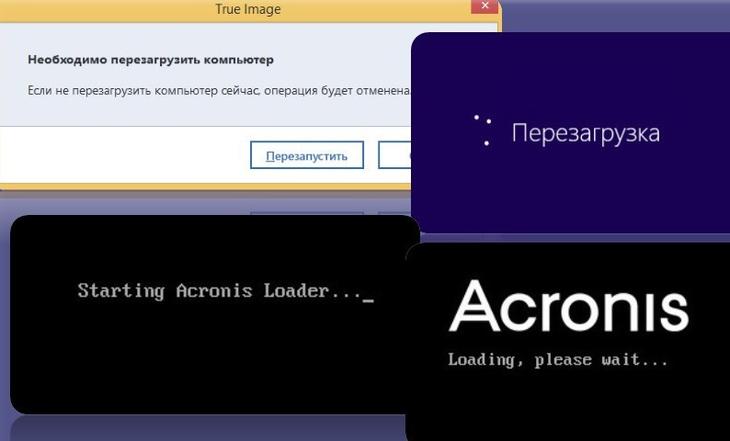
After selecting the sections and cleaning them click "Proceed". The program will perform the cloning and will ask you to restart the PC.
Reboot the computer.
What to do with the target disk space after cloning?
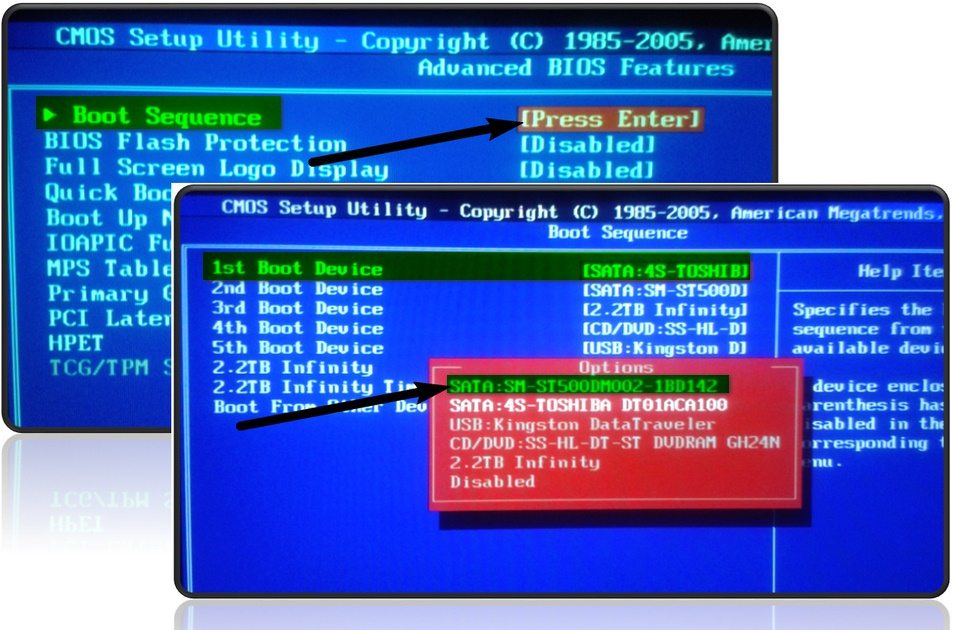
After the disk cloning is performed, during the PC reboot, click “F2” and “Del”, in order to get into the BIOS. In the “Boot device prioruty” section, we set the boot priority from the second target disk.
Booting from the target disk and hitting Windows 10, go to "Disk Management" and look at the partition structure. " Now the disk clone is referred to as "Disk 0", and the main hard drive as "Disk 1".

Explorer also shows changes. The source disk from which the files were excluded is now displayed as “І” and has a smaller volume. The clone disc is referred to as “F” and has free space.
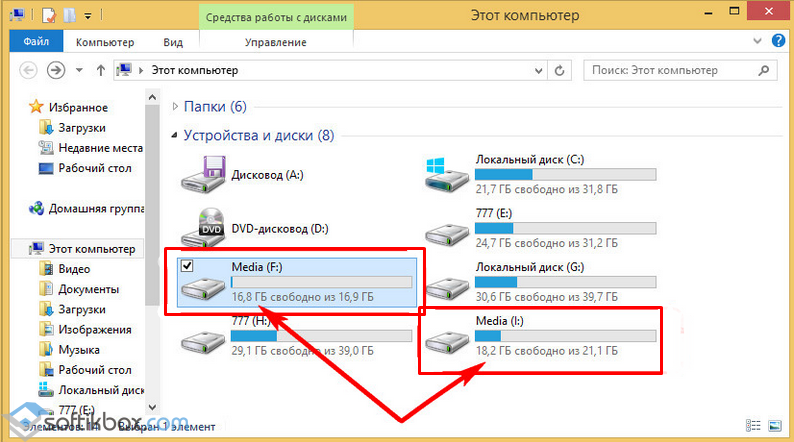
This place can be used to store information, media files, software. However, it is worth noting that for this, before cloning a disk, you need to select the manual, not automatic method. Only then will volume management be completely under your control.
Often, users of computers and laptops create a situation where the old hDD to be replaced with a new, faster or with a larger capacity. Therefore, there is a need to copy the available information from one disk to another. Then it becomes relevant to simply clone the old hard drive.
Cloning process hard drive is an operation in which all data from one hard drive is transferred to another. Since the cloning of a hard disk is a procedure for low-level sector-by-sector transfer of data from one media to another storage medium, the hard drive clone will be completely identical to the original hard drive.
In this case, the transfer of all user files, personal photos, movies, documents can take you a long time. It is also worth knowing that if you manually transfer the operating system files, then it will be copied on the new hard drive not in working condition, that is, it will need to be installed again. The cloning process allows you to copy the partition structure of the hard disk, a working active operating system, as well as installed programs and saved settings.

Hard Disk Cloning Software
In order to quickly and efficiently copy all data from one hard disk to another, while keeping the operating system in a working condition, so that after copying it with ease you can run, you should use special programs for cloning hard drives.
In order to create clone disks, quite a lot of programs, both free and paid, have been developed. Among this set of software there are highly specialized programs that work only with hard drives of a certain brand, but there are also universal programs that allow you to clone any HDD and SSD drives.
The programs that include the function of cloning hard drives include Paragon Hard Disk Manager, Acronis True Image, AOMEI Backupper, EASEUS Disk Copy, etc. But the most popular program among users is Acronis True Image.

True Image is a modern software product from Acronis. It is compatible not only with old versions of Windows such as Windows XP and 7, but also with new Windows 8, 10. Acronis True Image can be called a panacea for all problems with Windows, besides the cloning function, the program has many additional advantages such as:
- create backup copies of Windows;
- it acts as a system cleaning tool;
- allows you to test windows operation in trial mode with the ability to undo the changes made;
- saves backups in cloud storage;
- emergency data recovery.
In addition, when cloning a hard disk using Acronis True Image, it is possible to exclude certain unnecessary files. At the request of the user, you can configure the cloning of not only the whole disk, but also individual files or partitions. Other programs do not suggest this feature. This program not only multifunctional, it also has high speed, user-friendly interface in Russian, automatic and manual mode of operation.

The disadvantages of Acronis True Image should be attributed only to a paid license. It can be purchased on the official website of the developer. But despite this Acronis True Image remains the most popular program for cloning hard drives.
Acronis True Image terminology features
Before you engage in disk cloning, you need to familiarize yourself with some of the features of the Acronis True Image software. So in the process of preparing for cloning a hard disk, you will encounter the concepts of “source” and “target” disks. The original disk in Acronis True Image is considered to be the disk from which important data is being transferred, that is, it is the disk from which the clone is being created. The target disk in this program is considered to be a hard disk that will become a clone of the source disk, that is, a disk onto which user data, system files and software are transferred.
When cloning a hard disk using Acronis True Image, discrepancy in disk capacity is not critical. With the ability to exclude unnecessary files from the cloning process, the target disk can be much smaller in size from the source disk. The main thing is that there is enough free space for the necessary information from the source disk.
Acronis True Image cloning a hard disk
Consider the process of cloning a hard disk using the example of Acronis True Image 2016, for this we will follow the steps below.
Step 1. Run the program this version offers to log in account to use Acronis cloud storage, you can close the login window.
Step 2. In the side ribbon of the interface, select the “Tools” tab; then in the opened menu, select the “Clone disk” item.
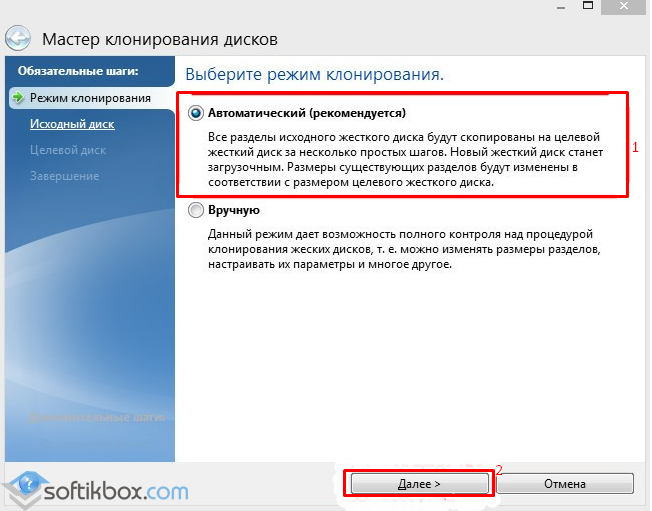
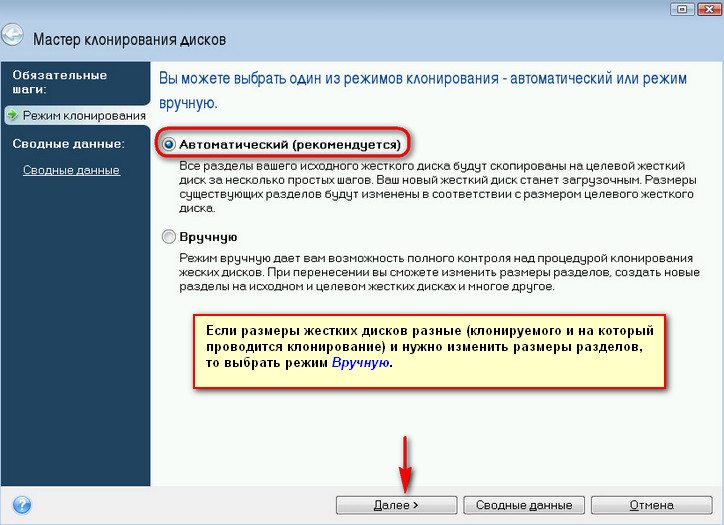
Step 3. Follow the prompts of the Disk Cloning Wizard at the point where you need to select the cloning mode and click "Automatic". It is always selected by default as a preset mode, click on the “Next” button.
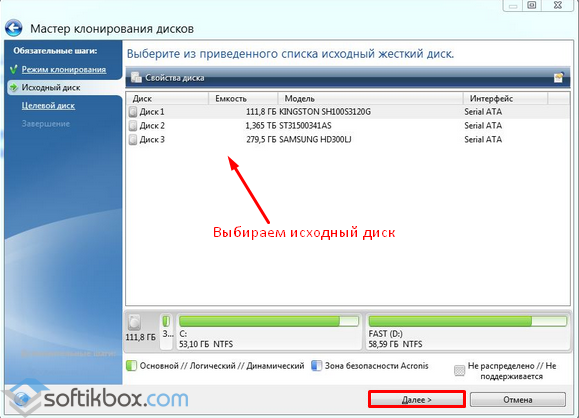
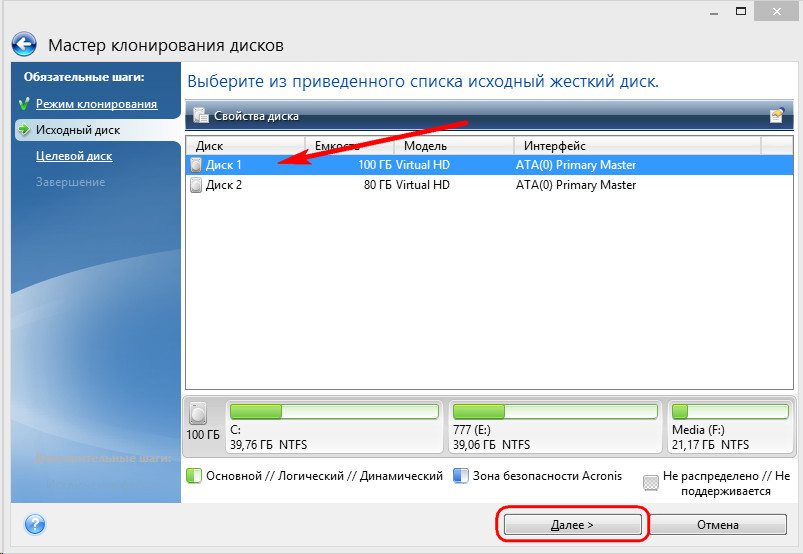
Step 4. After this, you will see the source hard disk selection window. In this window, you need to click the left mouse button on the disk from which we will transfer data. Disk names in Acronis True Image differs from disk names in the built-in Windows utility. In this case, it is better to focus on the volume or model of the disk. Selecting the hard drive for data transfer, click the "Next" button.
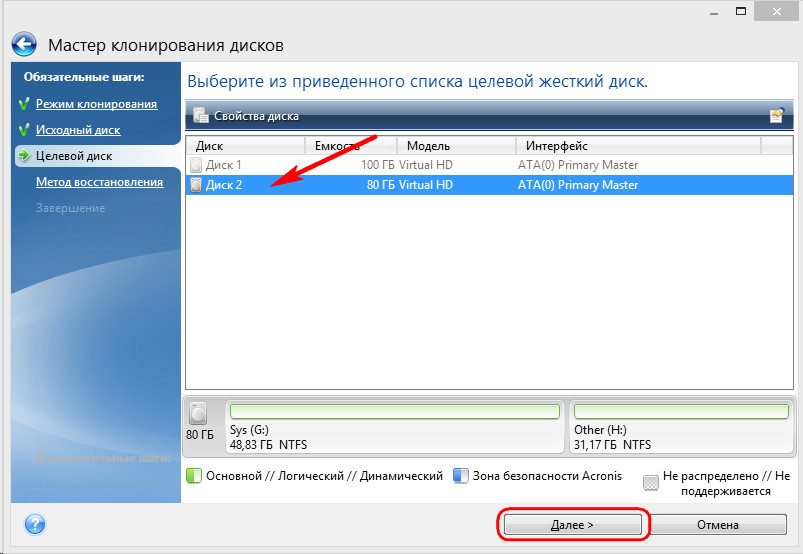
Step 5. In the window that opens, select the target disk, click the left mouse button on the name of the hard disk to which you want to transfer data, Windows OS and partition structure. Click on the button "Next".
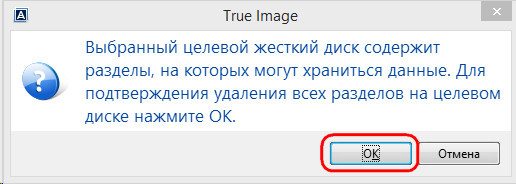
Step 6. Since in this case the target disk is not a new disk with unallocated space, with information stored on it, the program displays a warning window with information about possible loss of important data. If all the most necessary files have been saved, you can click on the "OK" button.
Step 7. After this, a window for selecting the recovery method opens. In it, by default, the checkbox on the item “Copy partitions without changes” is set; you do not need to change this setting, you just need to click “Next”.

Step 8. The Disk Cloning Wizard proceeds to the final stage of the data transfer process and displays the Summary Data Window. This window allows you to start cloning a hard disk by clicking the Proceed button, but this is relevant if there are no files to be deleted, so as not to occupy space on the target disk with unnecessary data and not to increase the time to perform this procedure. If you have chosen not the full cloning method of the source disk, then click on the “Exclude files” button.

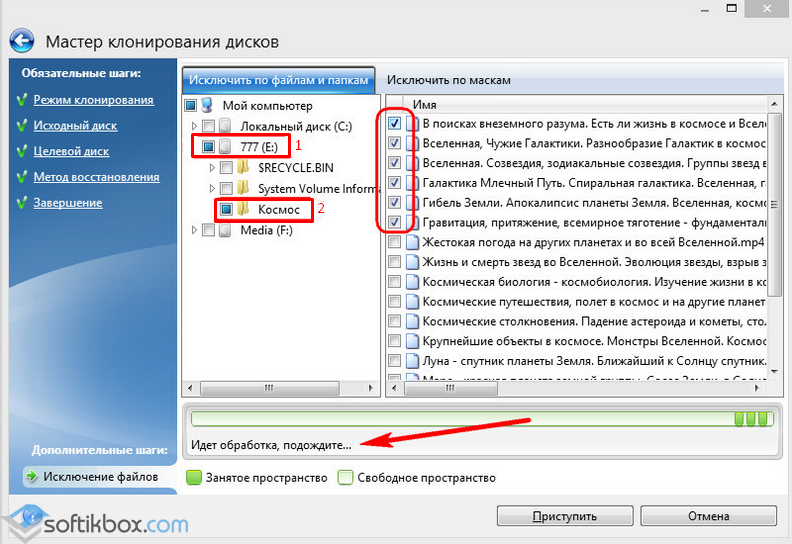
Step. 9. In the File exclusions menu that opens, we see the tree structure of the entire contents of the hard disk. Due to this structure, system files are immediately visible, which are not subject to exclusion. In our example, we exclude non-system video files from section E, setting the corresponding checkboxes next to their name. You need to wait a little time for the process of excluding these files to complete.
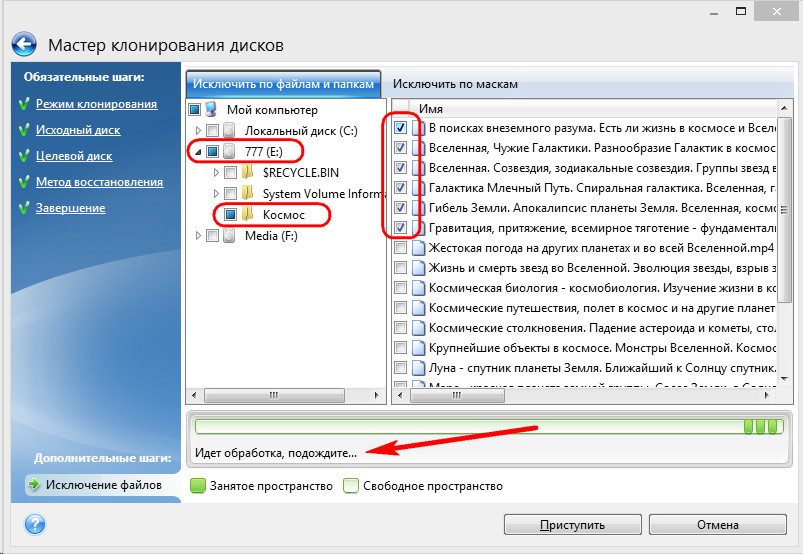
Step 10. We exclude in full volume F of the original disk by checking the box next to its name and all included files and folders are automatically selected after that. After the end of the cloning operation, this partition will be created on the target disk, but will not contain any data. When all partitions and files that we do not need on the target disk are excluded from cloning, we can start the whole process by clicking on the “Proceed” button.

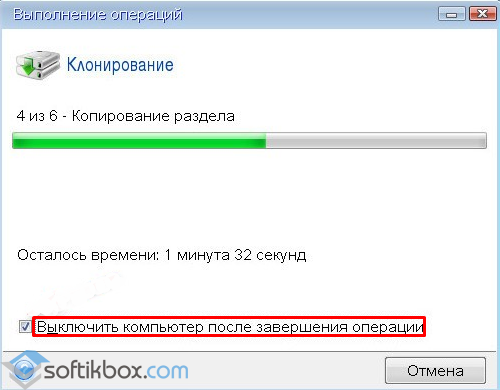
Step 11. After carrying out all the preparatory actions, Acronis True Image will ask you to perform a system restart. And the cloning process itself takes place in the preload mode of the Windows operating system. In Acronis True Image preloading mode, the default shutdown function is visible immediately after the cloning process.

The next time you turn on the computer, you will be taken directly to the BIOS menu, in which it is possible to set the operating system boot priority from the created clone disk. In addition, this window shows the remaining time until the end of the cloning and the progress of the task.

Step 12. When the cloning is complete, you can boot from the target disk.
Transfer the desktop to another drive in Windows 7, 8, 10
Copying the desktop along with shortcuts and files to a non-system disk is a very profitable solution from all sides. After all, this will not only preserve the old look of your desktop after reinstalling the operating system, but also allows you to save it in case of a sudden system failure that caused your OS to be inoperable. In addition, a lot more free space appears on the system disk for your documents. When infecting a computer by malware most often the damage is done to the system partition, and since the desktop directory will no longer be on the system drive, it will be fully protected from this kind of sabotage.
In order to copy the Desktop folder in such major operating systems as Windows 7, 8 and 10, there are two ways - via windows Explorer and using the editor windows registry.
Copying the desktop in Windows 7, 8, 10 through Windows Explorer
In order to copy the desktop with all the contained files and folders to non-system local disk you need to follow the instructions below.
Step 1. Create a folder for storing data from the desktop on a local disk with user data (in our case, drive D).

Step 2. After opening the user folder. In Windows 7, click on the "Start" button and in the left column select the user name and click on it with the left mouse button. For users of Windows 7, follow the path Drive C: \\ Users \\ * username *. Opens the pack with the following data.


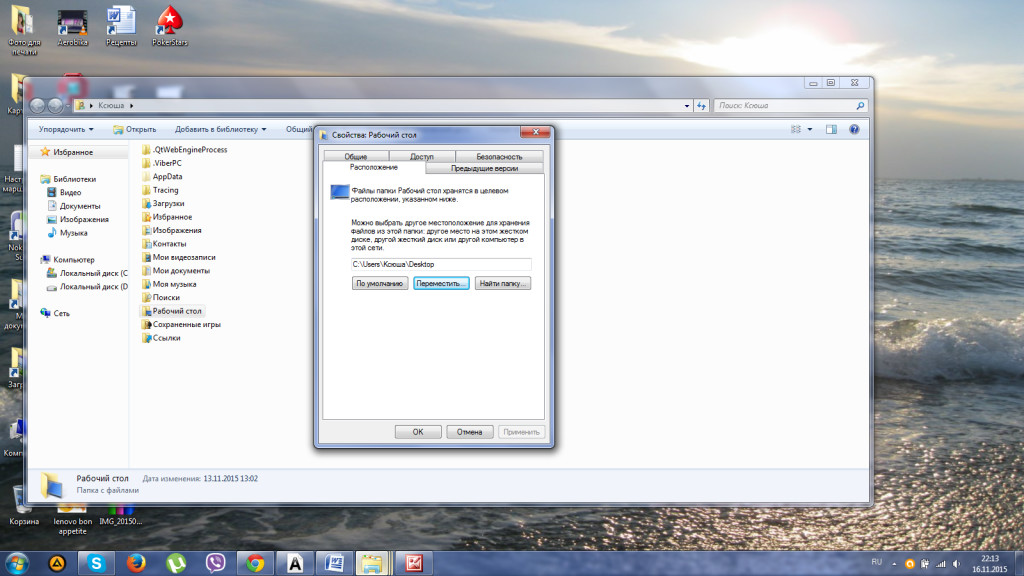
Step 3. Right-click on the folder "Desktop" and thereby opening the properties of the folder.

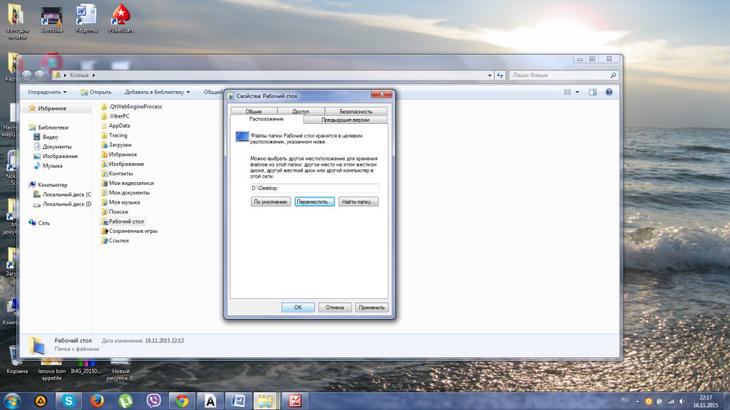
Step 4. Click the left mouse button on the "Location" tab and in this tab, click "Move".
Step 5. Find and select the “Desktop” folder that we created by performing step 1, and click on the “Select Folder” button.


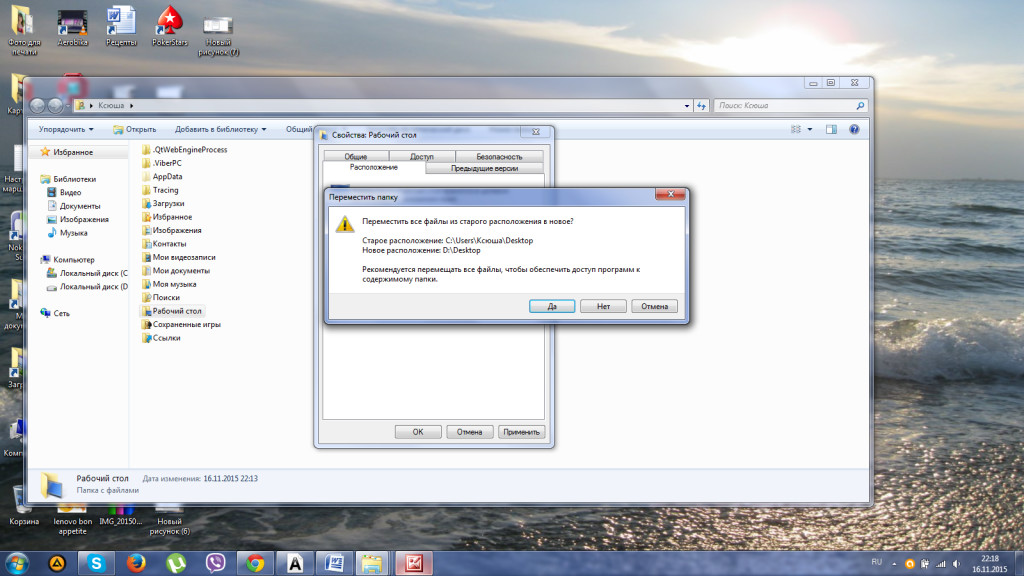
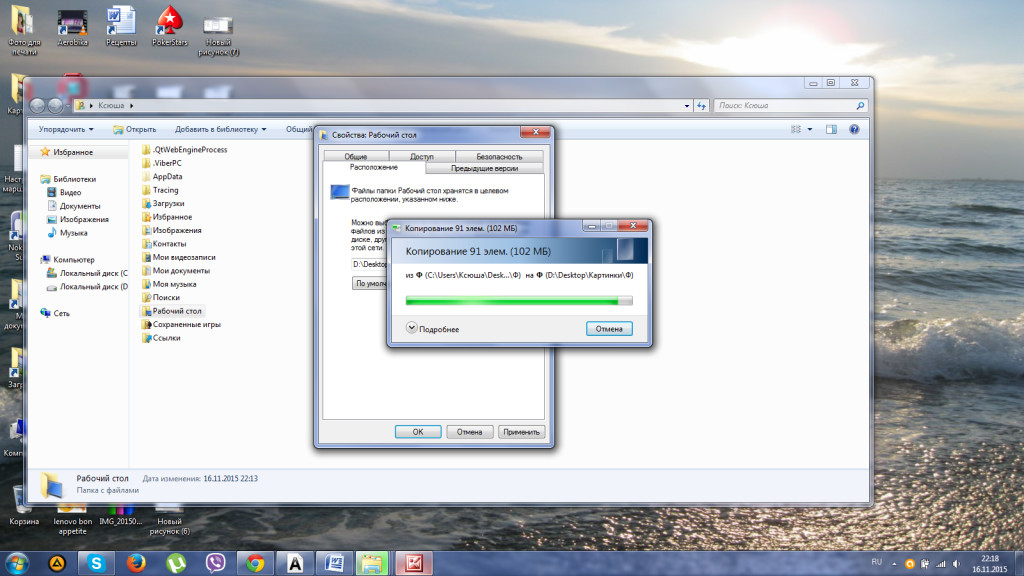
Step 7. In the dialog that opens, we agree to transfer the Desktop folder to another local disk by clicking the Yes button. Next, a progress window appears moving the desktop.
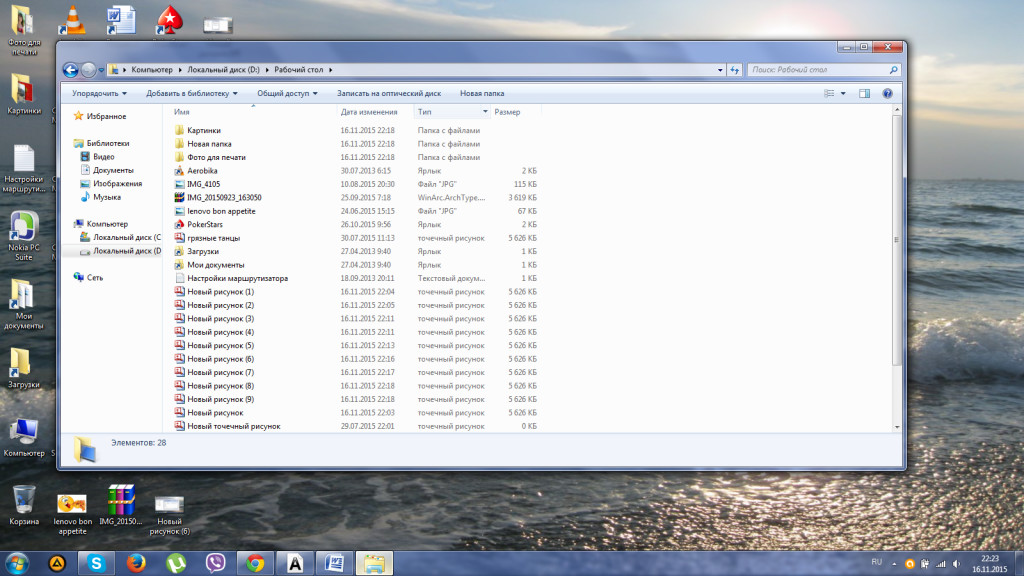
Step 8. All files and folders were successfully copied to the local D drive. In order for the changes to take effect, a full reboot is required.
Video lesson transfer desktop to another drive
Copying the desktop in Windows 7, 8, 10 using the registry editor
Transferring the desktop using the Windows Registry Editor in any version of the operating system is much easier to perform than through Windows Explorer. To this end, perform the following steps.
Step 1. To call the registry editor, we simultaneously hold down the Win + R keys on the keyboard, in the window that appears in command line we enter "regedit" without quotes. Next, click "OK".

Step 2. Proceed sequentially along the path HKEY_CURRENT_USER \\ Software \\ Microsoft \\ Windows \\ CurrentVersion \\ Explorer \\ Shell Folders. It is necessary to find the Desktop parameter in the displayed list.
Step 3. Double-click the left mouse button to open the parameter and in the “Value” line change the path, directing it to the folder in which we plan to save the desktop data. Click on the button "OK" below.
Step 4. Reboot the computer or laptop in order for the changes to take effect.
That's how pretty easy it is to copy the desktop along with all files stored on it to another hard disk partition.
Migrating operating system memory from HDD to SSD
When copying operating system memory from hard disk to solid state drive It creates an exact image of the system partition on the SSD. This action is performed to increase the speed of the operating system.
After transferring memory from HDD to SSD, loading the operating system when turning on the computer or laptop will last only 10-15 seconds.

Benefits of rewriting OS memory on SSD
Transferring operating system memory from a hard disk to solid-state drives has a number of advantages:
- from the system partition of a hard disk, during operation, a lot of operations are performed on reading information against the background of a small number of operations on writing information to a disk, it is the SSD that in this case ensures the fastest process of reading data from a disk;
- the amount of information stored on the system disk is usually small and rarely amenable to significant changes, so for ordinary users A solid-state drive with a capacity of about 20 GB will be sufficient for a computer or laptop, and only in fairly rare cases will SSDs of more than 30–40 GB be needed;
- sSD drives can be purchased at low cost compared to HDD.

Copying the operating system memory from the HDD to SSD using Windows own means
In all modern operating systems Windows versions 7, 8 and 10 are already built in the means to copy the system to another drive. But before starting the OS transfer, you need to prepare a solid-state drive to which you will be transferring system files. Next, open the "Control Panel".
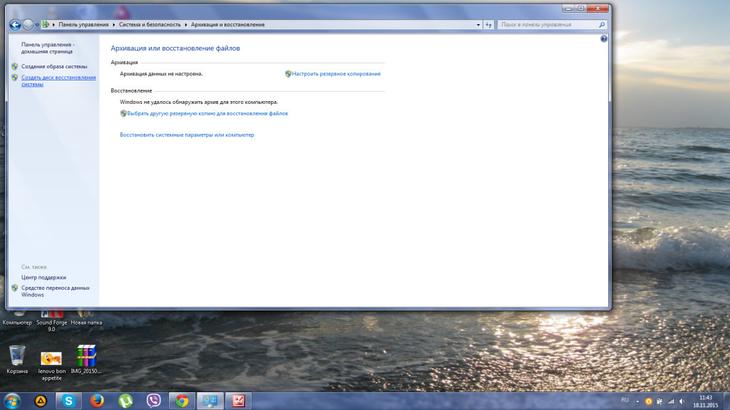
In the folder that opens, select the item “Back up computer data”.

After that, in the menu that opens, click on the item “Create a system image” and specify the path leading to the SSD we prepared. After a few minutes, the creation of the image and its transfer to the new drive will be completed.

For further use of the old disk, it is recommended to remove old system files to prevent a possible conflict. In order to successfully transfer, we advise you to disable the old hard drive where the OS was previously stored. When you further start the computer, select the system image from the boot disk.

Copying the operating system memory from HDD to SSD by third-party programs
In order to transfer the OS memory to SSD, special programs are also used. Such programs include Acronis True Image, Clonezilla Live, Paragon Migrate OS to SSD, Handy Backup Professional. They already have built-in functions for creating an image of the operating system and cloning it to another medium. It should be remembered that the amount of solid-state media should not be less than the volume of the system partition on the hard disk.
Conclusion
Above, we discussed in detail the cloning of a hard disk using Acronis True Image for Windows 7, 8, 10. We found out different ways transfer the desktop to another local computer disk. Find out the options for transferring the operating system memory from hard hDD on SSD SSD.
In addition, we considered programs designed specifically for cloning hard drives and copying data. system files OS Among the proposed methods, the choice of the best option remains for the user.
CloneZilla is one of top tools for reserve copy open source systems for Linux. The absence of gUI does not make it worse. On the contrary, there is an intuitive, easy and fast command line wizard with which you can do everything you need. This is the perfect tool for every system administrator.
With CloneZilla, you can completely copy a hard disk partition to another hard disk and then restore it very easily. In addition, you can back up clonezilla over a network using ssh, samba, or NFS and save these images to your local storage.
In case of any problems, you can very easily restore all data from a backup disk. For example, if the system breaks down, if there was a copy, you can deploy the previously created image and return the system to operation in minutes.
In this article, we will look at how cloning is performed. clonezilla drive, and we will be interested in any block devices. It does not matter that you will clone a partition or a whole hard drive, any block devices will do. The distribution is also unimportant, since everything will be done using the LiveCD CloneZilla image.
What do we need?
First, we need an image of the LiveCD CloneZilla, which can be downloaded from the official website. The image must be recorded on a USB flash drive or disk. I will not dwell on how to do this.
Second, to back up the hard disk to Linux, we’ll need another physical hard drive connected to the same system. And it should be the same volume or more than the disk that we want to copy. To clone a CloneZilla partition, a free partition of the same size will suffice. It is necessary to record the image.
CloneZilla Disk Clone
When everything is ready, you can start creating a clonezilla image. We will divide all actions into steps so that you can more easily navigate what you need to do.
After the LiveCD image has been downloaded and burned to a USB flash drive, connect this media to the computer and reboot. During the BIOS splash screen, press the F11, F12, Del, F2, or Shift + F2 button to enter the Bios menu and configure booting from your media there.
Step 2. Boot Loader Screen
After that, the bootloader will appear on the screen. In it, select the first item to launch Clonezilla Live with standard parameters and a screen resolution of 800x600. To select, press Enter.

Step 3. Choose a language
When the system boots into rAM, a wizard appears in which you have to select the system language. To move through the points, use the up / down arrows, and to select Enter:

Step 4. Customize Layouts
On this screen you can customize the keyboard layout. Just select Do’nt touch keymap and press Enter:

Step 5. Launch CloneZilla
On this screen, you can run the CloneZilla interactive wizard or go to the console. Select Start clonezilla:

Step 6. Choosing a way to work
You can clone hard linux disk directly from disk to disk or from disk to image. Choose the option that will be more convenient for you, in this article we will select from disk to disk:

Make sure that both drives are connected to the computer if you are going to clone a hard disk in Linux.
Step 7. Number of settings
On the next screen, you can choose how much detail you want to customize the process. To begin, select a mode for beginners, with default settings. Beginer Mode.

Then on the next tab, select what you want to do. In our case, the first item, save the disc. Savedisk.
Step 8. Select Copy Mode
Four disk cloning modes are available:
- disk_to_local_disk - local disk to another local disk;
- disk_to_remote_disk - local disk to remote disk;
- part_to_local_part - partition to local partition;
- part_to_remote_part - partition to remote partition.
If we chose a disk for an image in the sixth step, then we would have other options. We will copy our local disk to another hard disk connected to this computer. The program will perform a full clone of the Clonezilla disk, all partitions will be copied, as well as the MBR or GPT area.

Step 9. Select the source
In this wizard step, we need to select the source disk that will be used for cloning. Here, in addition to the disk number in the system (sda, sdb), its name and serial number are displayed, so you can choose desired disk easily.

After selecting the disk, press Enter.
10. Select disc for recording
Next, select the second disk to be recorded. Be very careful, because the program will erase all the data on this disk. And if you make a mistake, it will turn out quite the opposite, from what was planned.

11. File system check
If you are sure that file system not damaged, you can choose to skip the check Skip checking:

After that, you will need to press Enter again.
Step 12. Confirmation
Before starting the backup, the utility will display some information about the selected drives and their work. You will need to click twice Y:

Step 13. Copy
While copying a disc, Clonezilla displays a process line by which you can estimate how much data and time is left.

Step 14. Completion
After copying is complete, you will be provided with information about the entire process and the result. Press Enter and in the menu that appears you can choose what to do next. To power off, select poweroff.


That's all. In the event of a breakdown, you can use this disk instead of the damaged one, or if the experiment failed, you can recover all the data from it. In the same way, the partition itself is cloned and cloned onto the Clonezilla image. Next, consider restoring the Clonezilla image.
Clonezilla Disk Recovery
The initial boot and all the steps to prepare the system for operation are performed in the same way as for cloning a clonezilla hard disk in Linux. Everything is up to step 7. You only need to choose not disk_to_disk, but disk_to_image to work with disk images.
Step 1. Select an action.

Step 2. Location
Choose where we will get the image, local_dev, local device:

Step 2. Select the image
At this step, you have to choose an image or a disk, from which we will recover:

Step 3. Record Disk


Step 4. Confirmation
It remains to press Y several times to confirm the action and the recovery process will begin.


findings
That's all, now you know how clonezilla is backed up, as well as restoring from the clonezilla image. After that, you will always be safe and the created copy can save you many times from errors or unsuccessful experiments with the system. If you have any questions, ask in the comments!
Author Brian westover October 4, 2013 1:49
There are many different ways to back up data. However, few of them are as simple as cloning a hard disk. If you need to archive all data or protect your hard drive ...
There are many different ways to back up data. However, few of them are as simple as cloning a hard disk. If you need to archive all data or protect a hard disk from damage and physical damage, it is difficult to find a better option than a functional copy of the disk, immediately ready for use.
Two options: clone or image
A clone is a direct bitwise copy; The data on the cloned disk is identical to the source disk. From the operating system to hidden directory files, from the desktop to device drivers, everything is copied “one to one”. Replace the old hard drive with the clone you just got, and you will not notice any functional differences. The cloned disk can also be installed in another PC, and it should work in the same way as in a previous computer, with the possible exception of the lack of drivers due to differences in hardware. Thus, it will be an ideal backup in the event of a PC crash. The disadvantage of this method is that the bitwise clone is usually the only object on the backup disk.
The second option is to create a disk image that represents a snapshot of the data on the disk; this creates a complete copy of the contents of the disk, but it is stored in a single compressed file. This method is similar to saving the entire disk in one large zip file. You can create more than one disk image, which will allow you to repeatedly save the entire disk at different points in time, recording them locally (in the backup partition) or on a separate disk. The disadvantage of this method is that it is impossible to use the image immediately.
Tools and utilities
There are several tools with which you can directly clone a disk. Among the many backup utilities we tested, we preferred Acronis Backup & Recovery 11.5. This powerful program archiving is more suitable for experienced IT administrators than for small companies or ordinary users. It provides almost unlimited possibilities, but you will have to study the downloadable manual in order to master some of its functions.
Many users are willing to pay for convenience and ease of use. paid programs, but there are several widespread free products with which you can at least successfully cope with the task - in particular, Macrium Reflect Free, ShadowCopy, Clonezilla and EaseUS Todo Backup Free.
Target drive
When cloning and saving a backup disk image, you must specify the place where the data will be recorded. The only thing needed to back up an entire disk is a disk of the same or larger size. There are two options: an empty hard disk or an external disk.
An empty hard disk is exactly the same disk as an existing one in a laptop or desktop PC, but not yet installed in the computer. By purchasing a disc, you can install it as a second disc or purchase a suitable case for it. Drives are available in various sizes for desktops and laptops, and are suitable as hard drives with a rotating spindle, and semiconductor (SSD) devices. The capacity of the disk for cloning should be at least sufficient to accommodate the cloned data (used space on the source disk). For example, if only a 200 GB of data is stored on a 500 GB disk, some programs can be used to clone data onto a disk of less than 500 GB, provided that it has enough space to accommodate 200 GB of data. To absolutely accurately replace the disk already available in the PC, you need a device with the same dimensions and connectors as the original disk.
Another option is to buy an external hard drive. These self-contained drives are usually connected via a USB connection. External drives can be both large desktop and handheld devices, but, as a rule, they are suitable for use as a backup media, and many have additional features, including encryption tools and automatic backup.
Cleaning the source disk
Having a backup utility and a disk for storing data, you can start cloning, but first it is useful to do a digital “cleaning” of the source disk. Among the large amount of data you want to save, there are usually many files (drivers for old devices, unnecessary programs, forgotten multimedia files) that do not need to be duplicated.
Clone creation
After you acquire backup drive, get rid of digital "garbage" and select the backup utility, you can start cloning. Connect the target disk, run the backup utility and follow its instructions to copy data from the source hard disk to the backup one. Depending on the size of the disk being cloned, the amount of data on the disk and the speed of the source and backup disks, the process can take from several minutes to several hours.
Clone maintenance
After the end of cloning, the problem is solved - for a while. At your disposal is an exact copy of the original at this time. Any future changes to files, programs, and any other components will only be reflected on the source disk. Replacing it with a cloned disk will be equivalent to returning in time on the day you cloned the disk. To have a more recent clone on hand, perform scheduled cloning at regular intervals. Let it be just annual archiving on World Archiving Day (March 31).
The cloned disk should be kept in a safe and accessible place. During long-term storage, care should be taken to protect the disc from moisture, excessively high and low temperatures, the effects of static electricity and powerful magnets. A reliable solution is to place the disk in an antistatic bag, and then together with the most important documents - in a safe or a fireproof cabinet. If immediate availability is not a requirement, then you can store the disk in a remote location so that the backup does not suffer in the event of a fire, flood or other disaster.
Wednesday, March 09, 2016 11:07 + to quote pad
Often, users of computers and laptops create a situation where an old hard disk can be replaced with a new one, faster, or with a larger capacity. Therefore, there is a need to copy the available information from one disk to another. Then it becomes relevant to simply clone the old hard drive.
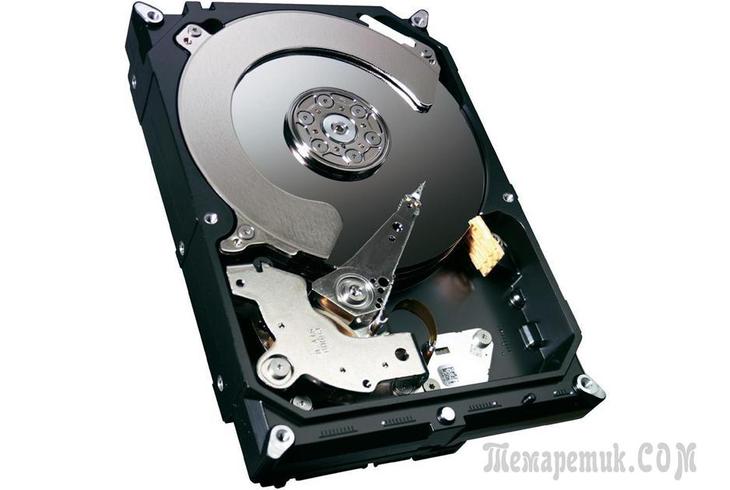
Computer hard drive
Hard drive cloning
The process of cloning a hard disk is an operation in which all data from one hard drive is transferred to another. Since the cloning of a hard disk is a procedure for low-level sector-by-sector transfer of data from one media to another storage medium, the hard drive clone will be completely identical to the original hard drive.
In this case, the transfer of all user files, personal photos, movies, documents can take you a long time. It is also worth knowing that if you manually transfer the operating system files, then it will be copied on the new hard drive not in working condition, that is, it will need to be installed again. The cloning process allows you to copy the partition structure of the hard disk, a working active operating system, as well as installed programs and saved settings.
Hard drive cloning
Hard Disk Cloning Software
In order to quickly and efficiently copy all data from one hard disk to another, while keeping the operating system in a working condition, so that after copying it with ease you can run, you should use special programs to clone hard disks.
In order to create clone disks, quite a lot of programs, both free and paid, have been developed. Among this set of software there are highly specialized programs that work only with hard drives of a certain brand, but there are also universal programs that allow you to clone any HDD and SSD drives.
The programs that include the function of cloning hard drives include Paragon Hard Disk Manager, Acronis True Image, AOMEI Backupper, EASEUS Disk Copy, etc. But the most popular program among users is Acronis True Image.

Acronis True Image program
Acronis True Image program
True Image is a modern software product from Acronis. It is compatible not only with old versions of Windows such as Windows XP and 7, but also with new Windows 8, 10. Acronis True Image can be called a panacea for all problems with Windows, besides the cloning function, the program has many additional advantages such as:
create backup copies of Windows;
it acts as a system cleaning tool;
allows you to test Windows in trial mode with the ability to undo the changes made;
saves backups to the cloud storage;
emergency data recovery.
In addition, when cloning a hard disk using Acronis True Image, it is possible to exclude certain unnecessary files. At the request of the user, you can configure the cloning of not only the whole disk, but also individual files or partitions. Other programs do not suggest this feature. This program is not only multifunctional, it also has high speed, user-friendly interface in Russian, automatic and manual mode of operation.

The interface of Acronis True Image 2016
The disadvantages of Acronis True Image should be attributed only to a paid license. It can be purchased on the official website of the developer. But despite this Acronis True Image remains the most popular program for cloning hard drives.
Acronis True Image terminology features
Before you engage in disk cloning, you need to familiarize yourself with some of the features of the Acronis True Image software. So in the process of preparing for cloning a hard disk, you will encounter the concepts of “source” and “target” disks. The original disk in Acronis True Image is considered to be the disk from which important data is being transferred, that is, it is the disk from which the clone is being created. The target disk in this program is considered to be a hard disk that will become a clone of the source disk, that is, a disk onto which user data, system files and software are transferred.

Identification of hard drives in the Acronis True Image program
When cloning a hard disk using Acronis True Image, discrepancy in disk capacity is not critical. With the ability to exclude unnecessary files from the cloning process, the target disk can be much smaller in size from the source disk. The main thing is that there is enough free space for the necessary information from the source disk.
Acronis True Image cloning a hard disk
Consider the process of cloning a hard disk using the example of Acronis True Image 2016, for this we will follow the steps below.
Step 1. Run the program, this version offers to log into the account to use Acronis cloud storage, you can close the login window.

Log in to the cloud storage Identification of hard drives in Acronis
Step 2. In the side ribbon of the interface, select the “Tools” tab; then in the opened menu, select the “Clone disk” item.

Acronis True Image Interface
Step 3. Follow the prompts of the Disk Cloning Wizard at the point where you need to select the cloning mode and click "Automatic". It is always selected by default as a preset mode, click on the “Next” button.

Selecting the clone mode in the Disk Clone Wizard
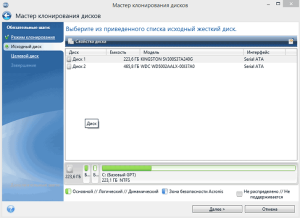
Step 4. After this, you will see the source hard disk selection window. In this window, you need to click the left mouse button on the disk from which we will transfer data. Disk names in Acronis True Image differs from disk names in the built-in Windows utility. In this case, it is better to focus on the volume or model of the disk. Selecting the hard drive for data transfer, click the "Next" button.
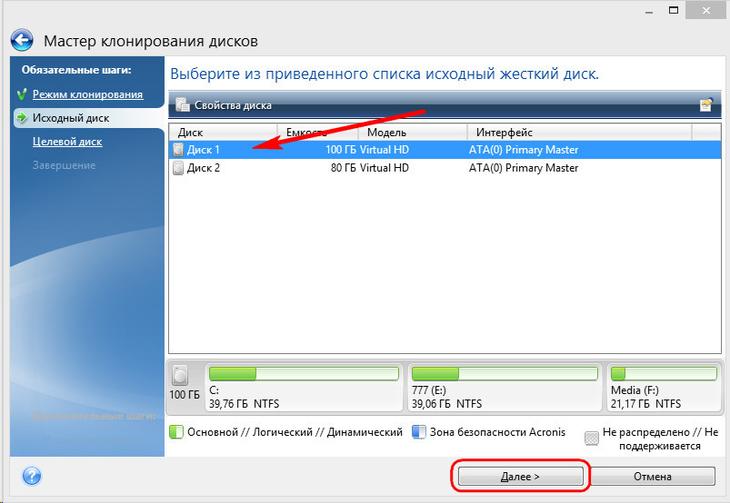
Select the source hard drive
Step 5. In the window that opens, select the target disk, click the left mouse button on the name of the hard disk to which you want to transfer data, Windows OS and partition structure. Click on the button "Next".

Select target hard drive
Step 6. Since in this case the target disk is not a new disk with unallocated space, with information stored on it, the program displays a warning window with information about possible loss of important data. If all the most necessary files have been saved, you can click on the "OK" button.
Acronis True Image Warning Window
Step 7. After this, a window for selecting the recovery method opens. In it, by default, the checkbox on the item “Copy partitions without changes” is set; you do not need to change this setting, you just need to click “Next”.
Choosing a recovery method
Step 8. The Disk Cloning Wizard proceeds to the final stage of the data transfer process and displays the Summary Data Window. This window allows you to start cloning a hard disk by clicking the Proceed button, but this is relevant if there are no files to be deleted, so as not to occupy space on the target disk with unnecessary data and not to increase the time to perform this procedure. If you have chosen not the full cloning method of the source disk, then click on the “Exclude files” button
Summary screen in Disk Clone Wizard
Step. 9. In the File exclusions menu that opens, we see the tree structure of the entire contents of the hard disk. Due to this structure, system files are immediately visible, which are not subject to exclusion. In our example, we exclude non-system video files from section E, setting the corresponding checkboxes next to their name. You need to wait a little time for the process of excluding these files to complete.

File exclusion window in Disk Clone Wizard
Step 10. We exclude in full volume F of the original disk by checking the box next to its name and all included files and folders are automatically selected after that. After the end of the cloning operation, this partition will be created on the target disk, but will not contain any data. When all partitions and files that we do not need on the target disk are excluded from cloning, we can start the whole process by clicking on the “Proceed” button.

Exclusion of the original hard disk partition during cloning
Step 11. After carrying out all the preparatory actions, Acronis True Image will ask you to perform a system restart. And the cloning process itself takes place in the preload mode of the Windows operating system. In Acronis True Image preloading mode, the default shutdown function is visible immediately after the cloning process.
Cloning is done in Windows preload mode.
The next time you turn on the computer, you will be taken directly to the BIOS menu, in which it is possible to set the operating system boot priority from the created clone disk. In addition, this window shows the remaining time until the end of the cloning and the progress of the task.

The hard disk cloning progress window
Step 12. When the cloning is complete, you can boot from the target disk.

Transfer the desktop to another drive in Windows 7, 8, 10
Copying the desktop along with shortcuts and files to a non-system disk is a very profitable solution from all sides. After all, this will not only preserve the old look of your desktop after reinstalling the operating system, but also allows you to save it in case of a sudden system failure that caused your OS to be inoperable. In addition, a lot more free space appears on the system disk for your documents. When a computer infects a computer with malware, the damage is often caused to the system partition, and since the desktop directories will no longer be on the system drive, it will be completely protected from this kind of sabotage.
In order to copy the “Desktop” folder in such major operating systems as Windows 7, 8 and 10 there are two ways - through Windows Explorer and using the Windows Registry Editor. 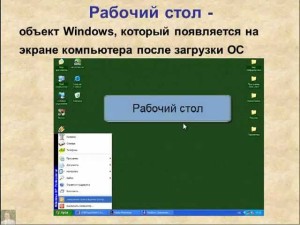
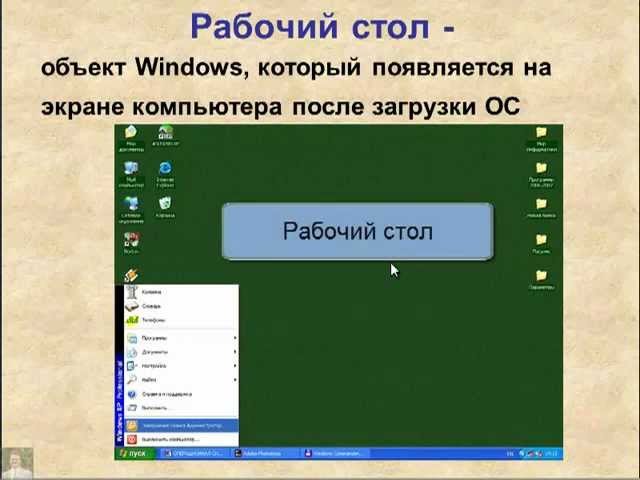
Working windows table
Copying the desktop in Windows 7, 8, 10 through Windows Explorer
In order to copy the desktop with all the contained files and folders to a non-system local disk, follow the instructions below step by step.
Step 1. Create a folder for storing data from the desktop on a local disk with user data (in our case, drive D).

Create a new folder on drive D to store desktop data
Step 2. After opening the user folder. In Windows 7, click on the "Start" button and in the left column select the user name and click on it with the left mouse button. For users of Windows 7, follow the path Drive C: \\ Users \\ * username *. Opens the pack with the following data.
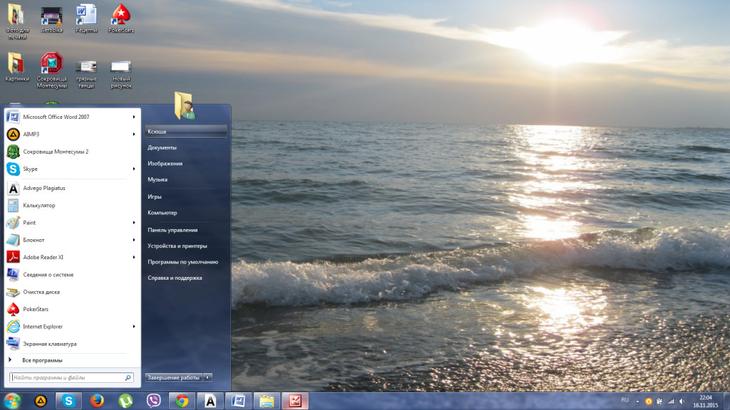
Opening the folder of the user whose desktop you want to transfer to another drive
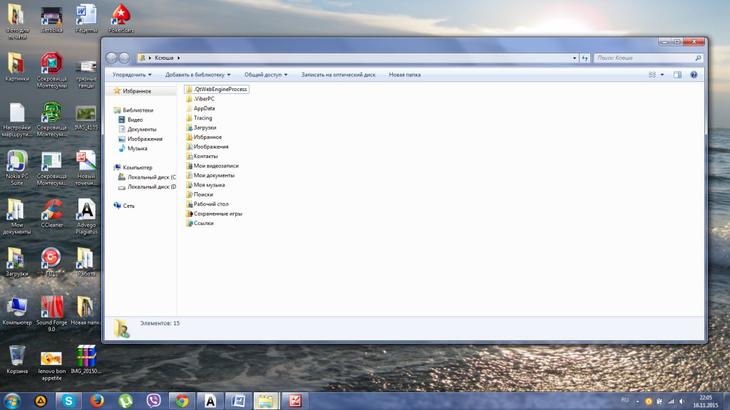
User folder on drive C
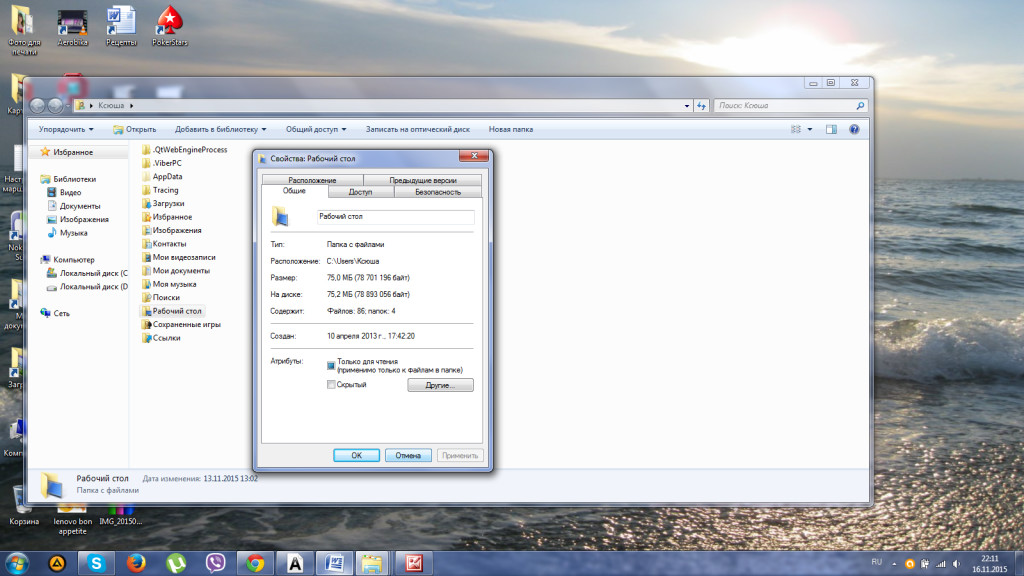
Step 3. Right-click on the folder "Desktop" and thereby opening the properties of the folder.
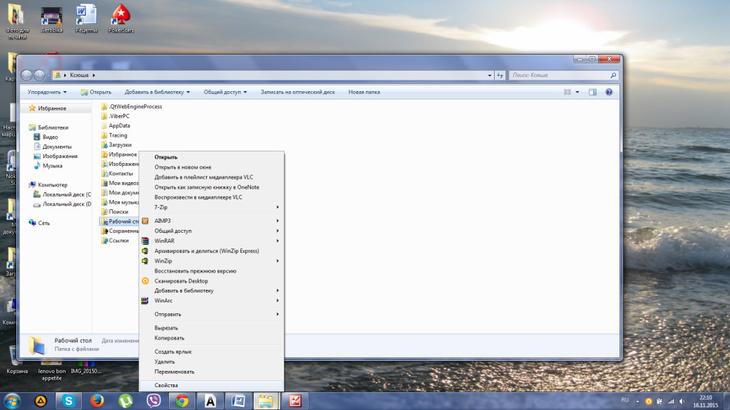
Call context menu Desktop folders
![]()
View of the folder properties Desktop
Step 4. Left-click on the “Location” tab and in this tab, click “Move”

Tab Location folder Desktop
Step 5. Find and select the “Desktop” folder that we created by performing step 1, and click on the “Select Folder” button.
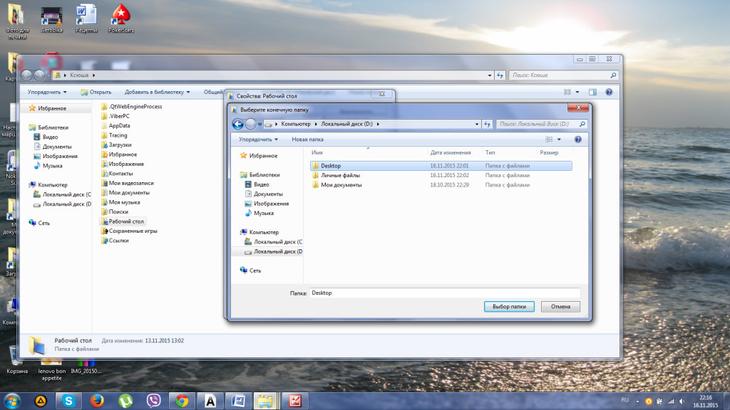
Select a folder to move the desktop
Application of changes made
Step 7. In the dialog that opens, we agree to transfer the Desktop folder to another local disk by clicking the Yes button. Next, a progress window appears moving the desktop.

Dialog box pop-up when transferring the desktop to another drive

Progress window to copy the desktop to drive D
Step 8. All files and folders were successfully copied to the local D drive. In order for the changes to take effect, a full reboot is required.
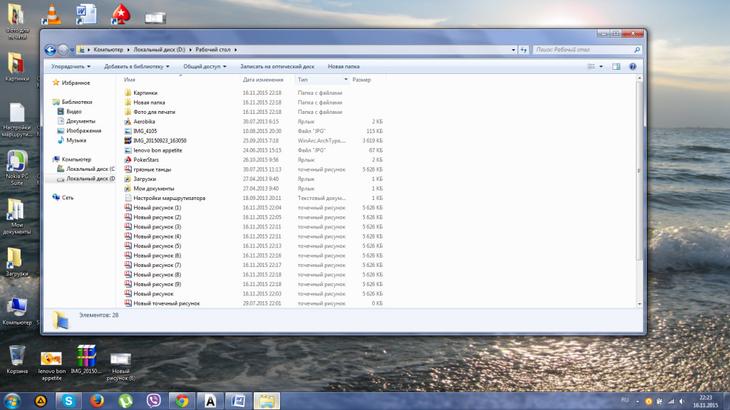
All files and folders on the desktop have been successfully transferred to the local disk D
Video lesson transfer desktop to another drive
Copying the desktop in Windows 7, 8, 10 using the registry editor
Transferring the desktop using the Windows Registry Editor in any version of the operating system is much easier to perform than through Windows Explorer. To this end, perform the following steps.
Step 1. To call the registry editor, we simultaneously hold down the Win + R keys on the keyboard, in the appeared window in the command line enter “regedit” without quotes. Next, click "OK".
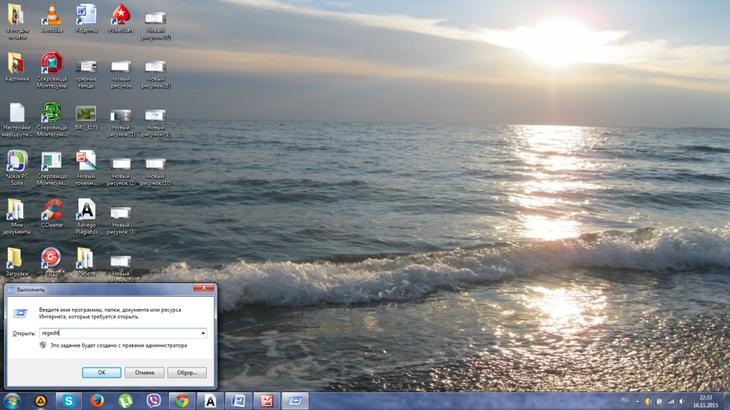
Call Registry Editor in Windows
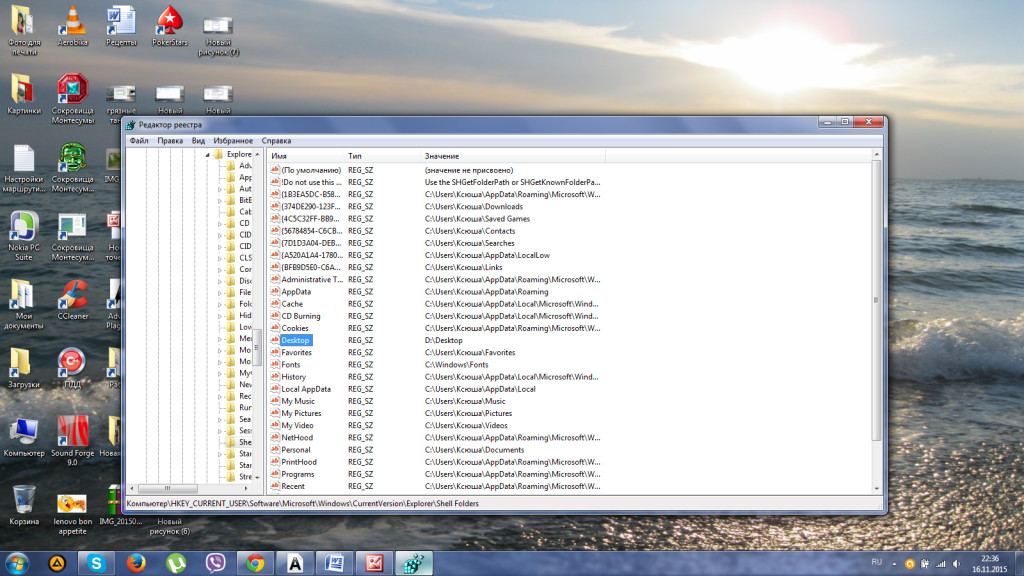
Step 2. Proceed sequentially along the path HKEY_CURRENT_USER \\ Software \\ Microsoft \\ Windows \\ CurrentVersion \\ Explorer \\ Shell Folders. It is necessary to find the Desktop parameter in the displayed list.

Window Registry Editor in Windows
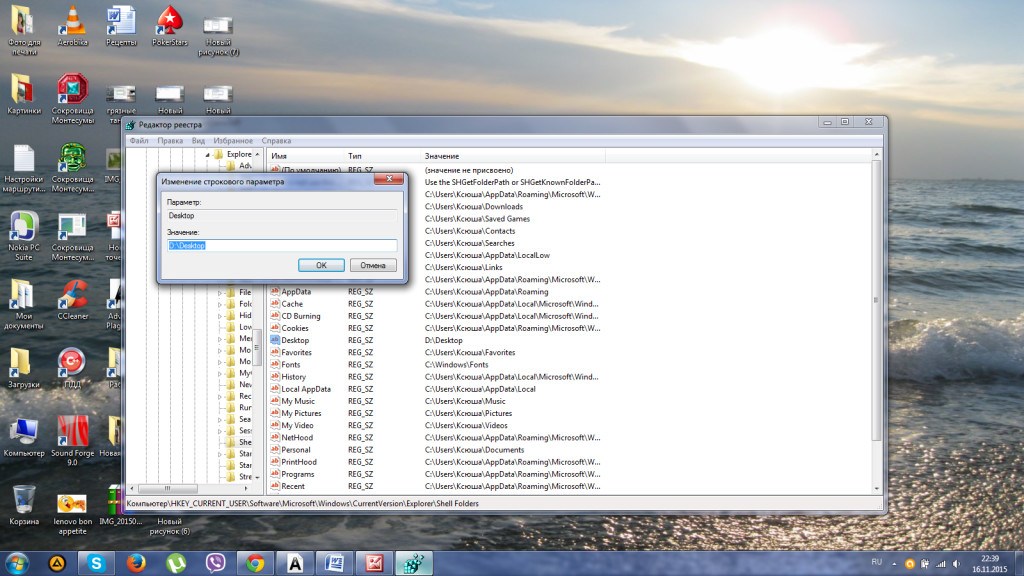
Step 3. Double-click the left mouse button to open the parameter and in the “Value” line change the path, directing it to the folder in which we plan to save the desktop data. Click on the button "OK" below.
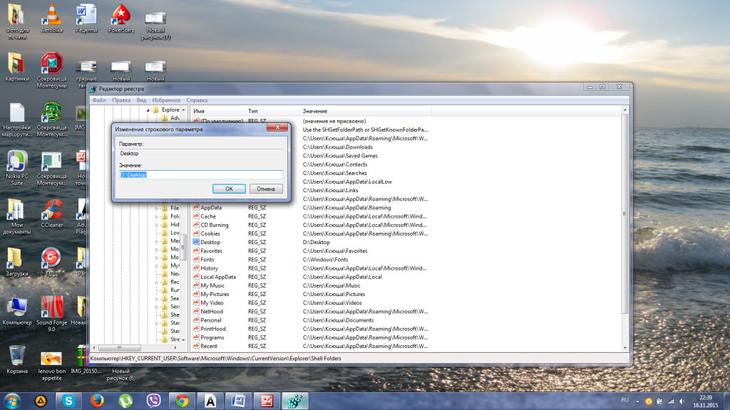
Changing the desktop placement path
Step 4. Reboot the computer or laptop in order for the changes to take effect.
That's how pretty easy it is to copy the desktop along with all files stored on it to another hard disk partition.
Migrating operating system memory from HDD to SSD
When copying the operating system memory from the hard disk to the solid-state drive, an exact image of the system partition on the SSD is created. This action is performed to increase the speed of the operating system.
After transferring memory from HDD to SSD, loading the operating system when turning on the computer or laptop will last only 10-15 seconds.

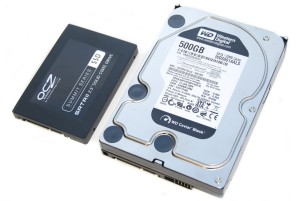
SSD vs HDD
Benefits of rewriting OS memory on SSD
Transferring operating system memory from a hard disk to solid-state drives has a number of advantages:
from the system partition of a hard disk, during operation, a lot of operations are performed on reading information against the background of a small number of operations on writing information to a disk, it is the SSD that in this case ensures the fastest process of reading data from a disk;
the amount of information stored on the system disk is usually small and rarely amenable to significant change, so for ordinary users of a computer or laptop there will be a solid-state drive with a capacity of about 20 GB, and only in fairly rare cases, SSDs of more than 30-40 GB may be needed;
SSD drives can be purchased at low cost compared to HDD.
Transferring OS memory from SSD to HDD
Copying the operating system memory from HDD to SSD with your own using Windows
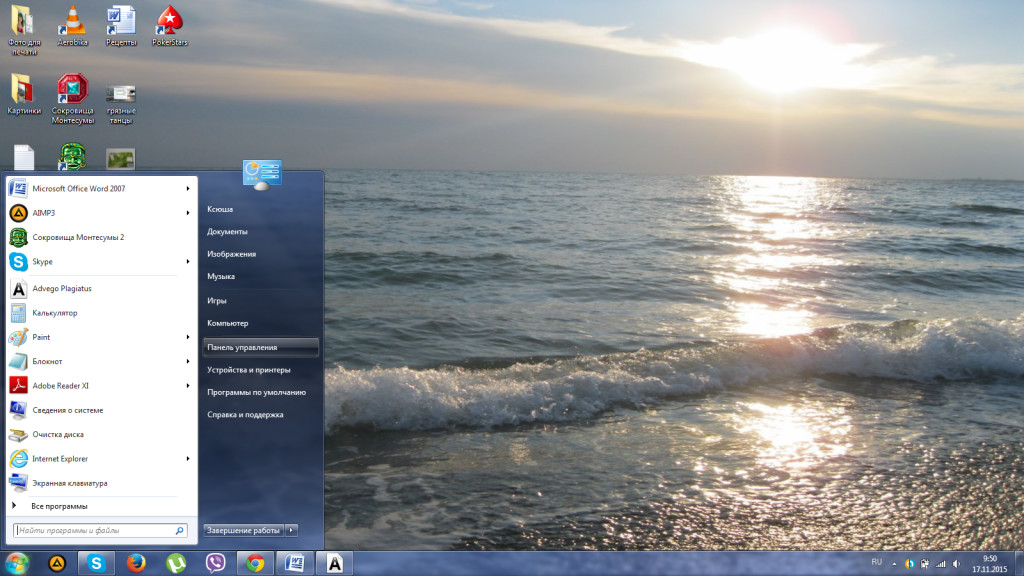
In all modern operating rooms windows systems versions 7, 8 and 10 already have built-in tools for copying the system to another drive. But before starting the OS transfer, you need to prepare a solid-state drive to which you will be transferring system files. Next, open the "Control Panel".
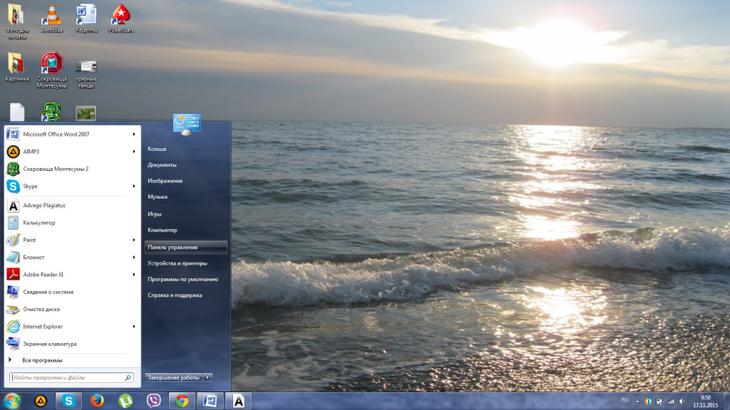
Login to the Control Panel folder
In the folder that opens, select the item “Back up computer data”.
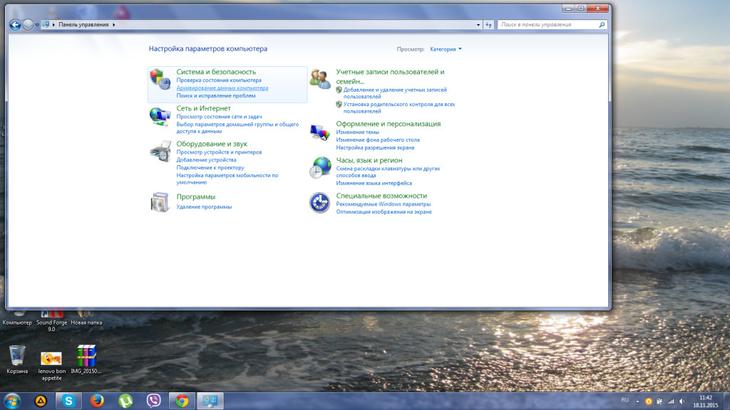
Folder Control Panel
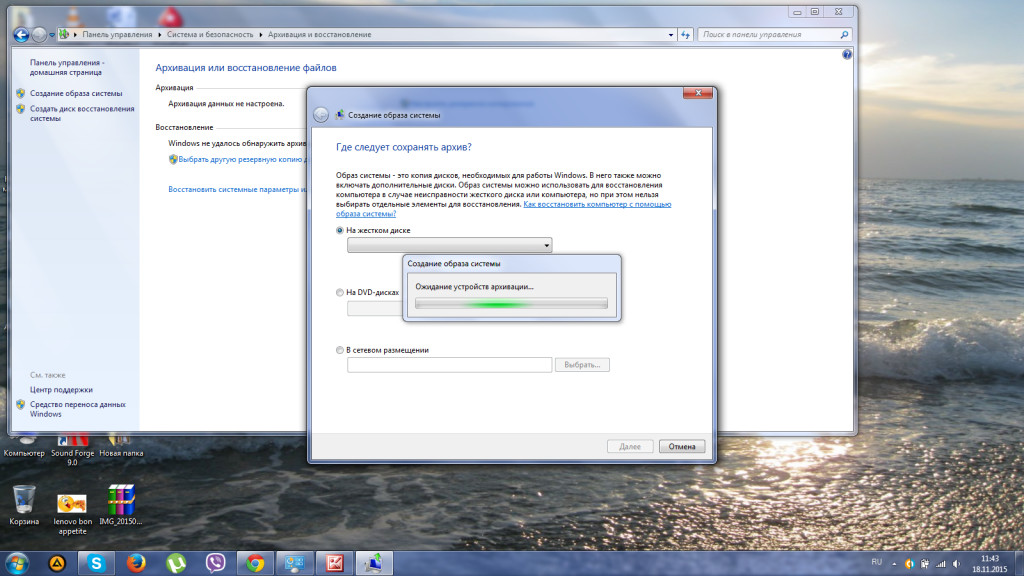
After that, in the menu that opens, click on the item “Create a system image” and specify the path leading to the SSD we prepared. After a few minutes, the creation of the image and its transfer to the new drive will be completed.
Folder Archiving Computer Data
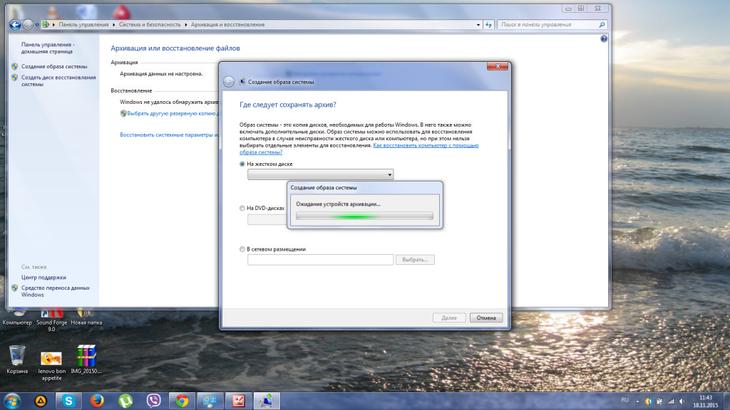
Creating a system image
For further use of the old disk, it is recommended to remove old system files to prevent a possible conflict. In order to successfully transfer, we advise you to disable the old hard drive where the OS was previously stored. When you further start the computer, select the system image from the boot disk.
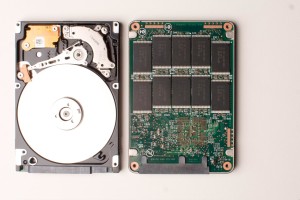
Internal SSD and HDD device
Copying operating system memory from HDD to SSD third-party programs
In order to transfer the OS memory to SSD, special programs are also used. Such programs include Acronis True Image, Clonezilla Live, Paragon Migrate OS to SSD, Handy Backup Professional. They already have built-in functions for creating an image of the operating system and cloning it to another medium. It should be remembered that the amount of solid-state media should not be less than the volume of the system partition on the hard disk.
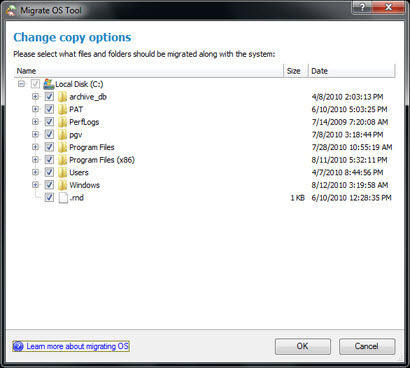
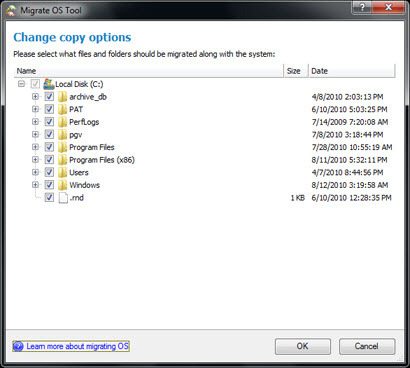
Paragon program Migrate OS to SSD
Conclusion
Above, we discussed in detail the cloning of a hard disk using Acronis True Image for Windows 7, 8, 10. We found out various ways to transfer the desktop to another local disk of the computer. We learned the options for transferring the operating system memory from the HDD to the SSD solid state drive.
In addition, we considered programs designed specifically for cloning hard drives and copying OS system file data. Among the proposed methods, the choice of the best option remains for the user.
A source
| Categories: | |
Quoted
Liked: 3 users