If there is not enough space on your hard disk, Acronis True Image Home 2011 can transfer (clone) the system to a new hard disk with a larger capacity.
Of course, to transfer the system, you must first install the disk in the computer. If the computer does not have a bay for another hard drive, you can temporarily mount the drive instead of the CD-ROM drive or use the USB 2.0 port of the external target disk.
If this is not possible, clone the hard disk by creating a disk image and restoring the image to a new hard disk with a large partition size.
The procedure for transferring data from one disk to another (disk cloning) in Acronis True Image Home 2011 is very simple.
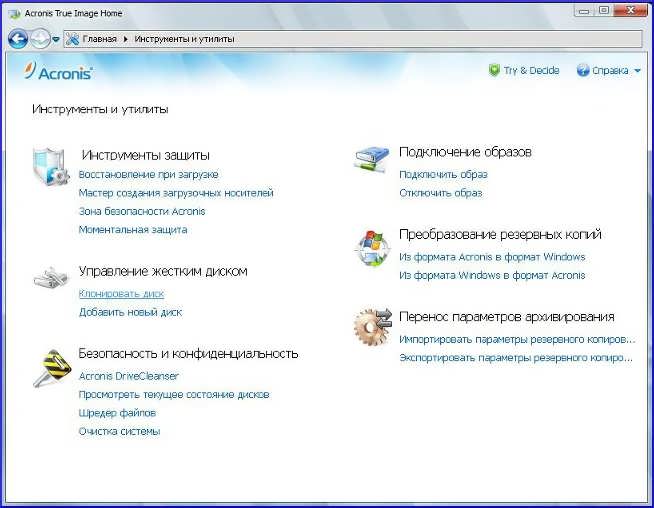
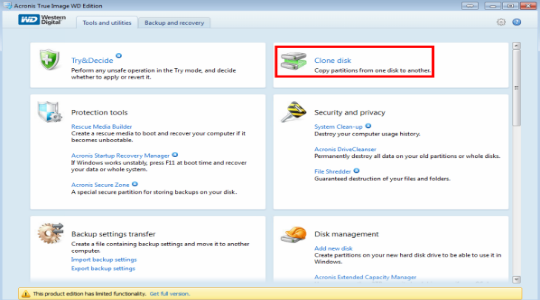
To start cloning a disk, select "Tools and Utilities" from the main menu.
In a new window, click "Clone Disk."
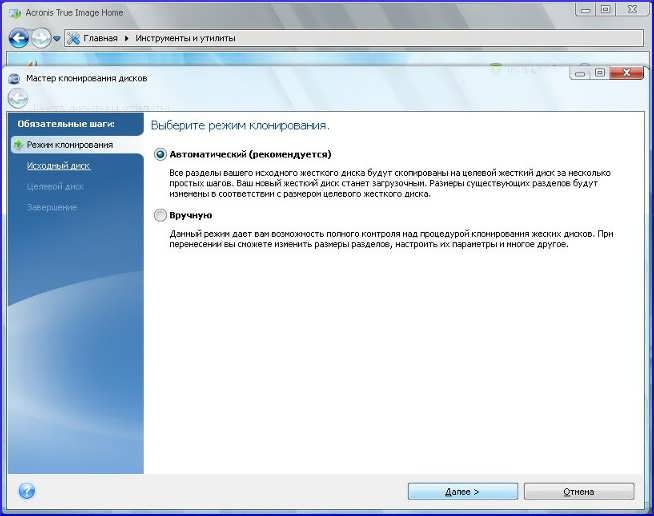
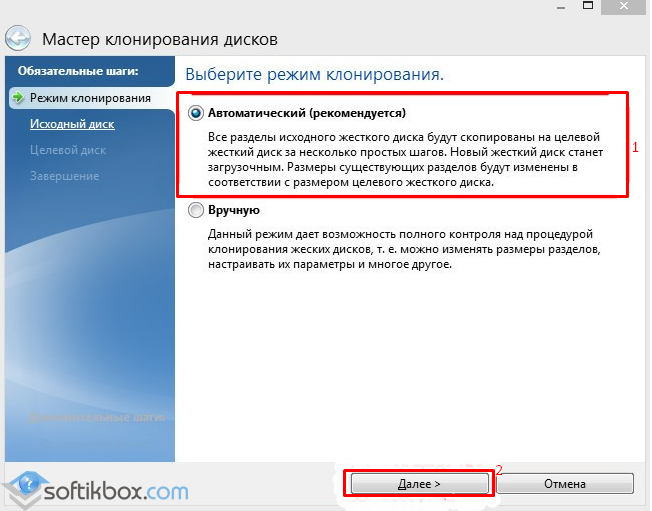
In Acronis True Image Home 2011, two modes of transferring the system to new disk:
1. Automatic. In the automatic mode, you transfer all data (partitions, folders, files) from the old disk to the new one, making the latter bootable if the source disk was bootable.
2. Manually. Manual mode is used if you need to change the partition structure on the disk.
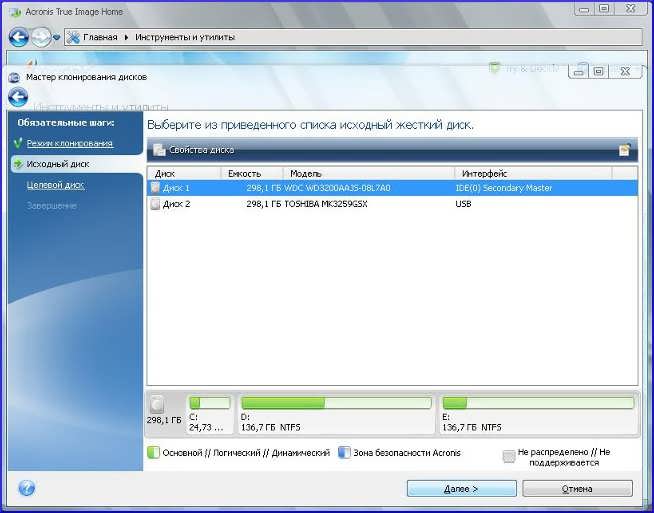
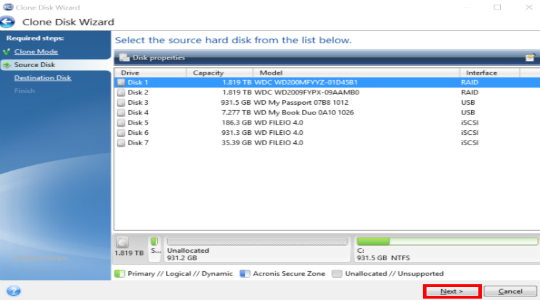
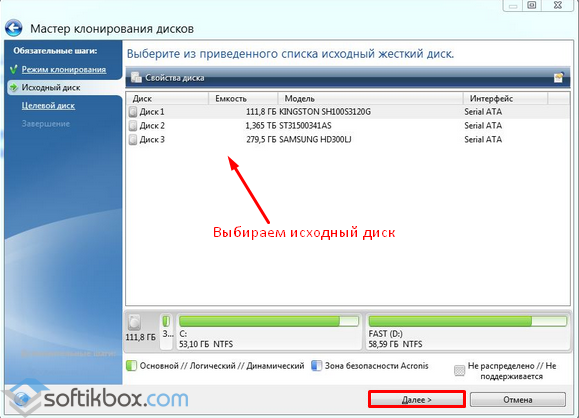
Typically, the program automatically determines which disk is the source, and which is the target disk. If the program detects multiple disks, you must specify which one is the original (old) disk.
Select the source disk and click "Next".
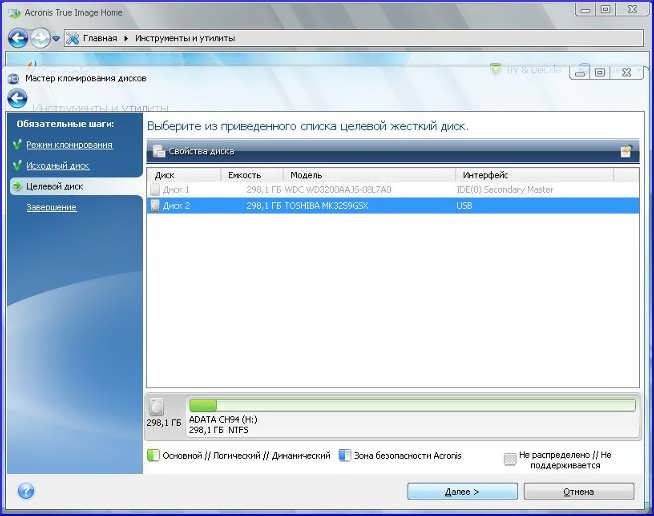
Select the target drive to which the information will be transferred.
The previously selected source disk in this window is not available for selection and is displayed in light gray font.
Click "Next" to continue.
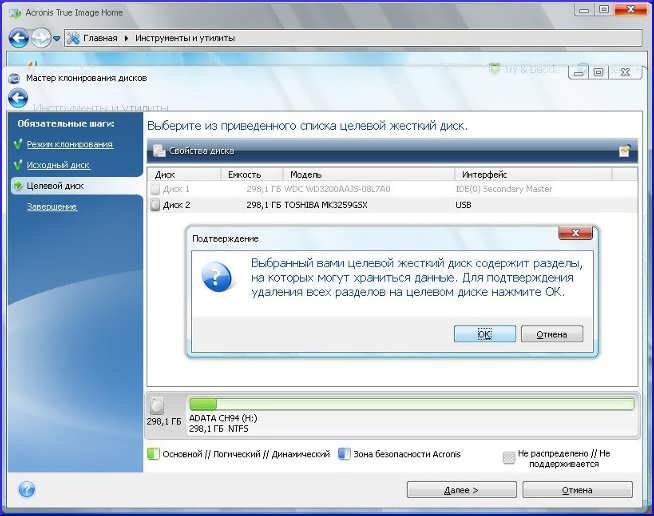
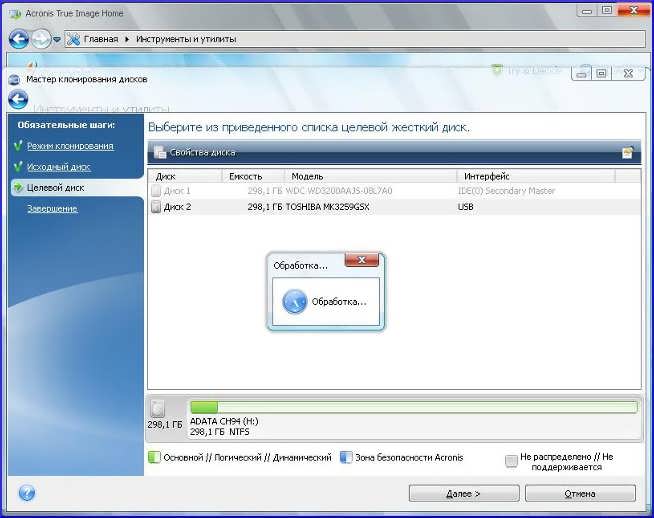
At this stage, the program determines whether the target disk is free, checks the partitions that can contain data.
To confirm deleting the partitions, click OK.
No real changes and data loss will occur. The program will create a cloning plan. All changes will be made only after clicking the "Proceed" button.
If there are no partitions on the target disk, the program will determine that this disc is the target, and this step will be skipped.
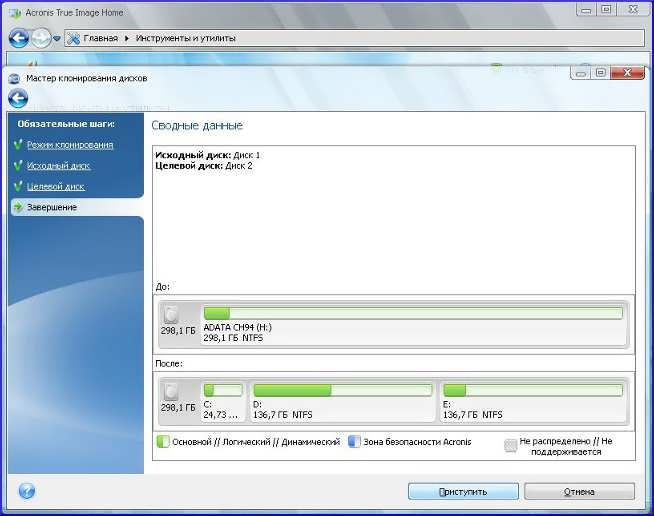
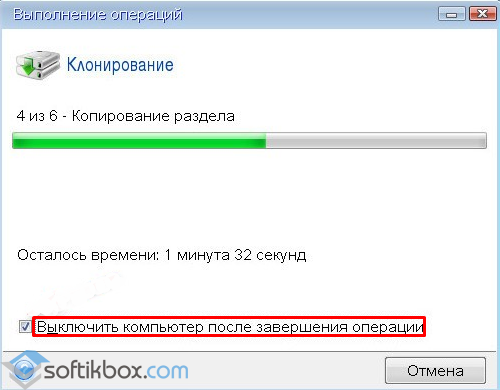
The final cloning window graphically displays information about what structure the target disk will have.
To start cloning, click the Proceed button.
Cloning a disk that contains the currently active operating system will require a computer restart. In this case, after clicking the "Proceed" button, you will be asked to reload. Failure to restart will result in the cancellation of the entire procedure.
After the cloning is complete, you will be prompted to turn off the computer by pressing any key. This will change the location of the master / slave switches and remove one of the hard drives.
Cloning a disk that does not contain an operating system or contains an operating system that is not currently loaded does not require a reboot.
After clicking the "Proceed" button Acronis True Image Home 2011 will start cloning the old disk to a new disk, and the progress will be displayed in a special window.
To cancel the cloning procedure, click the Cancel button. However, keep in mind that in this case it will be necessary to re-partition and format the new disk, then repeat the cloning operation.
After the cloning operation is complete, a message will be displayed about the results.
Note.
The program displays the damaged sections in the upper left corner with a red circle with a white cross inside. Before starting cloning, check the disks with the appropriate operating system tools to identify and fix errors.
This article will cover the cloning of a hard disk, or in other words - about moving Windows from one computer to another. This procedure interests users at the time when a more modern and capacious hard drive was purchased to replace the old one, but you do not want to lose all the data stored. The procedure for cloning a hard disk is not difficult, especially if you follow the recommendations from this article.
Today we will clone the hard drive using free utility AOMEI Backupper Standart, which is an analog of the famous, but already paid utility Acronis True Image Home. Download this program you can follow the link at the end of the article from the official website of the developer.
After installing the program, do not forget to download the crack by this link, otherwise the entire interface of the program will be exclusively on english language. After downloading the crack, go to the folder with the program where you want to open the folder Lang , which is responsible for languages. Rename the file «En.txt» at «En2.txt» , and then paste into this folder the downloaded crack.

After launching the program, the entire interface will be contained in the native Russian language.
Beginning of cloning
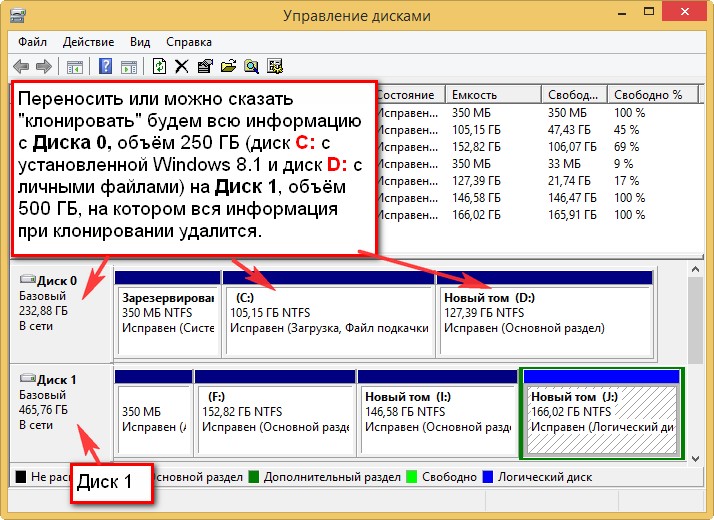
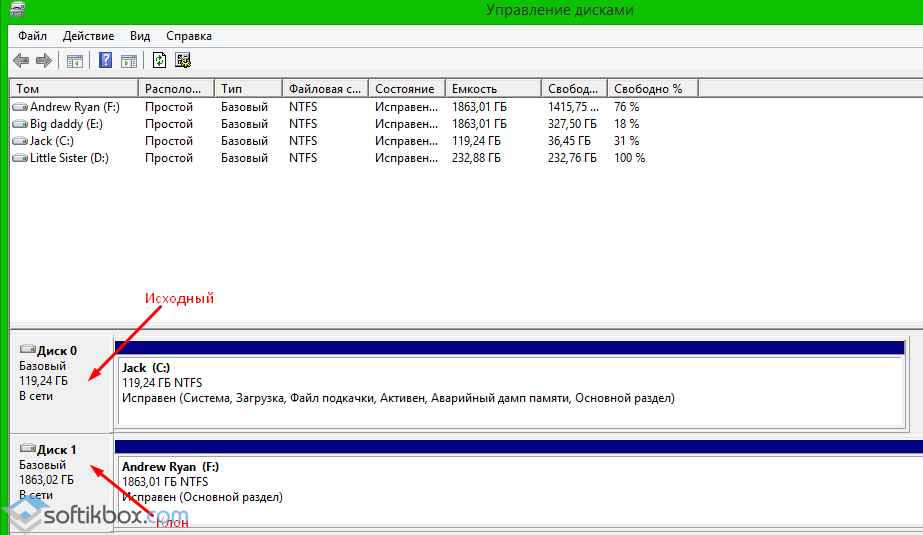
For a start, you can go to the menu "Disk Management" to know what to do with. In our example, the information will be transferred from Disk 0 to Disk 1, while you need to transfer the data from both the Drive (C :) and Disk (D :).
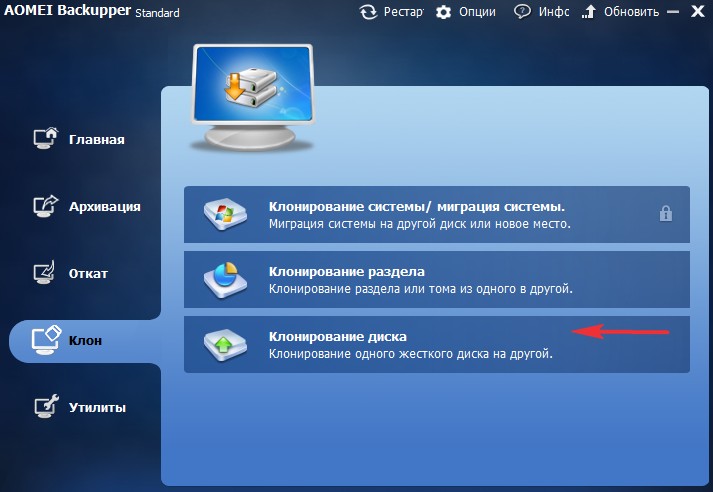
Now run AOMEI Backupper Standart. In the right part of the window, select the "Clone" tab, and then select the section "Disk cloning" .
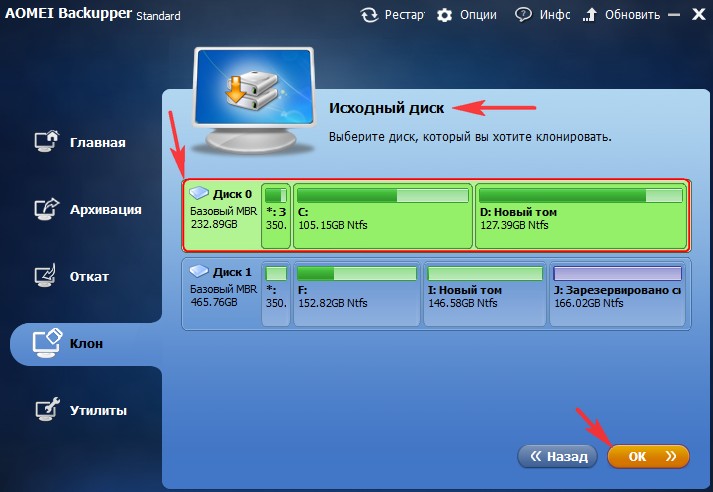
The window opens. "Original disk" , in which you want to note the drive from which Windows will be transferred. Just click on it with the left mouse button and move on by pressing the button "OK" .
Accordingly, now it is necessary to specify the destination disk in the same way, i.e. A new disk, which will be moved to Windows. Move on.
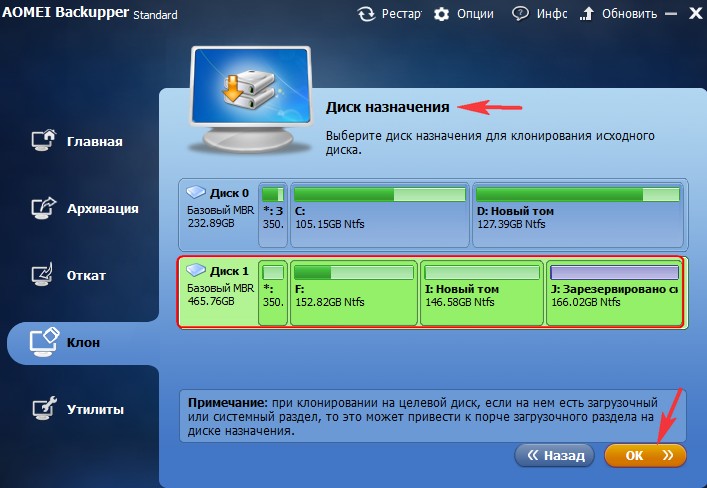
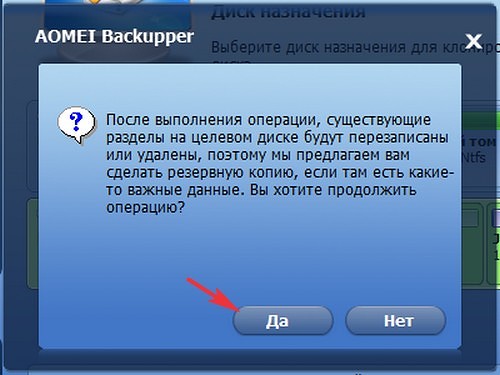
The next item AOMEI Backupper Standart will warn you that all information written to the destination disk will be deleted. If you agree with this, then click the button "YES" .
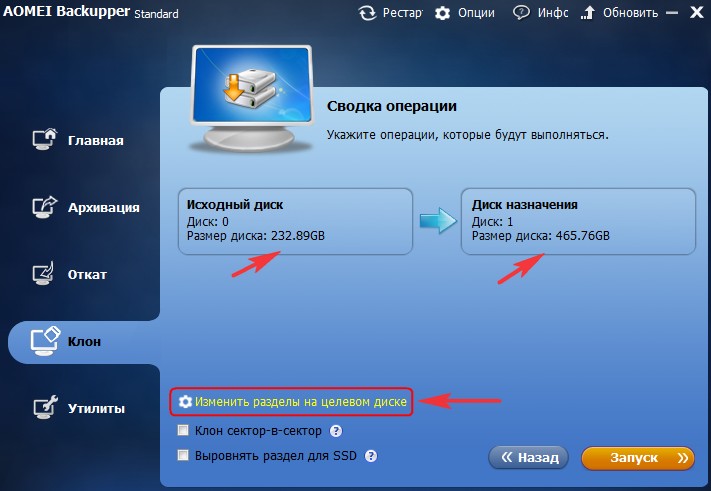
In a new window "Summary of the operation" select item "Edit partitions on the target drive" .
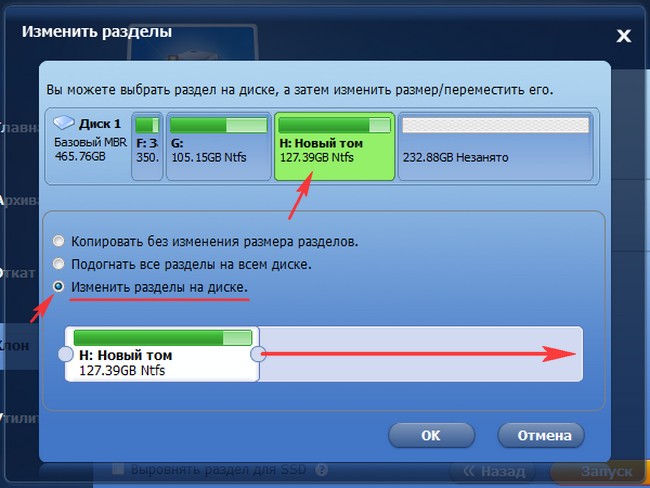
Mark the item "Change partitions on disk" , and just below stretch "H: The New Volume" to connect the unallocated space with the disk (H :). Click the button "OK" to apply the changes.
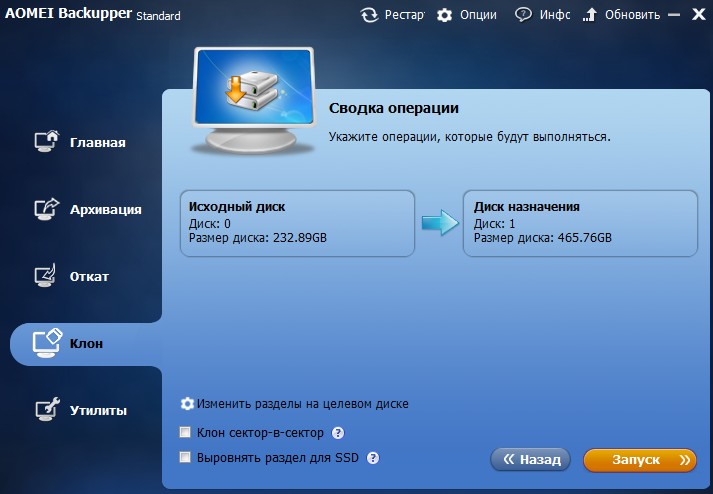
All the settings in AOMEI Backupper Standart are completed, so just click the button "Launching" .
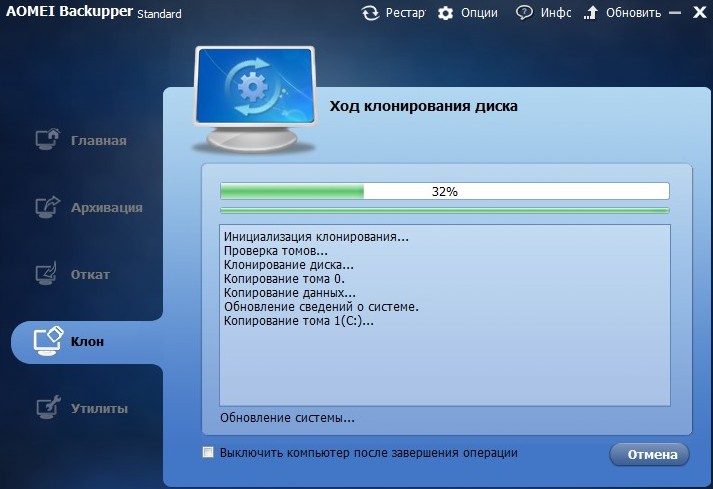
The process of cloning a disc starts, which can take quite a long time.
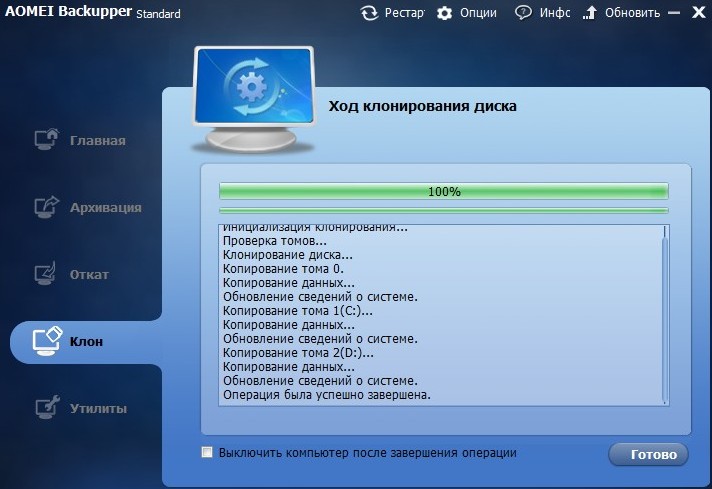
When the process is complete, click the button «Done» .
Cloning involves the complete copying of all files, in order to create a completely identical disk. Nevertheless, in some solutions presented there is the possibility of not complete cloning, sifting out unnecessary files. Thus, it is obvious that the application is reduced to transferring data from one drive to another.
The use is actual, first of all, when buying new media, for example SSD or for use in offices, to fix all computers, reducing to a common denominator.
A standard feature that would allow you to achieve the desired result, not yet, but there is a whole arsenal of programs from the side, both free and paid. Of course, in priority, those that do not require payment. Also, applications can be broken down into usage models, some are only suitable for certain drive manufacturers, others are more universal.
Sometimes you may have trouble using any of the methods provided in the article. Most likely, the problem lies in the fact that the programs are launched from the Windows platform. You should create a bootable USB flash drive or a disc with the program you selected. You can do this with the WinSetupFromUSB utility (for a flash drive). Now at the time of download, click the hotkey - usually F8 or F9. Now you can perform the actions specified in the section.
Cloning a Hard Drive Using Acronis True Image WD Edition
The proposed program for cloning a hard disk is designed for Western Digital, and this manufacturer is the most popular on our expanses. And to use the application does not necessarily need both drives of this brand, but at least one of them should be from Western. The application is the leader in this niche, as it works without failures and creates identical samples of disk space.
Of course, first of all, you should connect the second drive. For this, use either the USB port (for external) or the Sata connector (for internal). Then do:
Digital signature windows Driver 7
You should be prepared that the cloning of the Windows hard disk takes a long time and depends on the speed of data exchange of disks and the amount of downloaded information.
In exactly the same way, as shown in the example, the Seagate disks are cloned using Seagate DiscWizard. Actions and interfaces are identical.
Samsung Data Migration is a program for cloning
As the name implies, the application is used for the Samsung brand, and this is a very popular SSD manufacturer. Cloning a hard drive on ssd is no different from HDD, so it does not require a different approach. The only thing to consider is the limited amount of drive memory, it may be necessary to exclude some files.
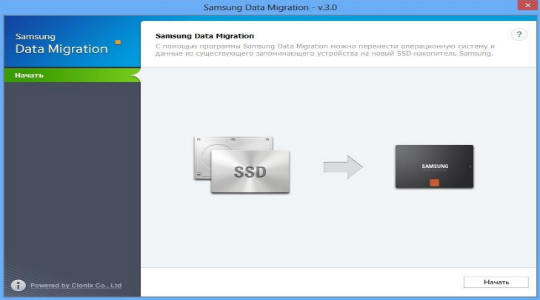
The entire process of installing and migrating data is completely automated, and the settings that you need to specify are identical to the previous method, so perform exactly the same thing.
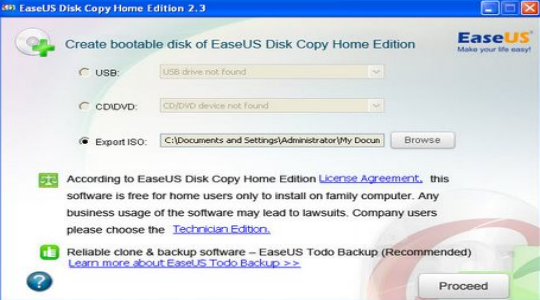
The application for cloning a hard disk is EASEUS Disk Copy
A more universal application, which is unpretentious to file systems, the disc brand and the volumes of the transferred data. In connection with these characteristics, the program is easy to use and, importantly, free of charge.
The application allows you to copy individual files or vice versa not to copy some files. In addition to this function, the utility can recover even deleted files, if they are not overwritten.
The settings are the same, specify the action to be performed, select the files to transfer and the media involved in the process, and everything else the program will do itself.
Let not often, but sometimes many users are faced with a situation when an aging hard drive is out of order, or the installed programs are simply an existing hard disk. At the same time, most users prefer buying a new HDD or a faster SSD. But then you need to reinstall the operating system or some important programs on a new disk, and this can take quite a long time. Therefore, in order not to waste time and not engage in such actions, the easiest way is to clone the hard disk in order to use the old system and the installed applications. You can do this in several ways, each of which will be considered as detailed as possible.
initial information
First of all, it is worth paying attention to the fact that the standard process of copying absolutely all the folders and files involved in windows operation, will lead to nothing, and when you try to boot from a new media, the result will not be. This is due only to the fact that the new device does not have boot sectors and records that are responsible for starting the system.
To get a fully operational OS, the hard drive will have to be cloned. From the hard disk to another drive (HDD or SSD), the data must be transferred specifically for this purpose by the developed methods. There are some nuances here.
Tools Used
To perform operations to create a copy of the hard disk, several options are used to transfer the system to another location. For this suit their own windows tools or special programs that allow you to simplify the entire process a little.
In the methodology, it is mainly used to create backup copies and images, and then restore the system from them on a new medium. In this case, you can make a copy of only the system, and you can transfer and installed programs. In addition, it is important to save the cloned data in advance (in the old disk partition or directly transfer to the new hard drive). Sometimes it can be useful to create a copy of the "Desktop", but more about this later.
How to clone a hard disk with Windows 7: Preliminary actions
To begin with, we will discuss the use of the system's own resources. Before using the built-in tools of the system directly to create a copy of the hard drive, several preliminary steps should be taken. The question of how to clone a hard disk with Windows 7 or any other system is not so difficult to understand, given some of the nuances.
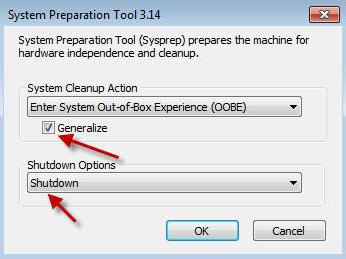
The first action is a call command line and its launch with administrator rights (the "Run" menu, which is called by the combination of Win + R). In the console, you need to write the line% windir% \\ System32 \\ Sysprep \\ Sysprep.exe, and then the system preparation window will open. Here, in the cleanup actions, you select the transition to the OOBE welcome screen, check the box for the preparation for use, and use the shutdown item in the next menu. This step allows you to remove all controllers, system registry events and prepare the system for cloning.
Saving a copy on an old hard drive
The second stage is connected with the use of a copy of a workable system by storing it on an old hard drive. Most often this approach is used when replacing some equipment, for example, the motherboard on which it is supposed to use an existing hard disk, or in case the old hard drive is installed on another computer.
The next question is how to clone a hard windows disk 8, 7, or 10 (no difference), assumes the computer will start normally, after which the installer will update the registry settings, install the necessary hardware and configuration parameters in order to prepare the computer for the first launch.
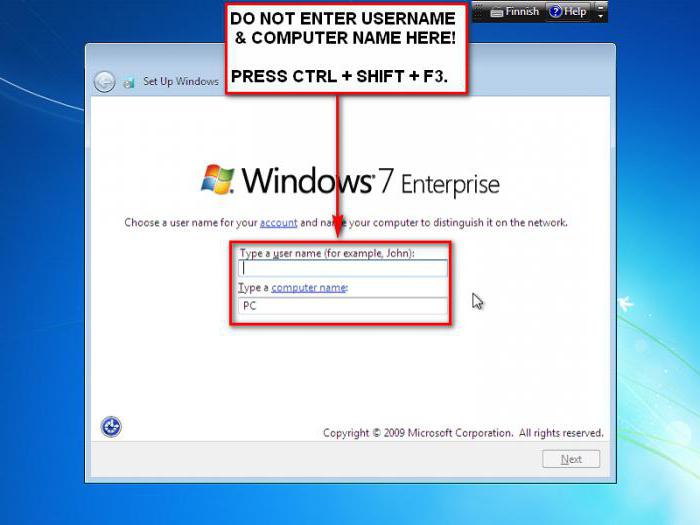
After that, it will follow standard setting regional standards and language, and then you will be prompted to enter the login and password for the account. There comes the most crucial moment. Enter your data is not necessary, because they are already used by the system. Instead, create a temporary account with a password and a confirmation (then you can delete it). Then follows the choice of recommended parameters, checking the location, date and time, network settings, etc. After the process is overloaded the system, we enter under our own account and delete the temporary.
Transferring the system to a new drive
Now let's see how to clone Windows 7 to another hard drive (this technique is applicable to systems of rank above). This option is suitable when you need to transfer the system to a new hard drive or another computer without using an old hard disk.
First, all the steps described above are performed, backup in the corresponding section of the "Control Panel". As a place to save it, we select another hard drive connected by an appropriate cable directly to motherboard or at least instead of optical drive. Next, click the backup button, and after that, when you are prompted to create a recovery disk on a DVD-media, agree (do not necessarily, but recommended).
Cloning a hard disk is a procedure that simplifies the installation of the operating system and software when transferring data to a hard drive or SSD-drive. As part of this procedure, a second hDD, to which the sections of the first the system disk and all the data on it. Also on removable hard disk completely transferred working Windows 10 with all settings and installed equipment.
You can clone a hard disk in Windows 10 using programs like Paragon Hard Disk Manager, AOMEI Backupper and Acronis True Image. A distinctive feature of the last program is the function of cloning the system with the possibility of excluding individual files. Therefore, we'll look at the cloning procedure with the example of this particular software.
A few words about Acronis True Image
Acronis True Image is the development of Acronis, the maître of the software market, which offers PC users a wide range of tools for restoring personal data at a professional level. Soft Acronis True Image includes not only the function of information recovery, but also the creation of a backup, the cleaning of the system, the cancellation of the actions that caused the error.
Acronis True Image exists in two versions. The first is a free 30 day version with organic functionality. In this program, the cloning function of disks is disabled. The second is a paid version with a full set of tools. It is the latter that allows you to make a correct copy of the disk.
What is the source and destination drive?
According to the terminology of Acronis True Image, the source disk is the hard disk from which the system data and the partition structure will be copied. A disc that eventually becomes a clone of the source is the target disk.
In order to see which drive is selected as the main one in Windows 10, it is worth to click "Start", "Disk Management" or type "Win + R" on the keyboard and enter "diskmgmt.msc".
The "Manage Hard Disks" window opens. A drive that is marked as zero is the source drive on which you installed operating system. Disk number 1 is the future clone or target drive.
The target disk has its own structure. However, during the cloning of the source disk, all available data is destroyed. Therefore, all important information should be copied before starting cloning.
Cloning a Hard Drive
We launch latest version programs. We refuse to enter the cloud storageby clicking on the cross.

The working interface of the program opens. In the left menu select "Tools", and then "Clone disk" (the version of the program should be complete).

The next step is to select the source hard drive. Choose the disk from which the data will be copied. In the program they will be displayed as follows: the drive that was numbered 0 will now become 1, and the second drive is the desired drive or the second hard drive. However, it is worth paying attention to the volume of devices.
After selecting the source disk, a window will appear with the selection of the target disk. Choose the right one and click "Next". Because the disk-clone is not a new disk, Acronis True Image will warn you of data loss. Click "Ok".

The next step is to choose the method for cloning materials. Select "Copy partitions unchanged" and click "Next".

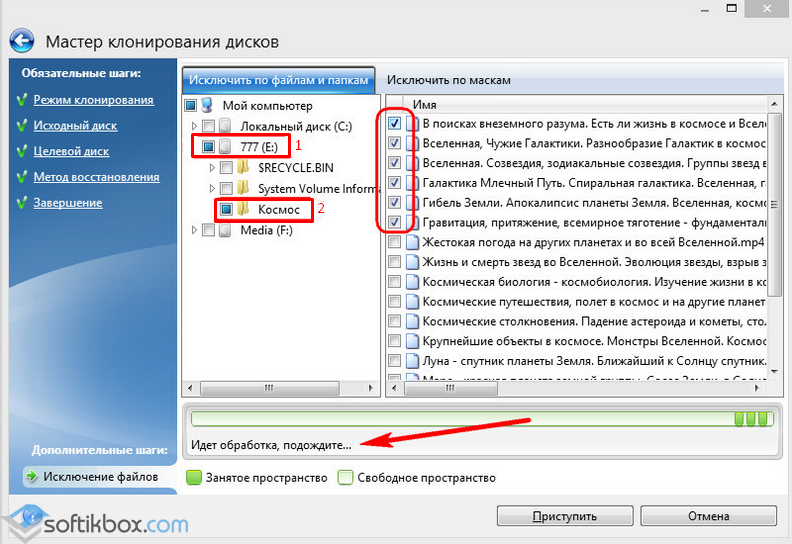
At the final stage, you can click the "Proceed" button and start cloning the disk. However, in this section there is a button "Excluding files". We press it and get into a new window.

Select the files that should be excluded, and wait for the program to remove them from the main cloning list.
After selecting the sections and cleaning them, click "Proceed". The program performs cloning and prompts you to restart the PC.
We reboot the computer.
What to do with the destination disk space after cloning?
After the cloning of the disk, during the restart of the PC, click "F2" and "Del", in order to get into the BIOS. In the "Boot device prioruty" section, we set the boot priority from the second target disk.
Booting from the target disk and hitting Windows 10, go to "Disk Management" and look at the partition structure. " Now the disk-clone is named as "Disk 0", and the main hard drive as "Disk 1".

The explorer also displays the changes. The original disk from which the files were excluded is now displayed as "I" and has a smaller volume. The disc clone is referred to as "F" and has free space.
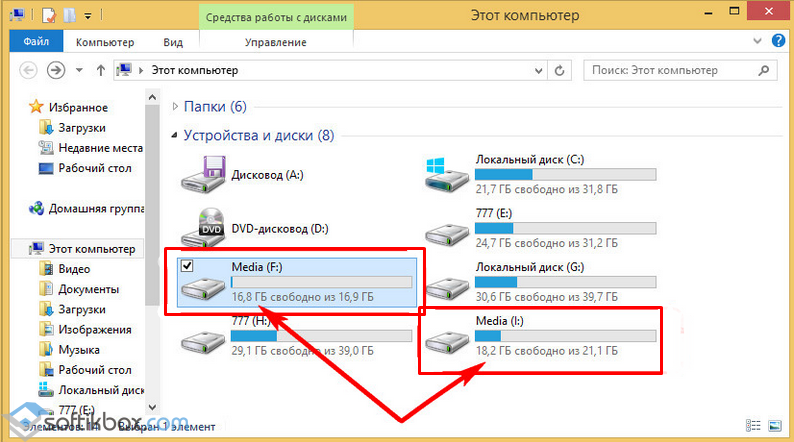
This place can be used to store information, media files, software. However, it is worth noting that for this purpose before cloning a disk, you need to select a method that is not automatic, but manual. Only then volume management will be completely under your control.