In our time, almost every month, new computer games are emerging, which are becoming more and more perfect. Naturally, this situation causes the computer industry to develop quick steps to keep pace with the rapid development of the gaming industry. Some of these new games set new standards, including new requirements for computer performance. And since most of the load falls on the video card, sometimes it needs to be improved (using drivers, via BIOS, etc.).
Why do I need to update the BIOS of the video card?
Usually updating the video card is necessary in order to improve its performance. For example, the power of the video card is not enough for a comfortable game, because of what black squares may appear, the image becomes inaccurate, and sometimes the computer even hangs, and you have to reboot it.
To solve such problems, the video card is overclocked, the drivers and BIOS of the video card are updated.
There are also several other situations in which you may need to update the BIOS of the video card:
- change of video encoding standard from NTSC to PAL (for owners video card Radeon with TV-out);
- replacement of standard 8x8 and 8x16 fonts with Russian;
- change the sweep frequency in VESA mode.
In all other situations, the BIOS of the video card is better not to update.
Preparing to update the video adapter
Before you start upgrading the BIOS of the video card, you need to stock up some programs that are needed for this procedure. So, to flash the video adapter you will need:
In addition, you need to know the model of the video card that you need to update. If the user does not know the frequency of the device, type, volume and other important characteristics, then this information can be obtained using the utility GPU-Z. You need to know the following parameters: device model, GPU, memory type and memory size, memory bus width and GPU Clock. Armed with this data, you can search for the latest BIOS version, and then.
How to update BIOS for ATI?
So, let's say that the utility GPU-Z showed that the user has installed ati graphics card Radeon HD 7970. So, you need to download the archive with the new BIOS version for this device, unpack it using winflash, and then create a bootable USB flash drive. After that, you need to run the RBE BIOS Editor program, select "File" and "Load BIOS" in the menu bar. In the "Informaiton" window, you can verify that a new version of the BIOS was actually downloaded, and not an mp3 file. Next, you need to click the "Close Settings" button and check all the information about the frequency and voltage of the GPU. After that, you can close the program (you do not need to change anything).
Then you need to save the working version of the BIOS as a file. Anything can happen, and with the help of this file, the user will at least have the opportunity to roll back to the working version of the BIOS. To do this, the GPU-Z utility is useful. It is necessary to start it, click the button with the image of the chip (it is in the item "BIOS Version") and in the appeared list select the line "Save to file". It is desirable to call a file a simple name, for example, old.rom.
Next, you need to copy 3 files to the boot drive (or floppy disk): the new firmware, the current firmware (just in case) and the "flasher" Atiflash. Now that everything is ready, you can proceed with the update: you need to insert the USB flash drive into the USB connector (or floppy in the drive) and restart the computer.
When you turn on the computer, you must also set it in the settings so that the system first downloads data from the flash drive. If the download succeeds, the user will see an invitation to enter DOS commands. To update the ATI video adapter, you only need to enter one command: atiflash.exe -p 0 biosnew.rom (you can also do so: atiflash.exe -p -f 0 biosnew.rom), where:
- atiflash.exe is the command to start the program;
- -p - "programm" key, which allows the programming of the memory chip;
- 0 - the serial number of the video card, the BIOS of which will be reprogrammed;
- -f - "force" key, which disables the validation of the video card data if it is installed by a non-native BIOS.
- biosnew.rom - the name of the firmware file.
After pressing the "Enter" key, the BIOS of the video card will be updated, and then you will need to restart the computer. This completes the update procedure.
How to update BIOS for Nvidia?
Similarly, the BIOS is updated for Nvidia graphics cards. That is, in order to update the BIOS, first you need to write a file with a new BIOS version, a file with a working BIOS version, and also a "flasher" (in this case a program called "nvflash" will be used on the boot drive or floppy disk).
Once everything has been prepared, you can proceed with the update. First, you must restart the computer and download data from the boot drive. When the DOS boot is complete, you will need to enter the command "nvflash -f newbios1.bin" (without the quotes). Instead of "newbios1" it is necessary to write the name of your file with the new BIOS of the video card. This command will update the BIOS of the Nvidia graphics card. After the procedure is over, you will need to restart the computer, without forgetting to remove the USB flash drive (or floppy disk) before that.
If suddenly something went wrong and the computer does not load now, then you need to roll back to a working BIOS version, which was saved just for such cases. To do this, you need to boot from the flash drive with all 3 files to update, and then enter the following line in DOS: "atiflash.exe -p -f 0 old.rom" (without quotes). After reboot, the computer should work again.
It is worth noting that updating the BIOS of the video card is extremely rare. But if there was such a need, remember that updating the BIOS of the video card is a potentially dangerous procedure, and in case of an unsuccessful outcome only the user will be to blame.
A video card is one of the most complicated components modern computer. It includes its own microprocessor, video memory slots, and its BIOS. The process of updating the BIOS on the video card is somewhat more complicated than on the computer, but it is required much less often.
Before you begin the BIOS upgrade, you need to study the following items:
- BIOS on video cards that are already integrated into the processor or motherboard (often such a solution can be found in laptops), does not require updating, since they do not have it;
- If you use several discrete graphics cards, then you can update only one at a time, the rest for the time of updating will have to be disconnected and connected after everything is ready;
- You do not need to upgrade without good reason, for example, there may be incompatibility with new hardware. In other cases, flashing is an inexpedient procedure.
Stage 1: Preparatory work
As preparation it is necessary to do the following things:
- Create a backup copy of the current firmware so that in case of problems you can make a backup;
- Learn the detailed characteristics of the video card;
- Download the current firmware version.
Use this instruction to learn the characteristics of your video card and make backup BIOS:
Now you need to download the current BIOS version from the official website of the manufacturer (or any other resource you can trust) and prepare it for installation. If you want to somehow change the configuration of the video card by flashing, the edited version of the BIOS can be downloaded from various third-party sources. When downloading from such resources, be sure to check the downloaded file for viruses and the correct extension (should be ROM). It is also recommended to download only from trusted sources with a good reputation.
The downloaded file and the saved copy should be transferred to the USB flash drive from which the new firmware will be installed. Before you use the USB flash drive, it is recommended to completely format it, and only then discard the ROM-files.
Step 2: Re-Flash
Updating the BIOS on the video card will require users to work with an analog "Command line" - DOS. Use this step-by-step instruction:
If, for some reason, the video card with the updated BIOS refuses to work or is unstable, then first try downloading and installing the driver for it. Provided that this did not help, you'll have to roll back all the changes back. To do this, use the previous instruction. The only thing is that you will have to change the name of the file to the one that the file with the backup firmware carries in the command in the 4th paragraph.
In case you need to update the firmware on several video cards at the same time, you need to disconnect the card that has already been updated, connect the next one and do the same with it as with the previous one. Similarly do the following until all the adapters are updated.
Without the urgent need to make any manipulations with the BIOS on the video card is not recommended. For example, you can adjust the frequency using special programs for Windows or by manipulating standard BIOS. Also, do not try to put different versions of firmware from unverified sources.
A computer graphics card is a very complex device. It consists of several elements: the graphics core, video memory, RAMDAC, cooling system, etc. From the settings of these elements and the order of their interaction, its work as a whole depends. The algorithms for the operation of the elements of the video card are determined by its BIOS (the basic input-output system) stored in a special chip, called video ROM or Video ROM.
In most cases, the video card for the whole period of operation successfully works with its "native" BIOS. However, in some cases, the BIOS may be advisable to change (reflash). This can eliminate the incompatibility of the video card with the rest of the computer hardware or software, and also allows you to solve other problems (overclocking, downlink, etc.).
About how to update the BIOS, here we will talk. For clarity, the article uses images of the process of flashing the BIOS of the Geforce GTS 450 video card. But in exactly the same way it can be done with any other Geforce or Radeon series video card.
Important. The process of flashing the BIOS is fraught with many risks and can result in serious consequences. It should be understood that in case of unsuccessful implementation of the video card can come to an inoperative state and for its "revitalization" will have to contact a specialized service. DO NOT UPDATE the BIOS without good reason. The absolute majority of problems can be solved in another way.
All of the following actions are at your own risk.
Other Warnings
1 . The information below does not apply to laptops, or to computers that use integrated graphics chips. Their video adapters, with rare exceptions, do not have a stand-alone BIOS. Parameters of their operation can be changed only by flashing the main BIOS of the computer.
2 . If several discrete video cards are simultaneously used in the system, only the video card, whose BIOS needs to be updated, should be left at the time of firmware in the computer, by connecting it to the main (the one closest to the processor) PCI-Express connector of the motherboard.
3 . The recommendations on this page are suitable for flashing BIOS video cards with one graphics processor. This is the absolute majority of video cards installed in home and office computers. But still, before using the instruction, make sure that your video card is also uniprocessor. Otherwise, as a result of the following actions, it most likely will come to a non-working state.
You can find out the number of GPUs of a particular video card model by examining its specifications on the manufacturer's website. A clear sign of the presence of two processors is the presence of the "X2" mark in the name of the model of the video card. You can also check the number of GPUs with the flashing utility right before the flashing itself (see below).
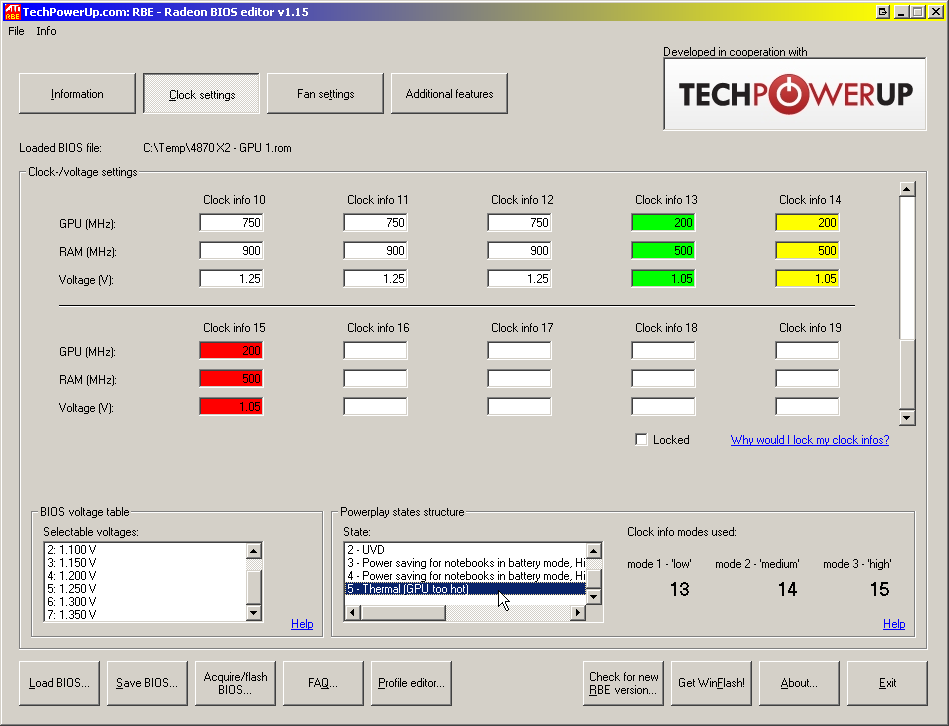
Stages of flashing
I. Preparation:
1 . If possible, before updating the BIOS, take care of the computer's power stability. It is desirable to connect it not directly to the power grid, but through an uninterruptible power supply. Re-flashing lasts a few seconds, but if at that time the electricity is gone, the performance of the video card may be broken.
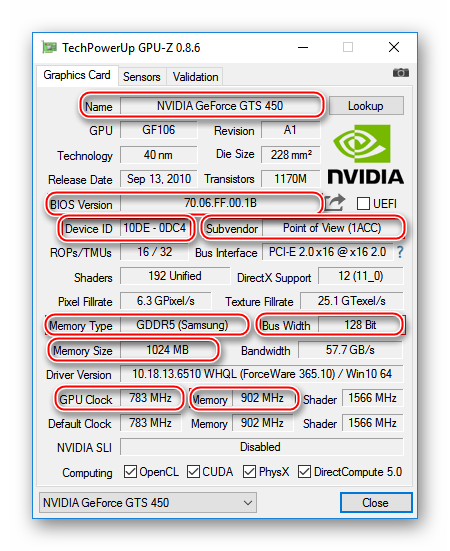
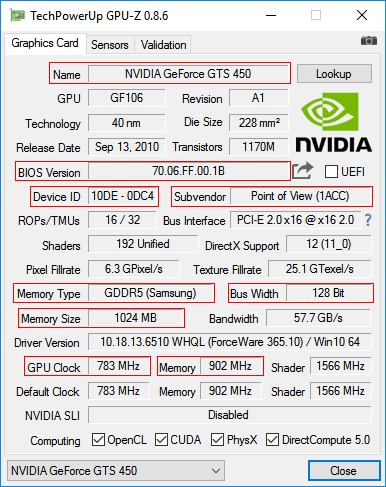
2 . Learn the model and other characteristics of the video card, as well as the current version of its BIOS. For this purpose it is convenient to use the utility GPU-Z.
Running GPU-Z on the computer, you need to know the following data (see the image below):
• Name of the model of the video card (Name);
• The current BIOS version (BIOS Version);
• manufacturer of the video card (Subvendor)
• Device ID;
• Type of video memory (Memory Type);
• the size of the video memory (Memory Size);
• Bus width of the video memory (Bus Width);
• frequency of the graphics core (GPU Clock) and video memory (Memory Clock).
3 . Make a backup copy of the current BIOS version. In the future, it can be used to return the video card to its previous state, if the flashing process fails (for more details, see the end of this article).
You can make a copy of the BIOS using the same GPU-Z utility mentioned in the previous paragraph. To this end, you need to start the GPU-Z and once click the left mouse button on the small icon to the right of the field displaying the BIOS version (in the form of a chip with an arrow, see the image). A menu will appear in which you need to click on the item "Save to file" ("Save to file").
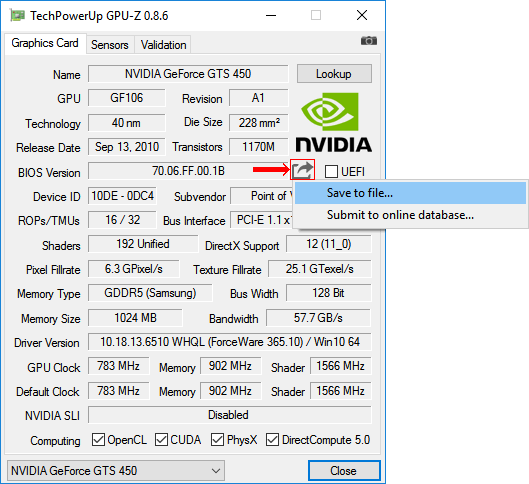
After a short time, the "Save As" window appears, in which you need to select the location to save, specify the name of the file to which the BIOS will be copied, and click the "Save" button.
You can specify any file name. The main thing is that it is not too long and well remembered. For example, a file can be called oldbios.rom. So it will be clear that this is an old BIOS version.
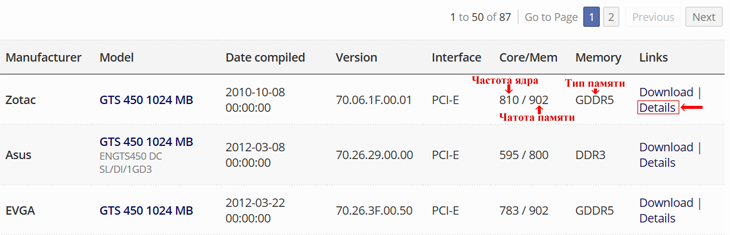
4 . Download new version BIOS (firmware file). Download it preferably from authoritative sites, for example, from this - www.techpowerup.com.
To select BIOS on the specified site it is necessary on parameters of the video card, received by means of utility GPU-Z (see above in item 2). In this case, you need to find a BIOS for a video card with exactly the same ID (Device ID).
To find the Device ID of the video card, the BIOS of which is offered for download on techpowerup.com, click on the "Details" link next to it (see the image).
In addition to the device ID, you need to match the type and amount of video memory, and the frequency of the graphics core and memory in the downloaded BIOS file is not much different from the current one.
As a result of the download, you should get the firmware file with the extension .rom. It can be called anything. But if its name is hard to remember, it's better to rename it to something simpler and more memorable, for example, on newbios.rom.
If the purpose of the flashing is to change the frequencies of the graphics core and / or the memory of the video card, you do not need to download the new BIOS version from the Internet. It is better to adjust the "native" BIOS of the video card accordingly, having previously made its backup copy. About how to save it in the firmware file, it was discussed in the previous paragraph.
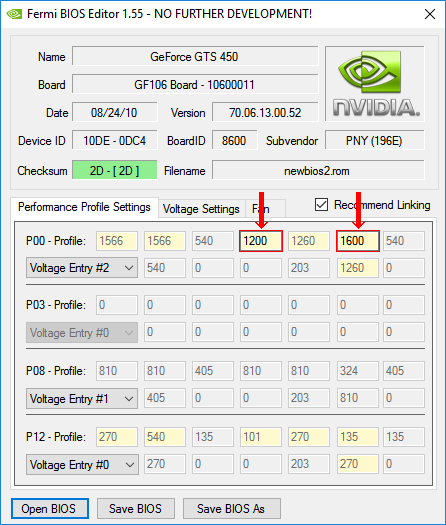
You can correct the firmware file with the help of special utilities. To edit the BIOS video card GeForce series GT400 and higher, you need the Fermi BIOS Editor. For older GeForce models, use the NiBiTor program.
The BIOS of Radeon graphics cards is edited by Radeon Bios Editor.
For clarity in preparing this article, we used GeForce GTS 450 manufactured by Point of Viev (seen in the screenshots above). By reflashing the BIOS, I decided to "turn it" into a GeForce GTS 450 video card from PNY with lower standard video and memory frequencies. The card almost "died" of old age and constant experiments. It was decided to de -force it in order to normalize the work, because at "factory" frequencies, under any load increase, it "hovered" and then sent the computer to blue screen of death. Even some films on it were impossible to watch.
With this goal I downloaded BIOS for GeForce GTS 450 from PNY with the appropriate parameters and then corrected it with Fermi BIOS Editor. At the same time, to reduce the speed of the graphics core, I changed the frequency of the shader units from 1566 to 1200 MHz. The memory frequency was reduced from 1804 to 1600 MHz (see the image).
5 . Download utility for flashing BIOS.
For video card nvidia (Geforce) need a utility NVFlash. It consists of two files: NVFLASH.exe and CWSDPMI.EXE. To download the archive with the specified files, click here.
For ATI / AMD (Radeon) graphics cards, a utility is required ATIFlash. It is a single file atiflash.exe. To download the archive with this file, click here.
6 . Create bootable USB flash drive with DOS.
For this purpose, any flash drive is suitable, but all data on it will be destroyed. After flashing the flash drive can be formatted and used as before.
The process of creating a bootable USB flash drive with DOS in detail.
7 . Copy the following files to the boot drive:
• The old BIOS version (the file oldbios.rom, see above in step 3).
• A new BIOS version or an updated old BIOS that you would like to flash instead of the currently used (file newbios.rom or whatever you called it, see above in step 4);
• Utility files for BIOS firmware. If the GeForce card is flashed, this is the NVFlash utility (NVFLASH.exe and CWSDPMI.EXE files), if the Radeon video card is the ATIFlash utility (atiflash.exe file), see above in step 5.
The listed files must be copied to the root directory of the USB flash drive (you do not need to place them in a separate folder). In this case, do not change those files and folders that are already on the flash drive (they were created during the process of converting it from the usual into a bootable one).
BIOS flashing:
1 . Download the computer from the flash drive created in the previous step.
Detailed instructions on how to download a computer from a USB flash drive,.
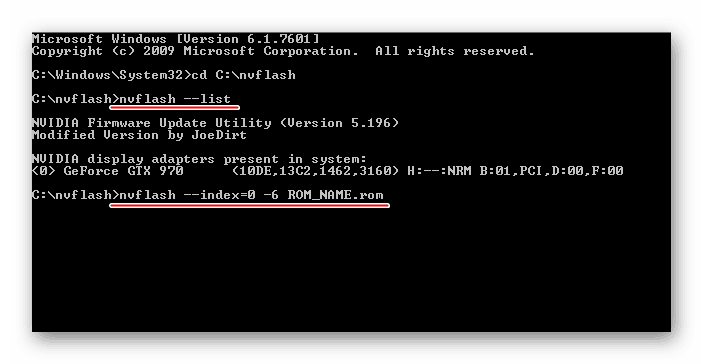
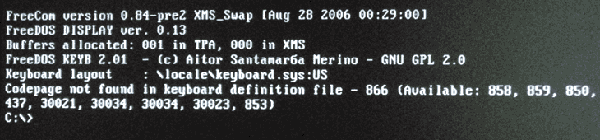
When the computer boots under DOS, you will not see the familiar system windows or other GUI elements. On the screen, on a black background, several lines of white symbols will be displayed. You can find out that the computer has booted up by prompting you to enter the "C: \\\u003e" commands (see the image).
2 . Make sure that the video card is uniprocessor. To this end, immediately after the prompt "C: \\\u003e
• for a video card GeForce: nvflash --list
• for a video card Radeon: atiflash -i
Then press the Enter key.
After a while, the required information will appear on the screen and an invitation will appear for entering the "C: \\\u003e" commands (see image).
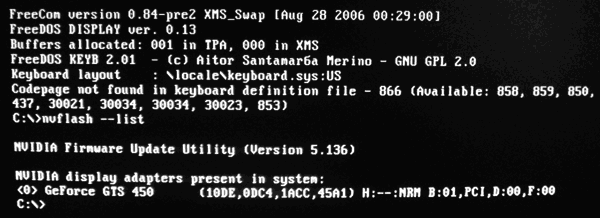
If one video card is installed in the computer, but after entering the above command, information on the presence of two graphics cards is displayed on the monitor, then your video card is dual-processor. You can not reflash it in the following way. Look for the appropriate instruction on the Internet.
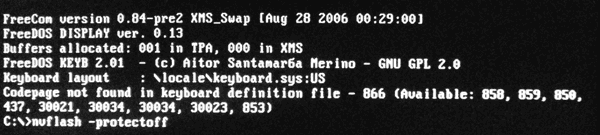
3 . In many cases, for GeForce graphics cards, you need to disable BIOS modification protection. To do this, after the "C: \\\u003e" prompt, enter the command nvflash -protectoff, press Enter and wait for the "C: \\\u003e" prompt.
If the computer asks you to confirm your intentions, press the corresponding key (Y or Enter).
For Radeon video cards, you usually do not need to disable security and you can skip this step.
4 . Reflash the old BIOS, replacing it with a new one.
For this purpose, after the "C: \\\u003e" prompt, you must enter one of the following commands:
• for video cards GeForce: nvflash -4 -5 -6 newbios.rom
• for video cards Radeon: atiflash -p -f 0 newbios.rom
In the specified commands, newbios.rom is the name of the file with the new BIOS. In your case, this element may be different, depending on how you named this file in the preparation phase (see above).
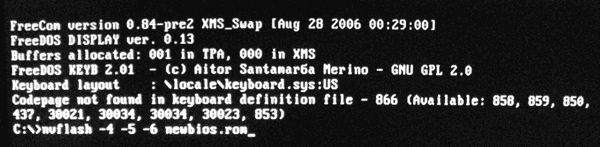
After entering the command, you must press the Enter key and wait a little while until the "C: \\\u003e" prompt appears again. Its appearance indicates the completion of the flashing process. If the computer requires confirmation of your intentions - press the corresponding key (Y or Enter, according to the situation).
5 . After reflashing, restart the computer in the normal mode. To reboot, you can press the key combination Ctrl + Alt + Delete or the Reset button on the keyboard. the system unit computer.
Usually, after a flashing, you need to reinstall the video card driver. More information on how to do it, you can.
My experimental GeForce GTS 450 as a result of the flashing got lower frequencies of the graphics core and video memory (see image). With them, it "came to life" and now works stably under any load.

If the BIOS flashed unsuccessfully
If after the flashing artifacts appeared on the screen, the video card does not work or works unstably, you can return it to its previous state, "sewing" back the previous BIOS version (file oldbios.rom).
Procedure:
1 . In case the video card does not work at all (if you try to turn on the computer, nothing is displayed on the monitor), you must disconnect the monitor cord from the video card and connect it to the video output motherboard. Thus, the information on the monitor will be output by a video adapter integrated into the processor or chipset of the motherboard. If there is no integrated video adapter on your computer, you will have to look for another computer on which such an adapter is available.
2 . Download the computer from the flash drive, which was used to flashing the BIOS;
3 . After loading DOS and prompting "C: \\\u003e" on the monitor, enter one of the following commands:
• for video cards GeForce: nvflash -4 -5 -6 oldbios.rom
• for video cards Radeon: atiflash -p -f 0 oldbios.rom
In the specified commands oldbios.rom - the name of the file with a backup copy of the old BIOS and in your case this element may be different.
Entering the command, you must press the Enter key and wait for the "C: \\\u003e" prompt to appear. If in the process the computer requires confirmation of your intentions - press the corresponding key (Y or Enter, according to the situation).
4 . Restart the computer by reconnecting the monitor cable to the video card connector.
All the actions from this article you do at your own risk! The administration of the resource does not bear any responsibility for any malfunctions or damages that may occur after the actions described below.
This article will talk about how to reflash the BIOS in video cards from AMD. For the procedure of flashing the video card you will need the utility ATI Winflash, which you can download.
It is recommended to unplug it before Windows BIOS in BIOS by opening " device Manager", and in the paragraph" Video adapters"select the right one, right-click on it and select" Disable".
Flushing through the graphical interface
Run with administrator rights ATIWinflash. Make sure that the video adapter you need is selected in the upper right corner of the program.
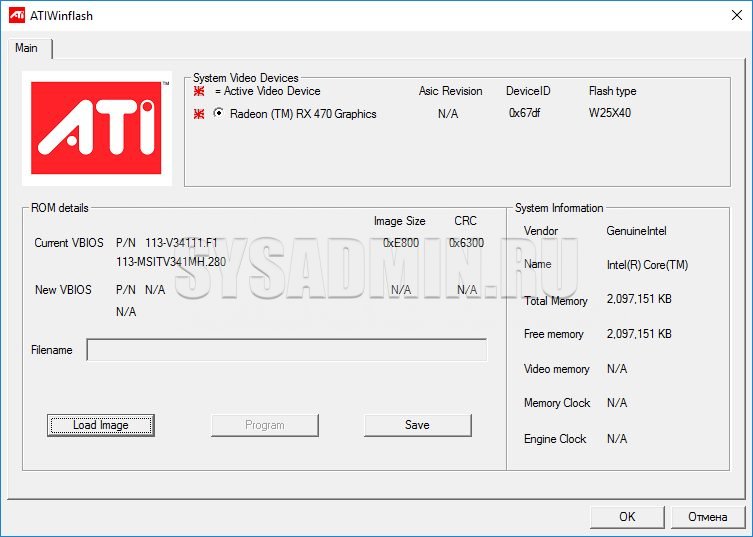
This is how the ATIWinflash program shows one single video card.
If the number of video cards in the system is more than 3, then the program can not correctly display the entire list - the fourth and subsequent video cards simply do not fit into the window. In this case, you will have to use the firmware via the command line (read about this in the same article below).
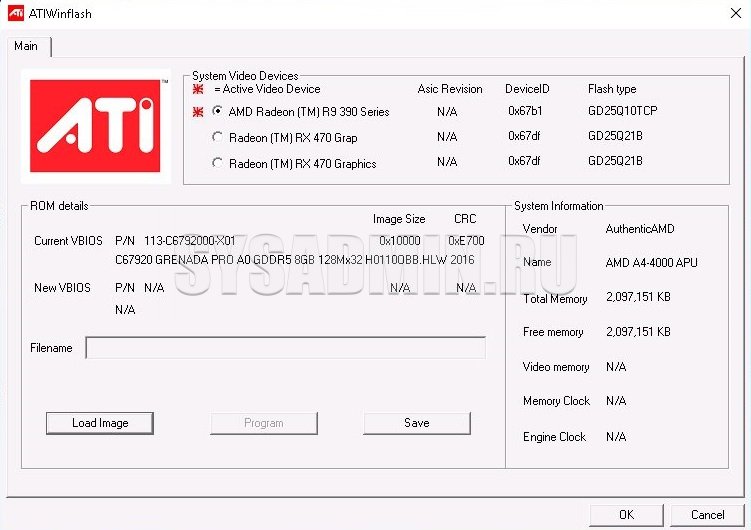
And so in the program ATIWinflash four video cards are shown - only three of them are visible, the fourth simply did not fit on the screen.
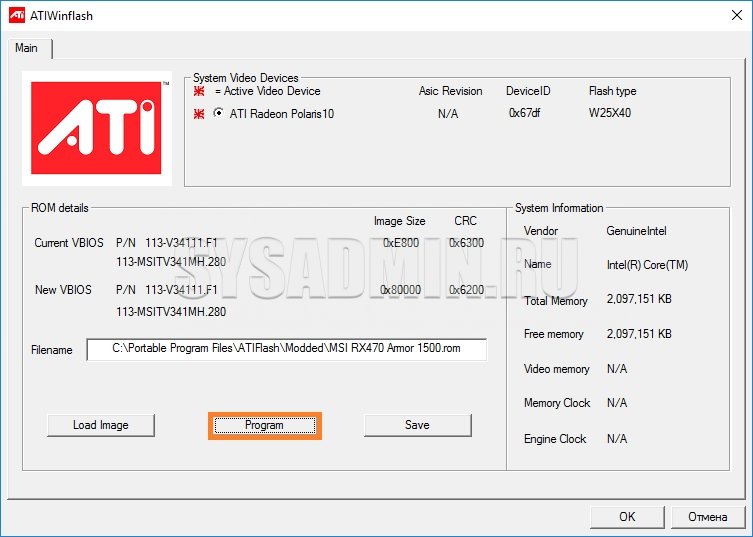
Having chosen the required graphics card, click on the button "Load image", and select the BIOS file "a, which we want to flash the video card.

And then click on the "Program" button.
After that, we wait, when the procedure for flashing the video card will end, which will be informed by a separate notification.
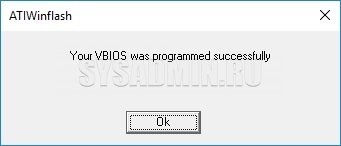
And then there will already be a proposal for a reboot, which is necessary for the video card to work with the new BIOS.
If after rebooting your video card is detected in the Device Manager, but it does not work, it may be due to the blocking of the user's BIOS by the AMD drivers. You can read about how to deal with this.
Flushing through the command line
The most useful ATIFlash commands are:
- atiflash.exe -i - will show the list of installed in the system AMD video cards. It is useful in order to reflash the BIOS on any particular video card.
- atiflash.exe -p - flashing the graphics card with the specified BIOS number from the specified file.
- atiflash.exe -pa - reflash to ALL video cards with the specified BIOS file "a.
So, in this article, we'll look at how to properly perform the scary procedure for novices to flush the BIOS (BIOS) of the video card. Let me remind you that BIOS (from English Basic Input-Output System - Basic System Input-Output) is one of the most important "gears" of the video card, without which the correct functioning of this card is not possible ... That is why, this procedure frightens newcomers so much, after all, BIOS "shutdowns" can be left without a video accelerator for a long time ...
There are many different versions and modifications of BIOS for video cards, starting from BIOSes, stitched by the card manufacturer and ending with reference BIOSes from the manufacturer of graphics chips, in our case from NVIDIA. For the most part, reference BIOSes, as well as drivers (detonators) can be flashed on any appropriate video adapter, whether it is released by ASUSTeK or by Creative ... The main thing here is to choose your BIOS type for your own video card. I explain - you can try to mount BIOS from GeForce2 GTS on a video card with a Vanta chip ... Of course, I doubt that there will be one who wants to increase performance in this way, but what the hell is not ... On the other hand, video cards of the same series (assembled / released by different manufacturers on the same chip, for example GeForce256 or TNT2) differ in the type of video memory installed on them - SDRAM or SGRAM. For SGRAM will have its own version of BIOS, for SDRAM - its own ... Remember about this, downloading BIOS from sites!
Why do you need this?
In the beginning, we will try to immediately dissuade you from this idea - a re-flash BIOS ... Think about what you want to achieve this operation? There may be several answers:
- I want BIOS with SBA support
Read on our website and live without it quietly - as they say, "works, son, well, do not touch!" ... - I want to overclock my card, changing the frequencies directly in the BIOS, so as not to load PowerStrip every time
Yes, this is certainly a question of the day ... If you have a TNT / TNT2 card, you can use TNTClck, but if GeForce or GeForce2 ... For now, we have not seen such a common overclocking utility from a third-party vendor, however, you can use the proprietary overclockers built into the drivers (they, however, are not always there - here, in some ways, help the reference drivers) ... Yes, and with TNTClck there are some problems - it improperly dispels memory above 200 MHz on some non-Asus cards Diamond, Creative) ... Plus, everything is used to that e Do disperse map - that in order to achieve greater speed in games. Where games are there is Windows 9X. But there is also Windows NT, in which neither TNTClck nor the built-in drivers are working ... In general, here the question remains open. - I want to reduce the memory timings and thereby increase the speed ...
Another myth! More precisely, of course, the performance will increase, but not enough to carry out such a risky operation (again, the article for beginners in this case - asses can only smile at these words J) ... In addition, often, this leads to a reduction in the overclocking threshold, or to reduce the stability of the board ... Yes, and our good old TNTClck can suit you for cards no higher than Ultra. - I want to change the inscriptions displayed by the map at loading ...
Well, this is already pampering ... J If you think that it's worth it - go ahead! - I want to replace Sub Vendor ID / Sub Vendor Model.
Here, there is nothing else to offer for the time being ... If you really need it, for example, to flash the brand BIOS from Asus to a noname-card, or to make it from PowerColor Creative to use proprietary drivers and utilities - go for it! - I want to change BIOS on a more recent one - I've found glitches in my ...
This is, perhaps, the reason why you should replace your BIOS, with a new one. Then this article is for you. Here only it is necessary to mention this point: if everything works OK, and the glitches found in your BIOS, you are not in any way concerned (for example, "some problem is solved, in some program unknown to you" or "compatibility with some chipset "(for example, MVP3, and you have BX)), then calm down -" glitches passed by, "and you do not have to worry and, even more so, to re-install BIOS. In these and similar cases, the risk of damaging the card does not justify itself.
Closer to the point
Now a little introduction to the practical part is a case from our practice. On the Asus 3800 Pro 32M, overclocked to frequencies of 187/210 (core / memory respectively), it was required to flash BIOS with SBA support. It was not possible to patch the firm flasher ... I had to extract the BIOS and flashing it with a standard NVIDIA flasher. As a result, timings in BIOS with SBA turned out to be less than in the firm BIOS ... Increasing them did not give the expected result by stable work board, and had to reduce the frequencies to 180/200 ... This, to the issue of the need for firmware BIOS with SBA support to increase card performance. By the way, BIOS from ASUSTeK is no exception in terms of failure of the flashing. BIOSes from Diamond, for example, "standard flasher" from NVIDIA "does not understand", more precisely, it "does not understand" the flash-chip of the card - therefore, there is only one way out - use the firm broacher.
So, if, after all, having read the above, you have not abandoned your intention; if the installation of the most recent detonator is for you a matter of honor, and passersby are poking at you with a finger because you have never (never thought! J) have re-flashed the BIOS of the video card, if so, we turn to the practical part ...
To begin with, we will compose a small algorithm of actions for reflashing (believe me, it's worth spending extra 5-10 minutes to prepare your rear):
- We document all our actions on paper, in case of failure of the operation ... This will provide you / restoring the necessary information.
- Create a backup copy of BIOS. In case of failure, you can try to restore the BIOS yourself. Or, bring your BIOS for a firmware upgrade to the firm in which you bought the card ... Usually, backup copy is a small (~ 50Kb) file, which can be created by the flasher, or some other utility. We recommend for simplicity to give a file a simple name, for example, "my.bin".
- We create all conditions for restoration. This item implies the creation the boot disk, on which your backup will be located, and which will be loaded by default. Let's take a closer look ....
- In Setup, set the boot order from drive "A"
- Make a boot floppy using your OS
- Check if the car is being loaded from it, if so, then move on
- We copy the "autonomous set of the broacher" to the floppy disk - what BIOS BIOS itself needs to flash + itself. For example, for firmware of the reference BIOS on TNT / TNT2 this will be "dos4gw.exe", "nvXXflash", "my.bin", where "my.bin" is our original BIOS
autoexec.bat CLS
PROMPT
$ p $ g
GOTO
% CONFIG%
: success
GOTO end
: failed
nvXXflash my.bin
GOTO End
: end
config.sys
MENUITEM = success, Bios has been changed
MENUITEM = failed, Bios change is FAILED!
MENUDEFAULT = failed, 10
With this build of system commands after 10 seconds, if no action is taken from the console by the operator, the BIOS will automatically be flashed. - Once again carefully check the implementation of points 1-3. Without comments - that's really where "verily, seven times check, one - ask!" ...
- Reshape BIOS. Here two storylines are possible - success and failure. It is clear, with success, you can congratulate yourself and shake your left hand with your right hand! J. If you fail - read carefully ...
- So, what happened was terrible ... Here too it is necessary to adhere to several rules:
- Do not panic. This is not the end of the world ... Come on!
- It is not necessary to press frantically the button "Power" in the hope that "it's not too late" and can "it has not yet asked." Better quietly try to repeat the flashing procedure. If, it did not work out - try to restore the backup BIOS (you can also the second time, after loading from the system floppy made).
- The computer is still not loaded - the card does not come alive. Then you need to take an old ISA or PCI card (only non-reprogrammable - nonFlashable) and insert it into the machine. Then we repeat the procedure for the firmware again; The fact is that the first in the car turns on the video card, and the ISA-video card - the older device and turns on independently, without requiring BIOS (in computers with BIOS Award on the motherboard there is a boot-block that initializes the ISA card).
- If as a result of manipulation the video card does not come to life ... Well, you need to contact a specialist, or to the firm that sold you a video card - there are two ways: honestly tell them what happened - you will almost certainly be helped (for n-th amount) J and, for sure , they will lose the guarantee; play a simpleton, whose "video card" has stopped working - maybe you will be trusted by J. In the second case, you risk getting into an embarrassing situation - most likely, you are not the first "smart guy" who came with such a problem, and they are aware of a possible reason ...
General: Usually the flashing procedure is performed from "pure DOS" (in Win 9X by pressing "Shift + F5"), which is recommended, but the hurry can also run from the MS-DOS window from Windows ... For NT and Windows 2000, it's probably better to boot from the DOS-diskette - here we do not have a personal experience, so we just assume ... Directories and file names where they will be stored, it is best to give as simple as possible - for convenience, if you have to operate with the command line ... Next - it is desirable to have an uninterruptible power supply unit (in the case of an excavator for fixing the highway or Uncle Vasi-electrician) or at least a network filter for noise immunity. If you have the overclocking of a component or a combination of them (processor, video card ...), then it is better to put everything in a regular mode of functioning, although it is possible to quietly flashing with a system bus of 83 MHz and a decently overclocked graphics card ... But, this is from the field "how to do it is not necessary."
Tools
TNT BIOS Edit & NVFlash
The practical part of our lesson will be to review the reference set for flashing from NVIDIA, the wonderful program "TNT BIOS Edit", working with BIOSes for cards on TNT / TNT2 chips and their modifications (Vanta, M64, Pro, Ultra). Roughly speaking, for the firmware of the reference BIOS on the cards with the TNT2 chip you need again three files: the BIOS file, "dos4gw.exe" and "nv5flash" ("nv4flash" for TNT-based cards). The firmware procedure is simple - starting from command line:
with: nv5flash change.bin
where "change.bin" is the file of the BIOS firmware
"TNT BIOS Edit" requires preset run-time library "LabWindows / CVI Run-Time Engine", which you can take where you took the main program ... The program is a BIOS loader editor. With it you can download the current BIOS, edit it and save it to a file, which is then stitched with "nvXXflash". The BIOS itself does not flash! In addition, it has a number of other useful functions, but more on this below ...
The main working window of the program:
Consider the most interesting parameters that are available for editing.
- BIOS Info - the lines displayed when the machine is booted (you can write anything, down to "Hi! How are you?") *
- SubVendorID, SubVendor Model - ID of the card manufacturer and model *
- NVIDIA Model - identifier of the chipset (model of the chip installed on the video card)
- Core Clock / Memory Clock - core / memory frequencies respectively
- 9 parameters for setting memory timings (located almost in the center of the window)
- The button block «Common» - provides the current BIOS, opens and saves files with the BIOS. The button block «Asus winFLASH» - provides extraction and insertion of BIOSes into the file «winFLASH», where BIOSes from ASUSTeK are kept.
* indicates uneditable fields. To edit, save the BIOS to a file and edit it in any hexadecimal editor. Save changes, then cross this file in the BIOS. A necessary condition is the correctness of the checksum.
Here I would like to make some explanations. Branded BIOS from ASUSTeK are supplied in the form of an ".exe" file, which is in fact a self-extracting zip archive (you can easily verify this by changing the extension to ".zip" and manually unpacking the file). After unpacking, we get a set of files with a proprietary stitcher, however, it is not always possible to flash them because of "EEPROM not found". Here, this block comes to the rescue. Open the file "winFLASH", extract the BIOS we need and save it to a file on the disk (the first control unit is "Common"). Then, according to the above procedure, we flash it as a regular BIOS reference.
I will remind you once again that after editing this program (either with a hexadecimal editor) and saving the BIOS file on the disk, you need to reflash it.
VGABios
In addition, I would like to mention the existence of the program "VGABios". It can help you if you could not, for some reason, rebuild BIOS, or if you find the optimal values of the BIOS you are changing (when debugging). This program is a dynamically loadable driver, which allows you to dynamically load the BIOS. VGABios overwrites that area of the system RAM where the BIOS of the video card is cached (in the BIOS of the motherboard, caching must first be enabled in the system BIOS of the graphics card). However, the contents of the ROM of the video card do not change. For permanent use it is necessary to register the download of the program in "autoexec.bat" (the program itself and the BIOS file must be in one folder of the disk, better at the root so as not to get confused with the paths):
c: vgabios -fROMFile -tM
where "ROMFile" is a video BIOS file, "M" is a TV mode (values from 0 to 5)
The same VGABios-ohm verifies the performance of the firmware BIOS - downloaded, checked, if everything is OK - then, we sew. That is, in case of an unsuccessful download, you should simply boot from a regular system floppy and cancel the call of VGABios in "autoexec.bat".
Changing the SubVendorID
By changing the SubVendorID, you can make a card from Asus from your noname-card; or change the manufacturer in order for the OS to find the "brand" of your card, and proprietary drivers and utilities (for example, from Creative) also worked for you ...
- ASUSTeK: SubVendorID = 1043
- Creative: SubVendorID = 1102
Just do not forget to specify the model of the card - they differ from different manufacturers. You can see them from your neighbor, or find out on the Internet by asking a question in the forum.
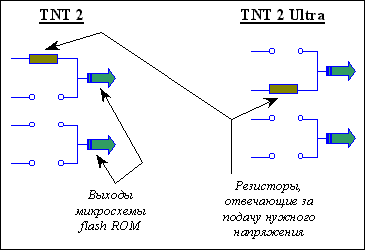
Do not think that by changing the inscriptions and ID in the BIOS, you can cheat the system. If you have a Vanta chip, then you can not make Ultra out of it. Although the drivers will be placed under the Ultras, and the inscriptions here and there in the system will be proudly say "Ultra", the system will still know which chip you have and will tell you this in the display settings. This information is "wired up" at the iron level into the video card and you can change it by changing the voltage on the corresponding outputs of the flash ROM chip of the video card. For example, the differences between TNT2 and TNT2 Ultra are shown in the figure below:
We will not give more detailed information about the outputs and the supply voltage, so as not to provoke folk craftsmen ... And this procedure, in our opinion, is doubtful - in fact the chip should work at higher frequencies. Plus the memory that manufacturers put up - it's unlikely that there will be a high-quality 5.5ns on the Vantaa. On the other hand, issuing TNT2 for Ultrus (with the appropriate changes to the necessary IDs, loading lines and other) is quite real - our Chinese brothers are practicing it with might and main. It turns out that at the moment, it's impossible to forge the speed of the video card. If this is Vantaa, no matter how hard we try, calling her at least "Super Ultra Plus", the test results will speak for themselves. So, if you still buy Chinese hand-made articles (which is highly discouraged by us), agree on a mani-pack and drive the card in heavy modes ... The result will not take long to wait ...
Timing and BIOS
We have already written above about changing timings in the direction of reducing their values to increase performance and talking about the loss of stability in this regard, however, it would be unfair to keep silent about the fact that timings can also improve the stability of the video card. For example, you can try to remove the "snow" by changing the "Wait State between read and precharge" from "0" to "1", but, of course, if possible, it is better to do this with TNTClсk. If there is no such possibility, and stability does not satisfy you - well, try ...
Notation of BIOS
BIOSes of different manufacturers differ in their designations (code). For example, NVIDIA designates its BIOSes with the set "CC.cc.mm.ee.oo", where "oo" is the OEM version, and Creative is "CC.cc.oo.mm.ee". I.e,
- in the transcription from NVIDIA - 2.10.01.04.1
- in transcription from Creative - 2.10.1.01.04
Be careful before updating!
J. In case of failure, you can only blame your crooked hands, and hope for the help of friends, or just good people who, by the way, and among the sellers meet ...
Thank you San,
Many thanks andser`y,
Special thanks to Vico for the programs, NEW for the links, and both for the exhaustive answers in the conference.
Feedback from readers
There is one thing that must be observed when installing the firmware! It's about the Bios checksum ...
The procedure for installing the run-time library "LabWindows / CVI Run-Time Engine", viewing the downloaded Bios TNTedit_om and writing it under a different name (newbios.bin) from TNTedit - is designed exactly to calculate the correct checksum and is MANDATORY!
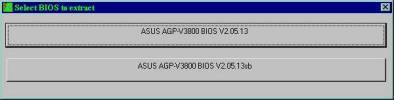
I have a Asus V3800 Pro 16Mb SgRam card (bios: 2.05.13a) and after reading your article I decided to flash BIOS from SBA with my native aspirator from SBA: 2.05.13sb. It's clear that this did not work (I do not understand flash-chip + can not call Flashv3k.vxd), then I just downloaded the latest BIOS flasher for V3800 Ultra (a38u13.exe), pulled the Flashv3k file out of it. vxd and copied it to the directory where the flash driver needed to unzip it before.
Next, the standard launch of the BIOS firmware and everything is ready! And the memory timings remain the same, the card stably works on 195/210 (there is no special cooling, the frequency on the AGP-bus is 83MHz), the performance did not measure, but the card stopped poking at higher resolutions in UT and NFS PU.


