In the previous two articles, I set up LAMP on VPS and screwed nginx to it. The next thing you immediately begin to think about is how to lose all this. That is, it comes to backup.
Let's discuss in order: what, where and how to back it up.
what
- All configs that you have painstakingly edited ( / etc)
- All user files ( / home, / root)
- Databases (we will refer to MySQL)
Where
Now everything goes to the "clouds". Backups want to add to the same.
A very interesting option for storing backup turned out to be Yandex.Disk. It has several advantages:
- 10 GB free
- It is located in Russia, and files are quickly uploaded to it.
- Able to work under the protocol WebDAV, which allows you to upload data to it from the console using the curl command
how
Here is the prescription. Login as root and create a script:
Chmod 0700 backup-now.sh
The script text will be something like this:
#! / bin / bash SERVER_NAME = "server1" TIME = `date +% Y-% b` FS_FILE = / tmp / $ SERVER_NAME-fs. $ TIME.tar.gz MYSQL_FILE = / tmp / $ SERVER_NAME-mysql. $ TIME .sql.gz Archiving files tar -czf $ FS_FILE / etc / root / home Archiving databases mysqldump -u root --password = qwerty --all-databases | gzip\u003e $ MYSQL_FILE # Uploading to the cloud curl - user USER: PASSWORD -T "($ FS_FILE, $ MYSQL_FILE)" https://webdav.yandex.ru/ # Cleanup unlink $ FS_FILE unlink $ MYSQL_FILE
The first time is better to run the commands one by one, commenting on the rest. If everything goes well, then two archives will appear in your Yandex.Disk.
Now, to automate, you need to add a symlink to backup-now.sh in /etc/cron.daily (or /etc/cron.weekly). Just keep in mind that on some systems (in particular, on Debian), the symlink has to remove the extension ().
The $ TIME variable is chosen so that you will accumulate backups from the last day of each month. If you do not want to clutter up the cloud, you can remove it from the script, but practice shows that old copies may be useful. Just need to periodically remove the old.
And if I do not want Yandex.Disk?
Obviously, you can upload to any resource that supports WebDAV. There are services that allow access via WebDAV to Dropbox or Google drive (for example, Otixo, SMEStorage, DropDAV). Rumor has it that SkyDrive works via WebDAV. And there is also hope that support will appear in Dropbox from the box.
P.S. Encrypting archives with GnuPG
Since backups contain a lot of secret information (passwords, data), it makes sense to encrypt them:
GPG_COMMAND = "gpg -c -z 0 --batch --passphrase XXXXXXXXXX" FS_FILE = / tmp / $ SERVER_NAME-fs. $ TIME.tar.gz.gpg MYSQL_FILE = / tmp / $ SERVER_NAME-mysql. $ TIME.sql. gz.gpg # Archiving files tar -cz / etc / root / home | $ GPG_COMMAND\u003e $ FS_FILE # Archiving databases mysqldump -u root --password = qwerty --all-databases | gzip | $ GPG_COMMAND\u003e $ MYSQL_FILE. . .
Greetings to you, dear readers of my blog. You’ve probably heard about a program that allows you to store files on a Yandex server. If not, welcome to soft.yandex.ru - it’s there.
So here. A few days ago, when I was browsing websites, I wandered over to a blog on which a script was published that allows you to save a backup copy of a site on a Yandex disk. In this article I will talk about it in detail.
What we need
- 1. Server, login, password and the name of the mysql database, if, of course, your site works with this database;
- 2. The path from the root of the disk to your site (ask the hosting support service);
- 3. The e-mail and password that you use to log into Yandex (this and data from the Yandex disk).
Work with file backup site on Yandex disk
First you need to change the address of the mysql server. In most cases, it is localhost, so I left it there, but if another one, we replace it with my own in the line
$ dbhost = "localhost"; // MySQL server address.
In the line below, replace "database_user" with your own username value of the mysql database.
"database_name" is the name of the mysql database.
Instead of "site_dear_hear" insert your path to the site from the root of the disk.
After that, go to the Yandex Disk setup:
- 1. "[email protected]" replace with your address email in Yandex;
- 2. "yandex_password" for a password from Yandex mail;
- 3. Create a "backup" directory in the root folder of the Yandex disk (there will be saved your backups).
All. Save the file and upload it to the server.
I do not recommend downloading it to the root directory of the site, because all sorts of robots will constantly refer to it, because of which the Yandex disk will be filled with extra copies of backups. It is better to create a folder, for example "a3hd7siq8a7s9xeeewwwerw-0-032-_2", so that no one but you and cran will know where you have it.
Cran is a task scheduler: a special program with which you can schedule scripts to run, but I don’t know how to use it, so I won’t be able to help here.
What if multiple sites
You probably already know that I have five sites. Naturally, you will get tired of launching them separately, but it’s good that the second script was placed in the same article, which launches all the other scripts in turn.
- 1. ;
- 2. Replace site1.ru, site2.ru, etc. with the addresses of your sites. In addition, do not forget to register after it the folder in which this script is located;
- 3. Save the changes and upload to the server, placing it as far as possible from the root folder of the site.
If you have less than five sites, simply delete the lines that look like this:
Echo ""; $ response = file_get_contents ("http://site5.ru/beckup.php"); echo iconv ("Windows-1251", "utf-8", $ response);
If you have a site in the zone. RF, you have to translate into Panycode before you write the address.
I hope that the article was useful to you.
Waiting for comments.
Much has been written about backing up to external media in Windows 7 or 8.1. But what if you use multiple devices (for example, a computer, tablet, phone running Windows)? And you urgently need data, say, documents stored on a computer or some other device? In such a case, it is best to create a backup in the "cloud". By the way, I would also recommend placing your archives there. For example, archives of the same documents. By the way, this is also very useful if you use an SSD solid-state drive in your laptop instead of the usual hard drive. In this article we will look at the main cloud storage - OneDrive from Microsoft, Google Drive, Dropbox and Yandex Disk.
Using OneDrive is very beneficial if you are running Windows 8.1. In this case, the storage capacity can be 15 GB, and if you are also a happy owner of the Office 365 subscription, then the storage capacity of the OneDrive is not limited at all. New users of Google Drive start with 15 GB. Dropbox initially provides only 2 GB of free space, but most users quickly increase this volume to 5 GB or more. The subscription price for 1 TB is $ 10 per month or $ 100 annually.
All services allow you to specify which files and folders you want to synchronize with the "cloud". This means that you can leave some files and folders only in your “cloud” disk and download them as needed. Let's take a closer look at how this is done.
To get started with Dropbox, you need to go to www.dropbox.com, register and select the appropriate tariff plan for personal use (see screen 1). After that, you will be prompted to download the appropriate package for installation (see screen 2).
| Screen 1. Dropbox |
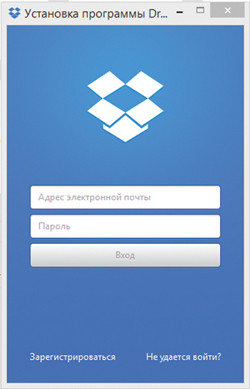 |
| 2. Registration in the screen? Dropbox |
I would like to immediately note that when registering with Dropbox you are asked to enter the password only once, respectively, you need to be more careful.
Selective synchronization when using Windows 7, 8 or 8.1 systems is as follows. To create custom synchronization rules, right-click on the Dropbox icon in the taskbar — the settings window will open (see screen 3).
 |
| Screen 3. Account Settings |
In fact, selective sync allows you to specify which folders you want to sync with Dropbox. This is definitely convenient if you have a netbook or computer with a small hard drive (And not with an external). Note that the selective sync folders must be inside your Dropbox folder. Thus, for selective synchronization, you must copy the files that you want to transfer (copy) to the “cloud” Dropbox storage in the appropriate folder on the disk.
If you cancel the synchronization of the shared folder through the “Custom synchronization” menu in the settings window, it will stop synchronizing only with your computer. At the same time, the folder itself will remain in Dropbox and will be synchronized with the accounts of other users having access to it. To stop using shared folder, you can either leave it on the Dropbox site, or (if you created it yourself) cancel general access To her.
In order to download Google Disk, you need to use your account to Google services, and then select the Google Disk service (see screen 4).
You can configure the following parameters.
Account
- Disable Account. Sync the Google Drive folder with a different Google account (not recommended).
- Expand storage space. Get extra space.
Sync options
- Sync only some folders with this computer. Check the boxes next to the folders in the “My Disk” section to enable synchronization. Uncheck the boxes next to the folders you do not need to sync.
- Synchronize objects to which I have access. If you are working in the new Disk interface, move the files and folders from the “Available” section to the “My Disk” folder to synchronize them with the computer. If you use the classic version of Disk, add folders and files from the section “Available to me” in the folder “My disk”.
Extended
- Run Google Drive automatically when you turn on your computer. Google Drive will launch and sync your folder on your computer with the “My Drive” section.
- Send crash reports and usage statistics to Google. Send information to Google so that you can improve the service.
- Proxy server Two functions are available to you: “Direct connection” and “Automatically detect proxy server settings”.
- Other Displays file sync status icons.
Select files and folders to synchronize with your computer. All documents, spreadsheets, presentations, forms, images and summary tables of Google are synchronized with the Google Drive folder on your computer. To disable synchronization, follow these steps:
1. Click on the Google Drive icon.
- On Mac computers, you can usually find it in the Menu panel in the upper right of the screen.
2. Select “Settings”.
3. Uncheck the "Sync only some folders with this computer."
4. Click the "Apply Changes" button.
Section "My Disk" (all files or individual folders). All files and folders from the “My Drive” section are synchronized with the Google Drive folder on your computer. To configure the synchronization of individual folders, follow these steps:
1. Move the files to the folders you plan to sync.
2. Click the Google Drive icon on your desktop.
- On Mac computers, you can find it in the Menu panel at the top right of the screen.
- On windows computers The icon is located on the taskbar in the lower right corner of the screen.
3. Select “Settings”.
4. Check the box "Synchronize only some folders with this computer."
5. Select the folders you want to sync with the Google Drive folder.
6. Click the "Apply Changes" button.
Work with OneDrive
If you are using an operating windows system 8.1, the One Drive repository is provided to you by default. OneDrive is a free online storage provided with your account microsoft record. Getting started using OneDrive is easy. You can add files already stored on your computer to OneDrive by copying or moving them. You can save new files to OneDrive to use from any device and share them with others. And if your computer has a built-in camera, you can automatically back up your photos in OneDrive to always have a backup. Unlike previous vaults, you can save files directly to One Drive without saving them on your computer.
Classic application features built into Windows
OneDrive synchronizes files when registering with the Microsoft account. If the classic application is installed on a computer running Windows 8.1, the installation program does not appear. A component will be installed that will allow Office to work with OneDrive documents simultaneously with other users, but other components will not be installed. If you are running Windows 7 or 8, you can download the classic OneDrive management application at onedrive.live.com/about/en-us/download/.
For windows users 8.1 it is enough to do the following (see screen 6):
- Open OneDrive in Windows Explorer.
- Right-click on the file (folder) and select “Make available offline” or “Make available only via the Internet.”
As Figure 8 shows, to synchronize Yandex Disk, just copy the corresponding files into the Yandex.Disk folder. At first glance, this approach to synchronization is most reminiscent of Google Disk. This is partly true.
Using the Yandex.Disk web application, you can download the corresponding application for Windows. For selective synchronization, you need to enter the Yandex Disk settings panel and select the Synchronization tab. If you uncheck the corresponding folder, it will not be synchronized. To upload files to a folder whose synchronization is disabled, simply drag and drop files into it in Explorer. Thus, in this case, the contents of the Yandex Disk root folder are always synchronized, and the contents of the subfolders can be synchronized at your choice.
The main difference between Yandex Disk and Dropbox and Google Disk is that you can save files to Yandex.Disk directly from Microsoft Office.
Thus, using "cloud" storage, you can not only increase free place on your hard drive, but also provide a backup of your most important files (documents, photos, etc.). If we compare the convenience of using selective synchronization, then the conclusion is clear. Both Dropbox and Google Disk are configured at the folder level. Thus, you need to go to the “Settings” dialog of the corresponding service and manually specify which folders are synchronized and which are not. The solution is supporting context menu In Explorer, and allowing you to configure the synchronization and location of files exists today only from Microsoft.
- convenient, functional and cheap solution. Handy Backup allows you to do without using the popular WebDAV interface for Yandex.Disk, using direct access instead.
Automatic backup on Yandex.Disk
With Handy Backup, you can backup Yandex.Disk to any data automatically, according to a schedule at intervals of months to minutes, or upon an event, as well as manually. You can automate the copying of any data, such as:
User data:
- Files and folders (with search by name mask)
- Windows libraries, user folders
- Microsoft Outlook files and folders of other email clients
Server data types:
- MS SQL, MySQL, MariaDB, PostgreSQL, Oracle, IBM DB2, Lotus Notes databases
- Microsoft Exchange
- Content FTP, SFTP or FTPS servers with SSL / TLS encryption
- Websites (static and dynamic content)
Virtual machines and storage:
- Hyper-V, VMware
- Servers, arrays and hosts of virtual machines
- Clouds Google Drive, Dropbox, Amazon S3, OneDrive, Box, 4shared and others
- Any clouds on the WebDAV interface
Other data types:
- Disk images
- Data 1C in file and SQL versions, for 1C 7.7 and solutions 1C 8, for example, 1C 8.2
- Files, folders and libraries of network machines (for network solutions)
- Windows Registry
Advantages of the Handy Backup solution for organizing backup on Yandex.Disk
Protect your data
Handy Backup has built-in encryption and compression of data in the archive under a password, allowing you to safely transfer commercial information over open networks and store it on a public cloud service without concerns for data integrity.
Product certification
In addition to having official certificates of compatibility with all serious commercial solutions listed in the list, the Handy Backup solution is also included in Unified Register of Russian software for computer.

Open storage of copies in source formats
In contrast to the reliable protection provided by means of encryption and compression, in general, Handy Backup creates backup copies while preserving the original file format. This allows you to view, edit and even restore backups as regular files.
Download
Buy!
Version 7.9.4 of September 15, 2017. 66.1 MB
Backup programHandy Backup. 7400 RUB for license
The Office Expert solution allows you to copy any type of data from one computer to Yandex.Disk automatically according to a schedule, either directly or via WebDAV. Free trial period of 30 days!
How to create a backup task on Yandex.Disk in Handy Backup?
Instead of outdated WebDAV backup on Yandex.Disk, backup is now used to organize backup new plugin Handy Backup Yandex Disk with access to cloud service through the RestAPI interface. To use it, follow these steps:
- Open Handy Backup and create a new task using the button on the panel or menu.
- Select a backup task.
- Switch to Step 2 and select the desired data to create a backup.
- On Step 3 select plugin from the list of storages Yandex.Disk, double click on it.
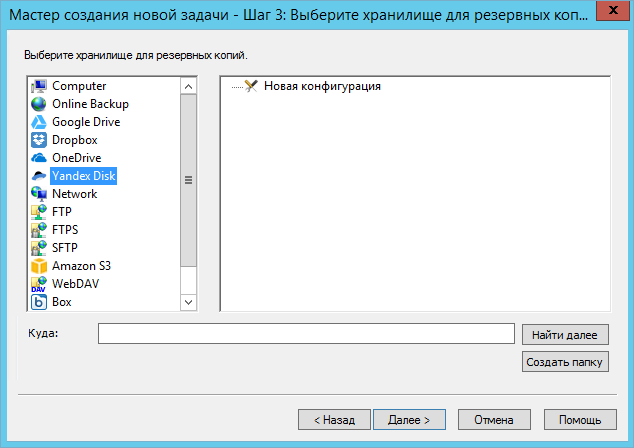
- In the window that opens, double-click “New Configuration”. A new dialog will open.
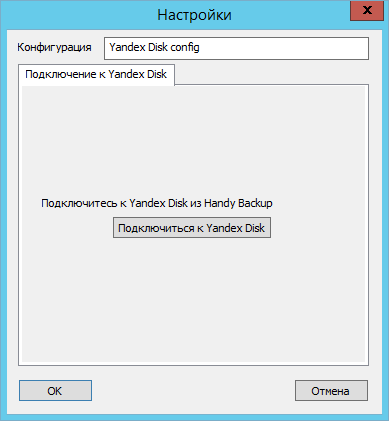
- Press the button “Connect to Yandex.Disk”. You will be redirected to the browser.
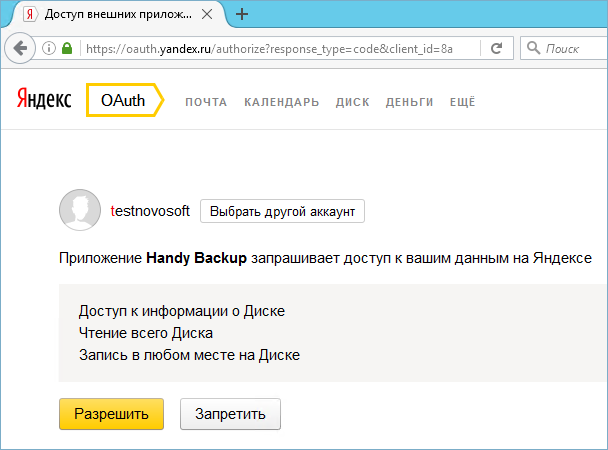
- In the browser window, enter login and password for access to Yandex.Disk. Confirm selection.
- Return to the Handy Backup window and select the created configuration.
- Next, continue to customize the task as usual. On Step 6 specify a schedule.
- In the last step, give your task a name and complete the task creation wizard.
Your task of automatic backup on Yandex.Disk is ready for execution, and will continue to run at a specified interval in the future. preset time. You can also start it manually at any time.
Comment: Similarly, tasks are created for copying data to other cloud services: Google Drive, Dropbox, Microsoft OneDrive, Amazon S3, Box and so on.
Video Tutorial on Yandex Disk Backup
This video tutorial covers instructions for backing up to Yandex Disk, as well as backing up data stored in this cloud.
Attention: This video tutorial is based on the assumption that the Handy Backup software is already installed on the computer. If this is not the case, please download and install Handy Backup before starting the training in accordance with the video tutorial.
Backup to Yandex.Disk via WebDAV
Despite the availability of a new tool for direct access to the Yandex.Disk service, in some cases the traditional method may be more preferable - for example, backup a site on Yandex.Disk via WebDAV using an external cryptography utility.
Handy Backup fully supports backing up to Yandex.Disk using WebDAV protocol.
- To use WebDAV to access Yandex.Disk, select the WebDAV plugin in Step 3, using the above described task creation algorithm. In the WebDAV configuration dialog, enter your Yandex.Disk access settings.
Attention: when using WebDAB, the backup on Yandex.Disk may be somewhat slower than with direct access. For example, backing up 1C to Yandex.Disk usually takes considerable time when using WebDAV.
Automatic backup on Yandex.Disk using Handy Backup has become even easier and faster with the introduction of a new tool that uses direct access to the cloud service Yandex. Try it yourself by downloading the free 30-day trial!
Hello friends!
It's been 4 years since I last wrote to the blog. During this time, accumulated a large base of knowledge and experience. A lot of interesting work has been done and many interesting projects have been completed. On some of them (read: "without violating trade secrets"), I will try to tell in several posts.
Motivated me to return several things at once. First of all, it turned out that many of the things written had not yet lost relevance. Secondly, it turned out that people liked to read it. It was very nice :) Example: three months ago at an interview I was asked why I abandoned my blog, praised. They said if they take it, I will write for their wall newspapers. Not taken, so I will not write for the wall. Newspapers :)
But this is all the lyrics, let's get down to business.
There was a task to set up a backup on Yandex.Disk. By itself, there are a lot of scripts, but most of them offer simple copying of a file without checking the fact of copying, without reports and other things. In the end, one good man dropped me a link to a blog of a certain comrade with the nickname del, who decided this problem. Given his nickname, I read the script, then checked in the test. Everything works fine, all the files are in place, nothing is sent to the side.
I warn you that the script in fact does not archive the data. Those. compression is, but it is minimal. If you need to compress data normally, then we smoke "tar --help" or "man tar" for FreeBSD. By the way, I really love FreeBSD for their man `s. More precisely, for the almost permanent need to read them. Every time you read, you get the feeling that "just about ... now a killer will appear ..", but again disappointment. Neither a murderer, nor a meaning in life.
Now the script itself. Note that an application folder will be created in the root directory of your disk. Look for everything there. Also, the script leaves all comments in Russian, so many may have problems with the encoding. Decisions, as usual, two. Either we install the necessary one on the server, or we rewrite everything into translit. You can even translate into English. The latter is best because who wants to read quotes from the Necronomicon or handwritten doctor's appointment.
Also note that at the beginning of the script is standard #! / bin / bash
Note that FreeBSD cannot work with bash, so you need to replace this line with #! / bin / shotherwise it will not start.
Spreading backups of projects (sites) on Yandex.Disk may be needed for several reasons, for example, due to the lack of space on the server (hosting, VDS, VPS) or to increase the backup storage safety (in case the server is without a raid and it goes out of building).
In this regard, I wrote for myself and decided to lay out for others a small bash-script for backup on Yandex.Disk. Script Functions:
- Creation of projects on the backup server (files + MySQL databases);
- Authorization on Yandex.Disk as an application (by token, more safe waythan using login and password);
- Sending backups from the server to Yandex.Disk;
- Delete old backups from Yandex.Disk to save space (the maximum number of stored backups is configured);
- Record and send log to e-mail (customizable).
In order to use the script, you must first obtain a token from Yandex.Disk. Let's get started
1. We log in to Yandex under the account, on the disk of which we will make backup, go to oauth.yandex.ru and click "Register a new application."
2. Fill in the name of the application (for example, “backup”) and issue the necessary rights in the “Yandex.Disk REST API” section, namely: “Access information about the Disk” and “Access to the application folder on the Disk”.
Below on the same page, under the “Callback URL” field, click “substitute URL for development” and click “Save”:
3. After saving the application settings, we will be redirected to the page with information about the application:
4. Now we will get the token itself (if you want, you can read more about this in the Yandex manual), for this we copy the ID, substitute the URL https://oauth.yandex.ru/authorize?response_type=token&client_id= into the end, go to the resulting address and confirm the issuance of permissions to the application:
As a result, the page will display a token that is issued for at least 1 year, so if the backup script suddenly stops working, we will be able to get a new token and substitute it into the script. You can test the possibilities of working with Yandex.Disk using the received token at a special test site.
And now the bash-script for backup on Yandex.Disk:
#! / bin / bash # # Yandex.Disk backup script v1.0 by Sergey Lukonin (neblog.info) # # # # # # # # # # # BEKAP SETTINGS MYSQL # # # # # # # # # # # Server DB MYSQL_SERVER = mysql.some-server.ru # User, under which we will backup available databases, the mysql root is usually accessible to all databases, the database for a particular project is usually accessible to a particular user MYSQL_USER = some-user # Database user password (Server root password and do not confuse from the root of mysql) MYSQL_PASSWORD = some-password # # # # # # # # # # GENERAL SETTINGS # # # # # # # # # # # Directory for temporary storage of backups that are deleted after sending to Yandex.Disk BACKUP_DIR = "/ home / www / backup" # Project name that is used in logs and archive names PROJECT = "neblog.info" # The maximum number of backups stored on Yandex.Disk (0 - store all backups): MAX_BACKUPS = "14" # Date, used in archive names DATE = `date" + % Y-% m-% d "` # Directories for archiving (indicated with a space), which will be placed in a single archive and sent to Yandex.Disk DIRS = "/ home / www / projects / neblog" # Yandex.Disk token ( how to get it - see on neblog.info) TOKEN = "" # The name of the log file is stored in the directory specified in $ BACKUP_DIR LOGFILE = "backup.log" # E-mail to send the result of the script execution. Leave blank if sending results is not required. sendLog = "[email protected]" # Send only errors (true). Specify false if you want to send logs for any result of the script execution. sendLogErrorsOnly = "false" # # # # # # # # # # # END OF SETTINGS # # # # # # # # # # # # # # # # # # # # # DO NOT CHANGE ANYTHING! # # # # # # # # # function mailing () (if [! $ sendLog = ""]; then if ["$ sendLogErrorsOnly" == true]; then if echo "$ 1" | grep -q "error" then echo "$ 2" | mail -s "$ 1" $ sendLog\u003e / dev / null fi else echo "$ 2" | mail -s "$ 1" $ sendLog\u003e / dev / null fi fi) function logger () (echo "[ "` date "+% Y-% m-% d% H:% M:% S" `"] File $ BACKUP_DIR: $ 1 "\u003e\u003e $ BACKUP_DIR / $ LOGFILE) function parseJson () (local output regex =" ( \\ "$ 1 \\": [\\ "]?) ([^ \\", \\)] +) ([\\ "]?)" [[$ 2 = ~ $ regex]] && output = $ (BASH_REMATCH) echo $ output ) function checkError () (echo $ (parseJson "error" "$ 1")) function getUploadUrl () (json_out = `curl -s -H" Authorization: OAuth $ TOKEN "https://cloud-api.yandex.net: 443 / v1 / disk / resources / upload /? Path = app: / $ backupName & overwrite = true` json_error = $ (checkError "$ json_out") if [[$ json_error! = ""]; Then logger "$ PROJECT - Yandex .Disk error: $ json_error "mailing" $ PROJECT - Yandex.Disk backup error "" ERROR copy file $ FILENAME. Yandex.Disk error: $ json_error "echo" "else outpu t = $ (parseJson "href" $ json_out) echo $ output fi) function uploadFile (local json_out local uploadUrl local json_error uploadUrl = $ (getUploadUrl) if [[$ uploadUrl! = ""]]; then echo $ UploadUrl json_out = `curl -s -T $ 1 -H" Authorization: OAuth $ TOKEN "$ uploadUrl` json_error = $ (checkError" $ json_out ") if [[$ json_error! =" "]; then logger "$ PROJECT - Yandex.Disk error: $ json_error" mailing "$ PROJECT - Yandex.Disk backup error" "ERROR copy file $ FILENAME. Yandex.Disk error: $ json_error" else logger "$ PROJECT - Copying file to Yandex .Disk success "mailing" $ PROJECT - Yandex.Disk backup success "" SUCCESS copy file $ FILENAME "fi else echo" Some errors occured. Check log file for detail "fi) function backups_list () (# look for all files in the application directory backups and display their names: curl -s -H "Authorization: OAuth $ TOKEN" "https://cloud-api.yandex.net:443/v1/disk/resources?path=app:/&sort=created&limit=100" | tr "()," "\\ n" | grep "name [[: graph:]] *. tar.gz" | cut -d: -f 2 | tr -d "" ") function backups_count () (local bkps = $ (backups_list | wc -l) # If we back up both files and the database, then we have 2 files for 1 backup. Therefore, the number of backups = the number of files / 2: expr $ bkps / 2) function remove_old_backups () (bkps = $ (backups_count) old_bkps = $ ((bkps - MAX_BACKUPS)) if ["$ old_bkps" -gt "0"]; then logger "Delete old backups from Yandex.Disk" # The cycle of deleting old backups: # We are deleting the first file in the list 2 * old_bkps once for i in `eval echo (1 .. $ ((old_bkps * 2)))`; do curl -X DELETE -s -H "Authorization: OAuth $ TOKEN" "https://cloud-api.yandex.net:443/v1/disk/resources?path=app:/$(backups_list | awk" (NR == 1) ") & permanently = true" done fi) logger "--- $ PROJECT START BACKUP $ DATE ---" logger "Unload database dumps" mkdir $ BACKUP_DIR / $ DATE for i in `mysql -h $ MYSQL_SERVER -u $ MYSQL_USER -p $ MYSQL_PASSWORD -e "show databases;" | grep -v information_schema | grep -v Database`; do mysqldump -h $ MYSQL_SERVER -u $ MYSQL_USER -p $ MYSQL_PASSWORD $ i\u003e $ BACKUP_DIR / $ DATE / $ i.sql; done logger "Creating an archive mysql $ BACKUP_DIR / $ DATE-mysql- $ PROJECT.tar.gz" tar -czf $ BACKUP_DIR / $ DATE-mysql- $ PROJECT.tar.gz $ BACKUP_DIR / $ DATE rm -rf $ BACKUP_DIR / $ DATE logger "Creating an archive of $ BACKUP_DIR / $ DATE-files- $ PROJECT.tar.gz" directories "tar -czf $ BACKUP_DIR / $ DATE-files- $ PROJECT.tar.gz $ DIRS FILENAME = $ DATE-mysql- $ PROJECT. tar.gz logger "We upload the mysql $ BACKUP_DIR / $ DATE-mysql- $ PROJECT.tar.gz archive to Yandex.Disk" backupName = $ DATE-mysql- $ PROJECT.tar.gz uploadFile $ BACKUP_DIR / $ DATE-mysql- $ PROJECT.tar.gz FILENAME = $ DATE-files- $ PROJECT.tar.gz logger "We are uploading to Yandex.Disk an archive with $ BACKUP_DIR / $ DATE-files- $ PROJECT.tar.gz files" backupName = $ DATE-files- $ PROJECT.tar.gz uploadFile $ BACKUP_DIR / $ DATE-files- $ PROJECT.tar.gz logger "Delete archives from the" find $ BACKUP_DIR-type f -name "* .gz" -exec rm "()"; # Delete old backups from Yandex.Disk (if MAX_BACKUPS\u003e 0) if [$ MAX_BACKUPS -gt 0]; then remove_old_backups; fi logger "Completion of the backup script"
You can also download the finished script file. The script should be located on the server, replace the parameters in it with your own, give the right to run (chmod + x) and put on daily execution in cron. If you plan to perform several such tasks, set the time between their launch (5-10 minutes).