This guide is designed to help those who wish to install Mac OS on their computer, but do not know where to start completely
In order for the description not to be too bloated and tedious, as the installation method, we take the common UniBeast + MultiBest + DSDT technology, which does not require any special knowledge or experience from the user.
It happens, the installation process is completed normally, but the first reboot of the axis gives an equally attractive window indicating that you are literally a step away from getting a working hackintosh.
Therefore, everyone who first decided to install OS X on their computer is a good advice - carefully study the material described below and adequately evaluate the capabilities of your machine to install this system.
Beginners who have made several installation attempts, sorting through various assemblies without realizing their purpose, who do not have a specific installation plan, are lost in an array of unfamiliar information, technical definitions and settings, will receive a hardware selection and preparation plan for this Guide, as well as an OS X installation script. There is also some understanding of the BIOS settings of motherboards and the installation of suitable drivers.
Those who have already advanced and almost put it will probably find a number of refinements here for themselves and complete the installation process, having received Hakintosh as a reward.
So, we start in order.
Selection of components
Briefly about iron
Since OS X was written, and continues to be improved by Apple for a specific set of components for its Mac computers, this system has a number of difficulties in installing and launching it on configurations assembled from components from other manufacturers.
Selection of components should be done very carefully, but this does not mean that the components should be chosen the most expensive.
Apple uses a basic configuration based on Intel chipsets in its computers.
Moreover, the company is trying to use the latest development of chips and technologies of Intel in current models.
Therefore, the advice for those who have not yet decided and collects information about creating a suitable configuration - in order to avoid problems with the installation and operation in OS X, do not try to use components 10 - 12 years old.
Especially worth noting is the absence in the native Apple machines of the PS / 2 port, in other words, the Macs never knew this port, as well as the usual pusyushki keyboards and mice.
To avoid unpleasant surprises during installation and after, get a USB keyboard and mouse in advance.
On the other hand, you want to enjoy the use of the axis, do without stupid poking into the keyboard, in the senseless hope of finding the necessary punctuation mark in the Cyrillic layout, buy real Epplow claves and a mouse or, at worst, inexpensive Chinese replicas.
Processors need to be used only by Intel, and preferably not trimming such as Celeron and Pentium, but high-grade Core, Sandy Bridge, Ivy Bridge, Xeon and more recent ones.
Processors last generations, on the sockets H1 (LGA1156), H2 (LGA1155), H3 (LGA1150), in addition to everything, they also contain an integrated graphics core (video card), in some cases powerful enough to replace a regular video card.
The built-in graphics cores of the HD Graphics 2000, HD Graphics 2500, HD Graphics 3000 types without special measures to launch them in OS X do not work. Therefore, you should not choose processors with such video cards, if you are going to save money on a regular discrete video card.
But graphics cores HD Graphics 4000 and higher work in OS X without the use of additional drivers. Usually, a video card built into the processor is quite enough for a home machine to sit on the net, watch a movie (perfectly reproduces files in Full HD format) and play around in not very intricate toys. The best option from modern low-cost processors on the popular H2 socket (LGA1155), which has a clock speed of 3.3GHz, two computational cores and an integrated graphics core HD Graphics 4000, is an Intel Core i3-3225 processor costing a little more than $ 100.
If you expect to play cool toys in perspective or do serious work on processing photos and videos, or some engineering solutions that require large computing resources from the graphics core, then it makes sense to use a processor without taking into account integrated graphics, but use a regular discrete graphics card from the list of supported in OS X.
Fans of gaming Athlone must disappoint. Due to the significant differences in the architecture of Intel and AMD processors, the latter have problems with OS X and do not really work in the latest versions of the axis. I do not argue, you can run AMD processors, but this will require certain skills, specific knowledge and practical experience for many years.
motherboards
Identify suitable motherboards and turnkey solutions
Motherboards should be chosen based on the tasks that you will be solving on your machine.
If you want to build a home machine, quiet, not greedy, taking up little space on the table, then it is quite enough for you to choose a neat mini-ITX board that contains all the necessary onboard peripherals.
Preference, among all motherboards, are of course using UEFI BIOS technology or Dual UEFI BIOS.
From modern motherboards, the exception is made by motherboards on the family of chipsets H61.
Also, there are some problems with modern motherboards manufactured by Asus, more precisely, Power Management is not quite correctly written in the bios of these motherboards and laptops, and therefore the power management of the processor in these devices prevents the installation of OS X. To solve this problem, use the BIOS patch. True, not quite neat execution of such a patch can lead to a complete loss of the device.
Motherboards from the budget segment, built on SIS, nVidia and VIA chips, should not be used, since they are not supported at all in OS X.
The same applies to peripheral chips, such as sound codecs, network cards and others.
On foreign sites we are very pleased with GigaByte motherboards:
GA-Z77-DS3H
GA-H77-DS3H
GA-B75M-D3P
GA-Q77M-D2H
GA-Z77X-UD5H
GA-Z77X-UP5-TH
GA-X79-UD5
You must use the dual-channel memory mode to achieve optimal performance of the computer as a whole. That is, the memory modules must be an even number - 2, 4, etc. Some manufacturers of high-quality memory, for such cases, form sets of two modules in one package, which is a guarantee of the coincidence of parameters. Such kits are preferable for use. In addition, you should definitely pay attention to the presence of heat sinks on the memory modules, which greatly facilitate the life of these modules. Selection of memory modules by frequency, processor type and name of recommended manufacturers random access memory can be done according to the lists in the manual (manual) attached to the motherboard.
The memory of the No Name type has a large variation of the time parameters of individual modules, so the strips even from one box cannot work in concert.
For this reason, such a memory cannot be used.
Video cards are one of the most important components of a computer. If you build a configuration using a discrete video card, then this is a particularly difficult decision. You need to understand which video cards are fully supported in OS X and which are not.
The following types of video cards are initially compatible without the use of additional drivers:
GeForce GT 6402048Mb GDDR5 128bit
GeForce GTX 6502048Mb GDDR5 128bit
GeForce GTX 650 Ti1024Mb GDDR5 128bit
GeForce GTX 650 Ti Boost2048Mb GDDR5 192bit
GeForce GTX 6602048Mb GDDR5 192bit
GeForce GTX 6702048Mb GDDR5 256bit
GeForce GTX 680 2048Mb GDDR5 256bit
GeForce GTX 760 2048Mb GDDR5 256bit
GeForce GTX 770 (2GB)2048Mb GDDR5 256bit
The only note is that these cards do not work in OS X version 10.6 Snow Leopard and earlier.
It is clear that other types of video cards will also be able to work, but as far as they are problematic, in each specific case it is worth asking about the network.
I would like to immediately note that in versions of OS X 10.8 and above there is no full support for the SVGA (D-Sub) interface for integrated graphics, due to the lack of necessary drivers. Therefore, it is worthwhile to attend to, in this case, that your Motherboard had a port for connecting a DVI or HDMI monitor and, accordingly, your monitor could also connect via the same port directly to the video card on the Motherboard
Otherwise, if you do not have a display equipped with a DVI port, you can use a simple discrete graphics card, for example NVidia 210 (NVidia GT210) or similar, having a SVGA port (D-Sub) and a passive heat sink (without a fan), so as not to add too much noise in the system unit.
CD / DVD Drives and HDDs
Unique solution
In conclusion of this section, I wanted to say a few words about the creation of a Mac-like configuration.
Actually, the approach to the true Makovsky configuration eliminates most of the minor problems in the operation of the system.
The ideal configuration option, as a rule, is free from Apple ID registration issues, running embedded cloud-based applications and, in general, is more stable and updating software at ease, this is a complete set as close as possible to those produced by Apple.
You can see this package here:
MacBook Air is one of the lightest and most compact among mobile machines.
MacBook Pro - a number of mobile machines that do not have the capabilities of stationary devices,
Mac Pro - the category of stationary machines, the most powerful among the devices of this manufacturer,
Mac mini - the most compact stationary machines with similar capabilities as the MacBook Air,
iMac - one-piece, having the widest family in its lineup.
HDD Preparation
One of the most important moments in installing OS X
Preparation hard drive - the point to which I take away a special place, since many problems and failures during installation are connected with it. So the first thing to do is preformat your hDD, format entirely, in one section.
Some readers may not give special attention to this point of preparing the disc, deciding for themselves that the disc was already formatted, and therefore everything will be fine.
The whole problem is that it is impossible to completely format the hard disk using only one Disk Utility. Anyway, something remains, some small things. And, if the previous installation did not work out for you, not that it failed at all, but in some separate moments, after deleting the partition in the Disk utility and the next successful installation, for some reason, the settings (but sometimes the jambs) are removed from the installation previous one.
Formatting can be done in two ways, either with the help of Windows installation disk on any computer or in the same Disk Utility when you are already installing OS X.
The disk is formatted as a whole, in one partition, into the FAT32 file system (if available) or NTFS, the scheme of the MBR partition table.
Windows installer makes this scheme automatically. To do this, run the Windows Installer (as during the installation, having previously disabled system disk physically), we reach the point hard formatting disk, delete all existing partitions on the disk, create one partition for the entire volume of the hard disk and format it.
At the same time, we apply full formatting, that is, not Fast
It is clear that this stage of formatting will take some time and will have to wait. Usually, after formatting and checking the disk, the Windows installer immediately starts copying the installation files. Do not pay attention to it and just exit the installer.
With Disk Utility, it is a little more difficult, as the machine will fall asleep periodically and have to constantly monitor it. Formatting in Disk Utility is, in fact, just as easy. But this will be discussed in the Installation section.
Configuring the BIOS for modern motherboards that support UEFI is practically not needed. The only thing you need to control is the inclusion of a precision timer for HPET events (High Precision Event Timer) and AHCI mode for SATA controllers.
Immediately before installing the system, you must put in the BIOS the first device on which you have the installer. In our case, it will be an installation flash drive, the creation of which is described below. Also in the properties of this flash drive, you must specify the Hard Disk in the BIOS. If your BIOS does not have such a function, you can specify the initial boot from the USB flash drive by going to the BIOS BIOS Boot Menu and selecting a USB flash drive from the list of boot devices. Accordingly, the next device in the hierarchy of boot devices after the flash drive, you need to put a hard disk on which the system will be installed.
In addition, all disk devices, card readers, duplicate network cards, PCI bus expanders that are not involved in the installation process, must be physically disabled.
For motherboards made a few years ago, as a rule, with processors on the LGA775 socket, BIOS settings will be more radical.
Here is a list of settings that must be performed from those that you find in your BIOS motherboard:
HDD SMART do enable
IOAPIC do enable
ACPI Suspend Type do S3 (Only)
HPET Support do enable
HPET Mode do 64 bit
PCI Latency Timer do 128
SATA AHCI Mode do enable
SATA Native Mode do enable
Onboard SATA / IDE device do enable
Onboard SATA / IDE Ctrl Mode do disable (Auto)
No Execute memory do enable
Suspend to RAM do Auto
USB Legacy do enable
CPU Thermal Monitors do enable
CPU Enhanced Halt do disable
CPU EIST function do disable
CPU Max ID do disable
It happens that the same BIOS settings differ slightly from different manufacturers, so you will have to look for functions similar in meaning.
Perhaps someone’s motherboard and processor will be very ancient and latest versions axes won't want to get up
You should not despair, you can try to install a suitable assembly, but it will be necessary to select the BIOS settings experimentally.
Installer training
All about creating an installation flash drive
Here is described the process of creating an installation flash drive for those who want to make it on their own due to some configuration features that will be installed.
Other users can apply ready-made images.
Preparation of the installer will take up the maximum time in the whole project with the installation of OS X.
Based on what configuration you have decided on, choose which version of the axis you can install:
- if you are considering a motherboard on a LGA775 socket and you intend to use the integrated GMA950 graphics (D945GC chipset), then you can count on OS X 10.6.7, and this is the limit for this configuration
- if the motherboard is on a LGA775 socket and you have a video card from the GF 7xxx or GF 8xxx series, then the limit for you is OS X 10.7.5
- if the motherboard is on a LGA1156 or LGA1155 socket, regardless of what kind of video card you have, then the limit for you is OS X 10.11.1, that is, the latest version of OS X at the time of writing this guide.
So, proceed directly to the preparation of the installer (installer).
For this we find a working Mac or Hack, borrowed for a while. Now this technique is already quite common, so find no big deal. Alternatively, you can use the OS X installed virtually. We are online from this machine, go to the Apple.com website to shop App Store and create in it your Apple ID, a kind of account for purchases. We will write the data of your Apple ID somewhere so as not to lose, then it will be very useful. Again, go to the App Store, but under your account (Apple ID), and look for the icon to download OS X.
This installer is distributed free of charge. We upload the installer to the Downloads folder. After downloading the installer, drag it to the Programs folder, where it will look like Installing OS X Mavericks. 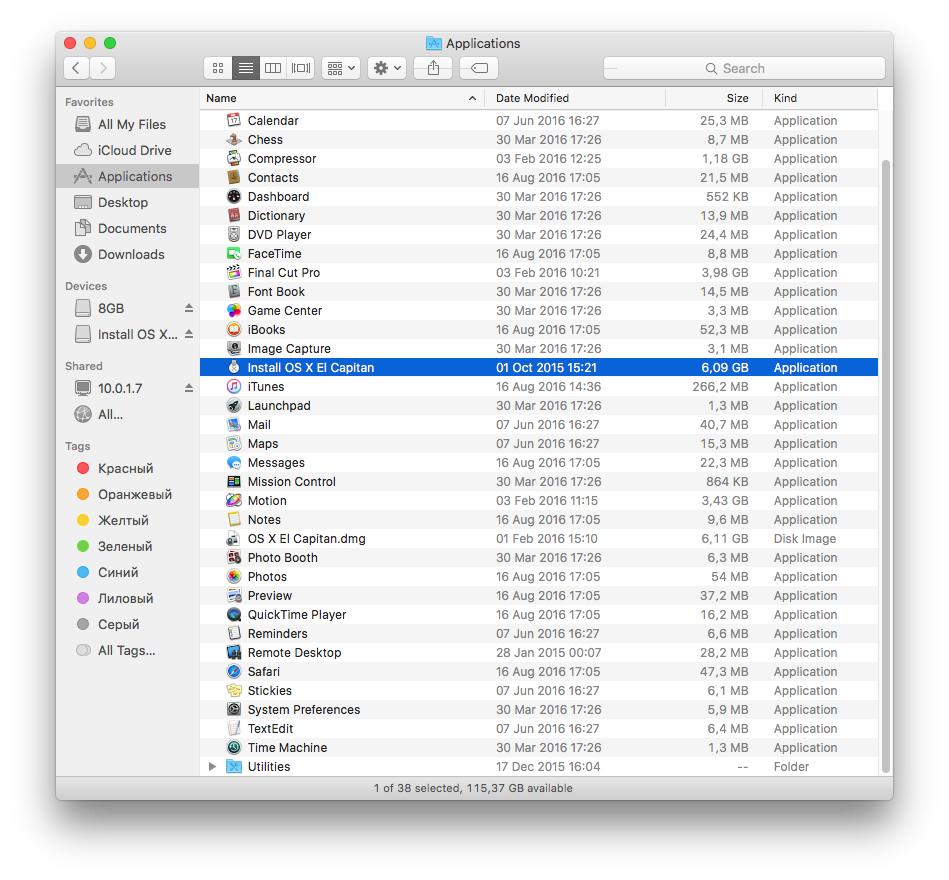
We take a USB2.0 flash drive with an 8Gb volume. We check that its volume was equal to or slightly larger than 8Gb. Under Windows is good A flash drive should show a volume of up to 7.9Gb (there are some features of the axes that show a slightly different volume of disk devices).
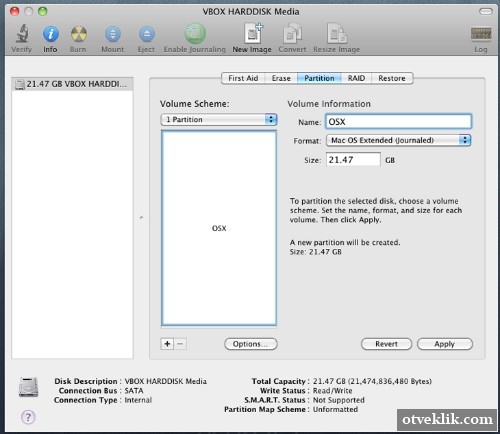
If you do not want to bother with checking, then just buy a 16Gb USB flash drive or an SD card of the same size, as well as an external card reader with a USB interface for such a card. In the latter case, it is desirable that the card has a tenth speed class. In addition, there will be no problem with changing the contents of the card during the installation process and re-unpacking the image, since most cards of this type have a built-in Look switch, which cannot be written to the card in the appropriate position. We insert the USB flash drive into the machine, launch the Disk Utility menu, select the USB flash drive as a device, open the Disk Partition tab and in the Partition Map: select Section: 1. 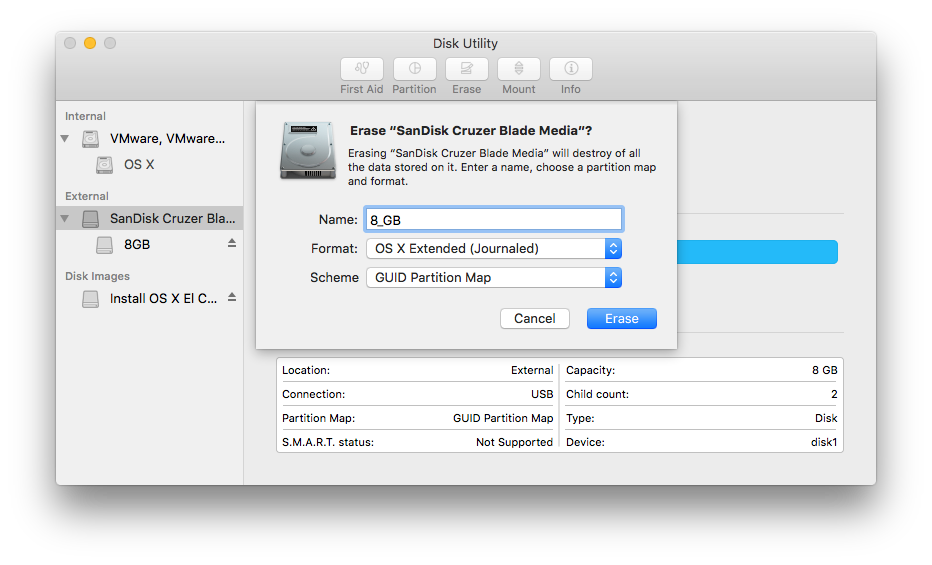
in the drop-down menu, select the main boot record and press the OK button.
After that, select Format: Mac OS X Extended (journal), in the column Name: enter, for example, USB (necessarily in Latin letters) and click the Apply button. We are waiting for the end of formatting and exit the Disk Utility.
The program UniBeast 6.2.0 run on the desktop.
In the window that appears, click the Continue button four times in a row and the Continue button. 
After that, the program will ask where to install, specify the USB partition, that is, our USB flash drive, again press the Continue button 
and in the next window, select the version of OS X that you are going to install (it is in the Programs folder).

And go! Installation on the flash drive went! Since the flash drive is slow, the creation time of the installer on it will take about 50 minutes. At the same time, in the program window, the scroll bar can stand still in one place, and the end time of the installation of growth to several hours or vice versa stop.
Do not worry, this is normal. If the scroll bar is poured, then the process is in full swing. 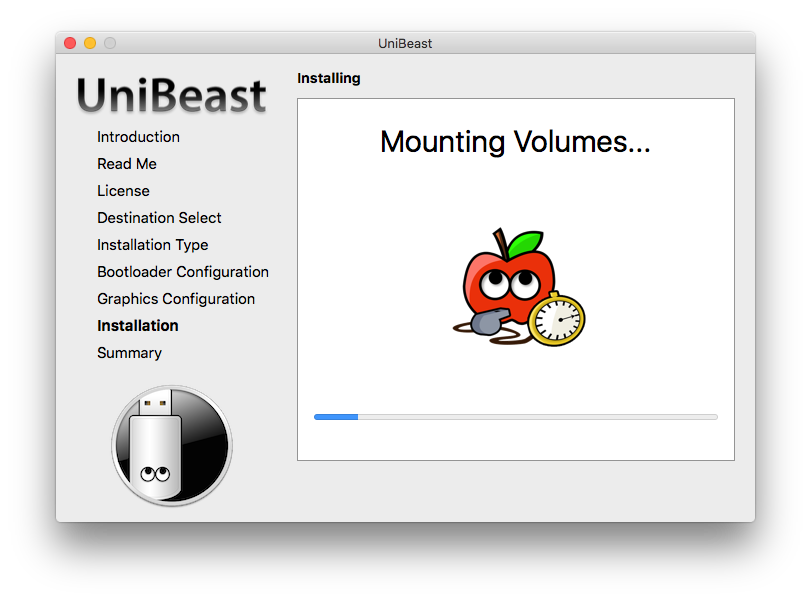
After the program reports the end of the process, the OS X installer will be created on the flash drive. All you have to do is to click Close to exit the UniBeast program. ![]()
System installation
Step-by-step instruction
Since OS X never knew the PS / 2 interface, you need to stock up with a USB keyboard and mouse before starting the installation.
At least for the time of installation.
After installing the driver, in the Multibeast program, the PS / 2 interface will be available.
All disk devices, card readers, redundant network cards, devices and PCI bus expanders that are not involved in the installation process must be physically disabled. Disks containing other operating systems can be returned to the computer after and used along with OS X using the common axis loader for input.
So, if everything is already ready, insert the USB flash drive into the machine on which we will install OS X, turn on the machine and enter the BIOS using the del key. On some motherboards and laptops, the BIOS is accessed by pressing the F2 button.
If your motherboard is modern and uses UEFI BIOS technology or Dual UEFI BIOS, reset the BIOS to Optimized Defaults, most likely with the F7 key (you can specify in the BIOS menu), and make sure that the settings of the BIOS that are important for the installation are:\u003e
* open bookmark bIOS BIOS Features, we find:
- Intel Virtualization Technology - disabled
- if there is a VT-d or VT-x - disabled
* open the Peripherals BIOS tab, we find:
- SATA Mode Selection - AHCI
- XHCI Mode - Auto
- XHCI Hand-Off - enabled
- EHCI Hand-Off - enabled
* open the BIOS tab Power Managements, we find:
- High Precision Event Timer or HPET - enabled,
if some setting does not match, change it.
We make the priority of the initial boot from our USB flash drive, save the BIOS settings by pressing the F10 and Enter keys.
The machine will reboot with new BIOS settings.
When the BIOS menu appears, press F12 (for a particular mother, look in the manual or in the BIOS menu), get into the boot menu selection menu and select the USB flash drive.
Boot from the USB flash drive, go to the boot menu selection menu and select the USB flash drive. 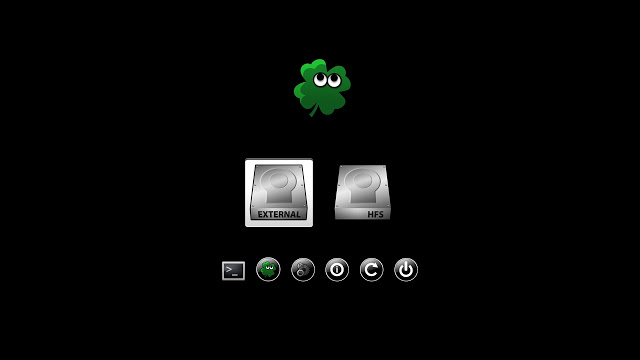
Almost immediately the language menu will appear, in which we select the language and click the icon: 
On the next screen, you can find a row with bookmarks at the top.
Having opened the Utilities tab (Utilities), select the Disk Utility and, in the side menu, select the hard disk as a device in it. 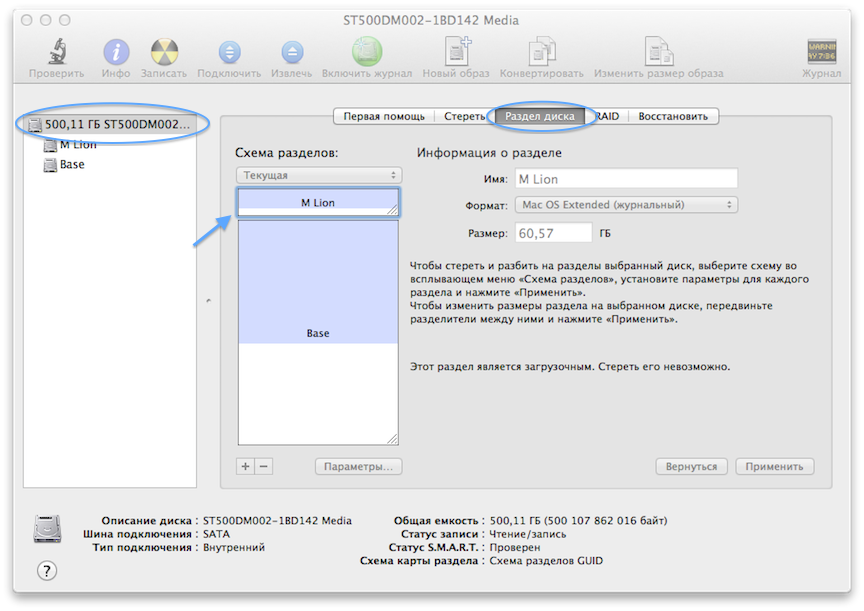
On the right, open the Disk partition tab.
In the Partition Scheme: click on Current and select the required number of sections.
* Usually create at least two sections.
The first partition for the system (boot) is created in size 40 - 60Gb, which is quite enough.
The second section is made the size of all that is left.
We need such a section to store a variety of data (movies, pictures, music), software distribution kits and other things that it is not advisable to lose if the system is reinstalled.
If your hard disk has a decent size (1 - 2Tb), then it makes sense to additionally create a third partition with a size of 100 - 150Gb to store programs, installers, various images and other things that you will rarely use.
We press the Parameters button ..., in the pop-up menu, select the GUID partition scheme and press the OK button.
Noting the section on the conditional picture, in the column Name: enter the name of the section, in the Size column: control the size of the section by moving the interval with the next section on the conditional picture with the cursor.
* File system (FS) for the system (boot) partition, select Format: Mac OS X Extended (journal) is mandatory, because OS X does not live on another markup.
For the remaining partitions, it is advisable to choose the same or any other file system from those available in the Disk Utility, not forgetting the specific limitations for each of them.
After you have named all partitions, selected a volume and file system, click the Apply button, wait for the formatting to finish and exit the Disk Utility.
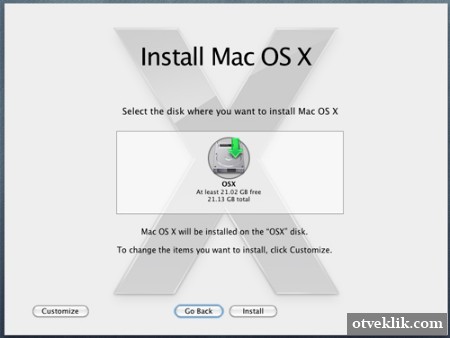
Click the Continue button and go to the hard disk partition selection menu to install the system, mark the system partition and click Install.
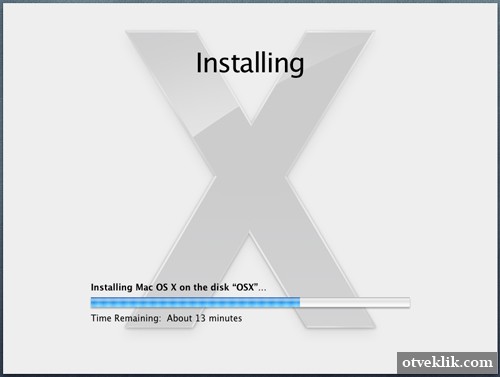
A setup window appears with a scroll bar showing the relative movement of the installation process.
After about 23 minutes, the installer will report the end of the process and restart the machine.
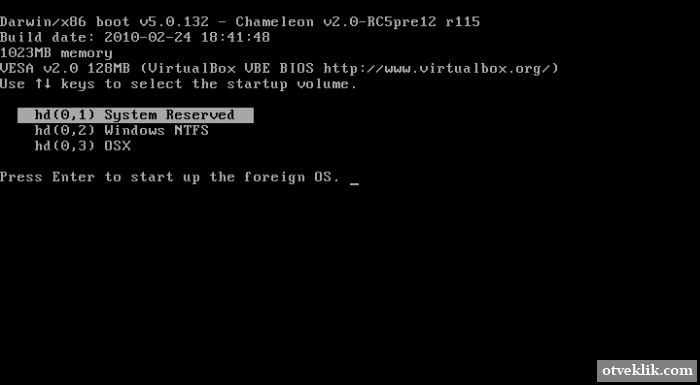
After the reboot, when the BIOS menu appears, press F12 and get into the BIOS boot partition selection menu, select our USB flash drive and boot from it, get into the Darwin boot section selection menu (black).
At the same time, we’ll have two objects in the window that can be booted from, this is our USB flash drive with the installer and a partition of the hard disk with the name that you named when formatting it.
Select the system partition where you just installed OS X, using the arrow keys on the keyboard and press Enter.
If at the same time there was a problem loading the installed OS X, read Troubleshooting above.
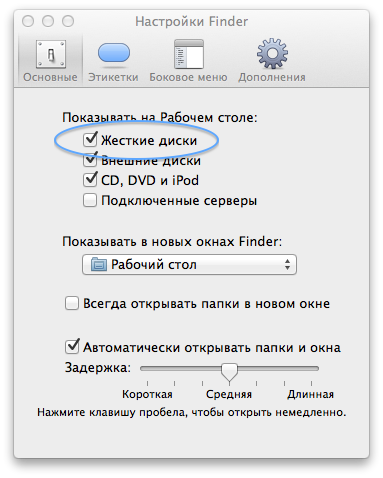
After logging in to the system, open the Finder’s settings and make all disks and partitions on them visible, on the Desktop and in the Finder’s side menu. 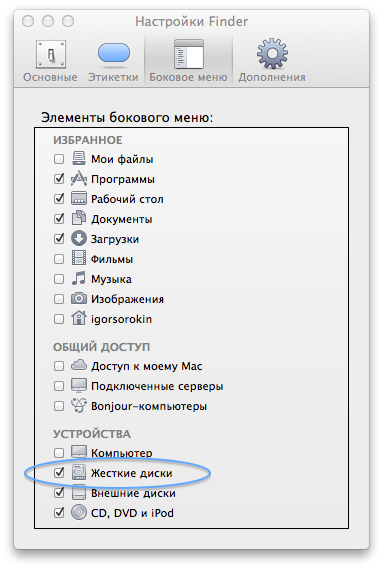
Install bootloader and drivers
One of the methods
As an introduction, I would like to give one piece of advice. Since the installation flash drive represents some guarantee, in case of failure of self-loading of the axis from the system partition of the hard disk, we must store it in this emergency. In addition, it will help us great with the next update of the system kernel.
Open MultiBeast on the desktop. 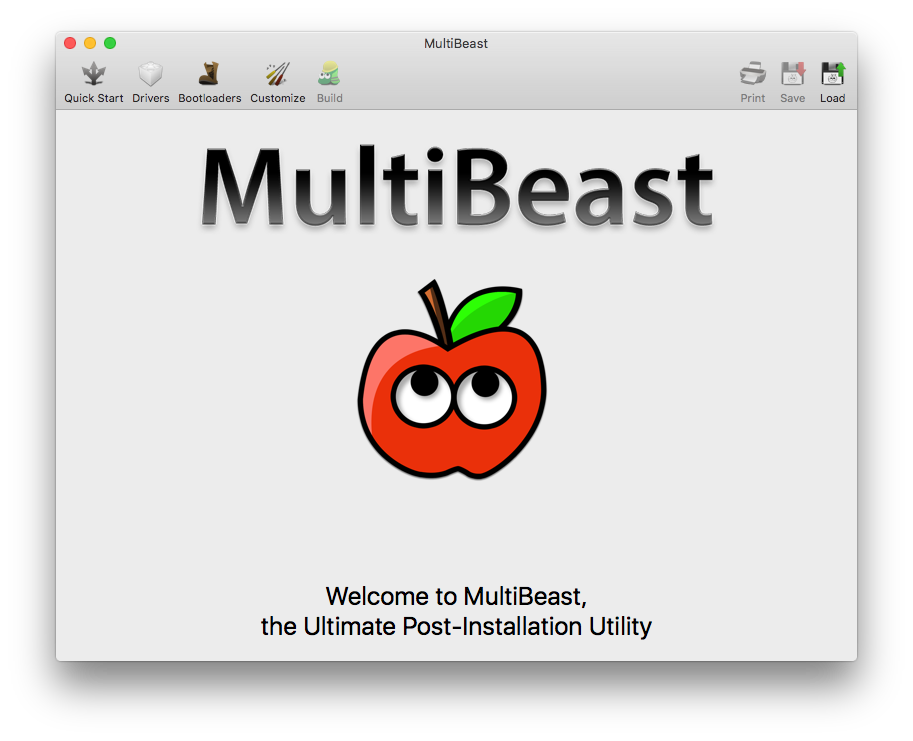
First choose the type of loader
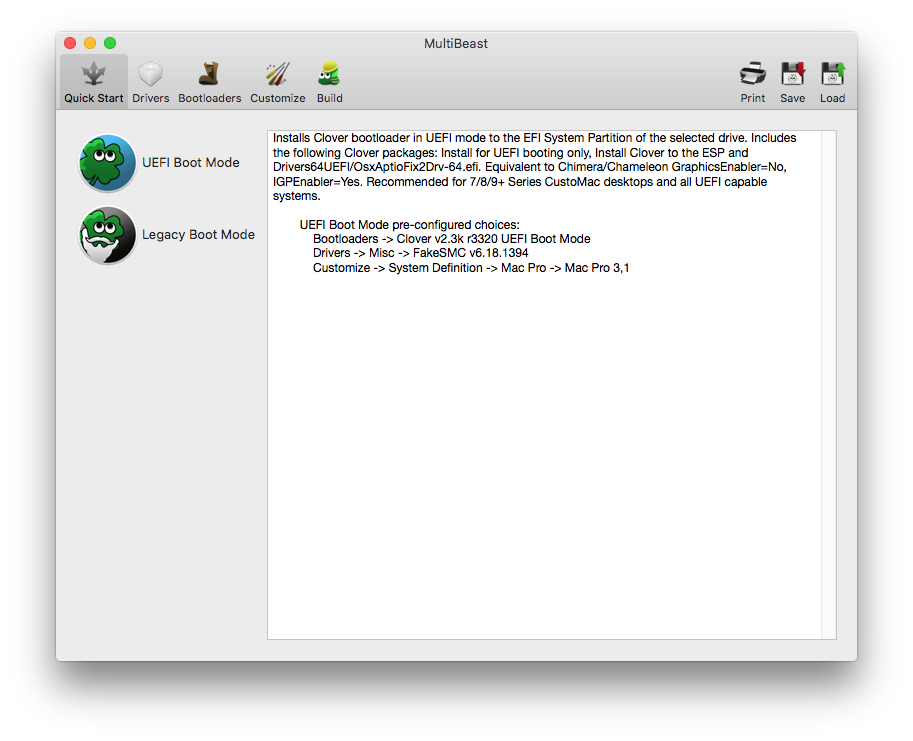
Then we go through the menu and consistently note all that is on your board. ![]()
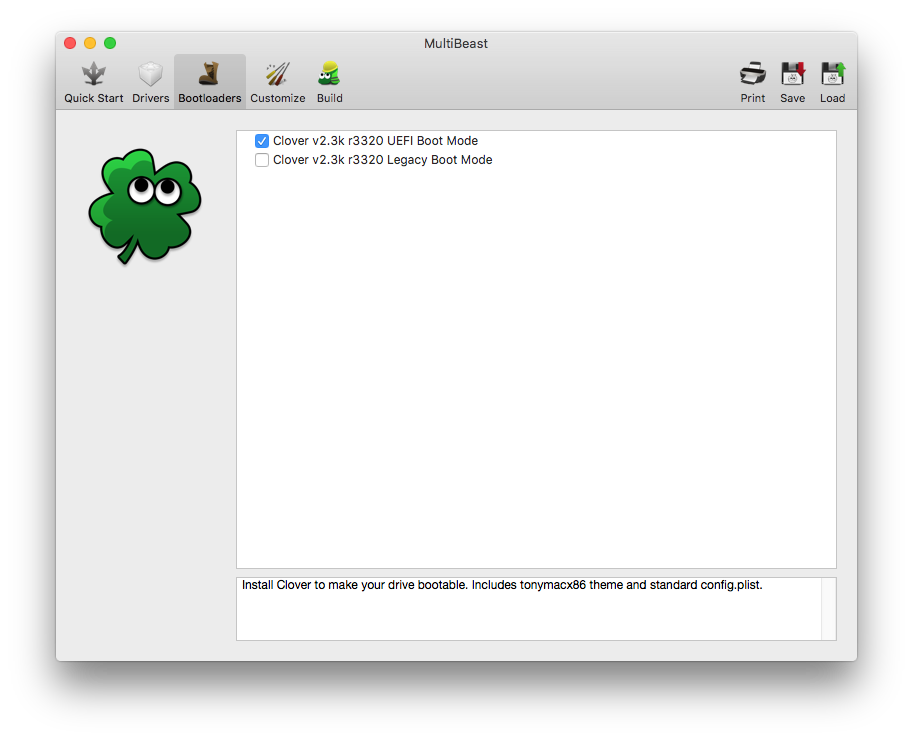

And so, you specified all the drivers and other settings correctly, click Build and put everything into the system.
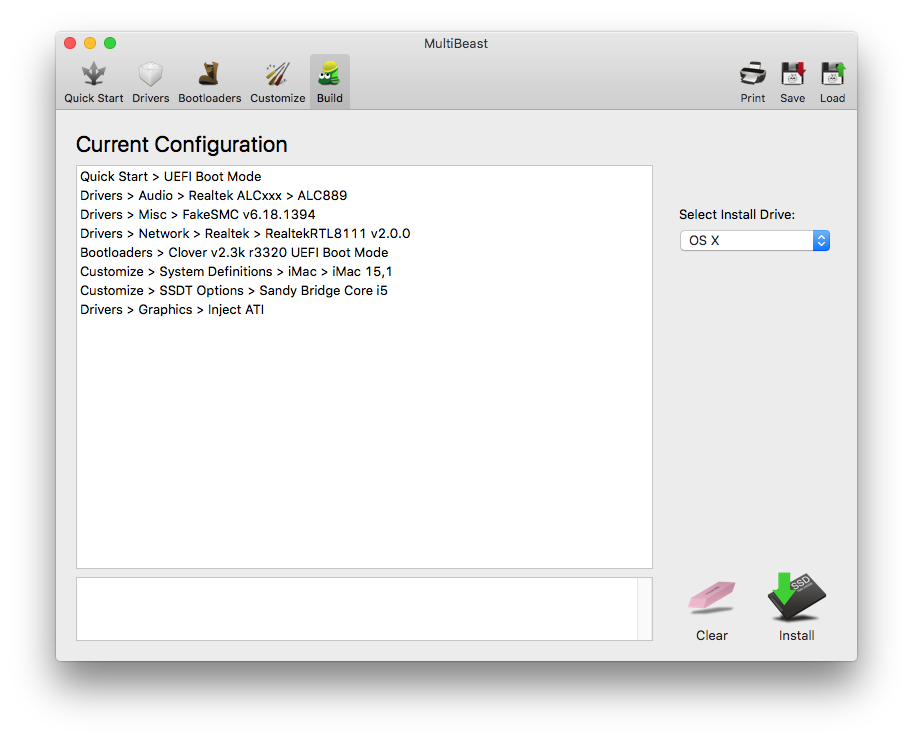
MultiBeast worked fine and showed a big green daw.
First, take out the boot drive. To use the installed components, you reboot the machine and watch the system load itself, without a bootable USB flash drive. In other words, the system is now running on your machine.
System Update and Embedded Applications
The easiest way
Since the applications and drivers that come with the installer are updated automatically and rare of them requires a system reboot, we will leave them unattended. An update of the operating system, as a rule, appears in two forms, it is a clean update of the kernel (the system itself), or a combo update that includes, in addition to the kernel, updates of applications from the axis kit. On the other hand, it is not so important if the axis you have installed is working normally and the built-in App Store application does not have any anomalies. To receive updates, you just need to start the App Store, in the program window click the Updates tab, choose from those that will be offered or select all. After updating the axis, the loading of the axis will fly off and it will stop loading.
There is nothing terrible, now we will fix everything. Insert our installation flash drive, go to the BIOS, do the first flash drive boot device, press F10 and Enter. In the Clover window, select the system partition of the hard disk and boot. Run the program Multibeast, choose our set of settings and drivers as if you installed the axis (this is where our records will be useful), and make the installation.
After that, it remains only to properly remove the flash drive and restart the machine.
Conclusion
In conclusion I want to wish you all successful installations.
Now everyone can install Mac OS X on their computer or laptop without buying an expensive iMac, Mac mini, MacBook or, especially, a Mac Pro! It is not so difficult to deny yourself the pleasure of working on a poppy). Despite. that now I use EL Capitan, my hands are itching to return to the already fully tuned Mavericks. In this article, I will share with you all the difficulties I encountered when installing and setting up Mac OS X on a PC.
To start the installation and use Mac OS X you need a program adapted to download it and stable work on ordinary computers or laptops. I use a bootloader Clover - it completely suits me, it works stably, loads quickly, but what else is needed. To get to know him better, it would be nice to read a small reference book “Clover khaki”; by the way will not be superfluous also in advance archive with the installation file .pkg inside. I advise you to take the latest version at the time of downloading. if you haven't prepared a flash drive, we recommend reading it before creating.
Have you looked through the directory? I confess to me when I first met Hakintosh - this guide seemed like a set of abstruse symbols, in fact, I didn’t need anything for the stable work of the mavérix. But this is purely my opinion and maybe you will find there many useful and interesting things. Let's go….
Configuring BIOS for installing OS X Mavericks 10.9.5
Main parameters in the BIOS for Hackintosh, which you need to specify. Otherwise, MacOS may not start for you.
Turning off all peripherals (webcam, smart, bluetooth whistles, card readers, etc.)!
- We reset all settings in default;
- AHCI - enable;
- HPET - enable;
- ACPI Suspend Type - S3 (Only);
- No Execute memory - enable;
- USB Legacy - enable;
- VT-d - enable (! *).
If in your BIOS at all not turned HPET, which is unlikely, go to the flash drive in the / EFI / CLOVER directory and open the config.plist file with the bootloader settings in any text editor and look for the ForceHPET key it is in the Devices section, you need to “uncomment” it, i.e. remove the “#” symbol and set the value to true.
If on the line containing AppleIntelCPUPowerManagement.kext do not despair - change the value to True for AsusAICPUPMit is in the section KernelAndKextPatches. This works not only for Asus motherboards.
Install OS X
So, the flash drive with the Clover bootloader is loaded, the top partitions are found with the Mac OS X installer on the USB flash drive, a small partition in FAT32 with Clover, then the hidden partition with the Windows bootloader, the Boot Manager and the system itself.
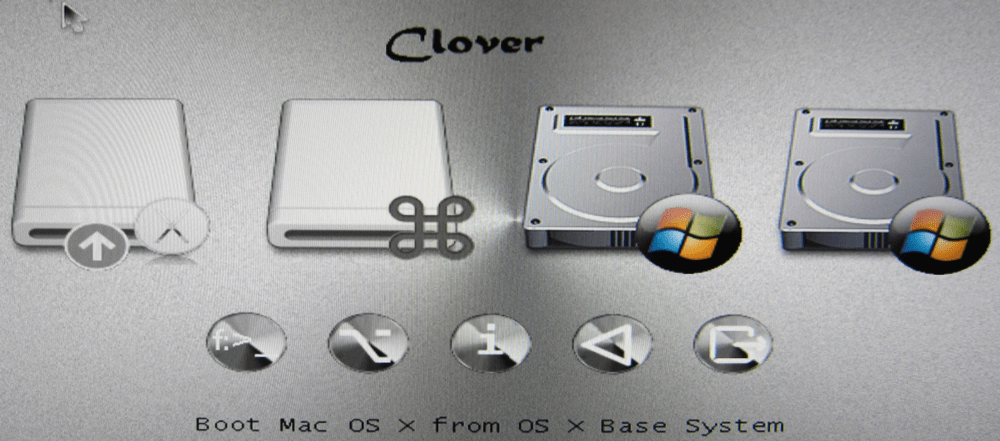
1 - choose it with the mouse or the down arrow on the keyboard Options (Settings)
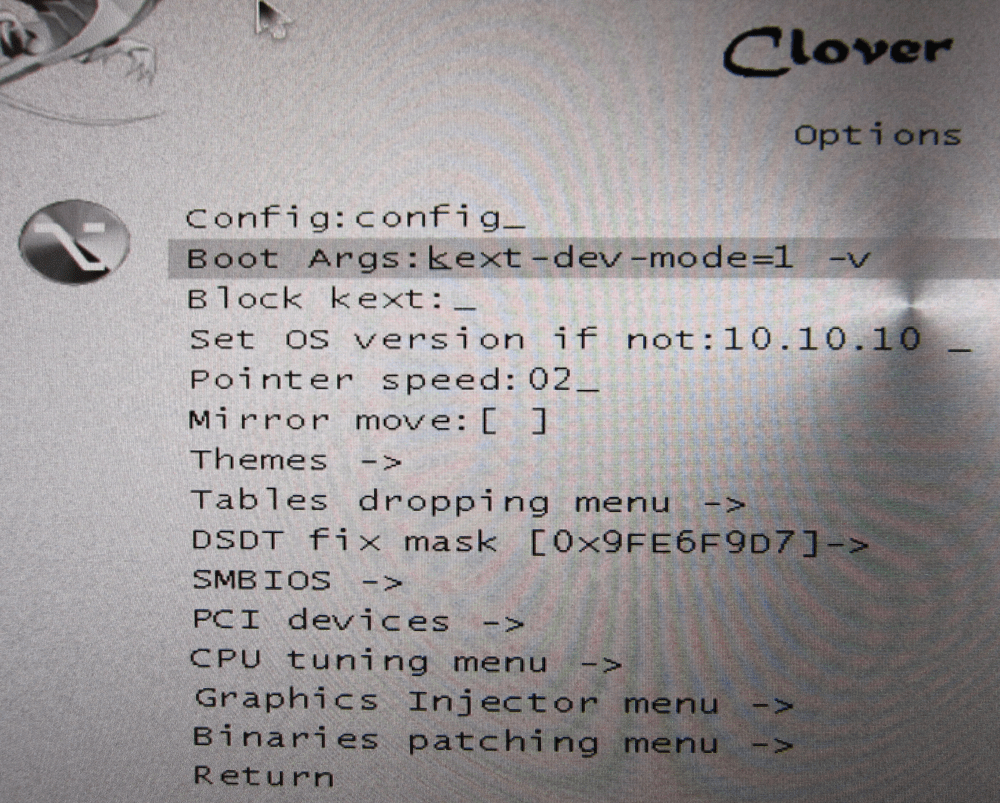
2 - On line Boot args (Download Options) click Enter to change it, and next to kext-dev-mode = 1 append -v npci = 0x2000 and again Enter. Use of this argument ( -v erbose) allows you to display information about the boot system on the monitor.
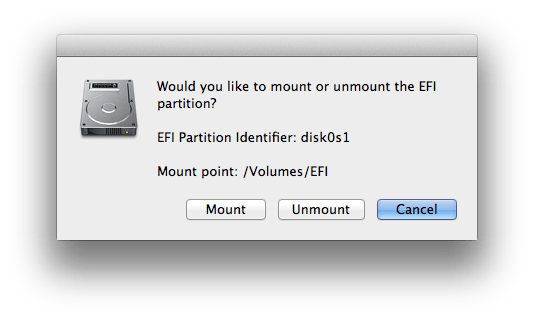
List of disks with partitions and dismounting (unmounting) an EFI partition
Still, the command line can be a little scary, so there is a simple EFI Mounter v2 program. Guess how to work with her?
Let's go back to the Clover installation - run the coveted .pkg file:
a) In the introduction there is information about the developers, by the way, the guys from Russia, version and so on played a significant role. Continue
b) Many letters, I hope you already know what is going on? If not yet, in order to have at least a general idea I strongly recommend to go once or twice in the manual. We continue.
c) Push Tune and select the Clover installation on the EFI partition
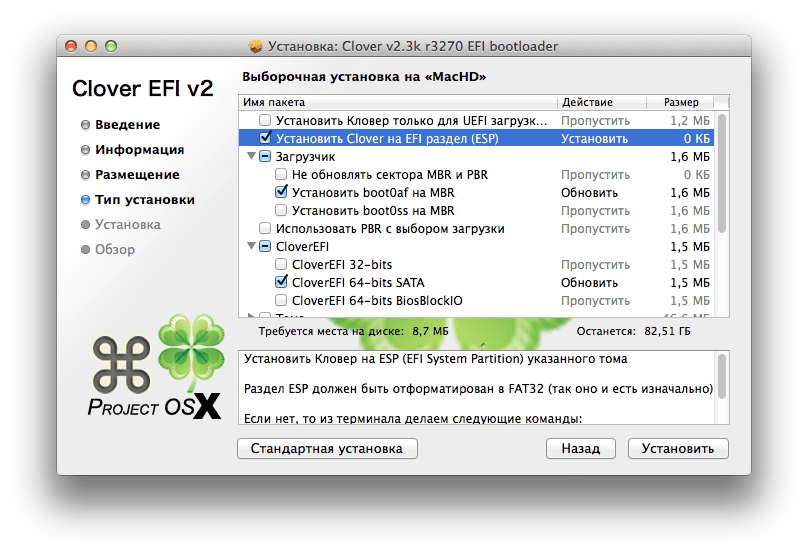 d) Upon successful completion of the installation, go on a flash drive from CLOVER choose a file with settings config.plistfolder kexts with "drivers", as well as a folder with themes themes, the latter is not at all mandatory, but it will allow you to avoid another edit of the settings file. Copy these folders to our EFI section in EFI \\ Clover
End) We take out the flash drive, boot from the hard drive.
Detailed video on installing and configuring Clover to your hard disk
Clover Configur ator.app is used for editing.
One moment CsmVideoDxe-64 serves to increase the expansion in Clover, so that when loading an apple it was like on a real poppy, but because of this function, sometimes the poppy is not loaded and you have to reload one and sometimes several times. So with this function it is worth being careful if you see that the computer does not often load the system, go to the EFI partition and delete this script. Or reinstall Clover without a tick, copying your config.plist
the Internet
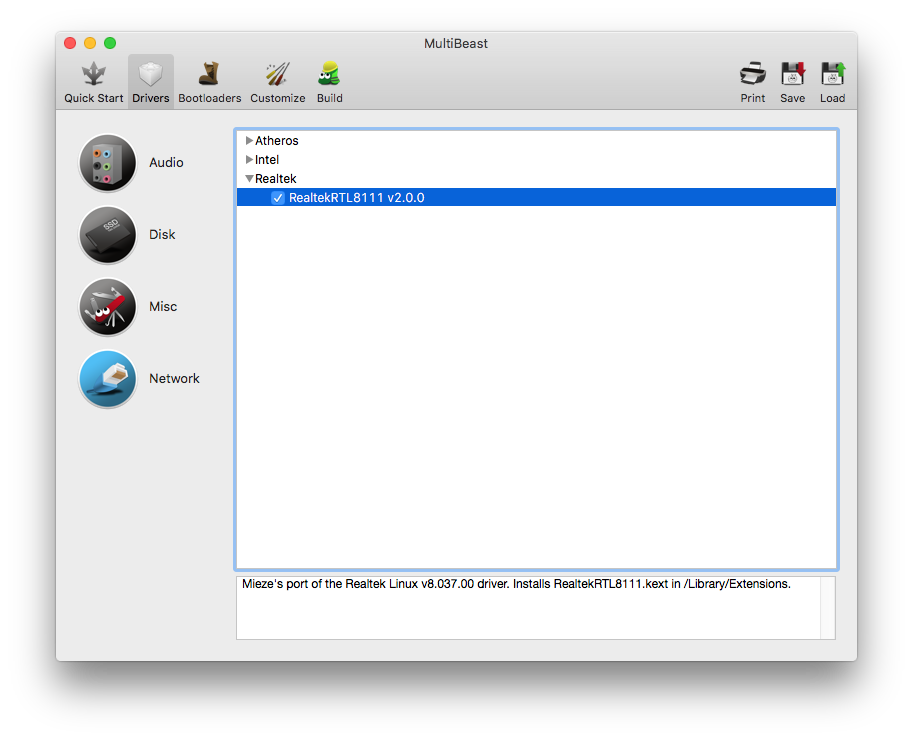
I have a Realtek RTL8111 network card (you can find out on the Yandex Market on the motherboard or run AIDA64, even in trial version). Typing in Google query Realtek RTL8111 os x or Realtek RTL8111 os x kext already on the first page there were positive results! But as practice has shown, they also had to pick up. If there were no problems with the Internet, then I was busy with sound for a long time. Under the link you can download already selected cakes for a network card - Realtek RTL8111sound and - Realtek ALC888
If it doesn’t work either way, you can try a different box or put the same one, but in a different way.
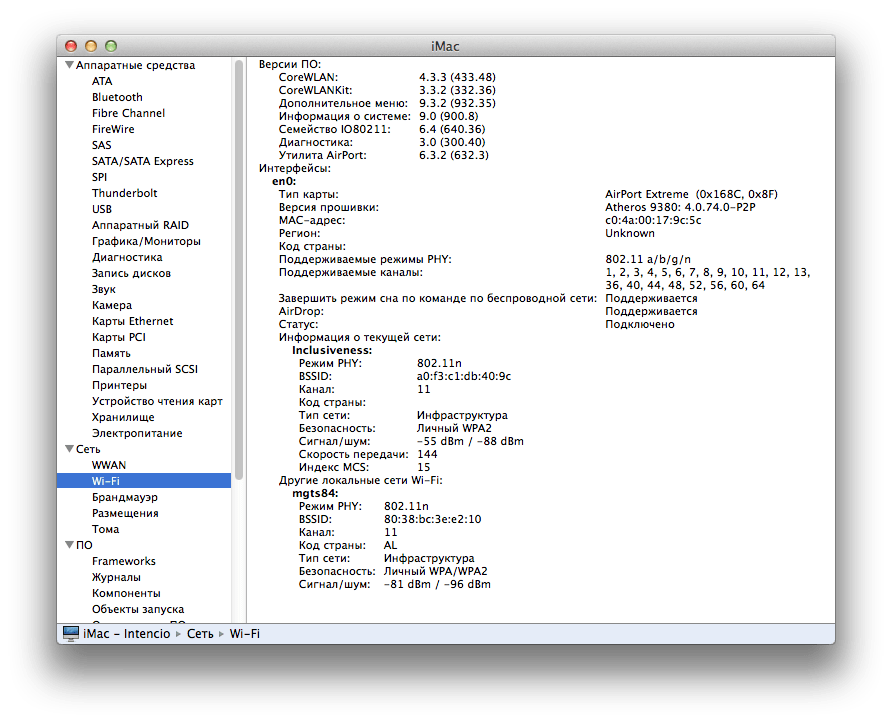
Naturally there is another option with a separate network adapter PCI Express interface, which will work without the slightest interference with the system, TP-LINK TL-WDN4800 for wireless data transmission in the 2.4 - 5 GHz range according to the 802.11n standard, for a more sophisticated 802.11ac you will need the TP-LINK Archer T8E AC1750. There are options and cheaper with minimal assault on the wireless IO80211Family.kext TP-LINK TL-WN781ND, be careful we need the first version on the Atheros AR9285 chipset with FCC ID: TE7WN781N on the radiator, the second run will not succeed (Atheros AR9485 with FCC ID: TE7WN781NDV2). Or, say, TP-LINK TL-WN881ND.

The system sees it as AirPort Extreme:
Concerning wireless usb adapters it also depends on the Ralink, MediaTek, Realtek or Atheros chipset. See what is used in the desired adapter and google on request with the addition of "OS X". For example, fit: D-Link DWA-125 (starting revision A1 from Ralink RT3070 to D1 with Realtek RTL8188ETV) or ASUS USB-N13 (A1-B1). You will need to install additional drivers manufactured by chipset manufacturers, you can get them at the office. sites or forums.
Last thingbecause there are USB-To-Ethernet adapters. For example, D-Link DUB-E100 + of course, additional installation of drivers is required.
Sound
It is possible to master AppleHDA subtleties for a long time and to the deaf or install VoodooHDA, get a working sound and decide where to develop further.
a) So download and unpacking VoodooHDA (). From the first installation, I always had the sound, I had to re-configure it all the time until I picked up a real working version, when all the settings are saved, so that you don’t steam with it like I did - I put the last one that I picked up completely working version. This comprehensive package will install the VodooHDA.kext in / System / Library / Extensions, also necessary for its operation AppleHDADisabler.kext disables the built-in AppleHDA sound and a convenient control panel for the new sound VoodooHdaSettingsLoader in the Program directory.
b) Continue -> To install, will be installed on the current system partition.
c) Enter the password, restart and "voila".
After that, I advise you to download the latest version and install it using a kekstevoy utility; The sound will improve, and the main thing is that the settings will still be saved. Settings will be enough to fix the first time after the reboot, in the future they will not have to touch.
To view or change the audio output sourceopen Utilities in the folder with Programs (or through Lounge padlocated in the Dock folder Other) choose Audio MIDI Setup. My sound is fed to HDMI, but you can also choose a jack for speakers / headphones on the motherboard. Through the socket of the motherboard and headphones works fine, but you have to manually switch.
Or you can buy for a slightly different amount of “out-of-the-box” sound from Creative, the Sound Blaster Play line of cards. There are many solutions, different degrees of sophistication and everything depends on your needs and desires.
Do not despair of your struggle and do not give up! You will surely succeed - after all, thousands of people around the world have already organized a working space for themselves on Mac OS, not overpaying for hardware and a trademark.
Finally installed, everything works fine. We relaxed, moved away from the computer, and he fell asleep - pulling the mouse - zero, pressing on the keyboard is zero. The only solution in this situation is a reboot. Many recommend to go into the settings and stupidly turn off the sleep of the computer, we will not become like them and decide this question to use a full-fledged poppy. not some kind of breed!
Sleep problem solving
You need to open a terminal window and enter, you can directly copy and paste in order not to type with your fingers.
sudo pmset -a hibernatemode 0
After entering in the terminal
sudo pmset -a hibernatemode 0
You need to click apply, in the window you will be prompted to enter an administrator password like this.
When you enter your password, then in the field there is nothing that will not be displayed, that is, the input will occur in the blind. After you have entered the password again, click apply.
Now you can check the current state of the mode for pm, for this enter the command
sudo pmset -g | grep hibernatemode
and click apply must see.
The order means we reboot and check the dream. :)
Unable to verify this instance of the installation program os x mavericks
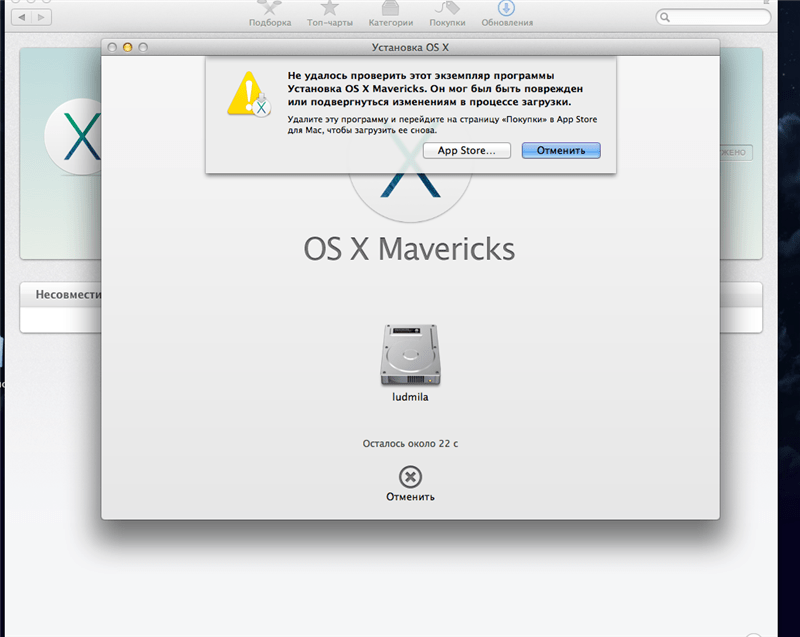
With this message all face. who tries to install OS X Mavericks after removing it from the App Store.
There are many different answers on the Internet, such as:
- Check out disk utility and click to fix the disk;
- The image is hacked by hackers and TP.
- Write a flash drive on another PC
The problem is that when installing Mac OS X, on your PC, you get an error, although the installation flash drive itself is done correctly ... Some people advise you to make the flash drive again on another PC, but this is not at all necessary!
The point is this:
Apple keeps track of the date of the recorded image on the flash drive, and if the date does not match the software limitations, we see the message as a result. We rush to look for other images and as a result we get the same result.
The solution is quite simple:
Through the top menu in the installer window go to Utilities -\u003e Terminal
And type in the terminal:
For OS X Mavericks
date 0706202713
which corresponds to July 6, 2013, 20:27.
For el capitan
date 0406200015
which corresponds to April 6, 2015, 20:00.
After you set the correct date, exit the terminal!
After a reboot, this message will no longer appear.
Important! After installing the system, enter the date and time settings and set the correct date - without this you will not be able to log in to the App Store and connect to Icloud - this is the first thing I encountered, I think other programs will also be buggy!
Mac OS X ORIGINAL (Retail 10.5.0)!
Hello everybody.
Many thanks to everyone who reads my blog, and who finds it interesting. Very pleased to be read.
Introduction
There are judgments that if your motherboard supports the native core of the axis (Mac OS X), then you can put it. This is not about hackintosh. This is what we will look at today by my example.
Many thanks to osikog (torrents.ru) and vlzhukov (forum.usemac.ru) for their invaluable help.
What was in theory has become a reality. I am now writing this note from under Mac OS X ORIGINAL (Retail 10.5.0 + Apple Software Update 10.5.5) now I have a real axis.
Getting to action.
What we need:
1 free flash drive of any raziera, up to 64 megs (it will be bootable)
2 a lot of free time
3 boot loader (external)
4 loader (internal)
5 1 HDD with GUID markup (not put on the MBR, you can not even try) what GUID and MBR can be found here - http://en.wikipedia.org/wiki/Master_boot_record (MBR) and here - http: // ru.wikipedia.org/wiki/Table_Section_GUID (GUID) paired with vents it does not work
6 right hands and desire
7 image Mac OS is desirable not on disk, but as a separate image file (.dmg .toast)
8 installed somewhere vindovz (2000, XP, viiiiiiiista)
9 hakintosh which is 100% placed on your computer (drivers are not required)
All the below described actions I did on my computer and all the drivers are suitable for me, if you have another hardware you may need to download driver images for your hardware here http://forum.insanelymac.com/ (search on boot 132):
motherboard: ASUS P5K-E WiFi / AP (Intel High Definition Audio ADI1989B \\ USB \\ LAN Marvell Yukon 88E8056 \\ Realtek RTL8187B WiFi)
cPU: Intel Core 2 Duo E6400
broom: HDD Samsung SATA2 320GB
video: nVidia GeForce 8800 GT 512Mb MSI
drive unit: ASUS DRW-2014L1T Sata
So.
Begin.
So that it was clear though what we will do, I will try to explain a little (I don’t understand much myself)
It’s just that many factors interfere with the axis, one of them is the preloading of drivers and system identifiers. I think I speak correctly. And then I understand something, but I can not say. In short, all this does not need to know. Getting started.
1 You will need the syslinux-3.71 zip archive which you can download here http://depositfiles.com/files/8386903. Next we need a couple more files and an image. You can take them here http://depositfiles.com/ru/files/8387261. Further. We load into the vents, the first and the last time, insert the USB flash drive, memorize its letter - this is important, it will be needed later.
Push start - run - enter - cmd - enter - further in the com window. lines write the following commands: ( pre-format the flash drive in FAT32 and copy the contents of syslinux-3.71. zip to the root of the C: drive and rename the syslinux-3.71 folder to syslinux)
syslinux.exe -ma K: where K: is the letter of the flash drive (I just have this letter, and you may be different)
This command copies one idlinux.sys file to the USB flash drive and makes the USB flash drive bootable. If everything is gut, then you will see a line like this:
c: \\ syslinux \\ win32\u003e
Next, open the archive number 2. There we see INITRD.IMG and the archive BOOTER.zip. We unpack the archive in the same folder and we have 5 files (INITRD.IMG, syslinux.cfg, boot, mboot.c32, syslinux.sys) necessary for normal boot. Copy them to the root of the flash drive. Voila flash drive ready. You can check her work just in case.
Select a disk after booting from a flash drive.
This is done by entering the disk number (81, 82, 83, etc.). 80 is the flash drive itself. Exit to the number entry menu via the ESC key.
So, the flash drive is ready. We have 6 files on it that are responsible for the full download. But one file differs from others in that it is very interesting to us. Namely, it contains drivers for the subsequent installation of the axis. His name INITRD.IMG. Inside it are important files. Directly in this image are the cakes for my iron.
For another iron they need to be collected. There is a program iDMG MAC OS X with which you can create .DMG images, and they then pereyenovyvayutsya in .Img. Ie you can eat your cupcakes and make your ownINITRD.IMG or surf the net in search of the desired image.
Partishen Map GUIDselects the optical button in the utility disk during the breakdown of the broom into partitions.
- 1 section for the main axis can be called Mac 60gb
- 2 section for the data, namely, it will later be put the original axisData 210gb
- 3 section for temporary hackintosh Hack30GB
All sections are edited in HFS + journaled with the erase button
The layout of the guid is interesting. We read the wiki and are not surprised that the working space of the broom is less than its nominal size. After all the changes.
So with a broom figured out. This is all set up during the installation of the hack. Next, put the hack in section 3. We take our image with the original axis and expand it to the root of 2 sections. The function to restore to disk utilities. There everything is done with a dragen drop. In the "what" field we drag our image, and in the "where" field we drag our Data section (on the left side of the utility disk) and click the restore button. We wait. It took me about 13 minutes like that. Everything. In this uncomplicated way we made a place from where we will put the axis.
We insert a flash drive and with God
After unfolding the image we reboot the computer and boot from the flash drive. Enter the number of the disk. And then choose our section Data for download and inter. You can also enter a key -v to see the boot process. If everything is good then we saw a menu with a choice of language. It is very good.
I had at least some possible difficulties at this stage.
Because of my card 8800Gt I did not see this menu. Instead, I saw volpaper "space" and the mouse that was spinning. The conclusion is that I had to pull out my card and insert the 7600Gt. It turns out the axis does not know 8800GT in version 10.5.0. And she does not want to be friends with her under any circumstances. The axis will be friends with my card at 10.5.4 and 10.5.5 exactly, but in other versions I have not tried it.
So here. changing the map to 7600Gt I started next. Choose a language. What they want is all in the distribution. We choose firewood on the printer and where to put the axis. In our case, this is our section number 1 Mac. After 5-10 minutes, you will see a message that everything has risen and everything is gut. Installation from a broom is much faster than from a disk. Do not be surprised. So the installer offers us to reboot, which we do, but we boot again from the flash drive. Now the flash drive replaces the bootloader. This is due to the fact that in real Macs the bootloader is embedded in the motherboard or in the ROM (Permanently Storage Device like BIOS) on some kind of motherboard or something else. In principle, everything. We got the original axis. Which works on your computer. This gives you the opportunity to update it from the off. site.
Install Internal Loader
here you can go in 2 ways
1 if you boot from a flash drive is not broke, then you can leave everything. The only thing is to shorten the time of reading the INITRD.IMG file by reassembling it using the program iDMG MAC OS X.
2 can install internal bootloader Chameleon DFE for Hard Disk. You can get it here http://depositfiles.com/files/8388004. In the archive there is a bootloader that you need to install in the section Mac, as well as there is a folderINITRD. There is a folder in it EXTRAand vney Extensions. When you start the installation of the bootloader, you will see 4 icons on a black background: read, install the bootloader itself, the plate icon, and the folder is blue. Here it also interests us. BEFORE INSTALLING THE DOWNLOADER IT IS NECESSARY TO COPY THE CONTENT OF THE EXTRA FOLDER (THIS FOLDERExtensions
) TO THE BLUE FOLDER BY THE DRAGEN-DROP METHOD.Only then install the bootloader in our section. Then test. Ie take out the flash drive and reboot. If all is well, then the axis will boot. In folder The INITRD archive contains drivers for my mother and system.
Well, that's all. We got a working axis. Now you can download updates. Install the driver. There is an excellent program for setting up the system and installing firewood - OSX86Tools.
Hakintosh that we set can not be deleted. May be useful.
I found it useful. We recall the problem with the map.
I'll tell you how I solved the problem. I downloaded the update, installed it. turned off the computer, inserted the card. booted in safe mode (-x) installed the card with OSX86Toolsby the method of adding strings. Voila everything works.
Thanks to all.
Why should I install Mac OS Ⅹ?
Experts point out a number of advantages of Mac OS Ⅹ:
- This system is not subject to virus attacks due to the rare use of system bugs by hackers.
- Thanks to the TimeMachine feature here is available to create backups system.
- On Mac OS: work games developed for Windows, as well as windows programs via Apple BootCamp, Crossover.
- The system functions without rebooting for quite a long time.
- In Mac OS, several processes can operate at once, without degrading the overall system performance.
- Apple offers a variety of interesting applications for Mac OS
Can I install Mac OS Ⅹ on a regular computer?
For those who do not stop the fact that installing Mac OS X on a regular computer is very difficult, we note some nuances. In particular, such a procedure can be done only on a PC, where there are components compatible with such an operating system.
For example, processors and chipsets from intel, and video cards from NVidia. At the same time the lion's share peripheral devices will not work. As practice shows, Mac OS Ⅹ is installed normally on a PC with a processor that supports SSE3, a Quartz Extreme video card, Quartz 2d, Core Image, GL.
In order to properly install Mac OS X, NTFS partitions will have to be converted to FAT32. Otherwise, there is a great risk of an error when creating a new partition, as a result of which the file system will no longer be read normally.
How to install Mac OS обычный on a regular PC?
For those who are not familiar with Mac OS X, the easiest way is to install versions 10.4.6 or 10.4.7, since there are almost no problems with their installation. Finding such software on the Internet is easy. Most often, Mac OS X can be downloaded online in ISO or DMG format. In the first case, the image is simply written to disk, in the second, we first convert it using the DMG2ISO program to the ISO format, and then copy it to the media.
Install Mac OS X in stages:
- After we insert the disk into the drive and reboot the computer, press the F8 key. After a few seconds, enter the Y character, which allows you to enter the text mode of the installation. Pressing other keys will redirect to the graphics mode, the functionality of which is lower.
- If the error “system config file‘ /com.apple.Boot.plist ’not found” pops up, it means that there is some inconsistency between the distribution of the operating system. Therefore, you will have to look for another option.
- If the “Still waiting for root device” error appears, the reason for the unsuccessful installation is hidden in the incompatibility of hardware to specific requirements for Mac OS.
- With a normal process, the screen takes on a blue color. After selecting the language, format the partition in which the Mac OS X operating system will be installed. It should correspond to Mac OS Extended journaled.
- In cases where Disk Utility is unable to format this area in HFS, we use the acronym. For this purpose, we set the manual mode in Acronis Disk Director Suite, after which we create the necessary area in FAT32 format. Using the context menu, we correct the type of the new section by setting here the value 0xAFh. The message about possible data loss is ignored.
- Next, agree with the license, select the installation section and the components of interest. It is important to select those patches that are consistent with the system. Moreover, they must be adapted either to SSE2 or to SSE3.
- We carry out the process itself mac installation OS X and restart the computer.
- If the installation of the operating system is successful, you can start working with it. If the “b0 error” error occurs, load the disk from the Hiren’s boot, then use the Acronis Disk Director program, activate the partition with Mac OS X. Restart the computer again.
Valery Kosikhin, _3dnews.ru
As you know, at the moment Apple computers are made up of the same components as the PC. So, on the last installation of Mac OS is also possible. How to do this - read this news.
Installing Mac OS X on a PC
Introduction
“Hakintosh” is an ironic name for Mac OS X, installed not on an Apple computer, but on a regular PC. This phenomenon became possible when the company from Cupertino in 2005 began migrating its machines from the PowerPC platform to x86 and Maki was equipped with the same Intel processors and chipsets used in personal computers. Since the time of the first modest victories, the so-called OSx86 project has turned from entertainment of a handful of enthusiasts into a mass movement with a growing user base. Today, when Apple officially released new version your OS, Lion, it's time to tell about Hakintosh to everyone who doesn't have a Mac, but there is an interest in Mac OS X and a desire to experiment.
Help excellent professionals and enthusiasts for operating system Mac OS can be obtained if desired at http://www.cyberforum.ru/mac-os/.
The first questions that a person asks when he sees the Mac OS on a PC: “Is it difficult to install?” And “Does everything work normally?”. The answer to both is negative. The installation is now simplified to the extreme, so you can play with Mac OS X on almost any modern computerBut full functionality is not available to everyone - a fair share of users either do not have hardware acceleration of graphics, or a network, sound, or something else falls off.
Hakintosh also has big problems with sleep mode. All these difficulties can be overcome, but you will probably have to spend several sleepless nights. In general, the situation completely copies what was happening with the desktop Linux distributions a few years ago. However, this is a very flattering comparison for the hacking community, as well as for Apple itself: despite the fact that no one ever prepared Mac OS X to work with non-native hardware, things could be much worse. Yes, some pieces of iron will never run on Mac OS, others will require dances with a tambourine for this. But at the same time, a huge fleet of components either works “out of the box” or starts up after easy manipulations. And software for Mac OS is installed and works in all cases in the same way as on the real Mac. It turns out that he is not so scary, this Hakintosh.
If there is no difference, then why pay more? Or is there?
So, if a small offense does not bother you, and technical difficulties only cause a healthy excitement, we will try to install Mac OS X on the PC together. In the article we describe two easy ways installing the previous, but still popular version of the OS, Snow Leopard (10.6), and one way for new items, Lion (10.7). Putting Leopard (10.5), and even more so Tiger (10.4) makes no sense anymore. If you like the result, then these instructions will be the starting point for self-development of Hakintosh. The last section provides links to popular resources of the OSx86 community, where you can learn from the experience of other users and find solutions for specific problems.
Preparing Hakintosh
Actually, why Mac OS X can't just work on a PC and how to overcome these obstacles? The number one reason is that in “Macs” not a good old BIOS, but EFI is used as an interlayer between the OS and the hardware firmware, and in order for the Mac OS to start, EFI is emulated at the level of a special “hacker” bootloader (by the way , this achievement we owe to the Russian hacker under the nickname Netkas). The most popular and rapidly developing loader today is Chameleon and its derivatives, for example Chimera.
The second reason: in Mac OS X there is a cachet (from kernel extension - kernel extension, remember this term) called Dont Steal Mac OS X. It is required to decrypt the applications that make up what the user looks like the operating system (Dock, Finder, loginwindow, SystemUIServer and others), based on the keys to the SMC chip, which is only on real Macs. Well, if "there are no legs, then there are no cartoons." The FakeSMC Kext comes to the rescue, which successfully emulates the SMC Device, for which, again, thanks to Netkas. Special bootloader and FakeSMC.kext is all you need to boot Mac OS X, if the computer is not very different from the real Macs by hardware.
And this is precisely the third reason. For unsupported hardware, there are no drivers for Mac OS X, or there are built-in drivers, but the system cannot use them because it does not recognize hardware with unfamiliar identifiers.
The hardware requirements for Hakintosha are the same - you need a processor with support for SSE2 instructions, best of all - Intel Core 2 Duo and later. AMD users will have to replace the OS kernel with a “hacked” version, as a result - there will be problems with updating the system from the Apple server. The same goes for netbooks on the Atom platform. It is highly desirable to support the AHCI mode from the SATA controller. To install Mac OS X Lion, you need 2 GB of RAM, and one is enough for Snow Leopard. The first rule for the selection of iron: the more the computer looks like a real "Macs", the less problems. The second rule: the newest and most advanced devices may not work in spite of any efforts, because hardware support depends primarily on Mac OS itself (hard-core hardware drivers are not written for Hakintosh), and Apple has nowhere to hurry. Evaluate the chances of success will help the site wiki.osx86project.org, which contains HLC (Hardware Compatibility Lists) for different versions of Mac OS X.
For installation, it is best to use a separate drive with SATA interface, and turn off the disk with Windows, out of harm's way. If it is not scary to conduct experiments on a single HDD with a working OS, then you will have to create on it new section with the help of some disk utility (for pure Mac OS X 10 GB is enough). Just keep in mind that during the installation, the Hackintosh bootloader will be recorded on the HDD, and then you can get into Windows only through it. Nothing threatens the available data, but backup also does not hurt. The disk must be connected to the port of the south bridge of the motherboard, the SATA controller in the BIOS must be set to AHCI mode. It is recommended to remove overclocking, remove all expansion cards, except graphic adapter in the upper PCI-E slot, disable peripherals, in addition to the keyboard and mouse, reduce the RAM size to 4 GB (if installed more). If the installation with minimal functionality is successful, then all this can be returned step by step. Too many conditions? Then you can practice in virtual machine. There are even ready-made images for various hypervisors on the Web, although their use in creating Hakintosh will not bring them.
We warn readers: although “Hakintosh” is a completely harmless entertainment that will not break a computer and is unlikely to spoil any data, all manipulations described in the article are done at your own peril and risk. In addition, you need to be with the computer on you and know what the bootloader is, the OS kernel and the layout of the hard disk.
Installing Snow Leopard with iATKOS 10.6.3 v2
The easiest and most versatile option is to install Mac OS X with a specially modified distribution. Since the release of Snow Leopard, such hacker builds have given way to a more elegant solution — installing from a copy of a company disk using a separate boot CD, and this is written below. But without assembly can not do CPU users from AMD or Intel Atom, because The original Mac OS X kernel (which our English-speaking friends call the vanilla kernel) only supports Intel processors with Core architecture and older, and the assembly allows you to immediately select the "patched" version during the installation process. And after you entered the world of Hakintosh with the help of the assembly and gained knowledge, you can make a clean installation, the components of which you fully control.
iATKOS 10.6.3 v2 is one of the latest released builds, and despite the rather old version of the OS (Snow Leopard has already been updated to 10.6.8), all the “hacker” software on it is quite modern. After downloading the image (we will not tell you where it is from), write it on a blank. Boot from the iATKOS disk and wait for the hacker boot loader to work and the OS to start.
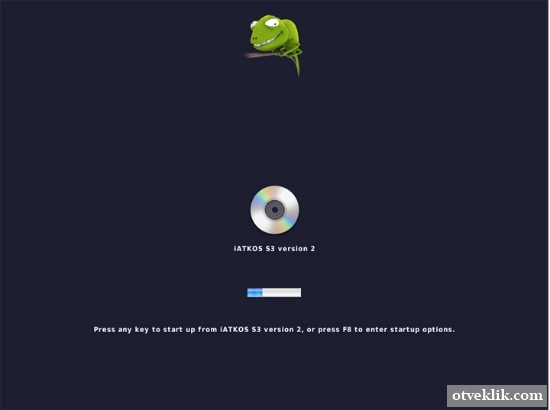

This process takes a few minutes, but if it suddenly drags on beyond reasonable limits or gives an error message, it means that something went wrong.
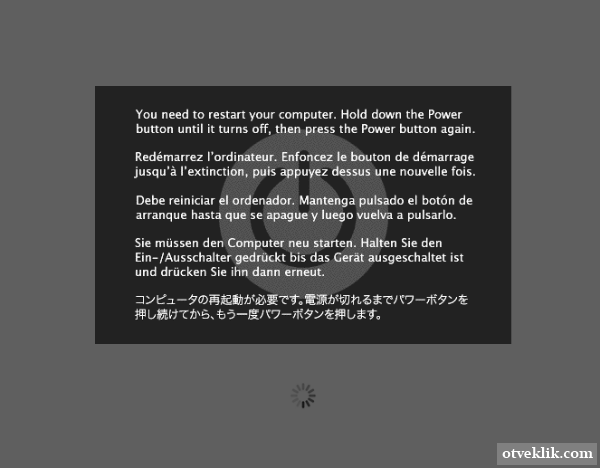
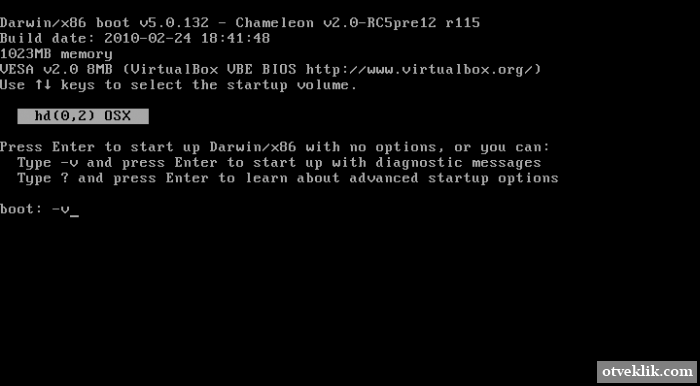
In this case, you need to boot from the DVD again, but on the bootloader screen with the green chameleon, press F8, select optical disk, type "-x" and press Enter. This is the so-called safe mode, but if you are not lucky with it, then you need to boot with the argument "-v", which will allow you to monitor the boot log. At the moment where the process got stuck or the phrase Kernel Panic appeared, you can take a photo of the screen and then, in a relaxed atmosphere, try to understand what is happening with the help of thematic sites, Google and tips of experienced “hackers”.
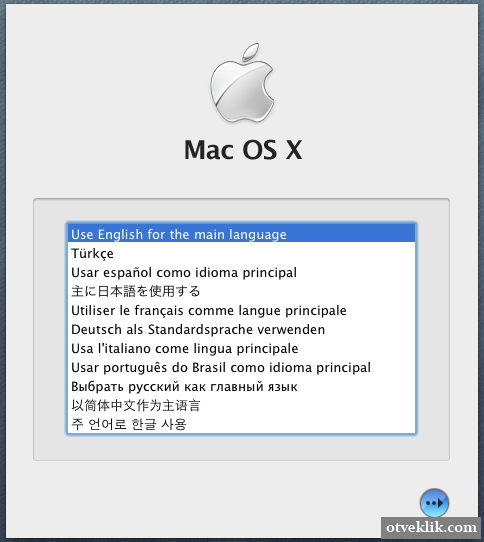
The appearance of the window with the choice of language indicates that the download was successful and your system is able to run Mac OS X. We recommend that you choose the language of Shakespeare whenever possible, since most of the instructions and analysis of problems on the Internet are written in it.
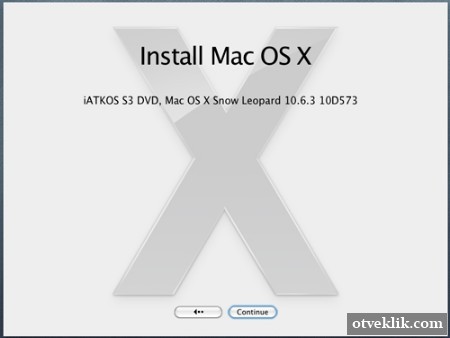
Scroll through the installer pages until a disk selection window appears.

Open the Utilities section of the menu and start Disk Utility. If you gave a blank disk for “Hakintosh”, then with the help of this program you need to “split it” (the Partition tab). For installation in a partition next to Windows, the partition is simply formatted in file system HFS + (Erase tab). For reliability, it is better to choose the HFS + Journaled option, and most users will not need the Case Sensitive option.
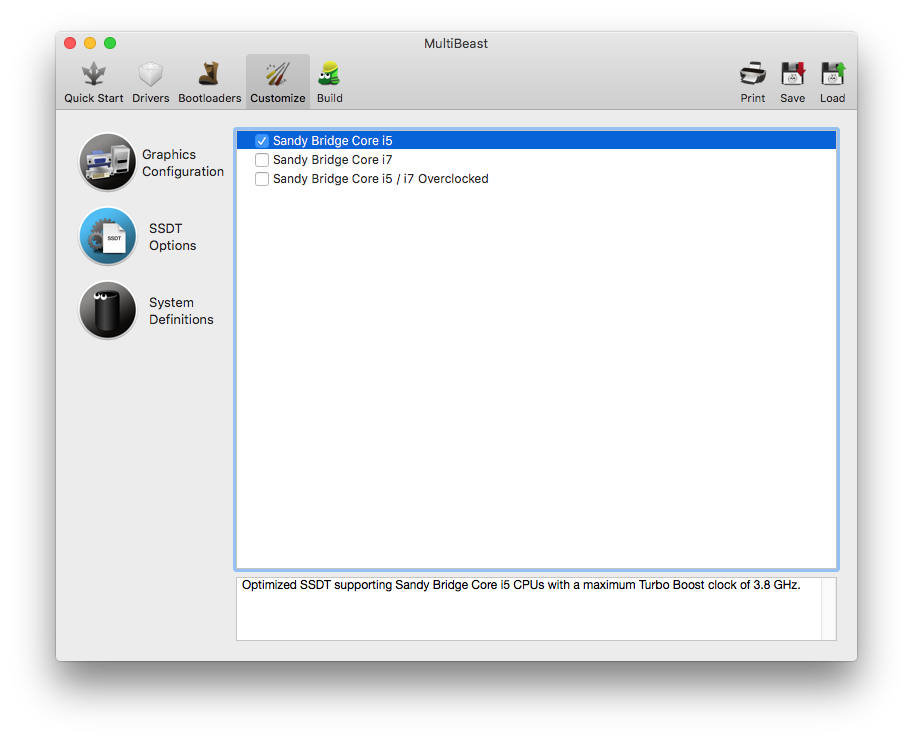
After the HDD is ready for installation, disk utility you can close and specify a partition in the installer window. And now the crucial point is the choice of drivers and settings, which allows Mac OS X to fully work on your hardware. The list opens with the Customize button. All users are advised to look in the Bootloader branch and select the Chameleon v2 RC5 option instead of the option marked by default. Owners of processors AMD, and also Intel Atom should select the modified kernel in section Patches, Modified Kernels.
You should not choose any "drivers" for the graphics adapter in the Drivers section, VGA. It is better to put a checkbox in front of the Graphics Enabler option in the Bootloader Options section - in this case, the bootloader itself will try to activate hardware acceleration. Be that as it may, in the 2D mode, the OS almost always boots, and if the Graphics Enabler method did not work, then you can try your luck with individual “drivers”. By the way, these are not drivers, but only injectors that allow drivers built into Mac OS X to work with unfamiliar video cards, and therefore they are quoted.
Select the appropriate package for network card in the section Drivers, Network - there is a good collection. For a laptop, the contents of the section Drivers, Laptop Hardware are useful. You can take any driver energy-saving functions of the CPU from the section Drivers, Main Hardware, CPU Power Management. The native extension of the kernel, called AppleIntelCPUPowerManagement.kext, which carries this function, is prudently blocked in the assembly, because it is suitable only for Intel processors, and even then not for everyone, and in case of errors does not allow the system to boot.
Do not mark the Sleep Enabler in the Patches section - if you need a sleep mode, then after updating the OS this extension will still have to be replaced.
The Language Translations section is included in iATKOS from the official distribution kit and contains OS interface localization packages, including Russian.

It is advisable to write a list of options that you have chosen, in case the freshly installed OS does not start and you have to find the culprit. When the choice is made, you can click OK and then Install. Go!
At the end of the installation, the computer will go to reboot. You can remove the iATKOS disk and boot up from the hard disk we used to roll out Mac OS X. While the Chameleon bootloader counts down the seconds before the OS starts up, you can press any key and see the list of partitions from which the download is available. If Windows was already on the hard drive, then it starts from the service partition called System Reserved, or directly from its root partition, if the service partition is missing for some reason.
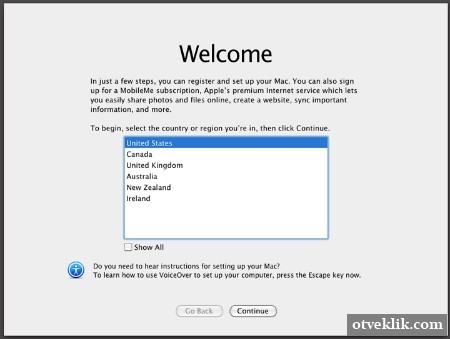
But we can't wait to see Mac OS, right? In this case, just wait, and if the options were set correctly during the installation, a registration window will appear on the screen, and if the Graphics Enabler option worked, then a welcome video will be shown.
What to do if the OS is stuck in the boot phase or gave an error message? The first tip in this case is to boot up with a log viewer. To do this, you need to stop the bootloader while it is counting down the time until the OS starts, select the partition with it, enter the argument “-v” and press Enter. The messages on the screen will find the component causing the crash. Then you can try to boot in safe mode with the argument "-x", and if it succeeds, then it is likely that the case is in some kind of kexte - the driver or device injector that you noted in the Customize menu of the installation disk, and you need to replace it. How to work with cakes, described in a special section of the article.
Installing Snow Leopard with a proprietary distribution
“Hakintosh” can be created with the help of the “native” image of Snow Leopard, which you can even buy to calm your conscience. In this case, all the software that makes Mac OS X compatible with a PC is written to a separate disk. But this method is only suitable for owners of Intel CPUs, since and the distribution disk, and a copy of the OS that will be installed from it, use the original kernel without AMD support. In addition, the unmodified installer of Snow Leopard will not allow the system to roll onto the hard drive, broken using the MBR, and supports only the GUID markup scheme. Therefore, the disk with the MBR will have to repartition.
If Windows is already there and you are not ready to say goodbye to the most popular operating system, then there is no obvious solution: using Disk Utility, first partition the disk with the GUID, create your own partition for the "windows" and install Windows, and then in the second section - Snow Leopard. The key word here is Disk Utiliy. This program, which, as you already know, is launched from the Mac OS X installation disc, creates hybrid markup with synchronized GUID and MBR. A MBR is required to install Windows.
The creator of the iBoot drive, which we will use for a “clean” installation, also warns that for Mac OS X you need to take a partition with a minimum volume of 1 TB. Those interested can see the original manual on the page. However, when preparing this article, the OS was perfectly installed and started up with a 20-gigabyte hard drive.
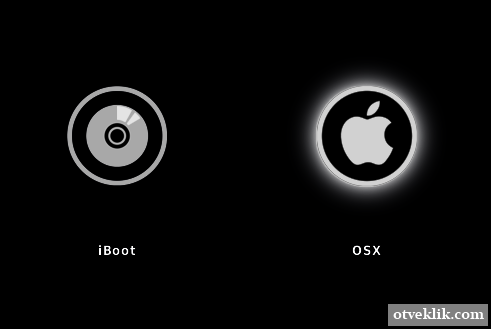
So first we need an image boot disk iBoot and MultiBeast driver package - the latest versions of both are posted on the tonymacx86 website (registration is required for downloading). Write the ISO image of iBoot on the disc and boot from it. When a window appears with the choice of partition to boot, you need to replace the iBoot in the drive with the “native” distribution with Mac OS X, press F5, select the DVD and press Enter.
The further procedure is completely analogous to what is written about the iATKOS build, only there are no “left” drivers in the Customize menu, only the standard Snow Leopard packages - interface localization, fonts, etc.
That's just after the installation is complete, boot directly from the hard disk does not work, because a copy of the OS is pristine clean and is no different from what is on real Macs. Therefore, you need to boot from the iBoot disk again and select the partition from Snow Leopad.
If an error occurs, you already know what to do: we boot with the argument “-v” and perform diagnostics, then we try to start the OS in safe mode with the argument “-x”. The tonymacx86 site also recommends the argument PCIRootUID = 1, which can be combined with “-x” and “-v”.
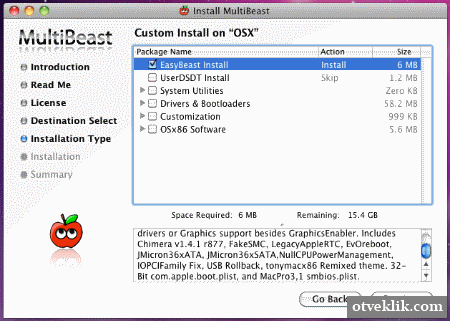
If Mac OS X showed a registration window, then it's time to accustom it to the PC. You need to run MultiBeast from the archive that we downloaded in advance, and scroll through all the installer pages up to the component selection menu. Here, all users should check the EasyBeast Install item - which sets the installation of a minimum set of cakes. To enable support for specific equipment, it is worth looking in separate branches of the list and choosing the necessary extensions. At the end of the procedure, the computer will be rebooted, and you can safely boot from the HDD.
In addition to the boxes, the Chimera boot loader is installed on the disk, and if Windows was previously installed, then it is loaded by selecting the appropriate partition.
Install lion
That's the most delicious - the latest version of Mac OS X. For now, only Intel users can evaluate it. At the time of this writing, Apple has not yet laid out the sources of the Lion core, which means there are no modified cores either. But most of the cases written for Snow Leopard work with Lion.
To install "Lion" we need a working Snow Leopard version not lower than 10.6.6, a free partition on the 5 GB hard disk for placing the installer files, the Lion distribution kit (available for $ 29.99 on the App Store and you know where for free) xMove utility and the familiar MultiBeast package.
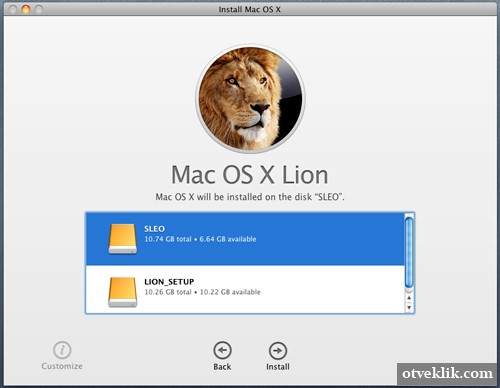
The Install Mac OS X Lion program runs directly from under a running operating system, and you need to select the one from which Snow Leopard is launched as the installation partition, which will not affect the OS in any way. After the files are copied, you can agree to reboot and go back to Snow Leopard.
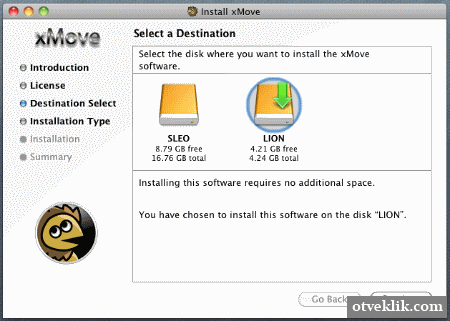
Now it's xMove utility. After launching it, you need to mark an empty partition, which we prepared in advance for Lion, and xMove will transfer there files unpacked by Install Mac OS X Lion. If Snow Leopard is installed using the iBoot + MultiBeast method, then it’s enough to boot from the hard disk and in the Chimera boot menu choose the partition with “Leo”. If iATKOS or another solution was used for the installation, but the bootloader and the cakes are also not the first freshness, then you will have to boot from the iBoot disk. The further procedure completely repeats the process of installing Snow Leopard from a proprietary distribution kit. And as a goal, you can choose a partition with an already running Mac OS X, and then it will be painlessly updated.
Installing and removing cases
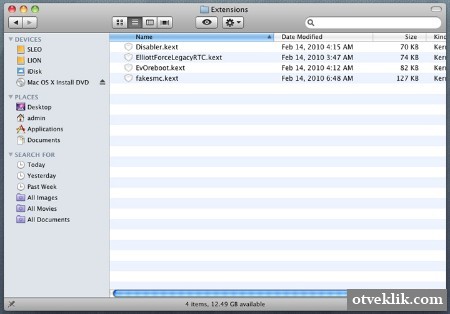
How to remove a problem driver, injector or add support for devices that did not start after the initial installation? The cache for kernels (kernel extensions) on Mac OS X is the directory / System / Library / Extensions, and they are loaded from the single cache at /System/Library/Caches/com.apple.kext.caches/Startup/Extensions.mkext, where the OS is puts only the necessary extensions. But modern Hackintosh loaders (already familiar to us Chameleon and Chimera) can download additional cakes from the / Extra / Extensions directory, and their small cache /Extra/Extensions.mkext is formed from them. In MultiBeast and iATKOS, this scheme is used, only in the latter case the / Extra directory is hidden. Display hidden files included with the command in the terminal.
Defaults write com.apple.finder AppleShowAllFiles TRUE killall Finder
To install many cases, just copy them to / Extra / Extensions. But some of them will not be able to resolve dependencies (in the cache /S/L/C/c/S/Extensions.mlext there are no necessary extensions), and you will have to create a single cache from all “native” and “third-party” extensions in the / Extra directory, which the OS can not alter. This is produced by the following command:
Sudo kextcache -m /Extra/Extensions.mkext - / System / Library / Extensions / Extra / Extensions
Before these files in / Extra / Extensions, you must assign the necessary permissions. Commands:
sudo chown -R 0: 0 / Extra / Extensions sudo chmod -R 755 / Extra / Extensions
And one more nuance: if even with the correct permissions the kexte did not enter the cache and does not load, you need to open it using the Show Package Contents option in context menu file and view the Info.plist file in the Contents directory. This is an xml file, and at the end, before the closing tags, there should be the following entry:
OSBundleRequired Root
Otherwise, it must be added or changed.
Mac OS X 10.7 is a bit different. Lion uses a different cache format - prelinked kernel. By default, Chameleon does not read it and scans the entire contents of the / Extra / Extensions directory, which slows down the download. The only thing that can be done so far is to create a shared cache in the /System/Library/Caches/com.apple.kext.caches/Startup system directory. Command:
Sudo kextcache -c /System/Library/Caches/com.apple.kext.caches/Startup/kernelcache -v -t -K / mach_kernel - / System / Library / Extensions / Extra / Extensions
And in order for the boot loader to hook up a kernelcache, you need to use the “UseKernelCache = Yes” argument when starting. But unlike the contents of / Extra, this file is subject to the operating system, and from time to time it will update it, forgetting, of course, about our “hacker” extensions. The solution to the problem is to move the cakes from / Extra to the / System / Library / Extensions directory and set the necessary permissions with the commands:
Sudo chown -R 0: 0 / System / Library / Extensions sudo chmod -R 755 / System / Library / Extensions
OS update
Hakintosh can be updated from an Apple server using the integrated software update utility. But at the same time, you need to be prepared for the fact that any cakes after the update will stop working or start to cause failures and have to find a replacement for them. Fortunately, the developers of popular extensions quickly respond to the release of new versions of Mac OS X. In addition, after the update, you need to rebuild the cache of catexes, preloading the system with the argument “-f”. Users of AMD processors, before upgrading the OS, should make sure that a new version of the modified kernel has appeared, or you can leave the old one.
Bootloader configuration
The Chameleon loader or its analogs are managed by the com.apple.boot.plist file in the / Extra folder. It can be modified manually, but there is also a special utility with gUI - Lizard, which can be downloaded from the page. It is desirable to include the screen resolution in the configuration, the arguments for the load (for example, the above-mentioned “UseKernelCache = Yes”), and the owners of the “non-standard” processors - the name of the modified kernel file. In iATKOS, this is a custom file (look, it lies in the root partition of the disk). Also check off Graphics Injection if this option helped you turn on 3D acceleration.
The 32bit Compatibility Mode option will force the kernel to boot in 32-bit mode, which may be necessary for some cases. At the same time, support for large amounts of RAM remains, and applications can operate in 64-bit mode regardless of the kernel. Similar argument command line - "-x32".
The argument list may also contain special options for individual cakes.
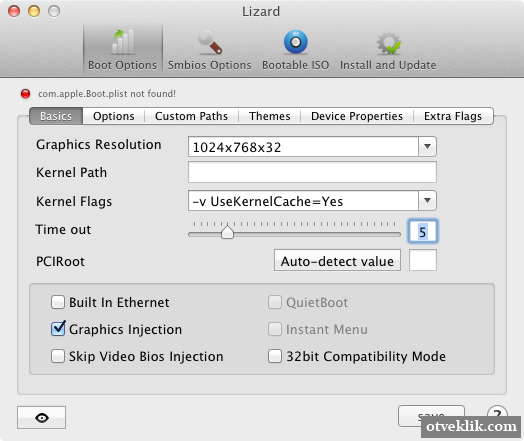
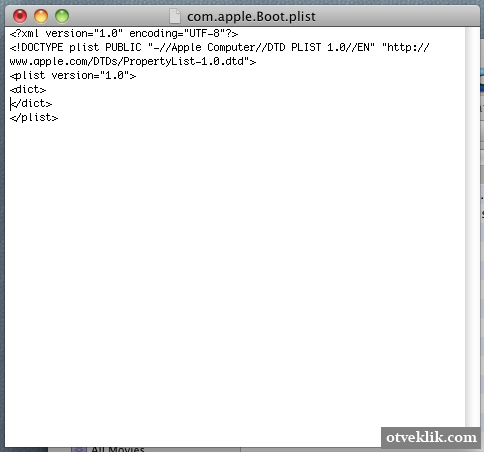
The program automatically opens the /Extra/com.apple.boot.plist file, and in case of absence will create it when trying to save changes. This is exactly what will happen with iATKOS, since This default build stores the bootloader configuration in the system file /Library/Preferences/SystemConfiguration/com.apple.boot.plist of the same name. This is not correct, so it's best to clean up after creating a file in / Extra. system file, leaving only those lines that are shown in the screenshot.
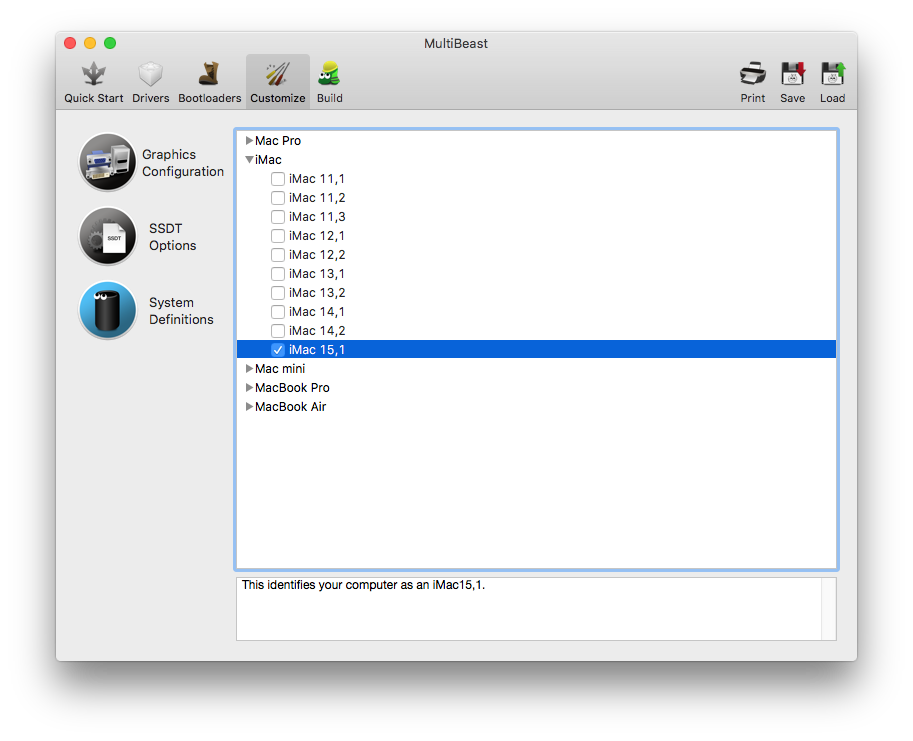
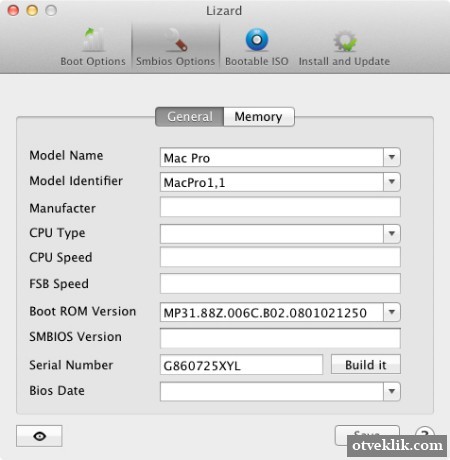
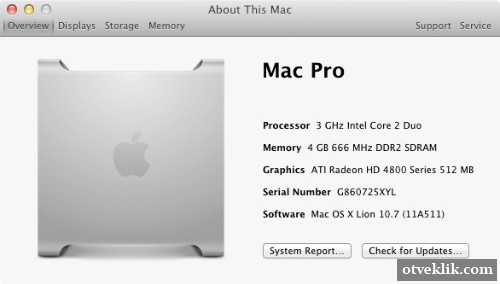
Another Lizard feature is editing the /Extra/SMBIOS.plist file. It contains information about the computer model and the hardware installed and helps to represent the computer as some kind of Macintosh in the System Information program.
Apple Peripherals
A question that worries many people, but I don’t want to spend money on the experiment: do the Mac devices and Apple Cinema Display, Magic Mouse and Magic Trackpad work with Hakintosh? So, the monitor is compatible with any video card equipped with DisplayPort (the DP Mini is suitable or a full-length version of the port with an adapter), and the light sensor also works, and the brightness adjustment in System Preferences. For a mouse and a touchpad, a Bluetooth USB adapter is needed - some work out of the box without any additional casestas, and the connection process is again no different from the one on real Macs.
Free swimming
Now that you can change the cakes and configure the bootloader, the Hakintosh configuration is completely in your hands. After the initial installation of Mac OS X, there are probably some “rough spots” left: something either does not work or it does not work well. Knowledge of the web resources on OSx86 will help bring the system to mind.
Well structured forum with a friendly public. There is a Russian-language section;
The above mentioned encyclopedia with a compatible iron database;
Site with installation guides and useful links;
manuals and software for Hakintosh;
a forum similar to InsanelyMac contains more in-depth technical information on some issues;
base
original and third-party cakes for Mac OS X.