In this article we will look at connection and setup Wi-Fi adapter D-Link DWA-140 to a stationary computer and laptop that do not have a Wi-FI module. Surely, you know that the adapter is necessary in order to connect to the Internet a computer or laptop that does not have Wi-Fi modules. An adapter is a small device that can be connected to a computer externally, via the USB interface, or internally via the PCI-E interface.
We will consider the option with a USB interface, which is the easiest and most affordable. In this guide, we will work with the adapter from the company D-Link, since we use the router of the same manufacturer. The interaction of devices from one manufacturer will positively affect the quality of the signal.
Open source licenses are usually licenses that make the source code available for free modifications or distributions; but also apply to technology derived and distributed exclusively in the form of object code. Therefore, you must treat the Software as any other material that is protected by intellectual property laws and treaties, and in accordance with this Agreement. The software may contain links or other resources that facilitate your access to or access to independent third-party sites.
Overview of the USB network adapter D-Link DWA-140
At the beginning of the article we will make a small overview of the connected device, we will consider its main characteristics. You may want to buy it in the future. Among all external adaptersprovided by D-Link, this model is an inexpensive and optimal option for desktop computers in terms of price and quality. The adapter is very easy to install and configure. You see for yourself.
Main characteristics
- The device works according to the standard 802.11n, compatible with IEEE 802.11g and 802.11b.
- The wireless speed is 300 Mbps and the transmitter power is 18dBM.
- When transmitting data over the network, it uses encryption technology WEP, WPA, WPA2.
- High performance provides a special technology RangeBooster N.
The adapter and attached documents are packed in a small, compact box. Open it and see a neatly packaged device.
These features are provided for convenience only. Linked Sites are not under the control of Belkin, and Belkin is not responsible or does not endorse or support the content or practices of linked sites, including any information or materials contained in these Linked Sites. You will need to make your own assessment regarding your interaction with these Related Sites.
If Belkin files a lawsuit, is involved in legal proceedings, or incurs any economic loss or damage as a result of your violation of this Agreement to the extent permitted by law, you will be responsible for compensating Belkin for the total amount of damages, in addition to other reasonable amounts, which Belkin incurs legal costs, expenses and attorney fees, unless Belkin contributes to loss or damage.
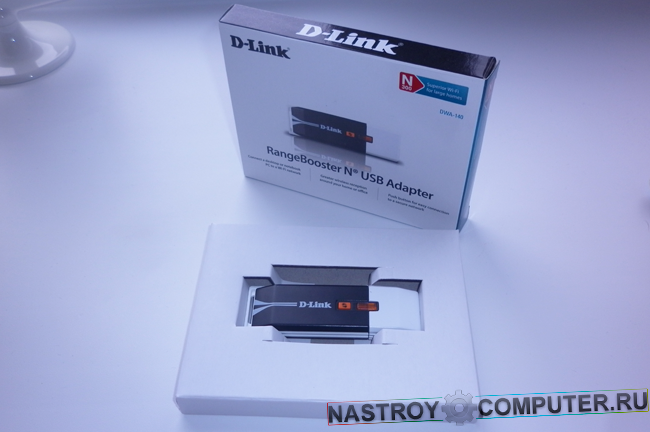
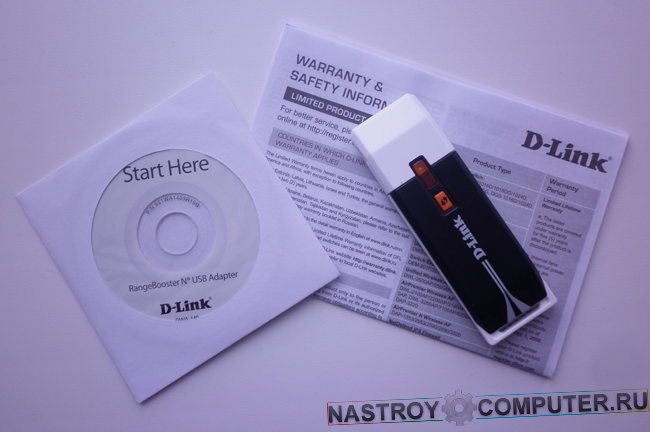
The photo below shows all the equipment: wireless adapter, installation disk and two paper documents.
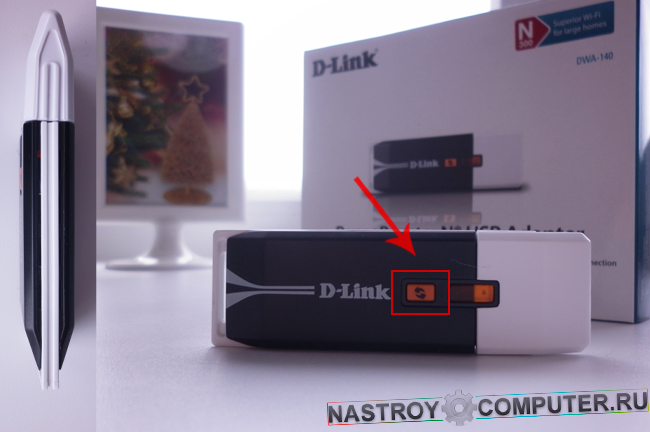
This is how the device looks like. Plastic case, beautiful white and black design, orange indicator and WPS button (Wi-Fi PROTECTED SETUP) to protect your wireless network.
This Agreement takes effect by clicking the “I Accept” button or when you otherwise use, copy or install the Software, which constitutes your consent and acceptance of this Agreement. The limited license in this Agreement will automatically terminate if you do not comply with any of the terms of this Agreement. You agree that in the event of termination, you must immediately destroy all programs and documentation relating to the Software, including any copies made or received by you, and you must stop using the Software.
Connecting Wi-Fi adapter to a computer or laptop
After you have carefully examined the receiver from all sides, it is time to connect it.
Step 1. Insert into any free USB connector on a computer or laptop. The system may give you a notice that the Software for the device has not been installed. Ignore and close the window.

If the Software is installed on a computer or mobile device, you must immediately uninstall the Software. All provisions of this Agreement, with the exception of Section 1 and the limited warranty in Section 12, shall prevail upon termination. If any condition, warranty or protection is implied in accordance with this Agreement or imposed on Belkin in accordance with the current legislation of Australia or New Zealand and cannot be excluded, but Belkin has the opportunity to correct it, then Belkin’s liability for violation of the condition, guarantee or protection is limited to one or several Belkin options below: in the case of goods, the replacement of goods or the delivery of equivalent goods, the repair of goods or the redemption of payment for goods, if it is not reasonable to repair products; or in the case of services, providing services again or paying the costs of providing services again.
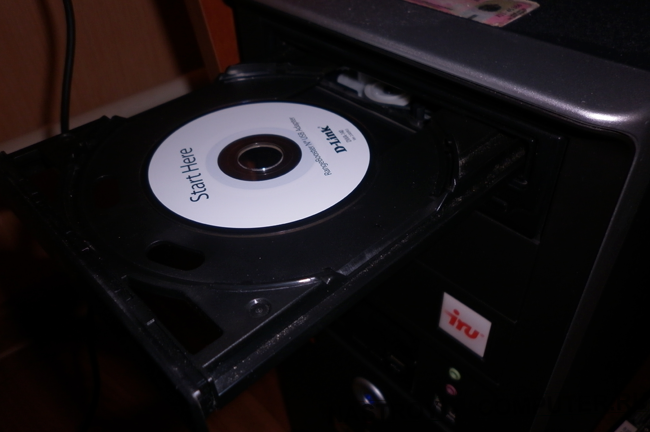
Step 2. Insert the D-Link DWA-140 installation disc into the CD / DVD drive. Run the installation wizard.
Configuring the Wi-Fi adapter D-Link DWA-140
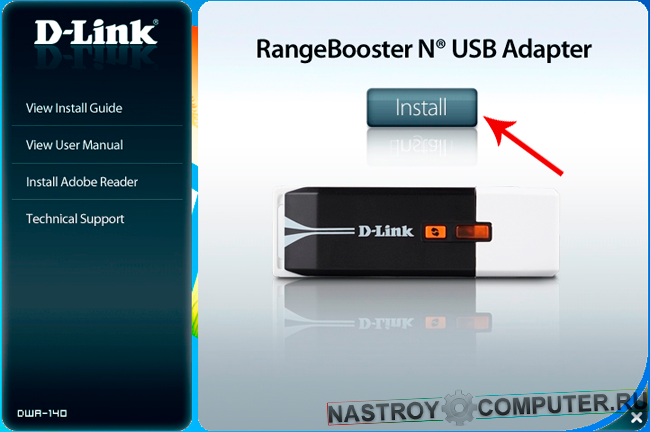
After starting the program, the start window will open wi-Fi settings D-Link DWA-140 adapter.
Step 3. Click on the " Install».
In addition to these solutions, the “consumer” may claim any reasonably expected losses resulting from the initial problem. Belkin warrants that any media on which the Software is provided are free from defects in materials and workmanship under normal use for 90 days from the date of the original purchase. This limited warranty will be void if the defect in the carrier is caused by accident, abuse or misuse.
All replacement media will be covered during the remaining time of the original warranty period or within thirty days with the maximum remaining time. Warranty limitations cannot be canceled or excluded, they are limited to the duration of the relevant Warranty Period. Belkin does not guarantee or promise any level of energy savings or other financial benefits associated with the use of the Products or the Software or any other remedy.
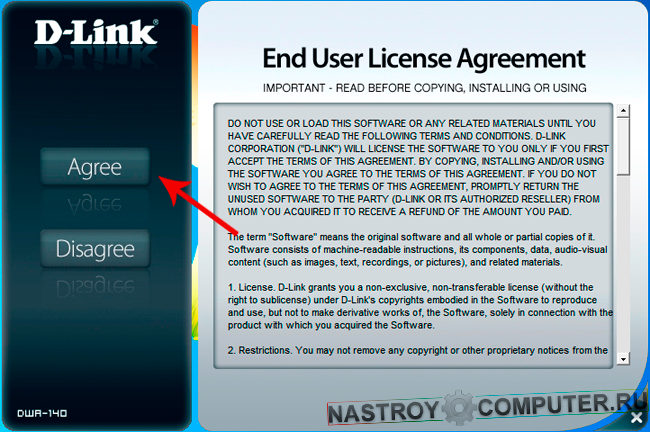
Step 4. Accept the license agreement by clicking the "Agree" button.
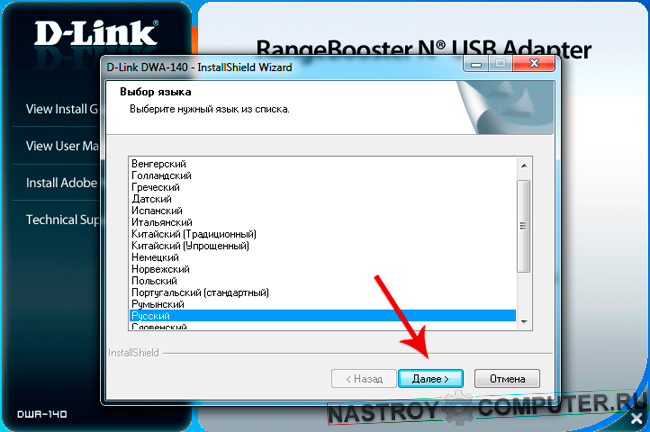
Step 5. Select Russian and click " Further».
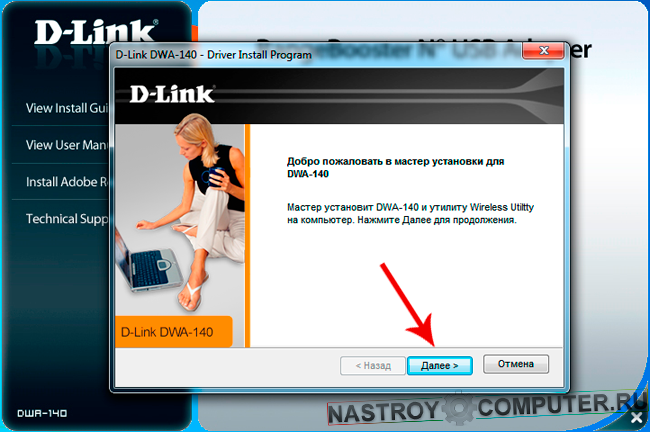
Step 6. In the next window you will be greeted by the Master. wi-Fi setup adapter DWA-140. Click " Further».
Energy savings and any monetary benefits associated with it vary depending on the factors underlying Belkin's knowledge or control. From time to time, Belkin may use the Software to provide you with information relating to you and your use of power, and offer the opportunity to save money on electricity bills if you accept offers or functions in the Product or Software. We cannot guarantee that they are true or relevant. In critical cases, access to information through the Software is not replaced by direct access to information in the home.
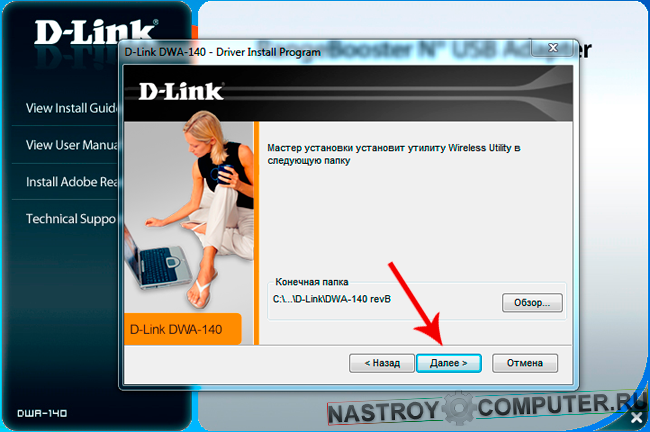
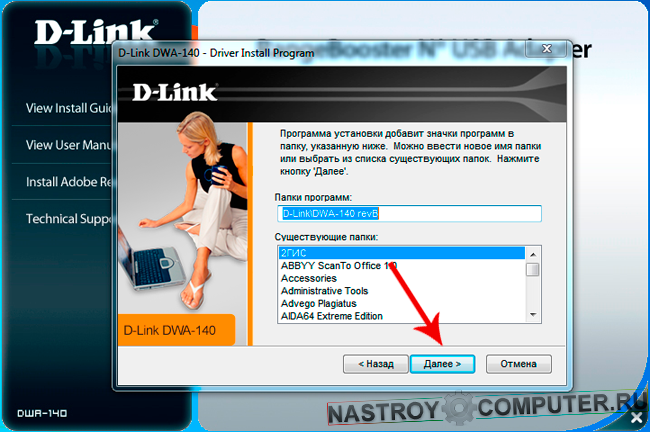
Step 7. Select the folder to install the utility and click " Further».
Step 8. Here you can see the name of the folder to which program icons will be added. Click “ Further».
The warranties and remedies set forth in this Agreement are exclusive and supersede all others, oral or written, express or implied. You agree to strictly abide by all export laws and regulations, and you agree not to export, re-export, redirect, transfer or disclose any portion of the Software or any technical information or materials, directly or indirectly, in violation of any export laws or regulations applicable .
This Agreement constitutes the entire agreement between Belkin and you in connection with the Software and its use and supersedes any conflicting or additional terms contained in any purchase order or elsewhere. Nothing in this Agreement can be canceled, changed or replaced, except for a written document signed by Belkin and you. However, in the event of a conflict or inconsistency between the English and any language versions, the English version of this Agreement will be regulated to the extent that is not prohibited by local law in its jurisdiction.
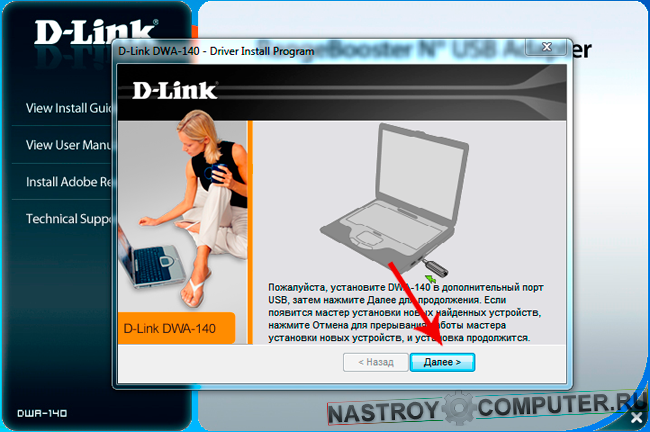
Step 9. At this stage, the program will ask you to connect the Wi-Fi adapter to the USB connector, insert the device into the computer if it is not connected, and click " Further».
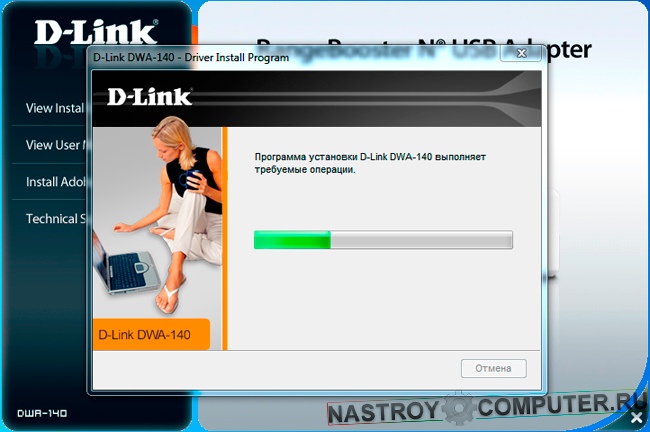
Step 10. Installing ...

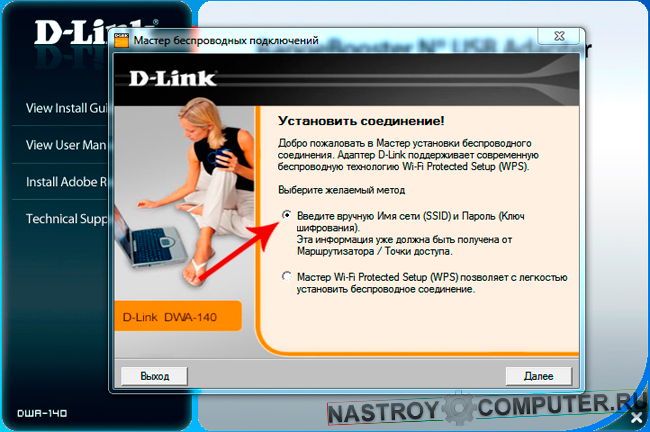
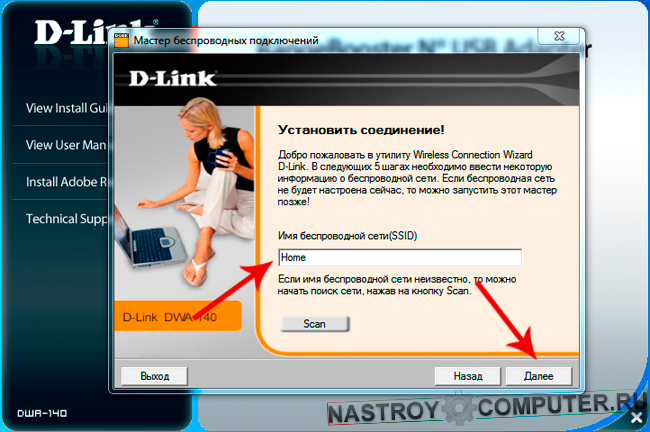
Step 12. Now we start setting up the connection. In this window, select the first method, Enter the network name and password manually. Click " Further».
Contrary to what is stated in the previous sentence, a person or organization who are not parties to this Agreement does not have the right to apply the terms of this Agreement. No waiver or delay in the exercise of any right or remedy will act as a waiver of any right or remedy. The wording of this Agreement shall not be construed strictly in favor of or against any party, regardless of who drafted the wording or has primary responsibility for drafting.
To successfully complete all subsequent configuration steps, you must have it.
Step 13. Enter the name of your wireless network in the field and click on the " Further". If you have forgotten the name, then to search the network, click " Scan».
The rights and obligations in this Agreement do not apply to you, and any attempt to assign them is void. This Agreement obligates and returns in favor of the parties and their successors and authorized successors. In the event of any legal proceedings between the parties arising from or relating to this Agreement, the winning party shall have the right to recover, in addition to any other repairs permitted or provided, its expenses and expenses incurred during such proceedings.
If you are in the United States, section 17 applies to you. Arbitrage, waiver of class arbitration, applicable law and local regulation. If you are outside the United States or if Section 17 does not apply to you or is otherwise invalid as determined by a court of competent jurisdiction, then Section 18 applies to you.
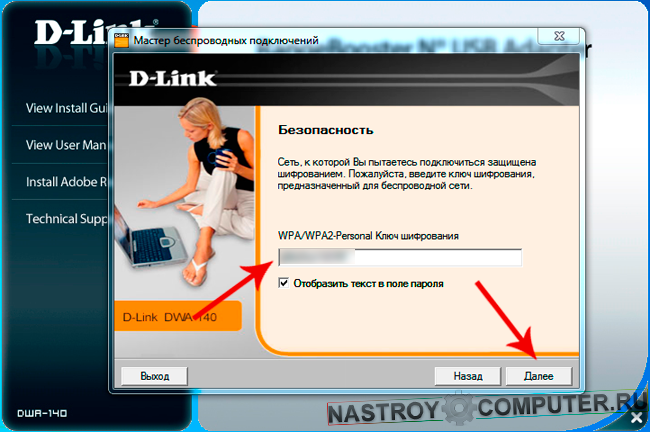
Step 14. If there is a password on your wireless network, then enter it in the appropriate field and click " Further».
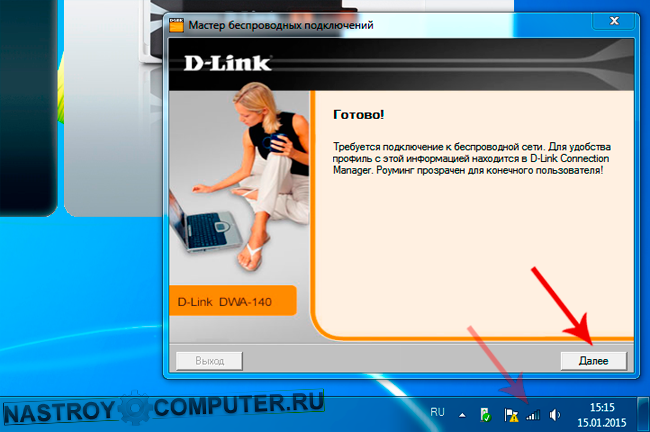
Step 15. Done! You have connected to a wireless network via a Wi-Fi adapter. A system tray icon indicating the level will indicate this. w-FI signal network. Click " Further».
Any action arising from or relating to this Agreement may be filed solely with the appropriate state or federal court in Los Angeles, California and Belkine, and you unconditionally agree to the jurisdiction of such courts and venue in Los Angeles, California. In addition, Belkin can go to court in court with jurisdiction to protect his intellectual property rights.
All United Nations conventions on contracts for international trade in goods and the United Nations Convention regarding the limitation period for the international sale of goods are hereby expressly excluded and do not apply to this contract. Unlimited entertainment is now available.
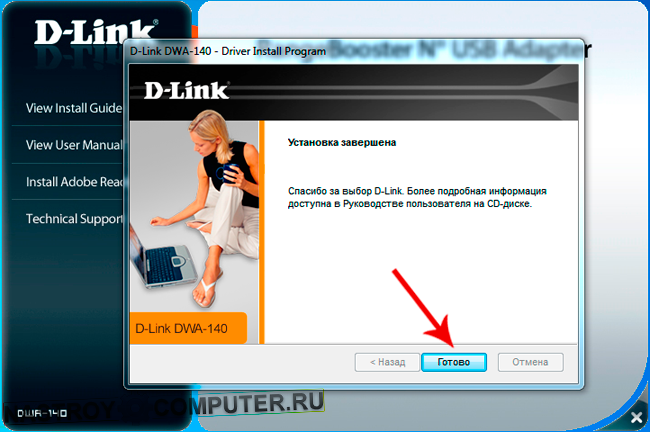
Step 16. Installation completed. In the last window, accept thanks from D-Link and click on the " Is done».
Step 17. The D-Link Connection Manager utility has been installed on your computer. With it, you can manage the wireless networks to which you have access, connect to them, and track the signal level.
You do not need to call a technician to repair your device and even buy less new computerand the one you use works fine. This accessory returns your old computer, providing it with much faster speeds. Your old computer probably slowed down your network at a slow connection speed. All you need to do is check. network settings one of the devices already connected to the access point or your router’s configuration settings. Determine if the adapter has single-band or dual-band technology that provides a much more secure wireless connection and is much better suited to prevent interference. Make sure the adapter is compatible with the operating system. Compatible list operating systems Must be listed on the adapter packaging.
- No complicated installation is required.
- Even the least knowledgeable user can exit.
- Determine the security protocol for your router.

Step 18. In this step, remove the installation disk from the drive, put the box from the adapter in place and enjoy the Internet.
Laptop - compact and mobile device, which allows you to use a full-fledged Windows OS, but it does not depend on sockets and wires (unless, of course, the battery allows). Today, the question will be devoted to the Wi-Fi adapter, namely, its inclusion in order to be able to connect to wireless networks.
A Wi-Fi adapter is a special device, usually built into a laptop, that allows you to search for available Wi-Fi networks and connect to them. If you are a laptop user, then with almost a 100% guarantee you can say that it has a built-in Wi-Fi adapter.
With a network adapter, your computer will be even faster and you will no longer need to purchase a new computer. The operation can be divided into two zones for acceleration. In Czech stores you can find it for about 500 Czech crowns. In the following sections, we will need to connect to the Internet so that we begin with its configuration and connection. However, if you are using a laptop or proprietary softwarewhich you cannot compile, we will need to install everything from non-free packages.
Currently detected list network adapters together with the interfaces assigned to them is available after issuing the following command. We check the network interfaces. If the interface was detected, we can check the access point with the command. We have two access points nearby. We can contact one of them by typing.
How to activate the Wi-Fi adapter?
In the event that all your attempts to find a wireless network failed, we can assume that the Wi-Fi adapter is simply turned off on your laptop. Accordingly, the following actions will activate it.
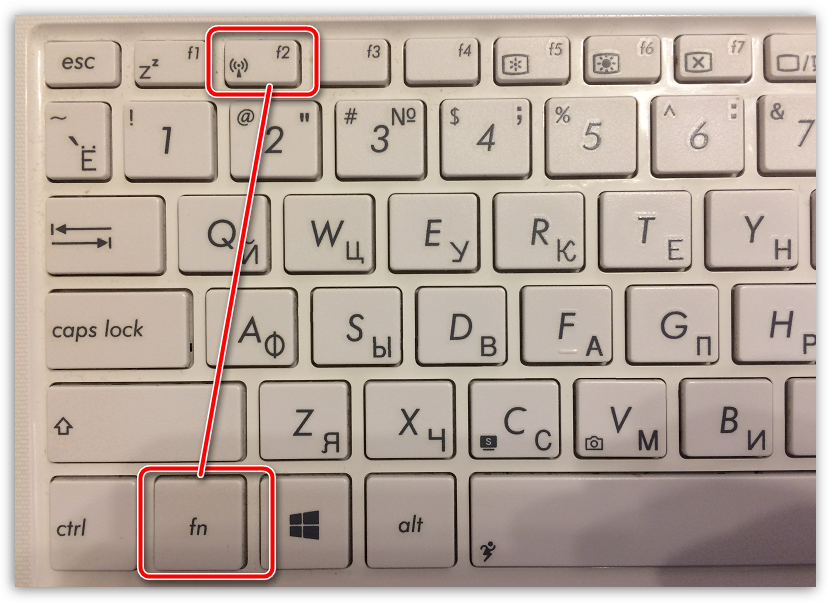
Activating the adapter using the keyboard
As a rule, most functions on a laptop can be activated using the keyboard. If you pay attention to the layout of F1-F12, you will see a set of icons, each of which relates itself to a particular function. So, for example, most often the Wi-Fi adapter icon is located on the F2 key, and it looks like this:
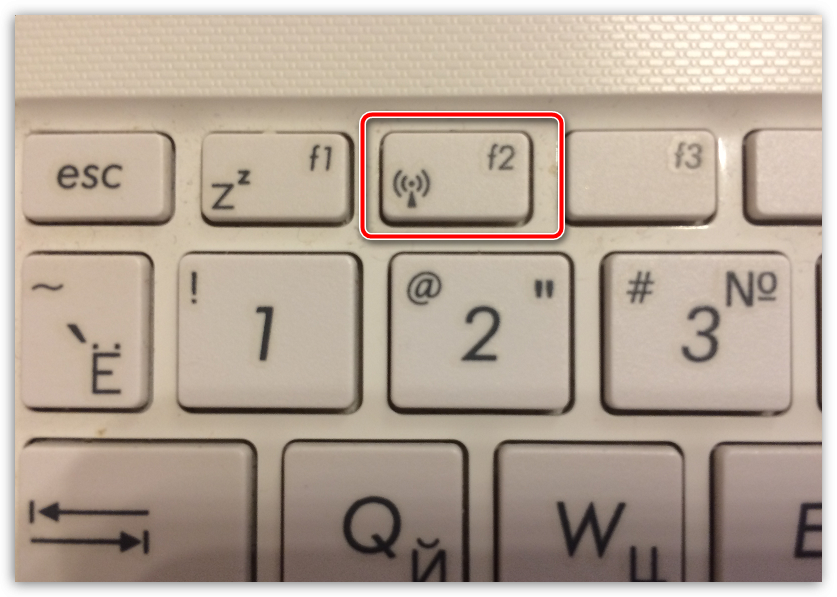
Most likely, in your case to turn on the Wi-Fi adapter, you will need to hold down the special Fn key, and then press F2, after which the screen will display a message that the adapter has been activated or, on the contrary, turned off.
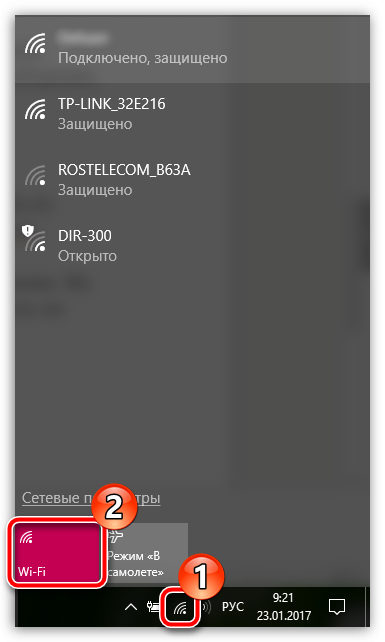
Activating the adapter using the Windows menu
In the event that you have not managed to find the key responsible for activating the Wi-Fi adapter on the keyboard, you can try activating it through the Windows menu.
To do this, click on the icon in the lower right corner of the screen. network connection. A small window will appear on the screen, in which you need to click once on the item "Wi-Fi" so that he had status "Enabled".
Wi-Fi adapter does not work after reinstalling Windows
In the event that you reinstall Windows, and then the Wi-Fi adapter stopped working, with high probability you can say that the computer does not have the necessary drivers, which ensure the normal functioning of the equipment.
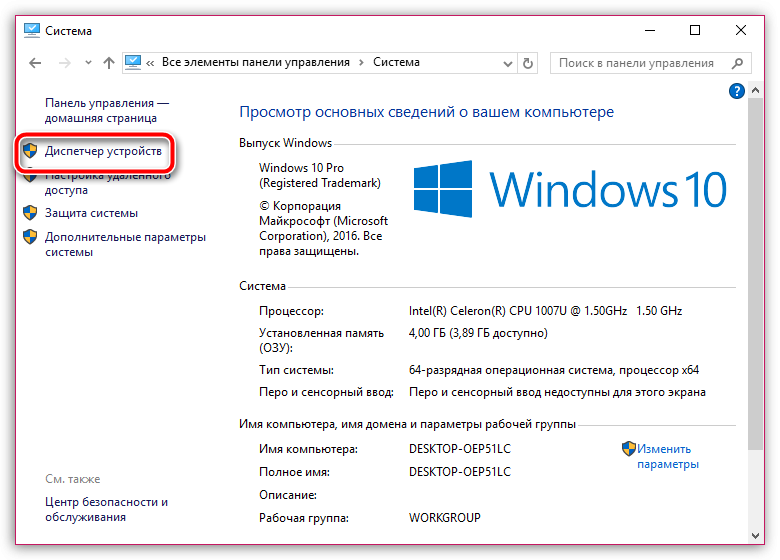
1. First of all, to check it, open the menu "Control Panel"and then go to section "System".
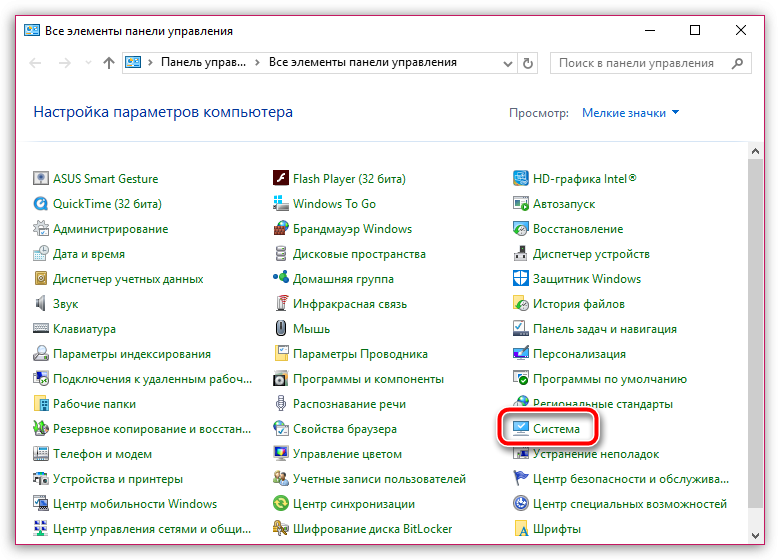
2. In the left pane, select "Device Manager".
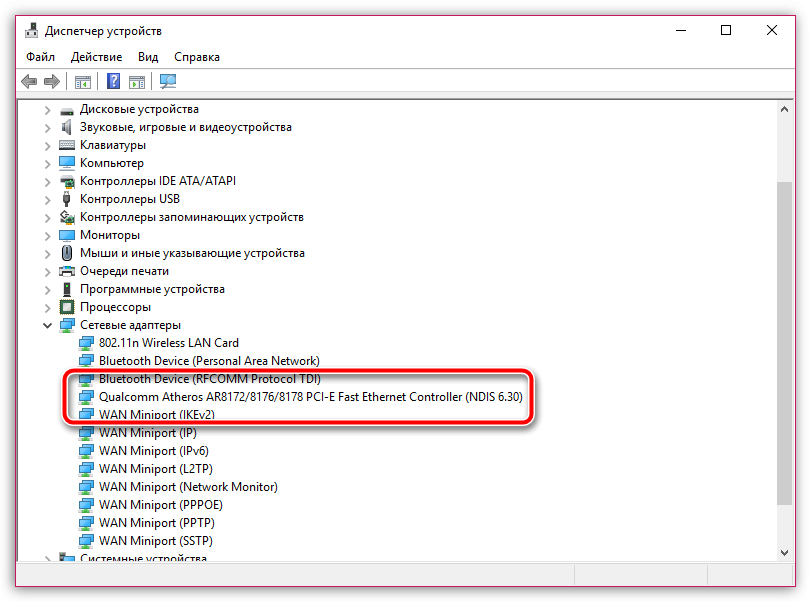
3. In the popup window, expand the tab "Network adapters". As a rule, network adapters of two manufacturers are installed in laptops: Atheros and Broadcom. If in the expanded list you do not see the names of one of these manufacturers or the list of network adapters is “Unknown Device”, then the case is really in the drivers, the problem with which you need to be fixed.
4. You can download the necessary drivers from the official website of the manufacturer of your laptop. To do this, go to the site and, using the built-in search, find the section dedicated to your laptop model.
5. On the desired page, you will definitely find a section with drivers and utilities. As a rule, the driver for the adapter is hidden under the item "Wireless" (do not forget to take into account the version and bitness of the operating system).

6. After downloading the necessary drivers, you will need to unpack the archive, and then run the distribution and install the drivers. As soon as the installation comes to an end, you will need to restart the computer.
Actually, if, after rebooting the computer, you again look in the “Device Manager”, you will see in the list of network adapters the name of the device for which we installed the driver. As a rule, after these manipulations, the problem with the inoperability of the Wi-Fi adapter disappears. If in your case it remains relevant, try returning to the activation methods described in the article above.