This mode windows Workflows, in which only the most necessary OS components are loaded. Downloading only the most necessary allows you to exclude the influence of secondary programs and the work of all operating system. Safe mode allows you to boot the computer in case of virus infection, a conflict of drivers or other software errors. In this material, you will learn how to enable safe mode on Windows 7.
In another article we saw. In general, it was good system, although with the interface of the 1980s it is very difficult to see and not just use. The computer restarts in the boot options menu. Depending on your computer, the settings may vary.
If not, you can always use this program. Safe mode. You can run Safe Mode to check which of the newly added applications cause problems with the device in normal mode. Safe Mode only loads the factory software.
Enabling safe mode on Windows 7 is quite simple. All you need to do is restart the computer (if the computer is turned off and does not turn on, just press the power button) and press the F8 button when the download starts. Press the button repeatedly until the list of options appears on the screen boot Windows 7.
Then the safe mode will appear in the lower left corner. If your device is usually in safe mode, remove the installed applications or update using the Application Manager. If necessary, click the LOAD button. Click the application you want to remove from the list.
The purpose of this topic is to make a brief and practical description. That's why the mode in question looks very scarce, low-resolution, does not have the Internet, can not run games, etc. When less processes, services, and drivers are started, this eliminates them as potential causes of the problem, so the list of "suspects" is drastically reduced. Well, after we clarify this, let's move forward.
Please note, the F8 button should be started immediately after the start of the computer startup, if you are late with the click, Windows will boot in the normal mode. If you see that the Windows startup started in the normal mode (the logo appeared), then you did not have time to press the F8 button. In this case, you must restart the computer and try again.
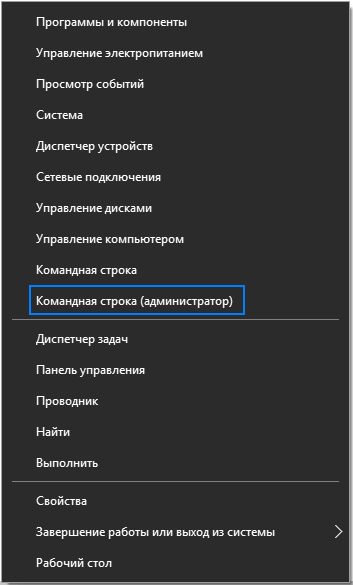
However, if you want to activate this menu, follow the hidden instructions. Run the Command Prompt window as an administrator. You should be notified in the window that the change was successful. This is the first screen that the user sees after turning on the computer, and at this time the computer initializes the hardware in the system. Some motherboards By default, the manufacturer's logo is displayed instead of technical information.
Of course, these are preliminary photographs. However, the photos should be enough to understand. The longer way to get to this menu is to drag the cursor in the upper right corner of the screen to display the options panel. If you want to restart immediately, click Restart. Otherwise, click "Quit without reboot". The next time you start the system, it will automatically go into safe mode.
If you press F8 on time, you will see a menu of additional Windows boot options (see screenshot below).
To enable it, simply select one of these options and press the Enter button. Please note that there are 3 options for downloading in safe mode:
- - Normal safe mode. In this version, only the most necessary components of the operating system are downloaded. In this case, the local network and the Internet do not work (the driver does not load the network drivers).
- Safe Mode with Boot network drivers - Safe mode with the download of network drivers. Same as the first option, but with support local Area Networks and the Internet.
- Safe mode with command line support - A safe mode in which the habitual graphical interface. After downloading in this mode, a command line appears in which the user can enter commands.
Auto-enable secure mode on Windows 7
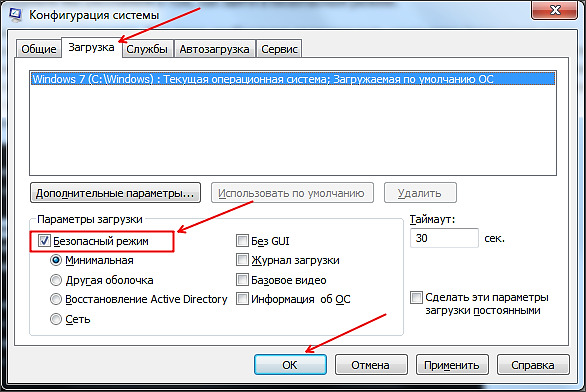
If the above described way of enabling safe mode seems too complicated, then you can use automatic login to safe mode. To do this, open the "Run" menu (Windows + R key combination) or and enter the command. After entering this command, a window called "System Configuration" should open. In this window you need to go to the "Download" tab, activate the safe mode and save the settings by clicking on the "Ok" button.
# 4 Interrupt launch
How to avoid unpleasant updates in the shortest time. The most unpleasant part automatic updates system is that sometimes the computer restarts, often in random and unusually comfortable moments. Cybersecurity is a very important aspect, given the fact that hackers are getting better and their attacks are growing.
Connect it and enjoy the optimized finger 10 instead of the mouse - and make the device faster. One way to get it back to work is to first check if there is a button on the keyboard to turn it off. From there, select the menu that says "Device Settings", then "Devices", and make sure that the touchpad is enabled here.
After that, the computer needs to be rebooted. The next time the computer boots, the safe mode will be turned on automatically.
It should be noted that after enabling this function, the computer will boot into safe mode every time. In order for the computer to start up again in the normal mode, you need to go back to the "System Configuration" window (MSCONFIG command) and disable the "Safe Mode" function.
This should fix it now. Safe mode - this is what you expect - safe way start your computer in non-automatic launch mode, only for the most important drivers. This often helps the computer start when it does not happen for one reason or another.
Logging in to the Windows7 safe mode at system startup
To update the information about the location of your computer, go to "Settings". If your computer runs fewer programs, increase the time it takes to turn on the computer. On the second you just right-click Disable and limit them. Naturally, remove programs that you do not use, leave free place on hard disks, check for viruses and malware and from time to time, clean the fans.
In today's article, we'll look at how to go into a safe windows mode 10, if the laptop / computer is working properly or the operating system does not start for some reason. The fact is that the usual way to call a window with a choice of operating system startup option was not relevant. It was replaced by several methods that allow you to turn on the PC in safe mode.
Remove annoying home screen. Fortunately, there is a way around the home screen, but it is slightly above average users and includes tingling in computer registers. Warnings aside - that's what you need to do. This will open the Registry Editor.
Login at system startup time
The process is a bit complicated, but after rebooting you had to get rid of the main screen. This is one of the good innovations in previous versions, but sometimes it is clogged with completely unnecessary things. Fortunately, it's easy to stop them. In this mode, you can reset many settings and disable any extensions that can cause problems.
Safe Mode Windows 10, called Safe Mode, is a diagnostic mode for loading the operating system, designed to find and solve many problems in the operating system in order to return it to a working state. This mode is used in cases when the computer refuses to start in the normal mode, with the last successful configuration, or it is impossible to perform any action due to the use of target files and drivers of Windows 10 itself.
Starting Safe Mode from Restore Mode
This regime has nothing to do with this - it's just a coincidence of the name. As you can see from the window, you have 3 options. While working in this mode, your themes and add-ins will be disabled, and other changes will be temporarily disabled. The following changes CAN NOT be restored. You can make the following changes.
- Discard the tape.
- Delete the current bookmarks and replace them by default.
While the PC is loading in Safe Mode, the random access memory Components that are necessary for running and running the operating system are located, such as drivers, system services, explorer, OS kernel. Application software and drivers peripherals, unnecessary for computer operation, are not loaded.
Safe mode is useful for removing viruses, fixing errors with drivers that have arisen due to imperfections or incomplete compatibility, eliminating the cause blue screens and freezes, uninstall programs, restore the system, activate the administrator account, and so on.
We return the menu, called by the key "F8"
The Advanced Boot Options dialog box opens. Continue by pressing. Click Restart. The computer will reboot and a menu with various startup parameters will be displayed. Then you will enter the default alarm mode with your user name and password. After restarting the safe mode, the computer restarts and restarts normally.Here, select the option "Start with advanced settings" by clicking the "Restart" button. A pop-up menu appears. Click the "Start Computer" tab and select "Safe Start". You can still affect some startup options.
Familiar with the "seven" option to boot the computer into safe mode - use the utility to configure the system.
1. Run the command interpreter, presented dialog box with the name "Run", which is started by "Win + R".
2. Enter the system command "msconfig", which runs the utility to configure the launch of Windows 10.
For example, select an emergency mode while working on the network. After rebooting, log in with your username and password in safe mode. If you do not yet see the problem when starting Safe Mode, you can exclude default settings and basic device drivers as possible causes. If you do not know the cause of the problem, you can use the exclusion method to determine the problem. Try running one of the frequently used programs one by one to see if the program is causing problems.
Start the computer in safe mode
It checks the boot disk and, if necessary, tries to fix the problems with the directory. Prevents automatic opening of items that open when you start or log on.
- It only extracts the necessary kernel extensions.
- Disables the fonts installed by the user.
- Clears the font cache, kernel cache, and other system cache files.
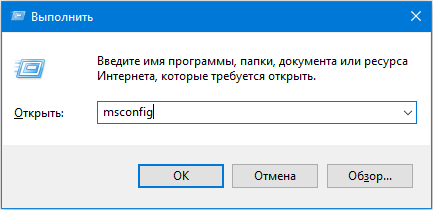
By the way, the command can be launched through the search string of Windows 10.
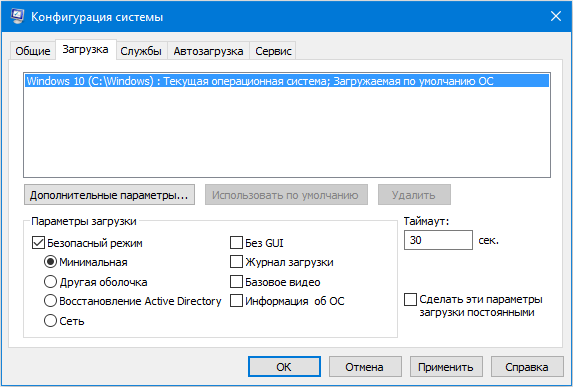
3. In the appeared window activate the second tab "Download" and select the operating system, which should be started in diagnostic mode.
4. Check the box below the form with the OS list option "Safe Mode".
When there is no problem in safe mode
Read. . You exit the safe mode by rebooting the computer, and then without holding down the keys while booting. If the problem does not return, it may happen that the problem with the cache or some directory on the boot disk - and in a safe mode it was fixed. If the problem returns, you can have. . When the computer is in safe mode, the system information is in safe mode, and not in the "Normal" section of the "Software" section. General access to files is disabled. . If the problem does not appear after running in safe mode, you can exclude default settings, basic device drivers and services as possible causes.
- "Minimal" - classic safe mode with a minimum of system components and Windows Explorer;
- "Another shell" is a new name for the configuration, which was named "With command-line support";
- "Network" - with the launch of network drivers in order to use the network connection.
Logging in to safe mode via msconfig
Displays a list of system recovery tools that you can use to troubleshoot startup issues, start diagnostics, or restore the system. This option is only available when these tools are installed on your computer's hard drive.
Click the Start button, click the arrow next to Shut Down, and then click Restart. Directory Services Restore Mode. Disable driver signatures: Enables the installation of drivers that contain invalid signatures.
- Use this mode to reset the display settings.
- Change the screen resolution.
6. Click "Apply" to confirm the intentions and click "OK" to close the window.
7. Using the "Start" menu or another convenient option to shutdown the computer, restart it.
8. After running the system configuration window, and on the "Download" tab, remove the previously placed check box in order to restore the computer startup to normal mode.
Use the arrow keys on the keyboard to select the emergency mode and press the enter key. 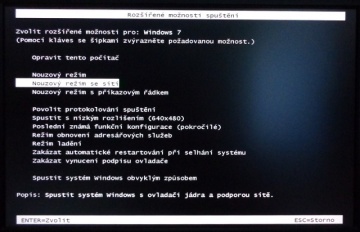
You can also try to start the emergency mode with a siege. You will also have access to the Internet. 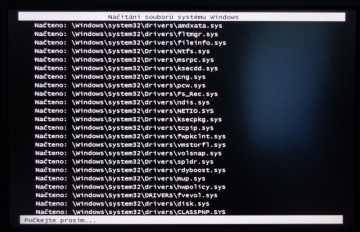
Attempt to call emergency mode. If there is a problem with adding a new device, changing the driver or adding software, you can use the emergency mode to remove the device or cancel the change.
Special launch options
Another method that allows starting Windows 10 in safe mode if it is started. As in the previous version, all actions consist in performing simple operations.
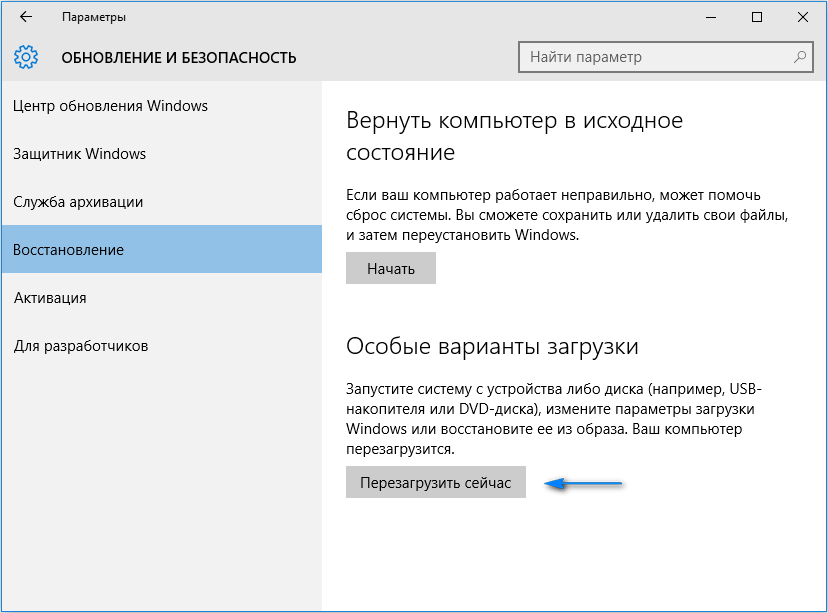
1. Open the "Options" window, using the search string, a combination of "Win + R" or a button in the "Start".
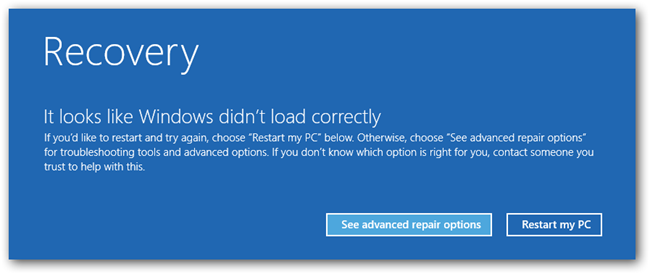
A very useful tool for these cases is the system recovery tool. For more detailed guidance on its use, please refer to the following: System Restore. In case of refusal to start the operating system, this offer should be displayed. Tools for open environment and system repair.
If it does not start automatically, you can start it manually. Therefore, it may happen that this combination of keys will not open an interface for you to repair. The repair interface can also be opened directly in the environment of the graphics operating system.
2. Click on the name of the section "Update, Security", where we go to the "Restore" subsection.
3. Find the item "Special options ..." and click on the button "Restart Now".
4. After the hardware self-test, a screen will appear for additional options for starting the computer, where we select the "Diagnostics" option.
5. Then click on "Additional options", "Download options" and click "Restart".

6. In the startup parameters menu, select the desired start mode of the computer using the keys F4 - F6.

In order to run "Special Variants" in case when the "dozen" is not loaded, but the lock screen is displayed, when the "Shift" button is pressed, select the "Restart" option after clicking on the shutdown button of the computer.
We use a boot device to call the safe mode
Do not know how to enable safe mode on Windows 10 when it does not start at all? Read the current section to the end.
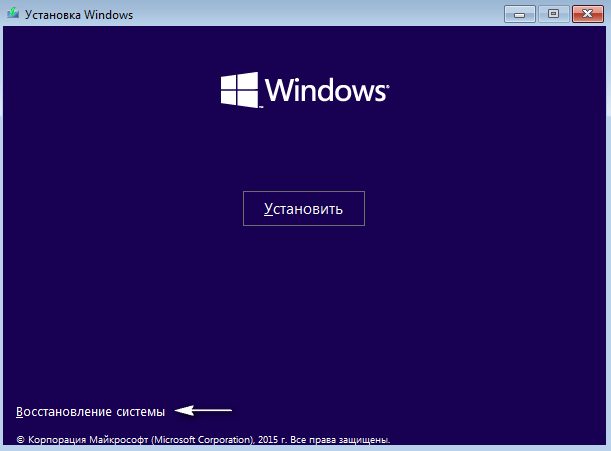
The only thing you need to run the "dozens" in diagnostic mode is the bootable media with the operating system installation files. A disk for OS recovery will do, but it is available for a limited number of users.
1. Starting with a bootable USB flash drive, using the Boot Menu of your BIOS.
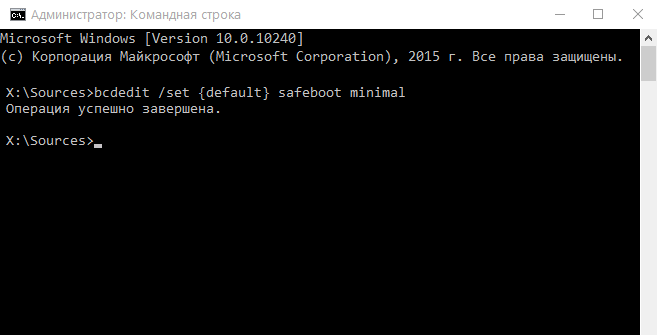
2. Press the "Shift + F10" keys to launch the command line or click on "System Restore" in the window with the "Installation" button, where we call "Diagnostics", go to extra options, call command line.
3. Using the command line, execute the command: "bcdedit / set (default) safeboot minimal" to start the classic debugging mode, and after replacing "minimal" with "network", boot into diagnostic mode with network drivers.
4. Close the command window, reboot.
5. After solving the problems, restart the OS, run the command line as before, and enter and execute: "bcdedit / deletevalue (default) safeboot" to turn off the safe mode.
The last method
This method displays a window where you can select one of the advanced versions of the safe mode. And it is applicable to any operating system installed on the PC.
- We call the command line, booted from the installation flash drive.
- Enter a long command: "bcdedit / set (globalsettings) advancedoptions true".
- After the notification of its successful execution appears, restart, closing the command line.
After restarting the computer, a window appears with the given list of advanced OS boot options.
Further, in order to deactivate this way of turning on the computer, you need to perform: bcdedit / deletevalue (globalsettings) advancedoptions. A command is entered on the command line that is called with administrator privileges.
We return the menu, called by the key "F8"
If you want to know how to enter the safe mode of Windows 10 using the classic method - the "F8" key, read the lines below.
The call of the window with a list of methods for starting the computer is returned by editing the configuration file of the "dozens" launch.
1. Run the command line with the privileges of the administrator account.
2. Perform the "bcdedit / deletevalue (current) bootmenupolicy".
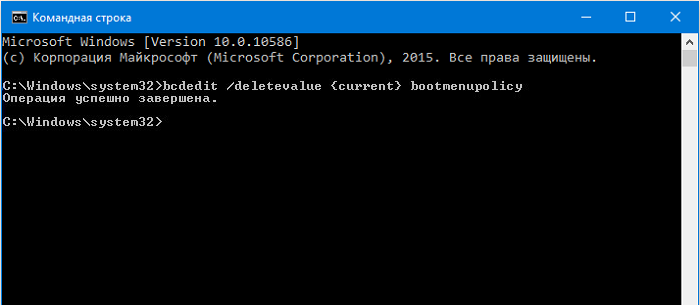
3. After the text "Operation Complete" appears, we restart the computer.
4. After the hardware hardware self-test, press "F8" until you see a familiar window with an expanded list of startup options "dozens."
To cancel the call of the extended list of options for turning on the PC, use the command "bcdedit / set (current) bootmenupolicy standart".
Choose an acceptable option and fix errors in the functioning of Windows 10, without having to reinstall it.


