How to install the program on a computer?
In today's world, almost everyone knows how to use a computer. Of course, almost every user can install and install programs. But still there are cases when for one reason or another a person can not figure out how to install the program on a computer. In this article, we'll look at how to install the operating system Windows, what problems can users encounter when performing this procedure.
Methods for installing the program on a PC
Install using the CD
- To install any program using the CD-ROM, you will need to insert a disk with the licensed version of the program in the drive.
- After this, you may receive a message stating that the Windows Firewall requires confirmation from the administrator to install the software. Confirm the installation or enter the password if necessary.
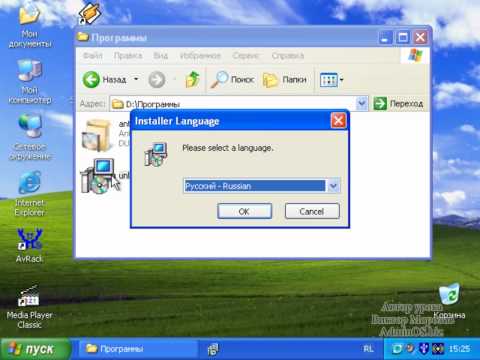
- Next, you need to open the installation package (installer) of the program and wait for the start of the installation wizard. This type of installation is called automatic.
- But it can happen that the installation wizard will not work. Then you need to use the custom installation type. To do this, open the attached text file, in which there should be an instruction for installing the program, and follow it.
Installing the program using the Internet
Now most users basically download the programs, but do not install them from the disk. To install the program using the Internet,  you just need to download it and then open the installer file.
Then repeat the steps described above, starting with the installation wizard. I would like to draw your attention to the fact that this method is more convenient on the one hand than setting up programs using a disk, but at the same time it carries a certain risk. It is possible that the program you download from the network resource may be malicious. Therefore, it is recommended to download programs only from trusted resources.
Installing the program using a local network
Each user whose computer is connected to local Area Networks, can  use it to install the program. To do this, open the Receiving Programs component.
Typically, this component is located in the Start-Control Panel-Programs-Programs and Features. In the last menu, select "Install a new program from the network". Then you just need to click the "Install" button and wait for the installation wizard to start.
"Pitfalls" when installing
Recently, many users are faced with a number of "pitfalls" when installing a particular program. The fact is that many software vendors integrate additional applications into the installation wizard, many of which the user does not need. For example, if you install a program 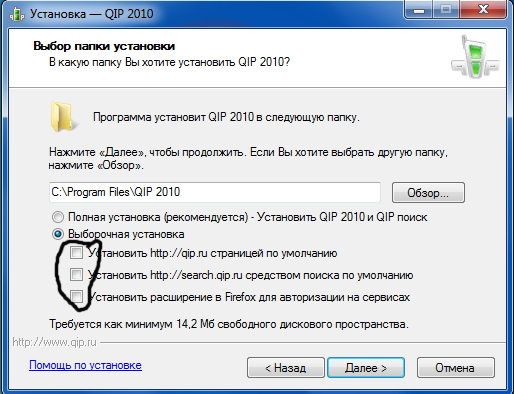 (AIMP or others), the user is encouraged to install the Yandex (or Mail) elements supposedly for the best performance of the program.
Therefore, it is worthwhile to be more careful during the start of the installation wizard, which necessarily asks the user about the need to install an additional software. It's enough just to remove the tickers in front of those products that you do not need. Even if the installation wizard strongly recommends them.
Varese. Varezami called sites with hacked pirated software, from which you can download programs for free. Try to avoid downloads from these sites, because you can never be sure that together with the program you will not be given a "gift" in the form of a virus, trojan, etc. Also, avoid sites offering anything to download "For free at high speed", this is usually written by lohotrons. The same applies to discs from trays in the markets.
Step 3
Installation. Enter in search engine The name of the program you need, find the official site in the list and download the program. Always scan the antivirus program before installation, because the developer's site can not be insured against hacking. Always click on the "Save" button, not on "Run" (see the picture). Run the program for installation only from the folder in which it was saved. I will not describe the installation process. this operation is simple and slightly different for each program.
Batch download programs- this is something that until recently known only selected advanced users. Previously, you could download software from different developers with the help of English-language services, known primarily to system administrators and geeks. Now we have InstallPack - Russian-language application for batch download of programs, designed for users of any level.
Questions:
How to install several programs at a time?
How to put all at once the right programs on several computers?
Advise software to install free software
Other InstallPack questions
Step 1
Download the InstallPack application. You can do this from our or from the official website: https://installpack.net/.
Step 2
Launch the application and get acquainted with the interface. In the main window - a list of available programs for download. They can be sorted alphabetically by clicking on the "Title" tab, or by category - by clicking on the "Category" tab. The latter option will certainly help when you know what the program is for, but do not remember what it's called. Opposite to each of the applications you can also see its rating, price, size and short description.
Step 3
Let's review the ready-made sets of programs by going to dropdown, where by default "TOP-100" is selected. Here it is worth paying attention to the "Must have" package - it will be especially useful after reinstall windows. In the package "Patriot" you will find software from Russian developers. As for the rest, their names speak for themselves.
Step 4
For convenience and time saving we will use search stringlocated in the upper left corner of the interface. It is enough to start typing the first letters of the program, and you will immediately see it at the very top of the list. For example, if you set out to find opera browser, type on the keyboard Latin "op", - this will be enough.
Step 5
We need to tick off the programs we need. Also, a checkmark can be placed opposite the inscription "Silent installation" - so we will get rid of the notifications, which, as a rule, come from the installer during the installation. The programs will be installed in turn to minimize the load on the processor
Step 6
Finally, close the InstallPack and make sure that the application shortcut is saved on the desktop. Just in case, we recommend to save InstallPack also to the USB flash drive - since the application is launched without installation, it can be used as a portable version. We will be able to quickly and conveniently install several programs in different situations, whether it's reinstalling the system, buying a new computer or working on a new project.
How to install the program from disk to computer?
To start, we insert the disk into the drive and wait for the answer from the computer.
Most likely, an autorun disk will open, in which the disk menu will be located. But, if nothing appeared, then go to "My Computer" (it is on the desktop and in the menu "Start").
In the folder "My Computer" we look at "Device with removable media" and search for our disk. Most likely the icon of the INSERTED disk will differ from the others, in my case it is a DVD RW drive H. Open the disk with a double click.

In all "avtorah" usually there is a button "Install", or "Install". After you click on this button, the program installation window will open. These windows often look different, but in principle all the buttons there are the same and they should not be frightened :) Below are examples of such windows:
Always when installing the program you need specify the installation path.The path can be something like this: C: \\ Program Files \\ ProgramName.
C: \\ Is the most important section hard drive, which stores all system files. Only useful files are installed in this disk, i.e. programs, drivers, etc. Other sections (E: \\, D: \\) can store files for entertainment (music, movies, games). Always pay attention to this!
After you have chosen the path, click "Install". The installation process will begin. The installation itself usually does not take much time. After installation, click "Done" and, I can congratulate you: you installed the program! :)
P.S. If you install the game, then I advise you to compare it minimum requirements from .
That's it, good luck!
For those who use the computer for a long time, this topic may seem simple and uninteresting, because each user, in any case, has to do this (and in the process to learn). Although, despite the seeming simplicity, not all correctly install and even more delete applications (games or programs).
And for beginners, especially this topic will be very useful, at least for the reason that a huge part of the problems with the computer (braking, hanging up, etc.) occurs due to incorrect actions during installation and removal of applications.
I have repeatedly mentioned in my newsletter that even after correct removal, in windows Registry there are "tails" from those programs that we delete. And if, moreover, the process of removal has gone wrong, then these same "tails" in the long term can cause a lot of trouble in the system.
Therefore, I want to tell newcomers and remind more advanced users about these simple procedures to exclude unnecessary crashes in the computer (due to ignorance or stupidity).
Let's start, of course, with the installation (in the pictures it's the Light Alloy program).
The installation process is started by means of special installation programs, which either are downloaded automatically (for example, after inserting a disk into the drive) or by manually starting the necessary files, which are usually called setup.exe or .
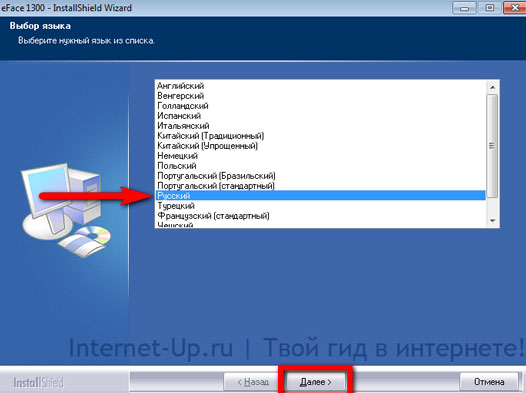
The process of installing most applications is simple and consists of the fact that you answer the questions of the installation program and press the button Further. Typically, during installation, the Welcome screen is first followed, followed by the License Agreement window, and then selecting the location for the program installation.
Here (based on my experience) and lies the most common problem for a beginner. The matter is that by default the computer suggests to install the application in a folder C: Program Files,
which can be used without problems (and even sometimes desirable), but not always.
Most users hDD broken into several logical drives (C, D, etc.). In this case, the C drive does not always have enough space to accommodate all the programs you want to put. An inexperienced user often does not pay attention to this, and installs everything in a row to this folder, which eventually leads to overflow of the C drive and, accordingly, to the computer's braking (for the system it should always remain free place on drive C) and the impossibility of installing other programs.
The second undesirable consequence of installing some programs in the above folder is that in the case of a complete reinstallation of Windows, the C drive is completely cleared and, naturally, all programs that are on it are deleted. All these programs, after reinstalling Windows, must be installed first. However, if they were, say, on drive D, then this would not have to be done.
This, it should be noted, does not apply to all programs, because some "serious" programs register themselves in the registry (on drive C) and they still need to be reinstalled. However, simple programs can be easily installed, and even need to be installed on a drive that is not system-wide.
To install the application on disk D (or any other), you just need to press the button Overview (see the figure) and choose another place to install (or type it manually):
Thus, you will get rid of the overflow of the system logical drive, which will have a good effect on its speed.
But this is not a very terrible problem. The main reason for computer failures due to improper installation is an incomplete installation.
This can happen during a sudden power outage of the computer or if you suddenly decide to interrupt the installation process in some unusual way. One of the reasons for the uncompleted installation can also be the situation described on this page (see July 2008).
After an incomplete installation on the hard drive, there are "tails" that can not be removed by standard methods. Therefore, you should try to finish the installation without crashing and interrupting. It's better to delete the application in a regular way than to interrupt the installation process!
Now let's talk about the correct removal of programs.
Many beginners believe that by simply moving the folder with unnecessary application at Shopping cart they thereby removed it. This is the most blatant mistake! You can only delete programs that you installed on the hard disk in the same way. a way of usual copying (we admit from a disk on which the program was copied from the computer of the friend). If you installed the application using the installer, then you need to uninstall it using the program designed to uninstall (uninstall).
Such a program (usually it is called or uninst) can be found in the same folder where the application itself is located. If you do not remember where it is, you can right-click on the application icon and select Properties. In the window that appears, you will see the path to the the necessary program:
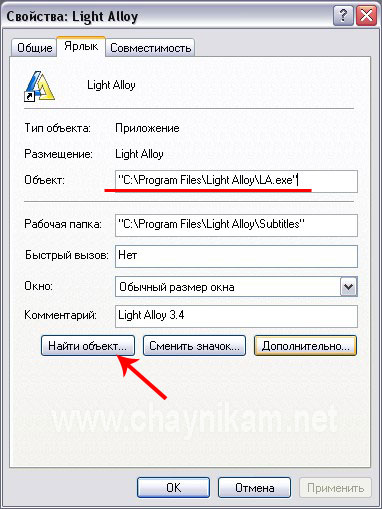
To quickly get into this folder you just need to press the button Find object .... In this folder we find the necessary program (uninstall.exe) and clicking it will activate the process of uninstalling this application.
Often such a program is located in the Start menu ( Start - All Programs - Application Name - uninstall).
There are applications that do not have programs to uninstall. In this case, the most correct way to remove such applications is to launch a special program from within the Windows system itself.
This is done like this: Start - Control Panel - Add or Remove Programs.
In the opened window we find the application to be deleted, select it by clicking the mouse and click the button Remove:
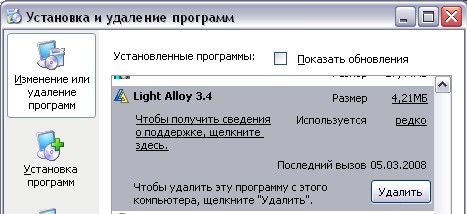
After that, after agreeing that you really want to delete the application with all its components, run the uninstall process and wait for it to finish.
The methods described in this lesson are the simplest (but perhaps the most reliable) ways to install and uninstall programs. By properly installing and removing programs and sometimes cleaning up the system from unnecessary application debris (as I described in the free newsletter), you'll save yourself from most of the extra Windows crashes.
It should be noted that there are special programs for uninstallers that monitor the installation process (while retaining all the data about each installed program) and during removal of applications very effectively remove all the "tails" (although not fact). But for a beginner these programs will not always be clear (especially if they are on english language), and they take up a lot of space. Incorrect handling of such programs on the contrary can "litter" the computer. Therefore, the expediency of their use and development, I leave to your discretion.


