Instructions
For hardware on / off of various devices, a special basic input-output system is installed in each computer, referred to in common as BIOS. Different motherboard manufacturers differently provide user access to the BIOS, but they all have the same principle. To enter the BIOS, immediately after turning on the computer, you must press one of the keys: delete, F10, F2 or Esc. What exactly is necessary to press the key, depends on the manufacturer motherboard. If the first time you failed to enter the BIOS, do not worry, restart the computer and repeat the operation again, but with the other key and so on until you get to the BIOS.
The larger the file size, the more hardware resources it uses. Therefore, limit the use of annotations to images so that the file size is minimal. The laptop designer is also located in its own memory segment, which is loaded only if it contains notes. Without notes, the segment does not load and requires fewer resources.
The performance of large assemblies slows down. Instead, use the Decryption command to connect the parameters to the components. Using this method, the software detects and updates the files that affected the change. We'll look at how to beat, unlock the kernel and what's all about performance with this platform.
Entering the BIOS, you will see a blue screen, with the settings, divided into two parts. Of all these items, you need to use the arrows on the keyboard to select a section with the word "Integrated" in its name.
After you enter this section, find a line with the following contents - "Onboard LAN Controller". Opposite this line, if the network card is not already disabled, the status will be "Enabled" or "Enhanced". You need to change it to "Disabled" using the keyboard. After you have changed the status, press the ESC key and you will return to the initial menu.
After a bit of theory, we finally got to our board and components. Then we will check the setting and tell you how and what. For our board, the utility is version 10 and will give you several operations. Then there is only waiting for the completion of the operation. First of all, we need to set the board in the default setting, which must be convinced of the stability by 100%. It could be a bad plate or memory module, and without a basic stability test we would look for a problem after overclocking and maybe not found.
To overclock the card will reduce the multiplier, which we do not want. Now we are looking at the time, now look at the tension. There is no need to raise anything, just the voltage of your memory modules to the operating voltage of your manufacturer. Leave the following four options, as they are, set them on the previous screen. If you do not know how to leave the car anywhere, you can not spoil anything. You will try to debug memory later. There is room for experiments here. You can choose additional settings at your discretion and your needs.
Then in the second half of the screen you should select an item called "Save Settings". A window will appear in which you will be asked in English if you want to save the changes. Agree, by pressing the "Y" key.
Next, you need to press ESC again, after which the system will ask if you really want to exit the BIOS with the new settings, press "Y", and the computer will automatically go to reboot.
Disable anything that you will never need, or use later. Of course, if you use network card and a sound card, leave them turned on. Boot into the operating system and get ready for stability testing for a few hours.
Download the following programs. Always use latest version, that is now 3. Set 500 cycles and wait for the result. If you want to fully test the system, install the maximum possible useful memory and run the test for at least 100 cycles.
If everything goes smoothly, you can be satisfied. If an error occurs at this stage, it's likely that the memory job or the faulty module will most likely be fixed. Download one of your versions and save to bootable media. Let it run a couple of times, and if the memory is bad, the program will most likely show it. I hope you do not have to test your memory at this stage, and your computer will be stable by default.
Several computers can be installed on the same computer connections. Very often this leads to confusion. As a rule, one network connection enough. Sometimes you can accidentally create several network connections to one type of Internet connection, which is not recommended. Therefore, unnecessary profiles of the Internet connection must be deleted.
Is it easy for your computer to make the initial stability test? Undoubtedly, most notebook users like to connect to a wireless network over a wireless network. If this is not enough, you can update your wireless network for relatively little money.
Following our recommendations, you will get good connections. To find out which model was used on your computer, simply call the device manager. The wireless network module is listed in the branch of the network adapter. It turns out when searching for driver update files. When you place the cursor over the icon, the system notifies you that there is no Internet connection. In some cases, you also need to turn off the flight mode. You will also get this option via the sidebar. The described method is more convenient than calling the control panel in the first place on the tablets, because it is processed through the touch screen.
You will need
- A computer
Instructions
Delete all unnecessary network connections except those that were active in the Windows Firewall (the name of the profiles you recorded). To delete, right-click on the "Network Connections" folder. The context menu, in which select the "Delete" command. If necessary, you can specify "Default connection" from this folder or send a network connection shortcut to the desktop.
The maximum transfer speed that the tablet or laptop reaches, at least theoretically, is usually not due to the technical characteristics of the device. Based on this information, you determine the maximum capacity of the network module. Therefore it is good to check the optimal conditions in which two data rates have been matched between the two devices. The laptop should be two meters from the router, and there should be no obstacles between the devices. Once you have established a wireless connection, check its current status.
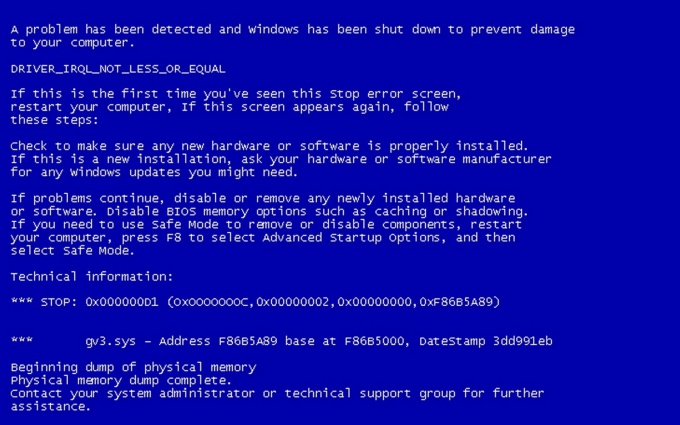
From the appearance of a BSoD error (blue screen death) is not insured by any user of a PC or laptop. But there is good news - this mistake operating system, in most cases, easy enough to fix.
Instructions
For successful removal blue screen It is necessary to be able to correctly read the information contained in its text. Most often, this error appears due to spoilage or removal of some system file. It can also be important device driver files.
To do this, open the Network Management Center and sharing in the control panel and double-click the desired connection. Its current throughput is indicated in the speed line. Typically, the laptop is not located near the router. The greater the distance between network devices and external interference, the worse the signal quality. Then the transmitter should often be re-broadcast so that all data reaches the receiver, which reduces the transmission rate.
As a result, web pages open longer, and movies that are played from the Internet are stuck. The built-in periphery is a card that basically contains the operating modes of the drives and ports of your computer. Here you can also enable or disable unused controllers.
First, restart the computer. Perhaps, after this, a BSoD error will not appear at all. If the same fault recurs, then read the contents of the text below the Technical Information line.
Usually it lists the files, the absence or corruption of which caused this error. Restart the computer. Press the F8 key. A list of possible download options is displayed.
Other useful options for this tab. Ways to save energy. The "Power Management Settings" tab sets parameters that help you save energy. In principle, the default settings should be sufficient, but they can be freely changed, although this is a task for dry booklets.
Fan speed, temperature and limit values. With their help you can specify the temperature limits and the operation of the fans. Here you can also read the readings of all the sensors built into the disk. Particularly important is the temperature sensor of the processor, which informs the experienced user whether the system is operating under safe conditions.
Select "Safe". windows mode". Wait until the Safe Mode download is complete. If you can not repair or repair damaged files yourself, then use the system recovery features.
Save settings and protect access. Their choice quickly performs a certain action. You can use it if you are not sure whether your settings are correct or your computer is unstable. Disk arrays are systems consisting of at least two hard diskswho work together to provide significant benefits.
There are also matrices of other species, but definitely less popular. Textbooks published in the blog will no longer be updated and are still protected by copyright. The owner of all entries is the blog administrator. Learn more about closing the blog on the main page.
Open the control panel and go to the "System and Security" menu. Open the "Backup and Restore" item. Click on the item "Restore system settings or the computer".
Start the system recovery. To do this, go to the "Show other recovery points" menu and select a control point from the suggested options. Restart the computer normally.
We can do this in case of problems with graphics cards, software and a blue screen. Be sure to restart your computer after installing the driver. Sometimes the installer will ask us to start the computer, then you must agree. List of drivers for download from the manufacturer's pages.
In this case, use this manual. Preparing to reinstall the driver. First, download the appropriate drivers for our hardware. In case of graphics card, sound card, network card it is necessary to install the driver on the chipset on the motherboard before installing the driver for one of the listed devices. Drivers are downloaded to your desktop for later retrieval. After downloading the drivers and programs, it is best to load the computer into the safe mode. However, we can also reinstall in normal mode.
Sometimes the information contained in the BSoD text contains more extensive data. For example, if ati2dvag or atikmpag.sys files are faulty, then most likely the problem is in the video card drivers. In this case, start the OS in safe mode and reinstall the drivers for your video adapter.
Sometimes the appearance of this error can be due to the failure or overheating of any device. In this case, you have to replace the defective part.
Removing and installing the driver. After these steps, we will automatically proceed to uninstall the card. Follow the instructions on the screen. We check that nothing is connected to our network adapter, if it should be removed. Look for everything that is connected to our device, and delete it.
We delete the folder only in case of a video card. After removing the driver you must. Follow these steps to restart the computer. We can also disable network adapters using Device Manager. When reinstalling the drivers for the network adapter, do not disconnect it from the Device Manager, but let's just follow the first sentence. First, install the driver for the chipset. After installation, restart the computer, which will be offered by the installer.
Related Videos
With active use of the laptop you have to connect often enough to different wireless networks. To avoid permanent long reconfigurations of the network adapter, it is recommended to save the settings of each network.
1. Please note:
The first thing that should be noted: if you are not sure of your actions - do not do anything !!!Invite a specialist who knows what he is doing. Since the BIOS of a computer is not the most successful platform for games and experiments. Most reliable way solve the problem - read the documentation on the motherboard. As a rule, everything is described and in detail. In the absence of documentation / availability in another language / impossibility to find the right item, etc. - we read further:
The creation of a computer network is usually associated with the purchase of the right components. Therefore, if you have already decided which type of topology to use and completed the necessary equipment, we must begin preparing your computer for work in your local Area Networks. Let's see how to do it.
The market presents network cards with different types of interfaces. Installing the internal network adapter. Installing an external network adapter. After that, the connected device will be ready and ready for use. Stay connected only with the local network if the router is already connected to the Internet and configured to exchange global network resources. If we do not see the installation of a new device, we will need to manually install the drivers from the board.
2. A bit of theory:
For starters - there are two main versions of BIOS: AMI BIOS (American Megatrends, Inc.) and AwardBIOS (Phoenix Technologies), although this does not mean that there are no others. Differences - in appearance, number of settings and location of settings. Depending on the motherboard used in your computer, the necessary actions will be different. Navigating through the sections of the menu: Selecting a field by pressing the "Enter" key; Go to the level above by pressing the "ESC" key; Movements - arrows on the keyboard.
If you have already installed network adapter and drivers, you still need to connect the computer to the router, which serves as the network agent. Of course, if we decided to use a special topology, we would connect our computer to another on the local network. The problem in this case is also the so-called. Patches.
To directly connect two computers, you will need a crossover cable, and you will need a standard cable to connect your computer to the router. These aspects are listed in the articles "Connecting and Configuring the Router" and "Connecting the Computer to the Network". The contents of this article makes it easy to find the error code and provide tips for correcting the error. First, try to fix the problem using these common solutions.
3. "How do I get there?"
During boot-up, most PCs display a message for a short time about how you can access the bIOS setup (setup). You will have a few seconds to press the required key - if you do not have time, the operating system will start to boot. Hold down or continuously press the desired key. On most PCs, it is "DELETE", and variants are also possible: "F1", "F2", "F10", "Ctl-Alt-Esc", "Esc". If your PC is not part of the BIOS setup for these keys or does not display a message on how to do this, you will have to consult the documentation or support service of the manufacturer of your PC.
A solution is not required. This error code serves only to indicate the status of the device and does not require a solution. This error code automatically stops displaying when the connected device is connected to the computer. The hardware device should work correctly after restarting the computer. The device is not available because the system is turned off.
This error code only appears if the driver check option is enabled, and all applications are already closed. To resolve this issue, unplug the device from the computer and reconnect it. This error only occurs if you use secure application to delete to prepare the device to be removed, or if you press the physical eject button.
4. So, the path to the desired setting:
For AMI BIOS version 2.5x / 2.6x / 3.31: Main -\u003e Integrated Peripherals; For AMI BIOS version 2.5x / 2.6x on ASUS motherboards: Main -\u003e Advanced -\u003e Onboard Devices Configuration; For AWARD BIOS 4.51PG: Main -\u003e Integrated Peripherals; For Phoenix Award BIOS 6.0: Main -\u003e Peripherals -\u003e Onboard Device; For Phoenix Award BIOS 6.0PG: Main -\u003e Integrated Peripherals; For Award BIOS 6.0 on ASUS motherboards: Main -\u003e Advanced; For Phoenix Award BIOS 6.0 on ASUS motherboards: Main -\u003e Advanced -\u003e Onboard Devices Configuration; If you do not find the desired item in the specified path, try searching in this section of the menu or sub-menu.
5. Possible options the name of the desired item:
We are looking for a line with the mention of the word "LAN" or "Ethernet". There are a lot of possible options: 10/100 Mb LAN Device, C.S.A. Gigabit Ethernet, Ethernet Device, GIGA LAN, Gigabit LAN Device, Intel 82573E, Intel GLAN Device, LAN Controller, MAC Lan, MAC LAN (nVIDIA), MAC Lan Control, MAC0 LAN, MAC1 LAN, Marvell Gigabit LAN, Marvell LAN Controller, On-Chip MAC Lan, Onboard GbE LAN1, Onboard GbE LAN2, OnBoard Gigabit LAN, Onboard H / W LAN, Onboard H / W LAN1, Onboard H / W LAN2, Onboard Intel LAN, OnBoard LAN, OnBoard LAN Controller, Onboard LAN Device Onboard LAN Function, Onboard LAN Controller, Onboard LAN, Onboard LAN Onboard, LAN Onboard, LAN Onboard, Onboard PCI Express LAN, Onboard PCI Gb LAN, Onboard PCI LAN, Onboard PCI LAN_2, Onboard PCIe GbE LAN_1, OnBoard PCIEX GbE LAN Onboard RTL8100C LAN DEVICE, OnChip LAN Controller, PCI Lan Controller, PCI-E Lan Controller, Realtek Gigabit LAN, Realtek LAN, Realtek RTL8100S, RTL GLAN Device, SiS 10 / 100M Ethernet, VIA Onboard LAN, VIA-3043 OnChip LAN.
Possible status options are "Auto", "Disabled" or "Enabled". Accordingly, you must select the option - "Enabled" or "Auto".
6. Save changes and exit:
Press the "F10" key to save the changes and exit. Alternatively, as an option, go to the main menu by pressing the "ESC" key and select "Save & Exit Setup". If there is no such item in this version of BIOS, look for the "Exit" section, enter it and select "Exit & Save Change".
7. After the operating system is booted, a network card should appear in the device manager.
8. If the this information did not help - try to find on the Internet specific information for your motherboard. Or use an additional network card installed in the PCI slot.