Instruction
Turn on the computer. After the initial load, the message “Press Delete to Setup” appears on the bottom line of the screen. Different manufacturers use different keys to enter the BIOS (Basic In-Out System). Most often it is Delete, F2, F10, Esc.
In the BIOS menu, find the item that contains information about integrated devices. In some versions, it is called Peripheral Setup or Integrated Device. Look for the search method - open all the menu items one by one until you find the OnBoard Lan device.
For integrated equipment, two states are possible - Enable and Disable. The first means that the device is turned on and working, the second - disabled and not used. Set the internal network adapter to Disable and press the F10 key to exit the BIOS, saving changes. Confirm the selection if the system requires it.
Turn off network card can also using Windows. To open the context menu, right-click on the “My Computer” icon. Select the lowest item “Properties”. In the "System Properties" window, go to the "Hardware" tab and click "Device Manager". Find the item "Network cards" and double-click it. In the list of network devices, right-click on the name of the built-in network card. In the context menu, select the option "Disable". Confirm the decision by answering "Yes" to the system question. A red cross appears over the network card icon.
If you want to reconnect the built-in network adapter, select the "Enable" command in the context menu - the red cross disappears, the device is ready for operation. In the list of commands there is an item "Delete". If you enable it, after rebooting, the system will report “New device detected” and begin searching for a driver for it.
To connect a computer to a local network, or to the Internet, it is necessary that the devices include system unit there was a network card (adapter). Most often, motherboard manufacturers integrate such a device into their products, but there are cases where the built-in network card does not satisfy the user's requests for connection speed.
You will need
- PCI compatible motherboard.
Instruction
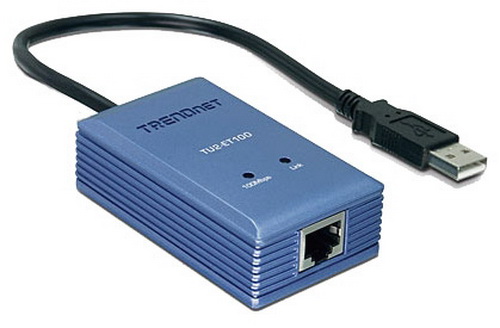
Built-in network adapters are widespread, but just like sound cards, there are a number of limitations compared to adapters that are bought separately. Recently, there have been new items in the field of network cards - adapters with USB interface. Such boards have advantages: you do not have to open the system unit if it is sealed. This saves the time you would have spent installing a regular PCI adapter. But there is also a minus: the network bandwidth is low, because operations through a special port (PCI) are much faster.
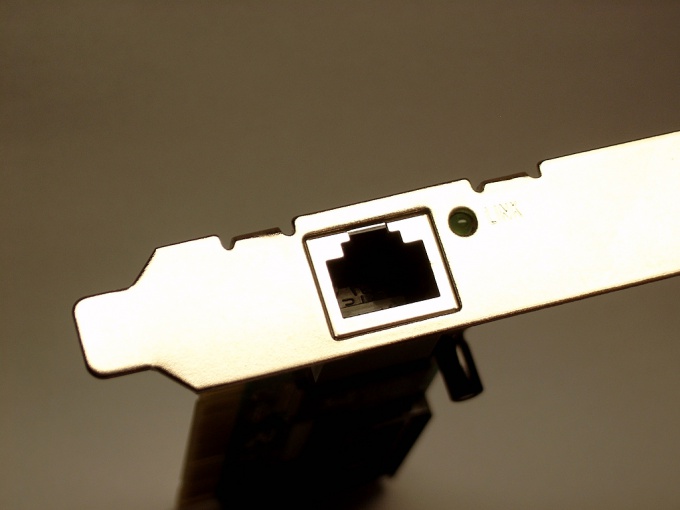
PCI adapters are installed in one of the free slots for PCI devices. Starting to install the adapter, you must remove the stub in front of the PCI slot you have chosen. Turn the system unit to your back, push your thumb on the plug. If the plug does not give in, then use a “+” screwdriver - on the plug you will see a special hole for a cross-head screwdriver.
Open the side wall of your system unit. Pick up the network adapter, plug it into your chosen PCI slot. Check that the adapter is secure. Secure the adapter with the bolt on the left side. Close the side cover of the system unit. Connect network cable to the new adapter. If a disk was attached with the adapter, then install the driver. Otherwise, installing drivers is not required.

Related videos
Network cards are separate and embedded. Built-in network card is located directly on the motherboard. A separate card is installed in the PCI slot. For the user, they work the same way, so when we talk about how to turn on the network card, we will not distinguish between them.
Instruction
Network cards are a type of device that often does not require special drivers to work. Standard windows drivers ensure the work of most boards. However, if your network card has problems finding Windows, go to the manufacturer’s website. There you can download instructions and programs for installing any devices.
After installing the card in the slot and detecting its Windows, it turns on automatically. The main criteria for proper connection are flashing orange and green diodes. If the blinking of the diodes is not visible, pull out and insert the power cord - the contact may have disappeared. If this does not help, check if the card is installed correctly in the appropriate slot.
Usually done operations should be enough to work with the card. However, it may be necessary to turn on the network card from Windows itself. This can be done in 2 ways.
Open the Start menu - Network connections. In the window that appears, see the icon that says "Local Area Connection". Clicking on it with the right button, select the "Enable" command.
If there is no corresponding icon in the Network Connections, we proceed differently. Through the Start menu, go to the Control Panel, select the Device Manager. In the opened window in the list of equipment we look for Network cards. Click on the displayed device (networking controller) with the right mouse button and select the "Enable" command.
For a few seconds a small window should appear on the screen with the words "Turning on ...". Network card is enabled. If after this access to local network impossible, refer to connection settings.
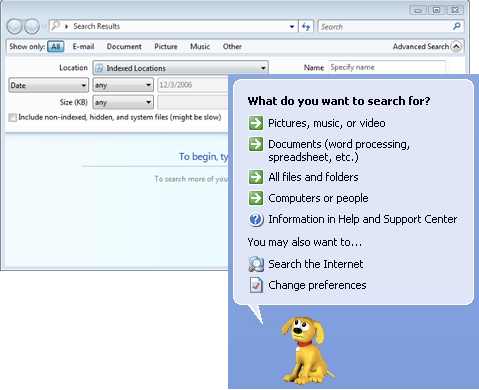
AT latest version its main product - Windows 7, Microsoft has developed new technologies for searching files and folders on hard drives. For a quick search in this environment, constant file indexing is used. The result was "on the face." The search really began to perform queries and find key queries much faster than in previous versions of operating systems. windows systems. But the constant indexing of files leads to “freezing” of processes on weak computer solutions. Therefore, disabling the search service in the operating system can increase the speed of the entire computer.
You will need
- Change the settings of Windows components.
Instruction
In the window that opens, select "Large Icons", then click on "Programs and Features" (Programs and Features).

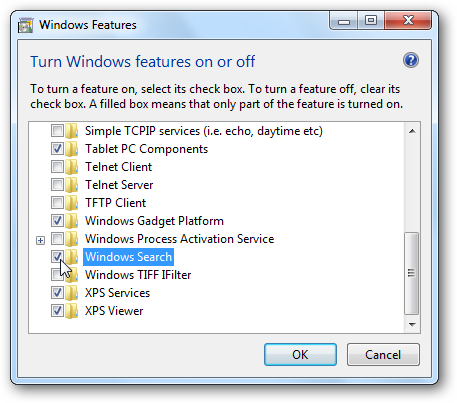
In the left pane of this window, click "Enable or Disable Components" (Turn Windows features on or off).

In the list that appears, find windows item Search and uncheck (tick).
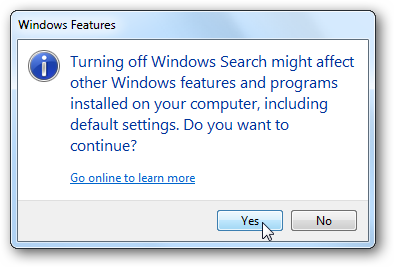
A dialog box appears in which you need to click “Yes”.
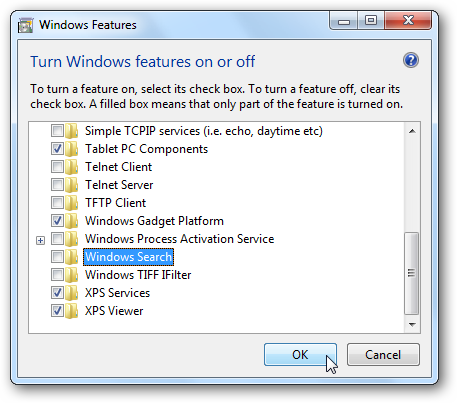
The window “ Windows components". Click "OK".
In the new window you can watch the process. shutdown windows Search. The running bar will display the shutdown progress.
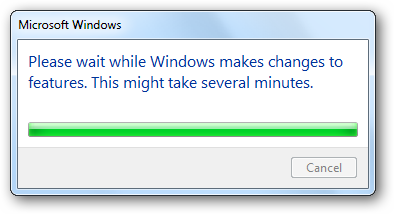
As soon as the strip is filled with color, a window will appear that will inform you about the need to reboot, otherwise the changes will not take effect.

Related videos
The operating system is a complex set of programs and components. Installing an unsuitable driver can lead to sad consequences in the form of problems with the launch and operation of the computer. Complicating the situation is that some programs and devices independently load drivers into the system, and it is difficult for an unprepared user to keep track of this moment of their work.

Instruction
The easiest way to disable the launch of any driver is to remove it. True, not all drivers are easy to follow this procedure. Log in safe mode. To do this, press the F8 button after the computer diagnostics page or the splash screen with the motherboard logo disappears. It is important to have time before the appearance of the Windows logo. If you did everything correctly, a menu appears with the string "Safe Mode". Select it with the arrow keys and press Enter again when the system prompts you which version to run.
When the computer starts up in safe mode, open the device manager. To do this, right-click on the "My Computer" icon and select "Properties." The system properties window opens. In it, select the "Hardware" tab and click "Device Manager" (if you have Windows XP). In Windows 7, right-click on the “Computer” icon and click the “Device Manager” link in the right part of the window.
A dispatcher window appears with a list of equipment. Double-click on the device whose driver you want to disable. The device properties window opens. Switch to the “Driver” tab and click the “Delete” button. Close the window and restart the computer.
Network computers are used to connect computers over the network. They are of two types - external and integrated into motherboard. If you need to disable the integrated network adapter, you can do this in the BIOS or using Windows tools.
Instruction
Most often it is Delete, F2, F10, Esc.
Instruction
For the hardware enable and disable of various devices, each computer has a special basic input / output system, commonly referred to as the BIOS. Different motherboard manufacturers provide user access to the BIOS system in different ways, but they all have the same principle. To enter the BIOS, immediately after turning on the computer, you must press one of the keys: delete, F10, F2 or Esc. Which key you need to press depends on the manufacturer of the motherboard. If the first time you failed to enter the BIOS, do not worry, restart your computer and repeat the described operation again, but with a different key and so on, until you get into the BIOS.
Entering the BIOS, you will see a blue screen, with settings, divided into two parts. Of all these points, you need to use the arrows on the keyboard to select a section in the title of which the word “Integrated” is present.
After you enter this section, find the line, approximately with the following content - “Onboard LAN Controller”. Opposite this line, if the network card is not yet disabled, the status will be “Enabled” or “Enhanced”. You need to change it to “Disabled” using the keyboard. After you change the status, press the ESC key, and you will be returned to the initial menu.
Then in the second half of the screen you should select the item called “Save Settings”. A window will appear in which you will be asked in English if you want to save the changes. Agree by pressing the "Y" key.
Next, you need to press ESC again, after which the system will ask if you really want to shut down the BIOS with the new settings, press "Y", and the computer will automatically reboot.
Multiple network connections can be installed on one computer. connections. Very often this leads to confusion. Usually one network connection enough. Sometimes you can randomly create multiple network connections to one type of internet connection, which is not recommended. Therefore, unnecessary Internet connection profiles must be removed.
You will need
- Computer
Instruction
Delete all unnecessary network connections except for those that were active in Windows Firewall (the name of the profiles you recorded). To delete, click on the Network Connections folder with the right mouse button. Will appear context menu, in which select the "Delete" command. If necessary, from this folder, you can set the "Connection by default" or send a shortcut to the network connection to the desktop.
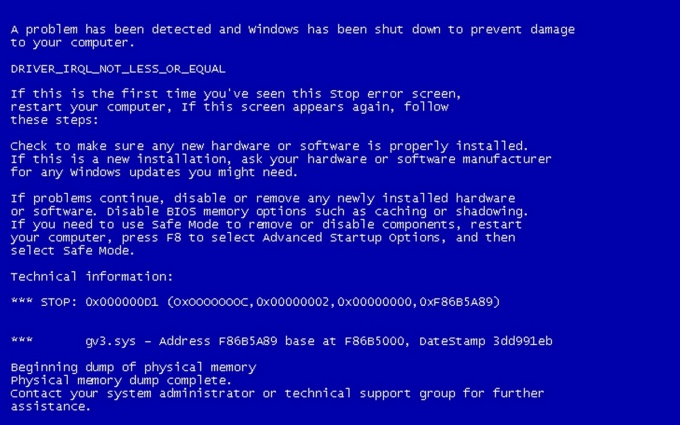
From the appearance of the BSD error (blue screen death) no PC or laptop user is insured. But there is good news - this error operating systemIn most cases, it is easy enough to fix.
Instruction
For successful removal blue screen you must be able to correctly read the information contained in its text. Most often, this error occurs due to damage or removal of any system file. It can also be important hardware driver files.
To start, restart your computer. Perhaps after this error BSoD does not appear at all. If this fault recurs, then examine the content of the text below the line Technical Information.
Usually it is there that lists the files, the absence or corruption of which caused this error. Reboot the computer. Press the F8 key. A list of available boot options appears on the screen.
Choose "Safe windows mode". Wait for the safe mode to load. If you are unable to repair or repair damaged files by yourself, then use the system recovery functions.
Open the control panel and go to the System and Security menu. Open the Backup and Restore item. Click on the item “Restore system settings or computer”.
Run System Restore. To do this, go to the menu "Show other recovery points" and select the control point from the options offered by the system. Restart the computer in normal mode.
Sometimes the information contained in the BSoD text contains more extensive data. For example, if the ati2dvag or atikmpag.sys files are faulty, then most likely the problem is in the video card drivers. In this case, start the OS in safe mode and reinstall the drivers for your video adapter.
Sometimes the occurrence of this error may be due to the failure or overheating of any device. In this case, you will have to replace the defective part.
Related videos
With active use of the laptop, you often have to connect to various wireless networks. To avoid constant lengthy reconfiguration network adapterIt is recommended to save the settings of each network.
1. Please note:
The first thing to note is: if you are not sure about your actions, do not do anything !!!Invite a specialist who knows what he is doing. Since the computer BIOS is not the most successful platform for games and experiments. Most reliable way solve the problem - read the documentation on the motherboard. As a rule, everything is described in detail. In the absence of documentation / presence in another language / the inability to find the desired item, etc. - we read further:
2. A bit of theory:
To begin with - there are two main versions of BIOS: AMI BIOS (American Megatrends, Inc.) and Award BIOS (Phoenix Technologies), although this does not mean that there are no others. Differences - in appearance, the number of settings and location settings. Depending on the motherboard used in your computer, the necessary actions will differ. Navigation in the menu sections: Field selection - by pressing the "Enter" key; Go up one level with the "ESC" key; Move - arrows on the keyboard.
3. "And how to get there?"
During the initial boot, most PCs briefly display a message about how you can enter the BIOS setup. You will have a few seconds to press the required key - if you do not have time, the operating system will start to boot. Hold down or continuously press the desired key. On most PCs it is "DELETE", the options are also possible: "F1", "F2", "F10", "Ctl-Alt-Esc", "Esc". If your PC is not included in the BIOS setup for these keys or does not display a message on how to do this, you will need to contact the documentation or support service of the manufacturer of your PC.
4. So, the path to the desired setting:
For AMI BIOS version 2.5x / 2.6x / 3.31: Main -\u003e Integrated Peripherals; For AMI BIOS version 2.5x / 2.6x on ASUS motherboards: Main -\u003e Advanced -\u003e Onboard Devices Configuration; For AWARD BIOS 4.51PG: Main -\u003e Integrated Peripherals; For phoenix Award BIOS 6.0: Main -\u003e Peripherals -\u003e Onboard Device; For Phoenix Award BIOS 6.0PG: Main -\u003e Integrated Peripherals; For Award BIOS 6.0 on ASUS motherboards: Main -\u003e Advanced; For Phoenix Award BIOS 6.0 on ASUS motherboards: Main -\u003e Advanced -\u003e Onboard Devices Configuration; If you did not find the desired item at the specified path, try searching in this section of the menu or sub-menu.
5. Possible options Name of the desired item:
We are looking for a string mentioning the word "LAN" or "Ethernet." There are quite a lot of possible options: 10/100 Mb LAN Device, C.S.A. Gigabit Ethernet, Ethernet Device, GIGA LAN, Gigabit LAN Device, Intel 82573E, Intel GLAN Device, LAN Controller, MAC LAN, MAC LAN (nVIDIA), MAC Lan Control, MAC0 LAN, MAC1 LAN, Marvell Gigabit LAN, Marvell LAN Controller, On-Chip MAC Lan, Onboard GbE LAN1, Onboard GbE LAN2, OnBoard Giga LAN, Onboard H / W LAN, Onboard H / W LAN1, Onboard H / W LAN2, Onboard Intel LAN, OnBoard LAN, OnBoard LAN Controller, Onboard LAN Device , Onboard LAN Function, Onboard MAC LAN Controller, Onboard Marvell Gigabit LAN, Onboard Marvell LAN, Onboard NV LAN, Onboard PCI Express LAN, Onboard PCI Gb LAN, Onboard PCI LAN, Onboard PCI LAN_2, Onboard PCIE GbE LAN_1, OnBoard PCIEX Gb LAN , Onboard RTL8100C LAN DEVICE, OnChip LAN Controller, PCI Lan Controller, PCI-E Lan Controller, Realtek Gigabit LAN, Realtek LAN, Realtek RTL8100S, RTL GLAN Device, SiS 10 / 100M Ethernet, VIA Onboard LAN, VIA-3043 OnChip LAN.
The possible status options are "Auto", "Disabled" (disabled) or "Enabled" (enabled). Accordingly, you need to select the option - "Enabled" or "Auto".
6. Save changes and exit:
Press the "F10" key to save changes and exit. Or, alternatively, go to the main menu by pressing the "ESC" key, and select the item "Save & Exit Setup". If there is no such item in this version of BIOS, look for the "Exit" section, enter it and select "Exit & Save Change".
7. After the operating system is loaded, a network card should appear in the device manager.
8. If this information did not help - try to find on the Internet specific information for your motherboard. Or use an additional network card installed in the PCI slot.
Basic bIOS settings (eng. basic input / output system - « basic system input-output ”) we covered in the article. But there we only touched the question. boot devices. We are interested in all the settings, aren't we?
What is the BIOS? "Implemented in the form of firmware part of the system softwarewhich is intended to provide the operating system API access to computer hardware and devices connected to it, ”Wikipedia tells us. Still not clear? And I think so. A simpler language is the firmware for setting up computer devices, where most of the values are represented as toggle switches (On / Off). It allows you to change its configuration without physical intervention in the computer's device (for example, disable the built-in sound or network card, overclock the processor or memory, change other parameters).
In order to enter the BIOS of your computer, you need to turn on (or reboot it) and at the very beginning of the boot press the desired key. It may differ depending on the motherboard manufacturer and bIOS versions. It is worth looking closely at the words like "Press Esc Button to Enter Setup". Options are: Esc, Del, F2, F10, F12. There may be others, these are the ones that I met.
Not to be unfounded, take for example the BIOS of the motherboard ASUS P8P67 Pro for Core i7 processors of the second generation (here you need to press Del to enter). It is worth noting that the BIOS has changed dramatically in graphical terms, instead of blue-turquoise panels there is beautiful graphics (don't be alarmed if you still have the old version, the basics are the same everywhere):
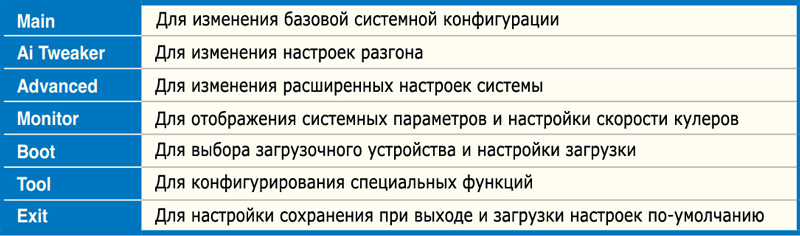
Let's start with the main menu:
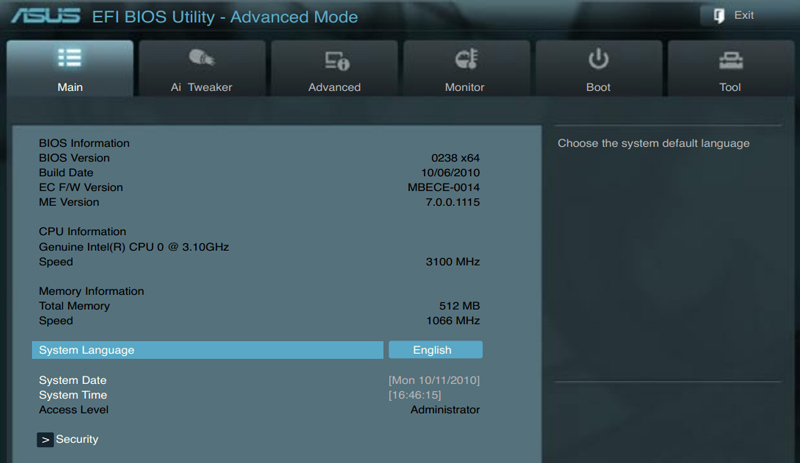
As we see, there is not much to change. Only display language and date and time settings. All other items are inactive and are informative. But as we see there is a submenu (or submenu) Security. Click on it if you want to configure security:

Here you can set a password to enter the BIOS (as described here is the Administrator Password) or a password to boot (will ask it when booting the system) - User Password. Passwords and settings will not be saved if the battery is pulled out of the motherboard.


As we can see, here for the change various groups of parameters are presented: CPU - processor settings. When you click on which displays another menu:

CPU Ratio is responsible for basic overclocking (automatic), I recommend leaving Auto. Next is the temperature sensor, Hyper-threading (multi-threading) - must be enabled. Further, the number of active processor cores (can be limited, if required). If you use virtual machinesthen it is worth turning the Intel Virtualization Technology switch to Enabled.
The following submenu in the Advanced section is the System Agent Configuration:
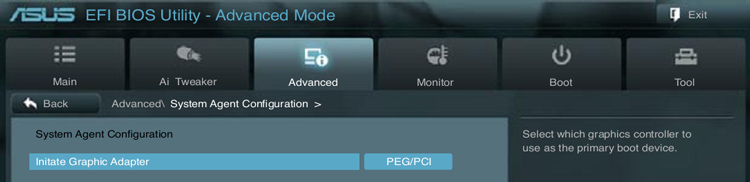
This section is needed to choose which of graphics adapters use when booting as a primary device. This parameter may be missing if you do not have an integrated graphics card (in the latest series of Intel processors, the graphics chip is embedded in the processor). PEG - integrated graphics, PCI - graphic card on PCI Express bus (discrete).
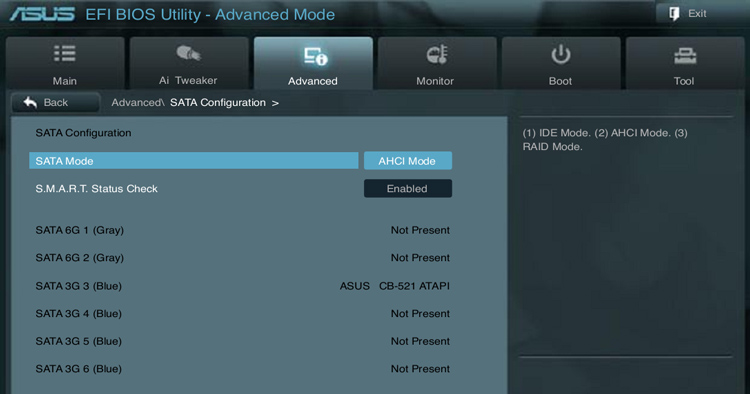
SATA Mode - interface operation mode. Options: AHCI, IDE, RAID and Disabled. Usually, AHCI mode is used, for systems without this mode, you can use IDE-compatible mode, also if you have several identical hard drives, they can be combined into a RAID array and use the corresponding function. Disabled - disables the onboard SATA controller (note, if your devices are connected to it, then they will stop working).
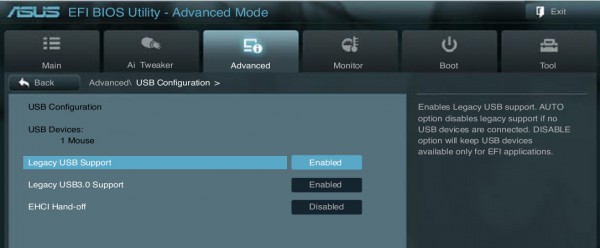
Connected devices are displayed at the top. Next comes download support. USB devices before loading the operating system (I recommend to enable the USB mouse and keyboard to work).
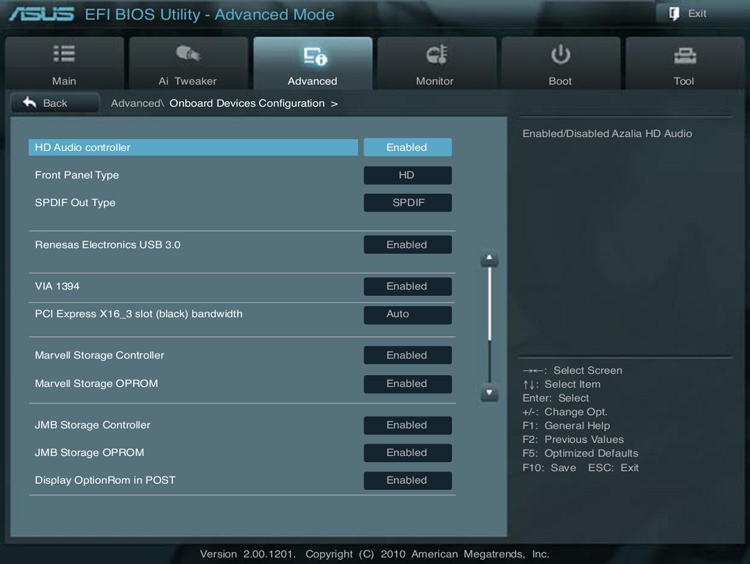
Where HD Audio Controller - enable / disable built-in sound card (if there is no discrete, then there will be no sound when mute).
Front Panel Type is a front panel type for enclosures with audio connectors in front.
SPDIF Out Type is a type of digital audio output.
Renesas Electronics USB 3.0 - enable / disable USB 3.0.
VIA 1394 - enable / disable the Firewire port.
PCI Express X16 3 slot bandwich - bandwidth of the 3rd PCI-E port (it is better to leave Auto).
Display OptionROM in POST - display the selection of the boot device at boot POST (at the very beginning of the boot).

Intel LAN - turn on / off the Intel network controller (integrated network card).
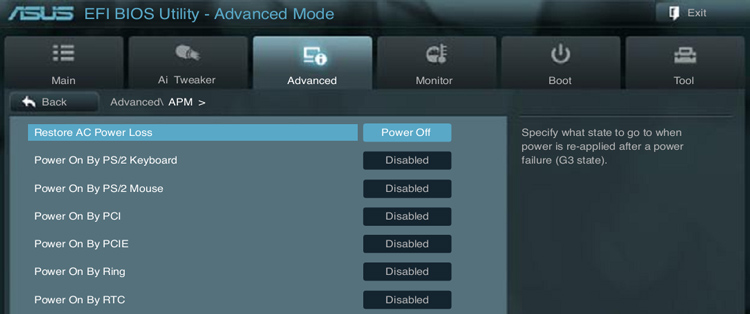
Restore AC Power Loss - power unit behavior after power interruption (Power On - on, Power Off - off, Last State - the last operating mode).
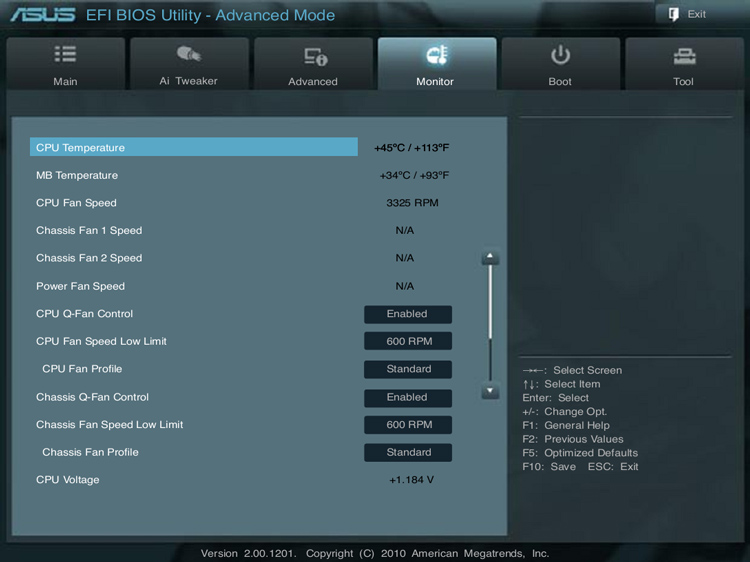
There is also a switch to control the rotation of the CPU cooler and the case (with the lower threshold speeds).

Bootup Numlock Status - the mode of the Numlock button at boot (enabled.disabled).
Full Screen Logo - if you want to see the results of the device tests instead of the welcome logo, then disable this item.
Boot Option - the order of boot devices (if you want to install Windows or another OS from a disk, you should set it to the first DVD-Rom device). In this version there will be as many options as the number of devices installed on the system.
And the final menu is the exit menu:
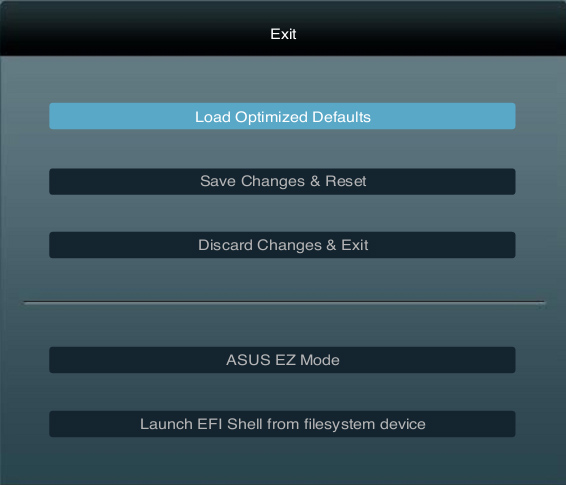
Load Optimized Defaults - load optimized BIOS settings (by default).
Discard Changes & Exit - discard changes and exit BIOS.
The rest of the menus are specific (loading the OS and system built into the motherboard asus utilities EZ).
Your BIOS may be very different from the one presented above, but do not be afraid. The fundamentals are the same everywhere. Well, if you still do not understand, then write me the type of your BIOS and I will help you figure it out.