This article describes the main functions and capabilities of the NanoStation M2, as well as an example of setting up the NanoStation M2 with a description of the main parameters.
Before the review and description of the settings of the NanoStation M2 was started, the latest version sewing v5.3, available at that time. It is worth noting that this version software in comparison with the previous ones, was greatly refined, and many new functions appeared in it. Firstly, it should be noted that Ubiquiti Networks has decided to make a separate section of the configuration of its proprietary technology AirMax, as well as the built-in spectrum analyzer AirView.
Let's briefly say a few words about AirMax and AirView.
AirMax - a set of technologies that improve the ability to prioritize traffic, and optimize the operation of devices with a "point-to-multipoint" scheme.
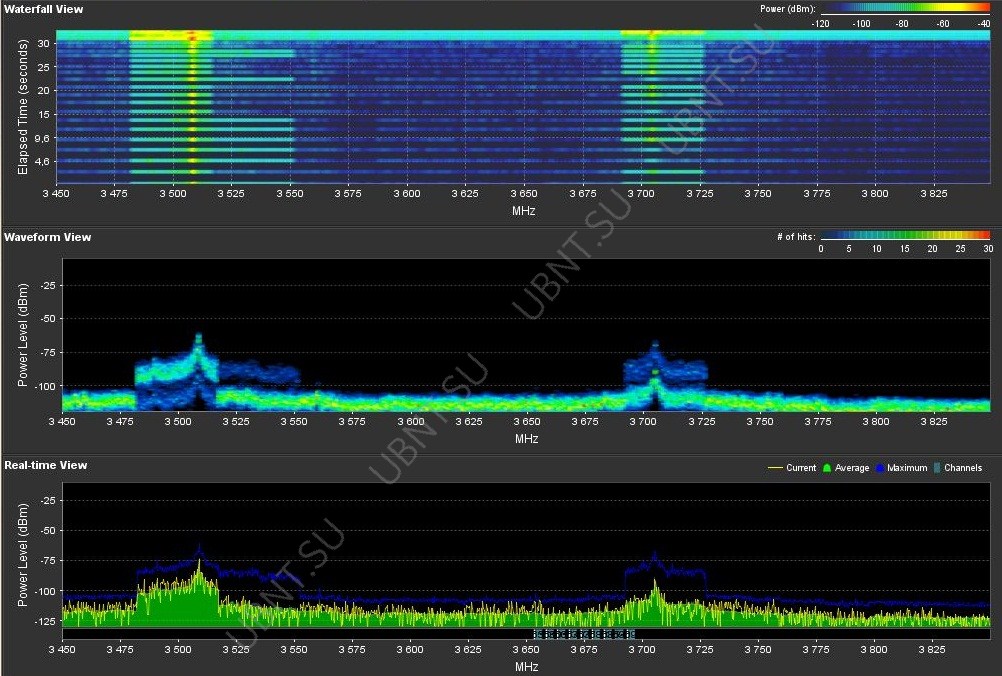
AirView - spectrum analyzer based on NanoStation M2, allowing you to scan radio airways in order to select the optimal operating frequency.
Configuring the NanoStation M2 All-weather access point and WiMAX subscriber station
Click image to enlarge
Let's go directly to the settings of the NanoStation M2.
We configure the first device in the Access Point mode.
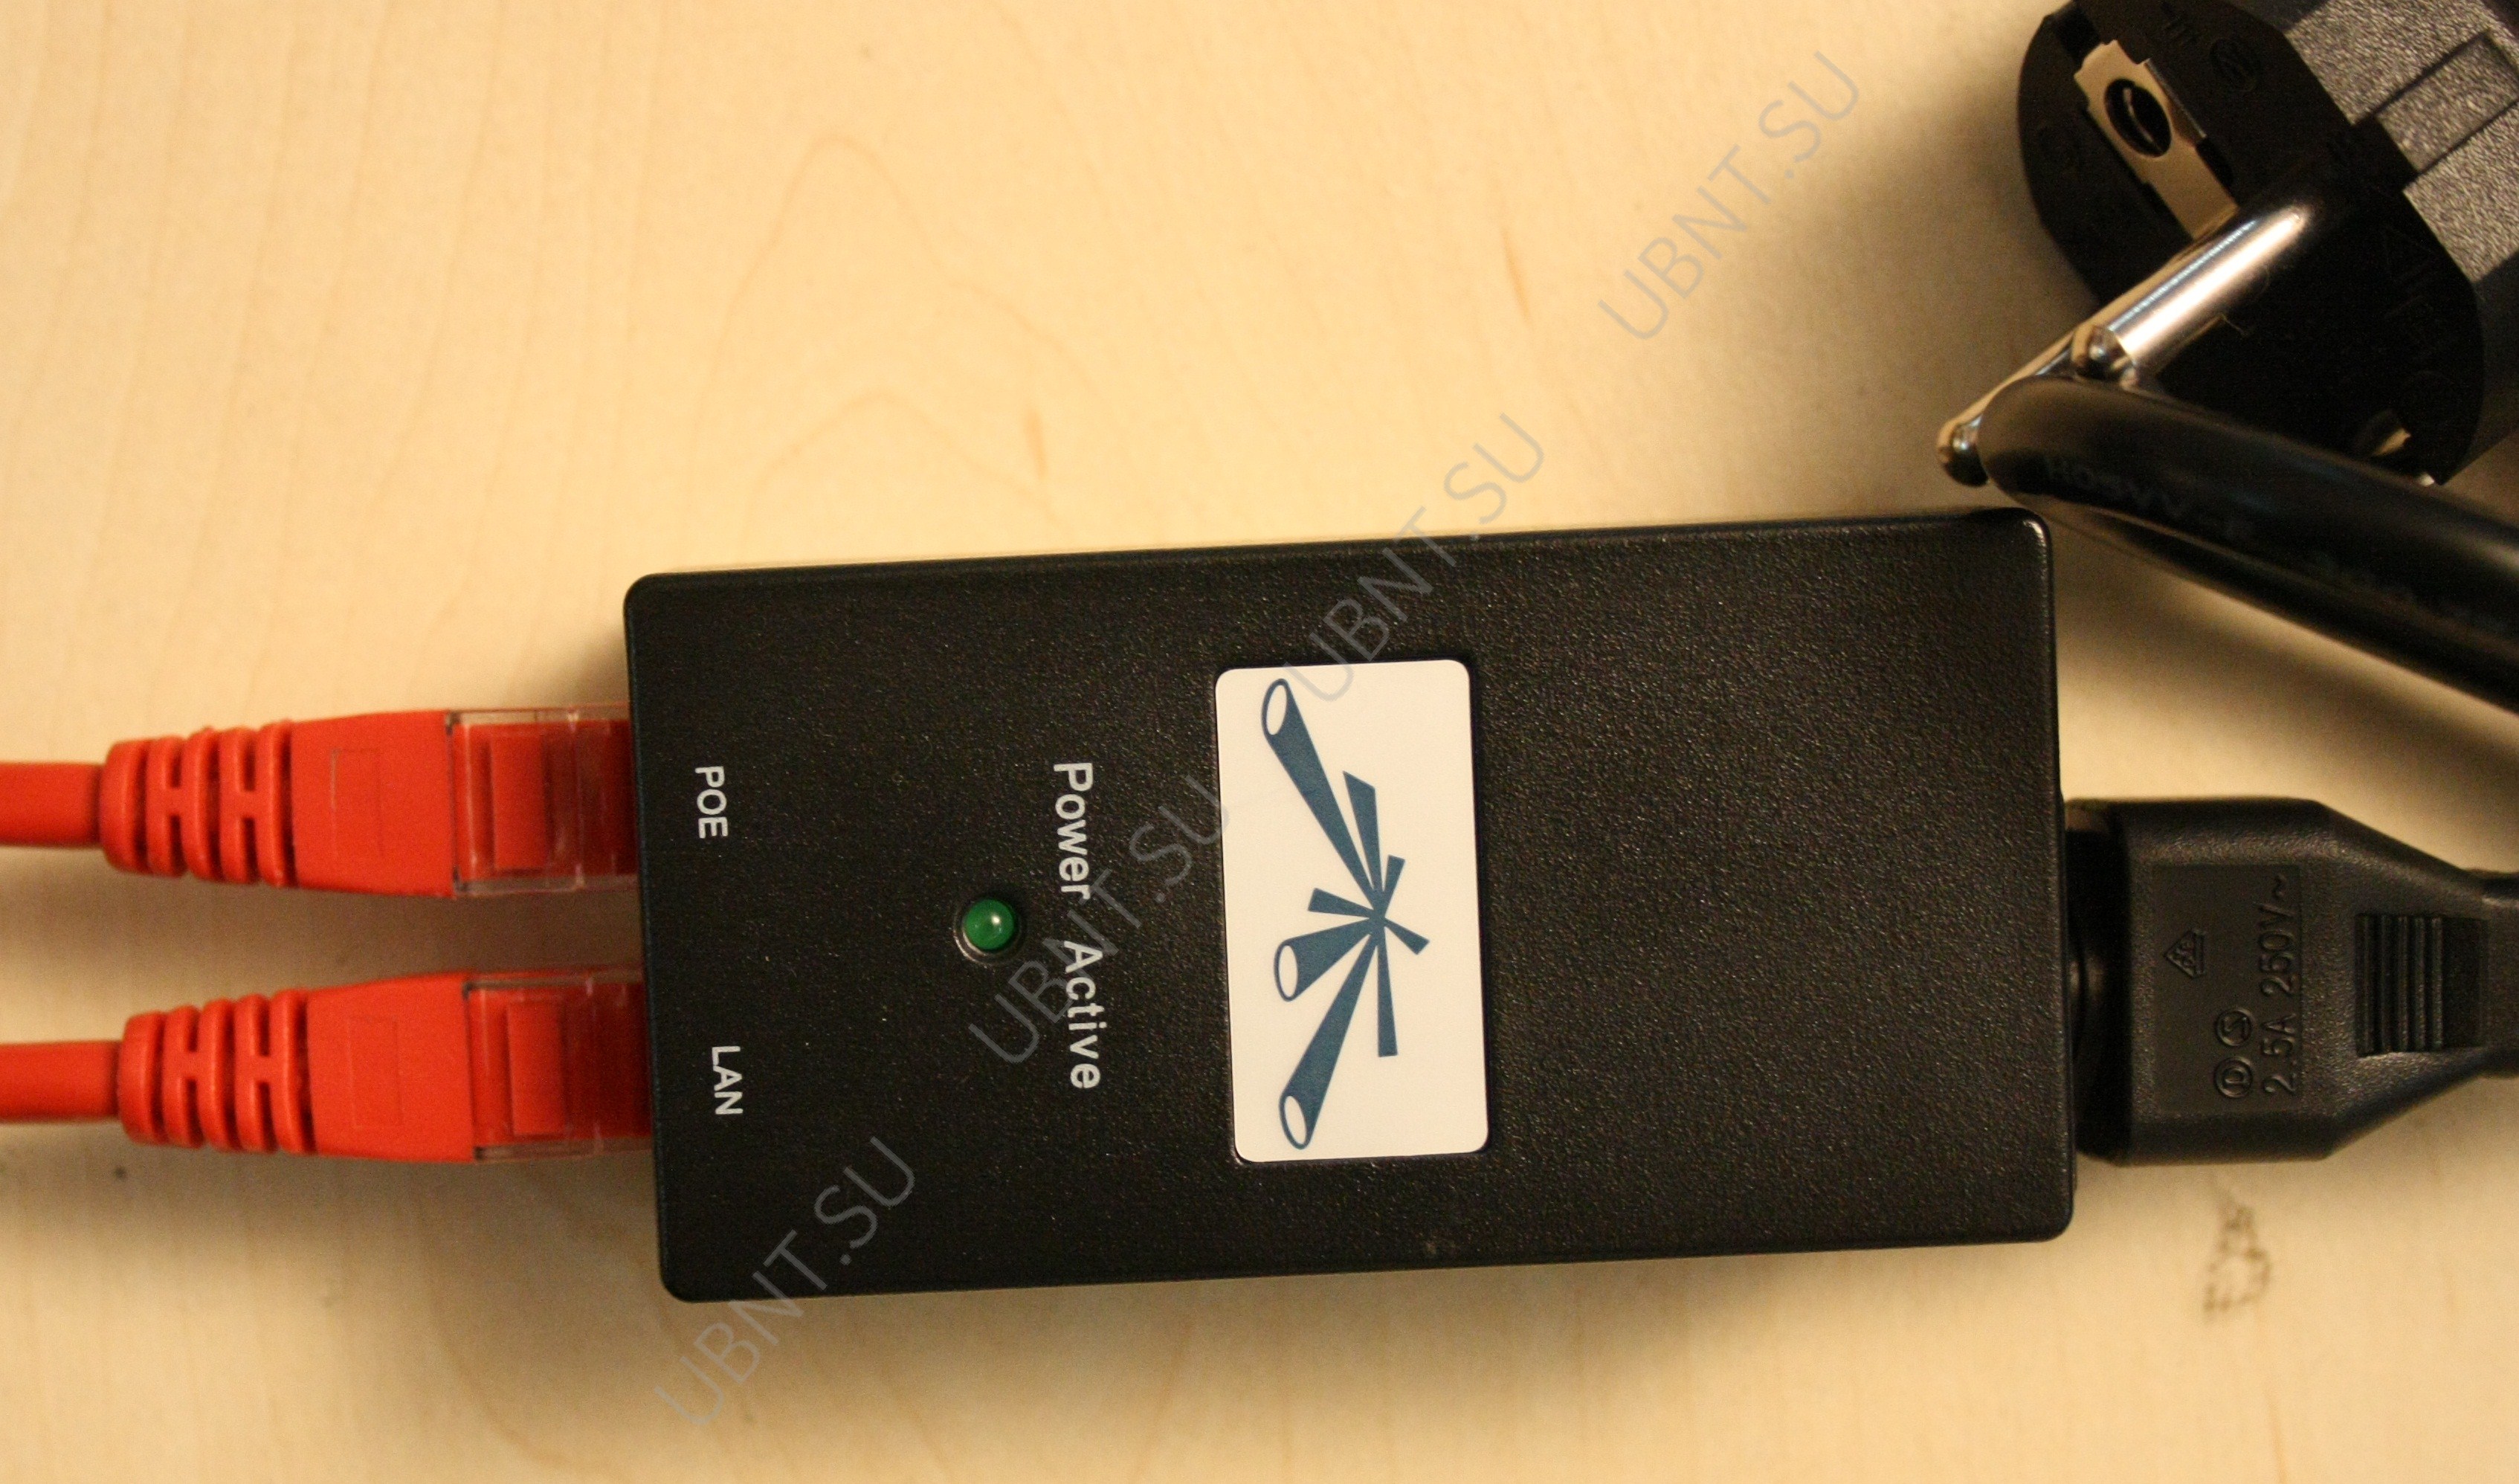
We connect the NanoStation M2 to the PoE device (POE port), the LAN port is connected to the local network or directly to the computer (the device needs several minutes to boot the operating system).
In the address bar of the browser we type http://192.168.1.20 (IP-address is indicated on the product package).
In the login window that appears, enter the login and password by default: ubnt (login), ubnt (password). If you have already configured the device or configured it in the service, you may need to enter that login and password that were previously assigned. If you do not remember them, you need to reboot the devices using the Reset button (under the device cover).
Attention! When the device is rebooted, all settings are "reset" to the factory settings (default). In the case of correct authorization, you will be taken to the Main page of the main software running this device.
Configuring the NanoStation M2 All-weather access point and WiMAX subscriber station
Click image to enlarge
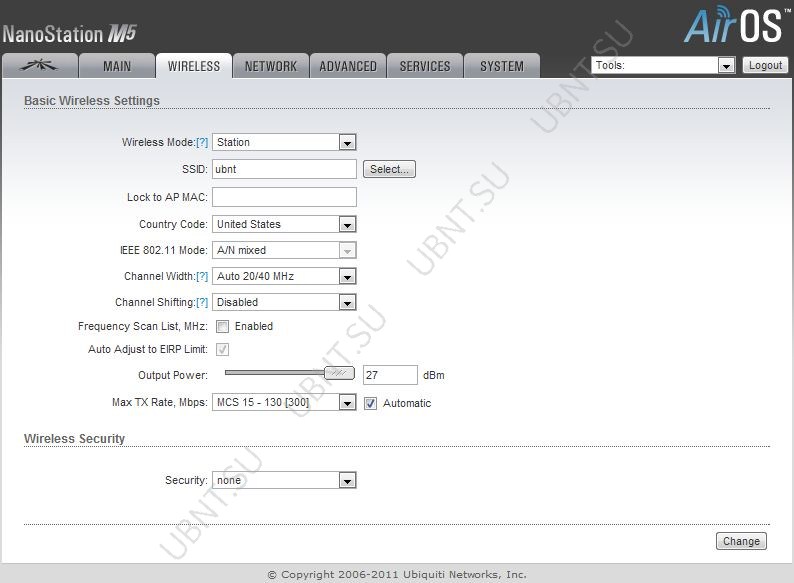
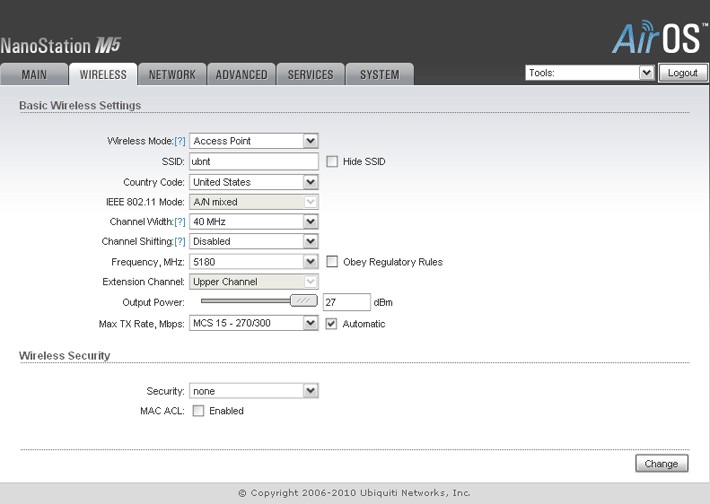
In the Wireless Mode item, select the Access Point mode.
Configuring the NanoStation M2 All-weather access point and WiMAX subscriber station
Click image to enlarge
Assign an access point to the SSID (network identifier) in order to select our access point when connecting subscriber stations.
In the Country Code field, you can leave the default United States or set the Compliance Test, this will allow you to use the maximum transmitter power and the extended frequency range. This parameter is responsible for the norms and standards adopted in different countries for Wi-Fi equipment.
The Channel Width parameter specifies the width of the speckle, the bandwidth depends on this value: 40 MHz to 300 Mbps, 20 MHz to 130 Mbps, 10 MHz to 65 Mbps, 5 MHz to 32.5 Mbps.
The Channel shifting parameter is set to Disabled by default, it allows you to transfer the center frequency of the working channel by several MHz up or down to reduce interference from other WiFi sources.
The Frequency value determines the operating channel (frequency) on which the access point will operate.
The Extension Channel option is enabled by default only when using the Access Point or Access Point WDS modes with a channel bandwidth of 40 MHz. This allows the system to use two channels of 20 MHz for data transmission simultaneously to increase bandwidth.
The Frequency List value allows you to select specific frequency channels that are available for scanning when searching for access points (used for Station and Station WDS modes).
In the Output Power field, set the output power of the transmitter.
In the Max TX Rate field, you can specify a fixed data rate or select Automatic. This will allow you to choose the optimal speed, based on communication quality conditions.
If you need to protect your network from unauthorized access, you can select the desired encryption mode in the Wireless Security section. If you are not familiar with the presented encryption modes, we advise you to configure the points using WPA2-AES.
Press the Change button, and then at the top of the active tab the Apply button to save the changes.
We configure the second NanoStation M2 device in the "Station" mode.
We connect NanoStation M2 to the computer, as it was mentioned above in points 1-3.
Since the IP address of this device is identical to the first one, it is necessary to change it, for example, to 192.168.1.21. To do this, go to the Network section and change the IP address.
Do not forget to save the settings after that.
Configuring the NanoStation M2 All-weather access point and WiMAX subscriber station
Click image to enlarge
After rebooting the device, you will be able to get to the menu for subsequent configuration already by the new IP address.
Go to the Wireless tab.
In the Wireless Mode item, select the Station mode, then additional items should appear in the window.
Configuring the NanoStation M2 All-weather access point and WiMAX subscriber station
Click image to enlarge
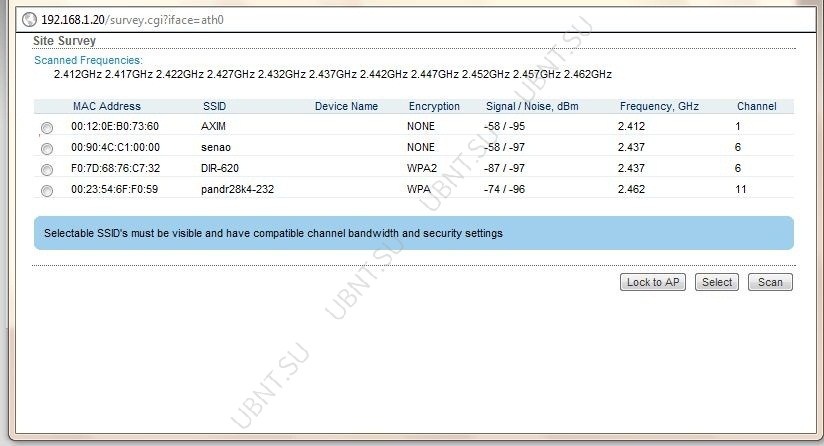
We press the Select button, in the appeared window all access points that could find our subscriber point NanoStation M2 will be displayed.
Configuring the NanoStation M2 All-weather access point and WiMAX subscriber station
Click image to enlarge
Opposite the desired access point, put a point and click Lock to AP to copy the mac-address in the field Lock to AP MAC, press Select.
After that, you need to insert the previously copied mac in the Lock to AP MAC field and press the Change button, and then Apply to save the changes.
Attention! If the access point has encryption enabled, the subscriber point itself will determine which one and prompts for the key.
All subsequent devices are connected to the Access Point in exactly the same way.
Ubiquiti Instruction NanoStation M5
Equipment

- AirMaxthis is the patented Ubiquiti technology of TDMA polling. AirMax provides better immunity from interference and increases the maximum number of users that can be connected to the device (provided that all devices support AirMax)
AirMaxPriority-(for Station and Station WDS) This function determines the size of the time slots assigned to each client. The higher the priority, the longer the time interval for transmission.
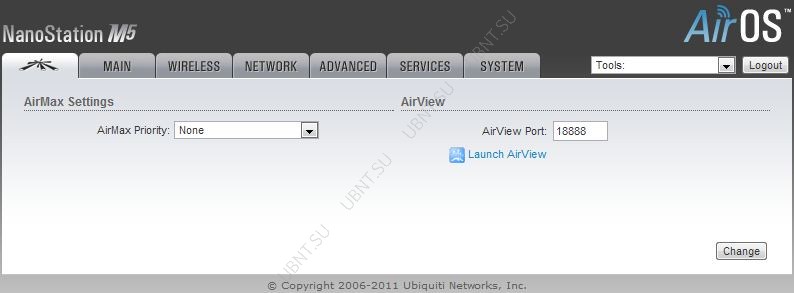
AirView- this is a spectrum analyzer built into NanoStaion, it allows to estimate the noisiness of the radio-frequency spectrum and the distribution of the best channel.
AirView Port- Specifies the port to use the utility.
Launch AirView-click this button to start the utility NanoStaion.
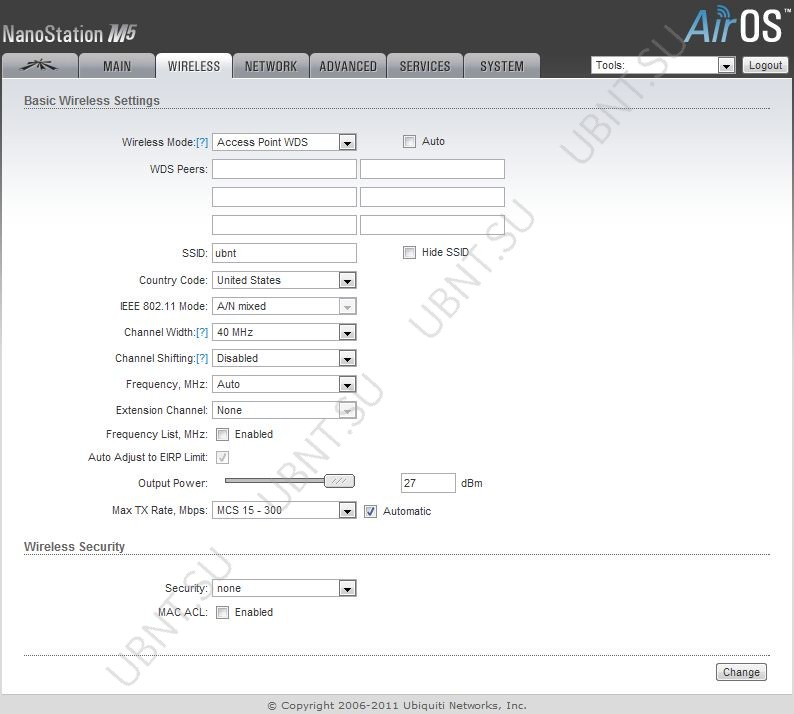
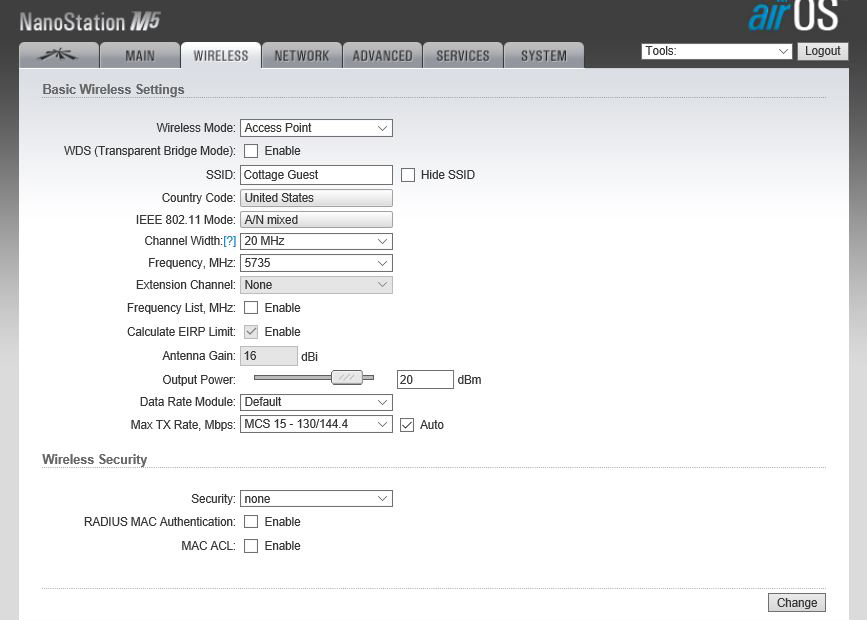
The Wireless tab contains all the necessary settings for the wireless part of the SSID, the channel and frequencies, the mode of operation of the device, the transmission speed, and safety.
Wireless Mode-wireless mode
Station- the client mode that can connect to the access point. In Station mode, the device works as subscriber stations when connected to an access point in
Access Point with a unique SSID that redirects all traffic to the LAN interface.
Station WDS- WDS stands for Wireless Distribution System. Station WDS mode should be used when connecting to base station in the mode
Access Point WDS.Station WDS mode is compatible with WPA / WPA2 encryption. Mode Station WDS- Bridge is completely transparent for all protocols of the second level.
WDS Peers-specify the MAC addresses of the WDS device in the WDS Peers fields. One MAC address for point-to-point mode, up to six WDS can be specified to use a point-to-multipoint connection.
OptionAutoin order to establish WDS connection between points if WDS peers are not specified is used in AP WDS mode. If the Auto option is enabled, the points will select WDS peers according to the SSID. The WDS access point must have an SSID as WDS Peer to automatically establish a connection when the Auto option is activated. This configuration is also known as a repeater. The base station in WDS mode and all WDS peers should operate at the same frequency, with the same spectrum widthandthe same security settings.SSID-identifier used for 802.11 wireless network in the Access Point mode or Access Point WDS. Devices connected to the base station will receive broadcast packets from the access point with the given SSID.
Hide SSID-will disable SSN NanoStation broadcasting. Conversely, the SSID is visible. Available only in Access point mode.
The available access points can be viewed using the "Select" button (not for the Access Point mode), Select an access point from the list and press the "Select" button to connect to it. The "Scan" button updates the list of available wireless networks.
Lock to AP MAC-is installed on the Station and Station WDS, in the case of multiple base stations with the same SSID, knowing its MAC can be connected to the desired one and avoid switching to another base station.
Country Code-country where you plan to use this device.
The width of the spectrum of the channel, the limitation of the output power, the channel list, the IEEE 802.11 standard will be set according to the national regulations.
I EEE 802.11 mode
A / N mixedto connect to networks on the standards 802.11a, 802.11n.
B / G / N mixedto connect to networks on the standards 802.11b, 802.11g, 802.11n.
Channel Width-
this is the width of the channel spectrum. Supported bandwidth of the channel:
5MHz
10MHz
20MHz - 20MHz (default setting)
40MHz
Auto 20MHz / 40MHz -Improved compatibility only for Station (or Station WDS) mode.
Channel Shifting-it is possible to shift the channel frequency relative to the standard one. The advantages of this feature are a significant increase in network security. C hannel-shifting, allows you to make invisible wI-Fi networks organized on equipment Ubiquiti.
Frequency,Mhz-select the frequency of the channel in the Access Point mode. About "Auto" selects the channel based on the current usage and noise level when the device is turned on / rebooted.
Extension Channel - only in AP or AP WDS mode, the bandwidth of the channel is 40 MHz. It allows AirMax to use two channels simultaneously, which increases the performance.
Channel Scan List, MHz-
only p Station and Station WDS. O borders the scan with only the selected channels.
Frequency List, MHz-
this option is used:
frequency is set to "Auto" mode, only the frequencies listed in the list will be analyzed
The AirSelect will use the channels listed in the list.
Output Power-
this function sets the maximum power level (in dBm) of the wireless device.
MaxTXRate, Mbps-
this function sets the data rate at which the NanoStation transmits wireless packets.
Go to the tabNetwork
Bridge Mode
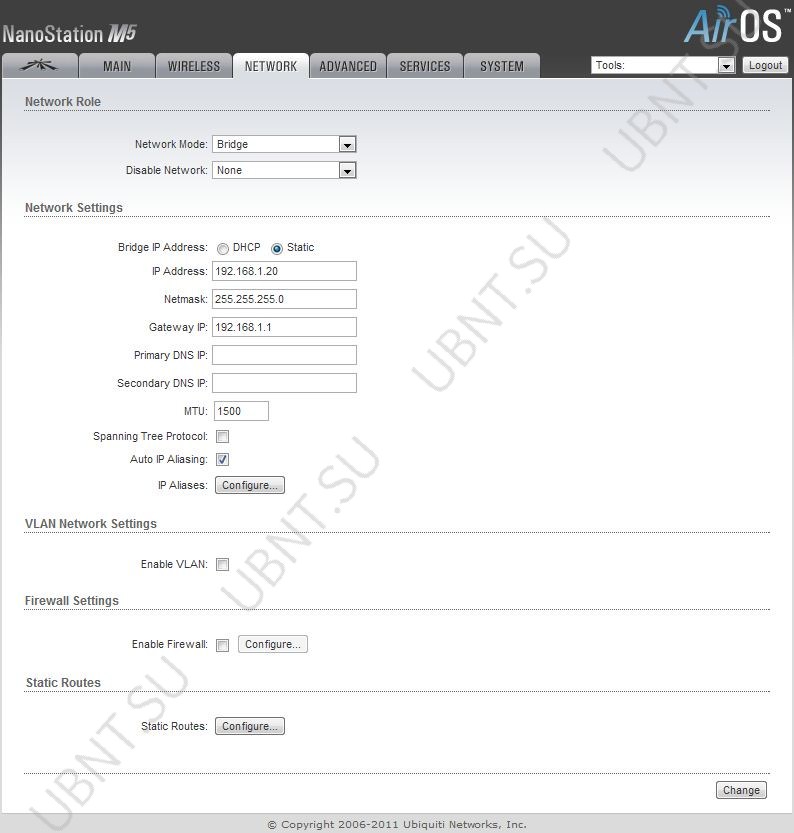
Router mode
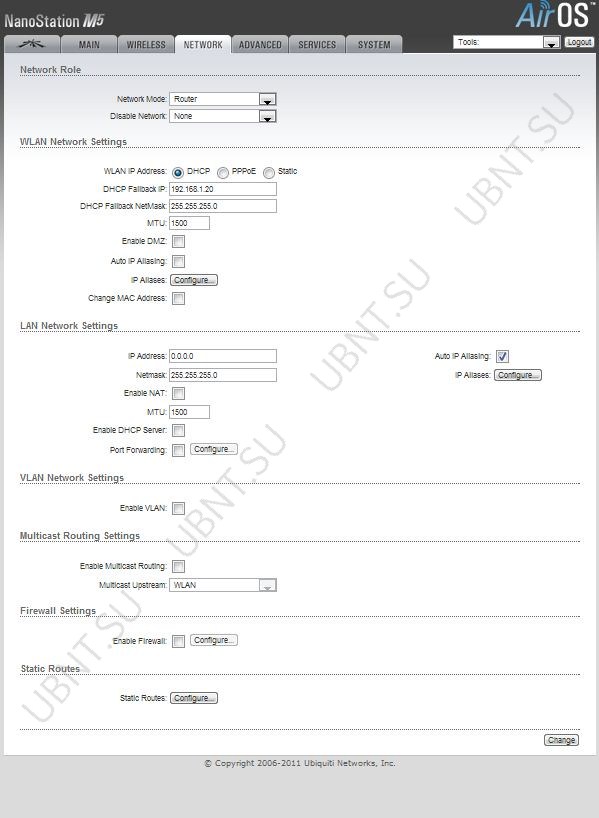
Router mode-In router mode, the roles of LAN and WLAN interfaces are consistent with the mode Wireless:
AP / APWDS-Wireless interface and wireless clients are considered local, and the Ethernet interface is connected to an external network;Station / StationWDS-The wireless interface and wireless clients are considered an external network, and the Lan interface and all the internal network connected to it.
Wired and wireless clients are routed from the internal network to the external one by default. NAT-works.
WLAN Network Settings
IP Address- this IP address is assigned to the WLAN interface that is connected to the internal network according to one of the modes of operation described above. This IP is used as the gateway IP address for routing in on the internal network, and for configuring Nanostation.Netmask
Primary / Secondary DNS IP
MTU-determines the maximum size packet bytes, which can be transmitted at the link level.
GatewayIP- Usually this is the IP address of the router through which the Internet is accessed.
Primary/ SecondaryDNSIP- The Domain Name System (DNS) - These fields determine the IP addresses of the servers to which NanoStaion refers as source of translation.
Enable DMZ-this zone can be turned on and used as a place where you can place services such as Web, Proxy, E-mail servers in such a way that they can serve local area network and be isolated from it for high security.DMZ Management Port-the web interface port for the device used for the host device if the DMZ Management Port option is enabled.
DMZ IP-connected to the internal network, the host specified in the DMZ IP address field will be accessible from the external network.
PPPoE: Point-to-Point Protocol over Ethernet (PPPoE)- virtual private and secure connection between two systems
PPPoE Username- user name to connect to the server (there must be corresponding settings on the PPPoE server);
PPPoE PasswordPassword to connect to the server.
Show- Select this check box to display the PPPoE password symbols.
PPPoE MTU / MRU- the maximum size of bytes of the transmitted / received data block of the encapsulated traffic passing through the PPP tunnel.
PPPoE Encryption- enable / disable MPPE encryption
Auto IP Aliasing- Creates an automatically generated IP address to match the WLAN / LAN interface
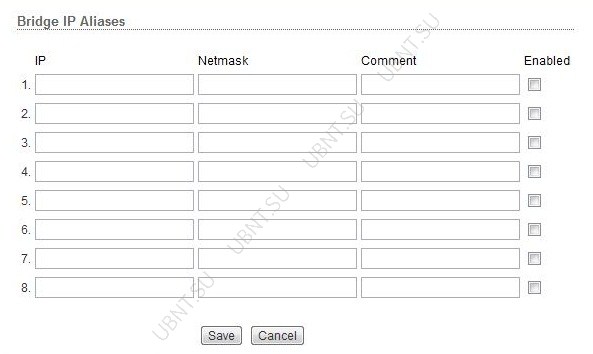
IP Aliases (IP aliases)- can be configured for both internal and external network. The configuration is done in the configuration window, which is available after clicking the "Configure" button.IP Address- An alternate IP address for the LAN or WLAN interface used to route or control the device.
Netmask-address space for a specific IP Aliases
Comments-information field for comments to IP Aliases
Enabled-checkbox that turns on or off certain IP Aliases
IP Aliases can be saved with the Save button or canceled with the Cancel button.
Change MAC Address-this feature allows you to easily change the MAC address of the interface.
LAN Network Settings
IP Address- this IP address is assigned to the LAN interface that is connected to the internal network according to one of the modes of operation described above. This IP is used as the gateway IP address for routing in on the internal network, and for configuring Nanostation.Netmask- This value determines which part of the IP address of the host belongs to the network address, and which one to the address of the node itself in this network.
Enable NAT- allows to transfer packets from the LAN interface to the IP wireless interface and then routing to clients located in the LAN.
Enable NAT Protocol:if NAT is active then the data can be modified to pass through the router. In order to prevent the modification of specific packets (SIP, PPTP, FTP, RTSP) uncheck the required.
MTU- determines the maximum size of a packet of bytes that can be transmitted at the link level.
Enable DHCP Server- The DHCP server assigns IP addresses to clients connected to the interface.
Range Start / End- the range that defines the list of IP addresses of the DHCP server.
Lease Time- the lease term of the IP address issued by the DHCP server. The value is set in seconds. max 172800.
Enable DNS Proxy- the function allows you to forward DNS requests from devices located on the internal network to the DNS server.
PortForwarding- the option allows you to redirect the defined ports from the internal network to the external one.
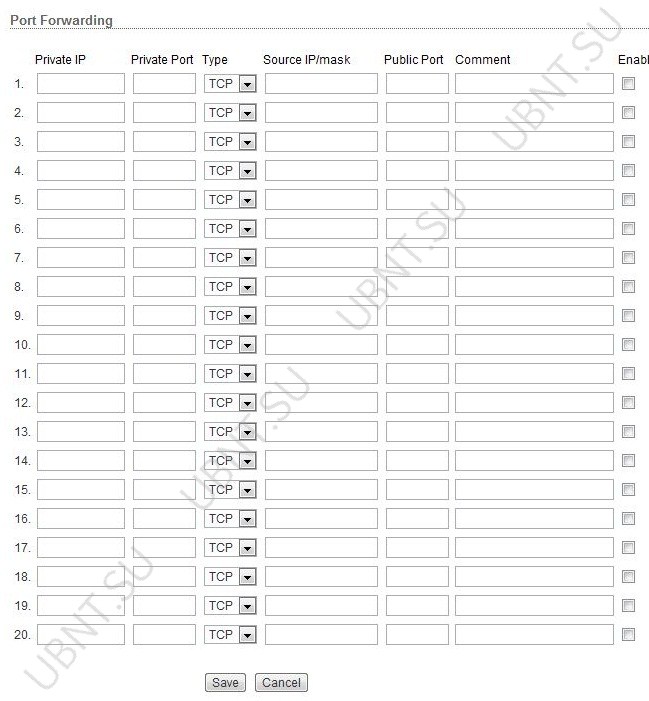
- Private IP-IP address device from the internal network to which you need to access from the external network.
Private Port-TCP / UDP port of the application running on the device from the internal network;
Type- the type of protocol that must be redirected from the internal network.
Public port-TCP / UDP port of the NanoStation device, which will redirect the connection from the external network to the device on the internal network.
Comments- text field for comments.
Enabled- check box that enables or disables the redirection rule.
VLAN Network Settings
Enable VLAN -the possibility of using virtual networksVLAN ID- value assigned to each device. The VLAN ID represents a separate virtual network.
VLANNetwork-determines which interface the assigned VLAN ID will be assigned to.
Multicast Routing Settings
Supported by Multicast(multicast sending), applications can send one copy of each packet to a group of devices that they want to accept.
Enable Multicast Routing- Activates the transmission of multicast packets between the external and internal networks.
Firewall Settings
Firewall can be activated on Nanostation using the function Enable Firewall. You can configure the firewall by pressing Configure.
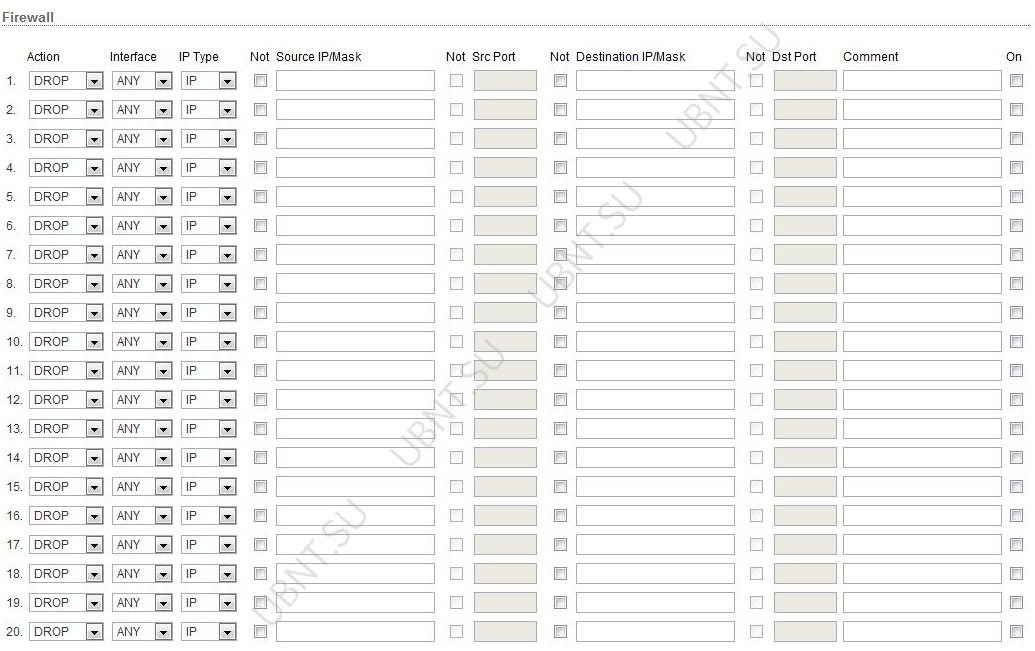
- Action-select between ACCEPT or DROP. If Accept, then the packets will pass unchanged. If DROP then the packets will be rejected.
Interface - the interface on which the filtering is performed (WLAN, LAN or PPP);
Source IP / mask is the source of the packets, this is the IP device that sends the packets.
Source Port- TCP / UDP port of the package source.
Destination IP / mask -IP is the destination address of the packet, which is the IP address of the device to which the packet is addressed.
Destination Port -port the destination TCP / UDP packet.
Comments- field for a short comment.
On- check box that enables or disables the rule.
No t - operators inverting the values of the fields Source IP / mask, Source Port, Destination IP / mask, Destination Port.
Static Routes
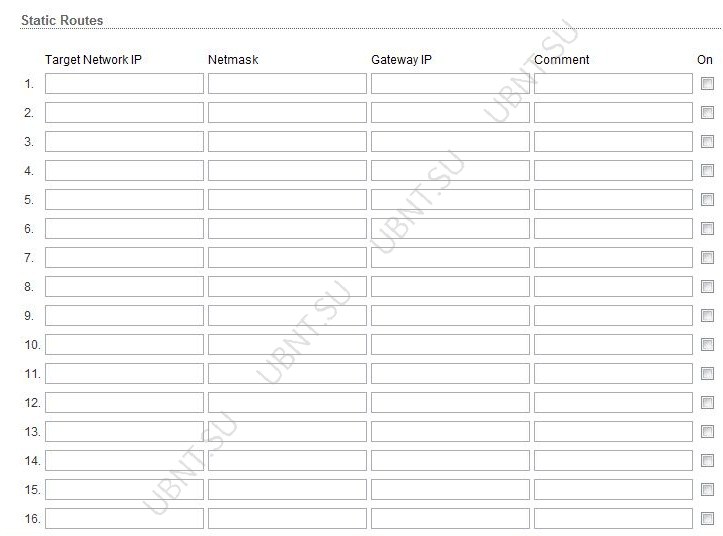
In this section, you can manually add static routing rules to the System Routing table, this will allow you to specify a specific IP address (s) that pass through a specific gateway.
For each record, you must specify a valid Target Network IP, Netmask, Gateway IP, to check the ON check box to enable the rule. Then click the Save button to save the changes or Cancel to cancel.
Enable Traffic Shaping- monitoring the throughput of the device.
Advanced page
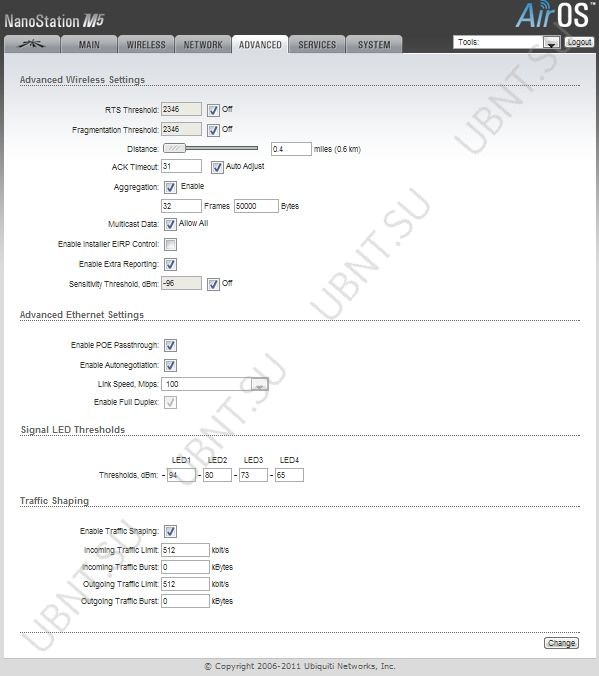
This tab contains advanced settings for routing and wireless interface.
RTSThreshold-the size of the transmitted packet and through the access point, helps to manage traffic flows.
Fragmentation Threshold-
the maximum packet size before it is divided into several packages. The range is 256-2346 bytes, or off. Using Fragmentation Thresholdcan increase the reliability of personnel transfer.
Distance-
distance in miles / kilometers using a slider or enter a value. Changing the distance will change the value of the ACK Timeout parameter according to the distance value.
ACK Timeout-
time interval of recognition. When the station receives the data packet, it sends the ACK packet to the access point (in the absence of an error). If the station does not receive an ACK packet from the access point within the set time interval, it repeats sending the packet.
Auto Adjust- this check box enables the ACK Timeout parameter to be configured automatically.
Aggregation-
part of the 802.11n standard. Allows you to send multiple frames with a single connection to the environment, merging frames into one large frame.
Frames- the number of frames in a merged frame.
Bytes-size in bytes of the combined frame.
MulticastData-in switches the transmission of multicast traffic. The default is disabled.
Enable Installer EIRP Control-
control of eisotropically radiated power.
Enable Extra Reporting-
allows you to output additional information in the control frames of the 802.11. Typically used to identify the system and status information in utilities for detecting and operating systems of routers.
Sensitivity Threshold, dBm-
the minimum signal level for the client at which it is possible to connect to a point. The client with a signal level lower than the specified value will be disabled.
Advanced Ethernet Settings
Enable PoE Passthrough-
the device allows to transfer power POE from the main port to the secondary one, thereby allowing to supply for example an IP camera.
Enable Autonegotiation-
automatic negotiation of transmission parameters with the opposite side, such as speed and duplex. In this process, the devices exchange information about their parameters and then select the fastest transfer mode that both support. If you want to set these parameters manually, disable this function and select the required values:
Link Speed, Mbps:select the maximum data rate. There are two options: 10Mbps or 100Mbps. If you use a very long Ethernet cable, a connection speed of 10Mbps should provide better stability.
Enable Full Duplex:choice of duplex mode; if the device is turned on in full duplex (allows two-way data transfer in both directions simultaneously). If disabled, the device will operate in semi-duplex mode (allowing two-way data transfer in both directions, but not simultaneously, but only in the same direction at the same time).
Signal LED Thresholds
The indicators on the rear panel of devices with AirOS v5.3 can light up when the values of the received signal are indicated in the corresponding fields. This allows technicians to install client devices without the need to connect to it (for example, position the antenna).
LED 1 (red) will turn on if the signal level reaches the value in this field.
LED 2 (yellow) will turn on if the signal strength reaches the value in this field.
LED 3 (green) will turn on if the signal strength reaches the value in this field.
LED 4 (green) will turn on if the signal strength reaches the value in this field.
7. Go to the tabServices
To configure services such as: SNMP, SSH, System Log and Ping Watchdog.
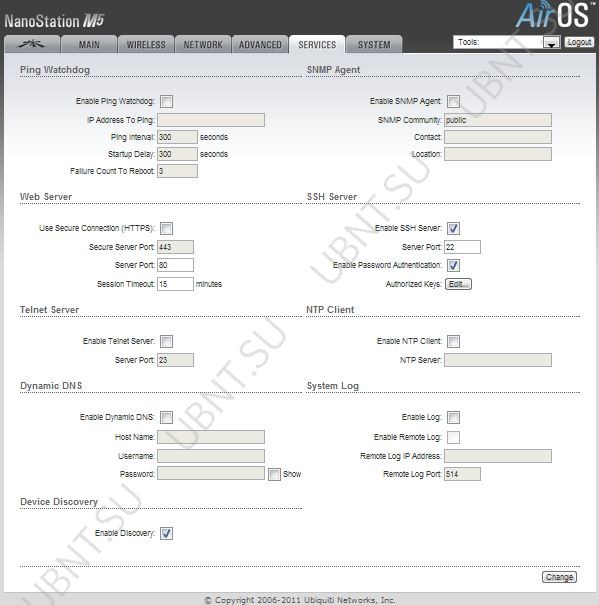
Ping watchdogon devices e NanoStaionin the mode of periodic ping of the IP address. If a certain number of replies do not arrive, the device reboots.
IP Address ToPing- IP addresses of the host for communication control.
Ping Interval - the time in seconds between requests. The default is 300.
StartupDelay- delay time in seconds before the request. The default is 300 seconds.
Startup Delayshould be not less than 60 seconds.
Failure Count to Reboot- the number of poluchenyh ovetov.Esli number of requests will not be received in the course of time StartupDelay, Ping Watchdogwill reboot the device.Simple Network Monitor Protocol (SNMP)it is used to monitor devices connected to the network that require attention of the administrator.
SMTP agent
SNMPagent for monitoring the device using the Simple Network Management Protocol (protocol for exchanging information for managing network devices)
Keys Enable Remote Log - activation of the function of sending messages system log to the server.
Remote Log IPAddress- IP address of the storage server.
Remote Log Port- TCP / IP port of the storage server of the system log. 8. The System tab contains the administrative options.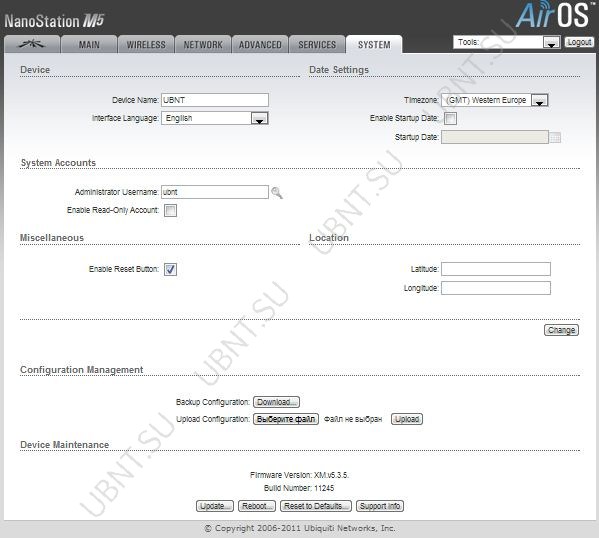
DeviceDevice Name- name of NanoStaion Interface Language- select the language of the web interface Date setting
Timezone- Select the time zone.
Enable Startup Date- allows you to edit the start date of the device.
StartupDate- date and start the device.
System Accounts
Administrator Username- user name with administrator rights.CurrentPassword- administrator password. It is necessary to change the password and the name of the administrator users.
New Password- field for entering a new password. Verify Password- field for re-entering the password.Enable Read-Only Account- enabling a read-only account
Read-Only Username- Username. New Password- new password for account with read-only permissions.Ubiquiti NanoStation M5 is used as an access point or it can be used to create a wireless bridge. The device can provide access to the global network of many customers in the sector of the radiation angle. At the same time, the data transfer speed will allow you to view online video in high quality, comfortably use IP-telephony and keep all synchronized electronic devices in constant synchronization. Below is the detailed manual on the implementation of the Ubiquiti m5 settings of the loco m5 model, as well as the main characteristics and capabilities of the device.
Device Description
The Ubiquiti NanoStation Loco M5 provides significant signal power at a frequency of 5 GHz. It can be used as a radio bridge with a length of more than 5 km.
The device is effectively used for both retransmission and for use as a powerful access point, that is, it has two modes of operation. Despite the small size, the Yubikvity M5 is equipped with a 400 mW transmitter, as well as an antenna with an angle of at least 45 degrees. All parameters of the device settings are made using the proprietary software.
Main characteristics Loco M5
The device supports 802.11a / n / AirMax wireless network standards. Equipped with a high-performance processor "Atheros". A built-in antenna with a gain of 13 dBi, supports a wireless connection speed of up to 150 Mbit / s. Due to the small dimensions (80x31x163 mm) and the manufacture of high-quality materials, external mounting of the device is possible with attachment to the surface of any wall. The weight of the device does not exceed 180 grams. Operates on the operating system «AirOS v5». The output power of the transmitter is 23 dBM. For data security standards apply: 802.1x, WEP, WPA, WPA2. Type of power - 220 V. It can be effectively operated in the temperature range from minus 20 to plus 70 degrees Celsius and at an ambient humidity level of 10 to 90%.
From Ubiquiti to 5 GHz. An access point is used for both external and internal use. The box is standard white, there is a holographic sign with the company logo. The box on both sides shows the back and front sides of the device.
Overview and setup of the Ubiquiti Nanostation M5.
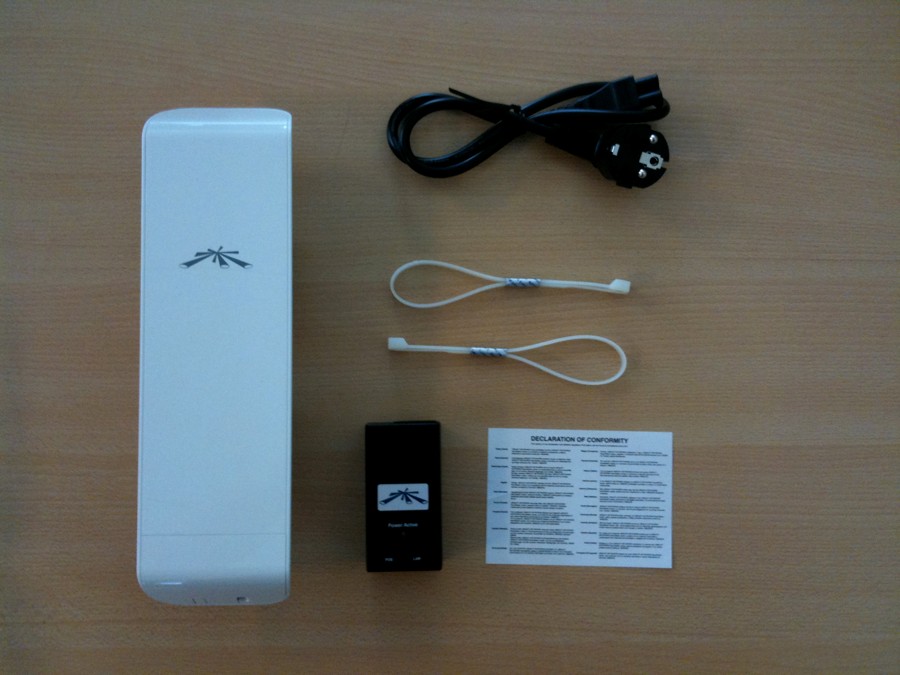
The complete set includes a brochure on english language for quick installation of the device, the access point itself in the film, POE power supply unit for 24 V, 0.5 A and screed. Let's consider in more detail the technical characteristics of the device.
Specifications Ubiquiti Nanostation M5
A small point with a glossy coating, heat-resistant, moisture-proof case. The device can be installed both indoors and outdoors. Built-in 12 dB antenna with dual polarization and mIMO technology 2T2R allows you to transmit or receive a signal at a distance of up to 13 km of line of sight and provide a bandwidth of up to 50 MB / s. ESD and EMP technologies protect equipment from most radio and wire interference. The power of the access point passes through POE 24 V, 0.5 A, as already mentioned above. It is not necessary to conduct 220 V, the unit is fed through a twisted pair. The device contains a system of remote hardware reboot through a special POE-adapter, it is purchased separately for 24 V, 1 A, if necessary. Manages a simple functional point operating system Air OS version 5.0.
The device is based on the processor Atheros MIPS 24KC with a clock speed of 400 MHz. It has a built-in RAM of 32 MB and 8 MB of flash memory. Connectors LAN 100 Mb / s RG45. It is recommended to buy lightning protection to avoid burnout of the port and the processor, in addition, damage from a thunderstorm is not a warranty case. Ubiquiti Nanostation M5 operates in the standard 802.11an technology airMAX. AirMAX can be turned off, then all devices that run at 150 MB / s will be able to connect to the point. The transmitter's power of the device is 23 dBm, which is about 200 mV. The operating frequency is 5-5.9 GHz. Double polarization can be noted: in horizontal polarization, the opening angle is 45 °, in vertical direction - 45 °. To enter the access point control panel, you need to drive IP to the browser address: 192.168.1.20. Login: ubnt, password: ubnt. Ubiquiti Nanostation M5 is great for receiving and transmitting wi-Fi signal for long distances at temperatures from -30 ° to + 80 ° and humidity 95%. You can use it to build a point-to-point connection or as a client device CPE. The price largely depends on the seller's warranty obligations.
Customize
We connect the access point to the POE adapter and to the computer via the LAN port. Then go to the settings network adapter and in the main gateway we write the IP address of the access point (it is written on the box). Open the browser and enter the IP access point in the address bar. In order for all frequencies to be open, choose the test mode Compliance Test. Enter username and password, by default: ubnt and ubnt. Go to the Wireless tab and set the Access Point mode in the settings. In the SSID field, we can change the name of the Wi-Fi network. If we do not want to distribute Vai-Fay to anyone, we select the type of protection in the Security field and set the password a little lower. Press the Change button.
In the Network tab, we can configure a static or dynamic IP address. There is also a router mode. In Advanced, we can adjust the exact distance between the access points. In Service, you can change ports and also configure DDNS for a remote connection to Ubiquiti Nanostation M5. Confirm all the settings with the Apply button and wait for the point to reboot.
Let's move on to setting up the second access point, which will be used as Station. Before entering the admin panel, all the settings are left the same, the Compliance Test still stands as a country. If previously changed username and password, then we enter new values into the form. We are inside, go to the Wireless tab and next to the SSID field click on the Select button. Here we need to select the network that we just created. Use the Scan button to refresh the page, new networks will need time to be displayed in the search. Enter the password from the network to connect to it. Press the Change button.
In the Network tab, you need to change the IP address so that access points do not conflict with each other. Click on the Change and Apply buttons.
In the Main tab, we can see at what frequency and width the access point works, the approximate distance is also indicated. There you can trace the signal level.
Conclusion
In general, the Ubiquiti Nanostation M5 is configured in the same way as its younger brother - the M2 version. Differences between devices end with power characteristics. The entire line of Nanostation has proven itself with a very good side, usually users do not have any problems when working with these devices. Use, the benefit of customizing products from Ubiquiti is not difficult.
If you have any questions or suggestions - write in the comments.