Hello! Very often asked how to connect the router? They bought a router, brought it home, and how to connect it, and what to do next with it, so that it would distribute the Internet via Wi-Fi and cable. In this article we will talk specifically about TP-Link routers. I'll tell you in detail, and even make a photo on tP-Link connection. Where and what cable to connect, how to connect the router with the provider, computer, modem, etc.
In fact, nothing complicated about it. It takes only a little time and patience :) After purchasing any router, in our case, this device is a TP-Link company, it will have to be properly connected and configured. If you connect it incorrectly, it can not be configured. The configuration process itself is a topic for another article, or for instructions on a specific model. Well, in this article we will analyze in detail the process of connecting the TP-Link router.
The article is suitable for all models: TL-WR940N, TL-WR740N, TL-WR841N, TL-WR842ND, TL-WA701ND, TL-WR743ND, etc. I will show the example of TL-MR3220. I would like to show how to connect (it's more popular), but at hand now there is only the TL-MR3220. Well, okay, they are almost the same.
Connecting the computer to TP-Link via network cable
First of all, we need to connect a power adapter to the router. Just plug it into the POWER jack. There definitely will not miss 🙂 Well, turn on the grid. If the indicators on the router are not lit, then check that it may have a power button on it, and it is disabled.
Further, if you will customize (and / or use the Internet by cable) router from the computer? or laptop, then take the network cable that comes with the router and connect one end of the cable in the network card of your computer, and second to LAN connector of the router. On TP-Link, LAN connectors are usually yellow and there are usually 4 of them.
We connect TP-Link router to an Internet provider, or modem
Everything is clear. What would the router be able to distribute the Internet (and this is his main task), you need to connect to the Internet. Most likely, you have an ordinary network cable laid in your apartment, or the Internet from your ADSL modem.
We need to connect cable from internet provider to wan connector TP-Link router. WAN connector is usually blue. Or, connect a modem cable to the WAN connector (for connection you can use the cable that comes with the router).
This looks something like this:

That's all, the Internet is connected, and you can start configuring the router. Go into the settings of your TP-Link (see) and configure the router. You can configure the instructions on the example. The setting is likely to be the same.
It may be that immediately after connecting the router, the Internet will work on your computer and other devices that you connect. This is possible if your provider uses the Dynamic IP connection type, or you have a modem connection. In any case, you will need and.
It seems to have forgotten nothing. As you can see, the instruction is simple and clear, everyone can connect. If something does not work out - write in the comments, we will understand.
Manufacturer TP-Link produces routers of various modifications, so the names of the connectors and software menu commands may vary depending on the model or version of the firmware. In general, the control interface software The router is pretty simple and straightforward.
Login to the router control panel
To enter the settings menu, you must connect the router to the computer through the local LAN connection port using network cable with an RJ-45 connector. The connector is located on the back of the router and can either be digitized or be signed by LAN. Typically, these connectors are colored yellow or orange. After connecting the cable to the router, the latter must be plugged in and wait for stable work light power indicator.In the address bar of the browser you need to enter the IP address of the device: 192.168.1.1 or 192.168.0.1, depending on the firmware version. In the window that opens, you must enter the authorization data set by default. Login admin and password admin are used in most models. After entering, you can see the main menu located on the left side of the screen. In it, select the System Tools item and click Password in the drop-down list. In the opened window, you need to change the default password, then click the Save button to save the changes.
Internet connection setup
The Internet cable must be connected to the WAN or Internet connector on the back of the router, after which you can proceed to configure the settings. When you select the Network menu item and click on the WAN item, a window will open for entering the Internet connection parameters. The parameter values must be checked with the provider. After entering the parameters you will need to save them. Next, in the same Network item, click on MAC Clone, click the Clone MAC Adress button and save the changes.Wireless settings
In the Wireless menu tab, select the Wireless Settings item. In the window that opens, you will need to fill in the empty fields and set values for some parameters. For example, the Wireless Network Name is the desired name of the wireless network. In the Region drop-down list, you must select the country of placement, and the Channel parameter should be set to Auto. The values of the remaining parameters can be left as default.To configure the security of a wireless connection, select the Wireless security menu item. In the window that opens, you need to set the security protocol type by switching the toggle switch to WPA / WPA2, then set the security parameters:
For Version (protocol type) set the value to WPA2-PSK;
- set the value TKIP for the Encryption parameter;
- in the PSK Password field enter the network security key, consisting of eight characters.
Tp Link is a very popular brand of routers and routers, so it’s better to consider connecting it by a specific example. To do this, we will take TP-Link TL-WR841N, work with which fully illustrates what and how to do with almost any similar device.
Completion and connection of tp link router
If you buy a router with hands, check the completeness of the configuration, as well as the performance of all the details, simply asking the owner to demonstrate it. The standard set includes the router itself, the power supply, a network cable, an instruction book, which will greatly simplify the handling of the device and the disk with the auxiliary files. We connect the “box” with TP-Link marking as follows: we connect the power supply unit with the corresponding connector on the router and the 220 V network, using an adapter if necessary. The WAN wire that comes in the kit is inserted into the socket marked in blue, up to a slight click. The TP-Link TL-WR841N used by us has 4 LAN ports marked in yellow. This means that you can connect another 4 computers to it using a wire (and any number via wireless, if your model supports it). Our router also has the following indicators and buttons on the case:
- button to turn the device on and off;
- a button that performs a reboot and a factory reset;
- button to enable QSS;
- indicators of communication with the local network, the Internet, ADSL and others.
How to configure TP-Link router?
To connect the router and configure it does not require virtually any special knowledge or expert assistance. All the most common questions, including possible errors, are set out in detail in the instructions in the kit. If it is not there or it is difficult to read, follow our recommendations.
- Previously, it is worth holding the button labeled RESET for a few seconds to reset to the recommended parameters.
- Next, to enter the web interface of the router, open the browser and enter the numbers 192.168.0.1 in the address bar. or 192.168.1.1.
- The router will ask you for a standard login and password, which by default is listed as admin and admin. You can later change them on the System Tools tab for more security.
- Data for input in the sections “Network” and “WAN” is better to take from your contract with the provider or by calling technical support.
- In the item "MAC Clone" click "Clone MAC Address" and confirm with the button "Save".
- The “Wireless” item is responsible for setting up the wireless network. In “Wireless Network Name” we indicate the desired name for your Wi Fi, and in “Wireless Security” -\u003e PSK Password - its password. Sometimes the current password is indicated on the case of the router itself.
- Be sure to save the changes and on the tab "System Tools" click the reset button. This will allow changes to take effect.
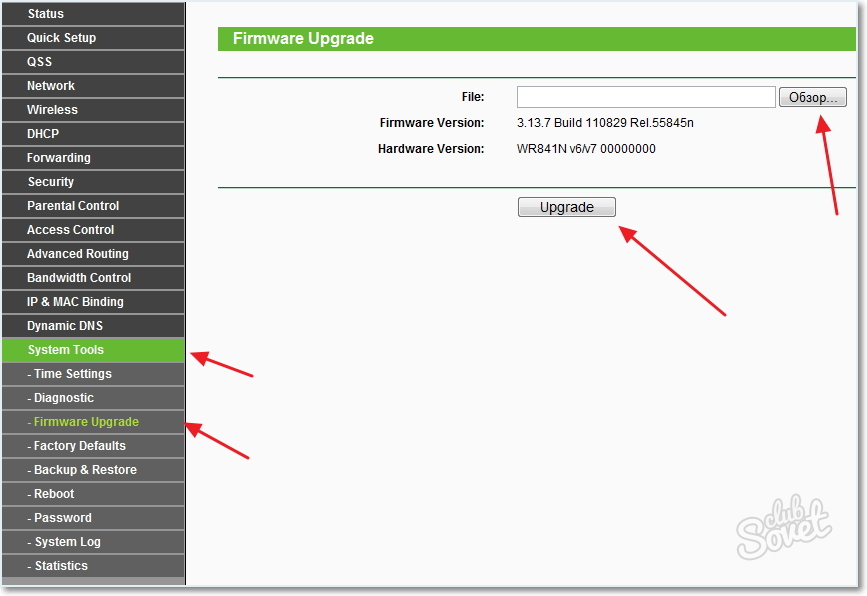
Firmware update for TP-Link router
Each fresh update for the router has useful features and greater usability. Download the latest firmware for your device on the official website of TP Link. To install it, go to the router through the web interface, in the tabs "System Tools" -\u003e "Firmware Upgrade". Using the "Browse" button, select the resulting file and click "Upgrade". We are waiting for the end of the process.
Attention, do not disassemble your router yourself unless absolutely necessary. Damaged seals, decals and housing parts will void the warranty on the device.
Currently, unlimited high-speed Internet is no longer a novelty. And even more so, if we are talking about a wireless connection, which is applicable even for a personal computer, not to mention laptops, tablets or smartphones. Now most mobile devices have a built-in WiFi module, and their comfortable use directly depends on how well a quality wireless connection is installed in your home and how well you can connect everything to your computer.
TP-Link WiFi routers are a good example of solving problems with speed, range and antenna power. Also, you are guaranteed to get rid of the wires in your apartment. After you have purchased a router, it is very important to understand how to connect the device to the computer on your own. The fact is that if you have already conducted the Internet, the lack of knowledge on this issue can lead to additional expenses for calling specialists.
In this article, we will try to tell you how to properly connect your TP-Link to the computer and make its subsequent configuration.
Connecting to computer
The first step is to open the box and make sure that the configuration of the TP-Link router corresponds to what was described in the documentation. That is, make sure that all the elements are in place. In addition to the router itself, it is necessary to have a power supply unit, cables, as well as a CD with software.
Before you connect the TP-Link router to the computer, you need to place it correctly. It is best to place the cable near the place where your PC is located, as the cable included in the package is not too long. If this fails, you can purchase a longer cable in addition. It is very cheap and is sold at any electronics store.
The TP-Link router has the following buttons and connectors, most of which we will need when connecting and configuring:
- power button;
- wAN connector for connecting the router to the Internet;
- LAN connectors for connecting a PC using a network cable;
- turning off and turning on the QSS function;
- button to reset the router.
After you have familiarized yourself with the location of the connectors, you need to connect the power supply unit to the TP-Link router and plug the unit into an outlet. A cable that was connected by the provider, that is, that connects directly to the Internet, is connected to the WAN jack located on the device. The TP-Link configuration assumes at least four LAN ports, so you can connect four personal computers, if you use a network cable.
Configure TP-Link Router
Before proceeding with the setting, experts recommend a preliminary reset to factory settings. After the router has rebooted, use any browser. In the address bar, enter 192.168.0.1. Another option is 192.168.1.1, depending on the firmware version. You will automatically get access to the “Setup Wizard”.
To get inside, enter your password and login. By default, both lines are admin. For further security of the network, it is better to change the password during the pre-configuration that is in question at the moment. To change the input data, go to the System Tools tab, where you need to click on Password. In the fields Old User Name and Old Password you will need to enter the factory login and password, that is, admin. Come up with a username and password. In principle, the username can be left old. Enter the new data in the fields New User Name, New Password, Confirm New Password. The last field is the confirmation of the new password. Do not forget to save the updates by clicking Save.
On the settings page, you can download and install latest version firmware. The installation itself is carried out through the System Tools menu, where you need to go to the Firmware Upgrade field. In it, click on Browse, select the downloaded file and click on Upgrade. Downloading should be done only from the official resources of TP-Link. Fully licensed firmware is absolutely free.
Setting up the Internet in the TP-Link router takes place in the Network and WAN menus. The first thing to do is select the type of network. If you don’t know it, just check it out by calling the provider’s Hotline. After you have chosen the type, you will need to save the settings, for which you need to click on Save.
After successful saving, go to the next tab, labeled MAC Clone. There is a button Clone MAC Address, which you need to click, then save everything using Save.
How to set up a WiFi network on a tp link router
To configure a wireless connection, you need to go to the Wireless tab. There is a field under the designation Wireless Network Name. The name of your network fits into it, and it can be chosen arbitrarily. If desired, you can enter the name of the country in the field below. Remember to save all changes.
On the Wireless Security tab, the security system configuration is configured, including protection against unauthorized access. To do this, you need to come up with a not too simple password and enter it in the PSK Password box.
All changes in the settings should be saved, after which the router must be restarted. Reboot the device with the Reboot button located on the System Tools tab. After clicking on the button you just need to confirm your action.
Conclusion
As you can see, nothing is complicated in the independent connection and configuration of the router. It is really simple and does not take much time. And you can save money on the call of specialists and the time during which you would have to wait for them.
Determination of ISP network settings
Before you connect a router, you need to know which network settings need to connect to the internet.
The following types of network settings are most common:
- Dynamic IP - dynamic settings are automatically issued by DHCP
- Static IP - static settings are entered manually
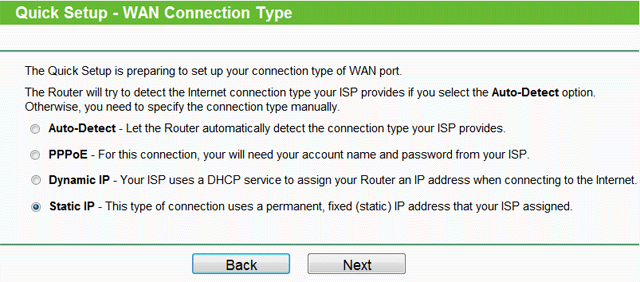
- PPPoE - Internet access is provided via PPPoE after entering the username and password
It is assumed that you have installed Windows 7, the provider cable is connected to the computer and Internet access is configured.
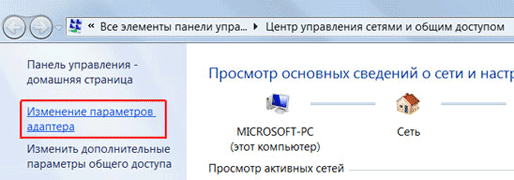
Go to “Change adapter settings”.
Right-click on “Connect by local network"And select" Properties "
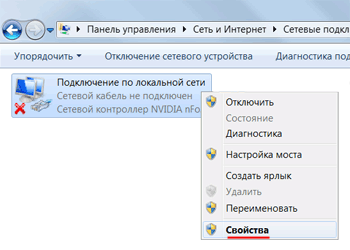
Click on "Internet Protocol Version 4 (TCP / IPv4)" and the "Properties" button.

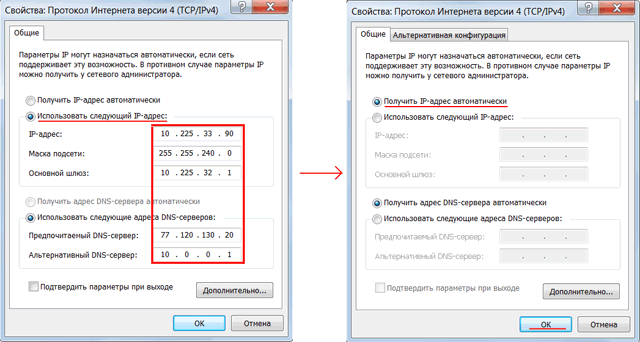
- If you have selected “Use the following IP-address” and there are numbers, then write down all the settings - these are the static settings of the provider ( Static IP). After that, select “Obtain an IP address automatically” and click the “OK” button.
- If you have selected the option “Obtain an IP address automatically”, then you get the network settings automatically - these are the dynamic settings of the provider via DHCP ( Dynamic IP).
There are providers that block access to the Internet by MAC address (you can see in the contract). In this case, you need to configure the router so that it has the same MAC address, which is registered with the provider.
To learn the MAC address network card, click "Start", in the "Find programs and files" window we write the command cmd and press Enter.
![]()
We write a command to the console ipconfig / all and press Enter.
![]()
We are looking for "Ethernet adapter Local Area Connection ..."
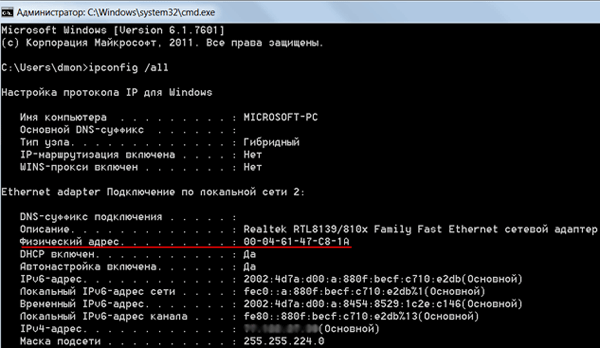
In field " Physical adress»Your network card MAC address is listed. Rewrite it.
Connection and configuration of TP-Link router
For wi-Fi settings Tp-Link router we need:
- provider cable (Triolan, MaxNet, Vega, Volia, Airbites, or others without vpn);
- computer or laptop;
- tP-Link router, which will distribute the Internet via Wi-Fi to a laptop, TV with Wi-Fi, tablet or smartphone.
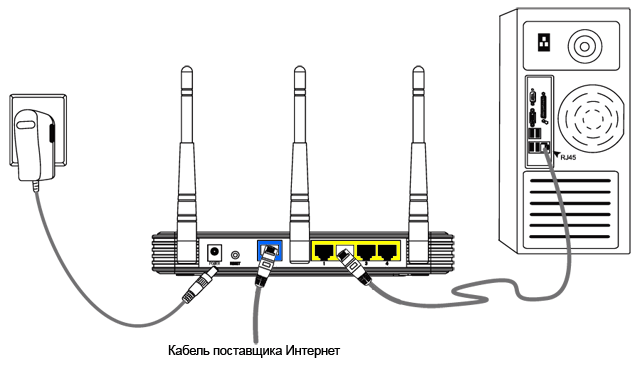
We connect the equipment as follows:
- power supply is included in the socket of the router "Power";
- the cable of the ISP is connected to the blue WAN port of the router;
- connect the computer to the router using a network cable in any yellow LAN port;
- other devices (laptop, tablet, TV with Wi-Fi, smartphone) will be connected wirelessly Wi-Fi.
We proceed to configure the router.
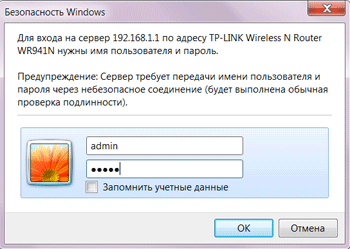
Open browser Internet Explorer and indicate the address 192.168.1.1
Attention! The proxy server should not be specified in the browser settings
In the window that appears, enter the user name admin and password admin.
In the menu on the left, select the quick setup wizard. Quick setup and push the button Next.

Dynamic IP— automatic network settings provider via DHCP
If you get automatic network settings, then choose Dynamic IP and press the button Next.

In field SSID
In chapter Wireless security specify the type of encryption WPA-PSK / WPA2-PSK
In field PSK Password:

Finish.

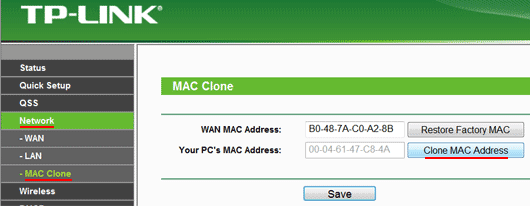
Network - MAC Clone.
In field WAN MAC Address enter the MAC address.
You can also click Clone MAC Addressif in the field Your PC’s MAC Address
Static IP— static network settings of the provider
If the network settings need to be entered manually, then we select Static IPpress the button Next.
Enter the settings:
- IP Address (IP address)
- Subnet Mask (Subnet mask)
- Default gateway (Main gate)
- Primary DNS (Preferred DNS server)
- Secondary DNS (Alternate DNS server)
- and push Next

In field SSID enter the name of the access point to connect via Wi-Fi.
In chapter Wireless security choose the type of encryption WPA-PSK / WPA2-PSK
In field PSK Password: enter the password to access Wi-Fi point access. Password must be at least 8 characters.
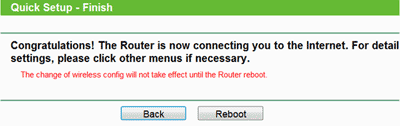
The following window indicates that you have successfully completed the configuration. Push the button Reboot and wait for the router to restart.
If the provider blocks access to the MAC address, select the menu on the left Network - MAC Clone.
In field WAN MAC Address enter the MAC address.
You can also click Clone MAC Addressif in the field Your PC’s MAC Address The required MAC address is located.
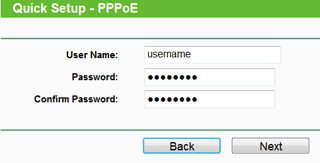
PPPoE— internet access by user and password
If access to the Internet is provided by the PPPoE protocol after entering the user name and password, then select PPPoE.

Enter the settings:
- User Name: (Username)
- Password: (Password)
- Confirm Password: (We confirm the password)
- and press Next
In field SSID enter the name of the access point to connect via Wi-Fi.
In chapter Wireless security choose the type of encryption WPA-PSK / WPA2-PSK
In field PSK Password: enter the password to access the Wi-Fi access point. The password must be at least 8 characters long.
The following window indicates that you have successfully completed the configuration.
Push the button Reboot and wait for the router to restart.
TP-Link router security settings
So that no one except the administrator can enter the settings of the router, it is necessary to change the password to enter the settings.
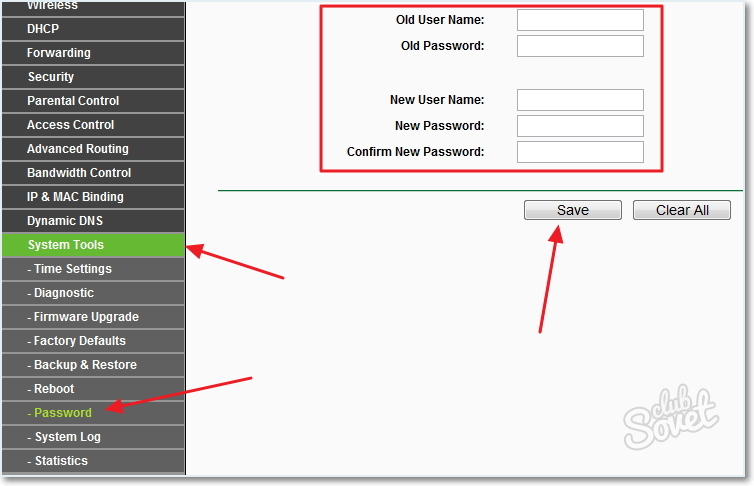
To do this, select the left menu System Tools - Password and enter the settings:
- Old User Name: old username, enter admin
- Old Password: old password, enter admin
- New User Name: enter new username, you can leave admin
- New Password: we enter new password
- Confirm New Password: confirm new password

After that we press the button Save to save the password.
Connecting the laptop to the Internet
Connect your laptop to the Internet via Wi-Fi.
To do this, in the lower right corner of the monitor, select the icon for managing wireless networks. After updating the list wireless networks, our network should appear in it. Select it and click the "Connect" button.

In the next step, enter the password to connect to the Tp-Link router via Wi-Fi.

Enter the password that you specified in the field PSK Password: in the settings of the router. After that, the Internet will appear on the laptop.
You can connect to Wi-Fi router Tp-Link devices that support Wi-Fi, for example, TV, netbook, tablet, smartphone. To do this, you must select the Tp-Link access point in the device and enter the password.
Password recovery for entering TP-Link router settings
If you have forgotten the password to enter the settings of the Tp-Link router, you can restore the factory settings and password.
To do this, on the back of the router, hold down the Reset button for 8-10 seconds.


