In fact, the way to reinstall Windows on a laptop differs little from reinstalling on a stationary computer, but there are some points. Laptops come in two types:
- Windows preinstalled
- Without her
In general, laptops are not sold without an OS, but often it can be a free Meego OS, which is installed instead of Windows to make a computer cheaper. After all, when you buy a laptop, the price of a copy of Windows is included in the price of the laptop, which raises the cost by 500-1000r.
If you do not have a pre-installed licensed OS on a laptop in a hidden section, then use the universal one, which is also suitable for pirated copies.
But there are pluses in the preinstalled windows - you can start system recovery to install a licensed OS from a hidden section of the laptop’s hard drive. Owners of laptops without an operating system from Microsoft are deprived of this opportunity. 3 options for restoring windows on a laptop:
- For laptops with Win of almost all models, the Start menu contains software from the manufacturer for system recovery. They are called differently, you can distinguish them by name - something about Recovery there. You will be offered several ways to restore the OS, as well as reinstalling Windows, and bringing the laptop to its original factory state.
- On almost all models of laptops, immediately upon startup, you can see something like “Press F2 for Recovery”. If you don’t see anything like that, then look carefully at the moment when the manufacturer’s logo is displayed on the screen. This will allow, instead of loading Windows, to begin restoring the operating system.
- On laptops with Windows 8, you can go to "Computer Settings" - "General", then find "Delete all data and reinstall Win". The operating system will be reinstalled automatically, plus all the necessary drivers and other preinstalled software that came into the system at the time of purchase will be installed.
Starting reinstallation from recovering licensed Windows on a laptop
If you did not reinstall Windows on a pirated copy, and did not delete the hidden partitions from the HDD, then you can use the built-in function to return the laptop to the factory state, which is essentially a reinstall of the OS.
To start Windows recovery, you need to press special keys during boot (when the manufacturer’s logo is visible), look for an inscription like Press F2 for Recovery. Basically, these will be the following keys, depending on the manufacturer:
- MSI - F3.
- Samsung - F4, or run the Samsung Recovery Solution III program from the OS.
- Fujitsu Siemens and Toshiba - F8.
- ASUS - F9.
- Sony VAIO and Packard Bell - F10.
- HP Pavilion, LG, and Lenovo ThinkPad - F11.
- Acer - Alt + F10.
Restoring the factory state of the laptop

So, to reinstall Windows on a laptop using recovery, do the following. Consider an operation on an Acer laptop.

When the Acer logo appears, press Alt and F10. In order not to miss the moment, press them several times.
- The recovery program window will appear on the screen. A password may be required, if you did not set it, then use the factory passwords: 000000, 00000000 or AIM1R8.

- Select "Full recovery ...". All data from the C: drive will be deleted, save the necessary information from it in advance. If you need tips on how to do it right, then read the section "Saving data" in ours.

- Next, read what you are informed and warned about.

- Make sure the drive is selected correctly.

- Agree to start the operation.

- The process of restoring the OS on a laptop takes about 15-20 minutes.

This is several times less than the usual reinstallation of Windows on a laptop, especially considering the installation and settings of some utilities from the laptop manufacturer that come bundled with a pre-installed licensed OS.
- The operation completed successfully. Click “Ok, the computer will reboot and you will be waiting for the entrance to the reinstalled OS.

In another model of a mobile PC (HP, Asus, Lenovo, Samsung, etc.), the program for recovering and reinstalling Windows may differ, but the essence is the same everywhere. You will receive a fully working laptop in the same state of software as when you purchased it.
There was a task to reinstall Windows on a netbook? This step-by-step guide will help you complete this task effortlessly. Any user, even a beginner, can do this by reading the instructions presented. So, what is reinstallation of Windows, and how to do it correctly without resorting to the help of a specialist?
To reinstall Windows yourself, you need to start with the preparation. First, we must take care of the information already available on the hard drive.
Preparatory stage
These instructions can be used for various models of netbooks from manufacturers Lenovo, ASUS, Acer and others. In principle, the described process will also take place for ordinary stationary PCs.
Before you reinstall the OS, you need to save valuable data on the netbook that you managed to accumulate during the operation of the old OS. You can transfer them to an external hard drive or to a USB flash drive of the appropriate size depending on the size of the information that you want to save.
It is important not to forget where valuable data can be found. For example, if the current system is an older version of Windows, for example XP, then you should look at the contents of the desktop, the My Documents folder. It’s also possible that you once saved something directly to the system drive, usually it’s drive C.
Of course, listing all the possible options where important data can be stored is very difficult, but nevertheless we will give good advice: carefully review everything so that you don’t regret any forgotten photo that captured one of the pleasant moments of your life.
Why is this needed? The fact is that our task is to perform a complete reinstallation of Windows, and this implies the need to format the partition where we will install the new system.
Why is it recommended to reinstall Windows completely and not update it? Everything is simple here. During the use of the previous OS, viruses could accumulate that are in files that you do not even suspect. For this reason, most experienced users practice a complete reinstall. Immediately make a reservation that if the accumulated viruses are the only reason why you decided to reinstall Windows, then you should consider whether this is really the last opportunity, because you can often get rid of malware in easier ways.
Determined with Windows bit depth
Before starting the installation of a new system, we’ll talk a little about the capacity of the system on which you decided to reinstall the current OS. Keep in mind that Windows can be 32-bit or 64-bit. Among other things, these versions differ in that in a 32-bit architecture, more than 4 GB of RAM can not be addressed. Also, you immediately need to decide which Windows we will install - licensed or not.
- Inability to install system updates
- Embedded viruses and other malware
- Deactivated Services
- Various Windows errors that you will not learn about right away, and many other troubles
Using a flash drive as the media for the installation distribution
To install Windows on a netbook, we need a flash drive, because on netbooks, due to their compact size, there is no device for reading CDs or DVDs. In fact, installing windows from a flash drive seems to many an even simpler option. After all, you can reinstall the system from this type of media on virtually any computer, whether it be a netbook, laptop or just a desktop PC. There are USB sockets on all modern computers.
Making a bootable USB flash drive
Just copy the contents of the Windows distribution to the USB flash drive of course will not work. It is necessary to perform additional operations, otherwise reinstalling Windows on a netbook will not work. But there is nothing complicated, just put the image of the system you want to switch to on a USB flash drive. There are special programs for this, for example, you can use such a popular tool as UltraISO:

As soon as the image of the new Windows is recorded on the USB flash drive, you can start installing the system. Let me remind you again that you must first save all the important information from the system disk. There will be no more such opportunity.
Now we reboot our netbook and go into the BIOS, for which, at the very beginning of the computer boot, you need to manage to press F12 or the Delete key.

Here you need to specify as a priority the boot from a flash drive.

As soon as we have done this, we exit the BIOS with saving the settings made, after which the netbook will go into reboot again. Next, the boot from the flash drive and, accordingly, the installation of Windows should begin.
Installation process
At this stage, we should already have booted the Windows installer and the initial window of the first step of the system installation. For different versions of Windows, the steps may vary slightly, but as a general rule, you can give this recommendation: do not immediately click on further without familiarizing yourself with what the next step is. As a rule, at one of the installation stages it will be necessary to check and, if necessary, indicate the correct date, time, time zone, language settings, and so on.
The only step you can’t stop at is the adoption of a license agreement that contains standard text, which probably makes no sense to read.
It is important not to make a mistake at the stage where you will be asked to choose the type of installation:
- update
- full installation
We need to specify the second option “Full installation”, because we want to install a clean system, and not update the old OS, as mentioned at the very beginning.
After that, a window opens to select the partition where you want to install Windows. Here we can safely indicate the section on which our current old system is installed, after which the specified logical drive will be formatted. Of course, we have already saved all the important information from the system disk and we will not lose anything in the formatting process.
After formatting is complete, the OS installation process will begin. It usually takes 30-60 minutes on netbooks due to their low performance, although it can go faster if you have a more modern and powerful computer.
When the installation is complete, the already new Windows system will ask you to provide your name, as well as an optional administrator password.
Then you may need to set additional parameters, such as network setup. Here, in most cases, you can agree with the recommended parameters, so that later they can always be changed already from the operating system interface.
I also remind you that Windows will not always be able to find drivers for all the devices available in your netbook, so you will need to check which drivers were not found and install them for the full operation of the system.
Reinstalling the Windows operating system is quite simple if it is not Windows 8. There is no key to the system on the bottom of the laptop, since it is “flashed” in its BIOS. Therefore, you can only install the old version on the laptop. Most often it is Single Language (version for one language). You can reinstall another, but this is a different story. Therefore, this step-by-step instruction describes reinstalling Windows 7.
Installing Windows on a laptop is almost the same as installing on a desktop computer, but there are some features. You will need: laptop, multi-boot disk, time from 30 minutes to 2 hours and attentiveness. Before installation, find out the bit depth and version of the system. Remember, if the disk is not licensed, then you install the system at risk. Irreversible effects occur. Prepare the hard disk partition for the system. This is usually the local drive "C: \\". All the contents of your "Desktop" is located on the "C: \\" drive. After installing the system, the information on it will be deleted. Carefully review the contents of the folders in this section, save your archive information in another section of the disk, on a CD-ROM, flash drive, on any other medium. Do not save installed programs - it is easier to do this again than to clean the registry. Prepare the necessary drivers for the laptop in advance. More often they are already included with the computer and laptop, but if they are missing or need to be updated, only on the manufacturer’s website. Without the correct selection and installation of drivers, you can stay, for example, without the Internet. This will happen if there are no network drivers for your laptop on the Windows disc. Put the multiboot disk into the drive (or a USB flash drive with the system image), restart the computer. It is important not to miss the moment and get into the BIOS. Therefore, immediately at the beginning of the download, press the “Delete” key several times (or another key: “F1”, “F2”, “Esc”, ... - depends on the system). A message about the desired key to exit the BIOS is displayed at the very beginning, when information about the motherboard appears, do not miss it. You are now in the BIOS setup window. Use the arrow keys to navigate to the “Boot” menu, it contains the “Boot Device Priority” line you need. Set the priority of the drive here so that the download starts from the installation disk, not from the hard disk. You have now marked the hard drive (“HDD”, “Hard Drive”, “Hard Disk”). Using the specified navigation keys, change it to a CD - its name always contains the letters “CD / DVD” (“USB” for a USB flash drive). Press Enter, then F10 to save changes. You can immediately go to the drive change if you press and hold the hot key "F8" (options: "F8" - "F12"). Wait for the file extraction to complete and you will see a “Starting Windows” message. If “Press any key to boot from CD or DVD” appears, press, for example, the space bar. A window displays starting the installation of Windows. Select a national language, click "Install." Select the edition of Windows that was installed on the laptop, from which there is a key. Usually it is indicated on a leaf glued to the bottom of the laptop. Read the license, accept it - check the box. Type of installation - “Full installation”. Follow on.


After installing Windows on the laptop, update the drivers via the Internet or from a disk. Then install all the necessary programs, be sure to install an anti-virus program, update its databases. This manual describes how to install the system from a licensed, not a “pirated” disk.
Friends, a lot of letters come up with the question of how to reinstall or update the Windows 7 operating system correctly and what exactly is the difference between these two concepts.
Letter No. 1. Please clarify a vague question for many than reinstalling windows 7 different from the update and what is better to prefer? The installed operating system 7 behaves extremely unstable, it takes a long time to load, many programs have stopped installing, sometimes errors of this content appear, for example, some system file or dynamic library is missing. Rollback using the recovery point for a significant period of time ago did not help. I do not want to reinstall again, because many programs are installed. You said in your comment that you need to restore system files, clean up startup, optimize Windows 7, or, in extreme cases, upgrade or reinstall Windows 7, but I did not hear anything about the latter.
I would like to know, firstly:
How to actually conduct this update or reinstall the operating system and what will happen to my personal files on the system partition, will they not disappear?
Secondly: they say that the update is launched only from a working operating system. Is it so? After all, in XP it was possible to start the update even when the system did not boot at all. Thank you earlier, Paul.
Reinstall Windows 7
To make everything clear to you, I will conduct the process of updating your operating system for you, and then I will show you how to reinstall Windows 7 in two ways and you will see everything for yourself, but first I will explain to you what Update is and Reinstall Windows 7.

What is a Windows 7 update?
it’s installing the system on top of the old one, that is, you insert the disk with the Windows 7 distribution kit and start the system installation right in the working seven, but in the installation menu you choose not a complete installation, but an update. What does she give?
First of all, damaged system files will be replaced, workable system files will not be replaced, with your personal data: installed applications, documents, music, nothing will happen, all your programs will start and your entire economy on all disks will remain untouched. Also, user accounts will be migrated unchanged, all this will be done by the tool -Money Transfer Windows (very important files, it’s better to transfer it manually). I also want to say that you have to re-enter the product key, select the language, region, set the time and so on. A warning. If you have unlicensed Windows 7, then after updating you will have a window in the lower right corner of the desktop with a warning that your copy of Windows is not genuine.
- People are often asked how the Data Transfer Tool works. When updating Windows 7, temporary folders of your data will be created containing information about user accounts and user settings, your email, files in the Favorites folder, personal files and user folders - music, images, videos, as well as parameters of installed programs . As your system updates, all data will fall into place, and temporary folders will be deleted. When updating, the data transfer tool does not allow the user to select files for transfer, but during reinstallation, you can choose what you want to transfer (more details below).
Will the update solve all your problems related to Windows 7? In most cases, Yes, but unfortunately no one can guarantee a 100% result here. In my opinion, if it is possible, it is better to delete and reformat the partition with a poorly working operating system, after transferring all the important files to other volumes of the hard drive or portable USB media and reinstall the system with all the programs again.
- Note: in Windows XP there is the same update mechanism and it can be launched both in a running operating system and in cases where you cannot log into Windows XP due to problems, then you can boot from the XP installation disk and select installation menu option. Know that in Windows 7, unfortunately, there is no such possibility, and updating can be carried out only in a working operating system.
What is reinstalling Windows 7?
Reinstallation is a complete replacement of all operating system files, that is, formatting a partition with an unstable system and installing Windows 7 again. Naturally, all your files and the system itself from the disk (C :) will be deleted. In order to transfer all your files from the system drive (C :), you will need to use Windows Data Transfer Tool, but it will not work automatically already, as in the case of an update, but we will use it ourselves and what we need to transfer from the old system to the new one, we also choose.
- Now the question begs: What is the difference between reinstalling the system from installation again? Friends are simple. When reinstalling Windows 7, you can optionally use the File Transfer Tool, since the system you had already been installed, but with a simple installation of the system again, install the system on the partition of the new hard disk that you created. In short, like that, I don’t know how to explain it even more clearly!
What can I say, let's first upgrade my Windows 7 together, and at the end of the article we will reinstall the system using the file transfer tool, it has also been working with errors for me lately and you will see for yourself, and then select what you need.
Windows 7 Upgrade
We insert the installation disk with Windows 7 into the drive, if you do not have autostart, click setup.exe.

Before updating, we can connect to the Internet and download the latest updates from the official Microsoft website

Select Update

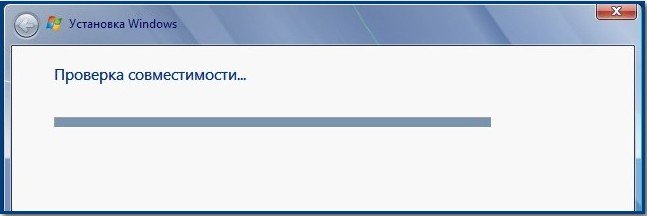
Compatibility check
Copy Windows Files

Collection of files, settings and programs, Unpacking Windows files, Installing components and updates, Transferring settings and program files


The computer restarts.
At this point, you need to boot already from the hard drive, and not a bootable USB flash drive or boot disk with Win 7.
Update registry settings

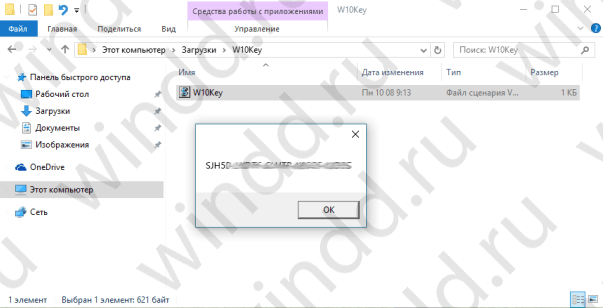
Enter the key


We set the time

Update process completed; accounts saved
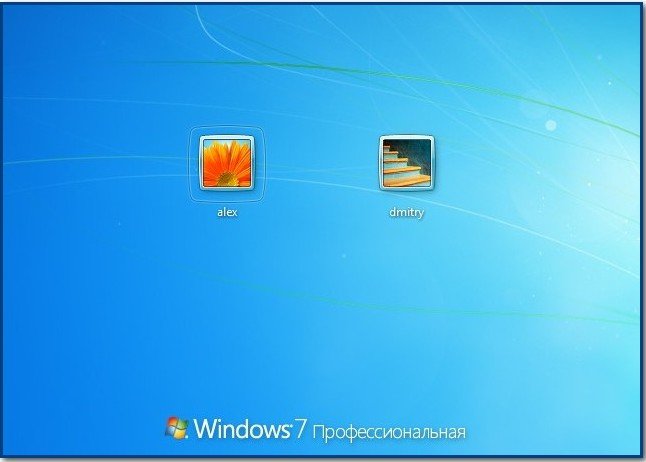
All the files in my place, all the programs are launched.

Reinstall Windows 7
Now let's find out what Reinstalling Windows 7 is. By the rules, we will reinstall Windows 7 on the same drive on which the old operating system is installed. If earlier Windows was installed, for example, on the partition (C :), then you need to reinstall it also on the partition (C :) and NO to any other partition (otherwise it will already be installing the second operating system). All your files on the section (C :) will be replaced by files of the newly installed Windows 7 operating system.
- First of all, we will launch the Data Transfer Tool, which will copy all our personal data from the Windows 7 partition to portable media or another partition of the hard disk, then boot from the Windows 7 installation disk (how to set it up) and install the system again. Immediately after installing Windows 7, we launch the Data Transfer Tool and copy back all our files, as a result, we will receive with you a new operating system and all our data: music, documents, personal folders and so on.
- Note: You may ask: But you can’t start installing a new system directly from running Windows 7 and do not climb into the BIOS. Answer: This method is given at the end and we will also consider it.
Let’s now see what will be transferred from our files Data Transfer Tool, run it.
Start, write in the input field Data Transfer Tool
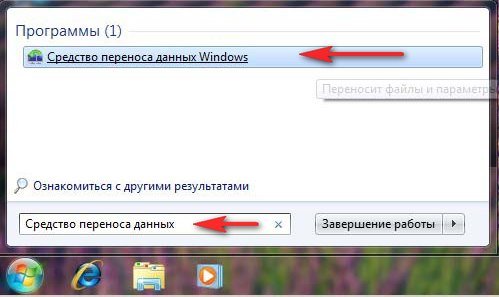
In this window we see detailed information about which files we can transfer from the old operating system to the new one, now we will choose.

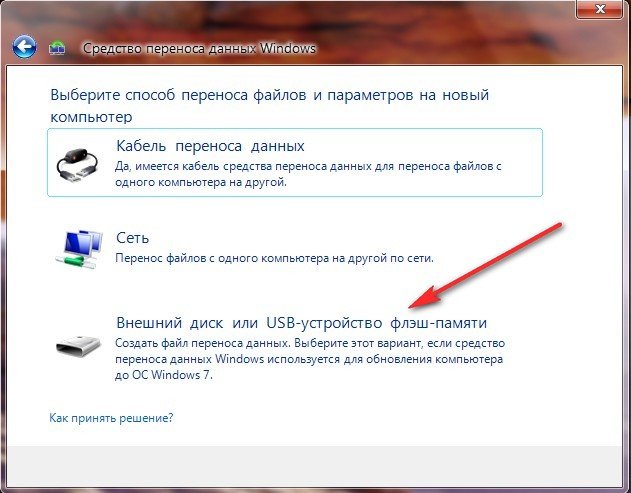
The data transfer tool offers us to use:
- Data transfer cable - a cable specially developed for these purposes, which still needs to be bought, is used to transfer files between two computers, in principle, we do not need this, because we have one computer.
- Network - file transfer over the network is also not our option.
- An external drive or USB flash drive. What we need. If you have a little data, you can even use a flash drive with a capacity of 8GB or 16 GB. By the way, if you do not have a USB flash drive or a portable USB disk, you can use another section of your hard drive to store, like me for example.
So you have chosen an external drive or a USB flash drive, and I have a section on your hard drive (D :).

We choose This is my source computer, that is, data must be transferred from it.

There is an analysis of the data that can be transferred to the new system, in paragraph User Names and click General Settings, and if you click Advanced, a complete picture of what the Data Transfer Tool will include in the archive will open.
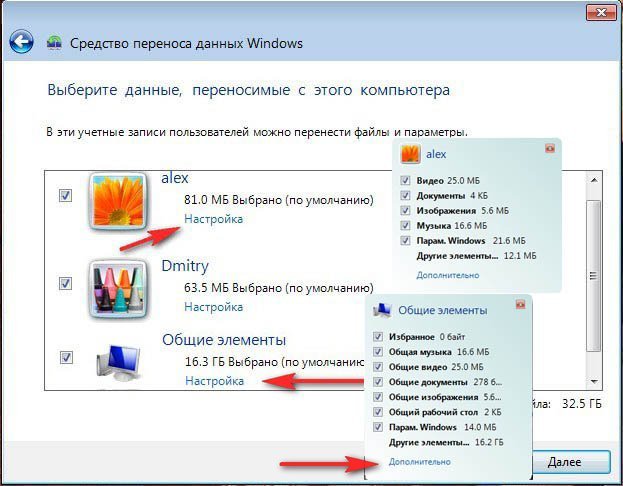
Please note that the archive includes folders of both users of the operating system and personal data, this is correct. But here the data located on all sections of the hard drive, except the system one (C :), we definitely do not need to transfer, since we will reinstall Windows 7 located on (C :) and the reinstallation process in our case will affect only the system partition ( FROM:). Uncheck all hard drives.


However, if you decide to transfer data from all partitions, you can leave the checkmarks unchecked, just keep in mind that the data transfer file in this case will occupy a very large amount ..
What else does not need to be included in the archive that will create the data transfer tool? For example, you may not include the C: \\ Program Files folder, it will be more reliable to reinstall all the programs after reinstalling Windows 7.
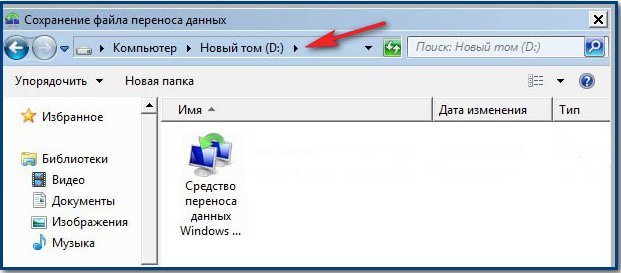
So click Save, you can assign a password


A file transfer process is taking place. A transfer file with the extension (MIG) is created on disk (D :)

Now it’s the turn to reinstall Windows 7, insert the installation disk with the seven into the drive and reboot, at the beginning of the installation it is better to click the Disk Settings button and select Format partition from the previous Windows 7, but in general the whole process is step by step, starting from changing the priority of the boot device in the BIOS and before installing the operating system itself, described in our article.
I think you have managed and installed the system, now let's use our Data Transfer Tool again.
Let's choose This is my new computer (you need to transfer files and settings to this computer)

Your external hard drive with the data transfer file should already be connected.
I, in turn, indicate the section of the hard drive (D :), the transfer file is located there.


We can click Settings and select the files for transferring to the new system manually, as we have already done or just click Transfer.
The process of reinstalling the operating system Windows not particularly different between different platforms. That is, it is almost the same for desktop systems and laptops. In particular for models Acer no special manipulations are needed.
Reinstallation can be entrusted to professionals with equal success and performed independently. In the latest versions, it is largely automated and, with the exception of the initial stage, the user does not need to follow anything more than the instructions of the installer with detailed instructions at each step.
Reinstallation Measures
Step one: The first thing to do before starting the installation is to make sure you have backup copies of important data from the disk on which the current OS is installed. You can copy data to any medium - a USB flash drive of suitable capacity, an external hard drive, or optical disks.
Step Two: Then you should download the system image in the .iso format (for downloading you need a serial key of the product) and the program Rufus to create installation media on a flash drive or optical disk. The downloaded image should be written to the media using the program with the settings shown in the image below.

When the process of recording the image to the media is completed, you should restart the computer.
Step Three: BIOS entry. This parameter changes in the BIOS environment. To get to the settings menu, it is necessary to turn on the device, before loading the operating system, press F1, F2 or Delete, depending on the specific model. The required key is indicated in the user manual.

Step Four: Change the order of devices to boot. This parameter can be changed in the menu item. Bootin section Boot device priority. In the list of available devices, you must first place the option with the device on which the system image is recorded.

Step Five: Exit with saving settings via the menu tab Exit.
Installation start
After rebooting, copying the operating system files will begin. The process takes some time, depending on system performance. When all the data has been copied, the installer starts.
Then you need to make presets. First, select the language and regional standards (language, time format, and input method). In all parameters, the default will be set to Russian.

In the next window you will need no more than pressing a button "Install".

Now you need to select the version of the installed OS (x86 - 32 bit, x64 - 64-bit).

After that, the installer offers to accept the terms of the license agreement. It is impossible not to accept it - otherwise it is impossible to install the system.

The next step is to select the logical (or physical) disk on which the new system will be installed. To reinstall, you must select the partition on which the current system is installed, and in the menu under the list of disks, select "Format".

After these steps, the reinstallation process will begin, which can take up to 40 minutes, depending on the hardware parameters of the laptop.

During installation, the computer will restart several times. The final stage of installation is the preliminary setup of the system. The user will need to configure six parameters in the appropriate number of windows with detailed instructions for each step.
After that, it will take a little more time to apply the selected parameters, and the system is nominally ready for operation. It remains only to install the device drivers for the laptop and the necessary application