Question from user
Good day.
After playing 40-50 minutes in one computer game (note: the name is cut out) - the temperature of the processor rises to 70-80 degrees (Celsius). Changed thermal grease, cleaned from dust - the result is the same.
So I think, is it possible to increase the rotation speed of the cooler on the processor to the maximum (otherwise, in my opinion, it rotates weakly)? The temperature without loading the processor is 40 ° C. By the way, is this possible due to the heat? And then we have about 33-36 ° C outside the window ...
Arthur, Saransk
Good day!
Of course, the temperature of the components, as well as the load on the cooling system, strongly depends on the temperature of the room in which the computer is standing (therefore, overheating is most often encountered in hot summers). The fact that your temperature reaches 80 degrees is not a normal phenomenon (although some laptop manufacturers allow such heating).
Of course, you can try to set the rotation settings of the cooler to the maximum (if this is not so), but I would still recommend a set of measures (you can find out about them from the article on measuring and controlling the temperature of the processor, video card, HDD -).
By the way, the reverse side of the coin also often arises: coolers rotate at maximum and create a lot of noise (while the user does not load the computer at all, and they could rotate much slower and quieter).
Below I will consider how you can adjust their rotation speed, and what to look for. So...
Increase / decrease the speed of rotation of coolers
In general, on a modern computer (laptop), the speed of rotation of the coolers is set by the motherboard, based on data from temperature sensors (i.e. the higher it is, the faster coolers start to rotate) and download data. Parameters from which the mat is repelled. the board can usually be set in the BIOS.
What is the cooler rotation speed measured in
It is measured in revolutions per minute. This indicator is designated as rpm (by the way, they measure all mechanical devices, for example, the same hard drives).
As for the cooler, the optimal rotation speed is usually about 1000-3000 rpm. But this is a very average value, and you can’t say exactly which one to set. This parameter strongly depends on the type of your cooler, what it is used for, the room temperature, the type of radiator, etc. moments.
Ways to adjust the rotation speed:

Speedfan
A free multi-functional utility that allows you to control the temperature of computer components, as well as monitor the operation of coolers. By the way, this program “sees” almost all coolers installed in the system (in most cases).
In addition, you can dynamically change the speed of rotation of the PC fans, depending on the temperature of the components. All changeable values, operation statistics, etc., are saved by the program in a separate log file. Based on them, you can see graphs of temperature changes, and fan speeds.
SpeedFan works in all popular Windows 7, 8, 10 (32 | 64 bits), supports the Russian language (to select it, click the "Configure" button, then the "Options" tab, see the screenshot below).

Main window and appearance of SpeedFan
After installing and running the SpeedFan utility, the Readings tab should appear in front of you (this is the main program window - see the screenshot below). In my screenshot, I conditionally split the window into several areas to comment and show what it was responsible for.

- Block 1 - the "CPU Usage" field indicates the loading of the processor and its cores. Also located next to the button are "Minimize" and "Configure", designed to minimize the program and its settings (respectively). There is also a checkmark "Automatic fan speed" in this field - its purpose is to automatically adjust the temperature (I will talk about this below);
- Block 2 - here is a list of detected cooler speed sensors. Please note that they all have a different name (SysFan, CPU Fan, etc.) and opposite each has its own meaning. rpm (i.e. rpm). Some sensors show rpm by zeros - these are "garbage" values \u200b\u200b(you can ignore them *). By the way, in the names there are abbreviations incomprehensible to someone (I will decipher just in case): CPU0 Fan - a fan on the processor (i.e. sensor from a cooler plugged into the CPU_Fan socket on the motherboard); Aux Fun, PWR Fun, etc. - rpm of fans connected to these connectors on the mat is similarly shown. circuit board;
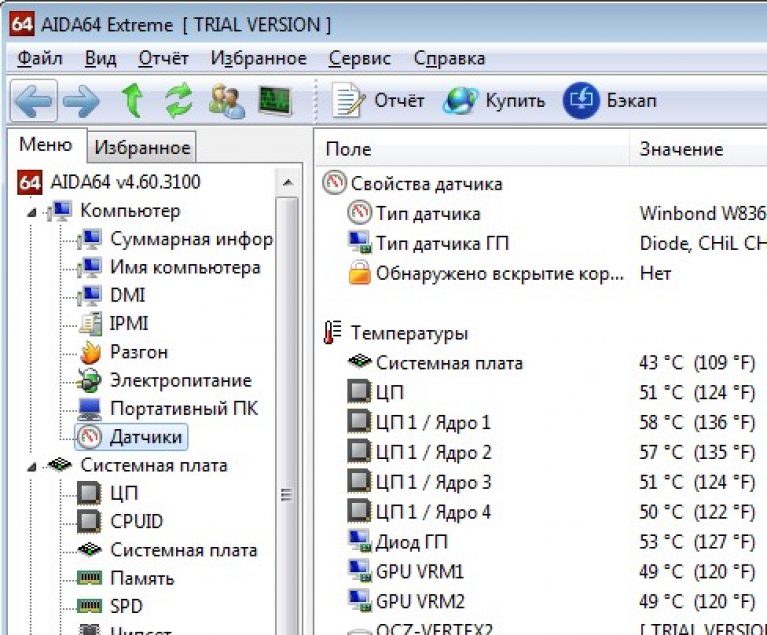
- Block 3 - the temperature of the components is shown here: GPU - video card, CPU - processor, HDD - hard disk. By the way, there are also “garbage” values \u200b\u200bthat are not worth paying attention to (Temp 1, 2, etc.). By the way, it is convenient to take the temperature using AIDA64 (and other special utilities), about them here:
- Block 4 - but this block allows you to reduce / increase the speed of rotation of coolers (set in percentage terms. By changing the percentages in the graphs Speed01, Speed02 - you need to look at which cooler has changed speed (i.e. what is responsible for what).
Important! The list of some indicators in SpeedFan will not always coincide with the cooler with which it is signed. The thing is that some computer builders connect (for one reason or another), for example, a processor cooler is not in the CPU Fan socket. Therefore, I recommend gradually changing the values \u200b\u200bin the program and looking at changes in the rotational speed and temperature of the components (even better, open the roof of the system side and visually see how the rotational speed of the fans changes).
Setting the fan speed in SpeedFan
Option 1
- As an example, it will try to adjust the processor fan speed. To do this, pay attention to the column "CPU 0 Fan "- this is where the rpm indicator should be displayed;
- Next, alternately change the values \u200b\u200bin the graphs "Pwm1", "Pwm2", etc. When the value is changed - wait a while, and see if the show has changed rpm, and temperature (see screen below);
- When you find the right one Pwm - adjust the cooler rotation speed to the optimal speed (about the temperature of the processor I I also recommend for review) .
Option 2
If you want the smart mode to work (i.e. so that the program dynamically changes the speed of rotation, depending on the temperature of the processor ), then you need to do the following (see screenshot below):
- open program configuration (note: Configure button) , then open the "Speeds" tab;
- then select the line that is responsible for the cooler you need (you must first find it experimentally, as recommended in option 1, see a little higher in the article) ;
- now in the columns "Minimum" and "Maximum" set the desired values \u200b\u200bin percent and check the box "Auto Change";
- in the main window of the program, check the box next to "Auto speed fans." Actually, this is how the cooler rotation speed is regulated.

Addition! It is also advisable to go to the "Temperatures" tab and find the processor temperature sensor. In its settings, set the desired temperature that the program will maintain and the alarm temperature. If the processor heats up to this alarming temperature, then SpeedFan will begin to spin the cooler at full power (up to 100%)!
For those who do not work SpeedFan
Setting automatic cooler rotation adjustment in BIOS
SpeedFan does not always work correctly. The fact is that the BIOS has special functions that are responsible for automatically adjusting the speed of rotation of coolers. They can be called differently in each BIOS version, for example, Q-Fan, Fan Monitor, Fan Optomize, CPU Fan Contol etc. And I immediately note that they do not always work correctly, at least SpeedFan allows you to very accurately and finely adjust the operation of coolers so that they perform the task and the user does not interfere ☺.
To disable these modes (The photo below shows Q-Fan and CPU Smart Fan Control), you must enter the BIOS and put these functions into mode Disable. By the way, after this, the coolers will work at maximum power, maybe they will make a lot of noise (it will be so until you adjust their work in SpeedFan).
Hot keys for entering the BIOS menu, Boot Menu, recovery from a hidden partition -

That's all for today, good luck to everyone and optimal fan performance ...
For temperature monitoring of the main computer nodes and for adjusting the rotation speed of the processor cooler and other fans installed in the computer. But before you start using the program, you need to install the Russian language in the program and configure the program.
In SpeedFan how to change the language
First you need to configure the interface in SpeedFan and make it in Russian, and for this we launch the program and close the additional window called Hint by clicking on the Close button. Then, in the window of the program itself, click on the Configure button.
Program for increasing the speed of a SpeedFan cooler with an English interface
A window will open called Configure. In this window, go to the Options tab.
 SpeedFan crack on the Options tab
 On this tab, in the Language item, select Russian (Russian) from the pop-up list and click on the OK button located at the bottom of the program window. After that, a window called Configure will close, and the program interface will already be displayed in Russian.
How to set up SpeedFan
Now you need to configure SpeedFan correctly, and for this, open the Configuration window again and go to the Options tab.
 Recommended program settings
 On this tab, you can check the Start minimized and Minimize items when closing so that when you start and when the program closes, it immediately collapses and hides in the tray. You can also check the box for Full speed of fans when exiting, since when you restart the computer it consumes more energy and the computer heats up more. If you tick the static icon, then the program icon will be displayed in the tray instead of the temperature readings from the sensors. By clicking on the OK button, all settings will be applied.
In SpeedFan, how to change the fan speed
With this program, you can configure the fan speed in automatic or manual mode. In order for the program for adjusting the cooler speed to work in automatic mode, you must first set the minimum and maximum temperature modes at which the fans will spin slowly or at full power.
 SpeedFan fan speed setting
 We open the Configuration window and on the Speeds tab you will see how many fans and on which devices this program can control the fan speed. On this tab, click on the desired fan and at the bottom of the window check the box for Auto Change. So do with the fans you want to regulate.
 Setting temperature conditions for fans
 Then we go to the Temperature tab and we see that there are a lot of sensors showing the temperature, but not all devices have fans. On this tab, click on the device for which you set Auto Change on the Speed \u200b\u200btab and set the temperature limits in the Desired and Alarm items at the bottom of the window. If the temperature is less than the set Desired, then the fans will spin slowly, and if the temperature is higher than the set Alarm, the fans will start spinning at full power. Thus, set the temperature conditions for all the fans that you want to regulate, and when everything is ready, click OK and the configuration window will close.
 In SpeedFan, the fan speed temperature controller operates automatically
 In order for the given parameters to start working, you need to check the Auto fans speed item in the program window.
Video
In this video titled SpeedFan, how to use the video explains how to change the speed of rotation of the cooler depending on the temperature.
Sometimes the buzz from the system unit does not allow you to enjoy the silence or concentrate. In this article I will tell you how to regulate cooler speeds using a special program for Windows XP / 7/8/10, and in the end I will show the entire process in more detail on the video.
Why do fans make noise and what are the ways to fix it
With the exception of special fanless modifications, each computer is installed: in the power supply, on the processor, video card, in the case and others. And everyone makes noise in their own way, and this is bad news. Many are simply accustomed to the noise of their system engineer and believe that it should be so. It may and should, but not necessarily! In 99% of cases, computer noise can be reduced by 10% -90%, and this is good news.
As you already understood, noiselessness is achieved by reducing noise from coolers. This is possible by using cooler, by nature, coolers, or by reducing the speed of existing ones. Naturally, you can reduce the speed to non-threatening values! This article will focus on this particular method. To reduce noise even more, programs for.
So, to reduce the rotation speed of the cooler, you can use one of the options:
- Program for controlling the rotation speed of coolers
- “Intelligent” BIOS revision control system
- Utilities from the manufacturer of the motherboard, laptop or video card
- Use a special device - reobas
- Artificially lower the fan supply voltage
Whoever normally has control from the BIOS may not read further. But often the BIOS only superficially adjusts the speed, without lowering them to silent, and at the same time still acceptable values. Utilities from the manufacturer, sometimes, are the only way to influence fans because third-party programs often do not work on unusual motherboards and laptops. Let's analyze the most optimal one - the first way.
Program for managing coolers SpeedFan
This is a multifunctional and completely free program. I’m probably disappointing right away by saying that this program doesn’t work on all laptops, but you can try and will not regulate the speeds of those fans that the motherboard from the BIOS cannot control. For example, from my BIOS, you can enable the SmartFan cooler control function only for the central processor. Although you can watch the current speed for two more.
Warning: before using the program, disable the cooler control from the BIOS!
Otherwise, the following situation may occur. At the time of downloading the SpeedFan program, the current revolutions are read and taken as the maximum. Accordingly, if by this time the BIOS does not spin the fan to maximum speed, then the program will not be able to do this.
It happened so once to me that at the time of downloading the program the cooler on the processor was spinning at a speed of 1100 rpm, and SpeedFan could not set a larger value. As a result, the processor warmed up to 86 degrees! And I noticed this by accident, when at the time of a heavy load I did not wait for noise from the fan. Fortunately, nothing burned out, but the computer could
Launch and appearance of the program
Download and install the application from the official site.
At the first start, a regular window will appear with a suggestion of help on the program functions. You can check the box so that it no longer appears and close it. Next, SpeedFan considers the parameters of the chips on the motherboard and the values \u200b\u200bof the sensors. A sign of success will be a list with current fan speeds and component temperatures. If no fans are detected, then the program will not be able to help you. Go to “Configure -\u003e Options” immediately and change the language to “Russian”.

As you can see, the processor load and information from voltage sensors are also shown here.
Block “1” contains a list of detected cooler speed sensors with names Fan1, Fan2... and their number may be greater than it actually is (as in the picture). Pay attention to the values, for example, Fan2 and the second Fan1 have real indicators of 2837 and 3358 RPM (revolutions per minute), and the rest are zero or with garbage (in the picture 12 RPM is garbage). Then we will remove the excess.
In block "2" the detected temperature sensors are displayed. GPU Is a graphics chipset, HD0 - HDD, CPU - the central processor (instead of the CPU in the Temp3 picture), and the rest is garbage (cannot be 17 or 127 degrees). This is the drawback of the program, what you need to guess where what (but then we ourselves will rename the sensors as needed). True, you can download well-known configurations on the site, but the procedure is not simple and complicated by the English language.
If it is not clear which parameter is responsible for what, then you can look at the values \u200b\u200bin some other program to determine the parameters of the computer and sensors, for example, and compare with those that the SpeedFan program determined to know exactly where what speed and temperature readings are (in the video under the article everything I will show).
And in block "3" we have speed controls Speed01, Speed02..., with which you can set the rotation speed in percent (it can be displayed as Pwm1, Pwm2 ..., see the video for more details). For now, we need to determine which Speed01-06 affects which FanX. To do this, change the values \u200b\u200bof each from 100% to 80-50% and see if the speed of any Fan has changed. We remember which Speed \u200b\u200baffected which Fan.
I repeat that not all fans will be regulated, but only those that can be controlled by the motherboard from the BIOS.
Configure SpeedFan
So we got to the settings. We click the “Configuration” button and the first thing we will call all the sensors are understandable names. In my example, I will programmatically control the processor cooler.
On the “Temperatures” tab we find the processor temperature sensor defined in the previous step (I have Temp3) and click on it first once, and then again in a second - now you can enter any name, for example “CPU Temp”. In the settings below we enter the desired temperature that the program will maintain with the lowest possible speed of rotation of the cooler, and the alarm temperature at which the maximum speed is turned on.

I set 55 and 65 degrees, respectively, but for each this individually, experiment. At a very low set temperature, the fans will always spin at maximum speed.
Next, expand the branch and remove all the checkmarks, except for the Speed0X that controls the FanX of the processor (we have already determined this). In my example, this is Speed04. And also uncheck all other temperatures that we don’t want to see in the main program window.
On the fans tab, we simply find the necessary fans, call them what you want, and turn off unnecessary ones.

- Minimum - the minimum percentage of maximum revolutions that the program can set
- Maximum - respectively, the maximum percentage.
I have a minimum of 55%, and a maximum of 80%. It’s okay that the program will not be able to set the value to 100%, because on the “Temperatures” tab, we set the alarm threshold value at which 100% speed will be forced. Also, for automatic regulation, do not forget to check the "Auto Change" checkbox.

In principle, that’s all. Now we go to the SpeedFan main window and check the box “Auto-speed of fans” and enjoy the automatic adjustment of the rotation speed. The first time it’s not possible to optimally configure for yourself, experiment and leave the appropriate parameters, it's worth it!
Extra options
The SpeedFan program has a bunch of functions and parameters, but I won’t go into them, because This is the topic of a separate article. Let's put some more necessary ticks on the tab “Configuration -\u003e Options”
- Start minimized - so that SpeedFan starts immediately minimized. If you don’t install it, then when you start Windows, the main program window will hang on the desktop. If the program does not start with Windows, then just add its shortcut to startup.
- Static icon - I prefer to set that in the system tray instead of numbers, just the program icon is displayed
- Minimize when closing - set so that when you click on the "cross" the program does not close, but minimizes to the system tray (near the watch)
- Full fan speed on exit - if not installed, then after exiting the program the cooler speed will remain in the state in which it was at the time of closing. And since there will be no one else to manage them, the computer may overheat.
And now a video with detailed SpeedFan settings. Note: there was a slight glitch in the video. After manually adjusting the processor fan Fan1, its value did not return to 3400 RPM, but for some reason remained at 2200 RPM. After restarting the program, everything returned to normal. In recent versions of SpeedFan, this was not on my computer.
At any time of the year you should always carefully monitor your computer. Overheating is fraught with serious problems, up to the complete destruction of the motherboard and other components. One of the main elements that serves to cool the computer is a cooler, that is, an electric fan. Its rotation speed affects the quality of cooling. This method cannot be configured using standard methods, so there is a Speedfan program.
Speedfan is, as we have said, a program that is designed to adjust the speed of rotation of coolers in a computer. With this uniquely useful software, you can configure the fans to work optimally. This utility is completely free. It is very "light", and in handling is not as heavy as it could be. It is interesting that in this program you can not only set a certain rotation speed, but also turn on a kind of artificial intelligence, which will automatically make changes in the speed of coolers depending on the temperature of certain components.
First you need to download the program. It is better to take it from the official site. To do this, follow the link below, you will immediately find yourself on the page with the download of the program. In the “Download” field, find the blue link with the name of the program and the number of the current version. Just click on this inscription and the program will automatically download to your computer.
Speedfan how to use
Then you just have to install the software and start working with it. Before changing anything, note that an incorrectly configured program can lead to premature wear of some parts. Speedfan also offers overclocking features - be very careful with it! You can easily “burn” your PC.
Let's move on to setting up Speedfan.
The first tab is called “Readings,” which can be translated as “Metrics.” As you might guess, on this tab you can find out all the necessary information from existing sensors. You can see the temperature of the elements of the computer, how many percent of the maximum power coolers work, how heavily loaded the processor or RAM. This will help in future setup.
The second tab “Clocks” translates as “Frequencies”. Used to overclock the processor.
The third tab is “Info” or in another way “Information. Displays information about RAM and the program.
The next tab is called S.M.A.R.T. It is necessary for hard disk analysis.
In the last tab "Charts" ("Charts"), all available information can be displayed in graphical form.

Now let's move on to adjusting the cooler rotation speed. To do this, go to the first tab and click on the "Configure" button, i.e. go to configuration. Speed \u200b\u200bchanges in the corresponding tab “Speed”. Coolers in it are designated under the name "Aux". Select one of the coolers and see that at the bottom there are several fields - Minimum Value and Maximum Value, as well as the “Automatically variated” and “Logged” checkboxes. The first two allows you to adjust the operation of the fans at minimum and maximum loads. For example, when the computer works in free mode and does not strain much, then the minimum rotation speed can be at least 20%, at least 0 - as you prefer. The second field sets the rotation speed at high loads. The first checkbox is necessary, since it includes artificial intelligence, which will automatically switch the rotation modes of the fans.

Speed \u200b\u200bcan be adjusted in the main program window. In the middle of the window you can see similar fields for adjusting the rotation speed.
Under severe loads, the heat dissipation from the processor and the video card greatly increases, which makes the element itself, the motherboard and the laptop case warm up. Sometimes overheating leads to damage to the part and the need to replace it. To avoid this, you can overclock the laptop cooler above the standard settings.
Laptop fan control
There are one or more coolers in the computer. Devices cool the entire system. Typically, the manufacturer sets a specific rotation speed, which should provide the optimum temperature. At different times of the year, even the environment can be hotter than the developer exhibited at the test stand. The maximum temperature in summer can become critical for the cooling system, so there is a need to take control of the laptop cooler and increase its speed. There are several ways to do this, which involve finer debugging.
Before you increase the fan speed on a laptop, it makes sense to make sure that there is no pollution inside the case. Accumulations of dust, pet hair, and large particles can increase the temperature of the system. It is recommended that you clean your laptop at least once a year, especially if it is often on a blanket, bedspread, or near an open window. It is better to carry a warranty computer to a service center, if there is no coupon, contact a specialist. Do-it-yourself cleaning is not recommended.
Operating system setup
You can control the cooler speed from the operating system using special programs or through the BIOS. Initially, the fans are configured with the drivers of the motherboard and Windows itself. They work with maximum efficiency, create a minimum of noise. The faster the blades spin, the more buzz will come from it. Sometimes the cooling functions may be impaired when reinstalling the operating system or incorrect driver updates.
Programs for adjusting the fan speed
In the case when you are sure that the problem of overheating lies in the settings of the system itself, you should use special software. Before you increase the fan speed on a laptop, you should understand that 30-50% of the power is set by the manufacturer to reduce noise, lower power consumption and longer battery life. If you overclock the cooler, the battery will run down faster, the computer will “buzz” louder.
The most common way to increase the cooler speed on a laptop is with the SpeedFan application. An easy-to-manage utility that provides a wealth of data and configuration options. This program for overclocking the cooler is publicly available on the Internet and distributed free of charge. Management is as follows:
- Install and run the application.
- Examine equipment temperature values.
- Click on a device whose temperature reading is above normal.
- Click the Up button a few times.
- Find the optimal indicator at which the temperature drops to the desired value.
- Do not close the window so that the cooler speed adjustment will not go astray.

This is not the only program for managing coolers. Some manufacturers produce their own software that helps control the power and speed of the fans. Increasing through "native" utilities is considered safer and easier. For example, AMD has the option to increase speed through the AMD OverDrive application. It must be installed together with the main package for the operation of components from this company. After installation, you need to open the application, do the following:
- Find the Fan Control section in the main menu.
- Find the Performance Control submenu.
- The program for overclocking the cooler will offer you one or more sliders.
- Increase by the required value, as a rule, it is 70-100%, and click Apply.
- Go to the Preferences section and select Settings.
- Make the Apply my last settings item active. This will cause the program to set your fan speed every time it boots.
- Click OK, close the utility.
A similar method, how to programmatically increase the fan speed on a laptop, is also available for Intel processors. This requires the Riva Tuner utility. You need to perform the same actions, but already in this application. Increase the speed of the laptop fans until the temperature reaches the optimum value. Remember that the cooler will work louder, and will consume more energy.
How to configure a cooler in BIOS
In some cases, malfunctions occur, the set values \u200b\u200bare constantly reset or lost. In this case, setting the cooler in the BIOS will be more reliable. Most modern motherboards support fan speed control, the ability to increase this figure, the choice of different modes of operation of the cooling system. First you need to get into the BIOS itself, for this, when the laptop starts loading, press the “del” button, sometimes you need to press “F2” or “F8”. Further it is necessary:
- Go to the Power section.
- Go to the HW Monitor configuration menu.
- In this section you need to find the option that is responsible for increasing the fan speed, as a rule, the name has the word “Fan”, “control” or “speed”.
- Press Enter on this menu and set it to Enable, then activate Profile.
- Several options for the operation mode will appear. You must choose Turbo or Performance.
- Save the settings, restart the laptop.
- From now on, immediately when loading, BOIS will adjust the fan, making it spin at high speeds.

Video: how to change the cooler rotation speed
To maintain the desired temperature conditions of the computer and its main components, a cooler is used. A cooler is a small fan device connected to temperature sensors, the rotation speed of which depends on how heavily loaded the central processor or video card.
In order to increase the fan speed on a laptop, you usually need to change the corresponding parameter in the computer’s base system - BIOS. This method usually implies that the user has special knowledge and understanding of technical terms in English, and also gives more options for setting up the computer and its components than similar actions performed using special programs in the Windows working environment. However, changing settings through the Windows operating system is much safer and eliminates the risk of harming the computer due to incorrect settings.
Quick article navigation
SpeedFan Program
To change the rotation speed of coolers in a laptop using third-party software, you will need:
- Launch an internet browser.
- Go to the official SpeedFan website (almico.com/speedfan.php).
- Using the appropriate buttons on the site, download the program and install it.
- To restart a computer.
- Launch the application.
- On the main page of the program, adjust the values \u200b\u200bof the parameters “pwm1” and “pwm2”, which will correspond to the first and second cooler. If more cooling devices are installed on the computer, they will be available for the user to configure.
- Save changes and close the program window.
If the parameters “pwmX” are set to “0” - the corresponding fan will be stopped, and at a value of “100” it will always spin at full power. Both values \u200b\u200bare not recommended for installation, as they can lead to overheating or disable the cooler itself.
BIOS
In order to increase the rotation rate of coolers in a laptop through a basic input-output system, it is necessary:
- Turn off computer.
- Turn it on again.
- Read the labels that appear immediately after switching on and press the button indicated in one of the sentences (usually it is “F2”, “Del”, or “F12”). The BIOS menu opens.
- In one of the BIOS tabs, moving the arrows on the keyboard, find the parameter “Fan Control” or “CPU Q-Fan Function”
- Select a parameter and activate it.
- Choose one of the cooler operation modes (the most intensive, usually “Performance”).
- Exit the BIOS main menu using the “Esc” key.
- Exit the BIOS, confirming the changes by pressing the "Y" key.
- Wait for the computer to turn on normally.
The cooler is an important element of the cooling system of the system unit, which prevents overheating of the main components. However, sometimes the fan runs too intensively, producing excess noise. Let's see how to change the cooler rotation speed using Speedfan programs and built-in BIOS tools to adjust the noise level.
Using SpeedFan
The program for adjusting the speed of the cooler SpeedFan is the most famous utility with which users control the operation of the fan. It is distributed under a free license, in addition, it has a Russian-language interface, which can be enabled in the "Options" section.

Important! So that you can control the cooler, it must be connected to the motherboard through a 3-pin connector. If you have several fans, and they are powered directly from the power supply, then they must be switched, otherwise it will not work to increase the speed of the cooler or reduce it.

The utility provides many functions for managing computer components, but we will focus specifically on working with the cooler:
- Pay attention to the item “CPU 0Fan” - it reflects the rotation speed of the processor cooler.
- Below you see several fields with percentages. You need to find the field that is responsible for the cooler. This is done this way: you alternately change the value of each of the fields to 50-70% and watch when the number of revolutions starts to drop in the "CPU 0Fan" section.
- Using the found field, reduce the rotation speed so that the cooler starts working quieter. Do not forget; if the fan does not cool the chip enough, it will overheat.

Similarly, you can adjust the speed of all coolers connected to the motherboard. You can use a more flexible configuration option and specify not a specific value, but a range of fan speed.


The speed of rotation of the blades should decrease, the noise from the cooler should decrease. Do not forget to monitor the temperature of the processor in the line “CPU”. If it exceeds 70 degrees, run the cooler at full power.
Using BIOS Tools
The fan speed can be adjusted without the use of special utilities. All the necessary tools to complete this action are in the base I / O system; To use them, you only need to know how to set the cooler speed in BIOS.
This method may seem difficult for novice users who have never worked with the BIOS. Therefore, if you are not confident in your knowledge, it is better to choose Speedfan.
The cooler speed is changed by activating certain functions in the BIOS and setting threshold temperature values, upon reaching which the fan starts or stops (if there is such a possibility).
The main disadvantage of this method is the need to activate several utilities, the name and number of which varies depending on the BIOS version, motherboard model and processor generation. For example, for an Intel Core chip, you need to activate the AI \u200b\u200bQuiet and Intel SpeedStep utilities, which automatically reduce the fan intensity at low processor temperatures.

The difficulty is that all the parameters have to be adjusted manually, plus sometimes it is necessary to change them "on the fly" if the computer's working conditions become different. Every time you have to adjust the settings again, turning on / off the utilities, therefore, to solve the issue of how to adjust the cooler speed, it is better to choose the SpeedFan utility.
Evenings all the best. Another article is coming. Today, the topic will concern the physical side of the computer, namely the noise of the fans. While working in technical support, I noticed that a lot of users are asking to reduce the noise from their computer. First, find out the cause of this increased noise. It is possible that they simply did not clean or lubricate the computer for a long time. But there is a second version of this reason - flew / changed / reset the settings in the BIOS. Regarding the first part, there is nothing difficult to take a vacuum cleaner and a rag and remove all dirt and dust. Regarding the second case, some orientation skills in the BIOS are required. Just now, I’ll tell you about this.
Reduce computer noise through BIOS.
So we made sure that the computer is clean and the fans are working. Now turn on the computer and by pressing the special keys, we get into the BIOS setup menu. You can find out which button to press by the start picture, or by brute force. Most often these are the following buttons: Del, F2 and F10.
In my case, I came across an ASUS motherboard with a BIOS input button - Del.

Immediately we get to the main tab -Main, for us there is nothing valuable, so we move to the Power arrow to the left.

Having stopped on this tab, we begin to go through the items and select “Hardware Monitor”.

A page opens with a list of various add-ons. Yes, and it is also possible that the CPU Q-Fan Control item will contain Disabled, we can change this by going down to it and pressing Enter.

Well and accordingly, the full list will now be revealed. Here you can see both settings for the processor fan and case fans, by the way case are indicated by the word chassis.
Among all presented, a very important point for us is the CPU Fan Profile. The same profile with the settings, which determines the maximum number of fan revolutions per minute.

Again, if you click on this item and a list (in my case) of three items appears. By default was chosen - Optimal.
In short, then:
Optimal - This is an intermediate mode between productive and quiet;
Silent - This is the quietest mode;
Performance is a performance mode,
We opt for Silent. Then we press the F10 button and the BIOS will offer us to save the changes, we agree and the computer will restart itself.

Already at start-up, the fans at first strongly “ignite”, and then lower their revolutions to operate in quiet mode. If the noise still remains, then there are two reasons:
- On the motherboard there are two types of connectors for fans. Some are signed as "CHA_FAN" and "CPU_FAN", the second is simply "PWR_FAN". So only the first ones are manageable, while the second type is just nourishing;
- Conventional fans are connected (with two or three pins), such fans are not controlled. Controlled have a connector of 4 legs.
Conclusion.
Having completed all of the proposed instructions, we get a computer with a quiet mode of operation. Now you are calm and colleagues do not complain. Good luck
Update 08/20/2013
I think everyone would like to somehow reduce the noise made by coolers in the case or in the power supply.
The reasons that lead to the appearance of noise can be three:
1) The increase in fan speed, due to noise from its operation, may be, especially with regard to laptops
, and even when the temperature is higher than normal on the street / room.
In most systems, the cooler adjusts the speed automatically, depending on the heating of the components. And if the fan spins up to maximum speed and creates a lot of noise, then this is the first signal about the system overheating.
Then you definitely need and or.
If the cooling system is cleaned and thermal grease is changed, and the cooler does not automatically adjust the speed, then see points 2) and 3).
2) An old cooler is poorly lubricated, then it needs to be lubricated, we wrote about this:
or
3) A new branded cooler is selected with a higher than necessary speed.
Output from this situation simple - reduce cooler speed.
So, we found out that by reducing the number of revolutions of the cooler, we will reduce the noise that it produces.
Of course, productivity will drop a little, but let's say that in some "nodes" of the computer it will not give a significant deterioration in cooling. So, the fans that are installed in the chassis and power supplies are high-breasted, and not always the ratio noise / performance be at an optimal level.
There are several ways in which noise can be reduced, and cooling will remain at an acceptable level.
So to say, find the "Golden mean" in the ratio of noise / performance.
Let's start with the simplest and cheapest ways:
Method number 1.
The inclusion in the BIOS of a function that adjusts the fan speed automatically.
In principle, the greater the load on the computer, the faster the fans rotate.
This feature is enabled by default on all laptops (to extend battery life), and if the fan does not automatically reduce idle speed, then this is a serious signal about.
Also, this feature is supported by many motherboards: Asus (Q-Fan control), Gigabyte (Smart fan control), Msi (Fan Control) and others. More similar to the article How to read Vatsap correspondence
Consider the example of the motherboard ASUS function Q-Fan Control, with presets Silent / Optimal / Perfomans.
Where to enable Q-Fan in the ASUS EFI BIOS, look at.
1) We go into the BIOS (immediately before starting the download, press the button repeatedly)
2) From the section Main
go to section Power

3) Select the line Hardware monitor

4) Change the value of the lines CPU Q-Fan Control and Chassis Q-Fan Control on Enabled


5) As a result, the lines appear CPU
and Chassis fan profile
.
Three lines of operation can be selected on these lines:
- Perfomans
is a performance mode,
- Silent
is the quietest mode
- Optimal
- This is an intermediate mode between productive and quiet.

6) Then we save the settings through

Important! Automatic fan control will be done only on the connectors CHA_FAN
and CPU_FAN
.
BUT PWR_FAN
not regulated by Q-Fan Control.
Similar adjustment systems are also present on other motherboards from other manufacturers.
If your board does not support such a function, then I recommend paying attention to other ways.
Method number 2. Cooler speed reduction by switching method.
In order to reduce the fan speed, you can switch the fan to a lower voltage.
The rated voltage for the fan is 12 volts. And the entire specification (speed, noise level, current consumption, etc.) is indicated for the rated voltage.

We can switch our fan to three other voltage ratings: +12 Volt, +7 Volt, +5 Volt.
This is done using the usual Molex-connector, which are present in sufficient quantities in all modern power supplies.


In order to switch the case fan you need:
1) Turn off the computer, open the cover and disconnect the desired fan from the slot to which it is connected.
2) Release the required legs, using a needle or awl, from the 3-pin fan connector.
3) The fan wires of the power supply unit can simply be bitten off at the board itself (usually two wires red is the “plus” and black is the “minus”), put the power supply outside, and also connect it to the free molex connector.


4) And connect it to the Molex connector for the voltage you need:

At 12 Volts:

At 7 Volts:

At 5 Volts:

Approximately these values \u200b\u200bof revolutions will be at nominal voltage values \u200b\u200bof the fan with 2000 rpm and 3500 rpm:

Important! Never rearrange the legs in the Molex connector itself.
This may result in equipment damage.
More than once I witnessed how to connect the hard drive to the Molex-connector, in which the legs were rearranged not according to the standard. Result - the hard drive crashed forever !!!
Method number 3. Adjusting the fan speed using the reobas.
To be able to constantly adjust the fan, you can use a device called REOBAS.
Reobas is a device that allows you to smoothly adjust the voltage that is supplied to the fan. As a result, the fan speed is continuously regulated.
You can do reobas yourself using the scheme below:
The first circuit is similar to the regulator Fanmate from Zalmanwhich is used on CPU coolers.