Hello, dear friends!
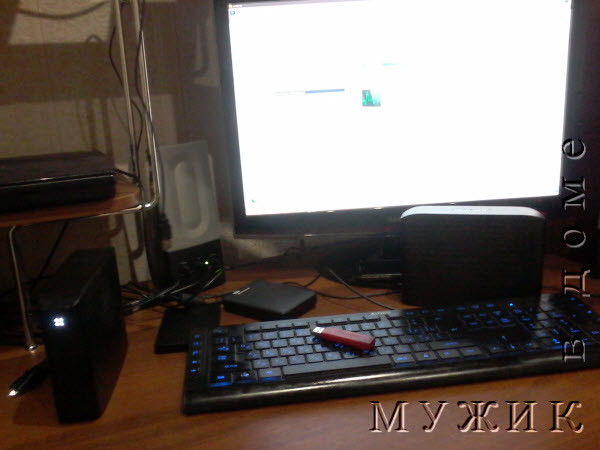
Want to know how you can remove the hard drive from a laptop? but you probably are interested in the question "why?" Well, situations are different. For example, do you know how much it costs to install a new hard disk into your laptop? Moreover, you already bought the disk and brought it to the service with the laptop and there was nothing left: to install a new HDD instead of the old HDD? So, my friends: they will charge you for this procedure as for a good computer repair! Question: Are you ready to pay a bunch of dough "Uncle Pete" for 30 minutes of his work? not? Then learn to change the hard drives in your laptops yourself: all the more so that it is very, very simple. (From the author: many users are afraid to pry nose into the depths of their laptops: like, "what if I break something there ?! You have to buy a new one." But "afraid of wolves is better not to bend over": how can you learn something if you shake with fear?). So, open the laptop and remove the hard drive!
It is also possible that the charger worked. When the operating system does not start, and the hardware is not an error, this is due to the fact that one or more important files that the operating system needs to run are damaged or missing. The two most likely reasons for this are.
This software will create an “image” of your hard drive, which you must store on an external hard drive. Then you can purchase a new hard drive and transfer the image, but you will need a docking station for the hard drive. The docking bay actually turns a regular hard drive into an external drive, and therefore information can be copied before it is installed on the computer. Many people faced with this situation, resort to reinstalling the operating system, but this is often not necessary.
HDD, it’s also a hard disk, it’s also “tin”, it’s also “hard drive”, it’s also “screw” - it’s very easy to remove. Naturally, you should turn off your laptop. Then - turn it upside down and look at its attachment. Fasteners are screws or latches that hold the bottom of the laptop (bottom). Your first goal is to move the battery clamp-lock: as a rule, a red lock icon opens under the shifted clamp. In general, understand, not children! After the first clip, open the second and pull out the battery.
If the problem is fixed, and usually it is, you do not need to start by first reinstalling every bit of software that you had. Malicious software is the common name of viruses, trojans, worms and rootkits, that is, nastiness that you should not use on your computer. Warning, if it is so that your operating system has been corrupted by malware, it is often very difficult to make repairs and restart your computer. This is not impossible, just difficult.
Malicious programs are so incredibly complex these days that even good proprietary anti-virus software cannot handle this. If you scan a hard disk that will not boot using the rescue disk provided by the creators of the antivirus, virus software, it is likely that malware will be detected and fixed, but the repair may not be 100% and the computer will still not boot.
Inside, under the battery, you will see another holding mechanism, painted in some color, for example - in orange. This is a latch that needs to be opened. Take a close look at exactly what this latch holds. Then, holding it with one hand, press down on the edge of the back cover of the laptop from bottom to top. In general, you will see for yourself: the main thing is not to put too much effort in order not to break the lid! The cover is completely removed - keep this in mind! Removed? Excellent: put it aside and admire your efforts. See: there is such a "black square" - a place taped with black film? Here under this film is the “treasure” - your HDD. Carefully remove the film, grab the ledge that is on the HDD plug cable. Lightly pull it to the top - the door will open: the cable loop will detach from the "tin". And then you will see a couple of screws that hold the hard drive on the platform of the laptop. Loosen the screws and pull the hard drive to the top. So, congratulations: you have removed the hard drive yourself!
Not all computers have a separate video card. It is easy to tell if your computer is working. If the monitor wire is connected to a computer in the same area where all the other connectors are connected, your computer does not have a separate video card. On the other hand, if you control leadership plus on your computer in an area different from other potential customers, there is a possibility that you have a separate video card.
The problem with video cards is that they often have a life expectancy of about three years. Perhaps this is due to the fact that they are very hot. That is why they have a fan or cooling vanes. If the video card fails, your computer may not start at all.
What's next? And then install a new hard drive, put it in place, screw it to the platform. Attention: the cable that connect to the drive must be “drowned” strictly in its place! We insert the plug into the hard disk slot (you should hear a distinctive click) - and it's done! Install the laptop cover in place, fasten it with a lock, connect the battery and the power cord. All: now you can check the work. Yes: do not forget to install the new OS!
Fortunately, they are easy and inexpensive to replace. However, you can simply try to connect the monitor to another port of the video monitor. If this works, then you know for sure that the additional video card is broken. But you can use the video component, which is usually built into the motherboard, but the image may be of lower quality.
If there is no other place, you can connect the video monitor wire, then you will need to replace the video card. Sometimes hard drives just break. A mechanical hard drive failure usually indicates the end of all your data on the disk. The only way the data can be saved is to separate the disk, and only specialists can do it, and it will cost a lot of money.
We all actively use various storage devices (flash drives, hard disks, memory cards) and we know that in order to avoid any failure and important files are not lost when a disk suddenly disconnects from a computer running Windows during their transfer, it is necessary to safely remove the device every time. It happens that this is not so easy to do, because the hard disk is used by the program or application. How to be?
Developing that the motherboard failed is indeed a process of elimination. If it is not a video card, power supply, memory modules, hard disk, etc. This means that a hardware failure is considered on the motherboard. For laptops, the failure of the motherboard often leads to the death of the computer. This is due to the high cost of replacement. However, if it is a good computer, many people can choose this cost, and not the cost of a new computer.
For desktops, the situation is much better. Motherboards are cheaper and much easier to insert. A hard disk is a storage device on which your computer stores program files. Not all laptop hard drives are the same. A hard disk can have different capabilities, and the hard disk itself can be installed in different positions around the computer, depending on the laptop model. If you need to remove a replacement laptop hard drive, it is important to know where the drive may be located inside the device.
How to remove external hard drive?
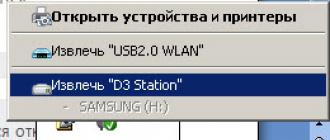
We all know that you can’t just take and unplug an external hard drive or USB flash drive from the cord or USB port of the system unit of a computer without clicking the following icon in the tray:
In the list that opens, we select the drive we need, click on it with the left mouse button:

The first place to search for a hard disk is under the laptop. Turn the laptop over and find a small hard drive symbol that will be engraved in the laptop case to indicate its location. For these built-in hard drives, you will need to unscrew the plastic cover using a small Phillips head screwdriver to open the system's hard drive.
Another place in which many laptop models place their hard drives directly in front of the device. Turn the laptop over and find the front of the computer. There will be a plastic cover, which you must remove from the place. After removing the plastic cover, find the thin tongue on the hard drive and gently pull the drive forward if you need to remove it.
Voila! A message appears that the device can be safely removed from the computer.
There is another simple way to safely remove the device - through the “Computer” folder: right-click on the device that you want to disconnect from the computer, left-click “Extract”. If the device is “busy”, the OS will ask if you need to interrupt all current operations.
Remember to note which side is face up, since you will need to reinstall the disk in the same position or it will not work properly. The most common type of hard drive is the hard drive with a hard drive, which is used by most new laptops. This is a laptop hard drive. There may be one or two screws holding this type of hard drive in place; However, some side hard drive model will be autonomous and connected to the plastic section of the outer shell of the laptop.
The location of the hard disk in the operating system
Most people have heard about the hard drive and may even know how it looks. However, many people do not know where the hard disk is in the operating system of the computer. Any disk located under the "Hard Disk" heading will be stored on the hard disk of the laptop.
But not always everything goes as smoothly as we would like. Often, when you try to safely remove a device in Windows, a message appears stating that it is being used by other programs and cannot be removed. The processes blocking the device cannot be forcibly terminated using this system function! It only remains to determine which programs are busy with the device and close them.
In addition to the built-in hard drive that each laptop has, there are external hard drives that can be purchased separately to increase computer capacity. Put a cotton bath towel on the table to protect the laptop cover from scratches. This towel can also catch tiny screws when you remove them from the laptop case.
Press the "On" button for a few seconds to remove all the electricity that may be on the motherboard. Otherwise, when you start working with the internal parts, you risk biting the motherboard if there is any parasitic charge or static electricity. To be more careful, leave yourself by touching a piece of metal before continuing. If you get up from the work area, ground yourself again before continuing your work.
To disable the external drive from the computer in an emergency, you can use the Task Manager, which is called up by simultaneously pressing the Ctrl + Alt + Del keys. Go to the processes tab, find your device there and right-click on it and click "End Process".
Turn the laptop on the cover, on top of the towel, and inspect the layout of the various plastic panels on the bottom of the laptop. Smaller access panels are likely to cover memory chips and an internal wireless network card. Look at the panel about the size and shape of a deck of cards with the symbol of a hard disk embossed on plastic.
Loosen and remove the small screws holding the access panel in place. Use gentle pressure if the screws seem very stubborn or tight. Avoid stripping screws with too much torsional pressure. Be careful not to use so much pressure that you hack into a thin laptop screen. Gently remove the access panel cover and set it aside, with the screws resting on the cover.
What if the external hard drive is not removed by any of the above methods?
Well, if no programs were started manually, and the device is still used by something - what to do? There is no reason to find a reason without special utilities.
One of the best ways to disable an external drive, which is used by unknown programs and which cannot be stopped by standard Windows tools, is to use special programs to remove flash drives and disks like USB Safely Remove. The Unlocker program also helps to identify and disable the processes with which the external storage device is busy, after which the disk or USB flash drive can be safely removed.
If it appears to be held in the cavity with another set of tiny screws, remove them. Notice the end of the hard drive that is connected to the cable or connector head. Carefully remove the hard drive from this connector head when the drive is in the “flat” position. Do not tilt the hard drive up. Use your fingers to slide the drive straight back and away from the connector until it is free.
If you buy a laptop, let me assume that being able to easily remove a hard drive should be an absolute requirement. Perhaps the best way to check this is to find the user manual on the hardware manufacturer’s website. If you just bought a laptop, try to remove the hard drive as soon as possible.
It happens that it is safe to remove USB HDD by any of the above methods, which was noticed in Windows 7, and using completely different external disks. If the disks were connected to the computer in the current session, everything is usually removed without problems. However, it is worth rebooting the system with the mounted disks, it will be impossible to remove them, since they will be occupied by “not killed” even with the help of Unlocker by the System.exe and svchost.exe system processes.
In my consulting business, I sometimes have to replace hard drives. Twice I was hampered by screws for laptops that were too tight. The screws are very small and cannot be made of the hardest metals. Perhaps the remote screw can be removed, but who wants to deal with this over the situation that caused the removal of the hard drive in the first place? In addition, it is necessary to be very careful, since the hard disk is near the motherboard and may contain important files that have not been copied.
Removing the hard drive to a new laptop computer means that if something goes wrong, the machine can be returned or repaired under warranty. This is the problem you want to have before there is a serious need to remove the hard drive.
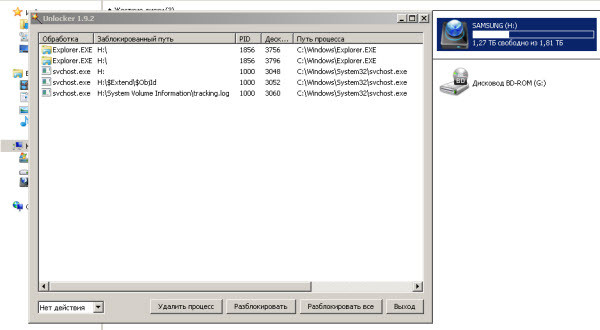
Unlocker shows that the device is busy by the explorer.exe and svchost.exe processes.
And this is even if you disable the index on all drives! In order not to rack your brains, you can simply remove the disk after the computer is shut down.