Why do I need to clear the free space of the hard disk of my computer?
There are several practical reasons that explain the need to remove free space on a personal computer. If you leave the office, you will of course want to delete on your office computer all personal and confidential files. If your company's management is going to update computers, then again there is a need to remove important corporate files from the hard drive, which may contain sensitive information of a personal and professional nature. The problem is that not all people know that it is not enough to simply delete files on operating system Windows.
If you are constantly deleting files on your computer, then you may have noticed that sometimes some of the deleted files reappear on your system. This is no coincidence. In fact, when you delete files from the operating room windows systems, you may not see them, but in reality, they will still be saved to hard disk... In this regard, it becomes clear why it is necessary to clean the free space of your personal computer.
Users may wonder: why do you need to clean up the free space of the hard disk of the computer? What will it give? As noted above, the personal computer could be saved and then deleted. confidential information... Even after deletion, and you may not even know about it, deleted files usually remain on the hard disk. Even if you empty the Trash, the files will still remain in the computer's memory - in the part of it where it will not be easy for you to find them.
The problem lies in the fact that today on the market there are many programs designed to recover and find deleted files. This way, anyone with access to your computer can easily recover both personal files and all your sensitive business information. Currently, great importance is attached to the confidentiality and security of information. Your computer may contain data related to trade transactions, personal secrets and other personal information. Remember that anyone can use all of your information and its privacy will be compromised if you don't delete it from your computer once and for all. You need to be sure that the people who will have access to your computer will not be able to recover and find information that you have already deleted from the computer's hard drive.
To clean up free space on your computer, you need to install a file deletion program. Such computer applications will effectively clean up all files and information that you have already deleted from your personal computer. If the files are cleaned with a special file deletion application, then none of the recovery and file location programs will be able to find them.
Thus, if you use special programsaimed at deleting files, you can be 100% sure that no one can find the secret and personal files you deleted and use them in order to cause you trouble. Best of all, file deletion programs are affordable so you don't have to spend a lot of money to buy them.
Many users, having rummaged through the numerous menus and settings of the CCleaner application, suddenly stumble upon the "Erasing Disks" section. The question quite naturally arises: erasure discs CCleaner what is it? Moreover, little can be understood from the menu items themselves. So…
What is CCleaner erasing discs?
This mysterious function is located on the "Service" tab, in the "Erase Disks" item. The tooltip at the top of the window displays a meager and uninformative message: "Reliable wiping of all content or free disk space." In fact, it is very useful function , which will surely come in handy for those who want deleted information to be truly removed from hard disk computer.
The fact is that an erased file, even if it has passed the Recycle Bin or has been deleted from it, still remains recorded on the hard drive for some time. The user just sees this place as free. However, with the help special utilities you can "pull" and recover deleted files... But this can be done only until the moment when the deleted file is not written over new information... In this case, no utilities will help. CCleaner, on the other hand, allows you to repeatedly overwrite a deleted file, so that no recovery utility will get to it.
How to use CCleaner Disc Erase
The following options are available in the dropdown menu:
- only free place... Visible free space is erased. Wherein visible files will not be affected. However, previously deleted files are completely overwritten;
- the whole disk. In this case, absolutely all files on the selected disk are deleted. However, this function should not be confused with disk formatting.
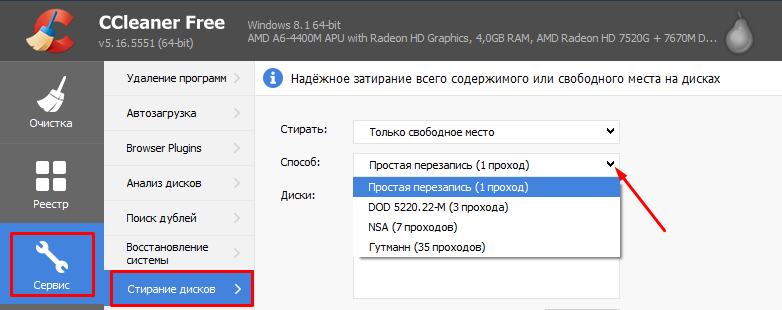
Erasing methods:
- simple one-pass dubbing. For most cases, this is sufficient;
- DOD 5220.22-M - expected to be erased three times for greater reliability;
- NSA - seven pass mashing;
- finally, the most reliable - Gutmann - in 35 passes.
It is also suggested to select the disc to be erased. At the same time, although the erasing process does not take up a lot of system resources, it can take quite a long time, depending on the method chosen, the power of the computer and the size of the disk. And now, knowing about erasing disks CCleaner - what is it for the function, you can use it at your discretion and not be afraid for the secrecy of your data deleted from your computer.
We often and a lot talk about protecting information. We talk about protection from viruses and Trojans. We consider different software and compare it with each other. We use keyloggers, firewalls, we use cryptography and various systems passwords. But information, no matter how we protect it in such ways, sometimes still leaks into the wrong hands. One of the ways to obtain confidential (and secret) information is to restore it from formatted disks on which this information was previously located.
Many people know that neither reformatting nor formatting disks provide a complete erasure of information stored on such media. If you look at the reformatting process, it turns out that this process destroys the references to partitions in the disk partition table without affecting the data itself. You can find many programs (once very useful program was Tiramisu), which will help restore seemingly permanently lost data, including after accidentally reformatting the disk.
Does not completely destroy data and formatting of data carriers, including low-level ones. Yes, regular programs after such a procedure, you may not recover the information, but there are other, non-software methods. For example, the use of magnetic microscopy technology. How long? Expensive? Certainly. But information is sometimes worth much more money and time spent on its recovery. (This method can even be used for discs whose platters have been subjected to mechanical stress.)
Therefore, in cases where information should in no case fall into the wrong hands, information carriers should be subjected to the procedure of irreversible deletion and destruction of data. This procedure is called wiping drives. It is believed that after cleaning, the media will no longer be of any interest and even developed technical means will not be able to remove any information from them. Many countries have adopted special standards that define algorithms for cleaning media. Here is an excerpt from the documentation for the program, which will be discussed below.
- US DoD 5220.22-M - US Department of Defense standard;
- uS naval standards NAVSO P-5239-26:
- NAVSO P-5239-26 for RLL encoded devices;
- NAVSO P-5239-26 for MFM encoded devices;
- british standard HMG Infosec No.5;
- german VSItR standard;
- australian ASCI 33;
- russian GOST R 50739-95;
- peter Gutman's algorithm;
- bruce Schneier's algorithm;
- paragon's algorithm:
- each sector is overwritten with a completely random 512-bit string, new for each sector, using CSPRNG (cryptographically safe generator random numbers);
- each erased sector is overwritten with its complement;
- each sector is overwritten with a 512-bit string (CSPRNG), again completely random, different from the one used in the first pass, and new for each sector;
- each erased sector is filled with 0xAA. Upon completion of the operation, the resulting data area is checked.
I will not quote more detailed description algorithms, users paragon programs Disk Wiper will find more information in its documentation. The program implements almost all of the above algorithms, and it is also possible to define your own mashing algorithm. The choice of the algorithm depends on the version of the program. There are two of them - personal and professional. The personal one implements the Paragon algorithm, the professional one - ten different algorithms. This is the main difference between the versions.
The main features of the program are disk wiping, for which you can use the basic version of the program or a specially created with its help bootable media (CD-disk, floppy disks) for working in DOS-mode, as well as the implementation of basic functions for initializing, splitting and formatting disks. The program can work under any windows versions and supports all file systems... Cleaning can be applied to both hard drives, floppy drives and flash drives.
Work with the program is performed through its main window. Its main field is designed to display information about physical and logical disks connected to your computer. Their list is located at the bottom of the main window. AT top line - physical disks, at the bottom - their division into logical. Both formatted and unformatted sections are displayed. When you select a physical or logical disk, information about it will be displayed in the upper part of the main window.
For physical disk in the title of the window its type is displayed, and as information - size, number of heads, cylinders and sectors. For logical drives the amount of information displayed is larger. Information about the file system, number of boot sectors, file system version, disk size, occupied and free space is displayed. Additional Information - is it logical drive active and visible.
Cleanup can be performed on both a physical disk and a logical partition. To facilitate the work in the program, special wizards are implemented, which step by step guide the user through all stages of preparation for the task.
Consider the process of preparing to clean up a disk (partition). At the first step, you can choose the cleaning option - either wipe the entire partition, or only clear free space. The second option, perhaps, will be in demand more often - without deleting all the information, you can destroy all the deleted information without the possibility of its recovery. To test the work, I would suggest using this option first. The next step is to choose an algorithm to use for cleaning. The default algorithm can be defined in the program settings. Then it will be he who will be offered as the main one.
In the personal version, only two options are available - either use Paragon's algorithm, or define your own cleaning algorithm. Choosing the standard algorithm, you will be taken to the page where it will be displayed detailed information about the principle of its operation and the possibility of some change is provided, in particular, you can completely or partially disable the verification of the performed operation. For test runs this can be played around, but in real life it is better to use the full capabilities of the chosen algorithm. On the same page, the estimated time of the operation is determined and displayed.
When you select the option of assigning your own algorithm, a window will open in which you will need to enter your own characteristics. The user can define up to four data wipe masks, the number of passes for each mask and for a group of masks. To define the erase mask, the user will need to enter a two-digit number in hexadecimal form (the default is "00"). In addition to the masks and the number of passes, you can set the check of the algorithm for the presence of the remaining data as a percentage of the total number of scanned sectors.
By selecting or assigning an algorithm, you can start the work, but the wizard will once again ask you to confirm whether you really want to complete the task. Who knows, maybe at the last moment you will remember that among the cleared information there is something that needs to be left behind. Then you have the last opportunity to refuse stripping and check again if the operation can be performed.
The Disk Wipe Wizard can be started different ways: through the context menu of a logical or physical disk, through the main window displaying information about the selected disk (partition), through the main menu or through the toolbar. The only difference is that when you start the wizard from the main menu at the first step, you will need to select the disk with which you are going to work, and when you work through the context menu, you don’t.

In the case when you need to destroy the data of the boot partition or destroy data on a disk from which the operating system is no longer loaded, you can use another program feature - loading it from boot disk or a floppy disk. To do this, you first need to create such a disk. For this purpose, you can use the wizard to create erasure media. It will prompt you to select the medium - CD-disk or floppy disk, and then either use the standard disk or diskette image supplied with the program, or use the rescue disk image you have. If there was any information on the disc, it will be previously destroyed (of course, this only applies to CD / RW discs) and floppy disks.
Now a little about working with disk partitions. As already noted, the program implements the ability to create, delete, format logical partitions, assigning and deleting section letters, surface checking. But there are some limitations when creating partitions. In particular, the current version of the program cannot create new partitions on dynamic disks. Supported only hard drivesusing DOS disk partitioning scheme (in Windows 2000 and XP these disks are called primary disks). Accordingly, the limitations of the DOS scheme also apply.
Partition setting is done with graphical interface, in which the program initially offers some agreed parameters. Often these values \u200b\u200bsuit the user, but you can change any available values. After creating a partition, it is formatted. The program offers a choice of different options: file systems FAT16 / FAT32, NTFS and HPFS, ReiserFS and Linux Swap v. 2. You can then assign a letter to the drive. Similarly, you can perform the reverse operations - delete a letter ("unmount" a disk), delete a partition. These actions are performed both from context menu disk, and from the "Section" submenu of the main menu of the program. Another feature of the program is viewing the sectors of a partition or disk.
In conclusion, I would like to note the high-quality interface of the program - it is pleasant and convenient to work with. Perhaps only one comment. Help about the program opens in the same field of the window, where information about disks and partitions is also displayed, so you will not be able to read the help and perform operations at the same time. But the need for this exists only at the initial stage of acquaintance, then you will no longer need help.
If you regularly deal with files containing private, important or secret information, remember (this has already been discussed) that even after deleting these files and emptying the "Recycle Bin", the files themselves may remain on the hard disk for an indefinitely long time. If someone steals your computer or gains access to it, then, having the appropriate programs, they can easily recover these files.
In the operating room mac system On OS X Leopard and newer, you can use the Empty Trash Securely Feature: select Finder About Preferences About Advanced to increase security by writing to gibberish files. You might think that this is excellent protection, but as it turns out, data recovery specialists using sophisticated equipment can still recover, at least partially, the original files.
It turns out that it is impossible to delete files absolutely safely? Fortunately, mac computer has a powerful tool that makes it possible to erase data many times deleted files, so no one will ever be able to restore them. This tool is called “Erase Free Space” and should be run from time to time to ensure that files containing important data are safely deleted. Here's what you need to do for this.
1. If you are using a version of Mac OS X earlier than Lion, insert the installation DVD or flash drive.
2. Restart your Mac while holding down the Option key. The boot menu will appear on the screen.
3. On Mac OS X Lion, double-click the Recovery HD icon. In earlier versions, double-click on the installation DVD or flash drive icon and then on the Continue arrow.
4. On Mac OS X Lion, click “ Disk utility”(Disk Utility), and then“ Continue ”. In earlier versions of Mac OS X, select Utilities About Disk Utility. The Disk Utility application starts.
5. In the list of drives, click Macintosh HD.
6. Click the Erase tab.
7. Click "Erase Free Space". Disk Utility will display the Erase Free Space Options dialog box.
8.Use the slider to specify how many times you want to overwrite free space on your hard disk:
- "Fast" (Fastest) method - "Zero Out Deleted Files". Free space is overwritten once. This is the fastest, but also the least secure method, and a sophisticated user will be able to recover some of the data after it.
- "Middle" method - "three-pass erase of deleted files" (3-Pass Erase of Deleted Files). Deleted files are overwritten three times. This means that erasing takes three times longer than zeroing, but it is more reliable. This method combines convenience and safety in the best way.
- Most Secure method - "seven-pass erase of deleted files" (7-Pass Erase of Deleted Files). Free space is overwritten seven times. This means that erasing is more than two times slower than with the three-pass method, and seven times slower than with zeroing. Most likely, this procedure will take several hours, but will provide the highest reliability of deleting deleted files (necessary, for example, in government organizations).
9. Click "Erase Free Space". Disk Utility will start cleaning.
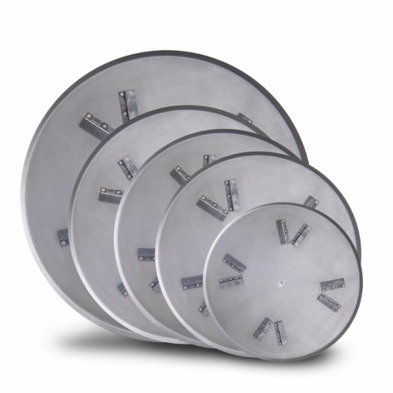
To prepare a concrete surface for further use, treatment with special trowels is required. Rubbing a hardener into cement is also not complete without special equipment. When leveling, the trowel discs will help to get rid of unevenness, distortion and sagging of different sizes. The choice of such discs will depend on the type of troweling technique as well as the application of the tools. Components of different diameters (610-1200 millimeters) are presented on the market.
Trowelling discs are parts of machines designed to smooth out unevenness in concrete. Tools are produced in the form of plates, which are installed on two- or one-rotor equipment. They are necessary for rough trowelling on concrete or when working on industrial cement floors. In addition, various tool modifications enable the finishing of concrete. All discs from leading manufacturers are capable of withstanding heavy loads.
Usually, specialists first smooth out irregularities and sagging that formed after using a vibrating device using discs, after which they use special blades or knives. They will help give the concrete a smooth, shiny finish. Among the advantages of components, experts mention their durability: it can process up to 1500 square meters surfaces. There are special fuses on the disc to prolong the life. However, manufacturers do not equip all models with them. Blades are used for additional smoothing. Such tools are divided by diameter, as well as by the number of fasteners.
Grout disk dimensions
Components are selected depending on the type of equipment. Their dimensions are 300-1800 millimeters. In addition, discs are either completely flat or slightly convex.
Examples of manufacturers and characteristics
Conclusion
When carrying out various construction works: pouring screeds, cement floor and road surfaces, it is necessary to use special trowel equipment. With the help of such devices, a perfectly smooth surface can be achieved.


